manuals.online logo
Brands
  1. Home
  2. •
  3. Brands
  4. •
  5. Aigo
  6. •
  7. DVR
  8. •
  9. Aigo P8131 User manual

Aigo P8131 User manual

Popular DVR manuals by other brands

Pace TDC577X manual

Pace

Pace TDC577X manual

Zavio NQ2040 user manual

Zavio

Zavio NQ2040 user manual

KGuard Security KG-SHA104 user manual

KGuard Security

KGuard Security KG-SHA104 user manual

SanDisk V-Mate Quick manual

SanDisk

SanDisk V-Mate Quick manual

Panasonic WJND200 - NETWORK DISK RECORDER Setup instructions

Panasonic

Panasonic WJND200 - NETWORK DISK RECORDER Setup instructions

Hunt Electronic HVRM-T1600Q Install & user's guide

Hunt Electronic

Hunt Electronic HVRM-T1600Q Install & user's guide

Portwell PIVS-6104 user manual

Portwell

Portwell PIVS-6104 user manual

AVer EXR6004 Mini Quick user guide

AVer

AVer EXR6004 Mini Quick user guide

Security Labs SLD261 owner's manual

Security Labs

Security Labs SLD261 owner's manual

Swann DIGITAL VIDEO RECORDER instruction manual

Swann

Swann DIGITAL VIDEO RECORDER instruction manual

EverFocus ECOR 4 instruction manual

EverFocus

EverFocus ECOR 4 instruction manual

Xoro HRK 7550 user manual

Xoro

Xoro HRK 7550 user manual

FLIR M3100E Series instruction manual

FLIR

FLIR M3100E Series instruction manual

VTRACKPRO FPRO300 user manual

VTRACKPRO

VTRACKPRO FPRO300 user manual

Swann NVR-7085 models instruction manual

Swann

Swann NVR-7085 models instruction manual

RMRC FPV1000 manual

RMRC

RMRC FPV1000 manual

urmet domus 1093/004AHD instructions

urmet domus

urmet domus 1093/004AHD instructions

Toshiba D-VR3SU Service manual

Toshiba

Toshiba D-VR3SU Service manual

manuals.online logo
manuals.online logoBrands
  • About & Mission
  • Contact us
  • Privacy Policy
  • Terms and Conditions

Copyright 2025 Manuals.Online. All Rights Reserved.

PVR P8131
OPERATION MANUAL
To ensure the proper operation of all features of PVR P8131 , please follow the Operation Manual and make
sure that the packaging contains:
- the cables required for connection of PVR P8131 products to peripheral equipment:
a). audio and video input connection: for connecting TV, digital TV set-top boxes and DVD players, use AV
cable to connect PVR P8131 to audio-video input in TV, digital TV set-top boxes, DVD player
b). audio and video output connection: for audio/video out, use AV cable to connect PVR P8131 to TV
output of audio and video. If a component output used, in addition to the using the color cable for video
output, AV cable is required for audio signal (connect both red and white cables to color sockets)
- adapters and power connectors provide the power supply for 220 V/50Hz.
- remote control has two AAA batteries inserted.
4. Quick Start
In this part we will explain how to use the mani functions of PVR 8131
4.1 Power up
Press the Power button on the bottom right corner of the front panel for about one second to power up PVR
P8131, untill the LED display on the front panel turns blue, and the TV screen displays the start-up interface
shown below:
4.2 Shutdown
In order to shutdown PVR P8131, return to the main interface and press "Power" button on the bottom right
corner of the front panel for about three seconds, untill LED display on the front panel goes off. Using the
"Power" button on the the Remote Control puts PVR P8131 in suspended mode.
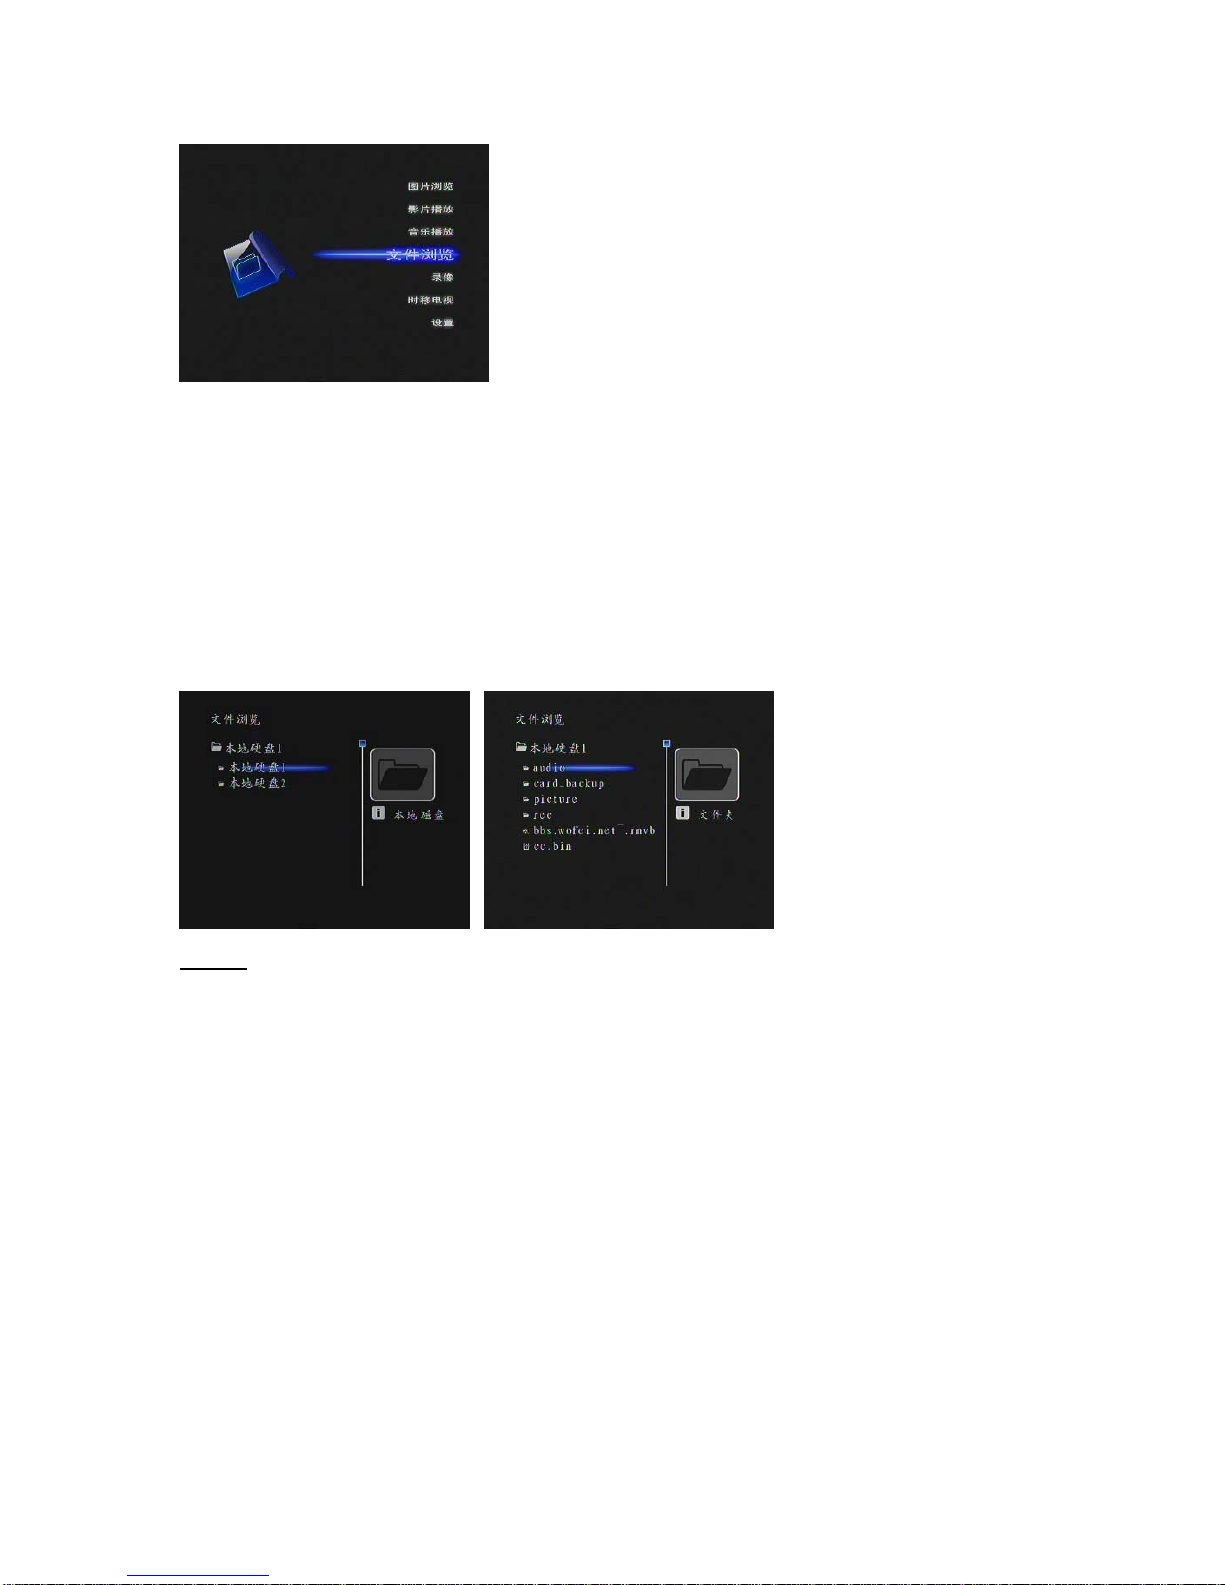
4.3 Main Menu
There are Patriot P8131 menu levels: the main menu, sub-menus and a list of avaialble functions:
On start up of PVR P8131, the Main Menu will display seven different function icons: Photo, Video, Music,
File Browser, Video Recording, TV Schedule to acess seven main functions. Pressing "Start / Pause"
button on Remote Control allows to enter the corresponding function.
This is is the Main Interface:
4.4 File Browser
In the main menu interface, press up/down keys on remote control - (13), (14), to move the cursor key up
or down to locate the correct file folder and press Play" (17), to access the files located within the folder and
the interface will display the browser utility for the built-in hard drive, select the name of a built-in hard drive
and press Play" (17) button to access the file located in the current folder of the browser.
Press the left directon button on Remote Control (15) to return to folder interface.
Press the exit button on the Remote Control (19) to return to the main interface.
This is the File Browser interface:
Caution:
1 PVR P8131 default settings separates the built-in hard drive into two FAT32 partitions, if the product
capacity is 250 GB, the display will show two separate hard drives: Local Hard Drive 1 (about 117 G) and
Local Hard Drive 2 (about 117 G); is the formating of hard drives is required, the PVR P8131 built-in
formatting feature should be used (please refer to 5.9.7.3);
2. When browsing in image, music and movie folders, only the first three of the folders matching the name
of the file, such as "photo" will be displayed.
4.5 Movie Playback
Entered a "Movie" section, as described in section 4.4 to locate the video file, and move the cursor to
navigate to the file you would like to play back and press Play" on Remote Control (17) to play the video
track.
During video playback, press "Exit" on the remote control (19) to return to the "Movies" Menu.
This is the Movie Playback interface:
4.6 Music Playback
Entered the "Music" section, as described in section 4.4 to locate the music file, and move the cursor to
navigate to the file you would like to play back and press Play" on Remote Control (17) to play the audio
track.
During video playback, press "Exit" on the remote control (19) to return to the "Music" browser interface .
This is the Music Playback interface:
4.7 Image Playback
Entered the "Photo" section using the browser and locate the images you would like to play back, when the
cursor at the desired image, press Play" (17) on Remote Control to display the image.
Use left / right buttons- (15), (16), to move the cursor between images
During video playback, press "Exit" (19) on the remote control to return to the "Photo" browser interface.
This is the Image Playback interface:
4.8 Video Recording
PVR P8131 supports two types of video recording: Instant Recording and Scheduled Recording.
4.8.1 Instant Recording:
Use up / down keys - (13), (14) to move the cursor, choose "Video", press Play to enter the "Video" section,
use the up / down keys -- (13), (14) to select the Instant Recording, press Play to access the Instant
Recording interface, select Start Recording and press Play" (17) to enter the video preview Interface. In the
video preview (the upper right corner of display shows "Preview") interface, once again press Play" (17), to
start recording (the upper right corner shows "Video").
This is the Instant Recording interface:
Press "Exit" (19) to stop video recording and save the video file.
4.8.2 Regular Recording
Caution: before using the advanced Video Recording functions, please consult with the manual.
4.9 Scheduled Recording
Scheduled Recording allows you to pre-set the time you would like to record the TV program.
Entered a Scheduled Recording menu and press Play" (17) to enter Scheduled Recording features. Press
"Exit" (19) on the remote control to return to the "Scheduled Recording " browser interface.
Use Fast-forward button (12) / and Rewind button (11) / to advance in the menu.
Press Play" (17) to confirm the choice
This is the Scheduled Recording interface:
Caution:
1. To use Scheduled Recording function you must first connect the video input to PVR P8131, and then
connect PVR P8131 video output to TV set;
2. Please make sure that you have confirmed the selected schedule prior to exiting the Schedule Recording
timer.
Reffer to relevant system settings in the manual for further advanced operations.
5. Advanced Operations
5.1 File Browser
In File Browser menu, press button (18) on Remote Control to acess advanced File Browser operations .
Move the cursor to File Browser interface
The following comands are avaialble through this menu:
Open: Open the file or folder into the current directory;
Delete: Delete the file or folder;
Copy: Copy the file or folder;
Shear: Cut the current file or folder;
Paste: will be copied or cut the paper / folder and paste it into the current document-level directory;
Set as background music: set the current file or folder as a background audio for image playback. (Only
allows to set background music for image files)
5.1.1 Coping files/folders
In the File Browser mode, select the file/folder, click on the Remote Control button (18) to acess file/ folder
menu operations. Using the up / down keys - (13), (14) select the item to copy and press Play (17) to
confirm, then select the target folder using file / folder operations menu and select the destination to paste
the file If the file with the same name already exists in the ndedtination folder you will be prompted to confirm
that you wish to overwrite the existing file. Select "Yes" to confirm and to begig the copy function (Note: This
product is not capable of creating multiple files with the same name. Therefore, regardless of whether there
is a file with the similar name in the destination folder or not, the PVR will always prompt you to confirm the
copy function . To make sure that you do not accidently overwite an important file in the destination directory,
please make sure thast you first back up the file).
Copy function interface
Caution: while performing the copy operation, please be patient and do not cut off the power.
5.1.2 Deleting files/folders
In the File Browser mode, select the file/folder, click on the Remote Control button (18) to acess file/ folder
menu operations. Using the up / down keys - (13), (14) select the item to delete and press Play (17) to
confirm.
When prompted "Are you sure that you want to delete this directory and subdirectories», choose" Yes " and
press Play (17 ) to confirm.
Caution: be carefull when deleting files/folders, you will not be able to un-delete them.
5.2 Video Playback
5.2.1 Preview of the video file properties
When you highlight the video file, the recorder will identify for you the file size and creation date. The
interface is shown below:
5.2.2 Pausing the Video Playback
During playback, press Play (17) on Remote Control to pause the playback. Into the upper right corner of the
screen you will see the word "Paused", press Play (17) to resume the playback. The interface and operation
are shown below:
5.2.3 Fast-forward and Rewind
During playback, press fast-forward/rewind buttons (12/11) on the remote control to fast-forward/rewind the
file. Press fast forward/rewind buttons (12/11) repeatedly to keep fast forwarding/rewinding the fle.
To speed up the fast forward and rewind by 2 x, 4 x, 8 x and 16 x, press the button repeately to cycle
between different speeds. To return back to playback during fast-forward/rewind process, press Play (17).
The interface and operation are shown below:
5.2.4 Volume control
During playback, press the volume + / volume - key (9 / 10) on the remote control to increase / decrease the
volume between level O and level 30, the default volume setting is 24.
When you press the volume + / volume button (9 / 10), the volume level is displayed in the top right corner of
the screen for 5 seconds. The interface and operation are shown below:
5.2.5 Activating subtitles
During playback, if you included multiple subtitle files you can press the Subtitles (20) button on Remote
Control to switch between subtitles. Press Subtitles (20) button repeatedly to switch subtitles and and off.
The subtitles sign is displayer in the top right corner of the screen for 5 seconds.
The interface and operation are shown below:
Caution:
1. This function is only available for VOB and AVI file formats (Sub/.srt subtitles);
2. To activate subtitles for AVI files (Sub/.srt subtitles), the Sub/.srt subtitles file name needs to be the same
as AVI file name and placed in the same folder;
3. Video file information is displayed for 3 seconds before the subtitles apper.
5.2.6 Switching chapters
During playback of video file in .VOB format if the movie contains multiple chapters press the Chapter (21)
button on remote control to move to a different chapter. Every time you press the Chapter (21) button during
playback, you will move to a different chapter. The Chapter sign will be displayed in the top right corner for
10 seconds.
5.2.7 Changing channels
During playback press the Channel (22) button on Remote Control to switch channels. Every time the button
is pressed, the next channel is displayed and the channel will be displayed in the top right corner for five
seconds. It is possible to adjust the audio output between the left and right channels. The interface and
operation are shown below:
5.2.8 Changing Playback Mode
During playback press the Playback mode (18) button on Remote Control to change the playback mode.
Press the Playback mode (18) button repeatedly to switch between different modes, the current playback
mode is displayed in the upper right corner of the screen for five seconds. There are three playback modes
available. The interface is shown below:
5.2.9 Mute volume
During playback press the Mute (4) button to mute the volume.
When you press the mute (4) button , the audio track is muted and the mute sign is displayed in the upper
right corner of the screen. To resume the normal audio playback press the the mute (4) button again.
See 5.2.10
During playback press Information (2) button on the Remote Copntrol to view the current file information.
Every time you press the Information (2) button, the information message will pop up and remain on the
screen for five seconds.
The following information is displayed: file name, video frame rate, resolution, playback speed and audio
track info.
The interface is shown below:
5.3 Music Playback
5.3.1 Preview of the audio file properties
When you highlight the audio file, the recorder will identify for you the file size and creation date. The
interface is shown below:
5.3.2 Pausing Music Playback
During playback, press Play (17) on Remote Control to pause the playback. Into the upper right corner of the
screen you will see the word "Paused", press Play (17) to resume the playback. The interface and operation
are shown below:
5.3.3 Fast-forward and Rewind
During playback, press fast-forward/rewind buttons (12/11) on the remote control to fast-forward/rewind the
file. Press fast forward/rewind buttons (12/11) repeatedly to keep fast forwarding/rewinding the fle.
To increase the fast forward and rewind by 2 x, 4 x, 8 x and 16 x, press the button repeately to cycle
between different speeds. To return back to playback during fast-forward/rewind process, press Play (17).
The interface and operation are shown below:
5.3.4 Volume control
During playback, press the volume + / volume - key (9 / 10) on the remote control to increase / decrease the
volume between level O and level 30, the default volume setting is 24.
When you press the volume + / volume button (9 / 10), the volume level is displayed in the top right corner of
the screen for 5 seconds. The interface and operation are shown below: