aiko STB 255 User manual

IB(English)
1:1 V2.0
Ali 3101
Black
143*210MM
20 English
Single black printingwith 70g paper.
STB255
AIKO STB255
CICO 2008.08.08
J080285
00STB255.I01.0.01
STB 255
Set Top Box
Digital receiver
OWNER'S MANUAL
English
Read this manualbefore installation and use.
STB255
P4B1TB255029

STB 255
Set Top Box
Digital receiver
OWNER'S MANUAL
English
Read this manualbefore installation anduse.
STB255

TO REDUCE THERISK OF FIREAND ELECTRIC SHOCK,DO NOT EXPOSETHIS UNIT TO
RAIN OR MOISTURE.
IMPORTANT SAFEGUARDS
Read and Follow Instructions- Allthe safety and operation instructions
should be read beforethe video product isoperated. Follow all
operating instructions.
Retain Instructions- The safety andoperating instructions should be
retained for future reference.
Heed all Warnings-Comply with allwarnings on the video product and
in the operating instructions.
Polarization- Some video products areequipped with a polarized
alternating -current line plug. Thisplug will fit into thepower outlet, try
reversing the plug. Ifthe plug still failsto fit, contact yourelectrician to
replace your obsolete outlet.To prevent electric shock,do not use this
polarized plug with an extensioncord, receptacle, or other outlet
unless the blades can befully inserted without blade exposure.If you
need an extension cord, usea polarized cord.
Power Sources- This video productshould be operated only fromthe
type of power source indicatedon the marking label. Ifyou are not sure
of the type of powersupply to your home, consultyour video dealer or
local power company. For videoproducts intended to operate from
battery power, or othersources, refer to theoperating instructions.
Overloading- Do not overloadwall outlets or extensioncords as this
can result in a riskof fire or electricshock. Overloaded AC outlets,
extension cords, frayed power cords,damaged or cracked wire
insulation, and broken plugsare dangerous, They mayresult in a shock
or fire hazard. Periodicallyexamine the cord, andif its appearance
indicated damage or deteriorated insulation,have it replaced by your
service technician.
Power-Cord Protection- Power-supply cords shouldbe routed so that
they are not likely tobe walked on or pinchedby items placed upon or
against them, paying particular attentionto cords at plugs,
convenience receptacles, and the pointwhere they exit from thevideo
product.
Ventilation- Slots and openings inthe case are provided forventilation
to ensure reliable operation ofthe video product and toprotect it from
overheating. These openings must notthe blocked or covered. The
openings should never be blockedby placing the video producton a
bed, sofa, rug, or heatregister. This video product shouldnot be placed
in a built-in installation suchas a book case orrack, unless proper
ventilation is provided orthe video product manufacturer's
instructions have been followed.
Attachments- Do not use attachmentsunless recommended by the
video product manufacturer asthey may cause hazards.
: To reduce the
risk of fire andelectric shock, do
not remove the cover(or back) of
the unit. Refer servicingonly to qualified servicepersonnel.
The lightning flash with arrowheadsymbol, within an equilateral
triangle, is intended to alertthe user to the presence of uninsulated
"dangerous voltage" within product'senclosure that may be of
sufficient magnitude to constitute arisk of electric shock.
The exclamation point within anequilateral triangle is intended to
alert the user to thepresence of important operationand servicing
instructions in the literature accompanyingthe appliance.
WARNING: TO REDUCE THE RISKOF FIRE OR ELECTRIC SHOCK,DO
NOT EXPOSE THIS APPLIANCE TORAIN OR MOISTURE.
CAUTION: TO PREVENT ELECTRIC SHOCK,MATCH WIDE BLADE OF
PLUG TO WIDE SLOT ANDFULLY INSERT.
In addition to thecareful attention devoted toquality standards
in the manufacture ofyour video product, safetyis a major factor
in the design ofevery instrument. However, safetyis your
responsibility, too. This sheetlists important information thatwill
help to assure yourenjoyment and proper useof the video
product and accessory equipment.Please read them carefully
before operation and usingyour video product.
Installation
Water and Moisture- do notuse this video product nearwater for example,
near a bath tub, washbowl, kitchen sink or laundry tub, in a wet basement,or
near a swimming pooland the like. Caution:Maintain electrical safety.
Powerline operated equipment oraccessories connected to thisunit should
bear safety certification mark onthe accessory itself and shouldnot be
modified so as todefeat the safety features.This will help avoidany and should
not be modified so asto defeat the safety features.This will help avoid any
potential hazard from electrical shockor fire. If in doubt,contact qualified
service personnel.
Accessories- Do not place thisvideo product on an unstablecart, stand, tripod,
bracket, or table. The videoproduct may fall, causing seriousinjury to a child or
adult as well asserious damage to thevideo product. Use thisvideo product
only with a cart, stand,tripod, bracket, or table recommendedby the
manufacturer's or sold withthe video product. Anymounting of the product
should follow the manufacturer's instructionsand use of a mountingaccessory
recommended by the manufacturer.
A video product and cartcombination should be movedwith care. Quick stops,
excessive force, and uneven surfacesmay cause the video productand cart
combination to overturn.
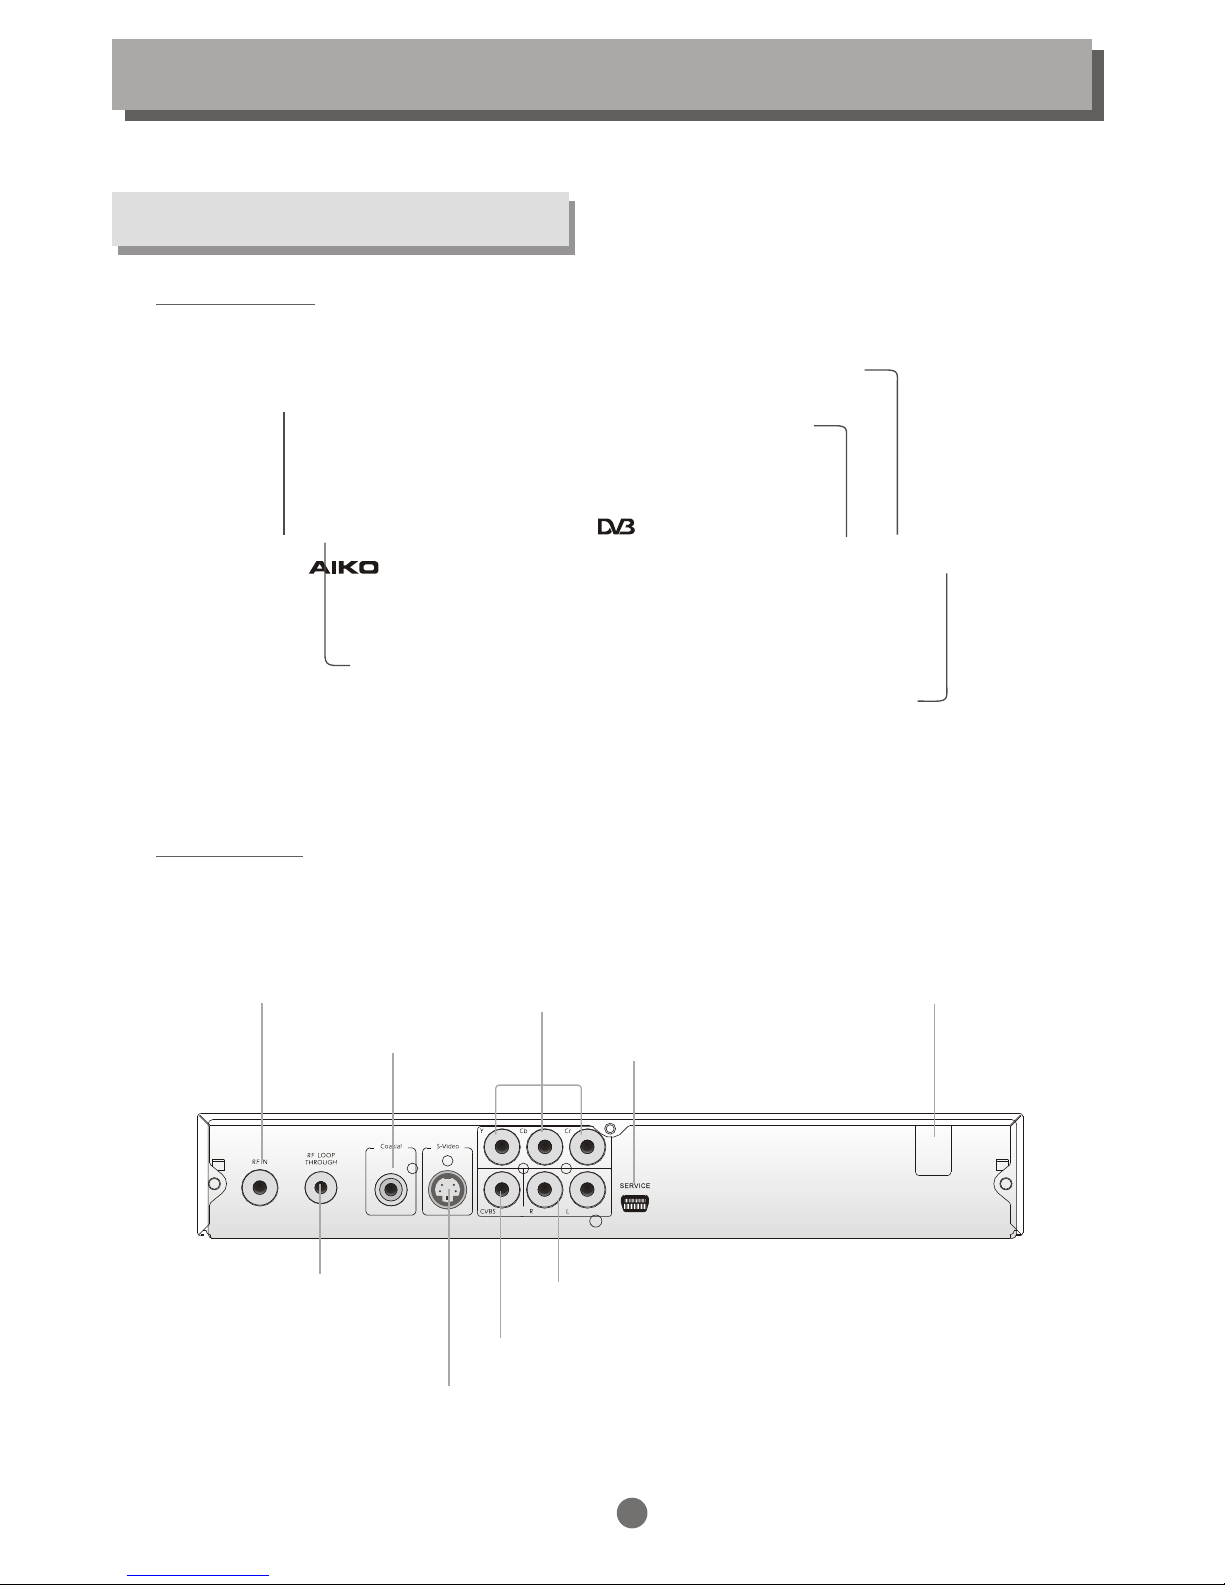
Note to CATV system installer
This reminder is provided tocall the CATV system installer'sattention to
Section 820-40 of the NECwhich provides guidelines forproper grounding
and, in particular, specifies thatthe cable ground shall beconnected to the
grounding system of the building,as close to the pointof cable entry as
practical.
Outdoor Antenna Grounding- Ifan outside antenna orcable system is
connected to the videoproduct, be sure theantenna or cable systemis
grounded so as to providesome protection against voltage surgesand built-up
static charges. Section 810of the National ElectricalCode, ANSI/NFPA No.70-
1984 (Section 54 ofCanadian Electrical Code, Part1)provides information with
respect to proper groundingof the mast and supporting structure, grounding
of the lead-in wire toan antenna-discharge unit, connection togrounding
electrodes, and requirements for thegrounding electrode.
Power Lines-An outside antenna systemshould not be located inthe vicinity of
overhead power lines, otherelectric light or powercircuits, or where itcan fall
into such power lines orcircuits. When installing an outsideantenna system,
extreme care should betaken to keep fromtouching or approaching such
power lines or circuits,as contact with them mightbe fatal. Installing an
outdoor antenna can be hazardousand should be left toa professional
antenna installer.
Use
Cleaning- Unplug this video product from the wall outlet before cleaning.
Do not use liquid cleaners or aerosol cleaners. Use a damp cloth for cleaning.
Objects that may touch dangerous voltage points or "short-out" parts could result in a
fire or electric shock. Never spill liquid of any kind on the video product.
Lightning-For added protection for this video product during a lightning storm, or
when it is left unattended and unused for long periods of time, unplug it from the
wall outlet and disconnect the antenna or cable system. This will prevent damage to
the video product due to lightning and power line surges.
Service
Servicing-Do not attempt to service this video product yourself, as opening or
removing covers may expose you to dangerous voltage or other hazards. Refer all
servicing to qualified service personnel.
Conditions Requiring Service-Unplug this video product from the wall outlet and refer
servicing to qualified service personnel under the following conditions:
A. When the power-supply cord or plug is damaged.
B. If liquid has been spilled, or objects have fallen into the video product.
C. If the video product has been exposed to rain or water.
D. If the video does not operate normally by following the operating instructions.
Adjust only those controls that are covered by operating instructions.
Improper adjustment of other controls may result in damage and will oft require
extensive work by a qualified technician to restore the video product
to its normal operation.
E. If the video product has been dropped or cabinet has been damaged.
F. When the video product exhibits a distinct change in performance-this indicates
a need for service.
Replacement Parts-When replacement parts are required, have the service technician
verify that the replacements he uses have the same safety characteristics as the
original parts. Use of replacements specified by the video product manufacturer can
prevent fire, electric shock, or other hazards.
Safety Check-Upon completion of any service or repairs to this video product, ask the
service technician to perform safety checks recommended by the manufacturer to
determine that the video product is in safe operating condition.
Wall or Ceiling Mounting- The product should be mounted to a wall or ceiling only
as recommended by the manufacturer.
Heat-The product should be situated away from heat sources such as radiators, heat
registers, stoves, or other products (including amplifiers) that products heat.
10.
11.
11a.
12.
13.
14.
15.
16.
17.
18.
19.
20.
21.
22.
CAUTION
The apparatus shall not beexposed to dripping or splashing,and that no
objects filled with liquids, suchas vases, shall be placeon the apparatus.
1.
2.
3.
4.
5.
6.
7.
8.
9.
SAFETY INFORMATIONS

SAFETY INFORMATION
INTRODUCTION
Front panel
Rear panel
Remote control
SYSTEM CONNECTION
General
Connection to theTV
Connection to thevideo recorder
Connecting a HiFiSystem
GETTING STARTED
Welcome page
Automatic channel scan
Manual channel scan
Aerial Adjustment
OPERATION
Changing channels
Access the ElectronicProgramme Guide(EPG)
Accessing the favoritechannels
CHANNEL
Channel list menu
TV Channel list
Radio Channel list
Delete All Favorites
Delete All Channels
SYSTEM SET UP
System setup mainmenu
OSD Language
TV System
Start up Service
Region and Time
Timer Setting
OSD Setting
Parental Lock
TOOLS
Tools main menu
Information
Game
Load Factory Default
Software Upgrade
TROUBLESHOOTING
SPECIFICATIONS
1
1
2
3
3
3
4
4
4
4
8
8
8
8
9
9
9
9
10
10
10
10
10
5
5
5
6
6-7
7
7
7
CONTENTS
11
12

AC 220-240V
~50/60Hz
STB255
Front panel
Rear panel
About STB
1
INTRODUCTION
Coaxial Digital Audio SERVICE port
(For update thesoftware)
TV aerial
for an externalTV aerial
Loop though
for an externaldevice
RF
AC Mains
S-Video
Composite Video
Down Mix Audio
2 Channel L/R
Component Video
(Y Pb Pr)
Standby button
Channel up
Channel down
Remote sensor
Power indicator

2
INTRODUCTION
Power On/Standby
(Switch the STBON/STANDBY mode)
INFO
(Press for currentchannel information)
RECALL
(switch to previouschannel)
Channel up/down
PAUSE (Pause thecurrent playback picture)
Menu
(Open up menu)
Cursor ( toselect sub-menu from the
main menu ,)
OK button
(Press to enter.)
EPG
(Open up Electronic ProgramGuide menu)
Numeric entry
(Enter numeric valuesand to select the channel
directly by enteringit's number and press "0" button
to open upthe channels digest)
LANG
(Select language forthe two or more language
simultaneous programmes)
AUDIO
(Select audio: Left/ Right /Stereo / Mono)
Red Button (Forteletext function)
Green Button (Forteletext function)
Mute (Turn offthe volume)
SUBTITLE (OFF/Standard/TTX)
Volume +/- (Turnup/down the volume)
EXIT (Exit frommenu)
FAVOURITE
(Open up Favouritelist)
PAGE +
(page up)
PAGE -
(page down)
TV/RADIO
(Switch between TVand Radio)
TTX (Open Teletextfunction)
Blue Button (Forteletext function)
Yellow Button (Forteletext function)
8
9
11
10
12
13
15
14
1
2
3
4
5
6
7
16
17
18
19
20
21
CH+
MUTE
STANDBY
RECALL
SUBTITLE
INFO
MENU
OK
EXIT
EPG FAV
PAGE+
AUDIO
PAUSE
TV/RADIO TTX
PAGE-
CH-
VOL+
VOL-
1
2
3
4
5
6
15
18
19
12
20
21
22
7
8
9
10
11
13
14
16
17
23
24
25
OK
LANG
22
23
24
25
Remote control
STB255

AC 220-240V
~50/60Hz
AC 220-240V
~50/60Hz
AC 220-240V
~50/60Hz
There are manydifferent types ofTV/VCR and other equipment that youcan connect to the STB. In
this manual youwill see someof the most common ways to connectyour equipment.
General
SYSTEM CONNECTION
Connection to the video recorder
Connecting a HiFi system
Coaxial cable
Hi-Fi
3
Connection to the TV
Antenna
RF cable
Red
Yellow
White
Red
Green
Blue
Red
White
Yellow Green
Blue
Red
Antenna
RF cable
Red
Yellow
White
Red
Green
Blue
Red
White
Yellow Green
Blue
Red
Video Cassette Recorder
VCR
S-Video cable
Y Pb Pr cable
AV cable
AV cable
Y Pb Pr cable

Welcome Page
If you use the STB the first time or after you delete all channel information in the STB,the "WELCOMOE PAGE"
picture for quick shortcut menu will display .
WELCOME PAGE
OSD Language
Region
Tuner Power
Auto Scan
Main Menu
1
2
3
4
5
Press "1~5" numeric button to enter OSD Language, Region, Tuner
Power, Auto Scan and Main Menu quickly.
4
GETTING STARTED
Automatic channel scan
Manual channel scan
Installation
Select Enter Exit
OK
MENU
Auto Scan
Channel Scan
Aerial Adjustment
The automatic search will start and the picture shown right is displayed.
Press the "MENU" button to enter the setup menu of the STB.
Press the "UP" or "DOWN" cursor button to select "Installation",and press the OK button to enter the sub-menu.
Select the "Channel Scan" and press the "OK" button, Channel Scan menu appears
Press the "LEFT" or "RIGHT" to select Scan mode, Scan Band and Channel No. and highlight "Search",
then press the "OK" button to confirm .
1
2
3
4
Installation
Select Enter Exit
OK
MENU
Auto Scan
Aerial Adjustment
Channel Scan
Channel Scan
MENU
UHF 470.0~478.0 MHz
Frequency FFT
Modulation GI
Exit
40%
TV Service Radio Service
Your STB will start to scan the desired service or Frequency and the picture shown right is displayed.
Press the "MENU" button to enter the setup menu of the STB.
Press the "UP" or "DOWN" cursor button to select "Installation", and press "OK"
button to enter the sub-menu.
Select the "Auto Scan" and press the "OK" button, Auto Scan menu appears.
Press the "LEFT" or "RIGHT" cursor button to select Scan mode, and highlight
"Search" ,then press the "OK" button to confirm .
1
2
3
4
Channel Scan mode:
By channel
By frequency
Channel Scan
Select
MENU
Mode
Scan Band
Ch No.
Search
Frequency
BandWidth
By Channel
UHF
21
000.000MHz
8 MHz
Change Exit
0-9
Input
Signal Intensity
Signal Quality
65%
90%
Auto Scan
Select
MENU
Scan Mode
Search
All
Change Exit
OK
Enter
Main Menu
Select Enter Exit
Channel
Tools
Installation
Setup
OK
MENU
Auto Scan
MENU
UHF 470.0~862.0 MHz Ch No.
Frequency 858.00 MHz FFT
Modulation GI
Exit
40%
TV Service Radio Service
Press the "MENU" button to return.
Enter the main menu, press the "UP" or "DOWN" cursor button to select "Installation",
and press the "OK" button to enter the sub-menu.
Highlight the "Aerial Adjustment" ,press "OK" button to enter the settings menu.
Select "Ch No " option, press "LEFT" or "RIGHT" button to select the desired channel Number.
Select the "Tuner Power", press the "LEFT" or "RIGHT" button to select the desired settings.
When you select "On", the tuner power is activated, and the STB will provide 5V power to
antenna. Otherwise it will not provide.
Press "MENU" button to exit.
1
2
3
4
Aerial Adjustment
Installation
Select Enter Exit
OK
MENU
Auto Scan
Channel Scan
Aerial Adjustment
The signal intensity and quality for the desired channel will display as right.
When you adjust the location of aerial, use this menu to check signal intensity and quality of the selected channel.
Aerial Adjustment
Change
MENU
21
On
Exit
Signal Intensity
Signal Quality
65%
90%
Ch No.
Tuner Power

5
Accessing the Electronic Program Guide (EPG)
Accessing the EPG of all channels:
1
2
3
4
Press the "EPG" button to enter EPG menu .
Press the "OK" button to view the current selected in full screen.
Press the numeric button"1" to display all programs schedule
information of the selected channel as right.
Press the numeric button"2" to display the detail information of
current channel.
EPG
Schedule
Detail
2
15/02/2006 14:29
Select Page Enter
OK
Exit
MENU
1
14:05-14:55
BBC News
Theme: News
Rate:00
15:00-16:00
BBC News
Theme: News
Rate:00
0001 HN Radio2
0003 BBC Text
0004 BBC Two
0005 BBC CHOICE
0002 BBC NEWS 2
Detail 15/02/2006 14:29
Page Extend
Timer
2
BBC NEWS 24
13:00-15:00 BBC News
Bill Turnbull and Valerie Sanderson present
the news,with live reports from around the
world. Widescreen.
Exit
MENU 1
Schedule
Detail
1
15/02/2006 14:29
Select Page
Enter
Exit
MENU
OK
0002 BBC NEWS 24
15/02/2006
Timer
2
Date
5In schedule and detail menu,press numeric button "2" can open the timer menu directly. This operation can
add the highlighted program to a timer quickly.
OPERATION
EPG
Changing Channels
There are fourways of channelselection - stepping throughthe channel list, selectionby number,
from the on-screenchannel list, and using the electronicprogramme guide(EPG).
Stepping through thechannel list:
To move throughthe channel list, press the upwardarrow or downward arrow key onthe
remote control.
Selection by number:
Enter the channelnumber directly by pressing numeric buttons,and press the "OK" button
to select desiredchannel.
Selection by on-screenchannels list:
You can alsoselect the required channel directly fromon-screen channel list. This is
displayed using theSTB's main menu. See "Channel List"in this manualfor operation detail.
1
2
3
4Selection by EPG:
You can alsoselect the required channel directly fromelectronic program guide (EPG).
This is displayed usingthe STB's main menu. See "Accessing theElectronic Program Guide
(EPG)" in thismanual for operation detail.
Accessing the favorite channels
Press to open up the "FAVOURITE LIST".
Press the LEFT or RIGHT cursor button to select the desired favourite group.
Select the favourite channels and press the OK button to view the selected
channel.
1
2
3
Channel
Installation
System Setup
Favorite Group 1
0001 HN Radio2
0002 BBC NEWS 24
0003 BBC Text
0004 BBC Two
FAV

Channel list menu
Channel
Select Enter Exit
OK
MENU
TV Channel List
Radio Channel List
Delete All Favorites
Delete All Channels
Press "MENU" button to enter the main menu, select "Channel" and press "OK" button
to enter the channel menu.
Press "UP" or "DOWN" cursor button to select the desired item and press "OK" button
to enter the setting menu.
Press "MENU" button to exit.
1
2
3
6
CHANNEL
TV Channel list
In channel menu, select "TV Channel List", press "OK" button to enter the TV channel list menu.
Press "LEFT" or "RIGHT" cursor button to select channel group. And press "UP" or "DOWN" cursor
button to preview the desired TV channel. Then press "OK" button to view the selected channel
in full screen.
1
2
Favorite
2
OK
MENU
1
TV Channel List
All Channel
0001 BBC CHOICE
0002 BBC NEWS 2
Preview
Move
3
Find
Select Page Enter Exit
4
Sort
5
Edit
Group
Favorite
Favorite
2
OK
MENU
1
TV Channel List
All Channel
0001 BBC CHOICE
0002 BBC NEWS 2
Preview
Move
3
Find
Select Page Enter Exit
4
Sort
5
Edit
Group
Favorite
Favorite 1
Favorite 2
Favorite 3
Favorite 4
Favorite 5
Favorite 6
Favorite 7
Favorite 8
In TV channel list menu, press numeric button "1" to set Favourite item.
Select a desired group, and press "OK" button,the highlighted channel is added to the
group and marked in a favorite symbol.
Press "EXIT" button to favorite setting.
1
2
3
Move
In channel list menu, press numeric button "2" , there will show a "moving mark" in the
right side of the selected channel.
1
2
Find
In channel list menu, press numeric button "3" to open Find menu.
1
2
3
4
Favorite
2
OK
MENU
1
TV Channel List
All Channel
0001 BBC CHOICE
0002 BBC NEWS 2
Preview
Move
3
Find
Select Page Enter Exit
4
Sort
5
Edit
Group
Find
ABCDEFG
HIJKLMN
OPQRSTU
VWXYZ12
3456789
0()@&-+
/
SP
?DEL OK
Press the cursor button to highlight the letter or numeric and press the "OK" button
to input one by one.
After inputting each character, the program list on the left will search the channel
according your input, and list the matched channel.
Pressing the "EXIT" button to close "Find" and select channel from the channels list directly.
Sort
Favorite
2
OK
MENU
1
TV Channel List
All Channel
0001 BBC CHOICE
0002 BBC NEWS 2
Preview
Move
3
Find
Select Page Enter Exit
4
Sort
5
Edit
Group
Sort
Default
Name(A-Z)
Name(Z-A)
FTA
Lockd
In channel list menu, press numeric button "4" to open "Sort" menu.
1
2
Default:
Name (A-Z):
Name (Z-A):
FTA:
Locked:
Sorting by scanning result.
Sorting in Alphabetical Order.
Sieving out all free fare channels.
Accumulating all locked channels and list in the last of TV Channel List.
Press the "UP" or "DOWN" cursor button to highlight sorting way you want and
press the "OK" button to confirm.
Press "UP" or "DOWN" cursor button to move the channel to the desired position.
Edit
In channel list menu, press numeric button "5" to open channel list edit menu.
You will be asked to enter the password. The default password is "0000".
Use this menu to delete ,skip,lock and edit channel list.
Delete:
In "Edit Channel" menu, press numeric button "1" can make a delete mark
in the right side of the highlighted channel. After save and quit "Edit Channel"
menu, the marked channel will be deleted.
Delete
2
MENU
1
Edit Channel
All Channel
0001 BBC CHOICE
0002 BBC NEWS 2
Skip
3
Lock
Select Page Exit
4
Edit
5
Del All
Group
Preview
Press "1" button again to cancel delete channel.
6

TV Channel list (Continued)
Skip:
In "Edit Channel" menu, press numeric button "2" ,the selected channel is marked in a skip symbol. After saving
and quitting "Edit Channel" menu, the marked channel will be skip while you change the channel in full screen.
Lock:
In "Edit Channel" menu, press numeric button "3" ,the selected channel is marked in a lock symbol After saving
and quitting "Edit Channel" menu, the marked channel will be locked. When watched the locked channel, you
are asked to input the password.
CHANNEL
Press "2" button again to cancel the skip channel .
Press "3" button again to cancel the lock channel .
Edit:
Edit Channel
All Channel
0001 BBC CHOICE
0002 BBC NEWS 2
Preview
Edit Channel
Name
BBC ONE
Video PID
Audio PID
PCR PID
Save
Exit
Delete
21
Skip
3
Lock
Select Page
MENU
Exit
4
Edit
5
Del All
Group
160
82
160
Del All:
In "Edit Channel" menu, press numeric button "5" can mark all the channel with delete mark. After save and
exit , all channels are deleted.
Press "5"button again to cancel Del All function.
In "Edit Channel" menu, press "4" button to open edit channel menu. Highlight name
item and press the "OK" button to confirm. The mock keypad will be showed.
Input letter and numeric one by one by pressing the cursor button and press
the "OK" button to confirm.
After complete input, highlight "OK" on mock keypad to confirm, you change
the name of channel successfully.
After modification, highlight "Save" item and press the "OK" button to save the modified value and exit "Edit" mode.
Highlight "Exit" item and press the "OK" button to exit "Edit"
mode and won't save any modification. "Video PID", "Audio PID" and "PCR PID" items are
grey and can not be edited.
NOTE:
Radio Channel list
In the Channel menu, select "Radio Channel List" and press "OK" button to enter the
radio channel list menu.
Press "LEFT" or "RIGHT" cursor button select channel group, and press UP" or "DOWN"
cursor button to preview channel logo of the desired channel. Then press "OK" button
to listen the selected radio channel .
1
2
Favorite
2
OK
MENU
1
Radio Channel List
All Channel
Preview
Move
3
Find
Select Page Enter Exit
4
Sort
5
Edit
Group
0001 BBC PARLMNT
NOTE:
The operation of "RadioChannel List" is thesame as "TV ChannelList", but in "RadioChannel
List" mode, there isno video information, soit will display Radio'slogo in the previewwindow.
7
Delete All Favorites
In the Channel menu, select "Delete All Favourites", and press "OK" button, you will be
asked to input the password.
Input the password using the numeric buttons, a warning window is displayed.
Highlight "Yes" to confirm,highlight"No" to cancel .
1
2
Channel
Select Enter Exit
OK
MENU
TV Channel List
Radio Channel List
Delete All Channels
Delete All Favorites
Input Password
----
Use this menu to delete all favorite channels.
Delete All Channels
Use this menu to delete all channels.
Channel
Select Enter Exit
OK
MENU
TV Channel List
Radio Channel List
Delete All Favorites
Delete All Channels
Input Password
----
In the Channel menu, select "Delete All Channels" and press "OK" button ,
you will be asked to input the password.
Input the password using the numeric buttons, a warning window is displayed.
Highlight "Yes" to confirm,highlight"No" to cancel .
1
2

System setup main menu
Use system menu to set OSD Language, TV System, Start up Service, Region and Time, Timer Setting, OSD Setting
and Parental Lock.
Press "MENU" button to enter main menu, select "SETUP" and
press "OK" button to enter the setup menu.
Press "UP" or "DOWN" cursor button to highlight the desired
item and press "OK" button to enter its setting menu .Then
press "UP" or "DOWN" cursor button to highlight the desired
item and press "LEFT" or "RIGHT" cursor button to change the
setting.
Press "MENU" button to save the setting and exit.
1
2
3
System Setup
Select Enter Exit
OK
MENU
OSD Language
TV System
Start up Service
Region and Time
Timer Setting
OSD Setting
Parental Lock
OSD Language
OSD Language
Select Change Exit
MENU
OSD Language
First Audio
Second Audio
English
English
English
Use OSD Language to set OSD Language , First Audio and Second Audio language.
OSD Language: To select your desired OSD language.
First Audio: Some channels have more than one audio language for choosing;
use this function you can set the first audio for this channel. If the
playing channel has the same audio as the "First Audio" you set,
system will play this audio language as default. If the channel hasn't
the suited audio language, then the system will compare automatically
with second audio language.
Second Audio: If the channel has no correspond audio with "First Audio" but have corresponded audio
with "Second Audio", system will play the second audio language as default. If no audio
language corresponds with the "Second Audio", then the default language of current
channel will be played automatically.
Main Menu
Channel
Tools
Installation
Setup
Select Enter Exit
OK
MENU
SYSTEM SET-UP
TV System
Use this menu to setup Display Mode,Aspect Ratio.Dolby Digital,Video Output and LCN Mode.
TV System
Select Change Exit
MENU
Display Mode
Aspect Ratio
Dolby Digital
Video Output
LCN Mode
Auto
4:3PS
Off
CVBS
Off
Display Mode: To set the the broadcast system to Auto/PAL/NTSC TV System.
Aspect Ratio: Aspect Mode is used for switching the screen aspect ratio mode.
Auto
4:3PS
4:3LB
16:9
Auto switch to Aspect Ratio
4:3 Pan Scan
4:3 Letter Box
16:9 Wide Screen
Dolby Digital: Dolby Digital to set AC3 on or off.
Video Output: To set the video output to CVBS/CVBS+YCbCr/CVBS+S-Video
LCN Mode: If LCN (Logical Channel Number)Select function is activated, you can't change the original
number of TV channels by scanning .
On
Off
Activate "LCN Select" function if there is LCN for the TV station of the country.
Deactivate "LCN Select" function.
8
Start up Service
Use this menu to setup a start up service when you power on STB.
Start up Service
Select Change Exit
MENU
Boot on Service
Mode
Start up Service
On
TV
Boot on Service: Set up Start up Service to On/Off.
Start up Service: Set up a channel as Start up Service.
On
Off
Activate "Start up Service" function
Deactivate "Start up Service" function
Mode: Set up TV or Radio as Start up Service mode .
NOTE:
1 Please make sure your TV set can support Progressive format before you select YPbPr Mode,
or you will can not see picture on TVset .
2 Y Pb Pr and S-Video Cable Should not be connected at the same time,or it will cause
pictures' qulity degraded.

Region and Time
Use this menu to setup country and time.
GMT Usage: To set the GMT Usage to Off / User Define / By Region mode.
GMT Offset: This item is valid only when the setting of "GMT Usage" is "Uesr Define".
And the GMT Offset range is "-12:00 ~ +12:00", Increase each half hour
progressively.
Date:
Time: "Date" and "Time" items are valid only when the setting of "GMT Usage" is
"Off". And use number keys to input directly.
Summer Time: This item is valid only when the setting of "GMT Usage" is "By Region".
You can set the summer time to "On" or "Off".
Time Display: This function can control whether the time will be displayed on screen or not.
You can set the time display to "On" or "Off".
9
Region and Time
Select Change
Region
GMT Usage
Summer Time
Time Display
GMT Offset
Date
Time
France
By Region
Off
Off
GMT+01:00
05/10/2005
11:23
Exit
MENU
Input Enter
0~9 OK
SYSTEM SET-UP
Timer Setting
Timer
Select
Change
Exit
MENU
Current Date/Time
Timer Number
Timer Mode
Timer Service
Wakeup Channel
Wakeup Date
Wakeup Time
Duration
Off
Message
General
06/10/2005
03:10
01:00
1
06/10/2005 03:17
Input
0~9
For "Timer Service",if youselect Message,a remind message will appearat
setting timer.Press "OK" buttonto exit the message window.
Message mode:General/Birthday/Anniversary
Sleep Timer: You can set the STB to power off in 10 min,30min,60min,
90min and 120min automatically.
Sleep Timer
Change
Exit
MENU
Sleep Time
Off
Load Default Timer Setting:
This function can clear all timer setting and return to default timer setting.
If you enter this menu,you will be asked to input password(the default
password is "0000").After input password, a confirmation window appears.
Highlight "Yes" or "No" and press"OK" to confirm or cancel.
Various time can be set, such as program time, Sleep time.
Program Timer: This item is used for setting program timer you want to change to.
When you want to quit program timer,a saving window appears
Time Setting
Select Enter Exit
MENU
Program Timer
Sleep Timer
Load Default Timer Setting
OK
OSD Setting
You can set Subtitle On/Off,OSD Timeout, OSD Transparency, and load default OSD setting.
Subtitle Display: To set up the subtitle Off/Standard/TTX.
OSD Timeout: When you switch channels in full screen, there will show up some
information about current channel on the lower of the screen.
Use "OSD Timeout " item to set the duration of these information
show up on the screen. You can set the time from "1second~10seconds".
OSD Transparency:
To set the transparency of display menu and the information show up
on the screen.
Load Default OSD Setting: To clear all OSD setting and reset parameters as default value.
OSD Setting
Select Change Exit
MENU
Subtitle Display
OSD Timeout
OSD Transparency
On
5
Off
Load Default OSD Setting
Parental Lock
The parental lock allows you to password protect channels, groups of menus or allow access to all menus.
Menu Lock: This item is used for lock the installation menu. When you want to enter
any installation sub-menu, you must input the password. You can set
menu lock to Yes/No(default password:0000).
Channel Lock: To Set the channel Lock Yes/No.
System Setup
Select Enter Exit
OK
MENU
OSD Language
TV System
Start up Service
Region and Time
Timer Setting
OSD Setting
Parental Lock
Input Password
----
New Password: To change the password.

Tools main menu
Press the "MENU" button to enter the main menu.
Press the "UP" or "DOWN" cursor button to select "Tools".
Press the "OK" button to enter the sub-menu.
Press the "UP" or "DOWN" cursor button to highlight the
desired item and press the "OK" button to confirm .
Press the "MENU" button to exit.
1
2
3
4
5
Tools
Select Enter Exit
OK
MENU
Information
Game
Load Factory Default
Software Upgrade
Welcome Page
Information
In "Tools" menu, highlight "Information".
Press the "OK" button ,the information window appears.
Press the "MENU" button to exit .
1
2
3
10
Information
Exit
MENU
Scan Band 2006-08-21
bootloader 0.2.0
Scan Band 2006-09-26
maincode 0.4.0w2
2005-12-23
videoback 1.0.0
Scan Band
radioback 1.0.0
Scan Band
default db 0.1.0
user db 1.0.0
2005-12-23
2005-12-23
2005-12-23
Tools
Main Menu
Select Enter Exit
Channel
Installation
System Setup
Tools
OK
MENU
The "Information" menu can display some parameters of the softwareinformation in this STB.
Load Factory Default
You can re-set the STB back to factory settings, clear all existed channels ae in this menu.
Enter "Tools" menu, highlight "Load Factory Default".
Press the "OK" button, you will be asked to input the password.
Input the password using the numeric buttons(the default password is "0000"),
a confirmation window is displayed.
1
2
3
Tools
Select Enter Exit
OK
MENU
Information
Game
Software upgrade
WELCOME PAGE
Load Factory Default
Input Password
----
This operation will load default
and erase all the channels that
user added,continue?
Yes No
Highlight "Yes" to confirm, STB will return back to
factory settings and clear all channels.
Highlight "No" to cancel back to factory settings.
Press the "MENU" button to exit .
4
5
6
Game
This function allows you to play games on the STB.
In "Tools" menu, highlight "Game", and press the "OK" button to enter the Game menu.
Press the "UP" or "DOWN" cursor button to highlight the desired game,
and press the "OK" button to enter the game menu .
Highlight "Start" in the selected game and press the "OK" button to confirm,
then the game will be started.
Press the "MENU" button to quit the game.
1
2
3
Game
Select Enter Exit
OK
MENU
Tetris
Snake
Othello
4
Software Upgrade
Connect master STB to slave receiver via serial interface.
Enter "Tools" menu in Master STB, highlight "Software Upgrade" and press the "OK"
button , then press the "LEFT" or "RIGHT" cursor button to select upgrade mode.
Turn on slave STB and it needn't operate any setting. Highlight "Start" on master STB
and press the "OK" button to start upgrade.
Press the "EXIT " button to save the parameters and draw back.
1
2
3
We offer the functions for user to connecting receiver (Master) to the other receiver (Slave) via serial interface to
upgrade software version.
4
Software Upgrade
Enter Exit
OK
MENU
Upgrade Mode
Input Password
----
videoback
Start
0%
Upgrade mode: allcode/config/maincode/videoback/radioback/defaultdb/flashwr/
userdb

In some region,the digital terrestrial signal may beweak. So you'dbetter use the antenna in whichthe
booster was built,forwatching the weaksignal channels.
TROUBLESHOOTING
Problem
Standby light not lit
No signal found
No picture or sound
Scrambled channel
message
No response to remote
control
Forgotten channel lock
code
Forgotten menu lock
code
The remote control will
not operate your STB
After moving the STBto
another room you findyou
are no longerable to
receive digital reception
Possible cause What to do
Mains lead unplugged
Mains fuse blown
Aerial is disconnected
Aerial is damaged/misaligned
Out of digital signalarea
Tuned to digital teletextchannel
Channel is scrambled
Receiver off
Handset not aimed correctly
Front panel obstructed
Hand set batteries exhausted
(1) The batteriesin your remote
control need replacing
(2) There is anobstruction
blocking the signal path
between the remote control
and the box.
The aerial feed formernew point
may come through adistribution
system which may reducethe
digital signal now receivedby the
box.
Check mains lead
Check fuse
Check aerial lead
Check aerial
Check with dealer
Reduce to another channel
Select alternative channel
Plug in and turnon plug
Aim handset at frontpanel
Check for obstructions
Replace handset batteries
Re-install channels to cancel
channel lock
Contact help line
(1) Replace the batteries
(2) Check that thereis nothing in
the way of thepath between
the remote control andthe
receiver
Try a direct feedfrom the antenna
11

TUNER & CHANNEL RF INPUT CONNECTORx1
(IEC-TYPE, IEC169-2, FEMALE)
RF OUTPUT CONNECTORx1
(IEC-TYPE, IEC169-2, MALE(LOOPTHROUGH))
FREQUENCY RANGE:
174MHz ~230MHz (VHF)& 470MHz ~862MHz(UHF)
SIGNAL LEVEL:
-15 ~ -70dbm
DECODER
TRANSPORT STREAM
PROFILE LEVEL
VIDEO FORMATS
AUDIO FORMATS
VIDEO OUTPUT
MPEG-2 ISO/IEC 13818
INPUT RATE
MAX. 15Mbit/s
MPEG-2 MAIN PROFILE@MAIN LEVEL
4:3/,16:9 SWITCHABLE
CVBS,CVBS+YCbCr,CVBS+S-Video
MPEG Layer I& II, 32 / 44.1 /48KHz
CONNECTION
MAIN POWER CABLE
TUNER
Video
SPDIF
FIXED TYPE
ANTENNA INPUTx1, RFOUTPUT x1
COAXIAL x1
USB x1
POWER SUPPLY
INPUT VOLTAGE
POWER CONSUMPTION
AC220~240V, 50/60Hz
MAX. 10W/STANDBY 5W
SPECIFICATIONS
NOTE
Design and Specificationsare subject tochange without notice.
DATA PORT
S-Video x1, YPbCb PrCr x1,Composite Video x1
12


Table of contents