AIPTEK EXPLORER 300 User manual

Explorer 300
8 x 22 VGA Digital Camera Binocular
Users Manual
English

2
Table of Contents .................................................................................................................. 2
Quick Start ............................................................................................................................. 4
Features ................................................................................................................................. 6
Introduction ............................................................................................................................ 8
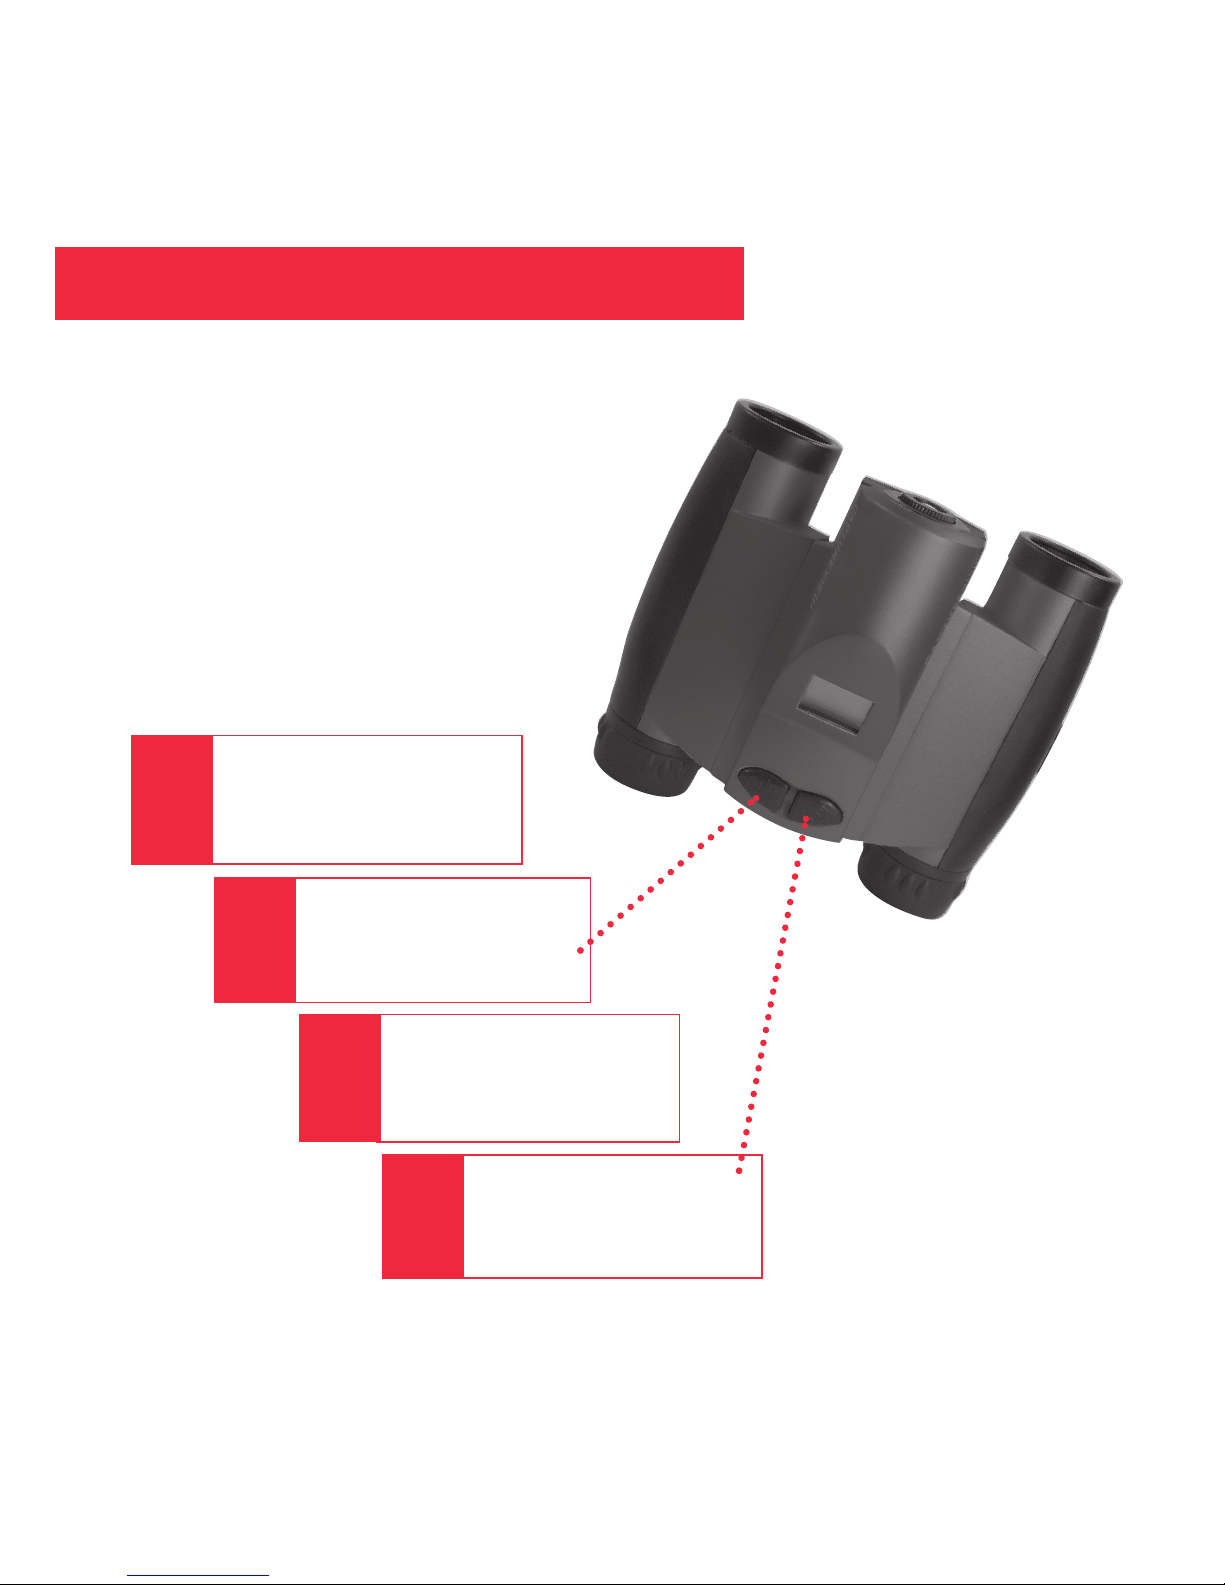
How to Use Your Binocular .................................................................................................. 9
Adjust Eye Relief .................................................................................................................. 9
Adjust the Barrels ................................................................................................................. 9
Focus the Binocular .............................................................................................................. 10
How to Use Your Camera ...................................................................................................... 11
Insert Batteries ..................................................................................................................... 11
Select an Operation .............................................................................................................. 11
Taking Pictures and Video .................................................................................................... 12
Taking a Still Picture ............................................................................................................. 12
Capture Video ....................................................................................................................... 13
Operations.............................................................................................................................. 14
Use the Mode and Shutter Button ........................................................................................ 14
Use the Camera Mode ......................................................................................................... 15
Change the Camera Resolution ........................................................................................... 15
Use the Video Mode ............................................................................................................. 16
Erase (Delete) Pictures or Video .......................................................................................... 16
Find Out How Many Pictures You’ve Taken .......................................................................... 17
Use the Self-Timer ................................................................................................................ 17
Find Out How Much Power is Left in the Battery .................................................................. 18
Find Out Why Explorer is Beeping ....................................................................................... 19
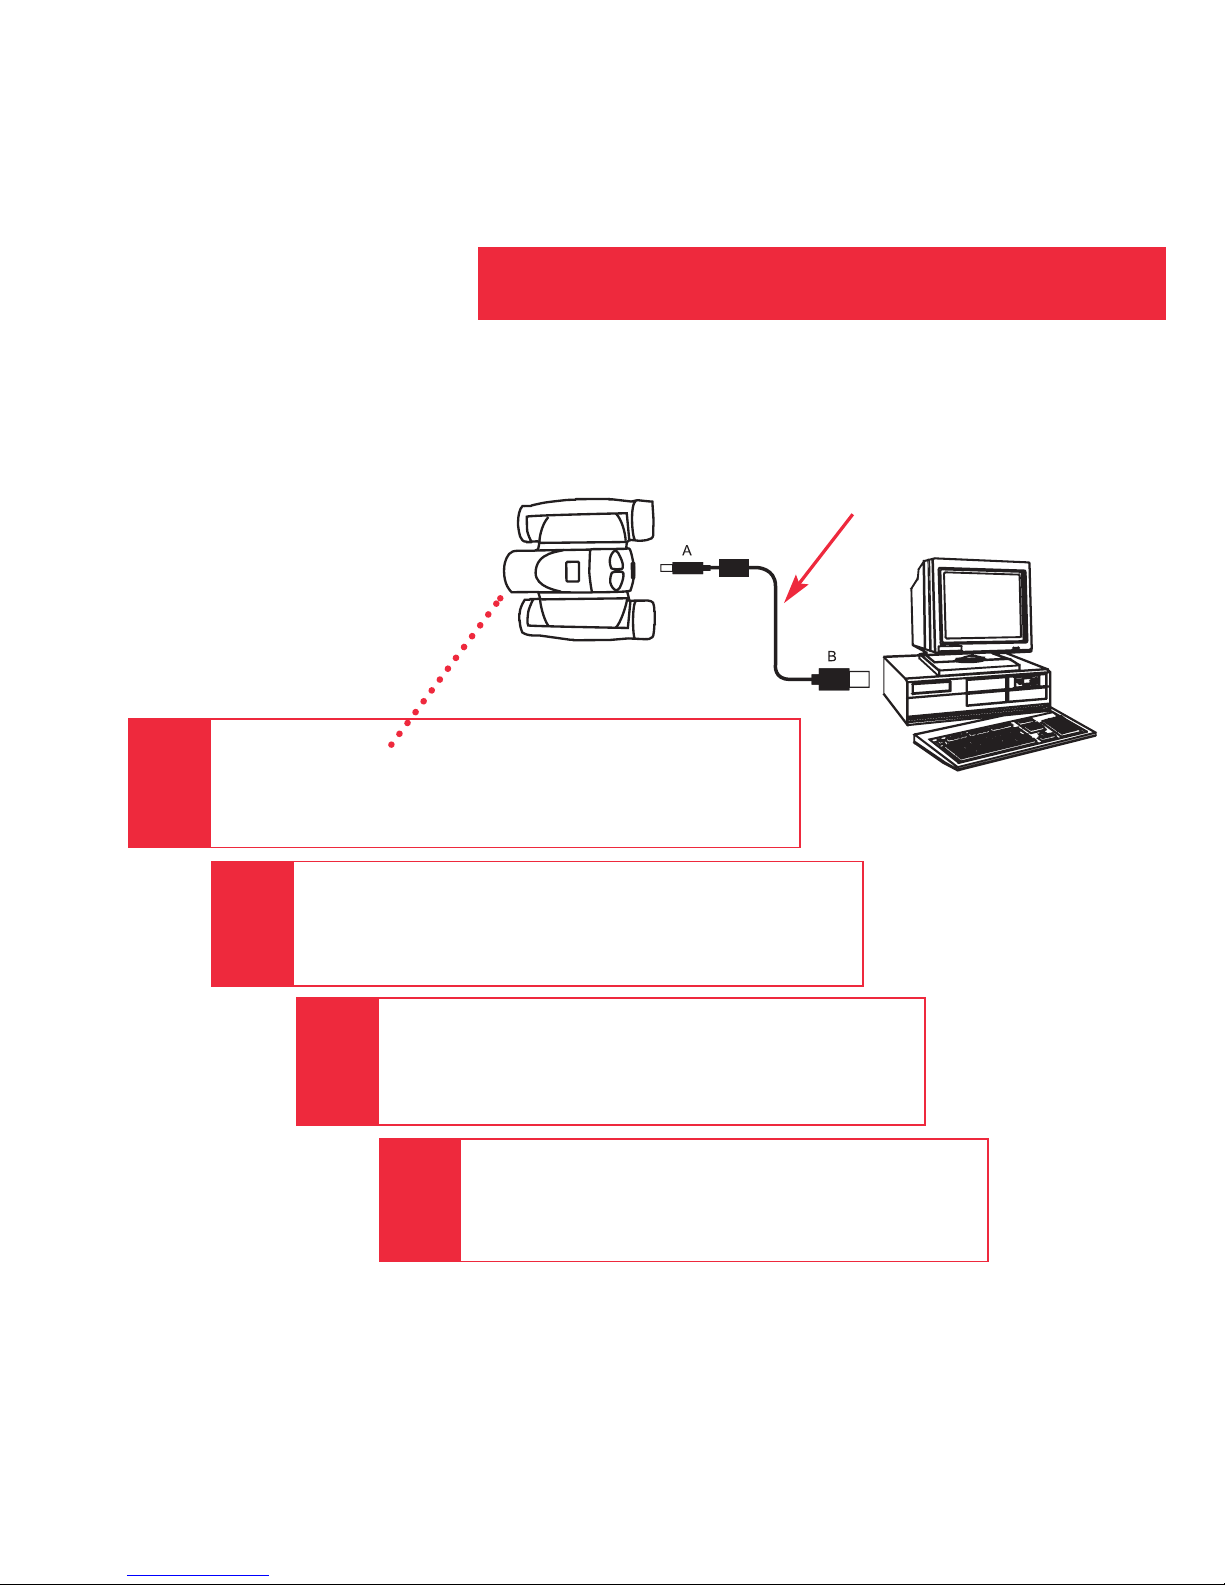
Download Pictures ............................................................................................................... 19
Install Image Editing Software .............................................................................................. 21
Table of Contents

3
Table of Contents
Other Software and System Requirements ........................................................................ 22
Maintenance and Troubleshooting ...................................................................................... 23
Specifications ........................................................................................................................ 24
Launching the Explorer Manager ......................................................................................... 25
Using the Explorer Manager ................................................................................................. 26
Downloading pictures and movies ........................................................................................ 26
Album mode ......................................................................................................................... 27
Viewing pictures and Viewing movies .................................................................................. 28
Album Manager .................................................................................................................... 29
Creating AVI files .................................................................................................................. 30
Sending mail ......................................................................................................................... 31
Aiptek Service ........................................................................................................................ 32

4
2
1
3
4
How to start taking pictures...
Install 2 AAA batteries
(not included).
Turn on camera.
Press and hold down
Mode for 3 seconds.
Point at something
interesting.
Press the Shutter.
You’ve taken a picture!
Quick Start

5
6
5
7
8
How to download your pictures...
USB cable
Plug in.
Connect Explorer to your PC using the included
USB cable.
Sit back and relax a minute.
Explorer automatically installs on your
PC. No drivers or other software is needed.
Install Ulead Photo Express.
Insert the CD, click on Ulead Photo Express
and follow the on-screen instructions.
Enjoy your photos.
Open Ulead Photo Express to view, edit
and print your pictures.
Quick Start

6
Fig. 1: Top View
1. Eyepieces
2. Mode Button
3. Shutter Button
4. LCD Panel
5. Objective Lens
6. Barrel
Fig. 2: Front View
7. Camera Lens
Features

7
11
Fig. 3: Bottom View
8. Diopter Scale
(on right eyepiece)
9. Focus knob
10. Battery
Compartment Lid
(push forward and
lift to remove)
Fig. 4: Rear View
11. USB Port
Features

8
WARNING! Never use an Aiptek Explorer to look at the Sun! Looking at or
near the Sun will cause instant and irreversible damage to your eye. Eye damage
is often painless, so there is no warning to the observer that damage has
occurred until it is too late. Do not point the binocular at or near the Sun. Children
should always have adult supervision while observing.
Congratulations on purchasing the Aiptek® Explorer® 300. Explorer 300 is an 8 x
22mm full-featured binocular. It is integrated with a digital camera that requires no
film to capture pictures or video. This manual is designed to quickly guide you
through the operation details of your Explorer 300. For best results, take a few
moments to become familiar with the operation of your device, and save the manual
for future reference.
Explorer has the following features:
• Fully functional binocular.
• Capture pictures and video, and view them on your PC.
• Transfer pictures and video to your PC for easy printing and editing.
• E-mail pictures to your friends and family.
• LCD display panel indicates status for ease in performing desired operations.
Important Note: Images in the camera will be lost if the batteries are depleted or if the
batteries are removed for more than 60 seconds. Accordingly, change the batteries
when they run low. Images will be maintained in memory for approximately 60 seconds
when changing batteries.
To conserve battery life, remove batteries after downloading images to a
computer. There is continual battery drainage even when Explorer is turned off.
Be sure Explorer is off before changing batteries.
Introduction

9
If you want to... Do this...
Adjust Eye Relief If you wear eyeglasses, fold down the
rubber eyecups and hold the
eyepieces up against your glasses.
Adjust the Barrels
You need to adjust the barrels, as the
distance between your eyes is usually
different than the distance between
another person’s eyes.
1. Hold Explorer up to your eyes in the
normal viewing position. Use both
hands to hold each barrel firmly.
2. Pull the barrels apart or push the
barrels together until you see a single
circular field with both of your eyes.
How to Use Your Binocular
Fold down
Barrel
Barrel

10
If you want to... Do this...
Focus the Binocular 1. Set the Diopter Scale on underside of
Explorer at its center point between “+”
and “-.”
2. Choose an object (such as a telephone
pole) that is at least 50 feet (15m.)
away.
3. Looking with only your left eye, rotate
the Focus Knob until the object you are
viewing is focused.
4. Looking with only your right eye, rotate
the Diopter Scale until the object you
are viewing is focused.
5. Now, looking with both eyes, rotate the
Focus Knob to focus on both far and
near objects.
Diopter scale
Focus knob
How to Use Your Binocular

11
Explorer performs best under good lighting conditions. Take some time to practice capturing
still pictures and video. Depending on the available light and your distance from the object,
captured images may not appear as bright or centered as viewed through the binoculars.
Explorer has a fixed focus (you cannot focus the camera manually) and takes focused
pictures even if the image in the binoculars is out-of-focus.
If you want to... Do this...
Insert Batteries
1. Make sure camera is off before
changing batteries.
2. Push the battery compartment lid
forward and lift to open.
3. Insert 2 AAA 1.5v (user-supplied)
batteries into the compartment, noting
the correct polarity as illustrated inside
the compartment.
Select an Operation • Press and hold the Mode button for 3
to 5 seconds to turn on the camera.
• Press the Mode button to display and
cycle through the operation icons on
the LCD.
• Press the Shutter button when the
desired icon is displayed to select an
operation.
Battery
compartment
Mode Shutter
How to Use Your Camera

12
If you want to... Do this...
Take a Still Picture
The amount of pictures you can take:
High Resolution (640 x 480): 360
Low Resolution (320 x 240): 1600
The number of photos you may take
will decrease if you have also taken
video.
1. Press and hold down the Mode button
for 3 to 5 seconds to turn on the
camera. The camera will beep and
the camera icon displays on the LCD.
The counter, battery life and resolution
icons also display.
2. Point the binoculars at an object. You
may use the focus knob to focus the
image in the binocular, but keep in
mind that the camera has a fixed focus
and is not affected by the focus knob.
3. Hold Explorer steady and press the
Shutter button. Note that the counter
advances. For example, if the counter
reads “016,” this means that this is
your sixteenth picture.
Mode Shutter
Taking Pictures and Video

13
If you want to... Do this...
Take Video
The maximum length of a video:
Up to 200 seconds.
The length of video will decrease if
you have also taken still pictures.
1. Press and hold down the Mode button
for 3 to 5 seconds to turn on the
camera.
2. Press the Mode button once and the
Video mode icon displays.
3. Point the binoculars at the scene you
wish to capture.
4. Press the Shutter button. The camera
now captures a movie.
5 The counter keeps counting (in
seconds) as you capture the movie.
Press the Shutter button again to
stop recording the movie. Note that
the counter stops and the number of
pictures advances by one (a movie
counts as one object).
Mode Shutter
Taking Pictures and Video

14
If you want to... Do this...
Use the Mode and Shutter Buttons • Press and hold the Mode button for
3 to 5 seconds to turn the camera on
or off.
• Use the Mode button to cycle through
the operation icons. As you press
the Mode button, the operation icons
display on-screen in the following
order:
Camera
Video
Resolution
Self-timer
Erase Last Image
Erase All Images
The next press returns you to the
Camera icon.
• Press the Shutter button when the
desired icon is displayed to select an
operation.
• Use the Shutter button to take a
picture, and to begin or end the
recording of a movie.
* * *
Mode Shutter
Operation Icons:
Camera Video Hi Res. Lo Res.
Self-Timer Erase Last Erase All
Operations

15
If you want to... Do this...
Use the Camera Mode
• Keep pressing the Mode button until
the Camera icon displays. Then press
the Shutter button to take a still picture.
Change the Camera Resolution
H: High Resolution mode (640 x 480).
L: Low Resolution mode (320 x 240).
(The default setting is High Resolution.)
• Select a Resolution setting before
taking a still image:
1. The first time you turn on the camera, it
displays the High Resolution icon. This
is the default setting.
2. To change the resolution, keep
pressing the Mode button until the
Low Resolution icon displays. Then
press the Shutter button to select Low
Resolution. Low resolution allows
you to capture more images with your
camera.
* * *
Camera Icon
High Resolution
Icon
Low Resolution
Icon
Operations

16
If you want to... Do this...
Use the Video Mode
Note: The length of a video depends on
how much memory you have available.
Audio recording is not available with
this camera.
• Keep pressing the Mode button until
the Video icon displays. Then press
the Shutter button to begin recording a
movie. Press the Shutter button again
to stop recording.
Erase (delete) Pictures or Video
• Erase Last. Keep pressing the Mode
button until the Erase Last Image icon
displays and then press the Shutter
button. The icon flashes. Press the
Shutter button again to erase the last
captured image or movie.
• Erase All. Keep pressing the Mode
button until the Erase All Image icon
displays and then press the Shutter
button. The icon flashes. Press the
Shutter button again to erase all the
images and video.
Video Icon
Erase Last Icon
Erase All Icon
Operations

17
If you want to... Do this...
Find Out How Many Pictures You
Have Taken
888
Note: If you take more than 999 pictures,
the camera counter returns to 001. The
camera icon flashes, indicating that
the number of pictures is 999 plus the
number displayed on the counter.
• Check out the LCD Counter. The
counter displays the number of
pictures or videos taken, from 0 to 999.
Use the Self-timer
• Keep pressing the Mode button until
the Self-timer icon displays and press
the Shutter button.
The camera then pauses for about 10
seconds: It sends out 6 slow and then
6 fast warning beeps before taking the
picture.
Counter Display
Self-Timer Icon
Operations

18
If you want to... Do this...
Find Out How Much Power is Left
in the Batteries
• Check the battery indicators on the
display.
Find Out Why Explorer is Beeping
Note: When the battery is low, Explorer
sends out six short high beeps. It is
recommended you download the pictures
or change the batteries at this time. If you
change the battery, remember that you
have 60 seconds to change the batteries
before your images are deleted.
Listen for the following patterns:
Power on: Two short high beeps.
Wake up: One long high beep.
Sleep: One short high beep.
Take a picture: One short high beep.
Failed to take picture due to
insufficient memory:
Three short high beeps
Low battery: Six short high beeps
(beeps only when power is On).
Self-timer: Sends out 6 slow, then 6 fast
beeps before taking a picture.
Full Power
Indicator
Low Power
Indicator
Operations

19
If you want to... Do this...
Download Pictures
No driver is necessary for downloading
your pictures or video. Just attach one
end of the USB cable to the camera’s
USB port and the other end to your PC’s
USB port.
Your PC considers the camera as a
mass storage device and displays it like
a hard drive. You can then copy your
still pictures or video to your computer
or even copy files to the memory on the
camera.
USB Port
Operations

20
If you want to... Do this...
Download Pictures (continued)
Note: See “Troubleshooting,” page 23,
for more information about connecting
Explorer to your PC.
1. Using the provided USB cable, plug the
one end of the cable into the camera’s
USB port and the other end into your
PC’s USB port.
2. Explorer automatically installs drivers
on your PC (there is no need for
external drivers).
3. After setup is complete, using Windows
Explorer, you can browse the camera’s
memory as if it were a hard drive.
4. If Explorer does not appear in
Windows Explorer, it might be using
a drive letter that has already been
assigned by your PC (e.g., C:, D:, E:,
etc.). Use Windows’ Disk Manager
program to change the drive letter to
an unassigned letter (e.g., K:).
5. You may now copy images or files from
the camera’s memory to your PC just
as you would with any external hard
drive or flash memory.
Operations
Table of contents
Languages:
Popular Binoculars manuals by other brands

Harbor Freight Tools
Harbor Freight Tools 41491 operating instructions

Hikmicro
Hikmicro HABROK Series user manual

Opticron
Opticron 8x42 User instructions

ORION TELESCOPES & BINOCULARS
ORION TELESCOPES & BINOCULARS Venture 9376 Instruction

Conrad Electronic
Conrad Electronic 671439 operating instructions

Newcon Optik
Newcon Optik SIB 16X40 WP Operation manual