▋SafetyPrecautions
Donotassembleorflythisgliderwithoutseekingexpertassistance.Be
guidedbyyourdealer,shopowner,orR/Cflightschoolinstructorwho
isexperiencedwithmodelflying.Thepersonhelpingyouisrequested
toobservenotonlytheinstructionsandprecautionsinthismanual,
butalsotheguidelinesforsafeflight.Inordertopreventfireorinjury
alwaysobservetheprecautions,warningsanddangersrefereedtoin
thismanual.
▋BeGuidedByYourDealer,HobbyShoporanAdvancedPilot-
thisgliderisnotatoy.
IfyouareabeginnerwithR/Cgliders,donottrytoassembleorflythis
modelbyyourself.Ifyoucannotcompletetheassemblybyyourself,
takeguidancefromyourdealeroranadvancedpilot.Seekappropriate
guidancefromyourdealeroranadvancedpilotsothatyoucanhave
successandenjoymentfromyourflying.Whenyoufirstflythemodel,
besuretoaskforassistance.Paycloseattentiontothecareanduseof
peripheralequipmentincludingthebattery,charger,etc.
▋BuyaRadioControlInsurancePolicy
Pleasebesure topurchasea"radiocontrolinsurance policy".For
details,pleaseinquirewith ourdistributor,dealer,oraninsurance
agent.Becarefulwhenhandlingpartssuchasthebatteryorcharger.
Improperhandlingmayresultinelectricshock,burn,explosion,or
fire.Please follow theguidance fromrelatedinstructionmanuals
whi le using this product. When not f ly ing, please u nplug the
batteryconnectors.Whilestoringormovingthebattery,pleaseuse
specialbatterycases.Donotstorebatteriesinahightemperature
environmentsuchasacartrunk.
▋PrecautionsforHandling
•Accessoriessuchasthebatteryandelectricalpartsshouldbehandled
withcare.Iftheinsulationistornoraconnectorisshorted,youcould
beburntorinjured.Readtheinstructionsforallaccessoriesbefore
handling.
•Unnecessarydisassemblyormodificationofanycomponentisstrictly
prohibited.
•Neglectofthiscouldresultinafaultand/oraccident.
▋PrecautionsforSafeFlight
•Tosuccessfullyflythisglider,itisfirstnecessarytolearnbasicskills
forflight.
•Receiveguidance from our dealer oran experienced pilot, and
operateundertheirinstruction.
•Ifyounoticeanabnormalitybeforeflight,besuretoeliminatethe
causebeforeflying.
•IftwoormoreFMorPCMradiodevicesareusedsimultaneously
onthesamefrequency,youcannotoperatethegliderbecauseof
interference.
Ifsomeoneelseisusingthesamefrequency,operationmaystop.
Ifthere isinterference despiteno oneusing the samefrequency,
anothersourceofinterferenceexists.Neverflyuntilthisinterference
hasbeencleared.
•Whenlaunching thisgliderusingthe'discus launch method',be
carefulofyoursurroundings.Donotlaunchtheglidertowardpeople
(especiallychildren),property,etc.
•Thisgliderrequirestheuseofatransmitterwhichallowsappropriate
gliderfunctionssuchasflaperonmixing,cambertrim,flightmodes,
etc.SuitabletransmittersincludetheJRXG6,XG8orXG11.
▋FlyingSiteandRange
1)Thecontrollable range ofthe glider willvarydependingonthe
receiveryouareusing.Fullrangereceiverswillallowcontrolofthe
glideratagreatdistance.However,thetruerangeislimitedtowhere
youcanconfirmthebehaviorsofthegliderwithyourowneyes.
2)Neveroperatethegliderinaplacewhereyoumaylosesightofit,or
theradiosignalfromyourtransmitterfailstoreachit-acrashis
verylikely.
3)Trytounderstandyoursurroundingsatalltimesandneverflyin
badweathersuchasstrongwindorrain,atnight,orinlowvisibility.
4)Neverflyinaplacewheretherearepeople,cars,schools,hospitals,
otherbuildingsorobstacles,orbyariverorontheseashore;always
flyatanexclusiveairfieldforradiocontrolledmodels.
5)Donotflynearroads,tracks,electriclines,high-tensionlinesor
otherobjectsdetermineddangerous.
6)Observetheserulesforsafeflightwithyourglider.
▋PrecautionsfortheOperator
1)Thefollowingpersonsorthoseinthefollowingstatesshouldnever
operatethisglider:
Infants,children,orotherpersons whohave noknowledgeor
experienceofr/cgliders
Pregnantwoman;
Whenyouaretired,ill,undertheinfluenceofmedicineoralcohol
andcannotmakeproperjudgmentsinsafeoperation;
Whenyouareabeginnerorborrowsomeone'sradiocontrolglider
andhave nottakensufficientsafetyguidanceontheoperating
methods;
Thosewhoarebelievedtobeincapableofflyingaradiocontrol
glider.
2)Weareasy-to-moveclothes.
Wearclotheswhoseedgesorhemscannotcomeintocontactwith
thewingsoftheglider,theantennaorcontrolsonthetransmitter.
Itisverydangerousifaccessoriessuchasrings,bracelets,etc.are
caughtbythegliderorthetransmitter.Removethemandbundle
longhairsothatitwillnotbecaught.
In order toprotectyourfeet, wearsolid, easy-to-move shoes,
avoidingsandalsorhigh-heelshoes.
Wearacap,gloves,sunglassesorgogglesasrequired.
3)Donotflythegliderinanunnaturalposture.
Avoidstandinginanunstableorslipperyposition.
Donotflywhilelookingbackward,sittingorlying.
Donotbringtheglidertooclosetotheoperatororsurrounding
people(iftherearebystanders,makesurethattheyarebehindthe
operator).
4)Takebreaksbetweenflights.
An excessively long f lig ht ma kes t he oper ator lose his/her
concentrationduetofatigue,leadingtoaccidents.
Takeadequatebreaksbetweenflights.
▋PrecautionsforFlight
1)Makesurethewingsareproperlysecuredtothefuselage.
2)Checkallscrewstoconfirmtheyareproperlytightened.Tightenany
loosescrews.
3)Keeptheairfieldasneatandtidyaspossibleandplacethegliderina
stableplace.
4)Makesurethatthebatteriesinthetransmitterandthereceiverare
fullycharged.
5)Alwaysturnonthetransmitterfirst.
6)Conduct a distance (range) test of the transmitter. Follow the
directionsofyourtransmittermanufacturer.Movethecontrolsand
confirmmovementoftheGliderservos.Iftheydonotmoveproperly,
checkthecauseandhaveitrepairedasnecessary.
7)Extendthetransmitter'santennatoitsfulllength.Putthereceiver
antennathroughanantennatubeandmakesurethatitcaneasily
receivetheradiosignal,ensuringitcannotbecaughtbymoving
parts.Donotbendorbundletheantenna.
8)Whenusinga2.4GHztransmitterset,pleaseadjusttheantennaas
directedinthemanualsuppliedwiththetransmitter.
▋PrecautionsduringFlight
1)Ifyounoteanabnormalitysuchasunusualnoise,etc.duringflight,
swiftlylandthegliderinasafeplaceandeliminatethecauseprior
toflyingagain.
2)Neverlookawayfromthegliderduringflight.Ifyoudosoevenfora
shortperiodoftime,itmaychangeitspostureoryoumaylosesight
ofit,andloosecontrol.Alwaysassumetheworst-casescenarioand
allcareshouldbetakentopreventacrash.
3)Neverallowthepowerofthetransmitterortheglidertorunlow(set
thetransmittertimer,etcasaprecautionarymeasure).
▋InspectionafterFlight
1)Aftereach flightinspectthefollowing:Checkwingsandcontrol
surfaces.
2)Wipeoffdirtandwaterdropsfromtheglider(ifdirtonthemovable
partsisleftuncleanedforalongtime,theymaymovelesssmoothly,
havingabadeffectonflightperformance).
3)Whenstoringthegliderforalongperiodoftime,cleanitbefore
storage.
Storeitinadry,safeplacebeyondthereachofinfantsorchildren.
Ifthereisdamageorotherissuesrepairorreplacecomponentsas
necessarybeforestorage.
4)Checkwhetherornotthereceiverandservosarefirmlysecured,and
freefromproblems.
5)Checkthereceiverantennawirefromtimetotimebecauseitscore
maybecomebroken.Thismaynotbeimmediatelyapparent,sohave
itcheckedperiodicallybythemanufacturer.
▋Assembly
Carefullycarryoutthefollowingassemblyprocedures.
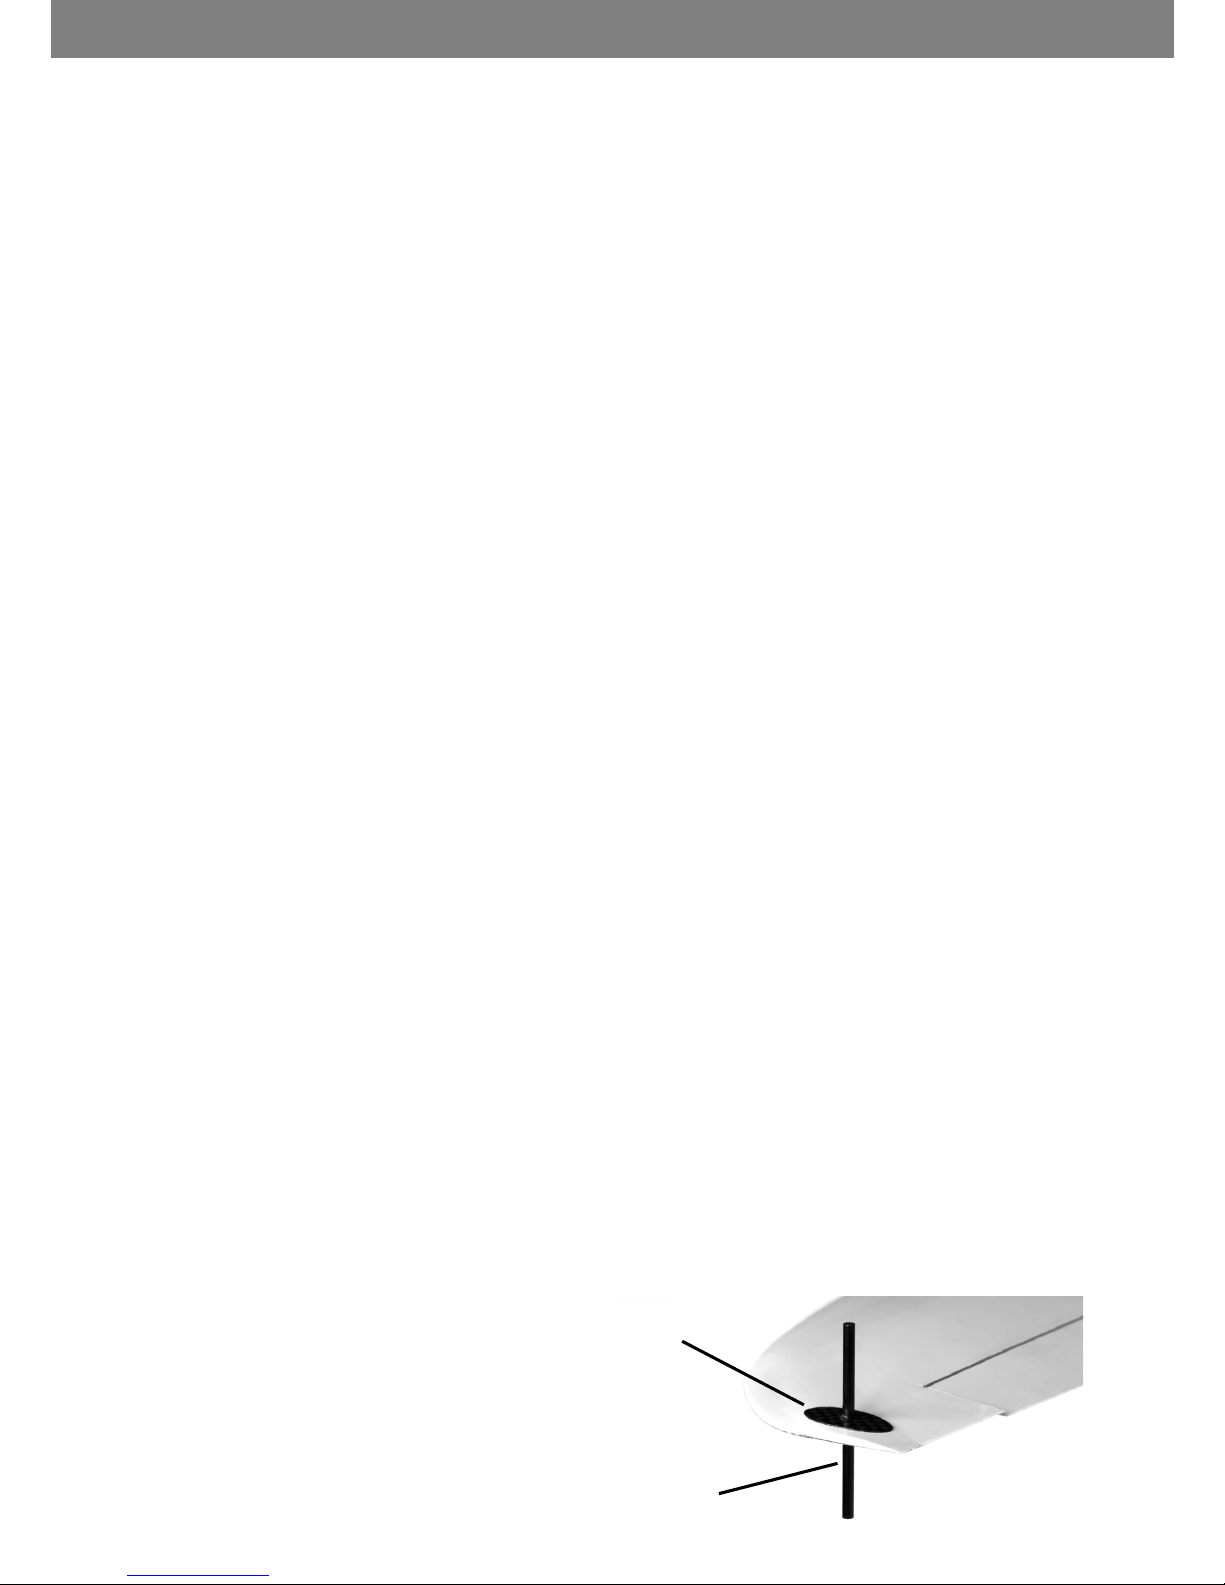
1)Drilla3mmholeatthetipofthemainwingwhere
marked.Positionthecarbonreinforcementplateand
carbonfiberpeg(shaft)asshownbelow.Attachthepeg
andplateusing30minuteepoxyglue.Besuretoplace
thepegdependingonyourhanddominance.Ifyouare
righthanded,placethepegontheleftwingtip.Ifyou
arelefthanded,placethepegontherightwingtip.
Caution:
※ ThemainwingstructureincludesfoamwhichCyanoacrylate
(CA)gluemaydeteriorate-werecommendnotusingCAglue.
※ Donotusetoomuchglueasitwillincreasetheglider
weight.
CarbonPeg
CarbonReinforcementPlate