Safety Precauons - Read &
Save
Warning! - To prevent re, electrical shock or
injury, please observe the following:
Electrical work must be performed by a qualied
person(s) in accordance with all naonal and local
codes/standards.
Q Series® Thermal Equalizer® fans
Models 10, 15, 25, 45, 60, &100: all voltages
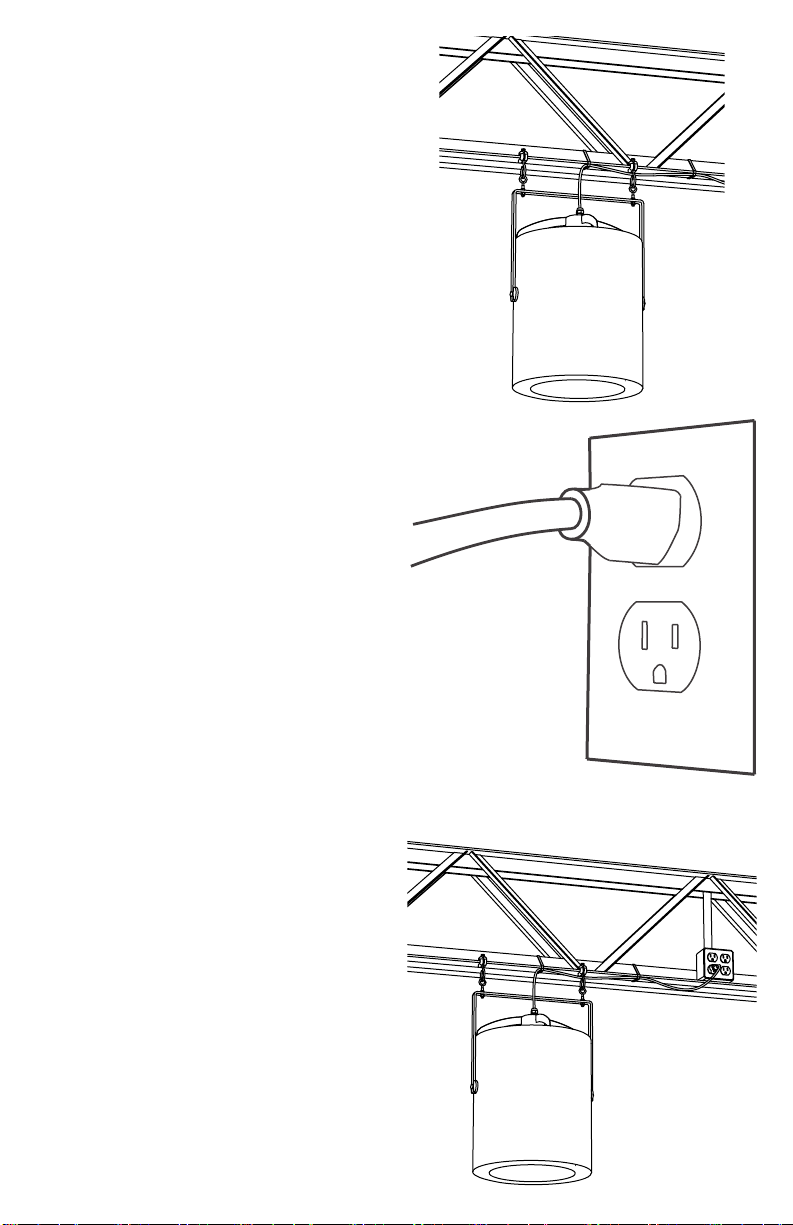
120V Models:
Supplied with a polarized/grounded plug molded
to a 6 . (1.8 m) cord. To reduce the risk of
electrical shock, this plug is intended to t in a
polarized/grounded outlet only one way. If the
plug does not t fully in the outlet, contact a
qualied electrician. Do not aempt to defeat
this safety feature.
230V & 277V Models:
Supplied with a 6 (1.8 m) cord with a 3-wire
pigtail for aachment to a single phase plug rated
for the correct voltage; NEMA type: L6-20P or
similar, wire color code: UL/CSA: black-live/
white-neutral/green-yellow-earth.
Warning! To prevent electrical shock and/or
injury, unplug/disconnect unit from power source
before you move unit, service unit or remove any
part of housing.
Warning! To reduce the risk of re or electrical
shock, do not use models 10, 15 and 25 equipped
with shaded pole motors or models 45, 60
and 100 with permanent split capacitor (PSC)
motors with any unapproved solid-state speed
control device. Models 45, 60, 100 and 125 with
electrically commutated motors (labeled as EC
or EL) are capable of variable speeds with the
proper controls. Contact Airius for addional
informaon regarding variable speed controls and
opons.
Do not carry the Q Series unit by the cord. Do
not use the cord as a handle. Do not use the cord
to aach or hang the product. Be sure to grasp
the plug, not the cord, when disconnecng this
unit from an electrical outlet.
Do not use this product if it has a damaged
cord, faulty plug or any broken housing or motor
component. If the supply cord, plug, motor
or housing is damaged, it must be serviced or
replaced by Airius, its service agents or similarly
qualied persons to avoid a hazard.
To prevent damage, which may result in re or
shock hazard, do not expose this product to rain
or direct moisture. Do not immerse product
into water or allow water to drip into the motor
housing. Do not install outdoors or in an area
open to the weather. Shut o power to a wet
motor at source before servicing.
Spinning blades may inict eye or other physical
injury. Always replace a damaged blade.
Disconnect unit from power source rst. Contact
Airius for replacement blades. Plasc blades are
rated 5VA, the highest re-resistant rang for
plascs, and they will not maintain a ame.
Cauon! Some Q Series products have an
unguarded impeller/fan blade. Do not use in
locaons readily accessible to people or animals.
Blades may inict injury when moving or
staonary.
To reduce the risk of injury to persons, install
product so that boom of moving fan blade or
the lowest moving part is at least 8.2 . (2.5 m)
above the oor or grade level.
The motor is thermally protected; overheang
will cause the motor to stop operang. The
motor may restart once normal operang
temperatures are achieved. If motor fails to
restart, disconnect motor from electric source
and contact Airius. Do not disable this safety
device or override this safety feature; doing so
will void the warranty.
Do not use any PVC product (electrical tape) with
the fans. If installing a fan in an environment with
cung oils in the air (producon machine shop)
contact the factory for assistance at 303-772-
2633.
Do not posion product near furnaces, replaces,
stoves or other high temperature heat sources.
Do not posion Q Series unit such that the
downward air column created by the Q Series will
be directly bisected by another source of air ow,
such as from another fan or from an open supply
register. Do not posion the unit close to other
objects that will interfere with fan operaon.
Do not allow fan blades to come into contact
with objects that can lock or inhibit the rotor
operaon.
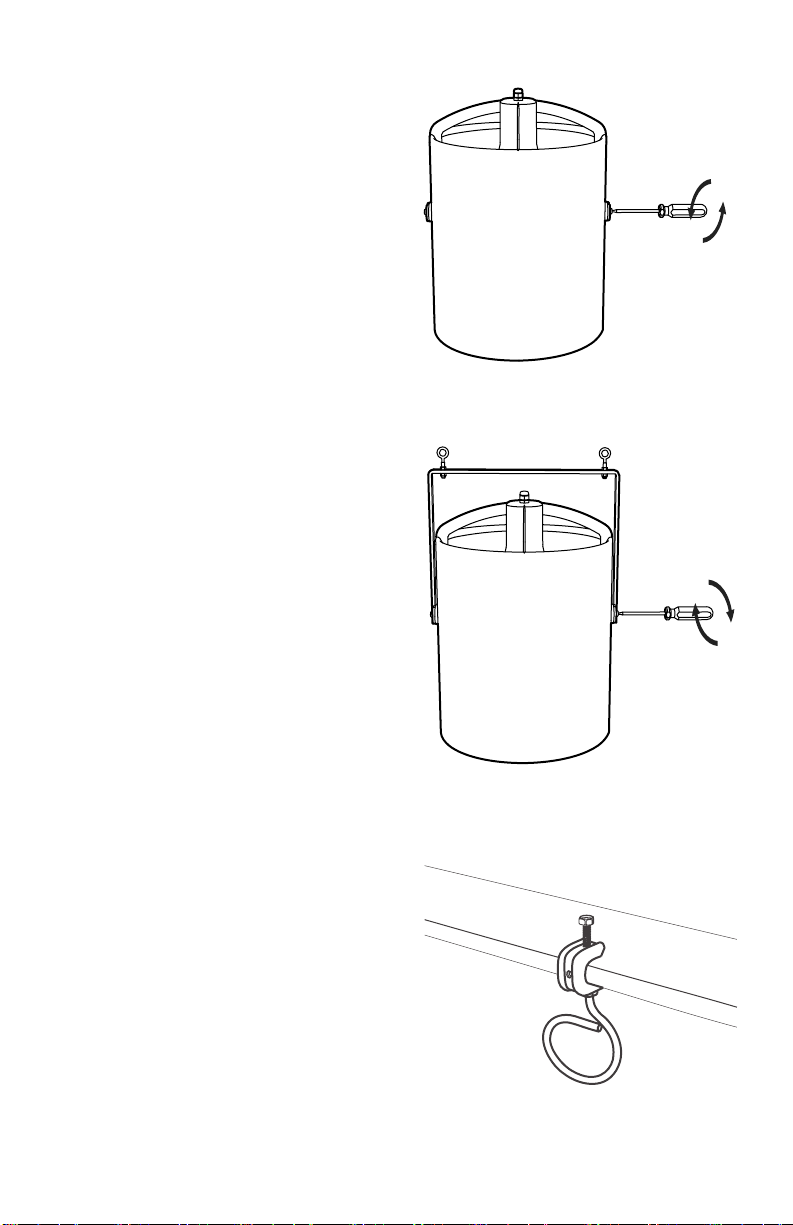
Service and installaon: No lubricaon is
required. Bearings are sealed. Bail adjustment
can be made with a T-30 Torx driver/wrench, or a
5/32” Hex wrench may be used. Other tools for
service: T-20 Torx (7/64” Hex) & T-25 Torx (1/8”
Hex) and a #2 Phillips screwdriver.