AirTEK Fitness AT-1000R User manual

1
HIIT aIR + mAGNETIC rOWER
AT-1000R
AirTEK Fitness
www.AirTEKFitness.com
PO Box 1509 Langley WA, 98260
(360) 321-7090 or (800) 398-9121

2
SAFETY FIRST....................................................................................................................................2
WARRANTY INFORMATION...............................................................................................................2
ASSEMBLY NOTE...............................................................................................................................2
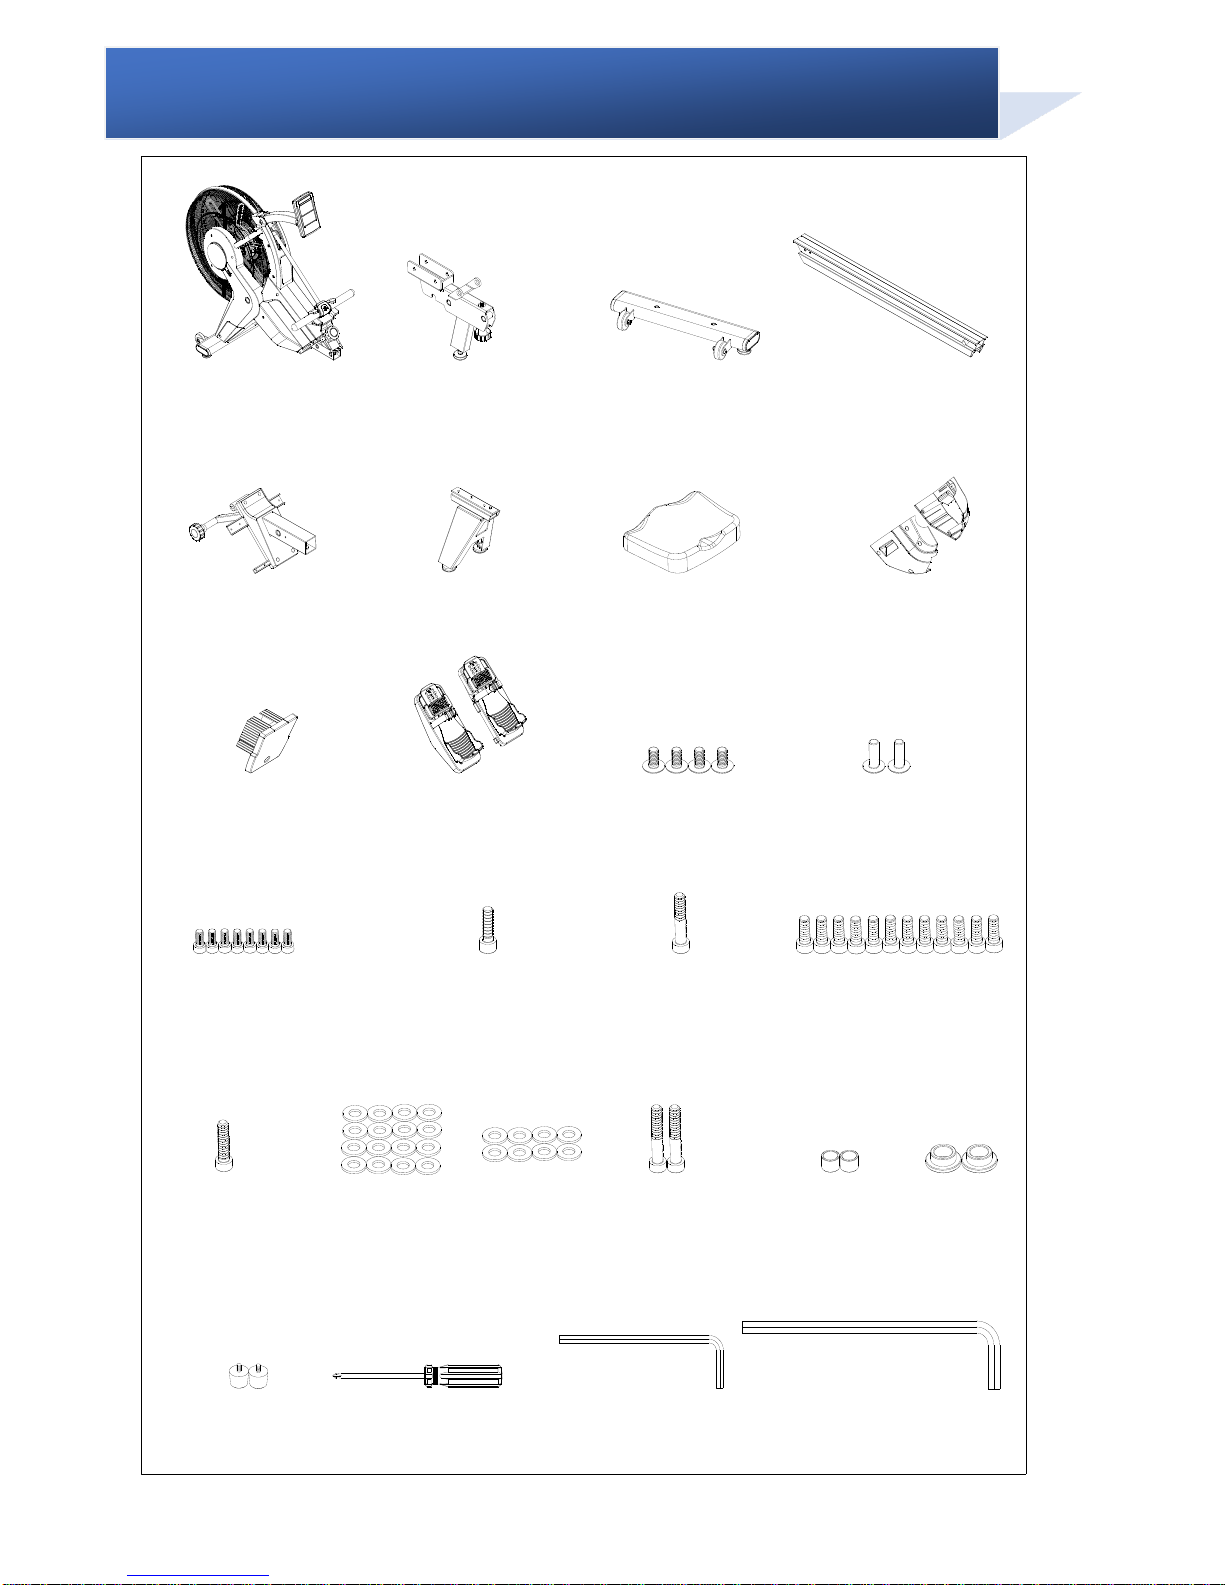
ASSEMBLY PARTS.............................................................................................................................2
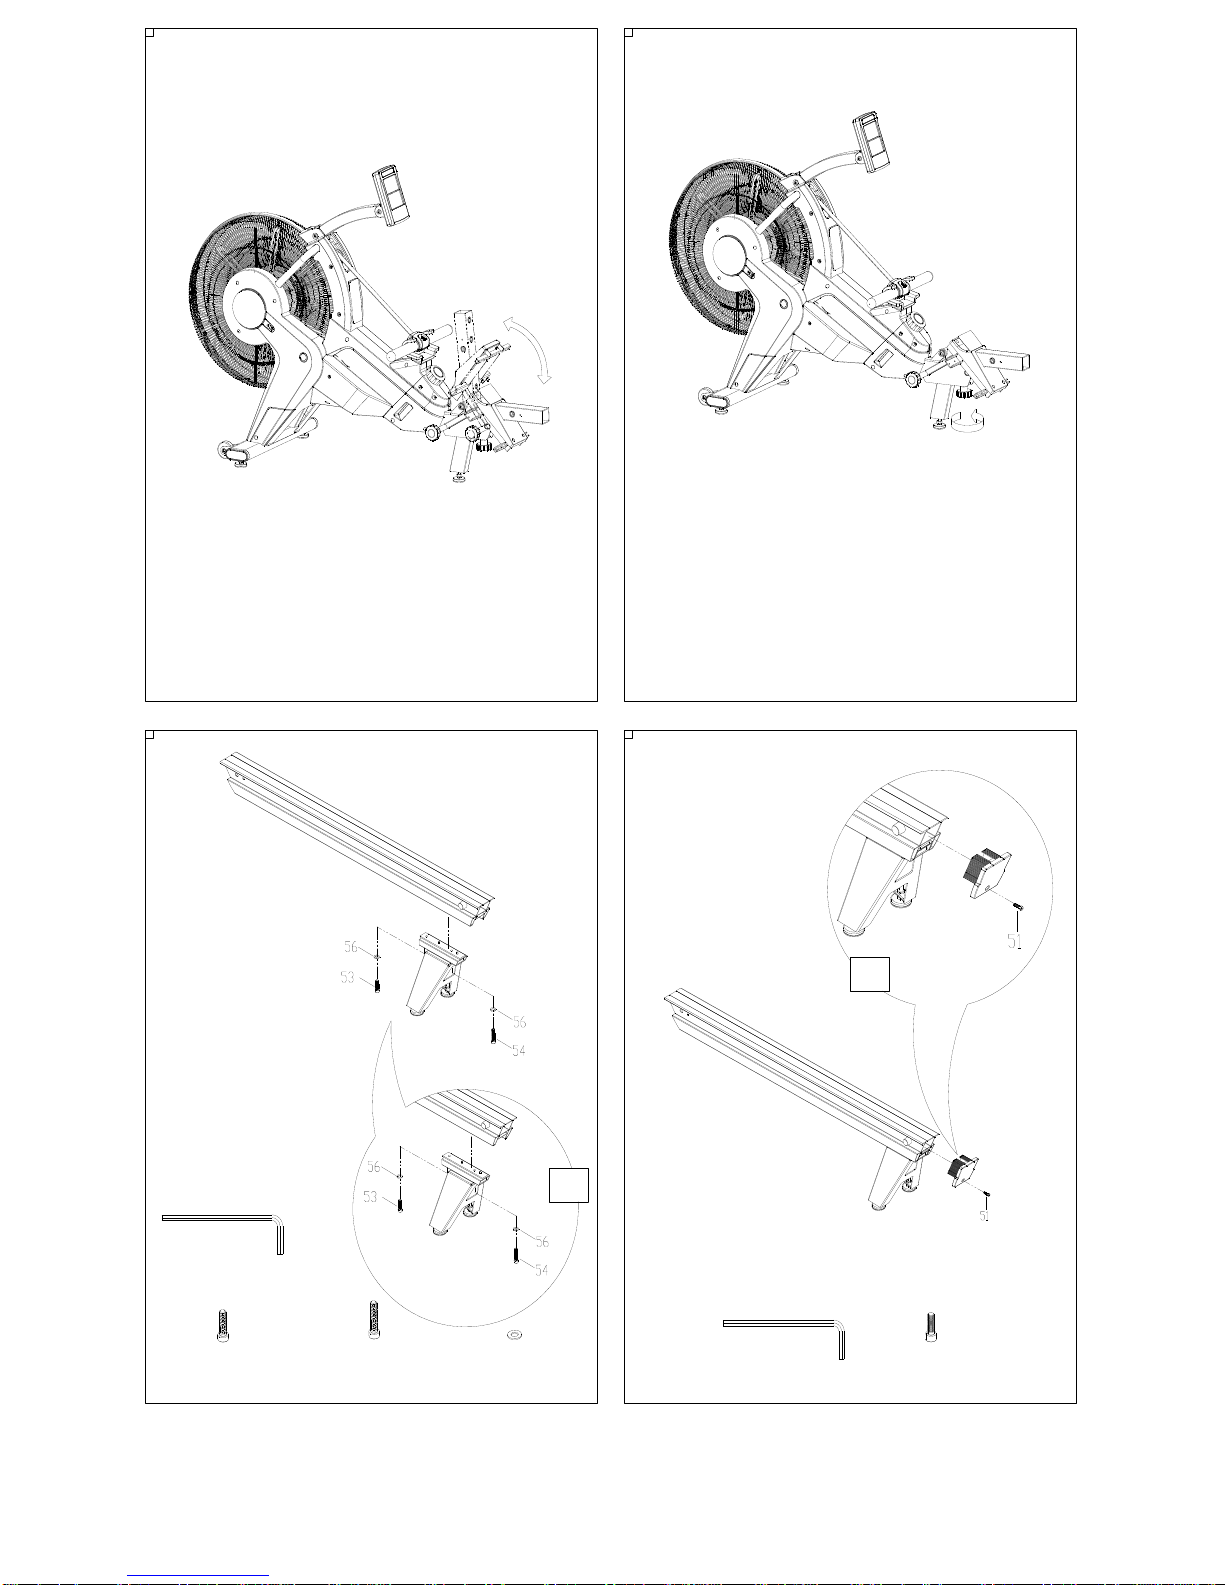
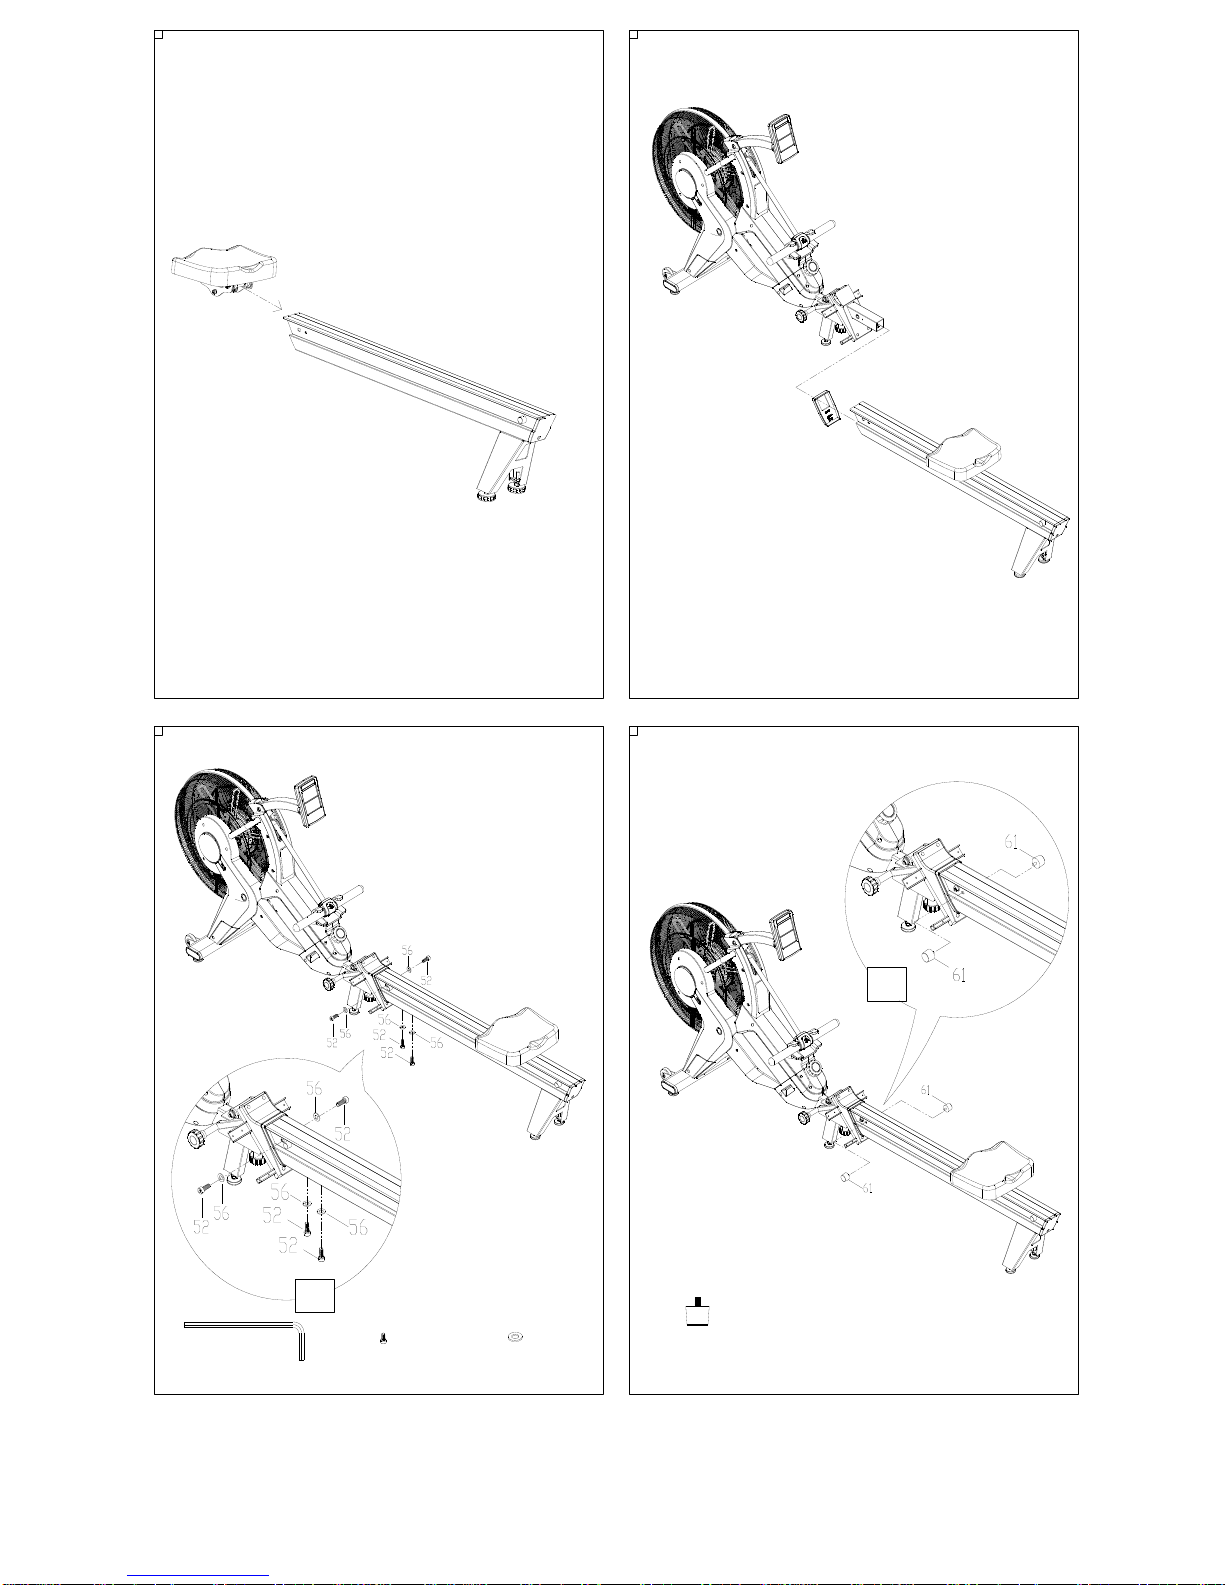
ASSEMBLY INSTRUCTIONS..............................................................................................................2
OVERVIEW OF YOUR ROWER..........................................................................................................2
FOLDING / STORAGE INSTRUCTIONS.............................................................................................2
GETTING STARTED............................................................................................................................2
DISPLAY FUNCTIONS........................................................................................................................2
QUICK START GUIDE.........................................................................................................................2
SELECT AN EXERCISE MODE ..........................................................................................................2
EXERCISE MODES: MANUAL, TRAINING, RACE.............................................................................2
SETTING RESISTANCE......................................................................................................................2
START / STOP / PAUSE / RESET.......................................................................................................2
TROUBLE SHOOTING........................................................................................................................2
EXPLODED DIAGRAM........................................................................................................................2
PARTS LIST.........................................................................................................................................2
TABLE OF CONTENTS

3
This exercise equipment was designed and built for optimum safety. However, certain precautions
apply whenever you operate a piece of exercise equipment. Be sure to read the entire manual before
assembly and operation of this machine. Also, please note the following safety precautions:
1. Read all instructions carefully before using the machine.
2. Consult your physician or other health care professional before beginning this or any type of exercise
program.
3. Always wear proper exercise apparel when using the machine.
4. If at any time you feel faint, light-headed or dizzy while operating the machine, stop exercise
immediately. You should also stop exercising if you are experiencing pain or pressure.
5. Keep children and pets away from the machine while in use.
6. Only one person can use the machine at a time.
7. Make sure your machine is correctly assembled before you use it. Be sure all screws, nuts, and bolts
are tightened prior to use and retighten periodically.
8. Do not operate this or any exercise equipment if it is damaged.
9. Keep hands and feet away from any moving parts. Do not insert any objects into any openings.
10.Keep clothes, jewelry, and loose items away from moving parts.
The maximum user weight for this machine is 350lbs. (158kgs.)
SAFETY FIRST

4
Dear Valued Customer,
Thank you for your recent purchase of the HIIT Rower from AirTEK Fitness. We believe that
you have purchased one of the highest quality and affordable air and magnetic rowers on the market
today. Prior to using you HIIT Rower please review the owner’s manual and product tips to maximize
your workout experience.
Record you Serial Number in your owner’s manual and register online www.AirTEKFitness.com/warranty
Serial Number: Purchase Date:
5 Years Frame Warranty, 2 Year Mechanical & Electrical Parts, Non-Transferable Limited Warranty.
Before begin to assembly your HIIT Rower:
1. Check all the parts included with shown in the manual. If parts are missing or damaged, do not
use it and please return to AirTEK Fitness.
2. Ready all your tools & parts. Only use original parts, safety cannot be ensured if any unapproved
components were used.
3. Make sure the space is free from anything that maycause injury and keep unsupervised children,
pets, disable persons & senior citizens during assembly.
4. If you have anyquestion or doubts duringassembling, please contact AirTEK Fitness at (360) 321-
7090 or (800) 398-9121.
WARRANTY INFORMATION
ASSEMBLY NOTE

5
M10X40L Screw X1
M10X50L Screw X1
M10X21X2.0T
Flat Washer X16
M6X20L Screw X1
M5X113L Tool X1 M8X180L Tool X1
Rubber Pad X2
Frame X1 Aluminum Rail X1
Rear Bracket For
Aluminum Rail X1
Rear Cover For
Aluminum Rail X1
Seat Assembly X1
RING X2SPACER RING X2
M5X12L Screw X4 M4X20L Screw X2
M6*10L Screw X8 M10X20L Screw X12
M6X16X1.5T
Flat Washer X8
Frame bracket set X1
Rall bracket set X1 Cover set for
main shrouds X1
Pedal set X1
Tool X1
Front stabilizer X1
M10X60L Screw X2
ASSEMBLY PARTS

6
1 2
3 4
2X
M8X180L NO.56
M10*21*2.0t(2PCS)
NO.62
M10X60L(2PCS)
6X
M8X180L NO.52
M10X20L(6PCS) NO.56
M10*21*2.0t(6PCS)
4X
NO.58
M5X12L(4PCS) NO.57
M4X20L(2PCS)
TOOL
2X
M8X180L NO.52
M10X20L(2PCS) NO.56
M10*21*2.0t(2PCS)
NO.59
RING(2PCS)
NO.60
SPACER RING(2PCS)
ASSEMBLY INSTRUCTIONS

7
56
78
NO.53
M10X40L(1PCS)
M8X180L
NO.56
M10*21*2.0t(2PCS)
NO.54
M10X50L(1PCS)
2X
NO.51
M6X20L(1PC)
M5X113L
1X
TURN&LOCK

8
910
11 12
NO.61
Rubber Pad(2PCS)
M8X180L NO.52
M10X20L(4PCS) NO.56
M10*21*2.0t(4PCS)
4X
2X

9
13 14
15
NO.50
M6*10L(4PCS) NO.55
M6*16*1.5t(4PCS)
M5X113L
4X
NO.50
M6*10L(4PCS) NO.55
M6*16*1.5t(4PCS)
M5X113L
4X
16
Assembly Complete!

10
ADJUSTABLE CONSOLE ARM
CONSOLE
FOOT PEDAL
HANDLEBAR
FAN
ALUMINIUM RAIL
SEAT
HEEL SUPPORTER
REAR BRACKET
FOLDING
THE ROWER
MOVING
WHEEL
FOLDING
BOLT
PEDAL BELT
HANDLE STRAP
TENSION
KNOB
OVERVIEW OF YOUR ROWER

11
Leveling the Rower
When you are ready to use the rower, first
lay the rail flat (H). Then, adjust the
leveler (C) in order to prevent the rower
from shaking during your exercise.
STEP 1
Press down and lower the adjustable
console arm (G), then loosen the knob (1)
STEP 2
Next move the seat to the front of the rail.
STEP 3
Pull the bolt (3), and lift up the rail to a 90
degree angle and lock the rail into the
upright position securely by inserting the
bolt back into the locked position.) Check to
see if rail is locked into position.
STEP 4
Before you use the machine, please pull out
the bolt (3), and lower the rail (H), and then
lock the knob (1).
Caution: Make sure the Rail and Locking
Knob are secured before use.
H
G
C
H
2
1
3
1
3
2
G
FOLDING / STORAGE INSTRUCTIONS

12
POSITIONING YOUR BODY
Place your feet on the foot pedals. Adjust the pedal
straps accordingly. Lean your upper body slightly
forward with back straight. Extend arms straight to grab
the handle. Position your body to a comfortable
position.
RECOVER
Extend your arms toward the flywheel. Slide your body
forward and then back to the starting position.
IMPORTANT!
1. Please make sure you are moving your upper
body before bending your knees. If you do
them at the same time, the handle might hit
your knees.
2. You may need to practice for a while to reach a
smooth and continuous cycle.
3. During exercise, you will feel your hamstrings,
gluteus, dorsal and biceps muscles being
used.
GETTING STARTED
STEP 1
Use your legs to push your body back until your legs are
straight. Keep your arms and hand position straight.
STEP 2
After your legs are in the straight position, then bend your
arms until they reach a slight backward lean. Keep holding
the handle.
STEP 3
Then use your dorsal and biceps muscles to pull the
handle to your chest.

13
Button Functions
1. START BUTTON –Press the Start button to begin your workout.
2. STOP BUTTON - Press the Stop button to pause your workout, Hold the Stop Button to Reset the screen.
3. MODE BUTTON- Press the Mode button to cycle through Manual, Training, & Race Modes.
4. ENTER BUTTON –Press enter to input data and cycle between time, distance & calories modes.
5. UP / DOWN BUTTON –Use the Up and Down buttons to increase and decrease values.
Use 2 AA batteries for console power supply.
TIME
TIME FOR 500M DISTANCE
WATT
HEART RATE
CALORIES
EXERCISE DATA DISPLAY
STROKE RATE
SPEED
STROKE
DISTANCE
DISPLAY FUNCTIONS

14
RACE MODE: COMPUTER
LEVEL
RACE MODE: YOU
TIME (MIN: SEC)
TIME / 500M (MIN:SEC)
WATT
HEART RATE (PULSE/MIN)
RACE MODE: INTENSITY
CALORIES (KCAL)
RESISTANCE LEVEL
EXERCISE DATA
SPM (STROKE/MIN)
RACE MODE: DISTANCE
AHEAD/BEHIND (M)
SPEED (KM/HR)
STROKE
DISTANCE
REMAINING STROKE
REMAINING TIME
REMAINING DISTANCE

15
STEP 1
Press any button or begin rowing to power on the display.
STEP 2
The display will default to Manual Mode.
After 4 Minutes of inactivity the display will automatically turn off.
OR
Press Mode to cycle
Exercise Modes
Use the Up / Down keys
to adjust values.
Then press Enter to
confirm the setting.
Hold START/STOP to clear
workout data
Press MODE. You may select preset modes for your exercise. Also, you may adjust the setting at
each mode. Three console built-in modes:
Manual Mode
Training Mode
Race Mode
QUICK START GUIDE
SELECT AN EXERCISE MODE

16
EXERCISE MODE
MODE & ICON
EXERCISE
ADJUSTABLE SETTING
(range;per ADJ;preset)
MANUAL MODE
After you start your exercise,
the console will start to detect
your data.
The Data display screen will
show STROKE-SPEED chart,
according to speed of your
stroke.
STROKE
(0~99999;±10;0)
TIME
(0:00~99:59;±1:00;0:00)
DISTANCE
(100~99900;±100;500M)
The active setting will flicker.
Press UP or DOWN to adjust
your setting. Then, press
ENTER to confirm. Press
START to begin your workout.
TRAINING MODE
You may follow the display screen
to monitor your stroke. The
purpose of this mode is to train
your rowing cadence.
The upper display screen will
show the computer rowing guide.
The lower screen will show your
exercise. You can check to see if
your exercise is meeting training
target or not.
SPM
(20~80;±1;30 SPM)
STROKE
(0~99999;±10;0)
TIME
(0:00~99:59;±1:00;0:00)
The active setting will flicker.
Press UP or DOWN to adjust
your setting. Then, press
ENTER to confirm. Press
START to begin your workout.
RACE MODE
The upper display screen will
note the "machine's" distance,
and the lower display will be
your actual distance. The right
side of screen notes the end of
the race. The winner is the first
to reach the end point. Good
Luck!
After Competition, WATT display
screen will
show your
ahead / behind
distance.
DISTANCE
(100~99900;±100;500M)
COMPETITION
(L1~L5;±1;L3)
[L1 is low speed; L5 is the high
speed.]
The active setting will flicker.
Press UP or DOWN to adjust
your setting. Then, press
ENTER to confirm. Press
START to begin your workout.
EXERCISE MODES: MANUAL, TRAINING, RACE

17
Before you start your program, you may press ▲UP / ▼DOWN to adjust your level. Please make the
「LEVEL」adjustment the same as the machine's resistance knob. Then, press ENTER to confirm.
During exercise (at START STATE), you may press ▲UP / ▼DOWN to adjust the console's resistance
level.
(LEVEL: 1-12)
(LEVEL UP / DOWN)
After making the console and resistance knob adjustments, the console will be able to calculate
the data more accurately for: SPEED, WATT, CALORIES.
Start / Stop
After selecting mode and confirm target setting, please press
START/STOP. The console will count down 「3→2→1」andstart
your program (console will be at START STATE).You may control
the program as below:
Pause
During the program, press START/STOP to pause the program (console will be at PAUSE STATE).
Console will stop counting, and show 「PAUSE」. Press start to resume.
Reset
Hold the Start/ Stop button for 3 seconds to clear workout data.
SETTING RESISTANCE
START / STOP / PAUSE / RESET

18
ISSUE
CAUSE
INSPECTION & ELIMINATING
No Power
(won't turn on)
Battery Power
Weak Battery
Replace two new batteries AA-size, and make sure positive (+) & negative (-)
pole at the right position.
Display Off
Battery Power
Weak Battery
Replace two new batteries AA-size (UM-3), and make sure positive (+) &
negative (-) pole at the right position.
Data does not
change (during
the exercise)
Console is
showing
「PAUSE 」
or 「STOP」
When thescreen is showing 「PAUSE」or 「STOP」,the console is at pause
or stop state.
You may press the START button to start, and TIME display screen will continue
counting. Console will continue to work.
Speed sensor
NOT connect
completely
When the screen is showing「TIME」, console is at start state. And, SPEED &
SPM display data will show “0.” This means the console does not detect any
exercise. Please check and connect the console wires are shown below;
Sudden loss of
display
Console is
inactive for a
long period
of time.
SLEEP
MODE
Console is in the power-saving function. It will go into the SLEEP MODE
automatically if there are 4 minutes of inactivity.
You may press any button or pull the handlebar more than 12 inches to wake up
the console.
TROUBLE SHOOTING

19
EXPLODED DIAGRAM

20
PART NO.
Name
Q’ty
PART NO.
Name
Q’ty
1
FRAME
1
61
RUBBER PAD
4
2
LEFT BELT AXLE BRACKET
1
62
SCREW M10*50L
2
3
RIGHT BELT AXLE BRACKET
1
63
ADJUSTABLE FOOT
5
4
SCROLL SPRING SET
2
64
NUT M10*1.5*8t
5
5
SPEED SENSOR BRACKET
1
65
KNOB
1
6
SENSOR - DOWN
1
66
NUT M10*1.5*6t
1
7
SENSOR - MIDDLE
1
67
HANDLEBAR COVER - UPPER
1
8
ROPE WHEEL SET
1
68
HANDLEBAR COVER - DOWN
1
9
BELT WHEEL SET
1
69
HANDLEBAR ANTI-COLLISION COVER
1
10
ROUND MAGNET
4
70
ALUMINIUM PIPE
1
11
HANDLEBAR SPACER RING
2
71
HANDLEBAR COVER
2
12
C25 CLIP
1
72
SCREW M3*10L
4
13
NUT M5
4
73
SPECIAL ROPE
1
14
NYLOCK NUT M6
3
74
REAR STABILIZER
1
15
SCREW M6*12L
10
75
RAIL REAR COVER
1
16
SCREW M8*20L
6
76
RAIL PLATE
1
17
SPRING WASHER M8
6
77
SCREW M8*16L
2
18
WASHER M8*16*2.0
28
78
CONSOLE ARM
1
19
BELT
1
79
SCREW M8*65L
2
20
MAGNET FIXED PLATE SET
1
80
NUT 13MM
4
21
MAGNET BRACKET
1
81
FRONT PIPE
1
22
SCREW M5*12L
6
82
MOVING WHEEL
2
23
GUIDE PLATE
1
83
SCREW M8*45L
2
24
SCREW M5*8L
4
84
OVAL PIPE
2
25
MAGNETIC DRAG EAIL
2
85
SEAT FIXED PLATE
2
26
SCREW M5*10L
4
86
SEAT
1
27
GUIDE WHEEL
2
87
SCREW M6*16L
4
28
BEARING TPI6202
4
88
UPPER PULLEY SET
2
29
GUIDE SHAFT
2
89
DOWN PULLEY SPACER RING
6
30
C15 CLIP
4
90
DOWN PULLEY
2
31
SCREW M8*75L
2
91
SCREW M8*122
2
32
NYLOCK NUT M8
8
92
SCREW M8*25L
2
33
CAP NUT M8
2
93
RAIL BRACKET SET
1
34
HANDLEBAR FIXED SEAT
1
94
BOLT
1
35
SCREW M8*15L
4
95
SPRING
1
36
SPRING WASHER M8
2
96
KNOB
1
37
TRIMMING FIXED SET
1
97
RAIL BRACKET MIDDLE COVER
1
38
TRIMMING KNOB
1
98
STICKER
1
39
ROPE GATE FRAME
1
99
LEFT PEDAL PIPE
1
40
FAN COVER
1
100
RIGHT PEDAL PIPE
1
41
FAN LEFT COVER
1
101
REAR PEDAL PIPE
2
PARTS LIST
Table of contents
Popular Home Gym manuals by other brands

GPI Sports & Fitness
GPI Sports & Fitness Bodyworx KRX980 owner's manual

Weider
Weider 114-2 owner's manual

AsVIVA
AsVIVA MG5 manual

HUDSON STEEL
HUDSON STEEL Manhattan Super Gym owner's manual

BH FITNESS
BH FITNESS G6260 Instructions for assembly and use

First Degree
First Degree NEPTUNE Challenge AR owner's manual