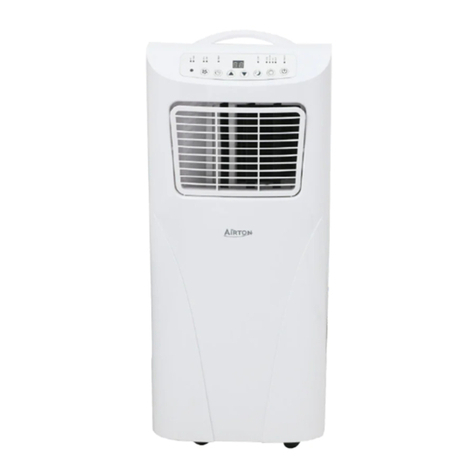
Airton YPS-12HW/3 Quick guide

Contents
Specific R290 gas warnings p.3
Important Safety Instructions p.4
1 . Overview of the air conditioner p.6
2. Installation requirements p.7
3. Control/display panel and remote control p.8
4. Instructions for use p.10
5. Drainage p.14
6. Maintenance p.15
7. Troubleshooting p.16
8. Appendices p.17
2

SPECIFIC WARNINGS R290 GAS
Read these warnings carefully.
• For the defrosting process and for cleaning, use only the tools
recommended by the manufacturer.
• The appliance must be installed in a location with no constant sources
of ignition (for example: open flames, gas or electrical appliances in
operation).
• Do not pierce or burn.
•This appliance contains approximately 265g of R290 refrigerant gas
•The device must be installed, used and stored in a room with
a surface > 13 m²
• R290 gas is a refrigerant gas that complies with European
environmental directives.
• Do not puncture any component of the refrigeration circuit.
•If the appliance is installed, operated or stored in an
unventilated room, this must be able to prevent the stagnation
of possible leaks of refrigerant gas which could be ignited by an
electric stove, a furnace or any other source of ignition and cause
a fire or explosion.
• Store the device in such a way as to prevent mechanical failure.
• Persons who work or intervene on a refrigeration circuit must
have appropriate certification, issued by an accredited body,
attesting to their competence in the handling of refrigerant
gases in accordance with an officially recognized specification.
• Repair interventions should be carried out based on the
manufacturer's recommendations.
3

Maintenance operations and repairs requiring the assistance of
other specialists must be carried out under the supervision of the
person specialized in the use of flammable refrigerant gases.
IMPORTANT SAFETY INSTRUCTIONS
Please read this manual carefully before using the device.
•This appliance is designed exclusively for household use.
•It is suitable for indoor use only. Please install it in a dry place.
•Regularly check the power cable. Do not use in case of damage
to the power cable, electrical outlet or air conditioner.
An extension cord can be used if the power cable is too short.
Be careful not to lay the cord in places where it could be pulled
off or cause people to trip.
•The air conditioner should be placed away from heat sources and out of
direct sunlight.
•Turn off the air conditioner before unplugging it.
•Turn off and unplug the air conditioner before uninstalling,
cleaning, replacing parts, or when not in use.
•Follow the instructions in this manual for cleaning the air
conditioner.
•The voltage of the electrical outlet must comply with the requirements.
Any damage resulting from incorrect power supply is not covered by
the warranty.
•Children are not allowed to play with the air conditioner.
•Do not insert your fingers or other objects into the vent outlet.
•Do not install the air conditioner in a place exposed to water or
any other liquid. Make sure that water or any other liquid
cannot enter the air conditioner.
•Do not repair the air conditioner yourself. Any possible risk
incurred due to maintenance by an inexperienced person
would constitute a violation of the provisions of the guarantee.
•If the cable or flexible outer cord of this air conditioner is
damaged, it must be replaced exclusively by the manufacturer
or its service agent or a person of equivalent qualification, in
order to avoid any risk.
4

•Please use the accessories provided by the air conditioner
manufacturer. Otherwise, it could be damaged.
•Recommended operating temperatures for the air conditioner
(cooling/heating): 15-35°C / 5-27°C.
•This appliance can be used by children aged 8 years or over or
by people with reduced physical, sensory or mental capacities,
or a lack of experience and knowledge, provided that they are
supervised or that they have been instructed in the safe use of
the device and understand the risks involved. Children should
not be allowed to play with the air conditioner. Cleaning and
maintenance shall not be made by children without
supervision.
Special warning:
•To avoid damage, place the device in an upright position
for at least 24 hours before starting it.
•Use the appliance only on a horizontal and flat surface to avoid any
water leakage and to ensure the correct functioning of the
compressor.
• Place the air conditioner on a flat surface and install it
vertically to ensure the smooth operation of the
compressor.
• The air conditioner should be placed at least 50 cm away from
surrounding objects. Make sure the air inlets and outlets are
always clear.
•Do not use the air conditioner near gasoline or any other
flammable liquid.
•Do not use spray agents and other solvents or flammable
substances near the air conditioner. This may cause plastic
deformation or damage to electrical parts.
Food
• The socket must be in good condition and undamaged.
It must not be replaced by an electrical plug.
•To operate the air conditioner, first plug in the power
cable, then press the on/off button.
5

1. PRESENTATION OF THE AIR CONDITIONER
1. Control panel + LCD display screen
2. Protective film to be removed
3. Air outlet flaps
4. Back panel
5. Front panel
6. Casters
7. Exhaust pipe 1.5 meters
8. Window recessed panel
9. Remote control and its housing
10. Rear air intake grille
11. Upper filter
12. Power cable winding hook
(for storage)
13. Carry handle
14. Air outlet to connect to the
exhaust pipe
15. Cap and drain plug (for
continuous draining)
16. Bottom filter
17. Air inlet grille
18. Cap and drain plug (for manual
drain)
19. Power cable
20. Mains socket
6

2.INSTALLATION INSTRUCTIONS
CAUTION: Before using the portable air
conditioner, keep it upright for at least two hours.
Always and imperatively move the air conditioner in a vertical position
Place the air conditioner on a flat surface.
Do not install the air conditioner in bathrooms and damp rooms. Place it in
a dry place, and keep it at least 50 cm away from any object
I. Installation of the exhaust duct:
Screw the end of the exhaust duct stub into the exhaust port
on the rear panel (counterclockwise).
II. Installation of the recessed panel to the window
The recessed panel can be placed horizontally or vertically. See
diagram above
Adjust opening distances to bring both ends of the assembly into contact with the
window frame and secure the various components of the assembly.
WARNING
Improper installation may affect the proper
operation of the air conditioner
The length of the exhaust duct should be 280~1500mm,
and this length is based on the specification of the air
conditioner. Do not use other exhaust duct models other
than the one supplied with your air conditioner,
and do not add any extension exhaust ducts. It may cause a
malfunction.
The exhaust must be unobstructed. Otherwise, it may cause
overheating.
The air inlets and outlets must not be obstructed.
The conduit must not be deformed, nor have a radius of curvature of more than 45°.
7

3. CONTROL/DISPLAY PANEL AND REMOTE CONTROL
CONTROL/DISPLAY PANEL
1. On/Off button
2. Mode key
(Cooling/Ventilation/
Dehumidification/Heating)
3. Temperature / operating
time setting button
4. Fan speed button
5. TIMER button
6.LCD display screen
This window displays the selected
temperature and time.
7. Remote control receiving window
CONTROL PANEL DISPLAY SCREEN
1. COOL lamp
2. OSCILLATION (air flap sweeping) indicator activated
3. FAN SPEED indicator
4. DRY indicator
5. Temperature / operating time indicator
6. HEATING indicator
7. TIMER indicator
REMOTE CONTROL
1.On/Off key
2.Mode key
(Cooling/Ventilation/Dehumidification/Heating)
3.Temperature/operating time setting button
4. Fan speed button
5.TIMER button
6. OSCILLATION button (air sweep flap)
7.Fahrenheit / Celsius degree switch key
8

CONTROLLED AIR CONDITIONER
I. BY REMOTE CONTROL or BY THE CONTROL PANEL
On/Off key
Press the button to turn the air conditioner on or off.
/
MODE key
Successively press the MODE button on the remote control or the control panel to select
the desired mode:
Cooling - ventilation - Dehumidification -Heating….Cooling-…ect.
OSCILLATION button (air swing), only on the remote control
Press the SWING button on the remote control to deactivate or reactivate the air swing
flaps. The swipe panes can be disabled and freeze at different desired angles.
Note: When the air conditioner is switched on, the air scavenging flaps are automatically active.
FAN SPEED button
Successively press the button on the remote control
/
or from the control panel
to choose the desired fan speed.
3 positions: high - medium - low
Temperature / operating time setting button
In cooling and heating mode, press the buttons on the remote control where the
keys on the control panel to increase or decrease the setting of the
temperature.
In TIMER mode, press these keys to program the stop or start time.
TIMER button /
The air conditioner turns OFF, press the TIMER button on the remote control or the
panel button to set the requested delay start time.
from
With the air conditioner turned ON, press the TIMER button on the remote control or the
panel button to set the requested delay time.
from
9

To switch from degrees Fahrenheit to degrees Celsius:
On the air conditioner control panel, press both buttons simultaneously
to toggle between Celsius (℃)and Fahrenheit (℉).
Or on the remote control press the button
II. BY WIFI
Refer to the WIFI application installation and user guide.
4. INSTRUCTIONS FOR USE
I- OPERATING MODE
When the air conditioner is turned on for the first time, a beep sounds when the power is turned on, then the air
conditioner goes into standby.
Turn on the air conditioner, by pressing the button on the control panel or the
remote control
COOLING / COOL MODE
Press the MODE button on the control panel remote control to select COOL mode.
Warning light
Press the keys on the control panel
to set the temperature (Range 16°C to 30°C). Press the
fan speed button on the control panel
lights up on the air conditioner display.
or remote control
or the
remote control to choose the desired cooling rate: High/Medium or
weak.
HEATING / HEAT MODE
Press the MODE button on the control panel remote control to select the HEAT mode.
Warning light
Press the keys on the control panel
to set the temperature (Range 16°C to 30°C).
lights up on the air conditioner display.
or remote control
10

Press the fan speed button on the remote control panel
to choose the desired heating rate: High/Medium or Low.
or the
FAN/FAN MODE
Press the MODE button on the control panel remote control to select FAN mode.
The indicator lights up on the air conditioner display panel.
Press the fan speed button on the control panel or the
remote control to choose the desired ventilation rate: High/Medium or Low.
NOTE: In ventilation mode, the temperature cannot be adjusted.
DEHUMIDIFICATION / DRY MODE
Press the MODE button on the control panel or remote control to select DRY mode.
Warning light lights up on the air conditioner display.
Beforehand, remove the cap and drain plug on the back of
the air conditioner for dehumidifying water.
Insert the drain hose, put the other end of the hose into
a water tank
Once the dehumidification mode is activated, if the room
temperature ≥ 15°C (59°F), the compressor will start. Then
when the ambient temperature is ≤ 13°C (55°F), the
compressor will turn off. Finally, when the temperature in
the room rises and is ≥ 15, the compressor will restart (in
order to protect the compressor, it will be restarted 3min.
later).
NOTE: In dehumidification mode, the fan runs at low speed and the airflow cannot be
adjusted.
The temperature cannot be adjusted.
11

TIMER/TIMER MODE
Beforehand, select the desired mode and fan speed
Programming No. 1:
The air conditioner turns OFF, press the button on the control panel once
to set the activation time.
or the
remote control
As for the TIMER timer light flashes on the display screen, press the keys
to activate the ignition delay time (from 0 ~ 24H).
Where
Programming No. 2:
The air conditioner running ON, press the button on the control panel once or the
remote control to set the stop time.
Press the keys (from 0
~ 24H)
Where to set the delayed shutdown time
Only the TIMER timer light lights up on the display screen.
NOTE: The 2 programs cannot be activated at the same time.
To deactivate programming No. 1 or No. 2, press the button on the control panel again.
control or remote control
12

II- OPERATING SAFETY OF THE AIR CONDITIONER
1. Freeze protection:
In cooling, dehumidifying mode, if the exhaust pipe temperature is too low,
the air conditioner will automatically enter protection; if the temperature of
the exhaust pipe reaches a certain temperature,
the original programmed operating state of the air conditioner will be restored.
2. Water tank full alarm:
When the water in the water pan exceeds the warning level, the air conditioner will
automatically alarm, and the temperature display area of the display panel will
show "FL". At this point, you need to move the drain pipe connecting the air
conditioner or the water outlet to the sewer or another drainage area to drain the
water. (Refer to the instructions in chapter 5.Drainage below).
After draining the water, the air conditioner will automatically return to its original state.
3. Automatic defrost
The air conditioner has an automatic defrosting function: during defrosting, the
heating symbol on the display screen flashes.
4. Automatic thermal protection
To protect the service life of the machine, the air conditioner has heating
mode protection. During the protection period, the compressor and the
lower motor will stop working and automatically return to the normal
heating state after the air conditioner temperature recovers.
5. Compressor protection
After the compressor stops, the protection is triggered and the air conditioner will
restart 3 minutes later
13

5. DRAINAGE
I. Manual drain
When the inner pan is filled with water, the panel
display screen will show “FL” signal and the compressor
will stop working automatically.
Turn off the air conditioner and turn off the power to
drain.
Note: Please move the air conditioner carefully so as not
to spill water from the pan into the air conditioner body.
Place a water tank/bucket under the side water outlet
behind the air conditioner body.
Unscrew the cap and remove the drain plug, the water
will automatically flow into the water tank.
Note: During drainage, the air conditioner may be tilted slightly backwards Once the water has
been evacuated, BE CAREFUL to reposition the drain plug and its cap before restarting the air
conditioner, otherwise the condensation water from the air conditioner will will flow to the
ground
II.Continuous draining
(only applicable to cooling and dehumidifying
mode)
Unscrew the cap and remove the rubber drain plug
Insert the drain hose into the water outlet Place
the other end of the drain hose into a tank/
bucket.
Note: During draining, the air conditioner may
be tilted slightly backwards
Once the water has drained, reattach the rubber stopper and
screw the cap back on.
14

6. MAINTENANCE
Cleaning: Before cleaning and maintenance, turn off the air conditioner and turn off the power.
1. Clean the surface
Clean the surface of the air conditioner with a damp soft cloth. Do not use detergents,
chemical products, such as benzene, alcohol, petrol, etc., as there is a risk of deterioration.
Avoid water splashing into the air conditioner.
2. Clean the filters
If the filters are clogged with dust and the efficiency of the air conditioner is reduced,
be sure to clean them once every two weeks.
Upper filter: Manually remove the upper frame to access the filter, by pressing down.
Unscrew the four screws securing the top filter to the rear panel.
Lower filter: Manually remove the filter by gently pulling.
Place the filters in the warm water (about 40°C) added neutral detergent, dry them in the
shade after cleaning.
Proceed with the reverse operations to replace the filters
Unscrew the 4 screws of the upper filter
Remove the top frame
Remove
the filter
inferior
Storage after the season:
1. Remove the rubber stopper, and empty all the water contained in the tank.
2. Turn on the air conditioner in fan mode low airflow position. Let it run for 2 hours
until the drain pipe and the inside of the air conditioner are dry to avoid mold.
3. Turn off the air conditioner, unplug the power plug and wind up the
power cord. Reinstall the rubber plug.
4. Remove the exhaust duct.
5. Cover the air conditioner with a plastic bag and place it in a dry storage place, out
of the reach of children.
6. Remove the batteries from the remote control.
15

7.TROUBLESHOOTING
Problems
met
cause Solution
The air conditioner is not powered Turn it on after connecting it to an electrical
outlet
Empty the water by draining the air conditioner, then
restart the air conditioner
The water tank “FL” indicator
lights up
The air conditioner does
does not work In cooling mode, the room
temperature is lower than the set
temperature; in heating mode, the
room temperature is higher than
the set temperature.
Change temperature settings
In dehumidification mode, the
room temperature is low.
The air conditioner is placed in a room with an
ambient temperature above 17℃
Direct sunlight Draw the curtains
The door and windows are open,
there are many heat sources in the
room.
Close the door and windows, remove
heat sources.
The effect of
cooling or
heating is not
not optimal The filters are too dirty. Clean or replace filters
Check air inlet and outlet, clear
obstruction
The air inlet or outlet is blocked
Place the air conditioner on a flat and rigid
surface, avoid any surface that causes
shaking
The air conditioner is not placed on a
suitable installation surface
Too noisy
The compressor does
does not work
Compressor safety
protection engages
Wait 3 minutes, then restart the air
conditioner after the temperature drops.
The distance between the air conditioner
and the remote control is too far and/or
the remote control is not aligned towards
the receiver
Bring the remote control closer to the air conditioner
and make sure to point the remote control in the
direction of the receiver.
The remote control
does not work
The batteries are exhausted Replace the batteries
In case of abnormal situations, turn off the air conditioner and pull out the plug, then contact a
professional electrician for help.
ERROR CODE DETECTION
E1 Fault in the pipe temperature sensor (probe)
E2 Fault in the ambient temperature sensor (probe)
E4 ANTI-FREEZE protection: the temperature of the pipe is too low and the air conditioner turns
off.
As soon as the temperature exceeds 8°C, the protection cuts out and the
initial programmed operating state is restored.
16

8.APPENDICES
Fuse Settings
Specification: Diameter 5 × 20mm
Voltage: 250VAC
Current: 3.15A
Schematic diagram
Capacitor
Compressor Evacuation
DISPOSAL OF WASTE ELECTRICAL AND ELECTRONIC EQUIPMENT FROM
OF END USERS IN THE EUROPEAN UNION”
This symbol on the product or on the container indicates that this product may not
be disposed of with general waste. The user is responsible for disposal of this
type of waste by throwing it in a "recycling point" specific to electrical and electronic
waste. Selective collection and recycling of electrical equipment helps preserve natural
resources and ensure recycling of waste to protect the environment and health. To
receive further information on the collection and recycling of electrical and electronic
waste, contact your town hall, the household waste service or the establishment where
the product was purchased.
STARLIGHT – 255 bd de la Madeleine FR-06000 NICE
V1-01-2020
17
This manual suits for next models
1
Table of contents
Other Airton Air Conditioner manuals