AIRVERSA Humelle AH1 User manual

User Manual
AH1
Model: AH1
Humelle
Smart Humidifier

AH1
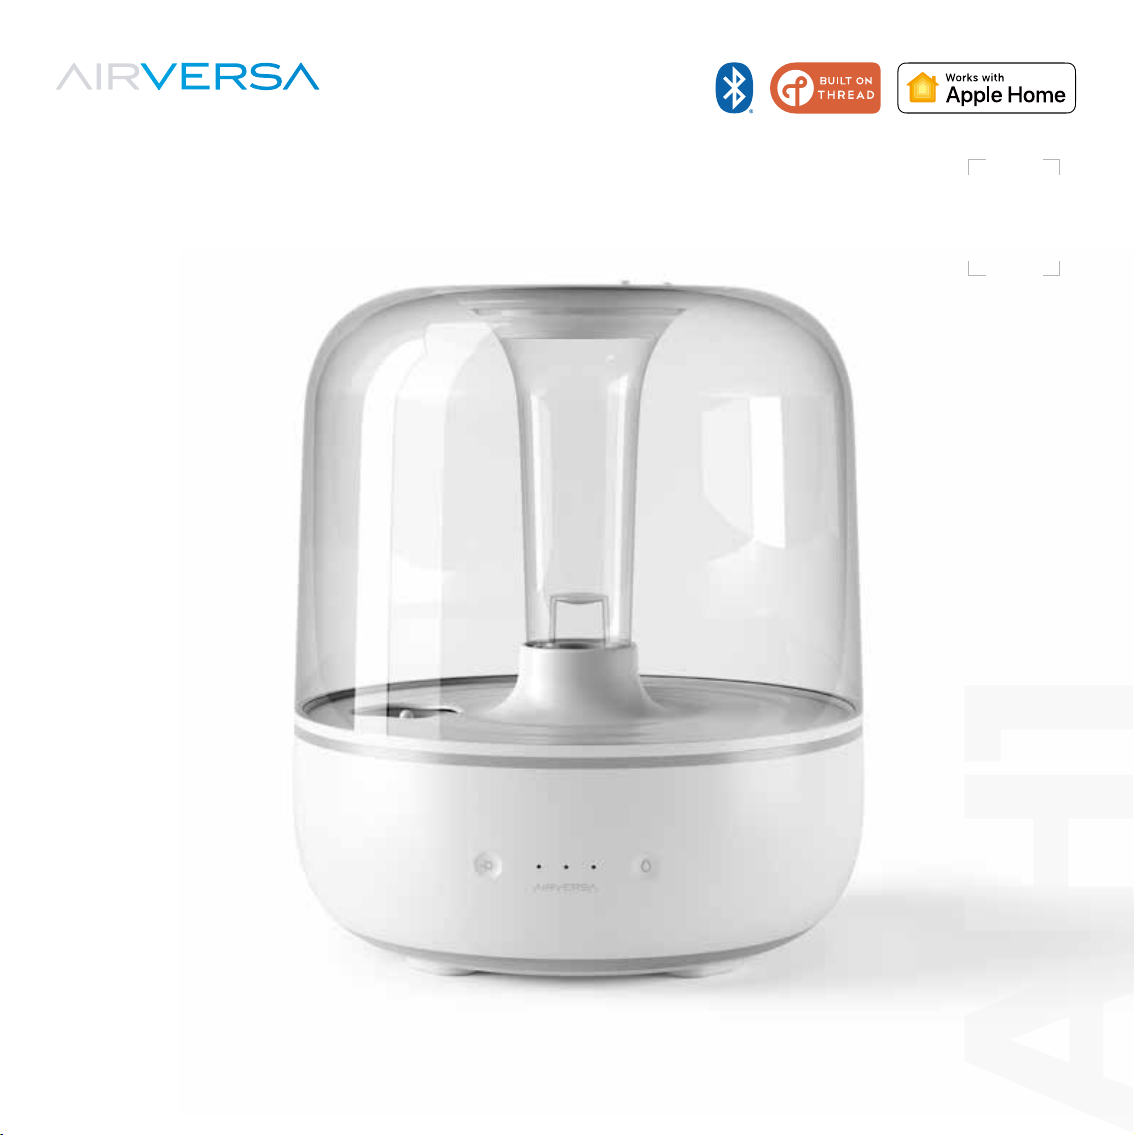
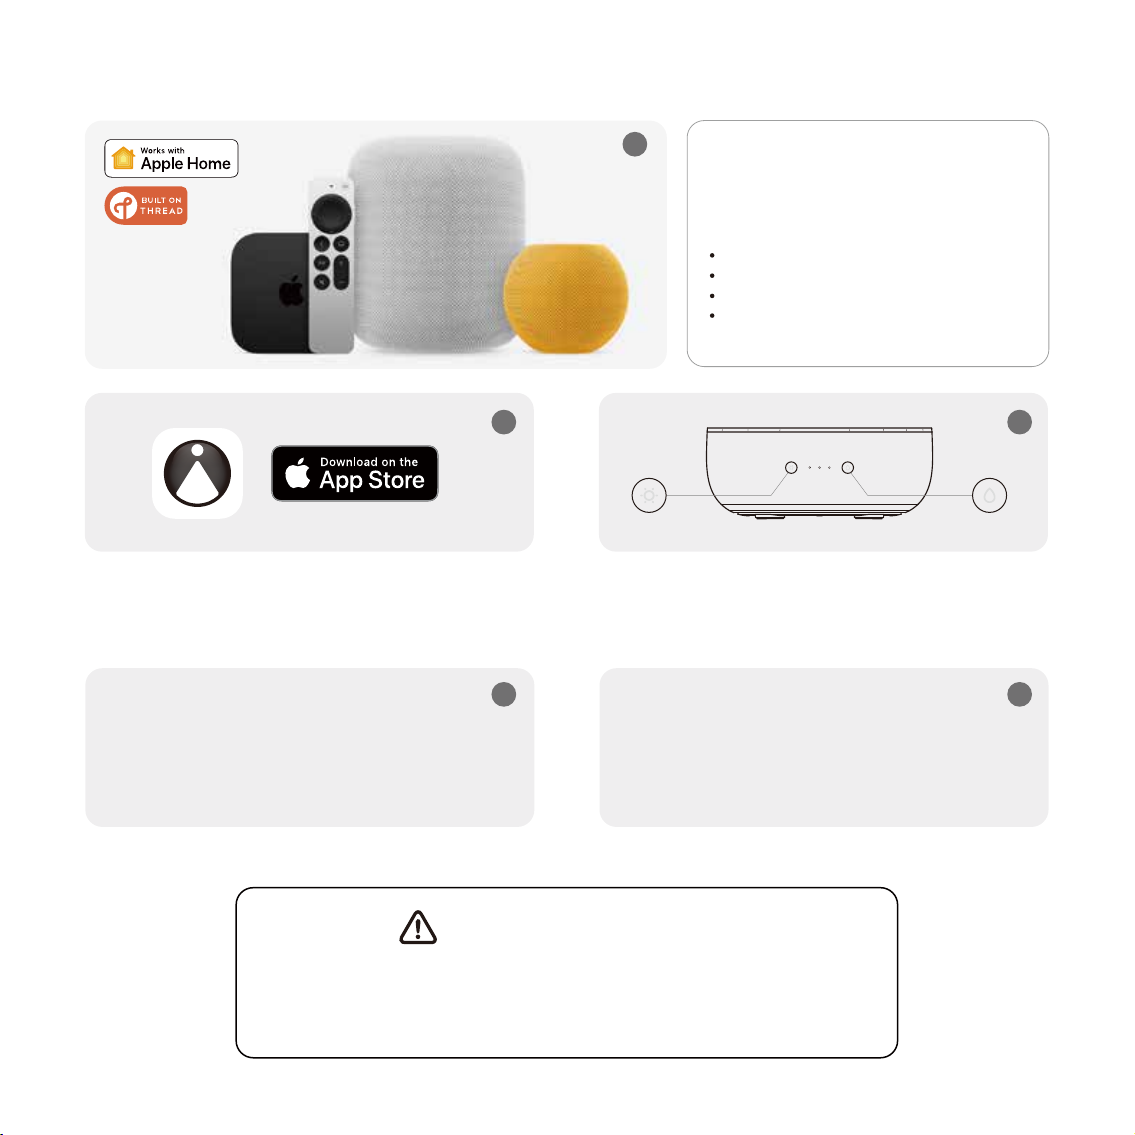
APPLE HOME (THREAD) SETUP
Download the Sleekpoint App from the Apple App
Store, open it and create an account, or open the
Apple Home App.
Simultaneously press and hold Power and Light
Buttons for approx. 5s to enter pairing mode untill
you hear a long beep.
3
45
Add the accessory to the app following
the on-screen instructions. As soon as it
is added successfully, it will automatically
connect to your Thread network.
Make sure your iOS device is close to your
accessory (less than 3m/10ft. away) and
Bluetooth is turned on in your iPhone settings.
Make sure one of your Apple Home Hub is close
to your accessory (less than 10m/30ft. away).
When an accessory is added successfully for the FIRST TIME, it usually takes
approx. 5-10 minutes to be able to connect to the Thread network. However,
if it is still not able to connect to Thread after a while, reboot your iOS device
or your Apple Home Hub and then check again.
Important Notice
Make sure you have one of
the Thread-enabled Apple Home
Hubs already setup.
HomePod 2nd Gen
HomePod mini
Apple TV 4K 2nd Gen
Apple TV 4K 3rd Gen (Wi-Fi + Ethernet)
1
2

If you have any questions or concerns about your new product,
please feel free to contact our Customer Service Team.
CUSTOMER SUPPORT
support@airversa.com
www.airversa.com
Zum Herunterladen scannen.
Scannez pour télécharger.
Escanear para descargar.
Scansiona per scaricare.

Thank you for choosing Humelle, our latest innovative product designed to optimize
the humidity levels in your home, while providing a customizable and visually
appealing atmosphere with its smart ring light feature. With its advanced sensors,
Humelle can detect the current humidity levels in your home and adjust its output
accordingly to maintain a target humidity level of your choosing. This helps to prevent
dry air, which can lead to issues like dry skin, coughs, and other respiratory problems.
Humelle works seamlessly with Apple Home using Thread Technology. With a
Thread-enabled Border Router (HomePod [mini] or Apple TV 4K), it allows for easy
integration with your existing Apple Home setup, giving your the ability to monitor
the humidity level in real-time, and control your Humelle with your iOS devices and
through Siri voice commands from anytime, at anywhere.
For now, please be sure to explore all of its features outlined in this manual. If you have
any questions, feel free to just drop us an email anytime. We’d love to assist you to get
the most out of it!
Hello!
1

IMPORTANT SAFETY INSTRUCTIONS
PLEASE READ AND SAVE ALL INSTRUCTIONS TO ENSURE THE SAFE AND EFFECTIVE USE OF
THIS HUMIDIFIER.
IF THE POWER ADAPTER OR UNIT DOES NOT WORK, CONTACT AIRVERSA CUSTOMER
SERVICE IMMEDIATELY.
When using electrical products, especially when children are present, basic safety precautions
should Always be followed to reduce the risk of fire, electric shock, or other injury.
ONLY use the humidifier as described in this manual.
It is advisable to carry filled Water Tank with two hands.
Humidifier requires regular cleaning. It is suggested to clean the humidifier every 72 hours.
Place the humidifier and cord so that it will not be knocked over.
DO NOTplace near large pieces of furniture or in high-trac areas.
When not in use, turn the humidifier off and disconnect from power by removing the plug
from the outlet.
Keep the humidifier out of reach from children.
ONLY fill the Water Tank with distilled, demineralized or purified water. Tap water can contain
minerals that can create buildup in your humidifier, leading to bacteria growth and potential
health hazards. Never fill the Water Tank with any other liquids.
Remove the Water Tank from the base before moving the humidifier.
If the humidifier is damaged or is not functioning properly, stop using it and contact Customer
Support immediately.
ATTENTION
2

This humidifier is not to be used by persons (including children) with reduced physical, sensory,
or mental capabilities, or lack of experience and knowledge, unless they have been given
supervision or instruction concerning use of the appliance by a person responsible for their safety.
Supervise children when they are near the humidifier.
Children should not clean or perform maintenance on the humidifier without supervision.
Children should be supervised to ensure that they DO NOT play with the humidifier.
Not for commercial use. Household and Indoor use only.
Before using the humidifier, extend the cord and inspect for any signs of damage. If the power
supply cord is damaged, please contact customer support for replacement in order to avoid an
electric or fire hazard.
Unplugging the power adapter will disable remote control of the humidifier and temporarily
disconnect the humidifier from apps.
ONLY add essential oils to the aroma box.
MUST DOs
Always have water in the Water Tank when operating the unit.
Always unplug your humidifier from the power outlet before cleaning your humidifier or detaching
the Water Tank from the humidifier base.
Always make sure to place the humidifier on a flat, Level and waterproof surface away from sunlight
before operation.
Always make sure to place the humidifier at least three feet (1.2m) away from bedside, 12 inches
(30cm) from the wall.
3

WARNINGS
DO NOT move or tilt humidifier while it is in operation.
DO NOT use the humidifier in wet environments.
DO NOT use hot water.
DO NOT add essential oils or other substances to the Water Tank in the humidifier.
DO NOT place the humidifier near sources of heat, such as stovetops, ovens, or radiators.
DO NOT place the humidifier directly on floors, carpets, or rugs.
DO NOT use other items as replacement parts for this product.
DO NOT cover any openings on the unit or insert objects into any openings while the humidifier
is on. Doing so may damage the humidifier.
DO NOT use the unit if the cord has been damaged.
DO NOT operate with power cord coiled or with twist tie in place.
DO NOT operate the humidifier without water. Turn off and unplug unit when tank is
empty.
DO NOT immerse the humidifier base, power cord, or plug in water.
DO NOT handle the power cord or plug with wet hands. Keep the plug and power cord away
from liquids.
DO NOT touch the Nebulizer while the unit is plugged in, as burns could result
DO NOT add essential oils, medication, supplemental water treatment liquids, or water filters
into the Water Tank or Base Water Chamber. This will damage the humidifier and cause leaks.
4

SAVE THESE IMPORTANT INSTRUCTIONS
FOR EASY REFERENCE.
DO NOT fill the humidifier with hot or boiling water. Use cool or lukewarm water to avoid
the risk of burns.
DO NOT let the water in the humidifier sit for extended periods of time. This can lead to bacteria
growth and potential health hazards.
DO NOT over-humidify your home. Keeping the humidity levels too high for an extended period
of time can lead to mold growth and damage to your home's structure.
DO NOT leave the humidifier unattended in a closed room. Doing so may result in personal
injury or property damage. If room becomes saturated, open the door and turn the humidifier
off or down.
DO NOT use a detergent to clean any parts of the unit that contain water. Detergent film
dissolved in the water supply can interfere with the output of the unit. Instead, Always use white
vinegar mixed with water to clean the humidifier.
DO NOT attempt to repair or adjust any electrical or mechanical functions on this humidifier.
Doing so will void your warranty.
DO NOT use the humidifier when an air purifier with a built-in air quality sensor, or an air quality
sensor, is nearby. The water particles can mislead the air quality readings in the sensors, and
could also possibly damage the sensor.
5

WHAT’S IN THE BOX
Cleaning Brush
*Power Adapter
*The image shown here is indicative only. If there is inconsistency between the image
and the actual product, the actual product shall govern.
*The plug type of the power adapter varies depending on the region where this device is purchased.
Aroma Pad
Humelle Smart Humidifier
User Manual
6

HOW IT WORKS
Water is released from the Water Tank into the Base Water Chamber. A Nebulizer vibrates at
ultrasonic frequency, breaking the water into a fine mist. The mist is quietly propelled by a fan up
a vertical Mist Tube to the Mist Nozzle where the cool, visible mist enters the room. This humidifier
will automatically shut off when the water level is low or when the Water Tank is removed from
the Base.
Lifting Handle
Power Button
(Detachable for cleaning purpose)
Water Level Sensor
Water Tank
Mist Nozzle
Base Water Chamber
Nebulizer Base
Light Button

Humidity and
Temperature Sensor
Intake Vent
Aroma Pad
(Detachable for cleaning purpose)
Water Tank Cap
Power Socket
Noise Silencer
Plunger
Air Inlets
Essential Oil Tray
Air Outlet
8

LEDs
Low Mist Indicator
Power Indicator
High Mist Indicator
No Water Warning
CONTROL CENTER
Smart Ring Light
Factory Reset:
Simultaneously press and hold Power and Light Buttons for approx. 5s to factory reset
until you hear a long beep. DO NOT lift your fingers until you hear the beep.
Light Button
Tap:
Turn the ring light on
Cycle through favorite lighting themes
Press & hold:
Turn the ring light off
Tap:
Turn the mist on
Cycle through mist levels (Medium, Max, Auto)
Press & hold:
Turn the mist off
Mist Button
9

SPECIFICATIONS
Model Name AH1
Rated Input Voltage 100-240 V
Frequency 50/60 Hz
Water Tank Capacity 5.5L | Approx. 1.5 gallons
Max Mist Output 330 ± 20 ml/h
Maximum Runtime Up to 60 hours
Effective Room Size 50 m | 540 sq.ft.
Wireless Protocol Thread
Bluetooth BLE
Dimensions 9.1 x 9.1 x 10.4 in | 23 x 23 x 26.5 cm
Weight 1.85 kg | 4.08 lb
5.2
SLEEKPOINT APP
10

SETTING UP YOUR HUMELLE
Place on a firm, level, water resistant surface a minimum of 12” (30cm) from any walls.
Adjust the nozzle Mist should be directed away from any walls, bedding and furniture.
Warnings:
- Do not place the humidifier directly
on floors, carpets, or rugs.
- Placing the humidifier away from
walls ensures that the humidity
sensor and air inlets function
properly.
Make sure Water Cap is secured in place.Remove all packaging materials. Remove
twist tie from power cord and extend power
cord to full length.
Clean the Water Tank with clean water
before first use.
1 2
3
11

FILLING/REFILLING
ALWAYS unplug the humidifier before
removing the Water Tank.
Fill Tank with cool water. DO NOT fill
with warm or hot water.
Place Tank on Base. The triangle arrow
marks on the side should perfectly align
with each other when placement is correct.
Water will drain from the Tank into the
Base Water Chamber when the Plunger
is engaged.
Lock Water Tank Cap by turning
clockwise (right).
Remove the nozzle, use the handle to
remove Water Tank from the base and
turn upside down. Remove Water Tank
Cap by turning counterclockwise (left).
1 2
3
5
4
12

1. High mineral content in your water, also known as hard water, may cause a white mineral
residue to accumulate on surfaces in the room near the humidifier. This mineral residue is
commonly referred to as white dust. The higher the mineral content (hardness) of your
water, the greater the potential that an ultrasonic humidifier may produce white dust.
2. White dust is not a result of a defect or flaw in the humidifier. It is a result of the amount of
minerals suspended.
Only fill the Water Tank with distilled, demineralized, or purified water. Tap water can contain
minerals that can create buildup in your humidifier, leading to bacteria growth and potential
health hazards. Never fill the Water Tank with any other liquids.
Do not add water directly into the Water Base Chamber.
Do not add essential oils into the humidifier. Only add essential oils to the aroma pad.
Warnings:
Tank should be carried using two hands;
one hand on the Tank Handle and the
other supporting the bottom of the Tank.
Hard Water and White Dust:
13

USING YOUR HUMIDIFIER
Plug in the humidifier. The power indicator on the display will light up along with a long beep.
If there is no water in the tank, you will hear multiple short beeps.
Warnings:
Position humidifier to direct mist output away from walls, furniture and bedding.
Mist Nozzle
This humidifier features a detachable,
dual-directional Mist Nozzle. Use this feature
to direct the mist where you want it most.
Warnings:
Direct the nozzles away from any
furniture, walls, or other objects
to prevent them from getting wet.
DO NOT inhale the mist directly
from the nozzles.
Tap:
Turn the mist on
Cycle through mist levels (Medium, Max, Auto)
Press & hold:
Turn the mist off
Mist Button
Light Button
Tap:
Turn the ring light on
Cycle through favorite lighting themes
Press & hold:
Turn the ring light off
14

A comfortable humidity level is between 40-60%. You may check real-time humidity and
temperature level in the Sleekpoint app/Apple Home app.
You may also set a target humidity level in-app to maintain your comfortable level of room
humidity. Our algorithm automatically calculates the level of mist needed to maintain such
target. For example, when humidity drops below target, the mist level will increase until the
target humidty level has been reached. When humidity exceeds target, the humidification will
decrease or pause until it falls back to target.
CONDENSATION:
If you notice condensation on the walls, windows or around the humidifier, the humidity level
is too high. Open doors to the room or turn off humidifier until humidity level drops.
Auto Target Humidity:
Comfortable Humidity
LED Indicators
Power On
Low Mist
High Mist
Auto Mist - Nebulizing
Auto Mist - Pausing
No Water
Note:
When Auto Mist mode is active, The
LED indicators stay on when the
humidifier is nebulizing, and slowly
blinks when humidification pauses.
If you do not see any mist, always check if the Auto Mist mode is on and
humidification is pausing because target humidity has been exceeded.
15

DO NOT pour any liquids into the mist outlet.
DO NOT add liquid inhalants, essential oils or any additives to the water tank nor the
Base Water Chamber. Doing so can have adverse effects on the humidifier and void
the warranty.
1Remove the Water Tank from the Base.
2The Aroma Tray is located in front of
the Air Outlet.
3Add a few drops of essential oil to the
Aroma Pad.
This humidifier features an Essential Oil Tray that can be used with your favorite essential oil for
added enjoyment. This is not a diffuser – the oil does not come in contact with water and is
passively evaporated into the air. Essential oils are not included.
Using the essential oil tray
16

CLEANING YOUR HUMIDIFIER
To keep your humidifier running efficiently, you should clean your humidifier Water Tank
and Base Water Chamber every 3 days, and when you’re ready to store it.
DO NOT store with water inside the Water Tank. Pack unit in original carton and store in a
cool, dry location.
All maintenance should be done in the kitchen or bathroom on a water-resistant surface
near a faucet.
Changing the water daily is highly recommended to avoid bacteria growth.
Use a tissue or cloth to clean the nozzles regularly.
Never immerse the base in water or liquid. DOING SO WILL DAMAGE
THE HUMIDIFIER AND VOID THE WARRANTY.
Warning:
Micro-organisms that may be present in the water or in the environment where the
appliance is used or stored, can grow in the water reservoir and be blown in the air
causing very serious health risks when the water is not renewed and the tank is
not cleaned properly every 3 days.
Do not place any part of
the base in a dishwasher.
Do not use detergents
to clean the humidifier.
DO NOT pour any
water into the Air
Outlet
17
Table of contents
Popular Humidifier manuals by other brands

TaoTronics
TaoTronics TT-AH004 user guide

TEFAL
TEFAL INTENSE AQUA CONTROL HU5120 user guide

Ingersoll-Rand
Ingersoll-Rand Trane EHUMD500A Safety instructions and installation template

Wilfa
Wilfa MOIST C instruction manual

GGM
GGM VH-2600 Technical manual

Stadler Form
Stadler Form Little Titanium O-065 operating instructions