manuals.online logo
Brands
  1. Home
  2. •
  3. Brands
  4. •
  5. Aiwa
  6. •
  7. Microcassette Recorder
  8. •
  9. Aiwa TP-M320 User manual

Aiwa TP-M320 User manual

Yu
OWNER’S RECORD PRECAUCIONES PRECAUTIONS
anua
For your convenience, record the model number and the serial number (you will Para mantener en buen estado de funcionamiento
●No utilice este aparato en lugares muy calientes, frfos, con polvo ohumedad.
Especialmente, no deje este aparato:
●en un Iugar humedo, por ejemplo en el bafio
●cerca de la calefacci6n
●en un Iugar expuesto aIos rayos del sol (dentro de un coche estacionado,
donde la temperature en et interior puede subir mucho)
●Mantenga Ios casetes, tarjetas magn6ticas yotros materials que contengan
grabaciones magneticas alejadas del altavoz, ya que la informaci6n grabada
puede borrarse o pueden aparecer ruidos en Ias cintas de casete.
●No abra el compartimiento del casete durante la reproducci6n, grabaci6n, avarice
rApido orebobinado.
Pour maintenir de bonnes performances
.Ne pas utiliser I’appareil Aun emplacement trbs chaud, froid, poussi&eux ou
humide. En particulier, ne pas Ie conserver:
●clans une zone trbs humide, une sane de bains par exemple
●prbs d’un appareil de chauffage
●clans une zone exposde en plein soleil (clans une voiture gar6e, ou la
temperature peut consid6rablement augmenter par exemple)
cConserver Ies cassettes, cartes magndtiques et autres mah%iaux magnetiques
enregistr6s a bonne distance du haut-parleur; sinon Ies matr%iaux enregistrds
pourraient &re effacr$sou du bruit pourrait apparaltre sur Ies cassettes.
●Ne pas ouvrir Ie Iogement de cassette pendant la lecture, I’enregistrement,
I’avance rapide ou Ie rebobinage.
TP-M320 find it in the battery compartment of your set) in the space provided below. Please
refer them when you contact your Aiwa dealer in case of difficulty.
Model No. TP-M320
MICRO CASSETTE RECORDER
GRABADOR DE MICRO CASETES
OPERATING INSTRUCTIONS
INSTRUCCIONES DE MANEJO
MODE D’EMPLOI
ISerial No. I
PRECAUTIONS
To maintain good performance
●Do not use the unit in places which are extremely hot, cold, dusty or humid. In
particular, do not keep the unit:
●in ahigh humidity area such as abathroom
●near aheater
●in an area exposed to direct sunlight (e.g., inside aparked car, where there
could be a considerable rise in temperature)
●Keep cassette tapes, magnetic cards and other magnetic recorded materials
away from the speaker as the recorded information maybe erased or noise may
occur on cassette tapes.
●Do not open the cassette holder during playback, recording, fast forwarding or
rewinding.
FUENTE DE ALIMENTACION SOURCE D’ALIMENTATION
Utilization de pilas +❑Fonctionnement sur piles seches +❑
Inserer deux piles format AA (R6) en respectant Ies polarites (0, 0).
Coloque dos pilas tamaiio AA (R6) con Ias marcas () yOcorrectamente
alineadad.
87-HX5-901-01
971107AYH-OX
Printed in Hong Kong Replacement des piles
Remplacer Ies piles par des neuves quand la vitesse de defilement de la bande
baisse, Ie volume diminue ou Ie son est d6forme.
AIWA CO.,LTD. Cambio de Ias pilas
Cambie Iaspilas por otras nuevas cuando la cinta pierda velocidad, baje el volumen
oet sonido se escuche distorsionado. Autonomic des piles
Pile Autonomic (enregistrement EIAJ)
Piles au manuanese (R6P) Armrox. 7 h
POWER SOURCE Viola util de la pila
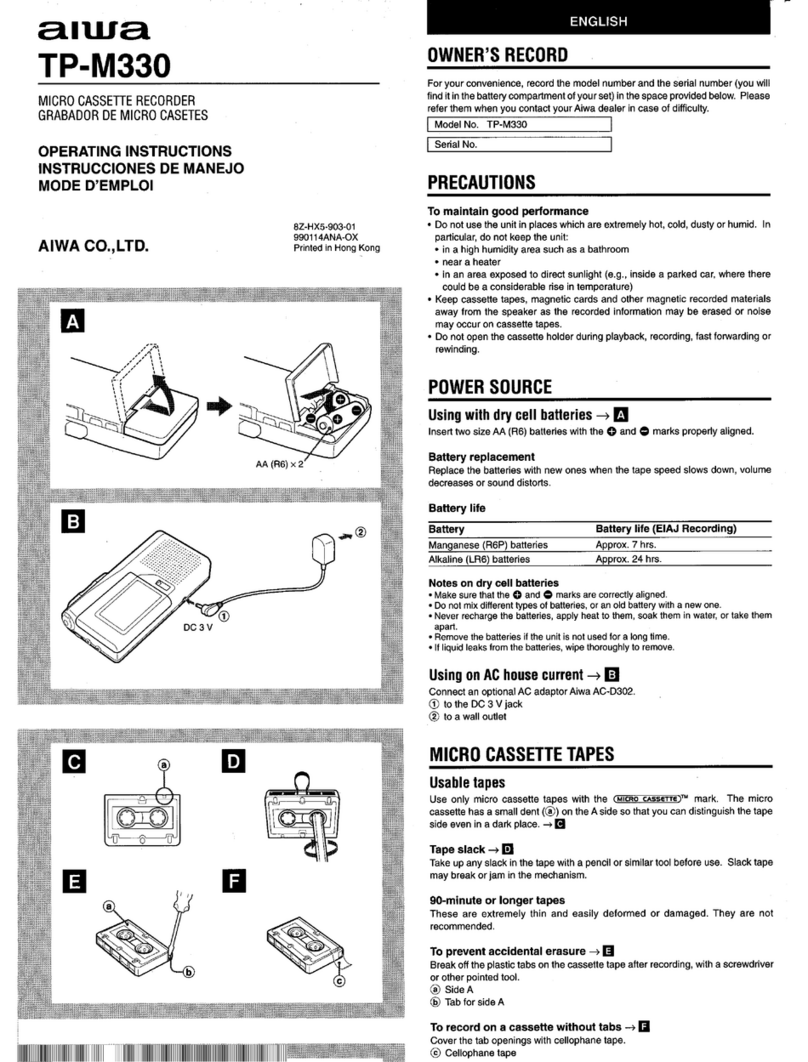
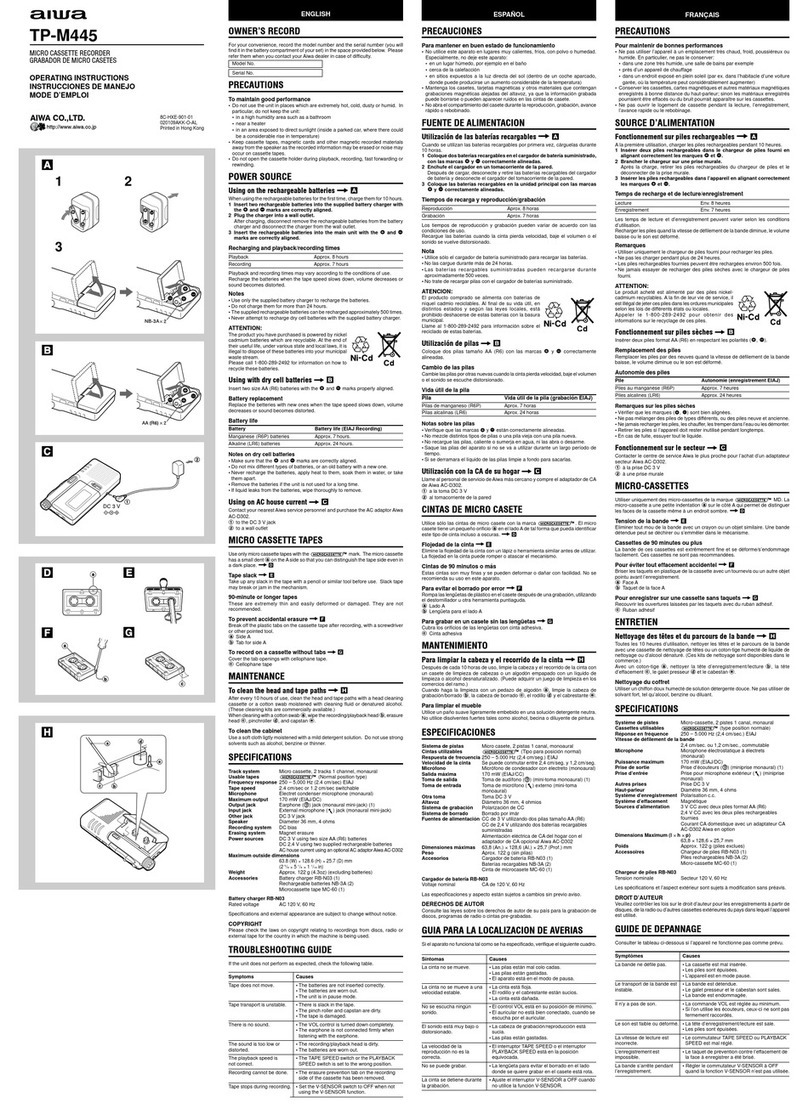
Using with dry cell batteries -+ ❑
Insert two size AA (R6) batteries with the C) and 0 marks properly aligned.
Pila Violautil de la pila (grabacion EIAJ)
Pitas de manganeso (R6P) Aprox. 7horas
Pilas alcalinas (LR6) Arxox. 21 horas Piles alcalines (LR6) Approx. 21 h
Battery replacement
Replace the batteries with new ones when the tape speed slows down, volume
decreases or sound distorts.
Remarques sur Ies piles seches
●verifier que Iesmarques (Q, 0) sent bien alignees.
●Ne pas melanger des piles de types different, ou des piles neuve et ancienne.
●Nejamais recharger Ies piles, Ieschauffer, Iestremper clansI’eau ou Ies demonter.
●Retirer Ies piles si I’appareil doit rester inutilise pendant Iongtemps.
●En cas de fuite, essuyer tout Ie Iiquide.
Notas sobre Ias pilss
●Verifique que Ias marcas C) y0estdn correctamente alineadas.
●No mezcle distintos tipos de pilas o una pila vieja con una pila nueva.
●No recargue Iaspitas, caliente osumerja en agua, ni Ias abra odesarme.
●Saque Iaspitas del aparato si no se va autilizar durante un Iargo perfodo de
tiempo.
●Si se derramara el Iiquido de [as pilas Iimpie afondo para sacarlas.
Battery life
Battery Battery life (EIAJ Recording) Fonctionnement sur Ie secteur -+ E
Raccorder un adaptateur secteur en option Aiwa AC-620/AC-302.
@)alaprise DC3V
@a une prise murale.
Manaanese [R6P) batteries Amrox, 7hrs.
Utilization con la CA de su hogar +❑
Conecte un adaptador de CA optional de Aiwa AC-620/AC-302.
@al enchufe de CC de 3 V
@al tomacorriente de la pared
Alkaline (LR6) batteries Approx. 21 hrs.
Notes on dry cell batteries
“Make sure that the ~and @marks are correctly aligned.
●Do not mix different types of batteries, or an old battery with anew one.
●Never rechargethe batteries, apply heat to them, soak them in water, or take them
apart.
●Removethe batteries if the unit is not used for along time.
●If liquid leaksfrom the batteries, wipe thoroughly to remove.
MICRO-CASSETTES
CINTAS DE MICRO CASETE Cassettes utilisables
Utiliser uniquement des micro-cassettes de la marque (MICROCASSGTTE)TM MD. La
micro-cassette a une petite indentation (@) sur Ie c6te Aqui permet de distinguer
Ies faces de la cassette mbme a un endroit sombre. +❑
Cintas que pueden utilizarse
Utilice s610Ias cintas de micro casete con la marca (MICROCASSETTG)TM (MR). El
micro casete tiene un pequeiio orificio (@) en et Iado Ade tal forma que pueda
identificar este tipo de cinta incluso aoscuras. +E
Using on AC house current -+ ❑
Connect an optional AC adaptor Aiwa AC-620/AC-302.
@to the DC 3Vjack
@to awall outlet Tension de la bande +❑
Eliminer tout mou de la bande avec un crayon ou un objet similaire. Une bande
detendue peut se d6chirer ou s’emm&er clans Ie mecanisme.
Flojedad de la cinta +❑
Elimine la flojedad de la cinta con un Iapiz oherramienta similar antes de utilizar.
La flojedad en la cinta puede romper oatascar el mecanismo.
MICRO CASSETTE TAPES Cassettes de 90 minutes ou plus
La bande de ces cassettes est extr6mement fine et se d6forme/s’endommage
facilement. Ces cassettes ne sent pas recommandees.
Usable tapes
Use only micro cassette tapes with the (MICROCASSCTTC)TM mark. The micro cassette
has asmall dent (@) on the Aside so that you can distinguish the tape side even
in adark place. +E
Cintas de 90 minutes omas
Estas cintas son muy finas yse pueden deformar odailar con facilidad. No se
recomienda su uso en este aparato. Pour eviter tout effacement accidental+ ❑
Briser Ies taquets en plastique de la cassette avec un tournevis ou un autre objet
pointu avant I’enregistrement.
@Face A
@Taquet de la face A
Para evitar el borrado por error +H
Romps IasIenguetas de plastico en e! casete despues de una grabacion, utilizando
el destornillador uotra herramienta puntiaguda.
@Lado A
@Lengueta para el Iado A
❑
DTape slack +❑
Take up any slack in the tape with apencil or similar tool before use. Slack tape
may break or jam in the mechanism.
?
an
Pour enregistrer sur une cassette saris taquets +❑
Recouvrir Ies overtures Iaissr$espar Ies taquets avec du ruban adhesif.
@Ruban adhesif
90-minute or longer tapes
These are extremely thin and easily deformed or damaged. They are not
recommended. Para grabar en un casete sin Ias Ienguetas -+ ❑
Cubra Ios orificios de Ias Ienguetas con cinta adhesiva.
@Cinta adhesiva
To prevent accidental erasure+ ❑
Break off the plastic tabs on the cassette tape after recording, with ascrewdriver
or other pointed tool.
@Side A
@Tab for side A
ENTRETIEN
MANTENIMIENTO Nettoyage des tiXes et du parcours de la bande -+ E
Toutes Ies 10 heures d’utilisation, nettoyer Ies tbtes et Ie parcours de la bande
avec une cassette de nettoyage de t&es ou un coton-tige humecte de Iiquide de
nettoyage ou d’alcool denature. (Ces kits de nettoyage sent disponibles clans Ie
commerce.)
Avec un coton-tige @, nettoyer la t~te d’enregistrement/lecture @, la t~te
d’effacement @, Ie galet presseur @et Ie cabestan @.
Para Iimpiar la cabezayelrecorridode la cinta -+ ❑
Despues de cada 10 horas de USO,Iimpie la cabeza yel recorrido de la cinta con
un casete de Iimpieza de cabezas o un algod6n empapado con un Iiquido de
Iimpieza oalcohol desnaturalizado. (Puede adquirir un juego de Iimpieza en [OS
comercios del ramo.)
Cuando haga la Iimpieza con un pedazo de algodon @, Iimpie la cabeza de
grabaci6n/borrado @, la cabeza de borrado @, el rodillo @yel cabrestante @.
To record on acassette without tabs +❑
Cover the tab openings with cellophane tape.
@Cellophane tape
MAINTENANCE Nettoyage du coffret
Utiliser un chiffon doux humect6 de solution d6tergente deuce. Ne pas utiliser de
solvant fort, tel qu’alcool, benzine ou diluant.
Para Iimpiar el mueble
Utilice un pafio suave Iigeramente embebido en una solution detergenceneutra. No
utilice disolventes fuertes tales como alcohol, becina odiluyente de pintura.
To clean the head and tape paths -+ E
After every 10 hours of use, clean the head and tape paths with a head cleaning
cassette or acotton swab moistened with cleaning fluid or denatured alcohol.
(These cleaning kits are commercially available.)
When cleaning with acotton swab @, wipe the recording/playback head ~,
erasure head @, pinchroller 6$, and capstan @.
SPECIFICATIONS
ESPECIFICACIONES Systbme de pistes Micro-cassette, 2pistes 1canal, monaural
Cassettes utilisables (MICROCASSGTT6]W (type position normale)
R6ponse en fr6quence 250 – 5.000 Hz (2,4 cm/sec.) EIAJ
Vitesse de defilement de la bande
2,4 cm/sec. ou 1,2cm/sec., commutable
Microphone Microphone electrostatique aelectrets (monaural)
Puissance maximum 130 mW (EIAJ/DC)
Prise de sortie Prise @(ecouteurs) (miniprise monaural) (1)
Prise d’entr6e Prise EXT MIC (miniprise monaural)
Autres prises Prise DC 3V
Haut-parleur Diametre 36 mm
Systdme d’enregistrement Polarisation cc.
Systbme d’effacement Magnetique
Sources d’alimentation 3VCC avec deux piles format AA (R6)
Courant CA domestique avec un adaptateur CA
AC-620/AC-302 AIWA en option
Autonomic des piles Voir “Autonomic des piles” ci-dessus.
Maximum (lxhxp) 66x121,2 x26,5mm
Poids Approx. 138g (piles exclues)
Sistema de pistas
Cintas utilizable
Respuesta de frecuencia
Velocidad de la cinta
Micr6fono
Salida mdxima
Toma de salida
Toma de entrada
Micro casete, 2pistas 1canal, monoaural
CMICROCASSETTG3TM (MR) (Tipo para posicirh normal)
250-5.000 Hz (2,4 cm/seg.) EIAJ
Se puede conmutar entre 2,4 cm/seg. y1,2cm/seg.
Micr6fono de condesador con electreto (monoaural)
130 mW (EIAJ/CC)
Toma @(auricular) (mini-toma monoaural) (1)
Tomade microfono externo (EXT MIC) (mini-toma
monoaural)
Toma de CC de 3 V
Di4metro 36 mm
Polarizaci6n de CC
Borrado por imar
CC de 3 Vutilizando dos pilas tamaiio AA (R6)
Alimentacion eldctrica de CA del hogar con el
adaptador de CA optional AIWAAC-620/AC-302
Bea la “Violautil de la pila” en Iaspaginas anteriores.
66 (An.) x121,2 (Al.) x26,5 (Prof.) mm
Aprox. 138 g (sin pilas)
To clean the cabinet
Use asoft cloth Iigtly moistened with amild detergent solution. Do not use strong
solvents such as alcohol, benzine or thinner.
SPECIFICATIONS
Otra toma
Altavoz “
Sistema de grabaci6n
Sistema de borrado
Fuentes de alimentaci6n
Track system
Usable tapes
Frequency response
Tape speed
Microphone
Maximum output
Output jack
Input jack
Other jack
Speaker
Recording system
Erasing system
Power sources
Micro cassette, 2tracks 1channel, monaural
(MICROCASSETTCJTM (Normal position type)
250-5,000 Hz (2.4cm/see) EIAJ
2.4 cm/sec or 1.2cm/sec switchable
Electret condenser microphone (monaural)
130 mW (EIAJ/DC)
@(earphone) jack (monaural mini-jack) (1)
EXT MIC jack (monaural mini-jack)
DC 3Vjack
Diameter 36 mm
DC bias
Magnet erasure
DC 3Vusing two sizeAA (R6) batteries
AC house current using an optional AC adaptor Aiwa
AC-620/AC-302
See “Battety life” above.
66 (W) x121.2 (H)x26.5 (D) mm
(25/8X 47/8 X1‘/16 h)
Approx. 138g (4.8 OZ)(excluding batteries)
Violautil de la pila
Dimensioned mdximas
Peso Les specifications et I’aspect exterieur sent sujets amodification saris preavis,
Las especificaciones yaspecto est~n sujetos acambios sin previo aviso, DROIT D’AUTEUR
Veuillez controller Ies lois sur Ie droit d’auteur pour Ies enregistrements apartir de
disques, de la radio ou d’autres cassettes exterieures du pays clanslequel I’appareil
est utilise.
DERECHOS DE AUTOR
Consulte Ias Ieyes sobre Ios derechos de autor de su pais para la grabaci6n de
discos, programas de radio ocintas pre-grabadas.
Battery life
Maximum dimensions
GUIDE DE DEPANNAGE
Weight GUIA PARA LA LOCALIZATION DE AVERIAS
Specifications and external appearance are subject to change without notice. Consulter Ie tableau ci-dessous si I’appareil ne fonctionne pas comme pr6vu.
Si etaparato no funciona tal como se ha especificado, verifique el siguiente cuadro.
COPYRIGHT
Please check the laws on copyright relating to recordings from discs, radio or
external tape for the country in which the machine is being used.
Sympt6mes ICauses
Sintomas
La cinta no se mueve.
Causas La bande ne d6file pas. l*La cassette est mal ins6ree.
●Las pilas est~n mal COIOcadas.
●Las pilas est~n gastadas.
●El aparato estd en el modo de pausa.
I●Les piles sent 6puis6es,
●L’appareil est en mode pause.
Le transport de la bande est ●La bande est d&endue.
TROUBLESHOOTING GUIDE “La cinta no se mueve a
una velocidad estable. ●La cinta est~ floja,
●El rodillo yel cabrestante estan sucios.
●La cinta esta dafiada.
instable. l*Le galet presseur et Ie cabestan sent sales.
If the unit does not perform as expected, check the following table. ●La bande est endommagee.
II n’y apas de son. ●La commande AVOL est r6glr4eau minimum.
Symptoms ICauses Nose escucha ningtin sonido. ●El control de volumen (AVOL) esta en su
posici6n de minimo.
●El auricular no est~ bien conectado, cuando se
escucha por el auricular.
l*Si I’on utilise Ies dcouteurs, ceux-ci ne sent pas
Tape does not move. ●The batteries are not inserted correctly.
●The batteries are worn out.
●The unit is in pause mode.
fermement raccord6s.
Le son est faible ou deforme. ●La t6te d’enregistrementilecture est sale.
●Les piles sent ‘6puis6es.
La vitesse de lecture est ●Le commutateur TAPE SPEED ou SLOW/
incorrect. NORMAIJFAST est mal r6gIe.
L’enregistrement est ●Le taquet de prevention contre I’effacement de
impossible. la face aenregistrer aete bris6.
El sonido est~ muy.bajo o
distorsionado. ●La cabeza de grabaci6n/reproducci6n est~
sucia.
●Las pilas est~n gastadas.
Tape transport is unstable, ●There is slack in the tape.
●The pinch roller and capstan are dirty.
●The tape is damaged. La velocidad de la
reproducci6n no es la
corrects.
●El interruptor de velocidad de la cinta (TAPE
SPEED) oel conmutador de rapido/normal/
Iento (SLOW/NORMAUFAST) esta en la
posici6n equivocada.
●La Iengueta para evitar el borrado en el Iado
donde se quiere grabar en el casete esta rota.
There is no sound. ●The AVOL control is turned down completely.
●The earphone is not connected firmly when
listening with the earphone.
●The recording/playback head is dirty.
●The batteries are worn out.
The sound is too low or
distorted. ,Nose puede grabar.
The playback speed is ●The TAPE SPEED switch or the SLOW/
not correct, NORMAIJFAST switch is set to the wrong
position.
Recording cannot be done. I
●The erasure prevention tab on the recording
side of the cassette has been removed.
COLOCACION DE UN CASETE +❑INSERTING ACASSETTE+ ❑INSERTION D’UNE CASSETTE+ ❑
Appuyer sur la touche ■/4 STOP/EJECT pour ouvrir Ie Iogement de cassette et
inserer une cassette, Ie c&e enregistrement/lecture (@) dirig6 vers Ie Iogement
de cassette.
Press the ■/= STOP/EJECT button to open the cassette holder and insert a
cassette with the recording/playback side (@) facing the cassette holder. Oprima el bot6n de parada/expulsi6n (■/= STOP/EJECT) para abrir la tapa del
comparlimiento del casete ycoloque un casete con el Iado agrabar/reproducer
(@) hacia la tapa del compartimiento del casete,
RECORDING FROM THE BUILT-IN
MICROPHONE +❑GRABACION UTILIZANDO EL MICROFONO
INCORPORADO DEL APARATO +❑ENREGISTREMENT AVEC LE MICROPHONE
INTEGRE +❑
1Insert acassette.
2Set the TAPE SPEED switch.
2.4: Normal recording
1.2: Double time recording
E.g.) A60-minute recordingcan be made usingboth sides of the MC-30
microcassette.
3Press the ●REC button to start recording.
The ~PLAY buttonis depressed simultaneouslyand the recording
indicator(@) lightsin red.
1Coloque un casete.
2Mueva el interruptor de velocidad de la cinta (TAPE SPEED).
2.4: Grabaci6n normal
1.2: Grabaci6n del doble de tiempo
Por ejemplo:)
Una grabacion de 60 minutes puede hacerse utilizando Ios dos Iados de
un micro casete MC-30,
3Oprima el boton de grabacion (0 REC) para empezar agrabar
El botch de reproduction (< PLAY) baja simultdneamente y se enciende el
indicadorde grabaci6n (@) en rojo.
Apunte el microfonoala fuente de sonido.
1Inserer une cassette.
2Regler Ie commutateur TAPE SPEED.
2.4: Enregistrement normal
1.2: Enregistrement temps doubk$
Asavoir: Un enregistrement de 60 minutes est possible en utilisant Ies deux
cdes de la micro-cassette MC-30.
3Appuyer sur la touche ●REC pour demarrer I’enregistrement.
La touche <PLAY est simultanement pressr$eet Ietdmoin d’enregistrement
(@) s’allume en rouge.
Orienter Ie microphone int6gr6 vers la source sonore.
Orient the built-in microphone to the sound source.
Basic operation
To stop recording Press the ■/= STOP/EJECT button.
To pause recording Set the PAUSE switch to ON.
To resume recording, set the switch to OFF.
Operations de base
Pour arri%er I’enregistrement Appuyer sur la touche ■/4 STOP/EJECT.
Pour faire une pause Regler Ie commutateur PAUSE AON.
d’enregistrement .Le regler aOFF pour reprendre
I’enregistrement.
Funcionamiento basico
Para parar la grabacion Presione el boton de paradaJexpulsi6n
(9/4 STOP/EJECT)
Para hater una pausa en Presione e! conmutador de pausa (PAUSE) hacia
la grabacion el Iado ON. Para seguir grabacion, mueva el
interruptor hacia el OFF.
When the end of the tape is reached
Press the ■/4 STOP/EJECT button. Ala fin de la bande
Appuyer sur la touche ■/= STOP/EJECT.
Tape counter (~)
The readout of the tape counter changes during playback, recording, fast-
forwarding or rewinding of the tape.
To set the counter to 000, press the COUNTER button to the right of the tape
counter.
Cuando la cinta Ilega asu final
Oprima el boton de parada/expulsi6n (9/= STOP/EJECT). Compteur (@)
L’indication du compteur change pendant la lecture, I’enregistrement, I’avance
rapide ou Ie rebobinage de la bande.
Pour remettre Ie compteur a000, appuyer sur la touche COUNTER adroite du
compteur.
Contador de cinta (~)
La Iectura en el contador de cinta cambia durante la reproduction, grabacion,
avarice rapido orebobinado de la cinta.
Para volver et contador al 000, presione el bot6n de reposici6n del contador
(COUNTER) hacia la derecha del contador de cinta.
To monitor the sound that you are recording
Use the earphone referring to “Listening with the earphone” below. You cannot
monitor the sound currently being recorded through the speaker.
Note
The standard speed of the micro cassette recorder is 2.4 cm/sec. If you record a
tape with the TAPE SPEED switch set to 1.2 and play it back on another micro
cassette recorder,playback sound may not be correct,
Pour contrtiler Ie son pendant I’enregistrement
Utiliser Ies ecouteurs en consultant “Ecoute avec des dcouteurs” ci-dessous. Le
haut-parleur ne permet pas de contrbler Ie son en tours d’enregistrement.
Para controlar el sonido amedida que se va grabando
Utilice et auricular consultando el punto “Escuchando por el auricular” mas abajo.
Nose puede controlar el sonido amedida que se va grabando utilizando el altavoz.
Nota
La velocidad normal del grabador de micro casete es de 2,4 crn/seg. Sise graba una
cinta con e! interruptor de velocidad de la cinta (TAPESPEED) en la position 1.2 y
se reproduce en otro grabador de micro casete distinto, el sonido puede no
reproducirse correctamente.
Remarque
La vitesse standard de defilement de la bande est de 2,4 cm/sec. pour
I’enregistrement. Si une cassette enregistree avec Iecommutateur TAPE SPEED
regle a1.2 est Iuesur un autre enregistreur de micro-cassettes, Ie son pourra ne pas
~tre correct.
To record only above apreset sound level+ ❑
Recording will start when the unit detects sound above acertain preset level. If
the unit does not detect the sound for about 4seconds, recording will pause. This
prevents tape waste and empty recording.
1Set the V-SENSOR* switch to ON.
2Adjust the sensor level.
Turn the AVOL (V-SENS LEVEL) control in the direction of A(@) to lower
the sensor level. General background noise will not be recorded, and only
relatively loud sounds will be recorded,
Turn the dVOL (V-SENS LEVEL) control in the opposite direction of ~(@)
to increase the sensor level. Even relatively quiet sounds will be recorded,
3Press the ●REC button to start recording.
*Voice Sensor Recording
Pour enregistrer seulement au-dessus d’un niveau sonore
prer6g16 +Q
1[1!+11 lima ‘1 Para grabar solo Ios sonidos que estan por encima de un
nivel predeterminado +Q
La grabaci6n empezar~ cuando el aparato detecte un sonido por encima de un
nivel predeterminado. Si el aparato no puede detectar ningun sonido durante 4
segundos, la grabacion entrara en pausa. Esto es para evitar un desperdicio
inutil de la cinta yla grabaci6n en blanco.
1Mueva el interruptor V-SENSOR* ala position ON.
2Ajuste el nivel del sensor.
Gire el control de volumen (AVOL) del nivel del sensor de voz (V-SENS
LEVEL) en el sentido del A(@) para bajar el nivel del sensor. No se grabaran
Ios ruidos de fondo en general ysr510se grabaran Ios sonidos relativamente
fuertes.
Gire el control de volumen (AVOL) del nivel del sensor de voz (V-SENS
LEVEL) en el sentido opuesto hacia A(@) para subir el nivel del sensor.
Esto hara que se graben incluso Ios sonidos relativamente silenciosos.
3Oprima el boton ●REC para empezar agrabar.
*Grabaci6n detecci6n de voz
L’enregistrement demarrera quand I’appareil detectera un son au-dessus du niveau
preregle. Si I’appareil ne detecte aucun son pendant environ 4secondes, il passera
en pause d’enregistrement. Cela c%ite I’usage inutile de la bande et
I’enregistrement vierge.
1Regler Ie commutateur V-SENSOR* aON.
2Ajuster Ie niveau sonore.
Tourner la commande AVOL (V-SENS LEVEL) clans Iesens de A(@) pour
baisser Ie niveau de detection. Le bruit de fond ne sera pas enregistr6, seuls
Ies sons relativement forts Ie seront.
Tourner la commande -VOL (V-SENS LEVEL) clans Ie sens contraire de
A(@) pour augmenter Ie niveau de detection. M~me Ies sons relativement
faibles seront enregistres.
3Appuyer sur la touche .REC pour d’emarrer I’enregistrement.
*Enregistrement avec detecteur vocal
3●REC
1V-SENSOR
Sensor level adjustment
The ideal sensor level varies according to the loudness of the source sound.
Experiment with the sensor level inadvance to determine the optimum level before
you start an important recording, Normally, align the white mark (@) of the AVOL
(V-SENS LEVEL) control with the part (@) first, then adjust it according to
surrounding conditions.
Note
When the recording resumes after sound detection, the very first sounds may not be
recorded.
Ajustement du niveau de detection
Le niveau sonore id6al varie selon l’intensit6 de la source sonore. Faire des essais
pr6alables de niveau de detection pour determiner Ie niveau optimum avant de
commencer un enregistrement important. Normalement, alignez d’abord la marque
blanche (@) de la commande AVOL (V-SENS LEVEL) sur la partie (@), puis
ajustez la commande en fonction des conditions environnantes.
Remarque
Ala reprise de I’enregistrement apres la detection de sons, Iestout premiers sons
peuvent ne pas 6tre enregistres.
Ajuste del nivel del sensor
El nivel del sensor optimo depende del volumen de la fuente de sonido. Haga
previamente varias pruebas con el nivel del sensor para determiner el nivel ideal,
antes de empezar una grabacion importance. Normalmente alinee primero la
marca blanca (@) del control 4VOL (V-SENS LEVEL) con la parte (@) yajuste
de acuerdo con Ias condiciones ambientales,
Nota
Cuando se empieza agrabar,despu& de detectar el sonido, Ios primeros segundos
del sonido nose grabaran.
To record the human voice more clearly+ ❑
When the voice you want to record is soft, and the surroundings are noisy, set the
NFR switch to ON and start recording. The voice will be recorded more clearly.
How NFR (Noise Filtration Recording) works
NFR emphasizes the frequency range of the human voice more than the high
and low frequencies that usually comprise noise.
●NFR does not reduce noise already recorded on the tape.
Pour enregistrer plus clairement la voix humaine +❑
Quand la voix aenregistrer est deuce et Ies environs bruyants, regler Ie
commutateur NFR aON avant de demarrer I’enregistrement. L’enregistrement
de la voix sera plus net.
Para grabar nitidamente la voz humana +K
Cuando la voz que se desea grabar es suave yel Iugardonde se hate la grabacion
es muy ruidoso, mueva el interruptor NFR ala position ON yempiece agrabar.
La voz se grabara mas nitidamente.
To record from another unit+ ❑
Connect the other unit to the EXT MIC jack of this unit, using the appropriate
connecting cords.
@To connect to stereo source equipment
@To connect to monaural source equipment
Fonctionnement du NFR (enregistrement avec filtrage du bruit)
Le NFR accentue la gamme de frequencies de la voix humaine plus que Ies hautes
et basses frdquences qui composent ordinairement Ie bruit.
●Le NFR ne reduit pas Ie bruit deja enregistre sur la bande.
oAttenuation Cable
a(Monaural mini-plug -Stereo mini-plug)
Cable de atenuaci6n
(mini-enchufe monoaural ++mini-enchufe estereo)
Cable d’attenuation
(miniprise monaural++ miniprise sk%do)
Funcionamiento de! NFR (Grabacion con filtro de ruido)
El NFR Ie da m~s dnfasis ala gama de frecuencias de la voz humana para que
se graben por encima de Ias frecuencias altas ybajas que son Ias que
normalmente forman parte de Ios ruidos del Iugar.
●El NFR no sirve para reducir el ruido que ya ha sido grabado en la cinta.
Note
●The connecting cords may vary according to the type of source equipment. Before
connecting aunit, read the operating instructions of the connected unit.
●Ifthe volume setting of the source equipment is too high, the recorded sound may
be noisy or distorted. Be sureto set the volume of the source equipment to a
moderate level.
Pour enregistrer depuis un autre appareil +❑
Raccorder I’autre appareil ala prise EXT MIC de cet appareil, avec Ies cordons
de raccordement adequats.
@Pour raccorder un appareil de source stereo
@Pour raccorder un appareil de source monaural . .
Para grabar de otro aparato +❑
Conecte el otro aparato en la toma de microfono externo (EXT MIC) de este
aparato, utilizando Ios cables de conexion correctos.
@Para conectar un equipo con una fuente en estereo
@Para conectar un equipo con una fuente monoaural
Nota ‘
●Loscables de conexion pueden ser distintos de acuerdo al tipo de equipo utilizado
como fuente de sonido. Antes de conectar el aparato, lea Iasinstrucciones de
funcionamiento del aparato conectado.
●Si el ajuste del volumen del equipo que sirve de fuente est~ muy alto, el sonido
grabado puede contener muchos ruidos oquedar distorsionado.Asegurese de
poner etvolumen del equipo con la fuente de sonido a un nivel moderado.
Remarques
●Lescordons de raccordement peuvent varier selon Ie type de I’appareil de source.
Avant de raccorder un appareil, Iireson mode d’emploi.
●Si Iereglage de volume de I’appareil de source est trop eleve, Ie son enregistre
peut &re parasite ou deforme. Bien regler Ievolume de I’appareil de source a un
niveau modere.
PLAYBACK +❑
1Insert acassette.
2Set the TAPE SPEED switch to the same position it was in during the
recording.
3Press the +PLAY button to start playback.
4Adjust the volume. LECTURE +❑
Attenuation Cable
(Monaural mini-plug eMonaural mini-plug) Basic o~eration
Cable de atenuaci6n
(mini-enchufe monoaural ++mini-enchufe monoaural)
C5ble d’atk%uation
(miniprise monaural++ miniprise monaural)
1Inserer une cassette.
2Regler Ie commutateur TAPE SPEED ala m~me position que pendant
I’enregistrement.
3Appuyer sur la touche +PLAY pour demarrer la lecture.
4Ajuster Ie volume.
To stop playback Press the ■/A STOP/EJECT button.
To pause playback Set the PAUSE switch to ON.
To resume playback, set the switch to OFF. REPRODUCTION +❑
When the end of the tape is reached
Press the ■/& STOP/EJECT button.
1Coloque un casete.
2Mueva el interruptor de velocidad de la cinta (TAPE SPEED) ala misma
position en la que estaba durante la,grabacion.
3Presione el boton de reproducci6n (+PLAY).
4Ajuste @nivel del volumen.
Operations de base
Pour arr6ter la lecture Appuyer sur la touche ■/= STOP/EJECT.
Pour faire une pause de lecture Regler Ie commutateur PAUSE &ON.
Le r%glerAOFF pour reprendre la lecture.
To find the section you want to listen to
To fast forwardhewind
To fast forward: Slide the +FF/CUE/- REW/REV switch to 4+ FF/CUE
during stop mode.
Torewind: Slide the 44 FF/CUE/ -REW/REV switch to WREW/REV during
Funcionamiento basico En fin de bande
Appuyer sur la touche WA STOP/EJECT.
Para parar la reproduction Presione el bot6n de parada/expulsi6n
(¤/~ STOP/EJECT).
Para hater una pausa en la Presione el conmutador de pausa (PAUSE)
reproduction hacia el Iado ON.
Para seguir reproduction, mueva et interruptor
hacia el OFF.
stop mode.
Press the ■/4 STOP/EJECT button at the desired point. Pour trouver la section souhaitee
❑To search while monitoring high-speed sound
Keep the 4+ FF/CUE/- REW/REV switch slid to 4+ FF/CUE or -REW/
REV during playback. When you reach the desired point, release the switch to
resume playback,
Pour I’avance rapide/rebobinage
Pour I’avance rapide: Glisser Ie commutateur 44 FF/CUE/- REW/REV sur
+FF/CUE en mode d’arr~t.
Pour Ie rebobinage: Glisser Ie commutateur +FF/CUE/~ REW/REV sur
-REW/REV en mode d’arrat.
Appuyer sur la touche ■/4 STOP/EJECT aI’emplacement souhait6.
@
SPEED
4~VOL
(V-SENS LEVEL) Cuando la cinta Ilega asu final
Oprima el bot6n de parada/expulsi6n (9/= STOP/EJECT),
To increase or decrease the playback speed
This unit can playback atape at 1.2 times or at 0.8 times the normal speed.
Set the SLOW/NORMAL/FAST switch according to your need.
SLOW/NORMAL./FASTswitch Playback
SLOW Playback at 0.8 times the normal speed
NORMAL Playback at the normal speed
FAST Playback at 1.2 times the normal speed
PAUSE Para encontrar la parte de la cinta que desea escuchar
Para el avarice rapidolrebobinado
Para avanzar r~pidamente: Deslice el conmutador de avarice rapido/localizaci6n
progresiva/rebobinado/localizaci6n regresiva (+FF/CUE/ ~REW/REV) ala
posici6n 44 FF/CUE durante el modo de parada.
Para rebobinar: Deslice el conmutador de avarice r4pido/localization progresiva/
rebobinado/localizaci6n regresiva( +FF/CUE/ ~REW/REV) ala posici6n
-REW/REV durante el modo de parada.
Presione etbot6n de paradalexpulsidn (WA STOP/EJECT) en el punto deseado.
Pour la recherche en contr61ant Ie son agrande vitesse
Maintenir Ie commutateur +FF/CUE/~ REW/REV sur 44 FF/CUE ou
~REW/REV pendant la lecture. Rel&cher Ie commutateur pour reprendre la
lecture en arrivant AI’emplacement souhaite.
+FF/CUE/
-REW/REV
34 PLAY
2TAPE
Pour augmenter ou reduire la vitesse de lecture
1W/&STOP/EJECT Cet appareil peut Iire une cassette ~1,2 fois ou 0,8 fois la vitesse normale,
Regler Ie commutateur SLOW/NORMAUFAST selon Ies besoins.
Notes
●Make sure that the TAPE SPEED switch is set to the same position as that used for
the recording.
●After listening, set the SLOW/NORMAUFAST switch to NORMAL. Commutateur SLOW/NORMAL/FAST Lecture
Para hater la busqueda mientras escucha el sonido agran
velocidad
Mantenga deslizado el conmutador de avarice rApido/localizaci6n progresiva/
rebobinado/localizaci6n regresiva (+FF/CUE/ ~REW/REV) ala position
44 FF/CUE 0- REW/REV durante la reproduction. Cuando Ilegue al punto
deseado, suelte el conmutador para seguir reproduciendo.
SLOW Lecture A0,8 fois la vitesse normale
Listening with the earphone NORMAL Lecture &la vitesse normale
FAST Lecture a1,2 fois Ia”vitesse normale
SLOW/NORMAL/
FAST
Connect an optional earphone (3,50 mini-plug) to the @jack.
The sound does not come from the built-in speaker when the earphone is
connected. Remarques
●W%ifierque Ie commutateur TAPE SPEED est regld ala m6me position que pour
I’enregistrement.
●Apres I’ecoute, regler Iecommutateur SLOW/NORMAL/FAST aNORMAL.
Para reproducer amayor omenor velocidad
Este aparato puede reproducer la cinta a1,2 veces o a 0,8 veces la velocidad
normal. Mueva el conmutador de lento/normal/rapido (SLOW/NORMAUFAST)
de acuerdo asus necesidades
Ecoute avec des ecouteurs
Raccorder des 6couteurs en option (miniprise 3,50) ~la prise (0).
Le son ne sortira plus du haut-parleur int6gre mais des 6couteurs.
Conmutador de lento/normal/rapido Reproducci6n
(SLOW/NORMAUFAST)
SLOW Reproducci6n a0,8 veces la
velocidad normal
NORMAL Reproducci6n ala velocidad
normal
FAST Reproduction a1,2 veces la
velocidad normal
Notas
●Verifique que el interruptor de velocidad de la cinta (TAPESPEED) esta en la
misma posici6n que la utilizada para la grabaci6n.
●Despu6sde escuchar, mueva el conmutador de lento/normal/rapido (SLOW/
NORMAUFAST) ala posici6n NORMAL.
Escuchando por el auricular
Conecte un auricular optional (mini-toma de a 3,5) en la toma o.
El sonido no sale por el altavoz incorporado si se ha conectado auricuiar al
aparato.
Other Aiwa Microcassette Recorder manuals

Aiwa TP-M330 User manual

Aiwa

Aiwa TP-M330 User manual

Aiwa M-185 User manual

Aiwa

Aiwa M-185 User manual

Aiwa TP-M330 User manual

Aiwa

Aiwa TP-M330 User manual

Aiwa TP-M440 User manual

Aiwa

Aiwa TP-M440 User manual

Aiwa TP-M115 User manual

Aiwa

Aiwa TP-M115 User manual

Aiwa TP-M920 User manual

Aiwa

Aiwa TP-M920 User manual

Aiwa TP-M330 User manual

Aiwa

Aiwa TP-M330 User manual

Aiwa TP-M725 User manual

Aiwa

Aiwa TP-M725 User manual

Aiwa TP-M130 User manual

Aiwa

Aiwa TP-M130 User manual

Aiwa TP-M140 User manual

Aiwa

Aiwa TP-M140 User manual

Aiwa TP-M445 User manual

Aiwa

Aiwa TP-M445 User manual

Aiwa TP-M131 User manual

Aiwa

Aiwa TP-M131 User manual

Aiwa TP-M130 User manual

Aiwa

Aiwa TP-M130 User manual

Aiwa TP-M230 User manual

Aiwa

Aiwa TP-M230 User manual

Aiwa TP-M330 User manual

Aiwa

Aiwa TP-M330 User manual

Aiwa TP-M340 User manual

Aiwa

Aiwa TP-M340 User manual

Aiwa TP-M131 User manual

Aiwa

Aiwa TP-M131 User manual

Aiwa TP-M105 User manual

Aiwa

Aiwa TP-M105 User manual

Aiwa TP-M145 User manual

Aiwa

Aiwa TP-M145 User manual

Aiwa TP-M330 User manual

Aiwa

Aiwa TP-M330 User manual

Popular Microcassette Recorder manuals by other brands

Sony Pressman M-450 Specifications

Sony

Sony Pressman M-450 Specifications

Sony M-98V operating instructions

Sony

Sony M-98V operating instructions

Panasonic RN-405 operating instructions

Panasonic

Panasonic RN-405 operating instructions

Panasonic RQ-L31 - Cassette Dictaphone operating instructions

Panasonic

Panasonic RQ-L31 - Cassette Dictaphone operating instructions

Panasonic RR830 - Desktop Cassette Transcriber operating instructions

Panasonic

Panasonic RR830 - Desktop Cassette Transcriber operating instructions

Sony M-430 - Microcassette Recorder Specifications

Sony

Sony M-430 - Microcassette Recorder Specifications

Memorex MB2190 user guide

Memorex

Memorex MB2190 user guide

Sanyo MCD-S730F Service manual

Sanyo

Sanyo MCD-S730F Service manual

Olympus J500 - Pearlcorder Microcassette Dictaphone user guide

Olympus

Olympus J500 - Pearlcorder Microcassette Dictaphone user guide

Memorex MB2186 operating instructions

Memorex

Memorex MB2186 operating instructions

DTS SLICE NANO user manual

DTS

DTS SLICE NANO user manual

Radio Shack 43-476 owner's manual

Radio Shack

Radio Shack 43-476 owner's manual

Panasonic RN-202 operating instructions

Panasonic

Panasonic RN-202 operating instructions

Sony M-455 - Microcassette Recorder operating instructions

Sony

Sony M-455 - Microcassette Recorder operating instructions

Sony ICD-ST20 operating instructions

Sony

Sony ICD-ST20 operating instructions

manuals.online logo
manuals.online logoBrands
  • About & Mission
  • Contact us
  • Privacy Policy
  • Terms and Conditions

Copyright 2025 Manuals.Online. All Rights Reserved.