,Q INSERTING ACASSETTE+ ❑COLOCAClON DE UN CASETE +❑INSERTION D’UNE CASSETTE+ Q
Insert acassette.
@front side (facing the cassette holder)
@reverse side (facing inside of the unit)
When the cassette holder is closed after inserting acassette, the recording/
playback side changes to the front side.
Inserte un casete.
@Iado delantero (hacia el compartimiento de casete)
@Iado de atr~s (hacia el interior del aparato)
Cuando se ha cerrado la tapa del casetero despubs de colocar un casete, el Iado
de grabacion/reproduction cambia al Iado delantero.
. ...\lnserer une cassette.
@face avant (vers Ie Iogement de cassette)
@face arrit+re (vers l’int&ieur de I’appareil)
Ala fermeture du Iogement de la cassette aprbs I’insertion d’une cassette, la face
avant devient la face aenregistrer/lire.
RECORDING FROM THE BUILT-IN
MICROPHONE +❑GRABACION UTILIZANDO EL MICROFONO
INCORPORADO DEL APARATO +❑ENREGISTREMENT AVEC LE MICROPHONE
INTEGRE +❑
1
2
3
4
Coloque un casete.
Para grabar solo un Iado
Coloque el casete con el Iado agrabar hacia adentro en la unidad ypresione
elbot6n ■STOP/DIR paraseleccionar elladodeatr&.
Para grabar ambos Iados
Coloque el casete con el primer Iado agrabar hacia la tapa del casetero.
Ajuste el interrupter TAPE SPEED.
2.4 Grabacion normal
1.2 Grabaci6n deldoble detiempo (amediavelocidad)
Por ejemplo) Se puede hater una grabacic5nde 60 minutes utilizando ambos
Iados de un micro casete de cinta MC-30.
Apunte e! microfono ala fuente de sonido.
Desliceel interrupter RECpresionandoel bot6n rojoenel interrupter
1Irrserta cassette.
To record only one side
Insert thecassette with the recording side facing inside the unit and press
■STOP/DIR button to select the reverse side.
To record both sides
Insert the cassette with the first recording side facing the cassette holder.
2Setthe TAPE SPEED switch.
2.4 Normal recording
1.2 Double time recording (with half speed)
E.g.) A60-minute recording can be made using both sides of an MC-30 micro
cassette tape.
3Orlentthe built-in microphone tothe sound source.
4Slide the REC switch pressing the red button ontheawitch to start
recording.
The OPE/REC indicator lights in red.The indicator lights and goes out according
to the voice input.
Recording stops automatically at the end of the reverse side.
1Instireru necassette.
Pour enregistrer seulement sur une face
Inserer la cassette avec la face aenregistrer vers l’int&ieur de I’appareil, puis
appuyersurlatouche ■STOP/DIR pour s61ectionner la face inverse.
Pour enregistrer sur Ies deux faces
lns&er la cassette avec la premibre face ~enregistrer dirig6e vers Ie Iogement
de cassette.
2Reglerle commutateur TAPE SPEED.
2,4 Enregistrement normal
1.2 Enregistrement double longueur (vitesse diminu6edemoiti&)
Asavoic Un enregistrement de 60 minutes est possible sur Ies deux c6t6s de
la micro cassette MC-30,
3Orienter femicrophone integre verslasource sonore.
4Faire glisser lecurseur RECenpressant lebouton rouge dessus pour
dr$marrer I’anreglstrement.
Le t~moin OPE/REC s’allume en rouge. II s’allume et s’eteint en fonction de
l’entr6e vocale.
L’enregistrement s’arr&e automatiquement Ala fin de la face inverse.
‘In 3
1
4@
03
PAUSWFAST PLAY ■STOP/DIR
2
OPE/REC
para empezar agrabar.
El indicador OPE/REC se enciende en rojo. El indicador se enciende yapaga
cada vez que se escucha una VOZ.
La grabaci6n se detiene automAlicamente al final del Iado de atras.
Funcionamiento b~sico
Basic operation
To atop recording Press the ■STOP/DIR button.
To pause recording Set the PAUSE/FAST PLAY switchto PAUSE.
To resume recording, set the switchto OFF.
Para ~arar la arabaci6n IPresione el bot6n ■STOP/DIR. Fonctionnement de base
Pour arr6ter I’enregistrament Presser la touche ■STOP/DIR.
Pour faire une oause IR601erIe commutateur PAUSE/FAST
Para hater una pauss en la
grabaci6n Mueva el interruptor PAUSE/FAST PLAY hacia
el Iado PAUSE.
Para seguir grabaci6n, mueva el interruptor
hacia el OFF. d’enregistrem&t PL~Y APAUSE.
Pour remendre I’enregistrement, Ie regler
Note
The standard spaed of the micro cassette recorder is 2.4 cm/sec. If you record
atape with the TAPE SPEED switch set to 1.2 and play it back on another micro
cassette recorder, playback sound may not be correct.
Nota
La velocidad normal del grabador de micro casete es de 2,4 cmheg. Si se graba
una cinta con el interruptor TAPE SPEED en la posici6n 1.2 yse reproduce en
otro grabador de micro casete distinto, el sonido puede no reproducirse
correctamente.
Contador de cinta +@
La Iectura en el contador de cinta cambia durante la reproducci6n, grabaci6n,
avarice r~pido orebobinado de la cinta.
Para vofver el contador al 000, presione el boton de reinicializaci6n del contador
@We eSt4 ala derecha del contador de cinta.
Remarque
La vitesse de defilement de bande normale de I’enregistreur de micro cassette
est de 2,4 cm/sec. Si une bande enregistrde avec Ie commutateur TAPE SPEED
r~gle a1.2 est Iue sur un autre enregistreur de microcassette, Ie son Iu peut ne
Tape counter +@
The readout of the tape counter changes during playback, recording, fast-
forwarding or rewinding of the tape.
To set the counter to 000, press the counter reset button @to the right of the
tape counter.
pas Mre correct,
Compteur de bande +@
L’indication du compteur de bande change pendant la lecture, I’enregistrement,
I’avance rapide et Ie rebobinage de la bande.
Pour rdgler Ie compteur a000, appuyer sur la touche de remise azero@ A
droite du compteur de bande.
Recording from the microphone remote control +❑
1Follow steps 1and 2of “RECORDING FROM THE BUILT4N MICROPHONE’.
2Connect the microphone remote control to the EXT MIC jack and orient it
to the sound source.
3Set the HOLD/REMOTE/MAIN switch to REMOTE.
4Slide the REC/STOP/DIR switch on the microphone remote control to REC
pressing the small button on the switch to start recording.
Grabacion con el control remoto del microfono +❑
1Siga Ios pasos 1y2 de “GRABACION UTILIZANDO EL MICROFONO
INCORPORADO DEL APARATO.
2Conscte el control ramoto del microfono en la toma EXT MIC yaptintelo
hacia la fuente de sonido.
3Mueva el interruptor HOLD/REMOTE/MAIN ala position REMOTE.
4Dealice el interruptor REC/STOP/DIR ala position REC presionando el boton
pequefio en el interruptor para que empiece agrabar.
Para parar la grabacion
Deslice el interruptor REC/STOP/DIR ala position STOP/DIR,
Ct.rando haga funcionar con Ios botones del aparato
Mueva el interruptor HOLD/REMOTE/MAIN aMAIN en el paso 3.
Se graba el sonido del micr6fono de control remoto conectado ypuede hater
funcionar con Ios botones del aparato principal,
Enregistrement depuis la telecommande de microphone -+ ❑
1Effectuer Ias etapea 1et 2de “ENREGISTREMENTAVEC LE MICROPHONE
INTEGRE”.
2Raccorder la telt$commande de microphone ala prise EXT MIC et I’orienter
vers fa source sonore.
3Regler Ie commutateur HOLD/REMOTE/MAIN aREMOTE.
4Faire glisser Ie curssur REC/STOP/DIR de la telecommande aREC en
pressant Ie petit bouton deasua pour lancer I’enregistrement.
To stop recording
Slide the REC/STOP/DIR switch to STOP/DIR,
When operating with the buttons on the main unit
Set the HOLD/REMOTE/MAIN switch to MAIN in step 3. . . Pour arri3ter I’enregistrement
Faire glisser Ie curseur REC/STOP/DIR aSTOP/DIR.
❑The sound from the connected remote control microphone is recoraea ana you
can operate with the buttons on the main unit.
(9 @@ )Pour la commande AI’appareil
Regler Ie commutateur HOLD/REMOTE/MAIN AMAIN Al’&ape 3,
Le son du microphone telecommande raccorde est enregistr~ et Ies commandes
sur I’appareil sent op&ables.
Para grabar SOIO Ios sonidos que estan mas fuertes que un
nivel predeterminado +❑
La grabaci6n empezara cuando el aparato detecte un sonido por encima de un
nivel predeterminado. Si el aparato no puede detectar ningtin sonido durante
unos 4segundos, la grabaci6n entrar~ en pausa. Esto es para evitar un desperdicio
inutil de la cinta yla grabaci6n en blanco.
1Mueva el interruptor V-SENSOR ala position ON.
2Ajuste el nivel del sensor.
Gire el control de volumen nivel del sensor de voz (~ VOLUME/V-SENSOR
LEVEL) en el sentido @para subir el nivel del sensor. Esto hara que se
graben incluso Ios sonidos relativamente silenciosos.
Gire el control de volumen nivel del sensor de voz (AVOLUMEfV-SENSOR
LEVEL) en el sentido del (@para bajar el nivel del sensor. No se grabardn Ios
ruidos de fondo en general ys610se grabar% Iossonidos relativamente fuertes.
3Deslice at interruptor REC preaionando el boton rojo en el interruptor
para empezar agrabar.
Ajuste del nivel del sensor
El nivel del sensor oplimo depende del volumen de la fuente de sonido. Haga
previamente varias pruebas con el nivel del sensor para determiner el nivel ideal,
antes de empezar una grabaci6n importance. Normalmente alinee primero la
marca blanca (@) del control AVOLUMEiV-SENSOR LEVEL con la parfe (@))
yajuste de acuerdo con Ias condiciones ambientales,
Nota
Cuando se empieza agrabar, despues de detectar el sonido, Ios primeros
segundos del sonido no se grabar~n.
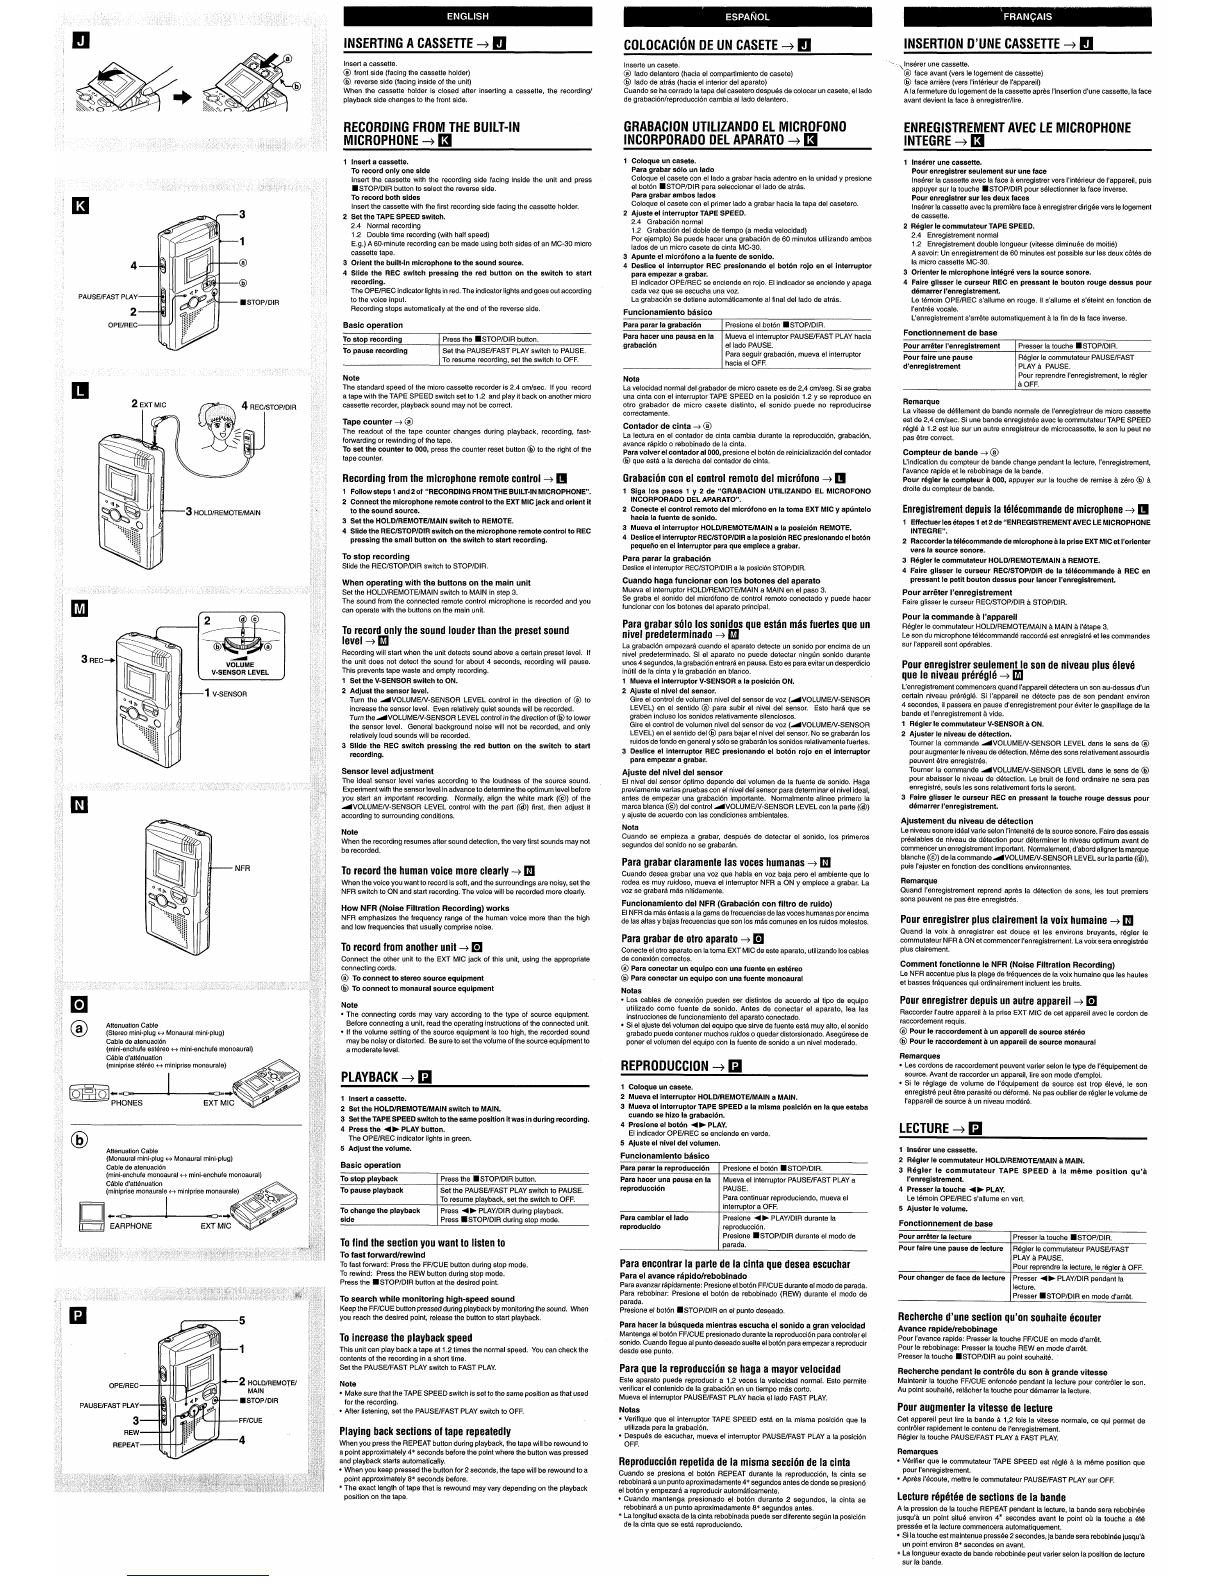
:~v$c:d~nly the sound louder than the preset sound
3REC+ Recording will start when the unit detects sound above acertain preset level. If
VOLUME the unit does not detect the sound for about 4seconds, recording will pause.
,; This prevents tape waste and empty recording.
,, 1Set the V-SENSOR switch to ON.
Pour enregistrer seulement Ie son de niveau plus fileve
que Ie niveau pr(!reglti +❑
L’enregistrement commencera quand I’appareil d&ectera un son au-dessus d’un
certain niveau prer6g16. Si I’appareil ne detecte pas de son pendant environ
4secondes, il passera en pause d’enregistrement pour &witerIe gaspillage de la
bande et I’enregistrement avide,
1Regler Ie commutateur V-SENSOR aON.
2Ajuater Ie niveau de detection.
Tourner la commande AVOLUME/WSENSOR LEVEL clans Ie sens de @)
pour augmenter Ieniveau de detection. M6me des sons relativement assourdis
peuvent 6tre enregistres.
Tourner la commande ~VOLUME/V-SENSOR LEVEL clans Ie sens de @
pour abaisser Ie niveau de d&ection. Le bruit de fond ordinaire ne sera pas
enregistre, seuls 10ssons relativement forts Ie seront.
3Faire glisser Ie curseur REC en preasant la touche rouge dessus pour
d6marrer I’enregistrement.
2Adjust the ssnsor level.
Turn the -VOLUMEiV-SENSOR LEVEL control in the direction of @to
increase the sensor level. Even relatively quiet sounds will be recorded.
Turn the -VOLUMEW-SENSOR LEVEL control in the direction of @to lower
the sensor level. General background noise will not be recorded, and only
relatively loud sounds will be recorded.
3Slide tha REC switch pressing the red button on the switch to start
recording.
Sensor level adjustment
The ideal sensor level varies according to the loudness of the source sound,
Experiment with the sensor level in advance to determine the optimum level before
you start an important recording, Normally, align the white mark (@) of the
-VOLUMEW-SENSOR LEVEL control with the part (@)) first, then adjust it
according to surrounding conditions. Ajustement du niveau de detection
Le niveau sonore ideal varie selon I’intensite de la source sonore. Faire des essais
prealables de niveau de d&ection pour determiner [e niveau optimum avant de
commencer un enregistrement important. Normalement, d’abord aligner la marque
blanche (@) de la commandeAVOLUME/V-SENSOR LEVEL sur la partie (@),
puis I’ajuster en fonction des conditions environnantes.
Note
When the recording resumes after sound detection, the very first sounds may not
be recorded.
Para grabar claramente Ias votes humanas +❑
Cuando desea grabar una voz que habla en voz baja pero el ambiente que 10
rodea es muy ruidoso, mueva el interruptor NFR aON yempiece agrabar. La
voz se grabara mas nhidamente.
Funcionamiento del NFR (Grabacion con filtro de ruido)
El NFR da mas enfasis ala gama de frecuencias de Iasvotes humanas por encima
de Iasaltas ybajas frecuencias que son Ios m~s comunes en Ios ruidos molestos.
To record the human voice more clearly+ ❑
When the voice you want to record is soft, and the surroundings are noisy, set the
NFR switch to ON and start recording. The voice will be recorded more clearly.
Remsrque
Quand I’enregistrement reprend apres la d&ection de sons, Ies tout premiers
sons peuvent ne pas ~tre enregistres.
How NFR (Noise Filtration Recording) works
NFR emphasizes the frequency range of the human voice more than the high
and low frequencies that usually comprise noise. Pour enregistrer plus clairement la voix humaine + ❑
Quand la voix Aenregistrer est deuce et Ies environs bruyants, rdgler Ie
commutateur NFR aON et commencer I’enregistrement, La voix sera enregistr~e
plus clairement.
Para grabar de otro aparato +❑
Conecte el otro aparato en latoma EXT MIC de este aparato, utilizando Ioscables
de conexion correctos.
@Para conectar un equipo con una fuente en estereo
@Para conectar un equipo con una fuente monoaural
Notas
.Los cables de conexibn pueden ser distintos de acuerdo al tipo de equipo
utilizado como fuente de sonido. Antes de conectar el aparato, lea Ias
instrucciones de funcionamiento del aparato conectado,
●Si el ajuste del volumen del equipo que sirve de fuente est~ muy alto, el sonido
grabado puede contener muchos ruidos oquedar distorsionado. Asegtirese de
poner el volumen del equipo con la fuente de sonido a un nivel moderado.
To record from another unit+ ❑
Connect the other unit to the EXT MIC jack of this unit, using the appropriate
connecting cords.
@To connect to stereo sourcs equipment
@To connect to monaural source equipment
Comment fonctionne Ie NFR (Noise Filtration Recording)
Le NFR accentue plus la plage de fr4quences de la voix humaine que Ies hautes
et basses fr6quences qui ordinairement inckrent Ies bruits.
Pour enregistrer depuis un autre appareil +❑
Raccorder I’autre appareil Ala prise EXT MIC de cet appareil avec Ie cordon de
raccordement requis.
@Pour Ie raccordement aun appareil de source st6r40
@Pour Ie raccordement aun appareil de source monaural
Note
●The connecting cords may vary according to the type of source equipment.
Before connecting aunit, read Ihe operating instructions of the connected unit,
●If the volume setting of the source equipment is too high, the recorded sound
may be noisy or distorted. Be sure to set the volume of the source equipment to
amoderate level. Remarques
●Les cordons de raccordement peuvent varier selon Ie type de l’6quipement de
source. Avant de raccorder un appareil, Iire son mode d’emploi.
●Si Ie reglage de volume de I’equipement de source est trop deve, Ie son
enregistr6 peut ~tre parasit6 ou deforme. Ne pas oublier de r~gler Ie volume de
I’appareil de source a un niveau mod6r&
REPRODUCTION +❑
PLAYBACK +❑1Coloqus un casete.
2Mueva el interruptor HOLD/REMOTE/MAIN aMAIN.
3Mueva el interruptor TAPE SPEED ala misma posici6n en Is que eataba
cuando se hizo la grabaci6n.
4Presione et boton +EPLAY.
El indicador OPE/REC se enciende en verde,
5Ajuate el nivel del volumen.
Funcionamiento basico
1Insert acassette.
2Set the HOLD/REMOTE/MAIN switch to MAIN.
3Sat the TAPE SPEED switch to the same position itwas in during recording.
4Press the +> PLAY button.
The OPE/REC indicator lights in green.
5Adjust the volume.
LECTURE +❑
@Attenuation Cable 1Inadrer une csssette.
2Regler Ie commutateur HOLD/REMOTE/MAIN aMAIN.
3Regler Ie commutateur TAPE SPEED ala mt?me position qu’a
I’enregiatrement.
4Presser la touche <› PLAY.
Le temoin OPE/REC s’allume en vert,
5Ajuster Ie volume.
Basic operation Para parar la reproducci6n
Para hater una pausa en la
reproducci6n
Presione el bot6n ■STOP/DIR,
Mueva el interru~tor PAUSE/FAST PLAY a
~
Set the PAUSE/FAST PLAY switch to PAUSE.
To resume playback set the switch to OFF
Press +~ PLAY/DIR during playback.
Press ■STOP/DIR during stop mode.
PAUSE.
Para continuar reproduciendo, mueva el
interruptor aOFF.
Para cambiar el Iado
rsproducido Presione +- PLAY/DIR durante la
reproducci6n.
Presione ■STOP/DIR durante el modo de
parada.
Fonctionnement de base
Pour arri$ter la lecture Presser la touche ■STOP/DIR.
Pour faire une pause de lecture Regler Ie commutateur PAUSE/FAST
PLAY aPAUSE.
Pour reprendre la lecture, Ie r6gler aOFF.
Pour changer de faca de Iacture Presser +- PLAY/DIR pendant la
To find the section you want to listen to
To fast forward/rewind
To fast forward: Press the FF/CUE button during stop mode.
To rewind: Press the REW button during stop mode.
Press the ■STOP/DIR button at the desired point.
Para encontrar la parte de la cinta que desea escuchar
Para el avarice rapido/rebobinado
Para avanzar r~pidamente:Presioneel bot6nFF/CUE durante el modode parada.
Para rebobinac Presione el bot6n de rebobinado (REW) durante el modo de
parada.
Presione el bot6n ■STOP/DIR en el punto deseado,
lecture.
Presser ■STOP/DIR en mode d’arri%.
To search while monitoring high-speed sound
Keep the FF/CUE button pressed during playback by monitoring the sound. When
you reach the desired point, release the button to start playback.
❑
●
5
1
OPEIREC 2HOLD/REMOTE/
MAIN
PAUSEIFAST PLAY ■STOP/DIR
3FFICUE
REW
REPEAT 4
Recherche d’une section qu’on souhaite rfcouter
Avarice rapidelrebobinage
Pour I’avance rapide: Presser la touche FF/CUE en mode d’arr6t.
Pour Ie rebobinage: Presser la touche REW en mode d’arn%
Presser la touche ■STOP/DIR au point souhait6.
Para hater la btiaqueda mientras escucha el sonido agran velocidad
Mantenga el bot6n FF/CUE presionadodurante la raproducci6npara controlarel
sonido.Cuando Ilegueal puntodeseado suelteel bot6npara empezara reproducer
desde ese punto.
To increase the playback speed
This unit can play back atape at 1,2 times the normal speed, You can check the
contents of the recording in ashort time.
Set the PAUSE/FAST PLAY switch to FAST PLAY, Para que la reproduction se haga a mayor velocidad
Este aparato puede reproducer a1,2 veces la velocidad normal. Esto permite
verificar el contenido de la grabaci6n en un tiempo m&s corto.
Mueva el interruptor PAUSJYFAST PLAY hacia el Iado FAST PLAY.
Notas
●Verifique que el interruptor TAPE SPEED est~ en la misma posici6n que la
utilizada para la grabaci6n.
●Despu6s de escuchar, mueva el interruptor PAUSE/FAST PLAY ala posici6n
OFF.
Recherche pendant Ie contr61e du son agrande vitesse
MaintenirlatoucheFF/CUE enfonc4e pendant la lecture pour contrbler Ie son.
Au point souhaitd, rekicher la touche pour d6marrer la lecture.
Note
●Make sure that the TAPE SPEED switch is set to the same position as that used
for the recording.
●After listening, set the PAUSE/FAST PLAY switch to OFF, Pour augmenter la vitesse de lecture
Cet appareil peut Iire la bande A1,2 fois la vitesse normale, ce qui permet de
contrder rapidement Ie contenu de I’enregistrement.
R6gler la touche PAUSE/FAST PLAY ~FAST PLAY,
Playing back sections of tape repeatedly
When you press the REPEAT button during playback, the tape will be rewound to
apoint approximately 4* seconds before the point where the button was pressed
and playback starts automatically.
●When you keep pressed the button for 2seconds, the tape will be rewound to a
point approximately 8* seconds before.
*The exact length of tape that is rewound may vary depending on the playback
position on the tape.
Remarques
●V&ifierque Ie commutateurTAPESPEEDest reg16Ala m~mepositionque
pour I’enregistrement.
●Apr&s I’ecoute, mettre Ie commutateur PAUSE/FAST PLAY sur OFF.
Reproduction repetida de la misma seccion de la cinta
Cuando se presiona el bot6n REPEAT durante la reproduction, la cinta se
rebobinar~ a un punto aproximadamente 4* segundos antes de donde ae presion6
el bot6n yempezard areproducer automaticamente,
●Cuando mantenga presionado el bot6n durante 2segundos, la cinta se
rebobinar~ a un punto aproximadamente 8* segundos antes,
*La Iongitud exacta de la cinta rebobinada puede ser diferente seg(rn la posici6n
de la cinta que se est~ reproduciendo.
Lecture repetee de sections de la bande
Ala pression de la touche REPEAT pendant la lecture, la bande sera rebobin6e
jusqu’a un point situ6 environ 4* secondes avant Ie point oh la touche a6t6
press6e et la lecture commencera automatiquement.
●Si la touche est maintenue press6e 2secondes, ja bande sera rebobin~e jusqu’2r
un point environ 8* secondes en avant.
*La Iongueur exacte de bande rebobinee peut varier selon la position de lecture
sur la bande,