Akai AK-10KGTLW User manual

After Sales Support
(AU) 1300 886 649 (NZ) 0800 836 761 | info@tempo.org
10kg Top Load Washing Machine
INSTRUCTION MANUAL
MODEL: AK-10KGTLW

After Sales Support
(AU) 1300 886 649 (NZ) 0800 836 761 | info@tempo.org
2
Contents
03 General Safety Instructions
07 Product Overview
08 Getting Started: Installation
12 Features
14 Instructions
21 FAQs and Troubleshooting
23 Other Useful Information

After Sales Support
(AU) 1300 886 649 (NZ) 0800 836 761 | info@tempo.org 3
General Safety Instructions
IMPORTANT SAFETY INSTRUCTIONS
READ CAREFULLY AND KEEP FOR FUTURE REFERENCE
Read this manual thoroughly before first use, even if you are familiar with this type of
product. The safety precautions enclosed herein reduce the risk of fire, electric shock
and injury when correctly adhered to.
Keep the manual in a safe place for future reference, along with the completed
warranty card and purchase receipt. If applicable, pass these instructions on to the
next owner of the appliance.
Always follow basic safety precautions and accident prevention measures when
using an electrical appliance, including the following:
This heading indicates that there is a serious risk of
injury if you do not adhere to the warning(s).
This heading indicates that care should be taken to
avoid injury to persons or damage to property.
A tick in a circle accompanies a measure or action that
you should do or follow.
A cross in a circle accompanies a measure or action
that you should NOT do.
Warning
Caution
Electrical safety
• Before connecting and turning on the washing machine, ensure the electrical
voltage and circuit frequency correspond to those indicated on the appliance.
• Only connect the washing machine to a grounded (earthed) electrical outlet.
• Do not insert any objects into the appliance.
• Do not kink or damage the power cord, and position it out of the way so no one
steps on or places anything on the cord or against it.
• Do not overload the wall outlet. Overloading can result in fire or electric shock.
• If the supply cord is damaged, it must be replaced by the manufacturer or its
service agent or a similarly qualified person in order to avoid a hazard.
• Never use this washing machine with a power adaptor or an extension cord.
• Unplug the washing machine from the power supply before cleaning, servicing,
maintenance or moving the appliance. Pull by the plug, not by the cord.
• After use, always unplug the appliance and turn off the water.
• WARNING: All electrical work must be done in accordance with local and national
electrical codes as applicable and should be undertaken by licenced and qualified
persons only.

After Sales Support
(AU) 1300 886 649 (NZ) 0800 836 761 | info@tempo.org
4
General Safety Instructions (Cont.)
Installation
• Install the washing machine on a flat surface to avoid overturning during use. If the
machine must be placed on carpet, make sure any ventilation openings in the base
are not obstructed.
• Install the washing machine so that there is a distance of at least 200mm between the
appliance enclosure and any external heat sources, such as appliances containing
heating elements.
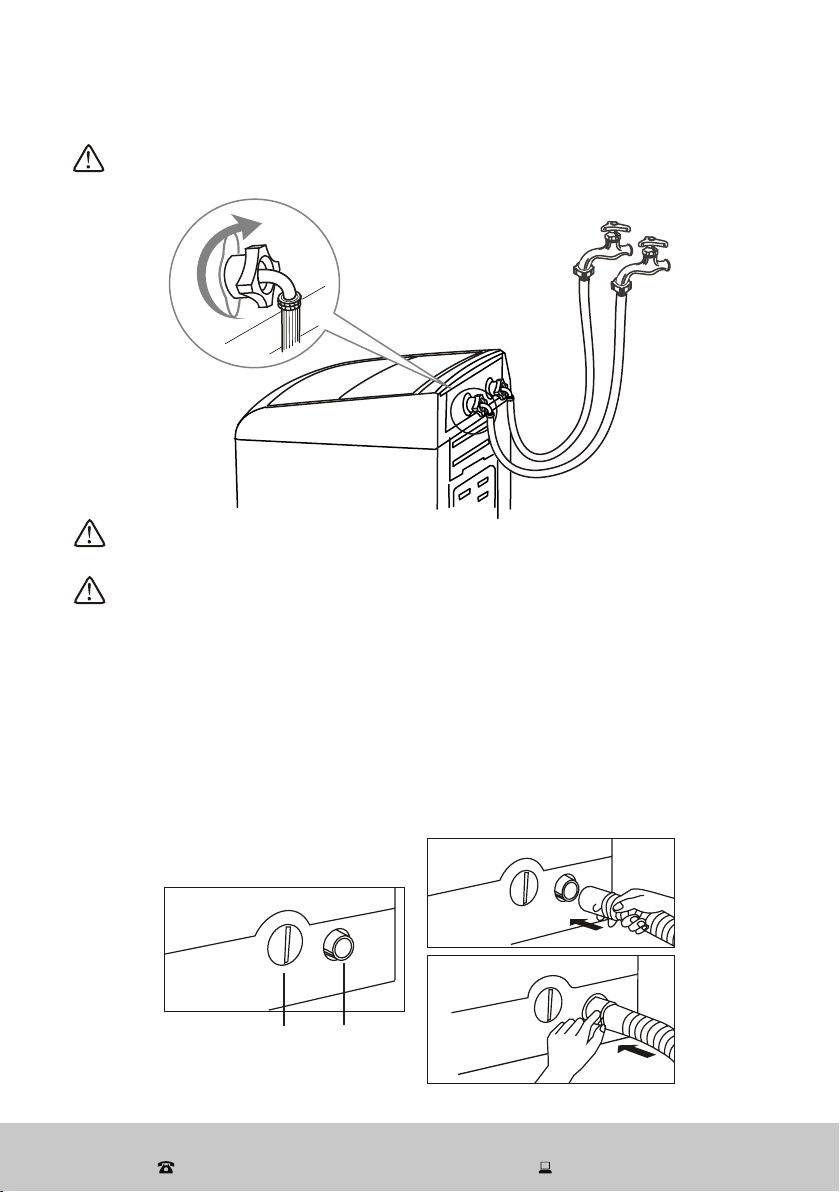
• Connect the washing machine to the water mains using new hose sets. Do not reuse
old hose sets. The required water pressure is 0.03MPa (min.) to 0.8MPa (max.).
• Make sure that all water and electrical connections are made by qualified personnel
only, observing local safety regulations and following the manufacturer’s instructions
(see “Getting Started: Installation” on pages 8 to 11).
• Improper installation may result in the risk of fire, electric shock and/or injury. We
assume no liability for any eventual damages caused by improper installation.
Usage conditions and restrictions
• The appliance is designed for private domestic use only. It is not suitable for commer-
cial or trade use. The appliance has a capacity (max. weight of dry wash load) of 10kg.
• Do not operate the appliance outdoors.
• This appliance is not intended for use by persons (including children) with reduced
physical, sensory or mental capabilities, or lack of experience and knowledge, unless
they have been given supervision or instruction concerning use of the appliance by a
person responsible for their safety.
• Children should be supervised to ensure they do not play with the appliance.
• Before loading the machine, always ensure no pet or young child has climbed into it.
• Make sure all pockets of clothing to be washed are empty. Hard, sharp objects such
as coins, safety pins, bra wires, nails, screws or stones can cause extensive damage
to the appliance and block the pump.
• Any damage or malfunction resulting from foreign objects is not covered by your
warranty and may lead to expensive repairs. We assume no liability for any eventual
damages caused by improper or faulty use.
Cleaning and maintenance
• Before cleaning or carrying out maintenance, always unplug the appliance from the
power supply.
• Except for the filters that require regular cleaning, the unit has no user-serviceable
parts contained within. Do not attempt to repair, disassemble or modify it. Repairs
made by inexperienced or unqualified persons may cause injury and/or make more
serious repairs to the appliance necessary.
• CAUTION: After each wash, check and clean the lint filter inside the drum. Also
check and clean the lint filter at the back of the machine next to the drain hose
outlet on a regular basis.
• This appliance should only be serviced by an authorised service centre, and only
genuine spare parts should be used. Contact our after sales support line for advice.

After Sales Support
(AU) 1300 886 649 (NZ) 0800 836 761 | info@tempo.org 5
General Safety Instructions (Cont.)
Do not let children climb into the
washing machine or peer into the
rotating spin barrel.
Do not wash clothes that
have residue of flammable
materials.
Do not use the appliance if the
power cord or plug is damaged
to avoid an electric shock, short
circuit or fire.
Regularly clean the power plug
to remove dust and dirt and
avoid contact failure.
Turn the machine off before
pulling out the plug from the
socket if the machine
is not in use.
Do not place any lit candles or
cigarettes on top of the washing
machine.
Insert the power plug securely.
Warnings
Use a 230-240V AC power
source.
230-240V

After Sales Support
(AU) 1300 886 649 (NZ) 0800 836 761 | info@tempo.org
6
Ensure the water inlet hoses
are connected and the taps are
turned on before washing a load.
Do not change the power cord.
If it needs changing, contact a
qualified electrician
or call the after
sales support line.
Do not pull the power cord when
removing the plug.
Do not wash jackets, raincoats,
fishing coats and similar clothes
in the washing
machine.
Do not allow children to lay or sit
on top of the washing machine.
The water temperature should
not exceed 60°C
when washing
with warm water.
Cautions
Do not pull out or insert the plug
with wet hands to avoid electric
shock.
No wet hands
To avoid electric shock, fire and
malfunction, do not install this
machine
in a damp
place.
No dampness
General Safety Instructions (Cont.)

After Sales Support
(AU) 1300 886 649 (NZ) 0800 836 761 | info@tempo.org 7
Product Overview
Accessories
Scope of delivery
14
13
12
Top load washing machine
1 Lid
2 Level indicator
3 Softener dispenser
4 Control panel
5 Housing
6 Adjustable leg
7 Rollers (one on each back corner)
8 Handle (one on each side)
9 Wash/spin tub
10 Detergent box
11 Cold and hot water connections
7
5
6
8
10
9
1
2
3
4
Accessories
12 Hot water supply hose
13 Cold water supply hose
14 Drain hose
Not shown: Base cover and screw for
attaching it to the unit (see page 8)
C Documentation (not shown)
Instruction manual
Quick start guide
Warranty certificate
Back view 11

After Sales Support
(AU) 1300 886 649 (NZ) 0800 836 761 | info@tempo.org
8
Getting Started: Installation
Unpacking
• This product has been packaged to protect it against transportation damage. Keep
the original packaging carton in a safe place. It will help prevent any damage if the
product needs to be transported in the future. In the event that it is to be disposed
of, please recycle it and all other packaging materials where possible.
• Plastic wrapping can be a suffocation hazard for babies and young children, so
ensure all packaging materials are out of their reach and disposed of safely.
• Unwind the power cord to its full length and inspect it for damage. Do not use
the appliance if the appliance or its cord has been damaged or is not working
properly. In case of damage, contact our after sales support centre for advice on
examination, repair or return of the damaged product.
• Read this manual to familiarise yourself with all the parts and operating principles
of the washing machine. Pay particular attention to the safety instructions on the
previous pages.
Levelling the washer
• Install the washer on a stable and level
surface, in a dry location, out of sunlight.
• The inbuilt levelling indicator (see page 7)
will help you determine whether levelling is
necessary. If so, adjust the adjustable leg
(at the front right side of the machine), as
illustrated, right. The maximum permissible
inclination of the supporting surface is 2°.
CAUTION: Installing the washer on a carpeted
floor may cause vibration issues. If you must
install it on carpet, make sure not to block any
ventilation openings on the bottom of the washer.
Installing the base cover
• Make sure the power cord is unplugged from the
mains supply.
• Place some padding (such as a soft mat, blanket or
thick towel) on the floor and gently lay the washing
machine on the padding, back side down. Take care
not to dent the housing.
• Insert the base cover into the hooks of the leg,
pushing it straight until it reaches into the front hooks.
• Fasten the base cover with the supplied screw(s).
• Carefully set the washer upright.
Base
cover
Back
Leg
Screw(s)
Front
Base of the washer
(3) Tighten (1) Loosen
(2) Down (4) Up
Adjustable leg

After Sales Support
(AU) 1300 886 649 (NZ) 0800 836 761 | info@tempo.org 9
Getting Started: Installation (Cont.)
Connecting the water inlet hoses
Install the water inlet hoses to your hot and cold water taps, as described below.
• Check and ensure that the sealing washers are firmly in place.
• Attach the straight end of the hose to your water taps. Make sure to attach the
hot water supply hose (with red markings) to the hot water tap and the cold water
supply hose (with blue markings) to the cold water tap.
• Tighten the coupling nuts securely by hand, as illustrated below (the sealing washer
is part of and located inside the tap end).
• Attach the curved end of the hose to the corresponding inlet valve of the washer.
• Tighten the coupling nuts securely by hand, as illustrated below.
• Tighten the nut by turning it clockwise while holding the hose. (To detach the water
supply hose, turn the nut anticlockwise after turning the tap off.)
• Turn on the taps and check for leaks. Tighten the coupling nuts firmly if there is any
leakage. If your water pressure is strong, close the water tap completely, then open
it slightly.
Tap
Sealing
washer
Tap end
Inlet hose
Twist
Water inlet valve
IMPORTANT!
• Both the hot water and cold water hoses must be connected to your taps.
• Make sure your hot water from the tap is no hotter than 60°C.

After Sales Support
(AU) 1300 886 649 (NZ) 0800 836 761 | info@tempo.org
10
Getting Started: Installation (Cont.)
Installing the drain hose
CAUTION: When tightening the clamping nut, take care not to damage the water
inlet valve joint. Apply force evenly and do not twist the water inlet valve.
CAUTION: Use only the new (supplied) hoses with your new appliance. Do not
use a hose from an existing machine, or one that has been used previously.
CAUTION: In the event that the hoses are too short for your set-up, please seek
advice from your local washing machine store to purchase a longer hose.
• The drain hose and drain pump filter are located at the back of the machine, as
illustrated below, left.
• Pinching the two bands of the clamp on the drain hose, connect it to the drain hose
connection at the back of the washer, as illustrated below.
• When the washer is in use, put the drain hose into a drain spout (or into a sink/tub),
as illustrated on the opposite page.
Drain pump with
lint filter Drain hose
connection

After Sales Support
(AU) 1300 886 649 (NZ) 0800 836 761 | info@tempo.org 11
Getting Started: Installation (Cont.)
CAUTION!
• While the washer is in use, make sure the height of the drain hose is at least 80cm,
otherwise the washer will not work well, or the water may flow out in the course
of washing. Also ensure the drain hose is not higher than 120cm above ground,
otherwise the washer will not drain water well.
• Never lay down the drain hose, as water will be discharged.
• Be sure the drain hose is properly routed so it will not kink or lift off the sink.
Using the rollers
The washing machine is equipped with two rollers at the back that you can use to
move the machine more easily. Tilt the washing machine by about 30 degrees and
push forward, or pull backward, while holding the machine securely on both sides
with your hands, as illustrated below.
Do not move the machine on the rollers on uneven ground, which can damage the
rollers.
.
CAUTION: Take care of your
back! Do not tilt the washing
machine too much, which could
cause injury.

After Sales Support
(AU) 1300 886 649 (NZ) 0800 836 761 | info@tempo.org
12
Time and preset indicators
Preset / Ultrasonic button
Detergent indication
Program/Child lock button
• These indicate
how much powder
detergent to use.
• See ‘Detergent
and load
recommendations’,
page 15, for details.
• Press this button to choose the washing program:
the relevant indicator light will start flashing.
• This button is also used to set the child lock
function. See ‘Child lock’, page 20, for details.
• The machine automatically sets certain washing
processes for the Normal / Heavy Duty / Custom
and Wool wash programs. See page 20 for details.
This indicator shows the
remaining time during washing.
• Press this button to preset the
finish time of the washing (not
applicable for the Delicate
program).
• To select or cancel the Ultra-
sonic function, press and hold the
button until the Ultrasonic light is
on or off. See page 20 for details.
This indicator shows during
presetting when the washing will
be finished.
When abnormal conditions occur,
an error warning will appear here.
When setting soak and wash
processes, this indicator shows
the time you set.
Features
The control panel
Water level button
• You can choose the
appropriate water
level that matches
the load size.
• Different water
levels for washing or
rinsing are optional.
• See ‘Setting the
water level ...’, page
19, for details.

After Sales Support
(AU) 1300 886 649 (NZ) 0800 836 761 | info@tempo.org 13
Start/Pause button
Rinse indication
Temp. button
Spin indication
Process buttons
Power
button
• Press this
button to
switch the
power on;
press it again
to switch the
power off.
• At the end
of a washing
program, the
power will be
switched off
automatically
after 5
seconds.
• If you leave
the washer
switched on
without starting
the operation,
the power will
be switched off
automatically
after 10
minutes of
inactivity.
• Press this button to start the
washer operation.
• During operation, press this
button to stop the washer
temporarily; press it again to
restart the washer operation.
NOTE: This is not a Cancel button.
• This indicator
shows the number
of rinses.
• Press this button
if you want to
choose the water
temperature.
See ‘Hot / cold
/ warm water
wash’, page 19
for details.
• This indicator shows
the spin time in
minutes (maximum
9 minutes).
• Press these buttons to set various
wash processes. See ‘Setting the
water level ...’, page 19, for details.
• Press the Soak / Variable Wash
button before the start to set a
soak time of up to 40 minutes (not
applicable for the Delicate and
Blanket programs). See page 19.
Features (Cont.)

After Sales Support
(AU) 1300 886 649 (NZ) 0800 836 761 | info@tempo.org
14
Instructions
Before you start washing
A Make sure the washer is stable and
level. The inbuilt level indicator (see
page 7) will help you determine
whether levelling is necessary. If so,
adjust the adjustable leg (front right)
to stabilise the washer (see page 8).
B Make sure the water inlet hoses
are properly installed (see page 9).
C Plug the machine into a nearby
power point.
D Open the water taps.
E Make sure the drain hose is properly
installed. Hang the upper end of the
hose over the laundry sink or into a
drain spout (see page 10).
F Before using the washing machine
for the first time, run a complete
cycle without laundry items.
Normal usage
1. Before washing, remove any coins, keys and other hard items
from pockets. Close any zippers to prevent damaging your
clothes and the wash tub. Brush dirt and sand off clothes and
turn pockets inside out.
2. Sort your washing into appropriate loads: whites,
coloureds, cottons, delicates, heavily soiled, etc.
On the back
Install
the drain
hose at a
height of
80-120cm
to prevent
water drain-
age and
overflowing
problems.
A
B
D
C
E
Place delicate items into a wash bag for protection.
3. Load your washing items uniformly in the tub.
4. Add washing detergent (see opposite for details).
5. Press the Power button.
6. Refer to the Program Selection Guide (opposite) and select a suitable wash
program. For the Normal and Heavy Duty programs, the machine will automatically
choose the correct water power and level, wash and spin time and rinse type; for
the Custom and Wool programs, the machine will automatically select the correct
water level. Other parameters can be set individually (see page 16).
7. Close the lid and press the Start/Pause button. (If the washer lid is not closed
properly, the washer will sound an alarm and stop working before spinning.
8. At the end of the wash, remove your washing, unplug the power plug from the wall
outlet and close the water taps. Leave the lid open until the interior has dried.
Select the Normal program and run the machine until the end of the
program.

After Sales Support
(AU) 1300 886 649 (NZ) 0800 836 761 | info@tempo.org 15
Instructions (Cont.)
Program selection guide
Program Suitable items
Default settings for individual wash processes
Washing time *
(minutes) Rinse type Spin time
(minutes)
Normal ** Normally soiled clothing
and other items
5–40 2 x Water saver rinse
4 x Shower rinse
5–26
Custom Dependent on the
custom settings
10 2x Water saver rinse 5
Delicate Delicate fabrics, lingerie 6 2x Water saver rinse 2
Heavy
Duty
Heavily soiled cottons,
workwear
7–14 2x Water saver rinse 7–8
Blanket Blanket or
bulky items
12 2x Water saver rinse 8
Wool Delicates, knitwear 10 2x Water saver rinse 2
* Total program times differ and depend on the weight of the wash load and water level.
** When the water level of the Normal program is set to 8, the program has a default
setting of 90L of warm water; all other programs have cold water as a default (water
temperature is adjustable, see page 19).
Detergent and load recommendations
• We suggest you use detergent in the amounts recommended below. Too little will
give poor washing results, but too much will affect rinse performance and may
cause overflow of suds, which could interfere with machine operation.
CAUTION: Do not overfill detergent.
• Add detergent into the detergent box or put it directly into the tub (see page 18).
• Dilute fabric softener with a little water and carefully add it to the softener
dispenser on the balance ring for dispersion through the final rinse.
Water level indicator
Water level 1 2 3 4 5 6 7 8
Water volume 28L 35L 44L 53L 65L 71L 81L 90L
Wash capacity (kg) Below 1 1–2.5 2.5–3.5 3.5–5 5–6 6–7.5 7.5–8.5 8.5–9
Detergent indicator
Amount of powder
detergent (g) 25–35 35–53 53–71 71–90
Liquid detergent Follow the recommendations on the detergent packaging.

After Sales Support
(AU) 1300 886 649 (NZ) 0800 836 761 | info@tempo.org
16
Instructions (Cont.)
Customising a program
This washing machine is equipped with a fuzzy logic function that automatically
chooses certain wash cycle processes for the Normal, Heavy Duty, Custom and Wool
programs. You do not have to adjust them yourself, however, if you want to adjust
these values yourself, proceed as follows:
1. Prepare your washing according to points 1 to 4 on page 14.
2. Press the Power button, then press the Program button to select the washing
program, e.g. Normal, Heavy Duty.
3. Press the appropriate process button to select the process and time you want to
adjust. The relevant indicator light will illuminate when the option is selected.
4. Press the Water Level button and choose an appropriate water level.
5. Close the lid and press the Start/Pause button for the washing program to start.
6. At the end of the washing program, a buzzer will sound to alert you that the
program has finished before the power is shut off automatically.
7. Close the water taps and unplug the power plug from the wall outlet.
8. If you want to use a particular customised program on a regular basis, you can
program it to the machine’s memory for easy access the next time you want to use
the same program. See ‘Memory function’, page 20, for instructions.
(The number is the number of rinses.)
options
options
options
options
options
4
Minutes (Delicate)
Minutes (Soak time cannot be adjusted for the
Delicate and Blanket programs.)
Minutes (For the Delicate program, spin time can only
be adjusted up to 3 minutes, as illustrated.)
Minutes

After Sales Support
(AU) 1300 886 649 (NZ) 0800 836 761 | info@tempo.org 17
Instructions (Cont.)
The blanket program
Use this program for washing blankets or other bulky items. It will automatically select
the highest water level (90L), but you can adjust this manually down to 62L according
to the size of your bulky item(s).
1. Press the Power button and open the washer lid.
2. Press the Program button repeatedly until the indicator for the Blanket program
flashes.
3. Dissolve an appropriate amount of washing detergent with a little lukewarm water,
then pour the detergent solution directly into the tub of the washing machine.
4. Fold up the blanket and put it into the washing tub, as illustrated below.
5. Close the washer lid.
6. Press the Start / Pause button for the washing program to start.
7. At the end of the washing program, a buzzer will sound to alert you that the
program has finished before the power is shut off automatically.
8. Close the water taps and unplug the power plug from the wall outlet.
9. We recommend cleaning the lint filter after washing a blanket (see page 23 for
instructions).
NOTE: If you notice that the blanket floats up during the wash, press the Start/Pause
button, the washer will stop working temporarily. Push the blanket down and
press the Start/Pause button again to continue washing.
Selecting a wash cycle process
On occasion you may want to select a single wash cycle process (or two processes)
instead of a complete program. For example, you may want to spin clothes that got
wet from rain while hanging on the line, or rinse and spin clothes washed by hand.
• To set a spin cycle only, set the WASH time and RINSE options to “0” and then
select a SPIN time (from 0-9 minutes). Then proceed as described opposite.
• To set a rinse and spin cycle, set the WASH time to “0”, then select a RINSE
option (from 1 to 4) and then the SPIN time (from 0-9 minutes). Then proceed as
described opposite.

After Sales Support
(AU) 1300 886 649 (NZ) 0800 836 761 | info@tempo.org
18
Instructions (Cont.)
Preset timer (delayed washing)
This washing machine has a 0–24 hour preset function, which you can set to
determine the time when the washing program will finish. (It is, in effect, similar to a
‘delayed start’ function, but you set the time period after which you want the wash to
finish rather than to start.)
NOTES: * The Preset function is not available for the Delicate program.
*To avoid water leakage when using this function, make sure the water taps
are open, the drain hose is properly installed and the washing load and
detergent are properly prepared.
1. Put your washing in the machine, loading items uniformly in the tub.
2. Press the Power button.
3. Select the required Program and process, and any other Water Level, Temperature
and Ultrasonic, if required.
4. Press the Preset button to select the desired time period (in hours) for the wash to
finish.
5. Select the water level, if necessary.
6. Add any detergents (see below and page 15 for details).
7. Close the washer lid and press the Start/Pause button.
8. After setting the Preset, the corresponding light will illuminate and all other lights
will be switched off about one minute later. (If you set the child lock, the Child
Lock light will be on.)
9. To check the preset program, press any button (except for the Power button); the
program will be indicated for 5 seconds. During these 5 seconds you can press the
Water Level button and set the water level.
10.To cancel the preset, shut off the power.
11.To change the preset time, first cancel the preset, then set it again.
Adding detergent to a preset wash
When using the delayed wash, we recommend
you use powder detergent. Do not add detergent
directly to the wash tub ahead of the wash time,
but follow the instructions below:
• Washing detergent: either put detergent into
the detergent box or, if you prefer to put it
directly into the wash tub, wrap the powder in a
small cloth.
• Fabric softener: dilute the softener with twice
the amount of water, then pour the solution into the softener dispenser.

After Sales Support
(AU) 1300 886 649 (NZ) 0800 836 761 | info@tempo.org 19
Instructions (Cont.)
Other functions
Hot / cold / warm water wash
This top load washing machine must be connected to both a cold and a hot water tap.
You can then set it to use either just cold water for a cold water wash, or just hot water
for a hot water wash, or both hot and cold water for a warm water wash.
To select the wash temperature, press the Temperature button.
• Cold wash: the corresponding indicator light is on.
• Hot wash: the corresponding indicator light is on.
• Warm wash: both the Cold and Hot wash indicator lights are on.
Water power
The water power affects the pause time of the pulsator and hence the intensity of the
wash. It is automatically selected for the wash and rinse process, however, you can
also adjust it yourself (except for the Delicate and Blanket programs). To adjust the
water power level:
• Press the Start/Pause button, then press the Soak/Variable Wash button: the
display will show “H0”.
• Press the Soak/Variable Wash button again, repeatedly, to increase the water
power level from “H1”, “H2”, “H3” to the strongest, “H4”.
• Press the Soak/Variable Wash button again, repeatedly, to decrease the water
power level from “L1”, “L2”, “L3” to the weakest: “L4”.
Setting the water level and other processes
You can set the water level for wash and rinse processes. For example, if you are
sensitive to detergent residues in your washing, you may want to select a higher water
level for rinsing.
To set different water levels:
• Press the Wash button until the Wash light flashes; press the Water Level button
to choose the appropriate water level; press the Wash button to set the wash time.
• Then press the Rinse button until the Rinse light flashes; press the Water Level
button to choose the appropriate water level; press the Rinse button to set the
number of rinses.
To set other processes:
• Then press the Spin button until the Spin light flashes; press the Spin button to set
the Spin time.
• Finally press the Start/Pause button: the washer will start operating according to
the set values for wash and rinse water levels, number of rinses and spin time.

After Sales Support
(AU) 1300 886 649 (NZ) 0800 836 761 | info@tempo.org
20
Instructions (Cont.)
Fuzzy control
For certain wash programs, the machine automatically detects the weight of your
wash load and selects the appropriate wash cycle processes.
• For the Normal and Heavy Duty programs, the machine will automatically select
the correct water power and level, wash and spin time, and rinse type.
• For the Custom and Wool programs, the machine will automatically select the
correct water level. Other wash cycle processes have to be manually set.
Ultrasonic function
This top load washing machine is equipped with an ultrasonic pump, which generates
thousands of vibrations per second into the wash tub. These vibrations help remove
stains and dirt without chemical stain removers, thus reducing the required detergent
amount and wash time.
To select this feature, press and hold the Preset/Ultrasonic button for four seconds
until the corresponding light comes on and a buzzer sounds. Repeat the steps to
cancel. When selecting the Ultrasonic wash, please use less detergent than usual.
Memory function
When you run the Normal,Custom or Heavy Duty program, the machine memorises
your settings (except for preset time and water level) for the next time you select it.
NOTE: This function is not available for the Wool, Blanket and Delicate programs.
Child lock
With the child lock activated, the machine will stop working automatically and sound
an alarm if the washer lid is opened for 4 seconds. To set the child lock:
• Press the Power button to switch on the power, then press and hold the Program
button for 4 seconds until a buzzer sounds. The child lock will be activated when
the Start/Pause button is pressed. Repeat the steps to cancel.
Start of washing
Washing will start when the water inside the tub has reached two levels below the set
level while the water will continue to flow in (see page 15 for the eight water levels).
This early start of washing will increase the wash time and allow the detergent to
dissolve fully before the start of the set wash time. This function will be ineffective:
• When water level 1 (28L) or 2 (35L) is selected.
• When the Delicate or Blanket program is selected.
• When Soak is selected, after the soaking process.
Table of contents
Other Akai Washer manuals