Akaso NV01 User manual

USER MANUAL
AKASO NV01 Night Vision Binoculars
V1.0

USER MANUAL
V1.0
AKASONV01 Night Vision Binoculars
1
What’s in the Box
USB Cable
* 1
Strap
* 1
NV01 Night Vision
Binoculars * 1
Cloth Bag
* 1
1
User Manual
* 1
Product Overview
Cleaning Cloth
* 1
32GB Memory
Card *1
Storage Bag
*1
2
3
4
5 5
6
7
8
9
10
12
11

•
•
•
•
•
•
•
•
•
•
•
2
1
2
3
4
5
10
Focus Wheel
Cover for USB Port/Micro SD Card Slot
IR Up/Zoom In/Up Button
IR Down/Zoom Out/Down Button
Strap Hole
IR LEDs
Menu Button
WIFI Button
Shutter/OK Button
Power/Mode Button
View Area
Battery Cover
6
7
8
9
11
12
Getting Started
Using Night Vision
1. Button Introduction
MENU Button: Enter and exit menu.
POWER Button: Press and hold to turn the device on or off.
MODE Button: Press to switch between Photo/Video/Playback mode.
IR UP/ZOOM IN/UP Button: Choose the option above.
IR DOWN/ZOOM OUT/DOWN Button: Choose the option below.
Shutter/OK Button: Take photos/videos/OK.
WIFI Button: Turn WIFI connection on/off.
1. Installing Batteries
Open the battery cover on the back of the device. Insert 6×1.5V AA alkaline
batteries (not included) into the battery compartment while noting the correct
polarity indication. Then close the battery cover.
2. Inserting a Memory Card
Prepare a Class 10 Micro SD card (capacity up to 32GB) in advance.
Open the card slot cover. Insert the Micro SD card into the slot. Make sure the
direction is correct. Never insert the card forcibly.
Format the Micro SD card to improve the battery life and shutter speed of the
device.
To remove the card, gently push to pop it out.
Note: If no memory card is installed, the device will prompt “Please insert SD card”.

•
•
•
•
•
•
•
•
3
2. Power On
Press and hold the POWER button for 3 seconds. When the boot animation
appears on the screen, the device is on.
3. Power Off
In the power-on state, press and hold the POWER button for 3 seconds. When
the shutdown animation appears on the screen, the device is off.
4. Mode Switching
Press the MODE button to switch between Photo mode, Video mode and
Playback mode.
Photo Mode
Video Mode
Playback Mode
For taking still photos
For recording videos
For playing recorded files
5. Settings
Press the MENU button in Photo or Video mode to change the settings.
MP Photo Resolution: [1.3M] / [VGA]
HD Resolution: [960] / [VGA]
Night Vision Sensitivity: [Low] / [Mid] / [High]
Language: [English] / [Simplified Chinese] / [Traditional Chinese] / [French] /
[Dutch] / [Spanish] / [Italian] / [Portuguese] / [German] / [Russian] / [Japanese] /
[Korean]
Date & Time
Auto Power-Off: [1min] / [3min] / [5min] / [10min] / [OFF]
Set the time interval to save power by automatically turning off the device
when not in use.
Power Frequency: [50Hz] / [60Hz]
Set the light source frequency to match the frequency of the local electricity
supply and prevent interference.
Datemark: [Off] / [Date] / [Date&Time]
Add a date and time watermark to photo or video files.

•
•
•
•
•
•
•
•
•
•
•
•
4
6. Taking Pictures
① Turn on the device. The default is Video mode. Press the MODE button to
switch to Photo mode.
② Zooming
Press and hold the IR UP button or IR DOWN button to zoom the image in or
out. The zoom value will be displayed on the LCD screen.
③ Take a still photo:
First, point the lens at the target and observe it through the screen.
Second, turn the focus wheel to adjust the focus until the screen display is clearest.
Finally, press the Shutter button to take a photo.
7. Recording Videos
① Turn on the device. The default is Video mode.
② Zooming
Press and hold the IR UP button or IR DOWN button to zoom the image in or out.
The zoom value will be displayed on the LCD screen.
③ Start a recording:
First, point the lens at the target and observe it through the screen.
Second, turn the focus wheel to adjust the focus until the screen display is
clearest.
Finally, press the Shutter button to take a video. The length of the video will be
displayed on the screen.
④ Stop a recording
Press the Shutter button again to stop recording.
Format: [Yes]/[No]
Formatting the memory card will delete all files including protected files.
Please back up important files to your computer before formatting.
Factory Reset: [Yes]/[No]
Restore all settings to factory defaults.
WIFI Password
A nine-digit password can be set. You can choose uppercase letters, lowercase
letters and numbers.
Version: 20190123 V001

•
5
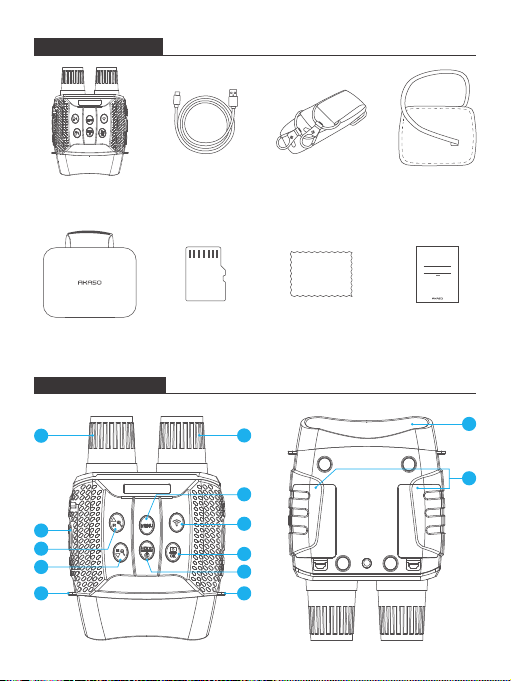
8. IR-LED (Night Vision Function)
In Photo/Video mode, if you need to observe a dark environment, please short
press the IR UP button to turn on the IR LED, and the image will become black and
white. There are 7 gears for the IR LED. Press the IR UP button to upshift the gear,
and press the IR DOWN button to downshift the gear.
(Note: When the battery voltage is insufficient, it will automatically downshift gear.
It can reach Gear 7 when fully charged, Gear 5 at half power and Gear 3 at quarter
power. The IR LED cannot be activated when the power is less than 25%.)
Note:
① Device power off
If the device fails to activate, check for defective, missing or improperly installed
batteries. Replace or install batteries correctly. Please make sure to use only
alkaline batteries.
② Poor image
If you wear glasses, please keep them on while using the device.
Make sure the IR is off in daytime (if IR is on, the screen will be black and white).
Press the IR UP button.
Adjust the focus by slowly turning the focus wheel until the presented image is
clear and sharp.
9. Playback
① Turn on the device and press the MODE button to switch to Playback mode.
② Press the UP/DOWN button to view photo and video files.
③ Playback the video
Press the Shutter button to start playing a video file.
Press the Shutter button again to pause.
Press the MENU button to stop playing the current video.
The device will automatically stop recording once the memory capacity is full.
•
•
•

④ Playback menu list
In Playback mode, press the MENU button to display the playback menu. Press
the UP / DOWN button to highlight a file to be deleted, locked or unlocked. Press
the Shutter button to select the file and enter the sub - menu.
Delete This
Delete All
Lock This
Lock All
Unlock This
Unlock All
Menu
[Yes] / [No]
Delete the current file
[Yes] / [No]
Delete all files on the memory card
[Yes] / [No]
Lock the current file
[Yes] / [No]
Lock all files on the memory card
[Yes] / [No]
Unlock the current file
[Yes] / [No]
Unlock all files on the memory card
6
Connect the binoculars and tablet/smartphone to WIFI
① Press and hold the POWER button to turn on the device.
② Press the WIFI button to enter WIFI mode (the WIFI icon will be displayed on
the LCD screen).
③ Open the WIFI connection interface on your smartphone, find the SSID
“NV_xxxxxxxxxxxx” and enter the initial password “123456789” to connect to WIFI.
④ After connecting to WIFI successfully, return to the app interface. You can
now perform functional operations in the app such as viewing real-time images,
viewing, downloading and deleting photo and video files, adjusting settings, etc.
10. Remote Control by WIFI Connection/Mobile App
This device can be remotely controlled via a tablet or smartphone.
Before performing remote control, an app named “NV Plus”
should be downloaded from the App Store or Play Store and
installed on your tablet and/or smartphone.
Function
NV Plus

7
1
2
3
4
5
Real-time image
Photo
Settings
File mode
Photo mode
IR light level
Video
6
7
Photo mode
① View the current real-time image.
② Click the VIDEO button to record in real time. Click again to stop recording.
Press the PHOTO button to switch to Photo mode and press it again to take a
real-time photo.
③ If you need to observe in a dark environment or at night, press the “+” button
to turn on the IR light. The image will become black and white.
④ There are 7 levels of infrared light. Press the “+” and “-” buttons to increase
and decrease the gear.
(Note: When the battery voltage is insufficient, it will automatically downshift
gears. It can reach Gear 7 when fully charged, Gear 5 at half power and Gear 3
2021/03/26 11:51:26
1
2
3
4
5
6
7

8
File mode
① You can remotely view and play the photo and video files stored on the
memory card of the device. Press the " " button in the upper right corner to
select, download and delete files.
②You can view and play local photo and video files that have been downloaded
to your smartphone. Press the " " button in the upper right corner to select,
download and delete files.
at quarter power. The infrared light cannot be activated when the power is less
than 25%.)
2021/01/25 09:00:45

9
Settings
①The time of the device can be calibrated with one click.
②You can set the menu parameters in the product remotely.
③ After completing your desired settings in the app, press the WIFI button to
exit WIFI mode.
Device
Photo
4
Video
4
Local

10
Using a card reader
①Eject the memory card from the device and insert it into a card reader, then
connect the card reader to a computer.
②Open My Computer or Windows Explorer and double-click the removable
disk icon which represents the memory card.
③ Copy the files from the memory card to your computer.
11. Download Files to PC
Photos and videos can not only be downloaded directly to smartphones and
tablets through the app, but also to a computer as below:
Insert the memory card into a card reader.
Connect the device to a computer using the supplied USB cable.
•
•

11
Connect the binoculars to a PC using a USB cable
①Turn on IR and connect the device to a computer using the supplied USB cable.
②"MSDC" will be displayed on the screen.
③ Open My Computer or Windows Explorer and double-click the removable
disk icon which represents the memory card.
④ Copy the files to your computer.
12. Care and Maintenance
Before cleaning the device, disconnect it from the power supply and remove
the batteries.
Only use a dry cloth to clean the exterior of the device. To avoid damaging
the electronic components, do not use any cleaning fluid.
Clean the eyepieces and/or lenses only with a soft, lint-free cloth such as a
microfiber cloth.
To avoid scratching the lenses, use only gentle pressure with the cleaning cloth.
Protect the device from dust and moisture.
Store it in a bag or box.
Remove the batteries from the device if it is not used for a long time.
•
•
•
•
•
•
•
CONTACT US
For any inquiries about AKASO products, please feel free to contact us. We will
respond within 24 hours.
Email: [email protected]
Tel: (888) 466-9222 (US) Mon-Fri (except holiday) 9am-5pm (EST)
Official website: www.akasotech.com
Table of contents
Popular Binoculars manuals by other brands

Leica
Leica geovid HD-B instructions

Leica
Leica GEOVID HD-B 3000 Series Instructions for use

ATN
ATN Night Shadow user guide

ATN
ATN OMEGA 7x50RF user guide

ORION TELESCOPES & BINOCULARS
ORION TELESCOPES & BINOCULARS 51463 manual

Novosibirsk Instrument Making Plant
Novosibirsk Instrument Making Plant PNB-3 Service manual