Akura AH14DVD User manual

ON SCREEN DISPLAY
REMOTE CONTROL
MULTI BAND TUNER
SCART CONNECTION
SIDE AV INPUT
BUILT IN DVD PLAYER
COLOUR TV AND DVD COMBINATION
Operating Instructions
AH14DVD
Customer Help Line 01422 263313
www.ekey.co.uk

Table of Contents
Front Control Panel
Menu Navigation DVD 12
User Help Guide
Installation 4
Remote Control Battery
Specifications
Disc Care and Handling
Main Plug Rewiring
1
Safety Instructions 2
Features 4
Remote Control Operation
15
6
Menu Navigation Tv 10
Optional Equipment Connections 5
4
5
16
16
16

RISK OF ELECTRIC SHOCK
DO NOT OPEN
WARNING
WARNING: TO REDUCE THE RISK OF ELECTRIC SHOCK DO NOT
REMOVE COVER OR BACK. NO USER-SERVICEABLE PARTS INSIDE.
REFER SERVICING TO QUALIFIED SERVICE PERSONNEL.
The lighting flash with arrow head within a
triangle is intended to tell the user that parts
inside the product are a risk of electric shock
to persons.
The exclamation point within a triangle is
intended to tell the user that important
operating and servicing instructions are in
the papers with the appliance.
WARNING: TO REDUCE THE RISK OF ELECTRIC SHOCK DO NOT EXPOSE THIS
APPARATUS TO RAIN OR MOISTURE AND OBJECTS FILLED WITH LIQUIDS,
SUCH AS VASES, SHOULD NOT BE PLACED ON THIS APPARATUS.
CAUTION
Changes or modifications not expressly approved by the party responsible for compliance with the CE
Rules could void the use s authority to operate this equipment.
,
The following illustrations represent the precautions to be taken when
using and moving your television:
1. Do NOT expose the television to
extreme temperature conditions
(below 5¡ãC and above 35¡ãC) or to
extreme humidity conditions (less
than 10% and more than 75%).
2. Do NOT expose the television
to direct sunlight.
Or other heat sources such as
radiators or fanheaters.
3. Do NOT expose the Tv to any
liquids or place vases on top of
the Tv or use in wet or damp
locations. Do not operate with
wet hands.
4. If the television is broken, do not
try to repair it yourself. Contact
qualified service personnel.
5.During a thunderstorm or when
going on holiday, disconnect the
mains supply and aerial (if external).
6. If the remote control is not
used for a long period of time,
remove the batteries and store
It in a cool, dry place.
Warning
2

7.POWER-CORD PROTECTION - Power supply
cords should berouted so thatthey are notlikely
to be walkedon or pinchedby items placedupon
or against them,paying particular attentionto
cords at plugs,convenience receptacles, andthe
point where theyexit from theappliance.
8.OVERLOADING - Do notoverload wall outlets
and extension cordsas this canresult in arisk of
fire or electricshock.
9.OBJECT AND LIQUIDENTRY - Do notpush
objects through anyopenings in thisunit as they
may touch dangerousvoltage points orshort out
parts that couldresult in fireor electric shock.
Never spill orspray any typeof liquid intothe unit.
10.SERVICING - Do notattempt to servicethis
unit yourself asopening or removingcovers may
expose you todangerous voltage orother
hazards. Refer allservicing to qualifiedservice
personnel.
11.DAMAGE REQUIRING SERVICE - Unplug this
unit from thewall outlet andrefer servicing to
qualified service personnelunder the following
conditions:
A. When thepower-supply cord orplug is
damaged.
B. If liquidhas been spilled,or objects havefallen
into the unit.
C. If theunit has beenexposed to rainor water.
D. If theunit does notoperate normally by
following the operatinginstructions. Adjust
only those controlsthat are coveredby the
operating instructions, asan improper
adjustment of othercontrols may resultin
damage and willoften require extensivework
by a qualifiedtechnician to restorethe unit to
Its normal operation.
E. If theunit has beendropped or thecabinet has
been damaged.
F. When theunit exhibits adistinct change in
performance, this indicates a need forservice.
12.REPLACEMENT PARTS- When replacement
parts are required,be sure theservice technician
uses replacement partsspecified by the
manufacturer or thosethat have thesame
characteristics as theoriginal part. Unauthorized
substitutions may resultin fire, electricshock or
other hazards.
13.SAFETY CHECK - Upon completionof any
service or repairsto this unit,ask the service
technician to performsafety checks todetermine
that the unitis in properoperating condition.
14.HEAT - The productshould be situatedaway
from heat sourcessuch as radiators,heat
registers, stoves, orother products(including
amplifiers) that produceheat.
Warning
3
CLASS 1 LASER PRODUCT
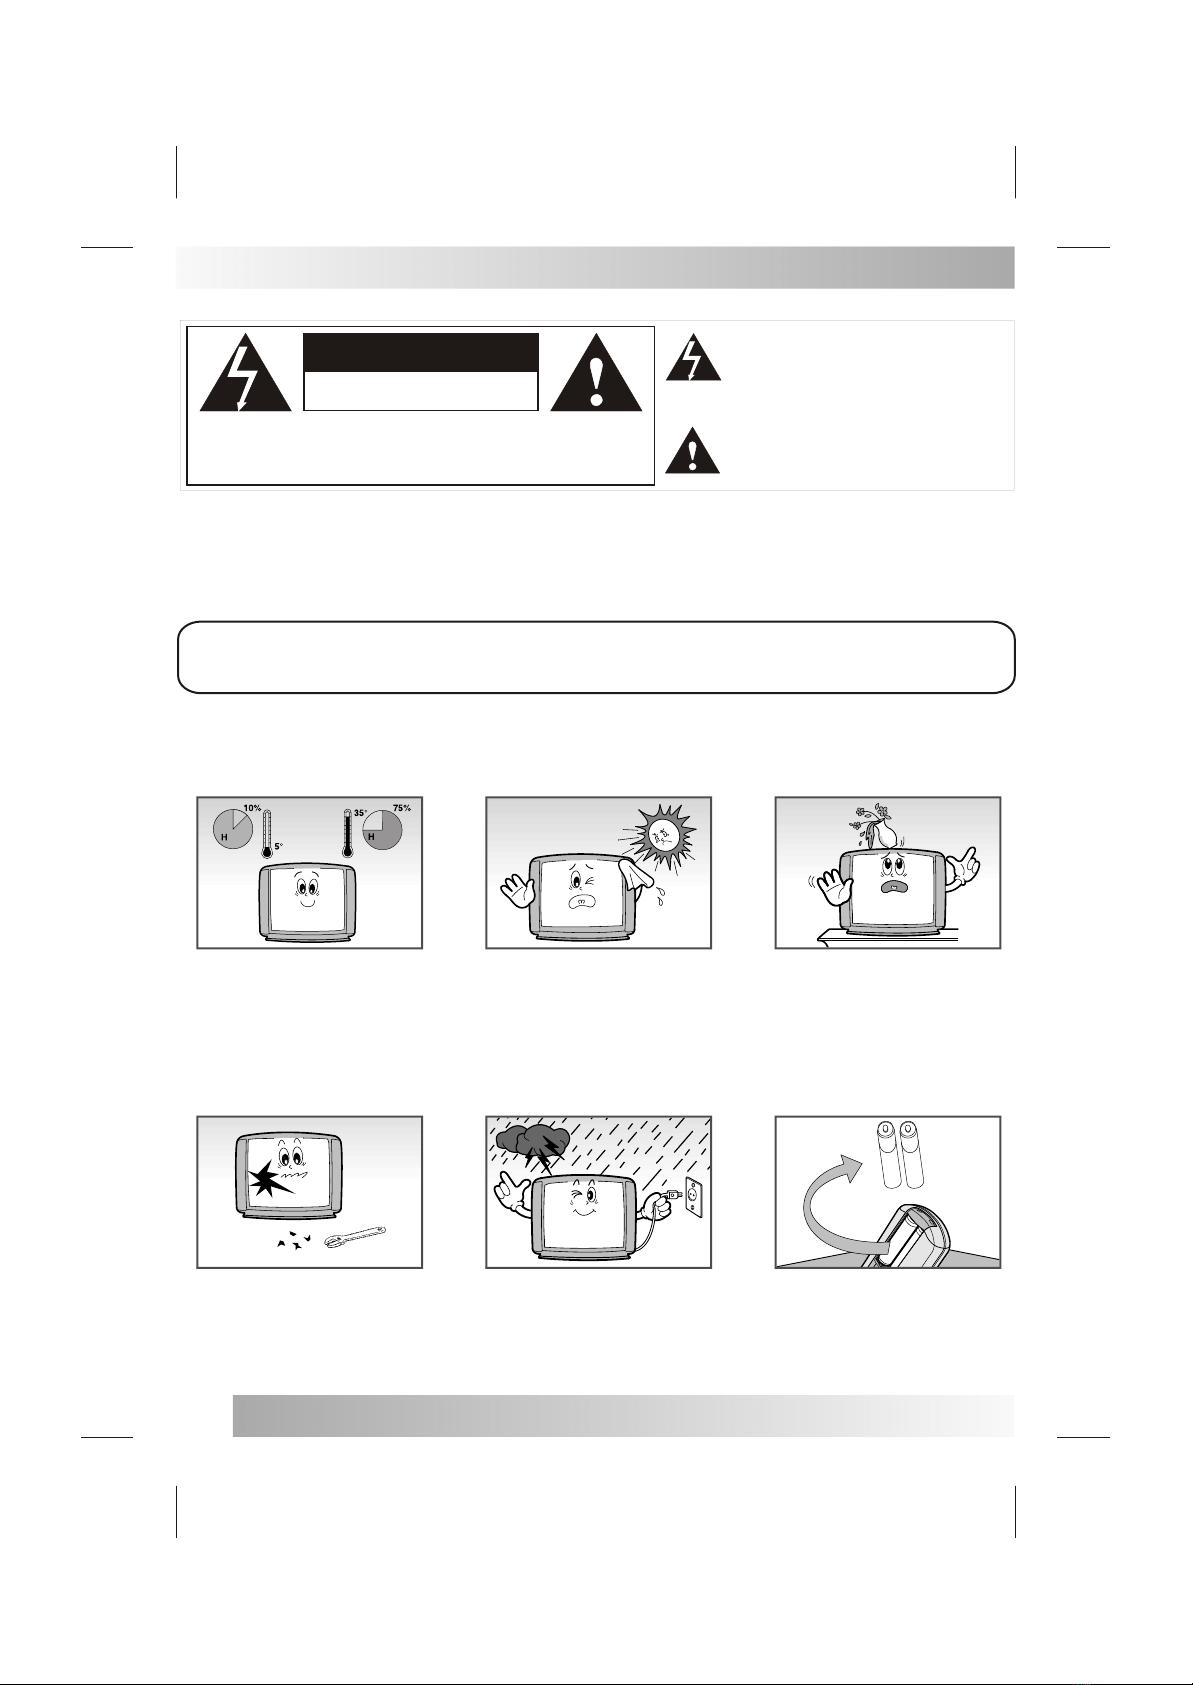
PLACING THE TV
Do not placethe Tv onan unstable surfaceor shelf. If
placing in acabinet ensure thereis adequate
ventilation. Do notcover ventilation slotsand do not
place the Tvon a blanketor fabric whichcould inhibit
ventilation.
STANDBY
Do NOT leavethe Tv instandby or operatingwhen
leaving the house. Do not leavein standby forlong
periods such asovernight, as thisTv uses 18Win
standby mode.
Discoloured patches mayappear on thescreen if the
Tv is notturned off viathe mains switch.
CLASS 1 LASERPRODUCT
DANGER : INVISIBLELASER
RADIATION WHEN OPENAND
INTERLOCKS DEFEATED, AVOID
EXPOSURE TO BEAM.
Correct disposal ofthis Product
(Waste Electrical &Electronic Equipment
(WEEE)
The crossed out"Wheelie bin" isintended
to show thatthis appliance mustnot be
placed with ordinaryhousehold waste
at the endof its usefullife. To
prevent possible harmto the environment
or human healthfrom uncontrolled waste
disposal, please keepseparate from other
household waste andrecycle it respo
nsibly to promotethe sustainable reuse
of material resources.
Household users shouldcontact either
the retailer whereyou purchased the
product, or theirlocal government office
for details ofwhere and howyou can
take this itemfor environmentally safe
re-cycling.
Business users shouldcontact their
supplier and checkthe terms and
conditions of thepur chase contract.
This product mustnot be mixedwith other
commercial wastes fordisposal

Features
TV Mode:
TV MODE.
Infrared Remote Control. Allows easy control of the
Tv from yourarmchair.
On Screen 6Language Display. This Tv can display
the OSD languagein English, Spanish, Portuguese,
German, Danish, Swedish.
Picture Adjustments. The OSD allows precise adju
stment of Brightness,Contrast, Colour, Tint (NTSC
only) and Sharpness.
Sleep Timer. You may setthe Tv to switch off to
Stand-by in 30minute segments up to 180 minutes.
When the timerreaches (0) thetv will switch to stand
by automatically.
Memory Backup. This Tv uses a "nonvolatile"
memory which storesall your settings even when
power is interrupted.
No Signal. Ifthe "Blue Background" is set "ON"
and no signalinput is received, the Tv will switch to
stand-by after a10 minute duration. This is applicable
to Tv and AV modes.
DVD MODES.
Random Playback. Tracks may be selected to playba
ck randomly.
Programmable Playback. You may programme track
s or chaptersto play inthe order yourequire.
DVD menus ina desired language. You can display
DVD menus ina desired language, providing the DVD
disc supports thatlanguage.
Sub TitleLanguages. You may selectany Sub Title
language on aDVD disc, providing the disc supports
that language.
Screen Saver/Auto Power off. The screen saver
programme starts when there is no "Moving" input
from the DVDplayer for 3minutes, such as in "Pause"
mode or "NoDisc". If the screen saver is active for
20 minutes theTv will switch to Stand-by.
Selecting anAngle. Some DVD's provide different
views of ascene. This player allows youto select the
angles available. This is disccontent provided only.
Search. Chapter search, Title search, Track search,
Time search.
Repeat. Chapter,Title,Track, Group, ALL,A-B
Resume Play. You can stopa DVD andresume playb
ack from thesame point, ifyou do notremove the disc
or switch toTv and back to DVD.
Dynamic range control. The volume range may
be controlled.
Audio Language and Sound mode. You may select
any language or Sound Mode on a DVD disc if they
are authored onthat disc.
4
Installation
Power Source
This apparatus is designed to operate from a 90 - 240V
AC 50Hz source. It is supplied with a standard UK 3 pin
(13A) plug. If for any reason the plug is damaged and
requires replacing, please see page 16 for wiring details.
If you are unsure please seek professional advice.
Antenna Connection. Any Tv is only as good as the
signal it receives. In poor or fringe areas an outdoor or
loft aerial is recommended. In strong signal areas
a "set top" aerial may be sufficient.
Other apparatus such as a "set top" box or VCR may
also be connected to the Aerial socket.
Remote Control Battery Installation
Requires two AAA Batteries(supplied).
Remove the batterycover and placethe batteries
(2x" AAA" )cells into thespace, making noteof the
polarities. Replace thebattery cover. Donot mix
batteries of differenttypes.
If not usingthe Remote controlfor a longperiod,
remove the batteriesto prevent leakage.
Exhausted Batteries.
Do not breakopen or throwon a fire,.Contact the
local waste disposalagency for advice

5
Connection Panels
Side AV
SCART Procedure
Front Control Panel
COAXIAL Procedure
Rear of TV
VIDEO
Headphone
plug
Connect equipment as shown to rear SCART
connect.
TV will check SCART signal Automatically and
change to SCART status.
VIDEO IN
AUDIO L/R IN
HEADPHONES OUT
VCR
VIDEO
LEFT
RIGHT
LEFT
RIGHT
SCART
COAXIAL OUT
23
1. Coaxial digital sound output
2. SCART AUDIO / VIDEO INPUT / OUTPUT connector.
3. 75Ohm coaxial connect for Aeria / Cable network.
VCR
SCART
COAXIAL OUT
Connect coaxial signal to sound equipment .
Press AV/DVD on the remote control to change
DVD status.
Note: Coaxial output is effective in DVD mode.
1
TV/DVD
MENU
V- V+ P+P-
235
6
7
8
9
1. Volume adjustment.
2. Program selection.
3. Menu display.
4. Power
5. TV/DVD change.
6. DVD player pause.
7. Stop.
8. Open/Close.
9. Remote control sensor.
10. Power indicator.
410
Optional Equipment Connections
1

OPEN/CLOSE POWER
P.P
LOCK
Q.
VIEW
REPEAT
MUTE TV/AV/DVD
MENU
PROG+
PROG-
VOL+
VOL-
SYS.
DVD MENU PROGRAM SUBTITLE
AUDIO
DISPLAY
DVD SETUP GOTO
ENTER
-/---/--
ANGLE SLOW TITLE ZOOM
Remote Control Operation
MUTE Button
To turn offthe sound, pressthis button once.The TV willbe
silenced and thesymbol MUTE willbe appear onthe screen. The
mute feature canbe released bypressing the MUTEbutton again or
one of theVOL> or VOL<buttons.
TV/AV/DVD Button
Selects TV/AV(side)/SCART/DVD.
Direct Channel Selection Button
Allows direct accessto any channel.
Q.
VIEW
Q.
VIEW
Q.VIEW Button
This button allowsyou to goto back theprevious channel selected
by just pressingthe Q.VIEW button.Press this buttonagain to
return to thechannel you werewatching.
LOCKLOCK
LOCK Button
Press this buttonto lock thefront control buttonsof the Tv. Note :- this
function is forTv only. InDVD mode the3 DVD buttonsactive are Open
/Close, Stop andPlay/Pause
TV MODE:
POWER
Press this buttonto switch televisionon or off.
P.P Button
Press the PPButton to select
<custom>, <dynamic>, <mild>or <standard> mode.
P.PP.P
MENU Button
Press to displaythe On-Screen menufunction.
MENU
PROG +/- Button
Press the PROG+/- button tochange to ahigher/lower numbered
channel into memory.
PROG+ PROG-
9
DISPLAY Button
When you pressthis button, thechannel number willappear in the
upper right cornerof the screen.Press the buttonagain to remove
display from thescreen.
SLEEP Button
To set TVturn off aftera preset amountof time, pressthe SLEEP
button on theremote control. Theshut off timecan be determined
each time thebutton is pressedin order of0, 30, 60,90, 120, 150or
180 minutes.
SYS. Button
Press to selectPAL or NTSCcolour modes (SelectPAL in UK).
VOL +/- Button
Press the VOL+ button toincrease, or theVOL button todecrease
the volume level.
VOL- VOL+

DVD Mode:
POWER
Press this buttonto switch televisionon or off.
OPEN/CLOSE Button
Press OPEN/CLOSE buttonto load discon disc tray.Hold the disc
without touching eitherof its surfaces,position it withthe printed
title side facingup, align itwith the guides,and place itin its proper
position. In caseof interactive DVDswith playback control,a menu
appears on theTV screen.
DVD MENU Button.
When playing someDVD discs, pressthis button toreturn to theroot
menu.
PROGRAM Button.
Music track selection.
SUBTITLE Button
To select aSubtitle language (discdependant). Press onceto change
each language. Toturn OFF keep pressing until Subtitle OFF
is shown.
TITLE Button.
DVD SETUP Button.
To set theDVD player parameters see page 12
AUDIO Button. Press thisbutton to selectany language available
on the DVDdisc.
GOTO Button.
Press this buttonto go toa desired positionon the disc.There are
2 search modes.You can selectfrom Chapter and Time . If you
input a numbergreater than thedisc capacity theplayer will revertto
its original position.
DISPLAY. Button.
Press this buttonto display thedisc status. CurrentTrack, Current
Chapter and TimePlayed can beseen.
" " " "
" """
Remote Control Operation
PREV/NEXT Button
Press these buttonto go tothe previous/next chapter(DVD).
FR/FF Button
These buttons allowskipping ahead/back at5-level speed. Press
PLAY button to returnto normal playback.
OPEN/CLOSE POWER
P.P
LOCK
Q.
VIEW
REPEAT
MUTE TV/AV/DVD
MENU
PROG+
PROG-
VOL+
VOL-
SYS.
DVD MENU PROGRAM SUBTITLE
AUDIO
DISPLAY
DVD SETUP GOTO
ENTER
-/---/--
ANGLE SLOW TITLE ZOOM
7

DVD Mode:
REPEAT Button
To press thisbutton you canrepeatedly play atitle(DVD) or all
tracks(CD) when¡°ALL ¡±appears on TV screen, you can
repeatedly play achapter (DVD) ora single track(CD)when¡°Repeat
chapter¡±appears on TV screen, you can cancel repeat functions
when no¡°Repeat off¡±appears on TVscreen.
PLAY/PAUSE Button
Press this buttonto start playback.Press this buttonagain to
pause playback.
STOP Button
When this buttonis pressed once,the player memorisesthe stopping
point. Playback willresume from thispoint if thePlay button is
pressed. If theStop button ispressed twice theplayer will notresume
Play. Also ifthe player isswitched to Tvthe memory iscleared.
Remote Control Operation
TITLE button
DVD disc:
Press TITLE button, then the DVD menu or titles available on the disc
will be displayed. Then you can use " " and ENTER button to select
programs.
ANGLE button
If the disccontains scenes recordedat different cameraangles, you
can change toa different cameraangle during playback.Press
ANGLE repeatedly duringplayback to selecta desired angle.Note
that the numberof the currentangle appears onscreen.
Note:
The angle indicatorwill blink onthe TV screenduring scenes
recorded at differentangles as anindication that angleswitching
is possible.
N
Note:Zoom may notwork on someDVDs.
N
ZOOM button
1.Press ZOOM duringplayback or stillplayback to activatethe
Zoom function. Thesquare frame appearsbriefly in theright bottom
of the picture.
2. Each pressof the ZOOMbutton changes theTV screen inthe
following sequence:
3. Use the buttons to movethrough the zoomedpicture.
4. To resumenormal playback, press ZOOM button until screen
becomes 1X.
SLOW Button
Press this button during playback to activate slow playback. Each press
of the button will change the playback speed. The speeds available are
!/2,1/4,1/8,1/16,/Normal
OPEN/CLOSE POWER
P.P
LOCK
Q.
VIEW
REPEAT
MUTE TV/AV/DVD
MENU
PROG+
PROG-
VOL+
VOL-
SYS.
DVD MENU PROGRAM SUBTITLE
AUDIO
DISPLAY
DVD SETUP GOTO
ENTER
-/---/--
ANGLE SLOW TITLE ZOOM
8

Press the MENUbutton to enterthe following menu's.Each press willselect PRESET :>PICTURE :>
SYSTEM :> TIME. To exit themenu's press thebutton again. Ineach menu pressPROG +/- toselect
each function. PressVOL +/- toadjust the functionvalues.
Menu Navigation
TV PARTS:
PRESET Menu.
CHANNEL. This displaysthe current channelselected.
SKIP. This turnsON and OFFthe Skip function.When " ON" the
channel will be " skipped " when using the PRPG +/- buttons, but not
when using thenumeric buttons. WhenSkip is "OFF " normal
operation is resumed.
ASM.SIF. This functionselects the "Sound system " for the country
you are viewingin. In UKthis MUST beset to "6.0 " . the other
selections are asfollows (4.5 USA),(5.5Western Europe),(6.5 Eastern
Europe).
FINE. This functionis to allowfor " FineTuning " inmost
circumstances this isnot necessary .
SEARCH. This isa " ManualSearch " function.It is usedto add single
stations that mayhave been addedto the transmitterlisting.
AUTOSEARCH. This functionis used toinstall the Tvwhen using for
the first time.
PICTURE
BRIGHTNESS
CONTRAST
COLOUR
SHAPNESS
50
PICTURE Menu.
BRIGHTNESS. Adjusts thegeneral brightness ofthe picture.
CONTRAST. Adjusts theBlack to Whitecontrast ratio
COLOUR. Adjusts theColour level.
SHARPNESS. Adjusts theclarity of thepicture.
SYSTEM Menu.
LANGUAGE. Selects theOSD (On ScreenDisplay) language, You
may select fromEnglish, Spanish, German,Portuguese, Danish,
Swedish.
COL SYS.. Selects the Colour system. In the UK PAL is used. NTSC 1
and NTSC 2are for USAsystems. AUTO autodetects the coloursystem.
SIF.SYS. " seeASM SIF inPRESET menu" .
SYSTEM
LANGUAGE
COL.SYS AUTO
SIF.SYS 6.0M
Menu Navigation
PRESET
CHANNEL 000
SKIP OFF
ASM.SIF 6.0M
FINE
SEARCH
AUTO¡¡SEARCH
36.31MHZ
9

TIME
CLOCK
00:00:00
TIMING
OFF
AWOKE OFF
TVON
TVOFF
AWTIMR
1.Ensure thatall the connectionsare made andthe power isturned on.
2.Turn onthe Tv withthe Power button.The Power ledwill light Red.Press the P-button on theTv or the
POWER button onthe Remote Control.The power ledwill turn Greenand the screenwill light up.
3.If theTv is usedfor the firsttime, it willneed to betuned in tothe local stations.
TV OPERATION
Menu Navigation
TIMER Menu.
TIME. The "Real" time mustbe entered beforethe other Timers
will work. Toset the timeuse the VOL+ button toset the Hours
and the VOL- button to setthe minutes.
TIMING. Set to "ON " or "OFF "
TV ON. Set the "ON "time. Use the VOL+/- buttons to adjust.
TV OFF. Set the "OFF " time.Use the VOL+/-buttons to adjust.
AWOKE. Set the"AWAKE " timeto "ON " or "OFF”
AWTIME. Set theAwake time. Usethe VOL+/- buttonsto adjust.
PRESET
CHANNEL 000
SKIP OFF
ASM.SIF 6.0M
FINE
SEARCH
AUTO¡¡SEARCH
36.31MHZ
MANUAL TUNING. "It is usefulto have acurrent Tv guidewhen tuning "
4. Select CHANNEL. Use the Vol + button toselect 001
5. Select SEARCH.Use the VOL+ button tostart searching. Thismay
take some timeto reach BBC1.The Tv maystop at somestations that are
not required, pressthe Vol +again to continuesearching.The Tv will
automatically store BBC1in Location 1
6. Select CHANNEL.Use the Vol+ button toselect 002
7. Select SEARCH.Use the VOL+ button tostart searching. Thismay
take some timeto reach BBC2.The Tv willautomatically store BBC2
in Location 2.
Continue to searchfor all localStations until youhave what yourequire.
Once this hasbeen done itwill not benecessary to doit
again unless movingareas.
AUTO SEARCH. This is used to search automatically for Tv stations. However the stations received will
be stored in "Found " order. The "found " order will not be necessarily the correct order foryour
requirements.
10

OPEN/CLOSE BUTTON
Press OPEN/CLOSE button to load disc on disc tray.
In case of interactive DVDs with playback control, a
menu appears on the TV screen.
Hold the disc without touching either of its surfaces,
position it with the printed title side facing up, align it
with the guides, and place it in its proper position.
NUMERIC BUTTONS(0-9):
If the title or track number is over 10. For instance ,
if "28" is wanted, press "10+" twice, and then press
the 2-digit number "8".
You can select desired titles(DVD) by pressing these
buttons directly only if the title or track number is less
than 10.
[DVD only]
TITLE XX/XX CHAPTER [ ]/XXX
[DVD only]
DISC GOTO TRACK GOTO
T: XX
[DVD only]
CHAPTER XX/XX TIME
[CD]
GO TO BUTTON
Press this button to go to desired position. The player
provides 3 search mode.
When the above items are showed on TV screen, you
can input numbers to locate desired sector, then press
PLAY to commence play.
The number you input is invalid if it is beyond the
track's capcity.
DVD Mode: AUDIO BUTTON
Press this button to change the Audio Language from
the default language to a different one, if supported on
the disc.
SUBTITLE BUTTON
Press this button to change the Sub Title language
from the default language. You can also turn " OF"
the Subtitles by pressing the button a number of times
DISPLAY BUTTON
Press this button once to show main playback in
formation on TV screen and press it again to show
playback time. Press this button at the fifth time, and
then the display will be cancelled.
DVD SETUP BUTTON
If playing some DVD discs, press this button back to
root menu screen .
If playing DVDs you can use the functions of MENU,
PROGRAM and RANDOM.
Menu Navigation
11

Audio audio compression
Video Pref...
General
-- GENERAL SETUP PAGE --
TV DISPLAY PS
ANGLE MARK ON
OSD LANGUAGE ENG
DIGITAL OUTPUT RAW
Closed Captions ON
SCREEN SAVER ON
GOTO GENERAL SETUP PAGE
»ù±¾²Ù×÷»ù±¾²Ù×÷
REPEAT BUTTON
DVD SET UP Button. If there is a disc playing, fully stop playback. Press this button once and you will see
the first menu, GENERAL. Press again to see the AUDIO menu, then audio compression, VIDEO and REF. To navigate
the menu's use the buttons. To return to playing press DVD Set Up again. The descriptions of the
functions are below :-
Menu Navigation
General Menu.
TV Display. PS cannot be changed.
Angle Mark. Use the navigation buttons to selectON or OFFand enter to
confirm.
OSD Language. Use the navigation buttons toselect your preference.
Digital Output. This is to select thetype of outputfrom the DigitalAudio
Output Coaxial socket,to be compatible with your HiFi system.
Captions.Select ON orOFF
Screen Saver. Select ON or OFF.
Audio Menu.
Downmix. Select Stereo orLT/RT. When using an external amplifier
select LT/RT. Ifusing the Tv sound select Stereo.
Dual Mono. Selects the type of Audiooutput required, select from Stereo,
Left Mono, RightMono, Mixed Mono.
Dynamic. Adjusts thedynamic range of Audio compression.
Video Menu.
Sharpness. Sets thelevel of clarity, from High toMedium to Low.
Brightness. "00"is set asa medium level, you may increaseor de
crease from thisvalue.
Contrast. . "00"is set asa medium level, you may increaseor de
crease from thisvalue.
Preference Menu.
Audio. Audio language. (Discdependant).
Sub Titles. Sub Title language. (Disc dependant).
Disc Menu. . Disc Menu language (Discdependant).
Parental Control. You may set the levelof Parental control depending on
the age ofthe person watching the disc.
Password. This is necessaryto set the Parental Control. You may change
the password toan easily remembered 4 digit number.
Default. Selecting thisresets the analog settings such asBrightness etc,
this does notreset the tuning memory though.
Audio audio compression
Video Pref...
General
-- ANALOG AUDIO SETUP PAGE --
DOWNMIX STR
GOTO SPEAKER SETUP PAGE
Audio audio compression
Video Pref...
General
-- audio compression DIGITAL SETUP --
DUAL MONO STR
DYNAMIC
GOTO audio compression DIGITAL SETUP
Audio audio compression
Video Pref...
General
-- VIDEO SETUP PAGE --
SHARPNESS LO
BRIGHTNESS 00
CONTRAST 00
GOTO VIDEO SETUP PAGE
Audio audio compression
Video Pref...
General
-- PREFERENCE PAGE --
AUDIO ENG
SUBTITLE ENG
DISC MENU ENG
PARENTAL
PASSWORD
DEFAULT
GOTO PREFERENCE PAGE
Audio Compression (audiocompression) Menu.
12

Menu Navigation
PROGRAM BUTTON
When you want to play only partial tracks/chapters
of a disc(DVDs) or to arrange the tracks/chapters
playback order, you need program functions. Do as
following:
Press PROG button. Then "PROGRAM" will appear
on TV screen.
Press the track number in the order you want. For
example, if the track numbers you want to play are
1, 3 and 8, just input in the order of 1-3-8.
You can press CLEAR button to cancel and input
again if you mis input track numbers.Now you can
press " " and "ENTER" button to select¡°START¡±
option and enjoy the desired tracks.
FR/FF BUTTON( / )
These buttons allow skipping ahead/back at 5-level
speeds.Press PLAY button to return to normal
playback.
Press these buttons to go to the previous/next
chapter(DVD) When Playing CD disc ,Press¡° ¡±
button twice to select previous song.
PREV/NEXT BUTTON( / )
When this button is pressed once, the unit records
the stopped point, from where playback will resume
(resume function) if PLAY is pressed afterwards.
But if STOP button is pressed again instead of PLAY
button, there will be no resume function.
STOP BUTTON( )
Password.
To change thepassword, select PASSWORDin
the Pref menu. Enter the factorydefault number
(1369).
The cursor willjump to NEWPASSWORD.
Using the decimalbuttons enter anew 4 digit
number.Enter the numberagain to confirm..
Should you forgetyour number, reenter the
factory default number.
13

HELP GUIDE
Should the TV or DVD player start mal functioning, please try the following before calling the
Customer Help Line.
Symptom
Possible Cause
GENERAL
Remedy
Dead. No led lit No power to the Tv
Check your mains connection.
Mains switch not pushed in
Check the button is pushed in
Dead. Led litRed.
No picture. Ledgreen
Noisy screen. Nopicture
Noisy or Ghostingpicture
DVD door willnot open
Message says "No disc".
Disc will notplay
Picture freezes orbreaks up
No Remote Controlfunctions
Intermittent operation.
Tv in Standby
Press either theP- button onthe
Tv or Powerbutton on theRemote
control
DVD in stopmode and DVDsetup
menu timed Out.
Press DVD Setup button,the menu
will re appear
AV selected with noinput Connect anAV input or select Tv
Aerial not connected Check aerial connections
Tv not tunedto a signal Tune theTv to a local signal
Poor signal
Check the condition of your aerial.
If using anindoor aerial consider
using an externalaerial
DVD
DVD
Disc may beplaced upside down
Disc may bedamaged or dirty.
See above
Remote Control
Batteries may beexhausted
Remote receiver windowrestricted
As above orhigh incident light.
not selected Select DVD
Disc must beplaced Label sideup
Check condition ofdisc, if dirtyor
damaged clean orreplace
See above
Replace batteries every6 months.
Ensure the pathto the tvis not
restricted
As above, orreduce incident light
in the room.
If you arestill having difficulty please call the Technical help line.Ring 01422 263313(Normal rates
apply).
Opening hours Mon-Fri8 am 8pm. Sat 9 am 4pm. Sun 11am 4pm "Bank holidays as Sun"
or www.ekey.co.uk
14

SPECIFICATIONS (design and specifications may change in the life of production)
Mains supply
Screen size
Tuner
Sound system (TV)
Colour system
External In/Out
Speakers
Audio output
Dimensions
Net weight
DVD
Remote control
AC 90 240V 50 Hz @ 50W
14 "diagonal
VHF/UHF Multi band
"I". ( "M"/ "BG "and "DK "are also available)
"AL "(NTSC is also available)
Scart, AV in (phono) CVBS and Audio
2 x 8 ohm
W 366mm, D 378mm, H 372mm
10Kg's
Accepts 12 cm and 8 cm discs
Range approx 3m. Batteries 2 x "AAA "cells
3W
Keep discs cleanand fee from sticky marks.
If they becomedirty,lightly dust with a soft duster or if the disc is sticky use a damp cloth with mild
detergent and wipefrom the center outwards not in a circular motion.DO NOT clean with Vynyl record
cleaner or petrolbased fluids.
Storing Discs.
Keep discs flat, either vertically or in a stand, do not store out of the case. Scratches will
impare the qualityof playing. Keepdiscs away from heaters or in direct sunlight.
Handling discs.
Do not touch the disc surface. Place a finger into the center hole and the outer diameter.
Disc care and Handling.
Mains Plug Replacement
IMPORTANT
For your safety. If the mains plug needs replacing, proceed as follows :-
DO NOT CONNECT THE CENTRE PIN (EARTH).
Connect the Blue wire to the (N) terminal ( this may be coloured blue).
Connect the Brown wire to the (L) terminal adjacent to the fuse ( this may
be coloured brown).
This appliance must have a 5A fuse fitted.
15

»ù±¾²Ù×÷»ù±¾²Ù×÷
Table of contents
Other Akura TV manuals