Alaska Tent & Tarp ARCTIC OVEN ARKTIKA Manual

Arctic Oven 10 X 20 Instructions www.alaskatent.com
November 5, 2003 Page 1 of 9
Packaging:
Your Arctic Oven 10x20 comes disassembled in a large, nylon drawstring storage bag.
The storage bag includes one (1) nylon tent fly, one (1) nylon/polypropylene tent body, one (1)
small nylon stake bag, and one (1) medium sized nylon pole bag. The pole bag includes eight (8)
“end poles”, two (2) “center poles”, two (2) “ridge poles”, and one (1) “center pole” with
attached carabineer.
Parts and Pieces:
Before assembling you’re Arctic Oven 10x20, it’s important to identify the parts and
pieces. Fabric pieces first. The smaller of the two fabric bundles is the tent fly. Solid yellow in
color, the one-piece, nylon tent fly includes two zippered doors, two vent tubes, and one gray
stove jack with attached cover. The larger fabric bundle is the tent body. The one-piece tent body
also includes two zippered doors, two vent tubes, and one gray stove jack (no flap). Additionally,
the tent body includes two attached, five-legged “end spiders”.
Inside the pole bag you will find thirteen (13) frame components. There are eight (8)
identical “end poles”. “End poles” are comprised of five shock-corded, aluminum sections and a
small J-bolt. Two (2) “center poles” are included. Slightly shorter than the “end poles”, “center
poles” are also comprised of five shock-corded, aluminum sections and a small J-bolt. There are
two (2) “ridge poles” identical 54” straight sections of aluminum tubing. Lastly, the “center
spider” is a simple, four-legged steel component with an attached carabiner.
Site Preparation:
Before erecting your tent, locate and properly prepare your tent site. Find a site
significantly larger that the size of your tent – the more room you have, the easier it will be to
erect your tent. Choose a firm, level tent site free of roots and shrubs. Remove any objects that
may wear or, in any way, damage your tent floor. And, for safety’s sake always choose a site
shielded from direct winds.
Setup:
The Arctic Oven 10x20 is a large, multi-piece tent. Setup is best accomplished with two
or more people – especially in adverse conditions. Do not attempt to setup an Arctic Oven 10x20
alone; damage to the tent or personal injury may occur.
ALASKA FABRICS, INC.
D/B/A
FAIRBANKS
529 FRONT STREET
FAIRBANKS, AK 99701
PHONE (907) 456-6328
FAX (907) 452-5260
1-800-478-8368 (Within Alaska)
ANCHORAGE
100 E. INTERNATIONAL AIRPORT RD
ANCHORAGE, AK 99518
PHONE (907) 562-2293
FAX (907) 562-8368
ARCTIC OVEN 10x20
SET-UP
INSTRUCTIONS

Arctic Oven 10 X 20 Instructions www.alaskatent.com
November 5, 2003 Page 2 of 9
1. Assemble all eight (8) “end poles” and both “center
poles “. Place four “end poles” at each end of your
proposed tent site. Place the “center poles” and “ridge
poles” midway between, one of each on either side of
the site. Place the “center spider” with one of the
“center poles”. (Note: Under extremely cold
conditions, the shock-corded poles may lose all or part
of their elasticity. If this occurs, simply grasp the
nylon rope located at the smaller end of the leg and
slowly pull the sections together.)
2. Unfold the tent body making sure that the yellow
nylon floor is on the bottom and the white liner is on
top. Fully unzip both zippered doors. Maneuver the
tent body until the floor is flat and fully extended.
Make sure that the two attached “end spiders” are
exposed and lying on top of the liner.
Starting at one narrow end of the tent body, step
through the opened zipper door and grasp the “end
spider” in one hand. Make sure that the non-typical
leg of the “end spider” is pointed toward the center of
the tent body. With the other hand, firmly slide the
larger end of one “end pole” over one of the “end spider’s” typical legs.
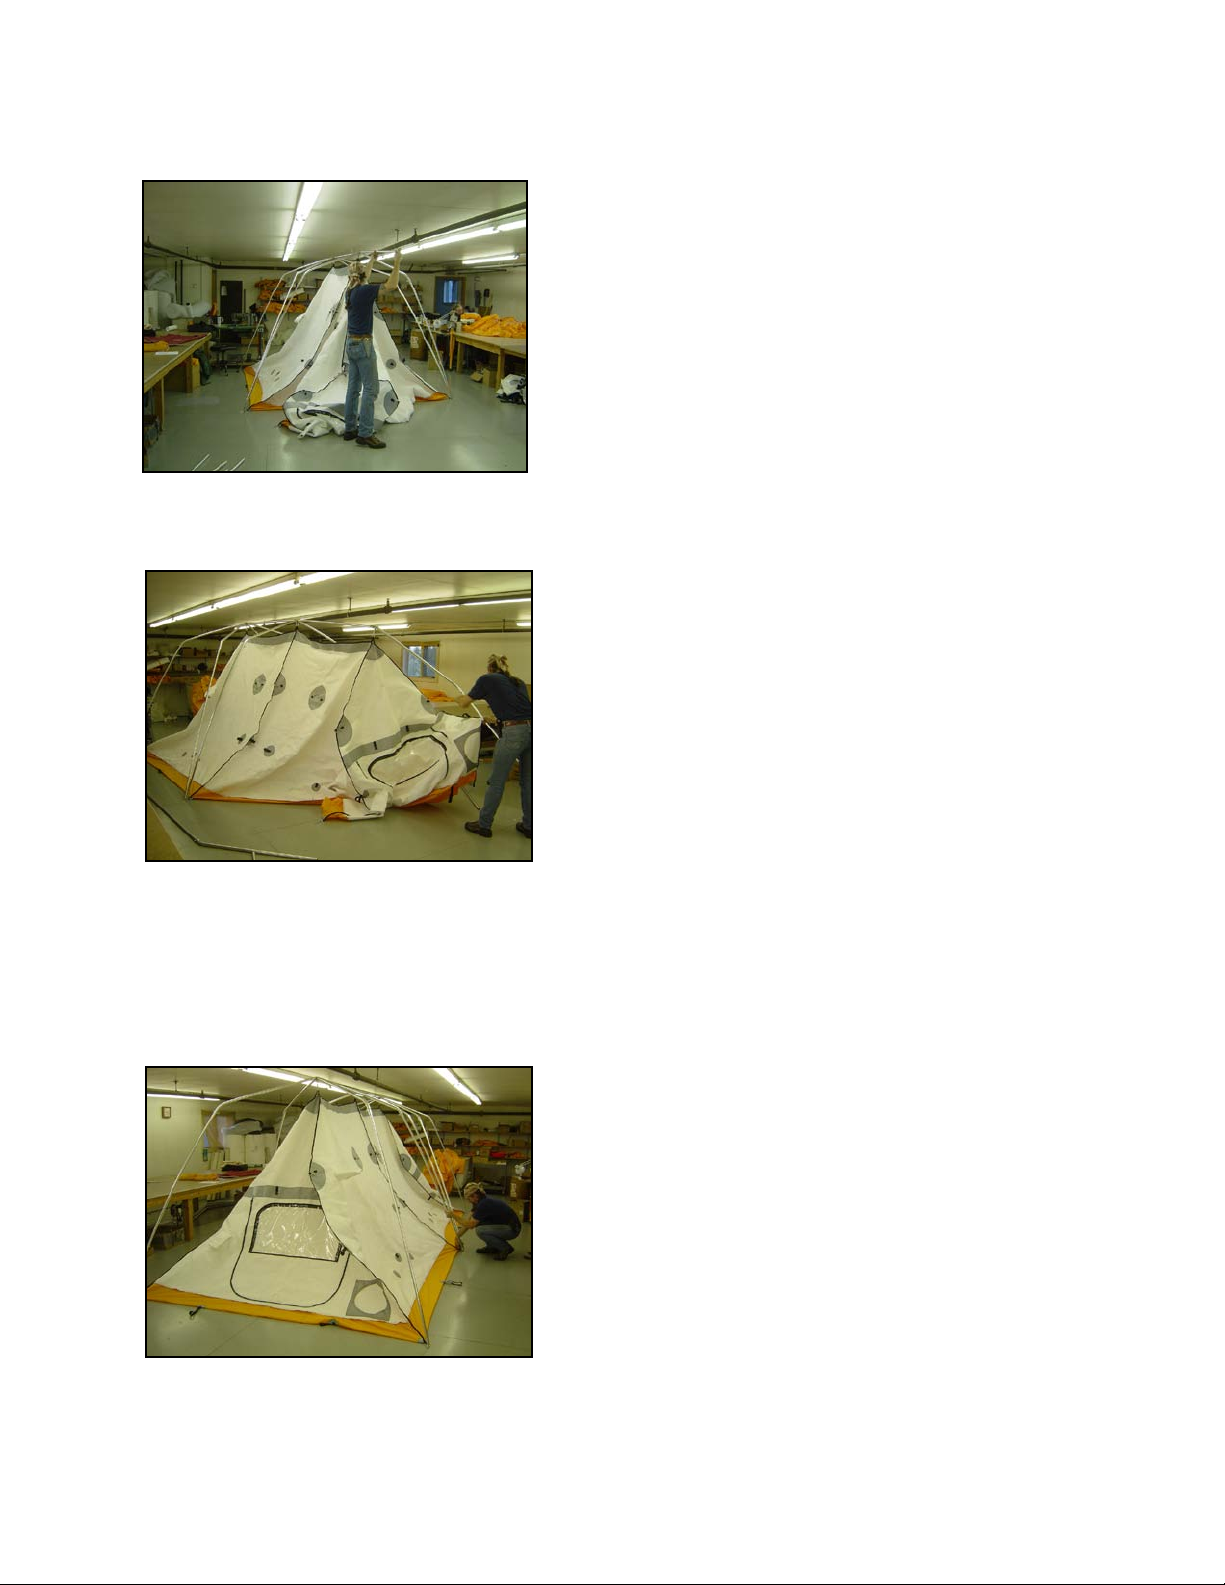
4. Following one of the black nylon edge bindings,
locate one of the corner ring and pin assemblies.
While holding the “end pole” in one hand, and the ring
and pin assembly in the other, insert the pin into the
bottom of the pole. You should now have an “end
pole” that is connected between the “end spider” and a
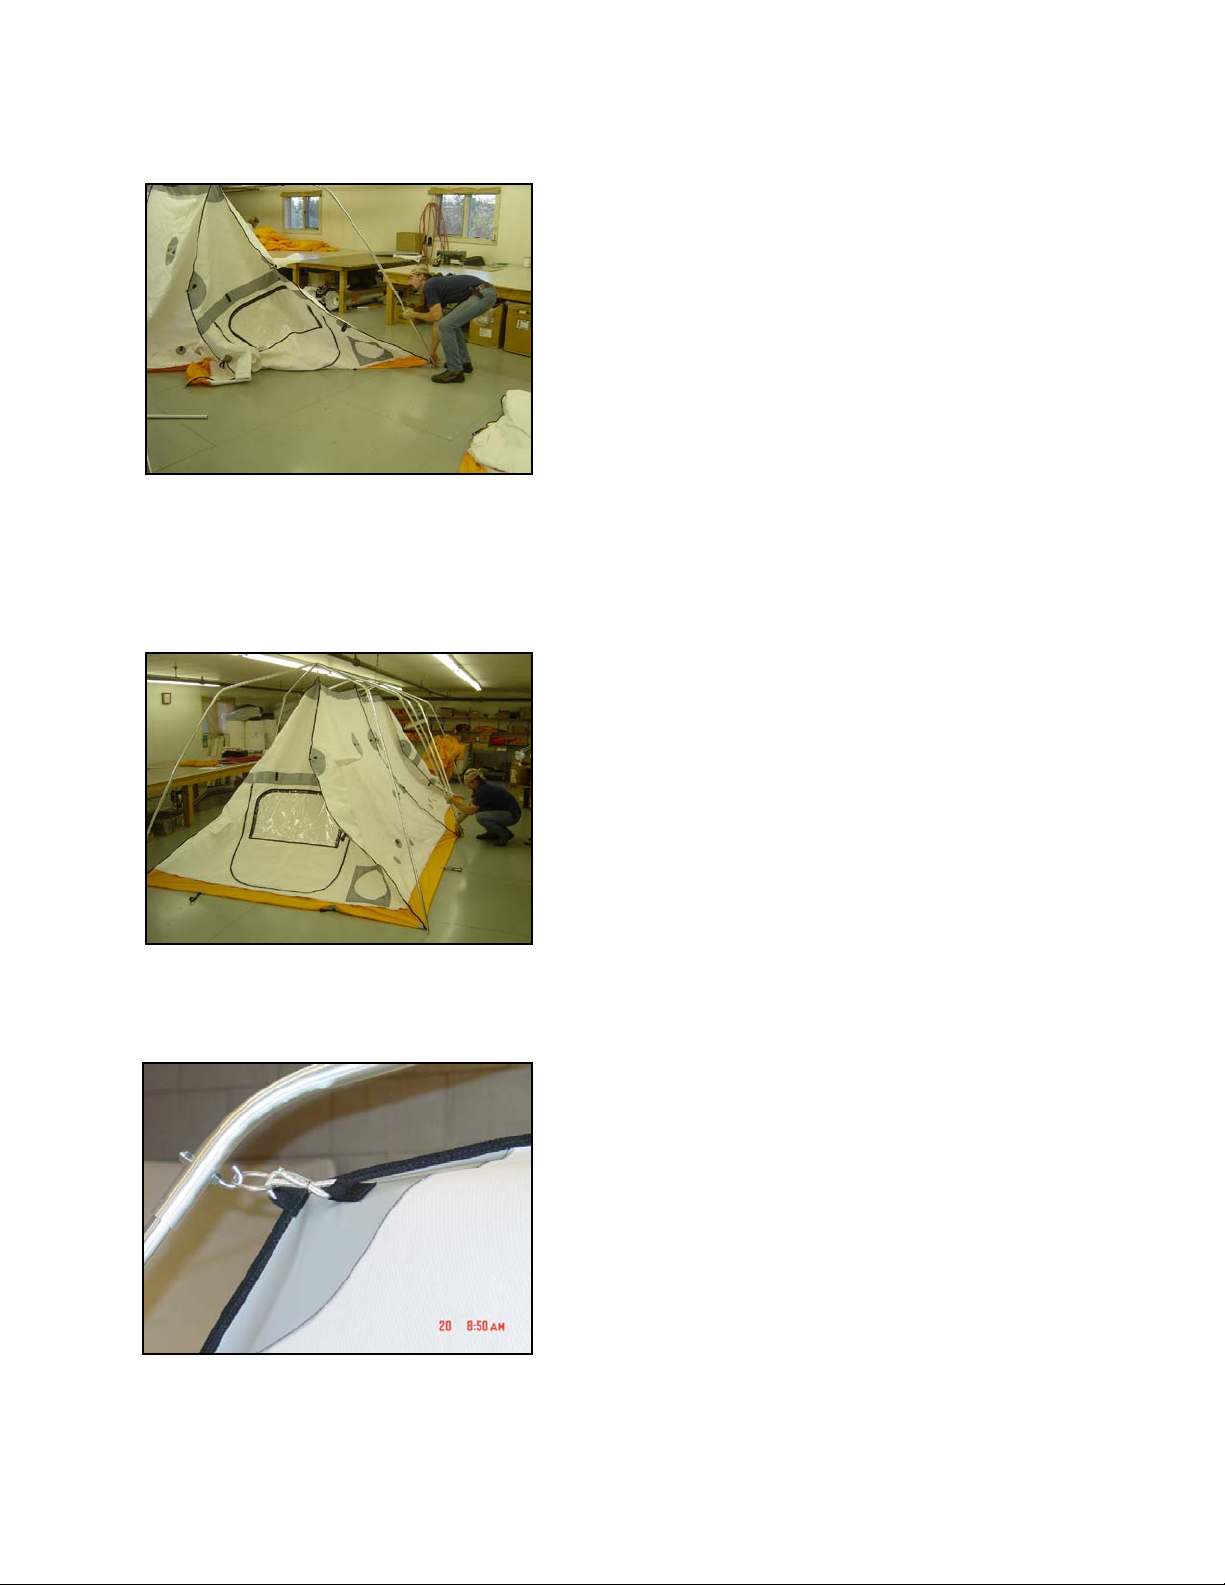
corner ring and pin assembly. Move to the side of the
tent body. Reach across the tent body and grasp the
“end spider” in one hand. Again, make sure that the
non-typical leg of the “end spider” is pointing toward
the center of the tent body. With the other hand, firmly
slide the larger end of one “end pole” over the typical leg of the “end spider” that is opposite the
“end pole” attached previously. ) Following one of the black nylon edge bindings, locate the
closest side ring and pin assembly. While holding the “end pole” in one hand, and the ring and
pin assembly in the other, insert the pin into the bottom of the pole. You should now have two
“end poles” connected to opposite legs of one of the tent body’s “end spiders”.

Arctic Oven 10 X 20 Instructions www.alaskatent.com
November 5, 2003 Page 3 of 9
5. Attach “end poles” to the remaining two typical legs
of the “end spider”. Make sure that the non-typical leg
of the “end spider” is pointed toward the center of the
tent body. You should now have an “end pole”
connected between each of the four typical legs of the
“end spider” and a ring and pin assembly. Continuing
at the same end of the tent body, grasp the “end spider”
with one hand. With the other hand, firmly slide one
end of a “ridge pole” over the non-typical leg of the
“end spider”.
6. Grasp the connected “ridge pole” with one hand.
With the other hand, firmly slide one of the straight
legs of the “center spider” into the end of the “ridge
pole”. Grasp the connected “center spider” with one
hand. With the other hand, firmly slide the larger end
of one “center pole” over one of the angled legs of the
“center spider”. Following the black nylon edge
binding, locate the middle side ring and pin assembly.
While holding the “center pole” in one hand, and the
ring and pin assembly in the other, insert the pin into
the bottom of the pole. Moving to the opposite side of
the tent body, attach the remaining “center pole”. Grasp the “center spider” with one hand. With
the other hand, firmly slide one end of the remaining “ridge pole” over the straight leg of the
“center spider”.
7. Grasp the unattached end of the “ridge pole” with
one hand. With the other hand, firmly slide the non-
typical leg of the “end spider” into the “ridge pole”.
Moving to the unassembled end of the tent body,
maneuver the tent body until the floor is flat and fully
extended. Step through the opened zipper door. While
holding an “end pole” in one hand, and a corner ring
and pin assembly in the other, insert the pin into the
smaller end of the “end pole”. Grasp the “end spider”
in one hand. Make sure that the non-typical leg of the
“end spider” is pointed toward the center of the tent
body. With the other hand, firmly slide the larger end of the “end pole” over one of the “end
spider’s” typical legs.

Arctic Oven 10 X 20 Instructions www.alaskatent.com
November 5, 2003 Page 4 of 9
8. Grasp the “end spider” in one hand. Make sure that
the non-typical leg of the “end spider” is pointed
toward the center of the tent body. With the other
hand, firmly slide the larger end of one “end pole”
over one of the “end spider’s” typical legs. )
Following the black nylon edge binding, locate the
closest side ring and pin assembly. While holding the
“end pole” in one hand, and the ring and pin assembly
in the other, insert the pin into the bottom of the pole.
Moving to the opposite side of the tent body. Moving
to the center of the tent body, with one hand, grasp the
carabiner that is hanging from the underside of the “center spider”. With the other hand, grasp
the black nylon web loop located at the top of the tent body liner. Pull the web loop up and slide
it over the gate of the carabiner.
9. The tent body should now be suspended from the
tent frame at the “center spider” and both “end
spiders”. In addition, the base of all tent poles should
be attached to the base of the tent body floor at each
ring and pin assembly. Visually check each connection
point, and adjust as necessary, before proceeding.
Next, connect the upper portion of the tent body liner
to the frame assembly. Starting at one corner of the
tent body, straddle an “end pole”.
10. With an arm around either side of the “end pole”,
find the metal O-ring located along the black nylon
edge binding. Grasp the metal O-ring with the fore
fingers and thumbs from both hands. While pulling the
O-ring toward the curve of the “end pole”, place both
thumbs around the outside of the “end pole” and
leverage the O-ring over and onto the J-bolt.

Arctic Oven 10 X 20 Instructions www.alaskatent.com
November 5, 2003 Page 5 of 9
10. Connect all remaining O-ring assemblies to their
respective poles. Next, connect the lower portion of
the tent body liner to the frame assembly. Starting at
one corner of the tent body, find the two-piece, black
plastic side release buckle located along the black
nylon edge binding. Using both hands, pull the male
buckle around the outside of the pole and firmly
“click” it into the female buckle. Connect all
remaining side release buckles. Make sure all buckles
are firmly connected.
11. Now, onto the tent fly. Begin by fully unzipping
both doors. Next, place the tent fly on the ground at
one narrow end of the tent. Stack the tent fly in a
manner that has one of the zipper doors on the bottom
and the other on top. Make sure that the zipper door in
the fly is running in the same direction as the zipper
door in the tent body. Also, make sure that the stove
jack in the fly is located on the same side as the stove
jack in the tent body. With one person on either side of
the tent fly, grasp the bottom corner of the fly where
the black nylon edge binding is located. Next, flip the
door of the fly backwards onto the top of the tent fly stack.
12. Starting at one corner of the tent, find the short
bungee cord and s-hook assembly sewn to the underside
of the fly near the black nylon edge binding.
Maneuvering the fly as necessary, grasp the s-hook in
one hand and pull it towards the bottom of the “end
pole”. Hook the open end of the s-hook to the bottom of
the “end pole”. Hook all remaining s-hook assemblies
to their respective poles.

Arctic Oven 10 X 20 Instructions www.alaskatent.com
November 5, 2003 Page 6 of 9
13. Lift the fly to expose a spring snap sewn to a gray
patch. Also, sewn to the tent body, find a D-ring sewn
to a gray patch. Connect the spring snap through the
D-ring. Connect all remaining spring snaps and D-ring
assemblies.
14. Finally, nest the vent tubes. One vent tube is
located on each side of the tent body and fly. From
outside the tent, reach through the fly’s vent tube and
gently pull the tent body vent tube until they are
aligned. Vent tubes should remain open at all time
Congratulations, you have successfully erected the
Arctic Oven 10x20 – the world’s finest all-season
tent.

Arctic Oven 10 X 20 Instructions www.alaskatent.com
November 5, 2003 Page 7 of 9
15. As with any tent, the Arctic Oven Arktika must be
guyed-out. Never leave a tent erected without guying it
out.

Arctic Oven 10 X 20 Instructions www.alaskatent.com
November 5, 2003 Page 8 of 9
IMPORTANT NOTES:
When this tent is up and sealed, ventilation is at a minimum. We have installed
vents in the front and rear top of the tent, BE SURE that you have the proper
ventilation.
The use of gasoline, propane, wood, or charcoal stoves; lanterns or heaters in a
confined space is NEVER recommended.
This tent is NOT IDIOT PROOF. Common sense and safe camping practices will
allow many comfortable and dry nights. We in the North are familiar with the need
for a practical and efficient shelter; this tent will provide you with exactly that.
A FEW HINTS THAT WILL MAKE YOUR TENT’S LIFE A BIT EASIER
SEAM SEALING INSTRUCTIONS
The tent floor and fly are made from a coated nylon that is highly water resistant;
however, the stitching is not waterproof. Seam sealer is provided in the stake bag
to take care of this potential inconvenience.
Lay the tent and fly out flat. Apply seam sealer to all seams of the coated nylon
portions that may be exposed to water. Draw the tube of sealer along the seam,
spreading the sealer evenly and liberally into all needle holes. Apply sealer to the
inside of the fly seams and tent floor seams. Allow to dry, apply a second coat if
necessary. Allow to dry completely (overnight) before using or storing.
WASHING
Hand wash with a sponge, using mild soap, such as Ivory Flakes. NEVER use a
detergent, bleach or a washing machine; they will damage the nylon coating and
the seams.
ZIPPERS
If zippers stick, lubricate them with silicone. Never force a zipper which has
material caught in it; this will result in a bent slider. When zipping closed and tent,
be sure that the zipper operates freely. If the fabric is tight and zipper closing
becomes difficult, pull on the frame to relieve the tension. Continued use in a
sandy environment can cause the slider to erode and fail to close the zipper. Keep
the zipper clean.

Arctic Oven 10 X 20 Instructions www.alaskatent.com
November 5, 2003 Page 9 of 9
LENGTH OF SERVICE
Various factors affect the life of a tent:
1. A nylon tent that is left erected all summer will last only one or two seasons.
The sun’s ultra-violet rays damage both nylon and polypropylene under
continuous exposure.
2. NEVER store a tent that is wet or damp, mildew will develop. It will not
harm the nylon; however, it’s very unsightly and may damage other parts of
the tent.
3. Acids and caustic solutions can damage tent fabric. This includes leaking
flashlight batteries, ascorbic acid in fruit juices, etc.
4. DO NOT spray insect repellents or hair sprays in or on the tent. Any
solvent or gasoline will harm the tent fabric.
REPAIR
Alaska Tent & Tarp has fabrics, zippers sliders and poles in stock. If you loose or
damage any part of the tent, give us a call.
WARNING
ARCTIC OVEN TENTS
The fabric used in the construction of the tent is Fire Retardant. NOTE: Fire
Retardant material will burn if exposed to a flame. The fabric will not continue to
support combustion when the flame is removed.
Should this tent be used with the vents holes blocked, an airtight situation would
develop and death could occur. KEEP THE VENT HOLES OPEN!
Lighting or heating devices are never recommended for use inside a tent. Should
they be used, you run the risk of fire, oxygen depletion or carbon monoxide
poisoning.
This tent is a specialty product designed to be used by people who utilize common
sense in their approach to cold weather camping. This is a tent, not a motor home
or travel trailer. If you aren’t sober or responsible, you shouldn’t be using this
product. Disregard for this warning could result in death or serious injury.
Table of contents
Other Alaska Tent & Tarp Tent manuals
Popular Tent manuals by other brands

Denver Tent Company
Denver Tent Company The Colorado Tent Maroon Bell Set Up & Care Instructions

Alpkit
Alpkit Ordos 2 quick start guide

Heimplanet
Heimplanet Mavericks manual

E-Z UP
E-Z UP Eclipse II Professional owner's manual

GigaTent
GigaTent CT-106 owner's manual

Ballard Designs
Ballard Designs JU017 Assembly instructions