Alber viamobil User manual

Ulrich Alber GmbH + Co. KG
Sigmaringer Str. 100
D-72458 Albstadt
Tel.: ++ / 7431 - 9096 - 0
Fax: ++ / 7431 - 9096 - 35
21.0001.4.02.03
R
R
User's manual
R
viamobil

Congratulations !
With the you have purchased a reliable and high-quality product from . After mounting to your wheelchair
the will things make much easier for you, for example driving long distances with your wheelchair. It assists you
in driving up slopes and slows the wheelchair down while going downhill. To get to know all advantages of the l
please read this user's manual carefully and pay attention to the safety instructions. If you have further questions,
please call your dealer (see point 8).
viamobil alber
viamobil
viamobi
The viamobil complies to the guidelines for medical
products of the European Community 93/42/EWF

Table of Contents
1. Brief Survey ...............................................................................................................................................1
1.1 Technical Data.................................................................................................................................................1
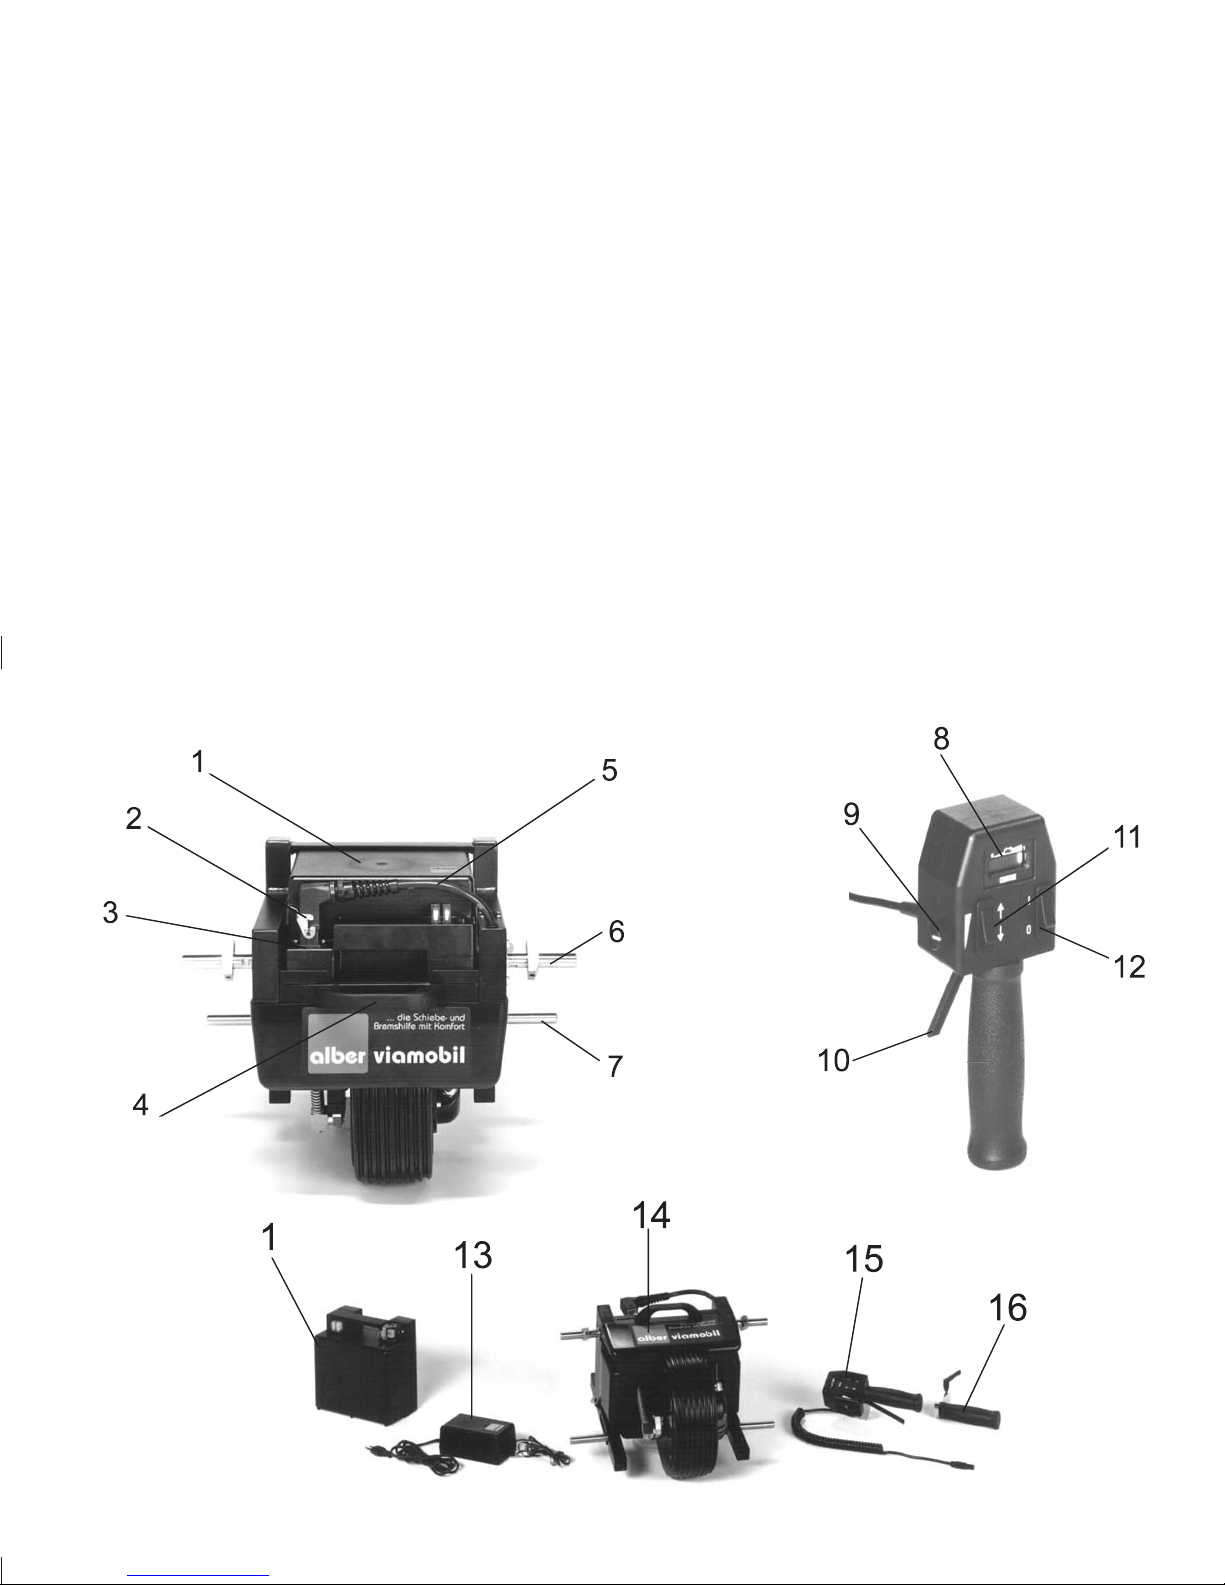
1.2 Essential Parts.................................................................................................................................................3
2. Before Operating.....................................................................................................................................................4
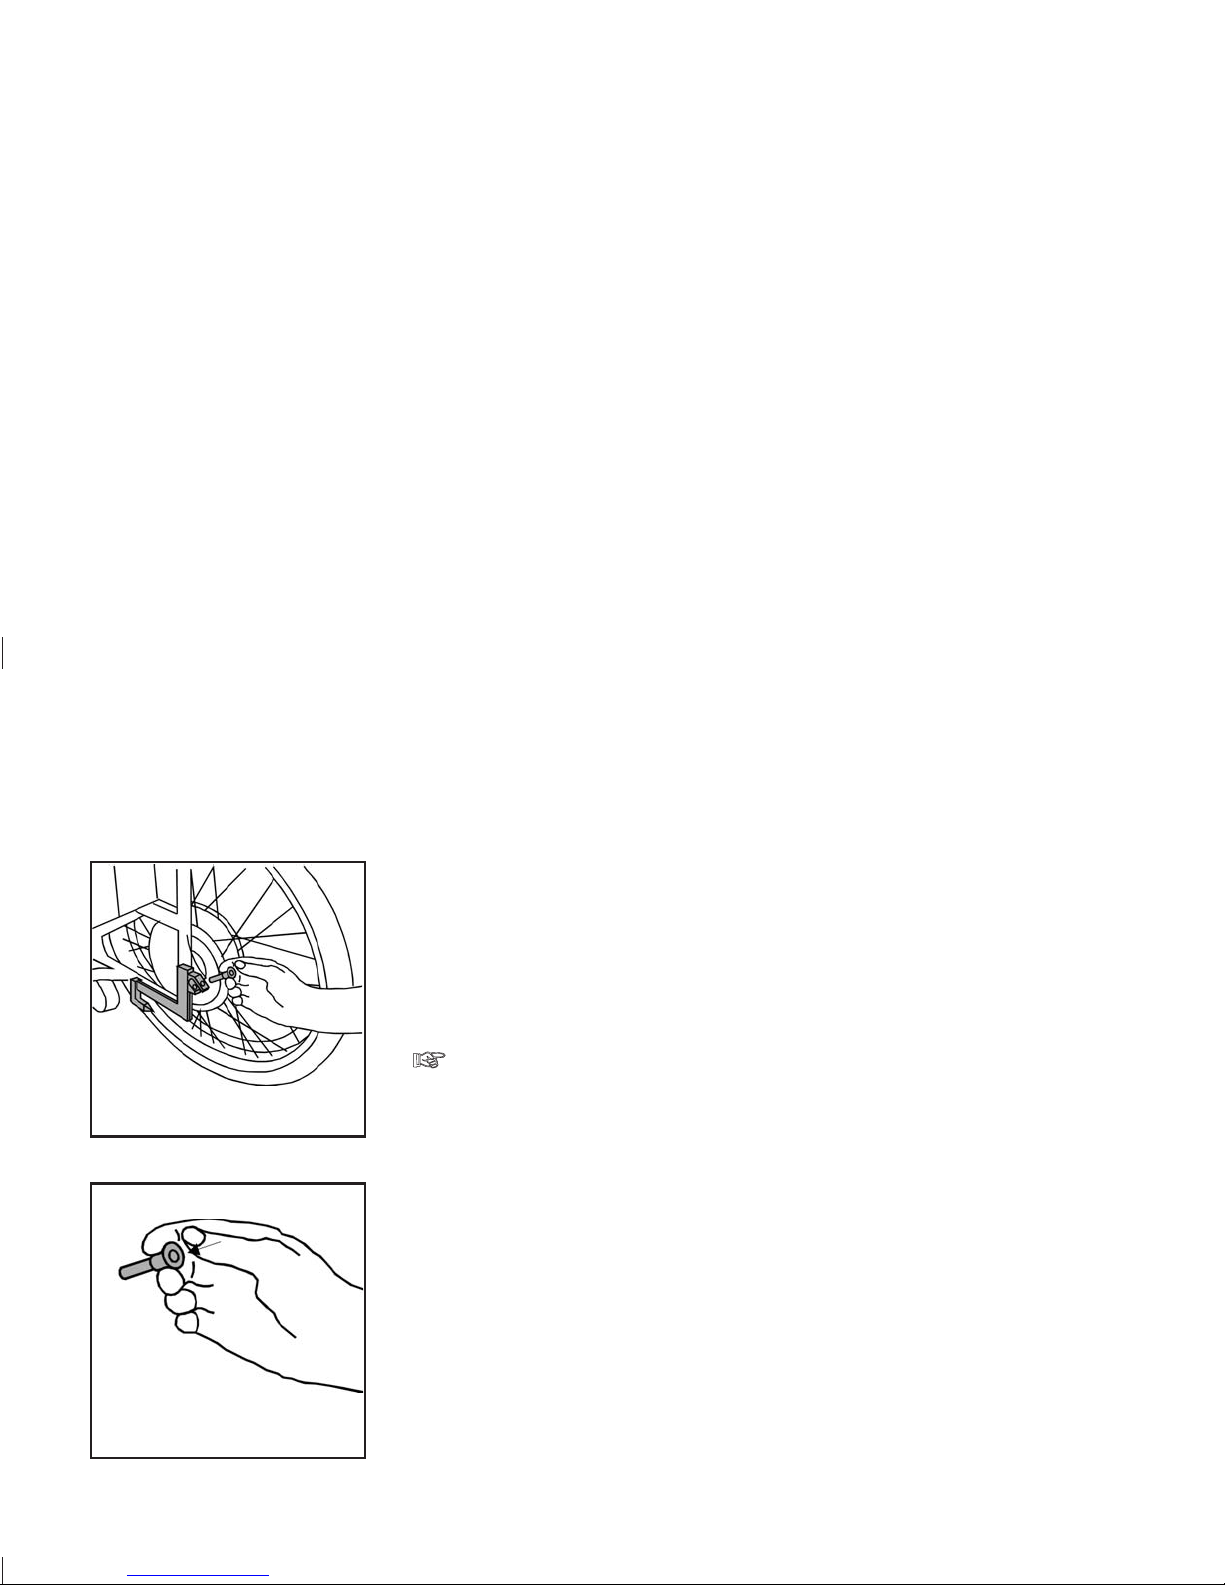
2.1 Attaching to the Wheelchair..............................................................................................................................4
2.2 Charging the Batteries......................................................................................................................................7
3. Operation................................................................................................................................................................8
3.1 Safety Instructions...........................................................................................................................................8
3.2 Driving...........................................................................................................................................................10
3.3 Obstacles.......................................................................................................................................................12
3.4 Dangerous Situations.....................................................................................................................................12
4. Accessories...........................................................................................................................................................13
4.1 Vehicle Charging Cable..................................................................................................................................13
4.2 Extra Battery pack..........................................................................................................................................14
4.3 Extra Handles................................................................................................................................................15
4.4 Anti Tippers....................................................................................................................................................17
5. Care and Maintenance..........................................................................................................................................18
5.1 Changing the Electrical Fuses........................................................................................................................18
5.2 General Information about the Batteries.........................................................................................................19
5.3 Charging the Batteries....................................................................................................................................20
5.4 Cleaning........................................................................................................................................................21
5.5 Maintenance..................................................................................................................................................21
6. Problems and Solutions / Troubleshooting.............................................................................................................22
7. Warranty and Liability ............................................................................................................................................23
7.1 Warranty........................................................................................................................................................23
7.2 Liability...........................................................................................................................................................23
8. - Dealers.......................................................................................................................................................24
viamobil
alber

1. Brief Survey viamobil
1.1 Technical Data
1
Akku-Recycling
Pb
max. 50°C
Battery
Battery: Sealed lead acid battery,
2x12V,12Ah
Operating voltage: 24 V
Battery dimensions: 151 x 99 x 95 mm
Maximum current: 25A
After expiry of the service life, return the battery to
or the specialist dealers who will
dispose of it correctly.
alber alber
Nominal Capacity: 150 W
Maximum Capacity: 300 W
Speed: variable, up to 5,0 km/h [3,1 mph] (forward) and up to 2,5 km/h [1,5 mph] (backward)
Climbing and Braking Capacity: up to a slope of 18% (at a total weight of 130 kg / 286 pounds)
Range: : up to 20 km (12,5 miles) depending on the surface topography and weight of the person
Charger
Designation: BC2403 A
Input voltage: 100-240 V
Nominal output voltage: 24 V
Charging current: 3 A
Charging process: IU0U
Weight
Control Unit: 0,9 kg (1,9 pounds)
Batteries: 9,0 kg (19,8 pounds)
Drive Unit: 14,0 kg (30,8 pounds)
Battery Charger: 0,9 kg (1,9 pounds)
Total Weight: 24,8 kg (54,6 pounds)
Temperature of
operation: -10 C / +40 C
oo

2

1.2 Essential Parts
1. Battery Pack 9. Speed Control
2. Clamp 10. Driving Lever
3. Charging Plug 11. Direction Switch
4. Carrying Grip 12. ON/OFF Switch
5. Power supply Cord 13. Battery Charger
6. Upper Bolt 14. Driving Unit
7. Lower Bolt 15. Control Unit
8. Charge Indicator 16. Extra Handles
3

The wheelchair must be equipped with the necessary brackets for the
If you are already using a (a stair climber for wheelchairs, manufact-
ured by ) the same bracket-system may be used for the
attachment.
Attaching the brackets and adjusting the must be done by Ulrich Alber
GmbH or authorized personnel only.
Always attach or detach the without the batteries.
Take out the locking pins from the holding device by pressing the button in
the pin's center with your thumb and simultaneously pulling it with your index
and middle finger.
viamobil.
scalamobil
alber viamobil
viamobil
viamobil
Taking out the locking pins
•
2. Before Operation
2.1 Attaching to the Wheelchair
4

Insert the into the lower hooks
Insert the into the brackets
viamobil
viamobil
viamobil
•
•
Insert the lower bolt (7) of the in the lower hooks of the brackets.
Push the upper part of the device forward until the upper bolts (6) catch the
brackets. Secure the upper bolts by reinserting the two locking pins into their
respective holes in the brackets. Use the same procedure as described to
take out the locking pins.
Push the upper part of the device forward until the upper bolts (6) catch
the brackets. Secure the upper bolts by reinserting the two locking pins
into their respective holes in the brackets.
5

Connecting of the power supply cord
Attaching the control unit
Put the battery pack (1) into its place on the and connect the power
supply cord (5).
Next the control unit (15) is attached. Push the receiver of the control unit
into its specifically provided fixture on the push handles of the wheelchair
and tighten the locking lever.
By pulling the locking lever outward, it can be put in a convenient, not
hindering position.
•
•
•
viamobil
6

Plugging in the helix cable
•Finally, plug the helix cable of the control unit into the designated socket of
the drive unit. Make sure that the nose of the plug fits into the groove of the
socket. Do not use any force when you plug it in.
Make sure that the helix cable does not touch the back
wheel of the wheelchair while driving.
In case that the extra handle (16) has not been attached to the other side of the
wheelchair, proceed as described for attaching the control unit.
+_To ensure the batteries' durability, charge them before using them for the
first time. Please see chapter 5.3
•
2.2 Charging the Battery Pack
7

3. Operation
3.1 Safety Instructions
In order to use the safely, please
follow these instructions strictly:
viamobil
!
•
•
•
•
•
•
•
The may be attached only to approved standard wheelchairs, that coincide with the authorized
standards of technology.
Attaching the to a wheelchair, make sure that the wheelchair is equipped with locking brakes /
parking brakes that are independent of the wheels' air pressure.
The wheelchair to which the is attached must have its locking brakes in such a position that the
attendant of the may easily reach them.
When you use the , you also need to consider the wheelchair's user's manual; e.g. its maximum
weight is reduced by the weight of the (approximately 25 kg / 55 pounds).
Only the attendant may operate the . The wheelchair driver cannot use the by himself
because of the danger of tipping over backwards particularly when driving on slopes.
Before you start, turn the speed control (9) to the position of the lowest speed.
The attendant must be physically capable to catch the wheelchair plus its driver if it tips over backwards.
Otherwise it is necessary to mount anti tippers.
viamobil
viamobil
viamobil
viamobil
viamobil
viamobil
viamobil viamobil
8

• The mounting and changing of holding devices for the may only be done by or authorized
personnel.
• The must be checked and approved annually by your dealer.
• If you drive parallel to obstacles that are narrower than the wheelchair's track, make sure that they
do not exceed 3 cm (1,18 inches).
• Do not use the on slopes that exceed 18%. In no case may the slope exceed the
maximum inclination permitted by the wheelchair manufacturer.
• Cross the edges of sidewalks carefully; if they exceed 8 cm (3,15 inches) in height, you need to
switch off the .
• Avoid using the in the sand, do not use it crossing puddles.
• Before using the on slopes, you should practice on even ground and learn how to handle
the device safely.
• Do not drive closely to precipitous edges, abysses, and stairs when the is in operation.
• When you use the on slopes, you need to secure it additionally with the locking brakes of
the wheelchair every time you stop or turn it off.
viamobil alber
viamobil
viamobil
viamobil
viamobil
viamobil
viamobil
viamobil
The efficiency of the additional drive may be affected by electromagnetic fields, generated for
example, by mobile telephones. The additional drive therefore, should be switched off if mobile
telephones are being used in the close vicinity of the wheelchair.
The additional drive can also affect other equipment such as theft-proof cabinets in departmental stores.
9

First check whether the pressure of the wheelchair's tires coincide with the
manufacturer's data.
Turn on the device with the ON/OFF Switch (12).
Turn the speed control (9) to the lowest speed, and, as the case may be,
unlock the wheelchair's locking brakes.
Then pull the driving lever (10) completely and simultaneously adjust the
speed control (9) to the speed you find comfortable.
As you drive, adjust the speed with the speed control (9) to the local condi-
tions, e.g. obstacles, slopes, people, etc..
Driving forwards
•
•
•
•
10
3.2 Operation

Driving backwards
Checking the Battery capacity
• If you want to drive backwards, put the direction switch (11) to "backwards"
(in this position the arrow points at you).
• Then turn the speed control (9) to the lowest speed before you start, and
select the speed you find most comfortable.
• The charging indicator (8) continually informs you about the charge status
of the batteries. If it starts to flash, the batteries' energy is almost used up.
If you continue driving, the device may stop soon.
To spare the batteries, always turn the device off after each use.
11
0+_1
0+_1
Full charge
Empty

3.3 Obstacles
!
In that case, drive forward to the obstacle.
Lift the front wheels of the wheelchair a bit by pushing its push handles slightly backward and
downward at the same time.
Then push the wheelchair on or across the obstacle.
Afterwards turn on the again and continue the trip.
•
•
•
•viamobil
12
You have to switch off the when crossing obstacles
exceeding a height of 8 cm (3,15 inches), such as sidewalks.
viamobil
3.4 Dangerous Situations
You may not use the in dangerous places and situations. The must be turned off in places
such as:
• airports, train stations, harbors and construction sites
• quay walls, landing-places, docks, paths and places close to water
• narrow walkways, bridges, slopes such as ramps, narrow pathways on slopes such as dikes, mountains
• crossing of major roads, intersections, railway crossings
• narrow and/or steep winding pathways next to major roads or in the proximity of steep edges or abysses
• snow-covered or icy surfaces
• closed, fenced-in, enclosed spaces or areas
viamobil viamobil

• With this charging cable you can charge the while driving in your
car by plugging it into the cigarette lighter.
• Open the spring-loaded latch (2) on the plug (3) of the and pull out
the power supply cord (5) of the battery pack.
• Now the battery pack can be taken out easily. First lift it, then pull it towards
you, and put it on the cars floor.
• Plug the end of the vehicle charging cable into the socket (2), and the other
end into the cigarette lighter.
• The batteries are charged by means of the car battery. They are equipped
with an overcharge protection.
The batteries will only be charged when the engine is running.
viamobil
viamobil
13
4. Accessories
4.1 Vehicle Charging Cable
2
3
5
3

•
•
•
•
•
If you want to make longer trips, it is advisable to buy a second battery pack,
which doubles the original range.
Simply open the clamp (2) on the plug (3) and pull the power supply cord (5)
out of the battery pack.
Take out the discharged battery pack at the grip.
Put in the extra battery pack and connect it with the power supply cord (5).
Lock it with the clamp (2).
viamobil's
14
4.2 Extra Battery Pack

Mounting the additional handgrips
Removing and attaching the additional handgrips
lightly
• If not already mounted, push the adjusting ring (B) onto the tube
(A). Do not yet tighten the threaded pin in the adjusting ring (B).
• Push the tube (A) together with the screwed-on adjusting ring (B)
into the guide mount (C).
• The tube (A) has 3 grooves in which the guide mount (C) can be
slotted for setting at the following heights:
a=96 cm distance from the floor
b=93 cm distance from the floor
c=90 cm distance from the floor
• Clamp the guide mount (C) in the desired position as shown in
drawing (ll). The lever (d) only requires pressing down slightly until
fixed inposition.
• Push the adjusting ring (B) onto the top edge of the guide
mount (C).
• Tighten the threaded pin in the adjusting ring (B).
• By pressing the lever (d) upwards (see picture I) the handgrips are
released and can be removed. The adjusting ring (B) secures the
already selected position.
• When attaching, push the additional handgrips into the guide mount
(A) again and clamp in position using the clamping lever (d).
15
4.3 Additional handgrips (optional)
A
B
C
a
b
c
d
(III)(II)
BB
dd
CC

To the extra handles, slide them into the designated recept-
acle at the back of the and turn the indexing bolt a quar-
ter rotation so that it locks into the indexing hole. Make sure that the
handles are securely fastened by pulling them two times up and
down.
• To the extra handles, pull out the indexing bolt and turn it a
quarter rotation. Take the handles out by simply pulling upwards.
•attach
remove
viamobil
16

4.4 Anti Tippers
In case you intend to use the on slopes frequently, we recommend that
you attach the anti tippers.
• The position at which the push spring button snaps in has to be such that the
entire supporting wheel stands out behind the wheelchair's back wheel in
order to achieve the sufficient supporting effect.
If you want to climb steps, separate the anti tippers from the device by
removing the locking pins at the holding devices.
• Open the locking pin at the receptacle of the anti tippers and push the latter
into said receptacle.
• Secure it with the locking pin. Then adjust the anti tippers to the appropriate
height.
The anti tippers must be attached in a right and a left position. Please
check the marks on the two anti tippers.
viamobil
viamobil
Position of the anti tippers
Attachment of the anti tippers to the
17
Other manuals for viamobil
2
Table of contents
Other Alber Personal Care Product manuals
Popular Personal Care Product manuals by other brands

Firstbeat
Firstbeat Bodyguard 3 user manual

Walgreen Health Solutions
Walgreen Health Solutions HEELIFT AFO Ultra Instructions for use

Therabody
Therabody SmartGoggles user manual

ISO Preferred
ISO Preferred BA205 instructions

Fackelmann
Fackelmann 84941 Instructions for mounting and use

KEUCO
KEUCO Plan 33097 1500 Series Instructions for use