ALCHEMIST 8 INTEGRATED User manual

ALCHEMIST
PRODUCT
EIGHT
INTEGRATED
8
INSTRUCTION
MANUAL

The Product 8Integrated Amplifier is a class A/B type device, and as such it will need to dissipate a little heat. It
should therefore be placed on a flat surface with free space all around. Under no circumstances must the unit become
covered as this may result in the unit overheating.
The Product 8Integrated Amplifier comes with an IEC mains lead fitted with the relevant plug type for the country
of use. If there is any need to change this then follows the relevant instructions for the plug type used.
There is an external replaceable fuse on the rear of the unit: refer to specifications for fuse value.
Never replace with a different value.
Be sure that your system is switched off whilst connecting / disconnecting any leads.
POSITIONING
MAINS POWER CONNECTION
CONTROLS
REMOTE HANDSET
The Product 8 Integrated Amplifier comes supplied with a full function
handset. It requires one CR2032 3V battery (supplied) to operate and
the functions are as follows:
FASCIA CONTROLS
The controls on the fascia of the Product 8
Integrated Amplifier are: VOLUME CONTROL,
POWER, MUTE and 6 INPUTS SELECTORS with a
power indicator above the volume control.
All functions are duplicated on the Product 8
Integrated Amplifier remote handset (except
Power).
VOLUME:Use this control to adjust to your required
listening level. You will probably find that the
maximum usable volume will be attained at
approximately two o'clock position on the
volume control (See Loudspeaker Matching)
POWER:This will allow the Product 8
Integrated Amplifier to be either fully
powered up or completely switched off.
When the unit is first powered up it will revert
to the volume to zero and select input 1. The
mute function will also be set.
MUTE:Once the Product 8Integrated
Amplifier has been initially switched and
powered up, this function will allow you to
toggle between; normal listening and mute.
INPUTS SELECTORS:These determine the
source component to be listened to. These
selections are also controlled by the Product 8
Integrated Amplifier remote handset. The selected
input will also be routed to the tape output sockets.
PRODUCT 8INTEGRATED AMPLIFIER
VOLUME
MUTE
4
TUNER
5
AUX
6
TAP E
POWER
1
CD 2
CD BAL 3
DVD INPUT
INDICATOR
VOLUME
MUTE
4
TUNER
5
AUX
6
TAP E
POWER
1
CD 2
CD BAL 3
DVD INPUT
INDICATOR
Power Standby
(not used on PRODUCT 8Integrated)
Volume Up
Input Channel Up/Down
Volume Down
Tape Monitor
(not used on PRODUCT 8Integrated)
Reset
(not used on PRODUCT 8Integrated)
Mute
Battery replacement type: 3V CR2032
Replace with same type only
RT
M
IR Transmitter

SOURCE CONNECTIONS
Be sure that your amplifier is switched off when connecting or disconnecting any leads.
.
Product 8Integrated Amplifier
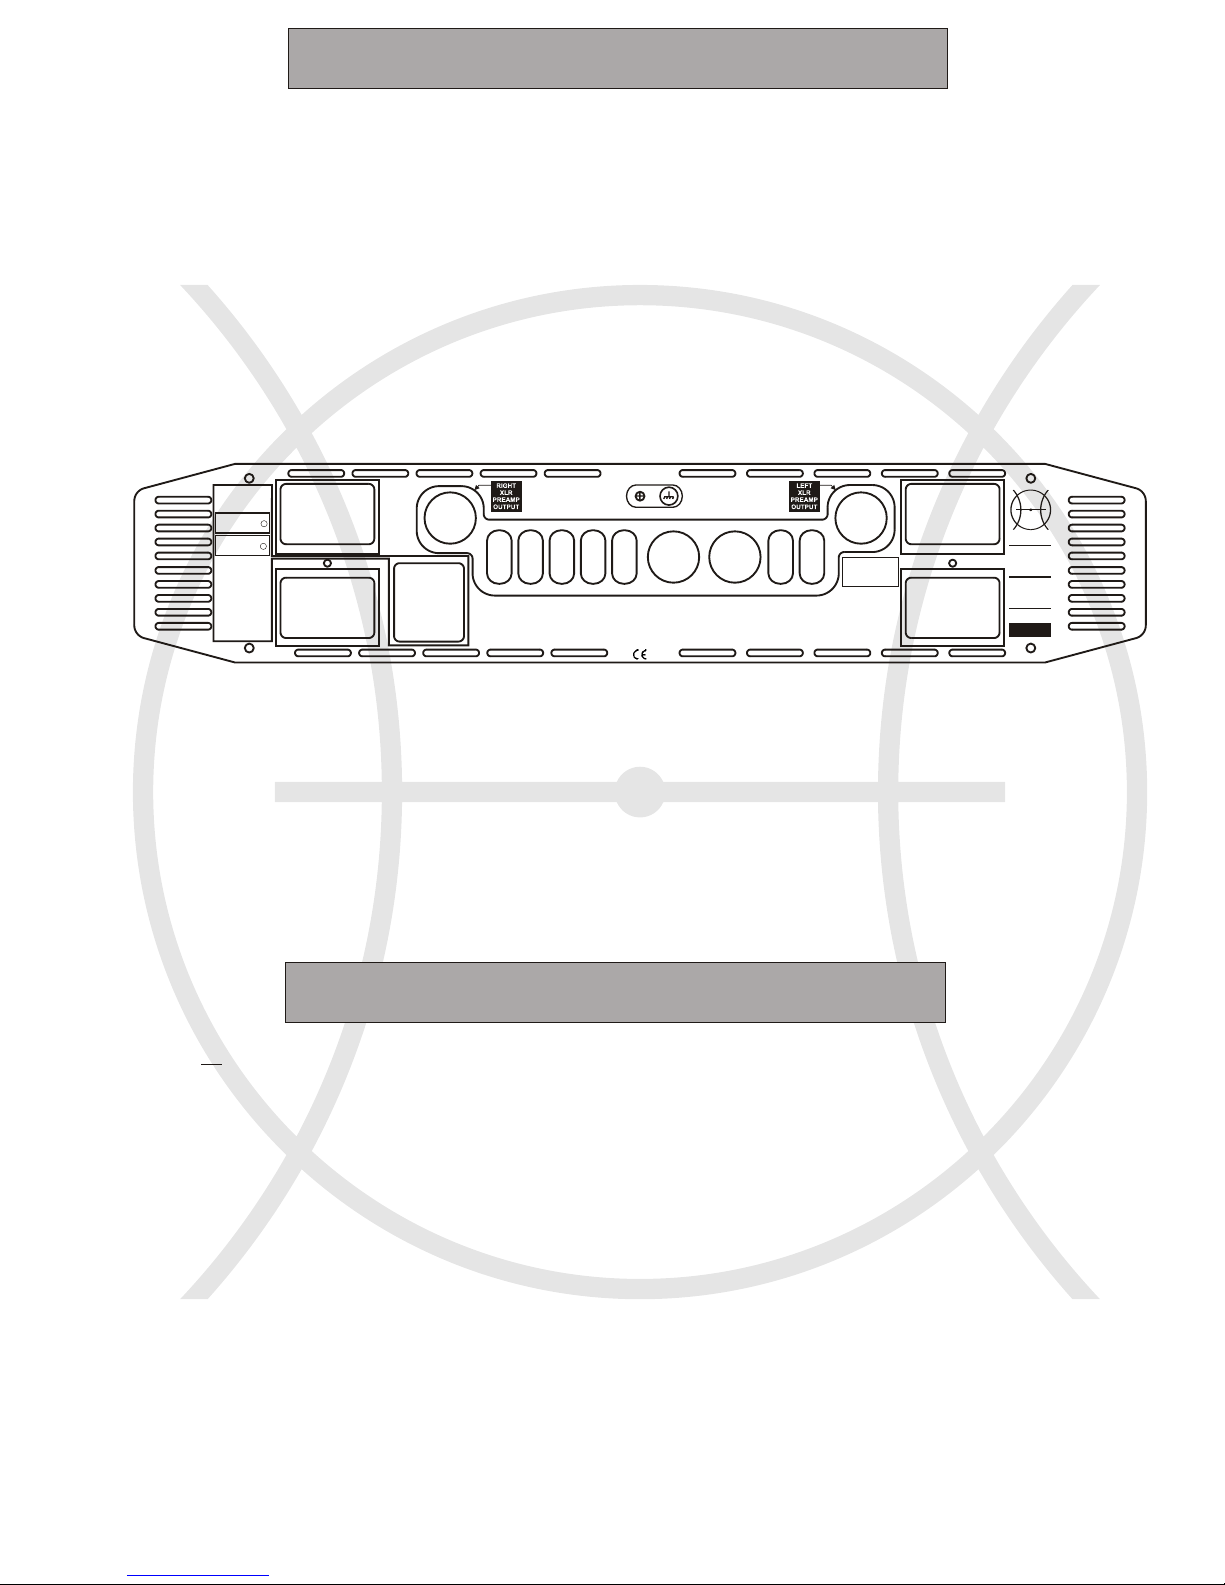
There are three outputs, TAPE and two PRE-OUT connections (one XLR and one RCA sockets).
The PRE-OUT facility has been provided so that you can follow a logical upgrade in the future, following such a path:
1Product 8Integrated
2Product 8Integrated + Product 8Power (Utilizing both the power amp and the power section of the Product 8
Integrated in bi-amp mode)
3Product 8Power + Product 8Pre.
As the phono sockets on the Product 8Integrated Amplifier are gold plated, we recommend that, where possible, you
use gold phono plugs on your interconnect leads. Gold to gold connections will ensure that a good electrical contact is
maintained without the need for periodic cleaning
Take care that your input leads are correctly oriented for Right and Left channels. RED is usually Right and WHITE or
BLACK is usually Left.
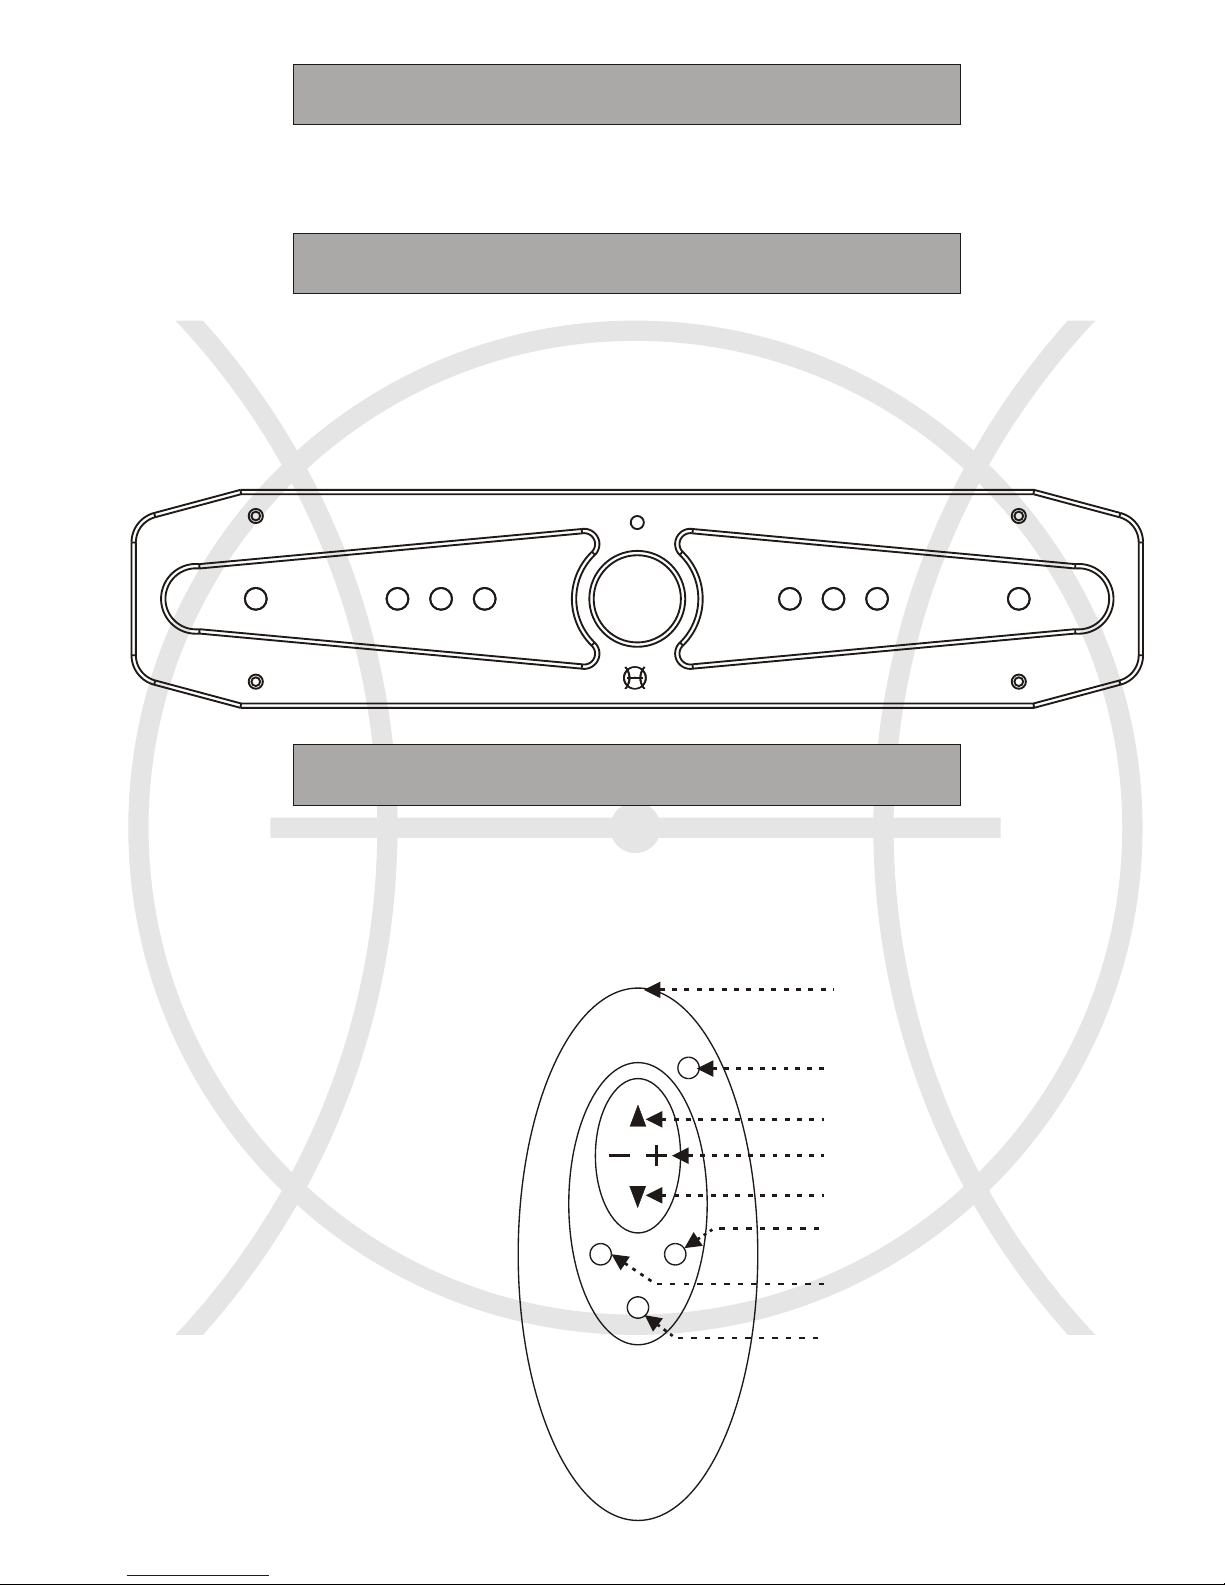
The has six inputs, 1-CD, 2-CD-BAL, 3-DVD, 4-TUNER, 5-AUX and 6-TAPE.
As with all connections ensure that the equipment is switched off before you attempt to connect any loudspeaker cables.
LOUDSPEAKER OUTPUT
The Product 8Integrated Amplifier has a bi-wiring facility and will allow you to connect your loudspeaker cables to
your loudspeakers via either a 4mm banana plug, spade or bare wire type connection. If you are using the bare wire
method make sure that all the strands of cable are securely within the binding post before you switch on your amplifier.
The Red terminal is for your positive (+) connection and the BLACK terminal is for your negative (-) connection. If you
fail to observe this pattern your system may result in an ‘out of phase’ condition, giving you poor results in sound quality.
LOUDSPEAKER MATCHING
The most common misunderstanding in matching amplifiers with loudspeakers is with power handling.
When amplifiers are given a power rating, this refers to the maximum output. The maximum usable output will usually be
reached at about 1 - 2 o'clock on the volume control, leaving enough reserve power to cope with transients and
crescendo's. This limit is also dependant on such things as source output levels and loudspeaker sensitivity. If an
amplifier is driven beyond this limit it will 'clip' (literally clipping the wave form), resulting in distortion. It is this
distortion that usually damages loudspeakers, and not a mis-match in power ratings. If you are in any doubt about the
suitability of your amplifier to drive your loudspeakers, please consult your dealer.
LOUDSPEAKER CONNECTIONS
Please note that, as with all hi-fi products, there are no user-servicable parts inside.
Please refer all servicing work to a qualified engineer.
4Product 8Power x2 + Product 8Pre (2 Product 8Power amps in bi-amp mode)
When you have your Product 8Power amp, connect PRE-OUT to Audio Input on the Power amp.
When you have your second Product 8Power amp, connect PRE-OUT Left to Power amp1 and PRE-OUT Right to
Power amp2. NOTE: As all power amps have differing input sensitivities, it is generally NOT recommended to use any
other model of power amp.
If you are using a turntable via a suitable phono stage it may be necessary to earth this phono stage to the Product 8
Integrated. This can be done using the earth terminal supplied. If, when listening to your turntable you can hear a slight
buzzing noise, you probably have an earth loop. You should therefore disconnect the Earth lead. If the buzzing persists,
contact your dealer.
110 - 120V, 60 Hz
Fuse Rating: 8A T
220 - 240V, 50Hz
Fuse Rating 4A T
ALCHEMIST
PRODUCT
EIGHT
INTEGRATED
CLASS1
AUDIO
PRODUCT
SERIAL NUMBER:
This unit has been
factory set to operate at
the voltage marked
below:
No user serviceable parts
inside.
Refer all work to qualified
personnel.
Do not remove any
panels for risk of electric
shock!
Mains Fuse:
Ensure correct rating and
type for voltage used!
WARNING: THIS
PRODUCT MUST BE
EARTHED.
Peak Power
Consumption: 380W
MAINS INPUT AC ONLY~
RIGHT OUTPUT
+_
RIGHT OUTPUT
+_
LEFT OUTPUT
+_
LEFT OUTPUT
+_
DESIGNED & MANUFACTURED IN HERTFORDSHIRE, ENGLAND
REC MON CDDVD
PRE-AMPTAP E
OUTPUT 12
3
4
5
6
BALANCED INPUT
TUNER
LEFTRIGHT
AUX
RCA INPUTS
UPPER = LEFT
LOWER = RIGHT
8
RCA

Output @1kHz into 8 ohms:
Input Sensitivity:
Frequency Response @ 3V:
Residual Noise (Max vol):
Total Harmonic Distortion:
Power Consumption (Nominal):
Power Consumption (Peak):
External Fuse Rating:
Dimensions ( W x H x D):
Weight (Packed):
100 Watts (Class A/B)
390mV
-3dB @ 50KHz
<2mV
<0.5% THD
100 Watts
370 Watts
8A@110-120V 4A@220-240V
470mm x 360mm x 105mm
20Kg
PRODUCT 8INTEGRATED AMPLIFIER
In the unlikely event that we should discover something that would improve one of our products, we reserve the
right to change specifications without prior notice
ALCHEMIST, UNIT 1, FURZEWOOD HOUSE, CRANBOURNE INDUSTRIAL ESTATE
CRANBOURNE ROAD, POTTER'S BAR, HERTS, EN6 3JN. United Kingdom.
Tel: 01707-664607, Fax: 01707-664207
www.alchemist-audio.com, e-mail: enquiries@alchemist-audio.com
SPECIFICATIONS
Any cleaning of your PRODUCT 8integrated amplifier should be done with a clean dry cloth or soft bristle
brush. There is no need to polish the gold effects, a simple dry wipe is sufficient.
Do not use any solvent or silicone based cleaning solutions as this may result in tarnishing.
Remember to replace all of your packaging in the box and re-seal. Keep the box for any future transportation of
your product.
GENERAL CARE
Table of contents
Other ALCHEMIST Amplifier manuals
Popular Amplifier manuals by other brands

IFM Electronic
IFM Electronic OBF5xx operating instructions

JBL
JBL 5306 Technical manual

Quicksilver
Quicksilver Triode Mono Amplifier operating instructions

Legacy
Legacy Streamline owner's manual

K+H
K+H KPA 2290 operating manual

Mesa/Boogie
Mesa/Boogie Three Channel Dual & Triple Rectifier Solo... Maintenance and repair information