ALDI Gardenline PREMIUM PK-001 User manual

Assembly
Instructions
PREMIUM
GAS BARBECUE

1
2
331
4
5
6
7
8
29
28
10
927
12
13
15
17 18
16 19
25
26
24
23
11
14
22
20
21
30
abcde
32 33
Overview
2

56
55
54
34
35 53
38
37
39
52
51
50
40
42
43
49
41
44
45
48
46
47
36
ade57 58 a
a
64
6362
60 6159
Overview
3

Scope of delivery/device components
Scope of delivery for gas grill
1
Lid
2
Warming rack
3
Grill plate
4
Grill attachment
5
Grate for side burner
6
Side burner
7
Table for side burner
8
Bracket for side burner
9
Cross bar (x2)
10
Rear wall
11
Rear left leg
12
Left side wall
13
Caster (x2)
14
Front left leg
15
Caster with brake (x2)
16
Base plate
17
Left door
18
Right door
19
Door handle (x2)
20
Rear right leg
21
Right side wall
22
Front right leg
23
Tray
24
Handle attachment (x2)
25
Handle for storage tray
26
Hook (x3)
27
Door bracket
28
Grease tray
29
Storage tray
30
Burner cover (x4)
31
Grill rack (x2)
32
Gas hose
33
Pressure regulator
Scope of delivery/device components
4

Scope of delivery for washing station
34
Rear bracket
35
Worktop
36
Rear wall
37
Hook (x3)
38
Handle
39
Handle attachment (x2)
40
Left side wall
41
Magnet
42
Caster (x2)
43
Caster with brake (x2)
44
Left door
45
Right door
46
Front trim panel
47
Chopping board
48
Door handle (x2)
49
Base plate
50
Divider
51
Front wall
52
Right side wall
53
Front bracket
54
Drain hose
55
Wash basin
56
Water tap
Scope of delivery for straight connection
57
Basket (x2)
58
Strut (x4)
Scope of delivery for corner connection
59
Corner worktop
60
Triangular connecting plate
61
Trapezoidal connecting plate
62
Base plate
63
Connecting bracket (x2)
64
Caster
Scope of delivery for connecting elements
a
M6x10 screw (x107)
b
M6x35 screw (x8)
c
M6x15 flat head screw (x4)
d
M4x8 screw (x15)
e
M6x15 screw (x4)
Tools required (not supplied)
65
PH1 Phillips screwdriver (magnetic)
65
Scope of delivery/device components
5

Table of content
Overview..................................................................................................................2
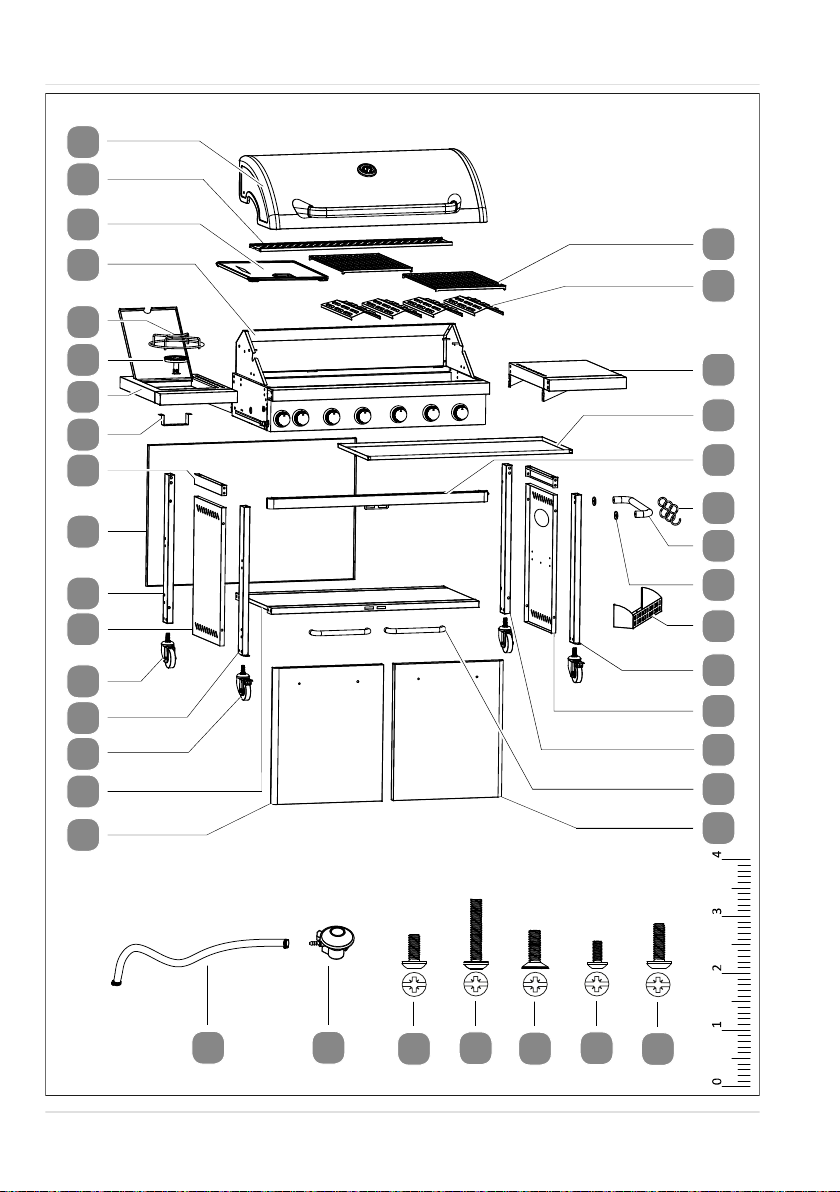
Scope of delivery/device components...................................................................4
General information................................................................................................8
Reading and storing the assembly instructions........................................................... 8
Intended use...................................................................................................................... 8
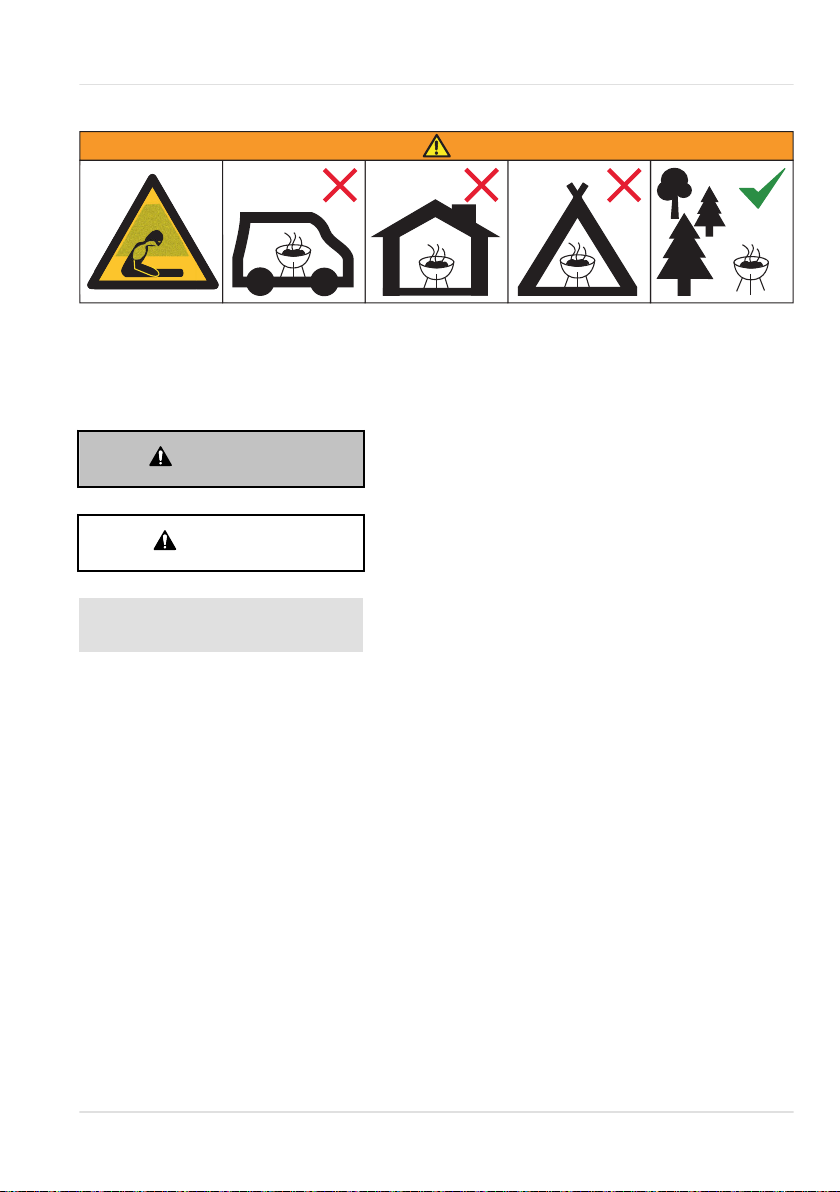
Explanation of symbols.....................................................................................................8
Safety.......................................................................................................................9
Assembly instruction..............................................................................................11
Grill step 1: assembling the legs......................................................................................13
Grill step 2: assembling the frame..................................................................................14
Grill step 3: installing the grill attachment on the frame............................................ 14
Grill step 4: fastening the grill attachment to the frame.............................................15
Grill step 5: attaching the side table.............................................................................. 15
Grill step 6: installing the side burner............................................................................16
Grill step 7: attaching the doors...................................................................................... 17
Grill step 8: assembling the tray..................................................................................... 17
Grill step 9: connecting the pressure regulator........................................................... 18
Grill step 10: preparing the grill...................................................................................... 19
Washing station step 1: assembling the side walls..................................................... 20
Washing station step 2: mounting the brackets..........................................................20
Washing station step 3: installing the divider...............................................................21
Washing station step 4: installing the front wall.......................................................... 21
Washing station step 5: mounting the casters.............................................................22
Washing station step 6: assembling the worktop....................................................... 23
Washing station step 7: attaching the doors................................................................ 24
Washing station step 8: assembling the wash basin..................................................25
Grill and washing station connection options.............................................................26
Side-by-side connection step 1: assembling the struts.............................................. 27
Corner connection step 1: assembling the connecting plate.................................... 28
Corner connection step 2: connecting the grill and washing station......................30
Use..........................................................................................................................32
Before using for the first time.........................................................................................33
Regulator and hose......................................................................................................... 33
Connecting the gas cylinder to the appliance.............................................................33
Checking for leaks............................................................................................................33
Lighting your barbecue.................................................................................................. 34
Taking the grill out of operation.................................................................................... 35
Cleaning.................................................................................................................36
Table of content
6

Maintenance.......................................................................................................... 37
Replacing the battery......................................................................................................37
Storage.................................................................................................................. 38
Troubleshooting....................................................................................................38
Technical data....................................................................................................... 40
Disposal................................................................................................................. 40
Table of content
7

General information
Reading and storing the assembly instructions
These assembly instructions belong to this Premium Gas Barbecue
(hereinafter also called the "product"). They contain important information
about assembly and use.
Read the assembly instructions carefully, in particular the safety
instructions, before using the product. Failure to follow these assembly instructions
may lead to severe injuries or product damage.
The assembly instructions are based on the standards and regulations that are valid
with the country-specific directives and laws.
Keep the assembly instructions for future reference. If you pass this product on to a
third party, you must also supply the assembly instructions.
Intended use
The barbecue is exclusively intended for outdoor use to cook, broil or heat food.
It is exclusively intended for private use and not for the commercial sector.
Only use the barbecue as described in these assembly instructions. Any other use is
considered improper and may lead to product damage or even personal injury. Do
not modify the barbecue. The barbecue is not a toy.
The manufacturer or retailer assumes no liability for damage caused by improper or
incorrect use.
Parts sealed by the manufacturer or the agent may not be manipulated by the user.
Explanation of symbols
The following symbols are used in these assembly instructions, on the product or on
the packaging.
This symbol provides you with useful additional information on
handling and use.
Declaration of conformity (see chapter “Declaration of conformity”):
Products marked with this symbol meet all the applicable Community
regulations of the European Economic Area.
General information
8

Safety
WARNING! Do not use the barbecue in a confined and/or habitable space e.g.
houses, tents, caravans, motor homes, boats. Danger of carbon monoxide poisoning
fatality.
The following signal words are used in these assembly instructions.
WARNING! This signal symbol/word denotes a hazard with
an average risk level that could lead to death or
severe injury if it is not avoided.
CAUTION! This signal symbol/word denotes a hazard with a
low risk level that could lead to mild or moderate
injury if it is not avoided.
NOTE! This signal word provides a warning about
potential material damage.
Safety notes
General safety notes
-WARNING! This barbecue will become very hot, do not move it during operation.
- Do not use indoors!
- Do not use in covered areas!
- Only use the barbecue at a safe distance from flammable materials (at least
1.5 m). Flammable materials include furniture or wooden structures, for instance.
- Use heat-resistant barbecue mitts or gloves (conforming to EN 407, Contact Heat
rating level 2 or greater) while cooking.
- Always use barbecue tools with a long, heat-resistant handle to set down and
turn items on the barbecue.
- Never use water to extinguish burning grease! Close the lid and the ventilation
opening to put out the flames.
- Allow the barbecue to cool down completely before cleaning.
- Screw connections may come loose during use, which can impair the stability of
the barbecue. Therefore, you must check that the screws are properly tightened
Safety
9

before each use. If necessary, retighten all screws to ensure that the barbecue is
secure.
- Do not use charcoal or any fuel other than liquid gas (propane, butane) to power
the barbecue.
- Do not smoke while using the product.
Risks for persons
- This barbecue may be used by persons with reduced physical, sensory or mental
abilities or lack of experience or knowledge if they have been supervised or
instructed in the safe use of the appliance and have understood the risks arising.
- Keep packaging film, styrofoam, or small parts away from children. Danger of
suffocation!
-WARNING! Keep children and pets away!
- The barbecue will be hot during cooking, and should never be left unattended.
- Do not wear clothing with loose flowing sleeves while lighting or using the
barbecue.
- Never bend over the hot barbecue during grilling.
- The use of alcohol, prescription, or nonprescription drugs may impair the
consumer’s ability to properly assemble or safely operate the barbecue.
- Never touch metal parts. They may be very hot.
- Touch the barbecue only on the handles.
- The barbecue may have sharp edges where you could cut yourself. Use working
gloves when unpacking, assembling, cleaning and maintaining the barbecue.
Safety notes for gas grill
-WARNING! Turn off the gas supply at the gas cylinder after use.
-WARNING! Gas cylinders must be stored outdoors out of the reach of children
and must not be stored in a building, garage or any other enclosed space.
-WARNING! After a period of storage and/or nonuse, the barbecue should be
checked for gas leaks and burner obstructions before use.
- Do not store or use petrol or other flammable liquids or vapours in the vicinity of
this barbecue or any other appliance.
- Do not store unconnected gas cylinders in the vicinity of this barbecue or any
other appliance.
- Storage of the barbecue indoors is permissible only if the gas cylinder is
disconnected and removed from the barbecue.
Before use
- Position the barbecue on a secure, stable and level surface.
- Never set up the barbecue near entranceways or areas with heavy foot traffic,
such as pathways.
- Do not transport the barbecue while it is hot.
- For safety reasons, you must not use liquid fuel to power the barbecue.
Safety
10

- Always keep a fire extinguisher and first-aid kit nearby so that you are prepared
to deal with fire or accidents.
Assembly instruction
CAUTION!
Risk of injury!
Some parts of the barbecue might have sharp edges. Touching
these parts can cause cuts.
- Wear protective gloves!
Use the following instructions and graphics to assemble the barbecue:
- Complete each assembly step in the given order. Do not skip any step.
- Do not fully tighten the nuts and bolts before assembling all the parts.
At least two adults are required to assemble the barbecue
Wear protective gloves during assembly.
Before starting assembly, familiarise yourself with the individual parts.
Grill step 1: assembling the legs............................................................................ 13
Grill step 2: assembling the frame.........................................................................14
Grill step 3: installing the grill attachment on the frame..................................... 14
Grill step 4: fastening the grill attachment to the frame......................................15
Grill step 5: attaching the side table..................................................................... 15
Grill step 6: installing the side burner...................................................................16
Grill step 7: attaching the doors.............................................................................17
Grill step 8: assembling the tray............................................................................17
Grill step 9: connecting the pressure regulator....................................................18
Grill step 10: preparing the grill............................................................................ 19
Washing station step 1: assembling the side walls...............................................20
Safety
11

Washing station step 2: mounting the brackets................................................... 20
Washing station step 3: installing the divider.......................................................21
Washing station step 4: installing the front wall.................................................. 21
Washing station step 5: mounting the casters......................................................22
Washing station step 6: assembling the worktop................................................ 23
Washing station step 7: attaching the doors........................................................ 24
Washing station step 8: assembling the wash basin............................................25
Grill and washing station connection options......................................................26
Side-by-side connection step 1: assembling the struts........................................ 27
Corner connection step 1: assembling the connecting plate............................... 28
Corner connection step 2: connecting the grill and washing station..................30
Assembly instruction
12

Grill step 1: assembling the legs
1
12
14 9
15 13
11
21
20 922
65
1. Attach the front left leg
14
and the rear left leg
11
to the cross bar
9
and the
left side wall
12
using 8 M6x10 screws
a
.
2. Attach the front right leg
22
and the rear right leg
20
to the cross bar
9
and
the right side wall
21
using 8 M6x10 screws
a
.
3. Screw the casters with brakes
15
onto the front left leg
14
and the front right
leg
22
.
4. Screw the casters
13
onto the rear left leg
11
and the rear right leg
20
.
Assembly instruction
13

Grill step 2: assembling the frame
227
16
65
10
1. Fasten the base plate
16
to the two side parts using 8 M6x35 screws
b
.
2. Fasten the door bracket
27
to the two side parts using 4 M6x10 screws
a
.
3. Fasten the rear wall
10
to the two side parts using 4 M6x10 screws
a
.
Grill step 3: installing the grill attachment on the frame
3
1. With the help of a second person, position the grill attachment
4
on the frame.
Assembly instruction
14

Grill step 4: fastening the grill attachment to the frame
4
65
28
4
1. Pull the grease tray
28
backwards out of the grill attachment
4
.
2. Fasten the grill attachment
4
to the frame using 4 M6x15 flat head screws
c
.
Grill step 5: attaching the side table
5
21
4
26
25
24 29
7
1. Fasten the table for the side burner
7
to the grill attachment
4
using
5 M6x10 screws
a
.
2. Thread the 3 hooks
26
onto the handle for the storage tray
25
. The small
diameter of the hook must fully surround the handle.
Assembly instruction
15

3. Attach the handle and handle attachment
24
to the storage tray
29
using
2 M6x15 screws
e
.
4. Fasten the storage tray
29
to the grill attachment
4
using 5 M6x10
screws
a
.
5. Fix the table for the side burner
7
and the storage tray
29
in place from the
inside of the grill attachment using 2 M6x10 screws
a
.
Grill step 6: installing the side burner
6
65
6
8
1. Open the flap on the table for the side burner.
2. Attach the bracket for the side burner
8
to the table using 2 M4x8 screws
d
.
3. Guide the stainless steel metal hose from the grill attachment
4
through the
hole in the bracket
8
.
4. Screw the side burner
6
onto the threaded end of the hose.
5. Connect the ignition cable to the igniter of the side burner.
6. Position the grate for the side burner
5
in the 4 holes in the table.
7. Close the flap.
Assembly instruction
16

Grill step 7: attaching the doors
7
65
17 18
19
3
1
24
1. Attach the door handles
19
to both doors
17
18
using 4 M6x10 screws
a
.
2. Mount both doors, first at the bottom in the outer holes in the legs and then at
the top in the door bracket
27
. Push down the pin on the top of the door.
Grill step 8: assembling the tray
8
23
65
21
1. Fasten the tray
23
to the right side wall
21
using 5 M4x8 screws
d
.
Assembly instruction
17

Grill step 9: connecting the pressure regulator
932
33
1. Push one end of the gas hose
32
onto the connector of the pressure
regulator
33
.
2. Guide the hose clamp over the gas hose and fasten the hose to the connector of
the pressure regulator.
3. Pull the protective sleeve off the hose connection on the grill attachment.
4. Push the second end of the gas hose
32
onto the hose connection of the grill
attachment.
5. Use the second hose clamp to fasten the gas hose.
Assembly instruction
18

Grill step 10: preparing the grill
10
2
331
30
1. Position the 4 burner covers
30
over the burners. Pay attention to the bars of
the grill attachment.
2. Position the 2 grill racks
31
over the 4 burner covers.
3. Position the grill plate
3
over the burners without burner covers.
4. Remove the protective film from the warming rack
2
.
5. Place the warming rack
2
on the two holding brackets.
6. Push the grease tray
28
at the back into the grill attachment
4
.
The grill is assembled.
Assembly instruction
19

Washing station step 1: assembling the side walls
11
40 49 52
65
1. Fasten the right side wall
52
and the left side wall
40
to the base plate
49
using 8 M6x10 screws
a
.
Washing station step 2: mounting the brackets
12
65
41
34
53
49
3 - 4 mm
1. Fasten the magnet
41
to the base plate
49
using 2 M4x8 screws
d
.
2. Screw 8 M6x10 screws
a
into the side walls, leaving 3 to 4 mm of the screw
thread visible.
3. Mount the rear bracket
34
and the front bracket
53
on the M6x10 screws
a
.
Assembly instruction
20
This manual suits for next models
3
Table of contents
Popular Grill manuals by other brands

Dakota Grills
Dakota Grills Metro Assembly instructions

Hamilton Beach
Hamilton Beach HealthSmart 840092400 operating instructions

VEVOR
VEVOR JY-MY-KYL46DB-120 manual

Klarstein
Klarstein JERSEY manual

King Kooker
King Kooker CS29 Assembly instructions and use and care manual

Napoleon
Napoleon NK22CK-L Assembly, use and care manual