ALDI Stirling HTJ-2108-W User manual

ID: #05007
m
y
h
a
n
s
e
c
o
n
t
r
o
l
.
c
o
m
M
A
N
U
A
L
D
E
V
E
L
O
P
E
D
I
N
G
E
R
M
A
N
Y
User-friendly
Manual
User manual
ULTRASONIC COOL MIST
HUMIDIFIER

Dok./Rev.-Nr. 199193_20210707
Contents
1Lid
2Water tank
3Control unit
4Essential oil tray
5Essential oil pad
3
2
1
4
5

Table of contents
3
Table of contents
Contents............................................................................................................2
General information........................................................................................ 4
Reading and storing the user manual ..................................................................4
Proper use..................................................................................................................4
Explanation of symbols................................................................................... 4
Safety............................................................................................................... 5
Explanation of notes ................................................................................................5
General safety notes.................................................................................................5
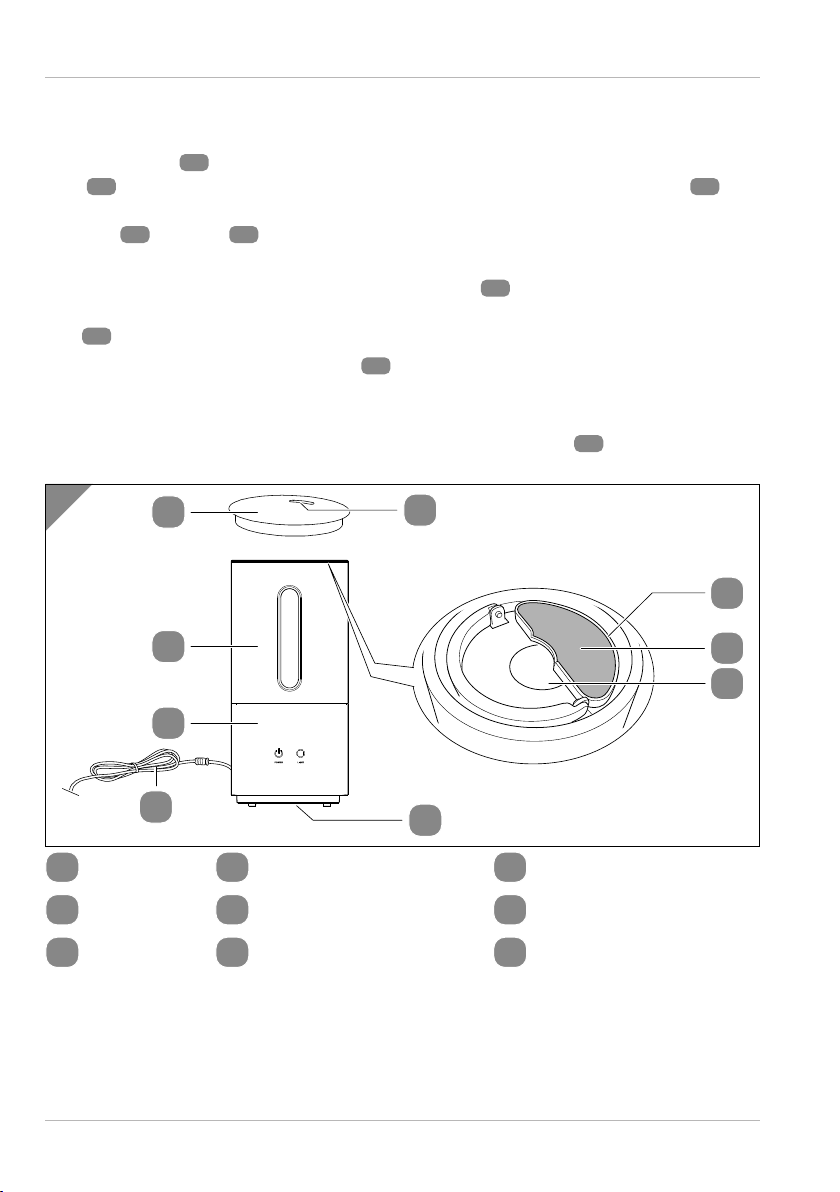
Product description........................................................................................10
First use........................................................................................................... 11
Checking the product and package contents..................................................... 11
Operation........................................................................................................ 11
Setting up the product............................................................................................12
Adding water............................................................................................................12
Connecting the product..........................................................................................13
Switching the product on and off ........................................................................ 14
Switching the bottom illumination on and off................................................... 14
Refilling with water ................................................................................................ 15
Stopping operation ................................................................................................ 15
Filling the essential oil tray.................................................................................... 15
Cleaning..........................................................................................................16
Cleaning exterior parts...........................................................................................17
Cleaning and descaling the water tank .............................................................. 18
Cleaning the control unit....................................................................................... 18
Cleaning the air vent .............................................................................................. 18
Cleaning the essential oil pad............................................................................... 18
Cleaning the dust filter........................................................................................... 18
Maintenance...................................................................................................19
Changing the silver ion ball filter ......................................................................... 19
Spare filters ordering instructions ....................................................................... 19
Storage .......................................................................................................... 20
Troubleshooting............................................................................................. 21
Technical specifications..................................................................................22
Disposal ..........................................................................................................22
Disposing of the packaging .................................................................................. 22
Disposing of the product ....................................................................................... 22
Warranty Details .............................................................................................23
Repair and Refurbished Goods or Parts Notice............................................ 24

General information
4
General information
Reading and storing the user manual
This user manual accompanies this Ultrasonic Cool Mist Humidifier (referred
to below only as the ‘product’). It contains important information about
start-up and handling.
Before using the product, read the user manual carefully. This particularly
applies to the safety instructions. Failure to follow this user manual may result in seri-
ous injury or damage to the product.
Store the user manual for future use. Make sure to include this user manual when
passing the product on to third parties.
Proper use
The product is designed exclusively for humidifying interior spaces.
It is intended for private use only and is not suitable for commercial purposes.
Use the product only as described in this user manual. Any other use is deemed
improper and may result in damage to property or even personal injury. The product
is not a children's toy.
The manufacturer or vendor accepts no liability for damage caused by improper or
incorrect use.
This user manual is also available for download at www.wachsmuth-krogmann.com.
Explanation of symbols
The following symbols are used in this user manual, on the product or on the
packaging.
This symbol provides you with useful supplementary information
about assembly or operation.
This symbol identifies electric devices with double-insulated housing,
which, therefore, comply with protection class II.
The Regulatory Compliance Mark (RCM).
The product releases vapour during operation.

Safety
5
Clean the water tank every three days.
The filter must be cleaned or replaced on a regular basis.
Safety
Explanation of notes
The following symbols and signal words are used in this user manual.
WARNING!
This symbol/signal word designates a hazard
with a moderate degree of risk which may lead to
death or severe injury if not avoided.
NOTICE! This signal word warns against potential dam-
ages to property.
General safety notes
WARNING!
Risk of electric shock!
A faulty electrical installation or excessive mains voltage may result
in an electric shock.
− Connect the product only if the mains voltage of the socket
corresponds to the rating plate specification.
− Only connect the product to an easily accessible socket so that
you can quickly disconnect the product from the mains supply
in case of a failure.
− Do not use the product if it is visibly damaged or if the mains
cord or mains plug is defective.
− If the mains cord of the product is damaged, it must be
replaced by the manufacturer, the manufacturer’s after-sales
support or a person with similar qualifications to avoid risks.

Safety
6
− Do not open the housing; have qualified professionals carry
out repairs. Contact a qualified workshop for this. Liability and
warranty claims are waived in the event of repairs performed
by the user, improper connection or incorrect operation.
− Only parts that comply with the original device data may be
used for repairs. This product contains electrical and mechanical
parts that are essential for protection against hazards.
− Do not operate the product with an external timer or separate
remote control system.
− Do not immerse the product, the mains cord or mains plug in
water or other liquids.
− Never touch the mains plug with wet hands.
− Never pull the mains plug out of the socket by the mains cord.
Instead, always hold on to the mains plug while doing so.
− Never use the mains cord as a carrying handle.
− Keep the product, mains plug and mains cord away from open
flames and hot surfaces.
− Lay out the mains cord so that it does not pose a tripping hazard.
− Do not kink the mains cord and do not lay it over sharp edges.
− Only use the product indoors. Never use it in wet rooms or in
the rain.
− Never store the product in a way that leaves it at risk of falling
into a bath tub or washbasin.
− Never reach to retrieve an electrical device if it has fallen in
water. In such a case, immediately disconnect the mains plug
from the socket.
− Make sure that children do not insert any objects into the product.
− Always switch the product off and pull the mains plug out of
the socket when you are not using the product, when cleaning
it, adding water (see section on ‘Adding water’) or in the event
of a fault.
− Disconnect the product from the mains when adding water,
emptying it, and cleaning it.

Safety
7
WARNING!
Danger for children and persons with impaired physical, sen-
sory or mental capacities (e.g. disabled persons, older persons
with reduced physical and mental capacities) or lack of experi-
ence and knowledge (e.g. older children).
− This product may be used by children aged eight years and
over and by persons with impaired physical, sensory or men-
tal capacities or those lacking experience and knowledge if
they are supervised or have been instructed in how to use
the product safely and understand the risks associated with
operating it. Children should not be permitted to play with the
product. Cleaning and user maintenance must not be per-
formed by unsupervised children.
− Keep children under eight years of age away from the product
and the connection cable.
− Do not leave the product unattended while in operation.
− Do not let children play with the packaging film.
Children may get caught in it when playing and suffocate.
WARNING!
Health hazard!
Improper use of the product may result in injury to your health.
− WARNING: Microorganisms, which might be in the water or
surrounding environment where the product is being used or
stored, can grow in the water tank and be released into the air,
leading to serious health risks if the water is not replaced and
if the water tank is not properly cleaned every three days.
− Please note that high air humidity can promote the growth of
biological organisms in the environment.
− Do not allow the area around the product to get wet or damp.
Reduce the release of vapour if moisture occurs.

Safety
8
Only use the product periodically if you cannot reduce the
release of vapour. Do not let absorbent materials (e.g. carpets,
curtains, drapes or tablecloths) get wet.
− Do not leave any water in the water tank when the product is
not in use.
− The product must be emptied and cleaned before being put
away. The product must be cleaned before the next use.
NOTICE!
Risk of damage!
Improper handling of the product can damage the product.
− Place the product on an easily accessible, level, dry, heat-re-
sistant and sufficiently stable surface. Do not place the product
on the edge of the surface.
− Avoid letting heat build up by not placing the product right
next to a wall or under a wall cupboard or similar. The steam
that is emitted could damage furniture.
− Do not cover the product during operation.
− Never place the product on or near hot surfaces (e.g. hobs).
− Ensure that the mains cord does not come into contact with
hot parts.
− Never expose the product to high temperatures (e.g. heaters)
or to the influence of weather (e.g. rain).
− Do not expose the product to direct sunlight or hot circulating air.
− Do not use the product with ambient temperatures below 0°C.
If the water in the water tank is frozen, wait until it has melted.
− If the room temperature is below 0°C, empty the water tank.
Freezing water can damage the product.
− Never fill the water tank with water that is above 40°C to pre-
vent discolouration or deformation.
− Only add water to the water tank; never put water in the other
parts of the product.

Safety
9
− Never add water to the product’s vapour discharge opening or
vapour discharge channel. Wipe wet areas on the product with
a dry cloth.
− Do not put any metals, chemicals or cleaners in the water tank.
Otherwise, humidification won’t work properly.
− Never remove residual water from the steam pipe when the
product is switched on. This can destroy the sensor.
− Do not move the product around too much if there is a lot of
water in the water tank. Otherwise, water may leak and can
get into other parts of the product.
− Never immerse the product in water or use a steam cleaner to
clean it. Otherwise, the product could be damaged.
− Never place the product in a dishwasher. It would be
destroyed as a result.
− Stop using the product if any of the product’s plastic parts
show cracks or deformation. Only replace damaged parts with
corresponding original spare parts.
− Refer to the ‘Cleaning’ chapter.

Product description
10
Product description
The product is used for raising humidity in interior spaces.
The control unit 3uses ultrasonic sounds to atomise the water filled in the water
tank 2into the finest drop particles and then the vapour discharge channel 7
releases them into the ambient air as vapour or mist through the vapour discharge
opening 6in the lid 1. Neither humans nor animals can hear the high frequency
of the ultrasonic sounds used.
You can also add essential oil to the essential oil tray 4depending on your personal
preferences. The released vapour absorbs the essential oil through the essential oil
pad 5and distributes it in the ambient air.
The control unit’s bottom illumination 8can be switched on for an eye-catching
visual effect. The bottom illumination features LEDs that light up blue when switched
on.
The product is mains-operated. The mains cord and mains plug 9are used to con-
nect to the mains.
1Lid 4Essential oil tray 7Vapour discharge channel
2Water tank 5Essential oil pad 8Bottom illumination
3Control unit 6Vapour discharge opening 9Mains cord and mains plug
2
3
98
16
4
7
5
A

First use
11
First use
Checking the product and package contents
NOTICE!
Risk of damage!
If you do not take care when opening the packaging with a sharp knife
or other pointed object, the product can quickly become damaged.
− Be very careful when opening.
1. Take the product out of the packaging.
2. Check to make sure that all parts are included
(seepage 2).
3. Check whether the product or the individual parts are
damaged.
If this is the case, do not use the product.
Contact the warrantor by following the instructions
on the warranty card.
4. Rinse the water tank 2and the water tank cap 10
with clear water (seeFig.B).
Operation
NOTICE!
Risk of damage!
Unusual noises or odours may be a sign that the product is damaged.
− If there are any unusual noises or odours coming from the
product, immediately pull the mains plug out of the socket.
− Contact the warrantor by following the instructions on the
warranty card.
2
10
B
2Water tank
10 Water tank cap

Operation
12
NOTICE!
Risk of damage!
The product can be quickly damaged when used with an empty
water tank.
− Never use the product without water in the water tank.
• It is best to use the product with cool boiled or distilled water.
• Change the water in the water tank on a regular basis to keep the
product clean.
• With a full tank, the product can operate continuously for 7 to 12
hours without having to refill.
Setting up the product
− Set the product up near a socket with an earthing contact with a mains voltage
corresponding to the rating plate. Make sure that the socket with an earthing
contact is freely accessible.
Adding water
WARNING!
Risk of electric shock!
If the product falls over with a full water tank, the leaking water can
flow out onto other electrical devices and cause electric shock.
− Put the product in a safe location.
− Empty the water tank if you will not use the product for an
extended period of time.
− Make sure that the product is unplugged when you add water
to it.
1. Grab the water tank 2by the carrying handle 12 and remove it from the control
unit 3. Turn the water tank upside down (seeFig.1).
2. Unscrew the water tank cap 10 from the water tank by turning it anticlockwise.
3. Use the water tank opening 13 to pour max. 2.8 litres of water into the water tank.
The water level can be read through the provided water level window 11 .

Operation
13
4. Turn the water tank cap 10 clockwise to put it back on and wipe off any remaining
water with a dry cloth.
5. Put the water tank with the vapour absorption unit 14 facing downwards onto
the control unit 3.
2Water tank 11 Water level window 13 Water tank opening
3Control unit 12 Carrying handle 14 Vapour absorption
unit
10 Water tank cap
10
2
12
2
11
3
13
14
1
Connecting the product
− Use the mains cord and mains plug 9to connect the product to a socket with an
earthing contact.

Operation
14
Switching the product on and off
The product has three levels of humidification. Press the Power touch key 15 to
change the levels of humidification (see Fig. C).
Based on the level selected, the Power touch key will illuminate a certain colour.
Colour Level of humidification
Red High
Yellow Medium
Green Low
1. Press the Power touch key 15 to switch the product
on.
The Power touch key illuminates red.
2. To select a different level of humidification, press
the Power touch key again until it illuminates in the
desired colour.
3. To switch the product off, press the Power touch key
again until it stops illuminating.
Switching the bottom illumination on and off
The product has blue-coloured LED bottom illumination 8
on the bottom of the control unit 3(seeFig. D).
1. Press the Light touch key 16 to switch on the bottom
illumination.
The Light touch key illuminates blue.
2. Press the Light touch key again to switch off the bot-
tom illumination.
15
C
15 Power touch key
16
8
D
8Bottom illumination
16 Light touch key

Operation
15
Refilling with water
The built-in safety mechanism automatically stops the humidification
process when there is no water in the water tank.
The Power touch key flashes red and vapour is no longer released from
the vapour discharge opening.
1. To use the product again, pull the mains plug 9out of the socket and add water
to the water tank (see ‘Adding water’ chapter).
2. Insert the mains plug into the socket and switch on the product (see ‘Switching the
product on and off’ product).
Stopping operation
1. To switch the product off, press the Power touch key 15 (repeatedly if necessary)
until it stops illuminating (see ‘Switching the product on and off’ chapter).
2. Pull the mains plug 9out of the socket with an earthing contact.
Filling the essential oil tray
NOTICE!
Risk of damage!
The product can be damaged if you fill the essential oil tray with water.
− Do not fill the essential oil tray with water.
Essential oil can be put in the essential oil tray. The released vapour
absorbs the essential oil through the essential oil pad and distributes
it in the ambient air. The amount of essential oil to be used depends on
the type of oil and your personal preferences. If you are not sure, add a
little less essential oil to the essential oil tray.
1. Remove the lid 1from the water tank 2(seeFig.2).
2. Remove the essential oil pad 5.
3. Add essential oil into the essential oil tray 4.
4. Put the essential oil pad in the essential oil tray.
Make sure that the essential oil pad can absorb the essential oil and that the
essential oil does not spill out of the essential oil tray and leak.
5. Place the essential oil tray with the essential oil pad on top of the water tank so
that the opening is positioned on the vapour discharge channel 7.
If you do not want to use essential oil, remove the tray and store it in a cool place.

Cleaning
16
6. Place the lid back on the water tank.
1
2
4
7
5
2
1Lid 4Essential oil tray 7Vapour discharge channel
2Water tank 5Essential oil pad
Cleaning
WARNING!
Risk of electric shock!
Water or other liquids that have penetrated the housing may cause
an electric shock.
− Always unplug the product and let it cool completely before
cleaning and putting it away!
WARNING!
Health hazard!
Improper use of the product may result in injury to your health.
− The water tank must be emptied and refilled every three days.
Before adding water, the water tank must be cleaned accord-

Cleaning
17
ing to the instructions provided in the ‘Cleaning’ chapter. Any
deposits, residues or dirty film that have formed on the water
tank’s surfaces or inner surfaces must be removed. All surfaces
must be rubbed dry.
NOTICE!
Risk of short circuit!
Water or other liquids that have penetrated the housing may cause
a short circuit.
− Never submerge the product in water or other liquids.
− Make sure that no water or other liquids get into the housing.
NOTICE!
Risk of damage!
Improper handling of the product can damage the product.
− Do not use any harsh cleaners, brushes with metal or nylon
bristles, or sharp or metallic cleaning utensils such as knives,
hard scrapers or similar. They could damage the surfaces.
− Never immerse the product in water or other liquids for clean-
ing, and do not use a steam cleaner to clean it. Otherwise, the
product could be damaged.
− Never place the product in a dishwasher.
It would be destroyed as a result.
• The water tank must be cleaned every three days.
• The control unit must be cleaned once a week.
− Before cleaning, pull the mains plug 9out of the socket.
Cleaning exterior parts
− Wipe down the product exterior with a damp cloth. Then let all parts dry com-
pletely before operating the product again.

Cleaning
18
Cleaning and descaling the water tank
1. Unscrew the water tank cap 10 from the water tank 2and remove any deposits
or dirt particles that have collected in the water tank (seeFig.B).
Wipe off limescale deposits with a damp cloth and, if necessary, use a little vinegar
to dissolve the limescale.
2. Then rinse the water tankand the water tank cap with clear water.
Cleaning the control unit
− Use a damp cloth to wipe off limescale deposits inside and on the surface of the
control unit 3. If necessary, use a little vinegar to dissolve the limescale.
Cleaning the air vent
1. Use a damp cloth to wipe off the air vent 17
on the control unit 3(seeFig.E).
If necessary, use a little vinegar to dissolve
the limescale.
2. Let the air vent dry completely.
Cleaning the essential oil pad
− Wash the essential oil pad 5with warm water and let it dry completely before
reinserting it (seeFig.A).
Cleaning the dust filter
1. Remove the water tank 2from the control unit 3and put it aside (seeFig.A).
2. Carefully pour out any leftover water in the control unit.
3. Turn the control unit upside down (seeFig.3). Push in the bottom cap 19 , turn it
to the left, and remove it from the bottom opening 18 .
4. Remove the dust filter 20 and wash it with warm water. Let it dry completely
before using it again.
5. Push the bottom cap in and turn it to the right to close the bottom opening again.
3
17
E
3Control unit 17 Air vent

Maintenance
19
3Control unit 19 Bottom cap
18 Bottom opening 20 Dust filter
OPEN
CLOSE
18
3
19
20
3
Maintenance
Changing the silver ion ball filter
• The silver ion ball filter ensures that there are no germs in the
stagnant water.
• The silver ion ball filter should be replaced after 160 hours of oper-
ation. Otherwise, it will lose its effectiveness.
• Only use original silver ion ball filters.
1. Remove the water tank 2from the control unit 3and put it aside (seeFig.A).
2. Remove the old silver ion ball filter 21
from the slot in the control unit and
replace it with a new one (seeFig. F).
3. Put the water tank with the vapour
absorption unit 14 facing downwards
onto the control unitagain.
Spare filters ordering instructions
You may order additional filters for the product (seeFig.G):
order. The filters come in packs of 3.
− Please advise your full name, email, delivery address and contact number.
3
21
F
3Control unit
21 Silver ion ball filter

Storage
20
− We will advise the charges for your order, including postage.
1× 3 pcs. set spare filters $8.95 AUD + $2.20 AUD postage.
− After you confirm the order a payment request via PayPal will be initiated.
You will receive an email from PayPal with payment instructions.
If you do not have a PayPal account, you do not need to register, simply a credit
card and email address is needed.
− After receipt of payment the spare parts will be mailed to you.
− Please keep this information for future reference, whenever you would like to
order additional filters for your Ultrasonic Humidifier.
G
Storage
− Empty and clean the water tank 2, remove the water from the inside of the
control unit 3, and wipe all parts dry with a cloth (seeFig.A).
− Keep the product in the original packaging, out of the reach of children, and in a
dry place.
This manual suits for next models
3
Table of contents