Alea Systems DeskJet 9xx User manual

Copyright © 2002-2003 Alea Systems, Inc.
Pingo-Photo RepPingo-Photo Rep
High Performance, Photo-Quality autoloading CD Printer

Alea Systems, Inc. Rev.1.13 Pingo-Photo Rep
User manual
2
All Rights Reserved. No part of this document may be copied or reproduced in any form or by any means without
the prior written consent of Alea Systems, Inc. Alea has made every effort to ensure the accuracy of this manual.
However, Alea makes no warranties with respect to this documentation and disclaims any implied warranties of
MERCHANTABILITY or fitness for a particular purpose. The information in this document is subject to change
without notice. Alea assumes no responsibility for any errors that may appear in this document. Alea, the Alea
logo design and Pingo Photo and Pingo Rep are trademarks of Alea Systems, Inc.
Initial issue: July 2002
Current revision: 1.13 March 2003
Alea Systems, Inc.
10810 Guilford Road, Suite 103
Annapolis Junction, MD 20701
Tel: (301) 776-3754
Fax: (301) 776-7561
e-Mail: [email protected]
Internet: http://www.alea.com
Macintosh is a registered trademark of Apple Computer, Inc.
Windows 95, 98 and Windows NT are registered trademarks of Microsoft Corporation
HP is a registered trademark of Hewlett-Packard Company

Alea Systems, Inc. Rev.1.13 Pingo-Photo Rep
User manual
3
1. Introduction to the Pingo-Photo Rep system................................................................................................6
1.1 Software revisions................................................................................................................................6
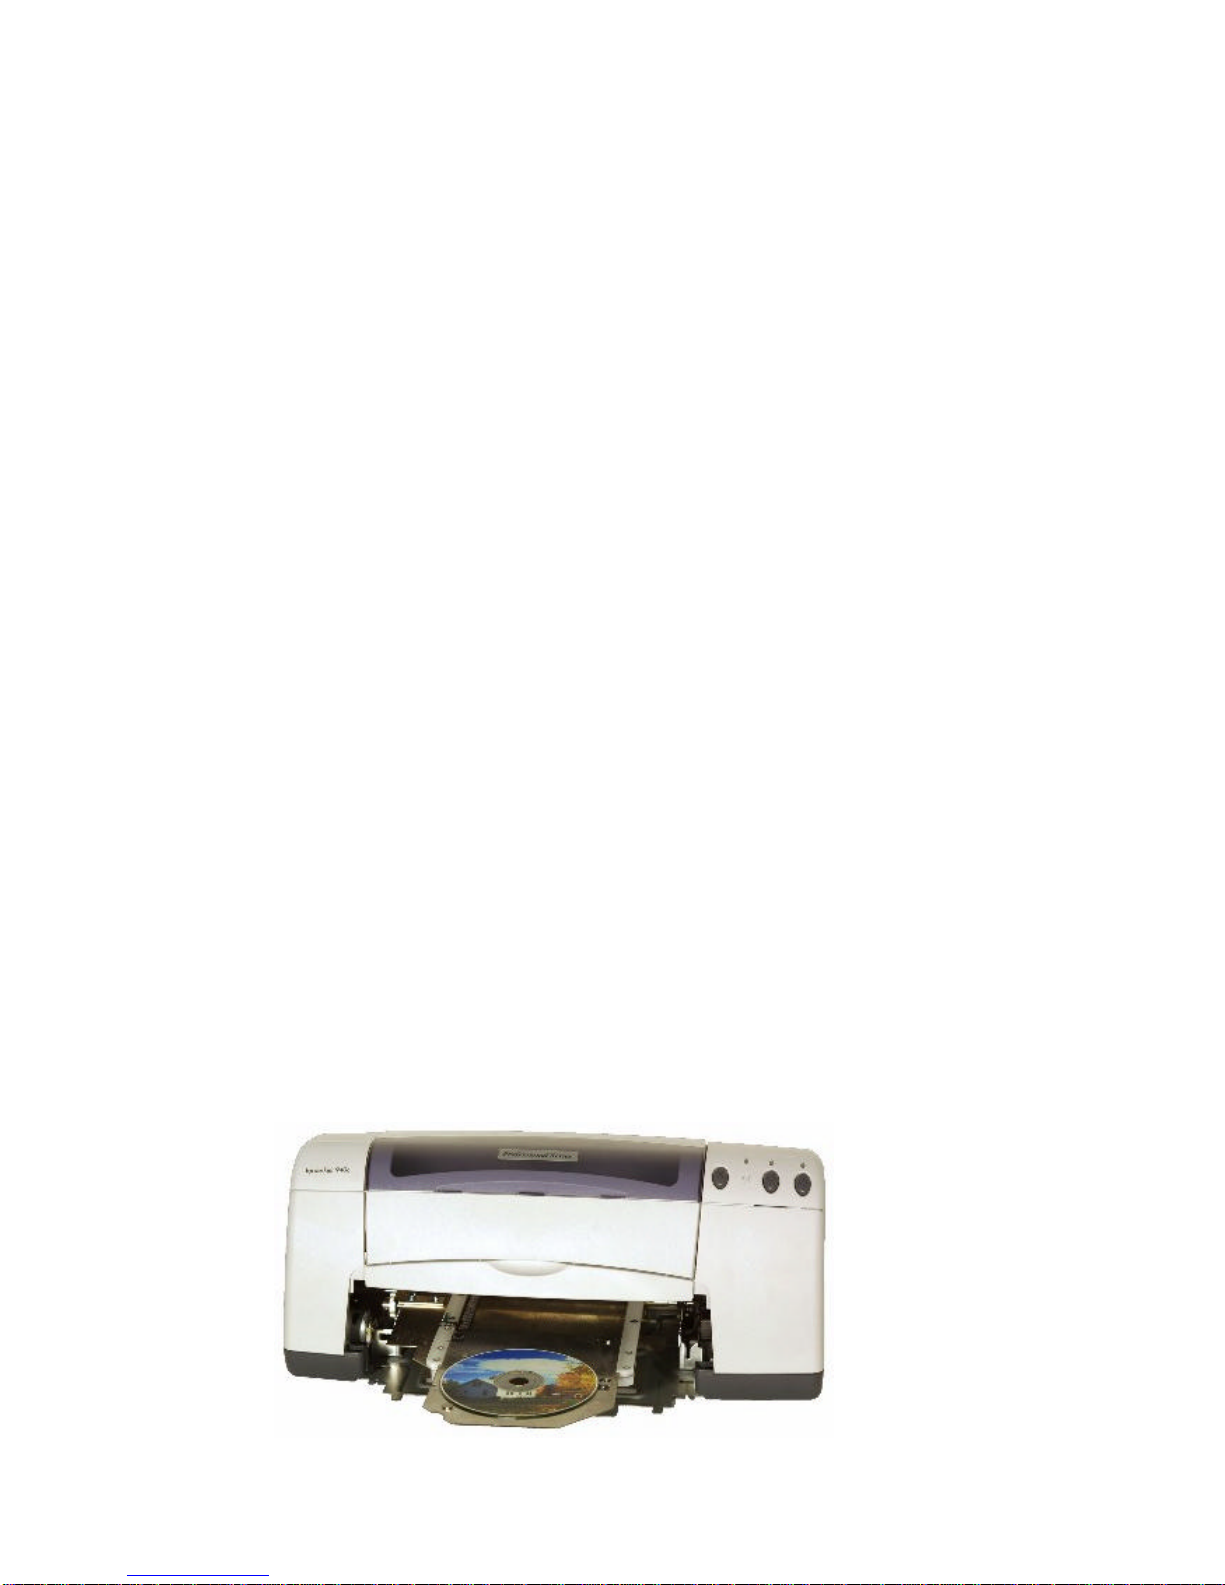
2. The CD Printer module................................................................................................................................6
2.1 Specifications...........................................................................................................................................7
2.2 Compatibility.............................................................................................................................................7
2.3 System Requirements...............................................................................................................................7
2.4 Cable Requirements.................................................................................................................................7
3. Unpacking the CD Printer and Setting Up.......................................................................................................8
3.1 Unpacking.................................................................................................................................................8
3.2 Printing Environment.................................................................................................................................8
4. Understanding the Printer...............................................................................................................................8
4.1 Printable area using the Pingo Photo........................................................................................................8
4.2 Manufacturing and Testing the Printer.......................................................................................................9
4.3 Ink Cartridge Life......................................................................................................................................9
5. Getting Started...............................................................................................................................................9
5.1 Connecting the Pingo Photo for WINDOWS..............................................................................................9
5.2 Installing the Ink Cartridges.......................................................................................................................9
5.3 Installing the Printer Driver Software (WINDOWS-Parallel)........................................................................9
5.4 Installing the Printer Driver Software (Mac - USB)...................................................................................10
5.5 Graphics Applications.............................................................................................................................10
5.5 Using the Alea Systems Template Files..................................................................................................10
5.6 Recommended Print Settings..................................................................................................................11
5.7 Printing on Standard and Business Card Media......................................................................................11
5.8 Operation of the Pingo Photo printer.......................................................................................................12
5.9 User control panel...................................................................................................................................12
6. CD Template layout .....................................................................................................................................13
7. Printing with Diskus™ or Surething™ label software.....................................................................................14
8. Creating Templates and a Print Mask...........................................................................................................15
9. Troubleshooting the Pingo Photo..................................................................................................................18
10. Printer Maintenance...................................................................................................................................18
10.1 Using and Caring for your print cartridges.............................................................................................19
10.2 Replacing print cartridges .....................................................................................................................19
10.3 Storing Print Cartridges.........................................................................................................................19
10.4 Cleaning Ink Cartridges.........................................................................................................................20
11. Frequently Asked Questions About USB (Universal Serial Bus)..................................................................20
12. Support of Your Printer...............................................................................................................................21
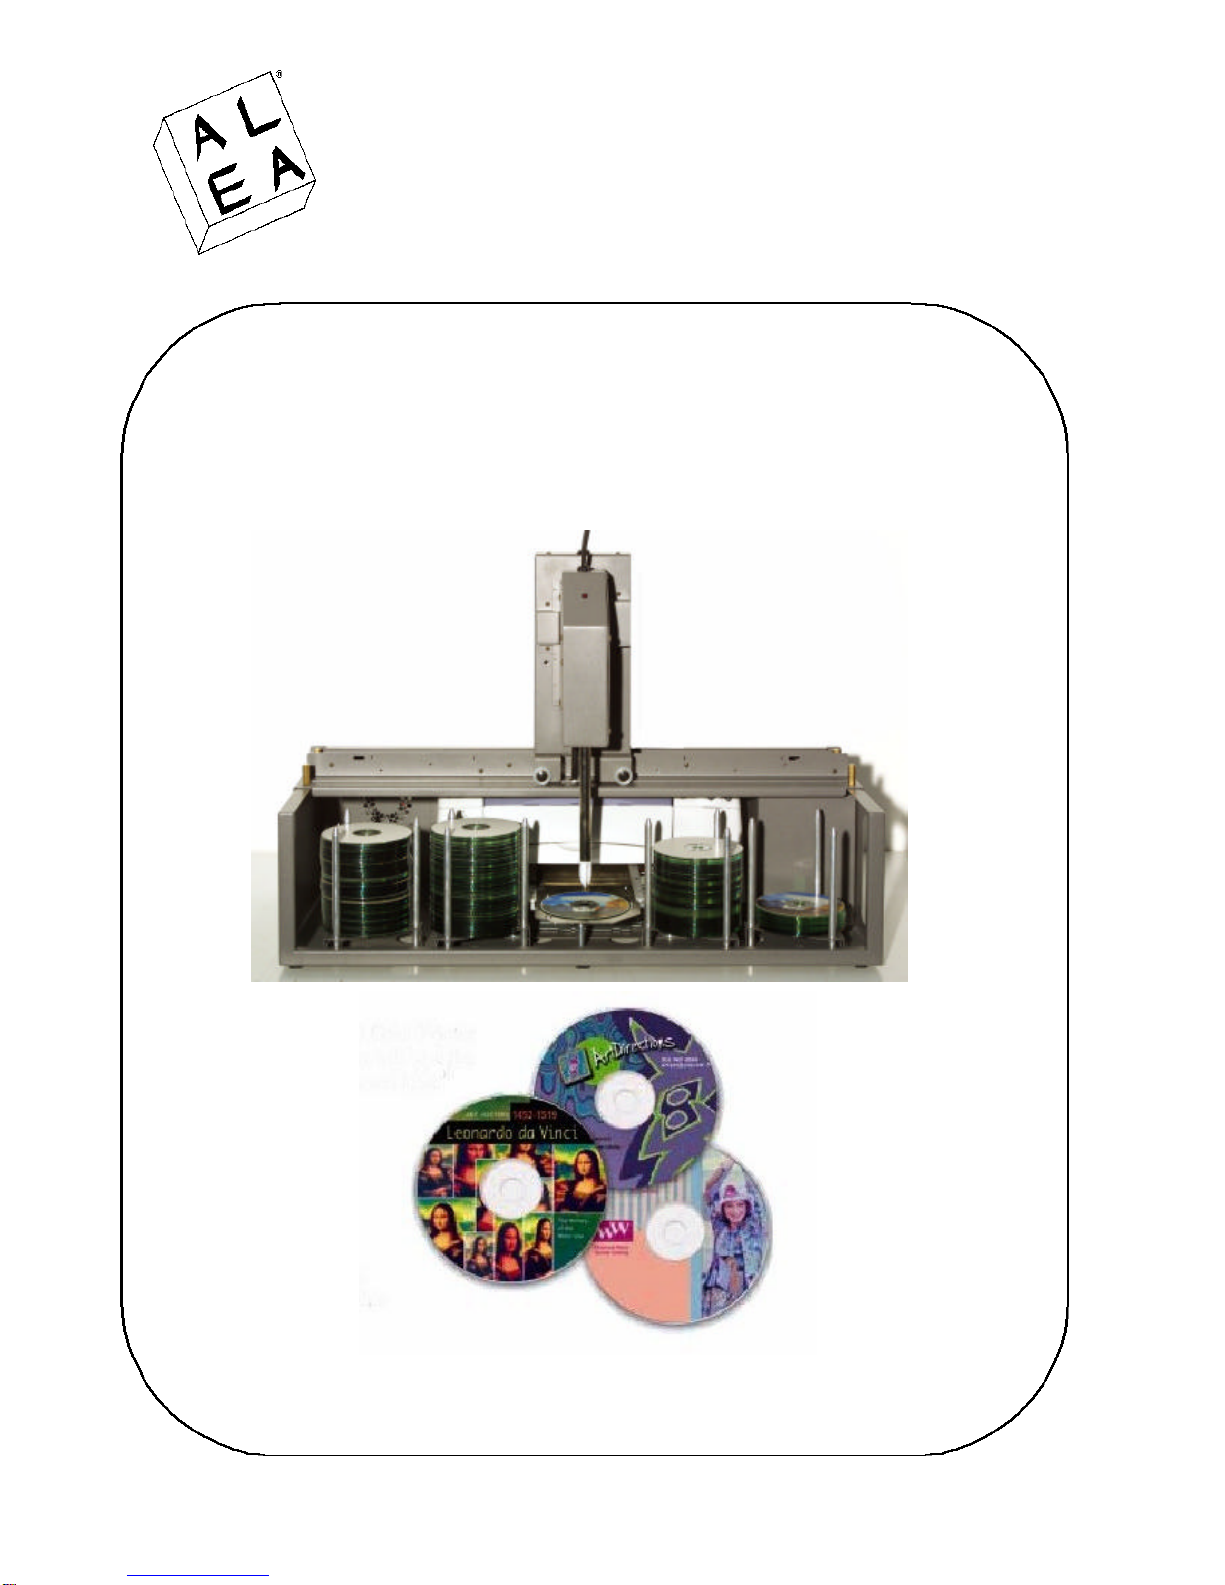
13. Introduction to Pingo-Photo Rep.................................................................................................................22
14. The Pingo Rep robotics..............................................................................................................................22
14.1 System requirements............................................................................................................................23
14.2 Cable requirements...............................................................................................................................23
15. Unpacking and setting up the Pingo Rep....................................................................................................23
15.1 Connecting Pingo-Photo Rep to a PC...................................................................................................27
15.2 Align the CD Printer and run system diagnostics...................................................................................29
15.2.1 How the CDR carrier works.........................................................................................................30
15.2.2 Test the CD Picker switches...........................................................................................................30
15.2.3 Align the CD Printer........................................................................................................................32
16. Replacing ink cartridges.............................................................................................................................33
17. Starting the Pingo Rep Application.............................................................................................................35
17.1 Set up the Pingo Rep options:...............................................................................................................35
17.2 Start the autoloader..............................................................................................................................38
18. Troubleshooting Pingo Rep....................................................................................................................40
18.2 Pingo Photo Error list............................................................................................................................41

Alea Systems, Inc. Rev.1.13 Pingo-Photo Rep
User manual
4
Alea Systems Limited Warranty
Alea Systems warrants to the original purchaser that Alea Systems's unmodified products, other than software,
shall be free from defects in material and workmanship for:
3 years for CD Printing Autoloading Systems excluding the CD-R duplication drives and any print engine which
has a 1 year warranty.
This warranty excludes all collateral or consumable items* and commences upon the original purchase date of
such products from Alea Systems or an authorized Alea Systems reseller. Alea Systems software is provided
"as is" pursuant to Alea Systems's separate Software License Agreement and Limited Warranty. This warranty is
only valid if HP brand ink cartridges are used. The use of any other brand of cartridge will result in this warranty
being void.
Alea Systems products requiring Limited Warranty service hereunder should be delivered to a Alea Systems
authorized service organization with proof of purchase within the applicable warranty period. Upon receipt of
products covered by this Limited Warranty, Alea Systems will, at its option, repair or replace the defective
system parts at no cost to the customer.
Alea Systems offers two options at no cost to the customer regarding the CD-R duplication drives. You must
choose from the following options:
Send in the drive(s) to Alea Systems for repair, (repairs take approx. 4-6 weeks).
Exchange the drive(s) for a refurbished CD-R drive.
There is no cost to the customer except the cost to ship their non-functional item to Alea Systems. All returns of
Alea Systems products require a return material authorization (RMA) number, which can be obtained by calling
Alea Systems Customer Support with a complete description of failure and error messages. If products are
returned by mail, the customer agrees to insure the products or assume the risk of loss or damage in transit. The
customer also agrees to prepay shipping charges. Standard warranty turnaround is 4-5 days, except duplication
drives (see above). Warranty coverage includes the cost to return the repaired or exchange item via 2 day on
part replacements, 3 day on systems and Fed Ex Int'l for shipments outside the US or Canada. This Limited
Warranty does not cover the following: (a) routine preventive maintenance, adjustments and cleanings described
in the user documentation; (b) any condition necessitating repair or replacement of products that result from (1)
operator error, accident, or misuse, (2) damage to the product, (3) improper maintenance, (4) improper physical
environments, or (5) the customer's unauthorized alteration, modification, or repair of such products; (c) any
failure or defect not reported to Alea Systems within five business days after its occurrence; or (d) any failure or
defect determined by Alea Systems not to have resulted from a defect in materials or workmanship.
IMPORTANT NOTICE REGARDING PERSONAL COMPUTERS:
Alea Systems expects that its customers utilize prudent hard drive data back up systems and routines. If a
Personal Computer ("PC") purchased from Alea Systems requires warranty repair work or warranty replacement,
Alea Systems does not and will not provide any hard drive data retrieval, recovery, transfer or back-up services.
Please back up your hard drive before returning a PC to Alea Systems for such warranty repair or replacement.
This warranty expressly excludes liability for lost data.
THIS LIMITED WARRANTY CONSTITUTES YOUR SOLE AND EXCLUSIVE REMEDY AND THE SOLE AND
EXCLUSIVE LIABILITY OF ALEA SYSTEMS IN CONNECTION WITH ALEA SYSTEMS'S PRODUCTS AND IS
IN LIEU OF ALL OTHER WARRANTIES, EXPRESS, IMPLIED, OR STATUTORY, INCLUDING, BUT NOT
LIMITED TO, AN IMPLIED WARRANTY OF MERCHANTABILITY OR FITNESS FOR A PARTICULAR
PURPOSE AND ALL OTHER OBLIGATIONS OR LIABILITIES OF ALEA SYSTEMS OTHER THAN AS

Alea Systems, Inc. Rev.1.13 Pingo-Photo Rep
User manual
5
EXPRESSLY SET FORTH HEREIN. NO ALEA SYSTEMS DISTRIBUTOR, AGENT, OR EMPLOYEE IS
AUTHORIZED TO MAKE ANY MODIFICATION, EXTENSION, OR ADDITION TO THIS WARRANTY. IN NO
EVENT WILL ALEA SYSTEMS BE LIABLE FOR SPECIAL, INDIRECT, INCIDENTAL, OR CONSEQUENTIAL
DAMAGES ARISING OUT OF THE USE OF OR INABILITY TO USE ALEA SYSTEMS'S PRODUCTS,
INCLUDING, BUT NOT LIMITED TO LOST PROFITS OR OTHER MONETARY LOSS, BUSINESS
INTERRUPTION, OR LOSS OF BUSINESS INFORMATION, OR ANY CLAIM BY YOU BASED ON A THIRD
PARTY CLAIM, EVEN IF ALEA SYSTEMS HAS BEEN ADVISED OF THE POSSIBILITY OF SUCH DAMAGE.
SOME STATES DO NOT ALLOW THE EXCLUSION OR LIMITATION OF INCIDENTAL OR CONSEQUENTIAL
DAMAGES, SO THESE LIMITATIONS MAY NOT APPLY TO YOU.
FCC Interference Statement
This device complies with part 15 of the FCC Rules. Operation is subject to the following two conditions: (1) This
device may not cause harmful interference, and (2) this device must accept any interference received, including
interference that may cause undesired operations.
Only peripheral computer I/O devices, terminals, printers, etc., tested and complying with Class A limits should
be attached to this device with shielded I/O cables.
Finally, any changes or modifications to the equipment by the user not expressly approved by grantee or
manufacturer could void the user's authority to operate such equipment.

Alea Systems, Inc. Rev.1.13 Pingo-Photo Rep
User manual
6
1. Introduction to the Pingo-Photo Rep system
The Pingo Photo system is comprised of three subsystems:
•The CD Printer module
•The Pingo Rep autoloader
•The Pingo Rep control software for Windows
1.1 Software revisions
1.13 The Pingo Rep is now able to print from .PRN file.
1.10 First release of the software
2. The CD Printer module
The Pingo Photo by Alea Systems, inc. is a PC controlled state-of-the-art, tabletop color ink jet printer for printing
on the surfaces of printable-surfaced, recordable compact discs. The printer delivers professional CDs without
the costs and efforts associated with the silk screen process. With the Alea Pingo Photo , image files are printed
directly onto ink-jet printable CD-R media as they appear on the computer screen.
The heart of the Pingo Photo is a modified Hewlett-Packard DeskJet 9xx, 2400 x 1200 DPI ink jet printer engine.
The modifications include increasing the "paper thickness" to accommodate the thickness of a CD-R disc and
providing the means to properly position a printable CD-R when the printer normally would load a sheet of paper.
Load control is derived from the printer's movements; therefore, no special software is required. Any program or
system that will print using the HP printer drivers will operate the Pingo Photo. The printer controller functions
are totally independent of the data stream between the computer and printer.
The Pingo Photo is controlled by a Windows-based computer running any desktop application with printer output
capability. This manual describes the exact placement of text and objects for proper print output to the Pingo
Photo. While paint, draw, illustration and page layout applications are best for print output, any application with
location-specific output control will work.
The CD-carrier mechanism is designed for precise operation and close-tolerance print placement.
Please note that many images, logos and pictures are protected by copyright laws in many countries around the
world. Unauthorized printing is the responsibility of the operator and the manufacturer does not bear any
responsibility for the way the equipment is used.

Alea Systems, Inc. Rev.1.13 Pingo-Photo Rep
User manual
7
2.1 Specifications
Black print resolution: up to 600 DPI with black pigmented ink
Color print resolution: up to 2400X1200 using premium photo coating
Print Heads: HP PhotoREt ink jet technology
Printer Model: HP DeskJet 9xx
All needed HP printer drivers are included
Interface: 8-bit bi-directional parallel, USB
Media: CD-R with inkjet printable surface
Print repeatibility: ± 0.002inches
Dimensions: 17"W x 19"D x 8"H
Weight: 19 pounds
Power: 110/220 VAC universal input power
Ink cartridges: Black: HP C6615d , Color: HP C6578 (D:19ml, A:38ml)
2.2 Compatibility
The Pingo Photo printer functions as any desktop printer and will therefore print from any application. The option
to use templates, masks and layers with some applications will provide easy print setup with graphic images and
allow placing of graphic images within the confines of the CD-R's printable surface.
Print location templates are supplied for popular applications. The templates are files saved with wire frames or
masks identifying the printer print area. The templates provided on the CD that is shipped with the printer may
vary depending upon popularity and consumer demand.
2.3 System Requirements
Any computer with a parallel port or USB port can be used to control the Trace Affex CD-Artist. Depending on
the user's requirements, application programs used with the printer may vary from high end graphics to simple
page layout and word processing programs. Generally, when the print command is issued, the file to be printed
will be spooled to the hard drive allowing the printing to execute as a background operation, with other computer
operations returned to the user. Better performance will be attained if at least 100 MB of hard disc space and
128 MB of RAM are available on the computer. Applications using extensive graphics operations will require
substantially more memory based on the size of the images being printed. High end graphics professionals will
often require 200-400 MB of RAM in a PC.
HP printer drivers are included for Windows operating systems. Mac drivers can be obtained by calling Alea
Systems Technical Support at (301) 776-3754. No other special software is required.
2.4 Cable Requirements
The Pingo Photo CD Printer is connected to the PC by one cable:
One standard parallel cable: DB25M/Centronics 36M shielded
or
One Universal Serial Bus cable (USB) (not supported by Pingo REP)
Note: The power is auto switching to accommodate both 110 VAC and 220 VAC power
requirements.

Alea Systems, Inc. Rev.1.13 Pingo-Photo Rep
User manual
8
3. Unpacking the CD Printer and Setting Up
Included with the Pingo Photo color CD Printer should be the following items:
* Alea CD that includes the following:
Pingo Photo Manual
CD and Business Card Print Templates
Sure Thing Label Software
Diskus label software
HP Printer Driver Software for PC
* HP Ink Cartridges (one combined color and one black starter cartridge)
(Replacement C6578 for color and C6615 for black)
* Printer Cable
* Power Cord
3.1 Unpacking
1. Carefully remove the unit from its shipping container. Save all packing material.
2. Once the unit is out of the shipping box, remove the protective plastic covers and the tape securing the print
tray, the cover and the print heads.
PACKAGING NOTE: Please save the packaging materials your printer was shipped in. It's very important to use
the same packaging to avoid possible damage during shipment, should you need to move the unit to another
location.
3.2 Printing Environment
CD-R printing is a process involving sophisticated and sensitive equipment that is affected by its environmental
surroundings. To ensure the best results, Alea recommends that you take the following factors into consideration
when choosing a place to operate CD-R printing equipment. By adhering to these guidelines, your print quality
criteria should be achieved.
The site chosen should have the following conditions:
• stable and ample electrical power (unstable power may cause equipment failure)
• adequate air circulation
• a relative humidity from 40%-60%, non-condensing
• ambient temperature from 59ºF to 77ºF (15ºC-25ºC)
• print media should be stored and acclimated for a minimum of 24 hours at 59ºF to 86ºF
(15ºC-30ºC) and 20%-60% RH
• be free of food and drink.
The operator handling the CD-Rs should always do so with clean, lint-free gloves approved for CD handling. Do
not touch either surface with bare hands. Fingerprint oil on the disc will prevent absorption of ink and be visible
on the finished product
4. Understanding the Printer
4.1 Printable area using the Pingo Photo
The Pingo photo is designed to print on ink jet printable CDs carried by the tray. The approximate printable area
must be defined in all applications used with the Pingo Photo. The area is defined within the portrait letter page
settings of the HP page setup dialog box. Any characters or graphics appearing beyond this area should be
blocked out with a printable white mask so they will not be printed. Any real print characters appearing on either
side of the defined area will cause ink to be deposited on the tray. If ink is deposited on the tray, it must be

Alea Systems, Inc. Rev.1.13 Pingo-Photo Rep
User manual
9
cleaned (simply wipe the ink off with a moist towel) before the CD is re-introduced into the printer. Failure to
follow this procedure may result in damage to the CD-Rs.
The dimensions of the printable area on different media varies significantly from brand to brand. For accurate
print placement, templates and masks must be adjusted for each type of media used. Fig. 4-1 depicts the basic
placement and printable area that can be used as a starting point to develop a new print mask. Check the
specific media dimensions against those above to modify or create application masks. See Section 5 for
additional information on creating a print mask.
4.2 Manufacturing and Testing the Printer
To ensure proper coordinated functioning of the significant electronic and mechanical modifications and
additions made to the HP printer engine, the printer has been loaded with ink cartridges and actual print tests
have been made before packing for shipment. You will notice ink remnants from this print-testing, but the printer
has never been used other than for performing these necessary quality assurance tests
4.3 Ink Cartridge Life
Ink cartridge life is a direct function of the print content. The HP DeskJet Printer uses a color cartridge and a
black cartridge. The cartridges can be replaced independently to reduce cost. Although the actual quantities of
CDs produced will vary widely based on image content and color requirements, for CDs with nominal ink
coverage for text and a logo, the cartridges may last up to 500 discs. Full bleed printing where the ink covers
100% of the disc surface may yield as little as 50 CDs from a color cartridge.
The printer will monitor ink usage and provide low-ink warnings and stop the printer when it senses it is out of
ink. This is a reasonably good indicator and should be followed.
5. Getting Started
Before actual CD printing can begin, there are several steps to be completed:
5.1 Connecting the Pingo Photo for WINDOWS
Connecting the Pingo Photo to a desktop computer is no different than connecting any other printer. The Pingo
Photo is based on the HP DeskJet 9xx ink jet printer and comes with a standard parallel printer cable (USB
cable is optional). Please note that the parallel cable is not a SCSI interface cable!
SPECIAL NOTE: It is highly recommended to use the parallel cable connection as the primary connection for the
Pingo Photo printer. This will eliminate the possibilities of communication errors between the printer and PC.
With power to both the Pingo Photo and computer turned OFF, connect the parallel cable or USB cable to the
computer and then to the printer. Plug in power cord.
5.2 Installing the Ink Cartridges
Turn the printer power on using the printer's power switch. Remove the vinyl tape from both ink cartridges. Open
the top cover and insert ink cartridges. Close cradle latch, then close top cover. DO NOT TOUCH OR REMOVE
COPPER STRIP ON PRINT CARTRIDGES.
5.3 Installing the Printer Driver Software (WINDOWS-Parallel)
The print driver is located on the Compact Disc labeled Pingo Photo found in the accessory kit.
DO NOT run virus protection or other software programs when installing your printer software. Turn on your
computer and wait for Windows to start.

Alea Systems, Inc. Rev.1.13 Pingo-Photo Rep
User manual
10
Automatic installation: In the Drivers/PC driver directory of the distribution CD, double click on
"install_cda_lpt1.bat". This will install the CD Printer to the LPT1 parallel port.
This procedure install the CD Printer driver for Windows NT using parallel connection:
All OS - 1284(Parallel) connection
Note: This installation method does not support printer status
•Click Start - Settings - Printers - open Add Printer
•`Add New HW Wizard' window appears
•Configuration (typically My Computer), Click Next
•Port (typically LPT1), Click Next
•Model - Have Disk...
•Browse... (cdrom folder) - enu\drivers\win9x_me\hpfCDAx.inf (Win 95, 98, ME)
enu\drivers\win_nt\hpfCDAn.inf (Windows NT4)
enu\drivers\win_2k\hpfCDAk.inf (Windows 2K)
•Select the Pingo Phot model from the drivers listed
All OS automatic installation:
5.4 Installing the Printer Driver Software (Mac - USB)
Copy the compressed file, PingoPhoto.set, from the Mac folder located on the PowerPrinter CD-ROM to your
local hard drive. Double click on the file to start the decompression. The application, Pingo Photo 4.31 Installer,
will now appear. Double click on it to start the installation. Follow the instructions shown to complete the
installation. Once installed, go to the chooser to select the printer for printing. You are now ready to begin
printing.
5.5 Graphics Applications
A graphics application will be required to use the Pingo Photo printer. Any computer software application can be
used to print on a CD. Applications which allow position control (such as graphics applications, e.g. Adobe
Illustrator, Corel Draw, Surething, etc.) will be the easiest to use. If you do not have a graphics application,
included is a 30 day trial version of SureThing software (for PC users only) and the Diskus software (for PC
users only) which is located on the Compact Disc labeled Pingo Photo.
The Pingo Photo printer comes with templates for use with several graphics applications. They consist of
background guides, and where possible, a top-layer mask to block out everything except for the printable surface
of the CD-R. We assume that if you choose to use one of the template files provided that: 1) you are a registered
user of the graphic application for which the template applies; and 2) you have a working knowledge of the
application. The template files are located on the Compact Disc labeled Pingo Photo.
Included templates: Adobe Illustrator, Adobe PhotoShop, CorelDraw and Canvas.
5.5 Using the Alea Systems Template Files
To use the template files provided, simply copy them from Compact Disc labeled Pingo photo to the place on
your hard drive where documents are stored (for example a directory entitled "My Documents".) Follow the
directions on the "Readme" file that came with the templates. To make your own template, refer to section 5.
You may have to adjust your template's placement to fit your printer's specific printing characteristics. This
entails moving the background guides, and in some cases the "mask layer" as well. See Fig 4.1 for approximate
printable area that must be defined in all applications used with the Pingo Photo.

Alea Systems, Inc. Rev.1.13 Pingo-Photo Rep
User manual
11
5.6 Recommended Print Settings
The Pingo Photo printer has a wide variety of settings that can enhance images, colors, and text. As a minimum
quality setting, it is recommended to use any Photo Coat setting as the media type and "Normal" or "Best" for
print quality. Additional changes can be made by selecting the Advanced Tab to adjust the sliders for Saturation,
Brightness and Color Tone.
5.7 Printing on Standard and Business Card Media
The Pingo Photo offers printing on both 120mm standard size CDs and optional 63mm business card CDs. The
CD print surface needs to be ink jet compatible. An optional business card tray insert and clamp adapter is
available with each Pingo photo printer to accommodate business card CD printing.
To print on either media type, the media should be loaded printable side facing up. To print on CD-R media
place the disc in between the 3 metal tabs and send the print job to the printer. For multiple prints, an operator
will need to remove and replace each CD as it is completed. The printer will automatically detect the next disc as
it is placed on the carrier tray.
To install the components to print on business card CD's do the following and see diagrams below:
•Place Clamp Adapter on the Carrier Tray so that the open circle on the adapter fits over the
holding pin that rises up from the rectangler cut out where the clamp adapter will lay.
•Place the Business Card Insert on the Carrier Tray so that the tabs on the insert are lined up to
slide under the square Carrier Tray holes to hold it in place. The smaller holes on the left side
of the insert should click into place over the small, raised circles on the Carrier Tray.
To remove the business card tray, slightly lift up on the tray from the lower left corner with your left hand. While
lifting, slightly pushing to the right with your index finger.
Page
Before the Adapter is
placed on the tray
After the Adapter is
placed on the tray

Alea Systems, Inc. Rev.1.13 Pingo-Photo Rep
User manual
12
5.8 Operation of the Pingo Photo printer
When the print image and page setup preparations are complete, load a printable CD-R (the CDs must be
coated with an ink absorption layer specifically designed for ink jet printing - most major manufacturers offer
printable surface CD-Rs in white and silver) into the tray. Verify that the printer is on and ready. Define your print
settings (see Section 4.5) and issue the print command. The print image will spool to the system hard disk drive
and then begin sending data to the printer. As the printer receives the image data, a load paper command will be
issued and the printing will begin.
5.9 User control panel
buttons and lights
The Pingo Photo CD Printer buttons let you turn the printer on and off, cancel a print job, or resume
printing. The lights give you visual cues about the state of the printer.
1. Cancel button 2. Print Cartridge Status light and symbol 3. Resume light and button
4.Power button and light
1. cancel button
Pressing this button cancels the current print job.
2. print cartridge status symbol and light
The light above the Print Cartridge Status symbol flashes when a print cartridge is low on ink or
incorrectly installed.
3. resume button and light
The light above the Resume button flashes when an action is required such as loading paper or
clearing a paper jam. When the problem is fixed, press the Resume button to continue printing.
4. power button and light
The Power button turns the printer on and off. It takes approximately five seconds for the printer to
turn on after you press the Power button. The green light above the Power button flashes when
printing is in progress.
Caution! Always use the Power button on the front of the printer to turn the printer on and off. Using a power
strip, surge protector, or a wall-mounted switch to turn the printer on and off may cause premature printer failure.
1
2
1
3
4

Alea Systems, Inc. Rev.1.13 Pingo-Photo Rep
User manual
13
6. CD Template layout
Fig. 4-1 CD print placement referenced to 8.5 X 11 inch letter page.
The printable area size shown is maximum possible. Actual print area will vary with media type.
Page placement dimensions vary between applications.
Business card CDs (63mm X 80MM) use exactly the same print center coordinates for each printer.
8.400"
4.724"
4.25"
2.700"
DO NOT PLACE ANY
PRINTABLE IMAGE OR
TEXT BELOW THIS LINE

Alea Systems, Inc. Rev.1.13 Pingo-Photo Rep
User manual
14
7. Printing with Diskus™ or Surething™ label software
Please refer to the documentation suplied with the lagel design software
The Diskus software is shown on the desk top as follows:
The Sure Thing software is shown on the desk top as shown below:

Alea Systems, Inc. Rev.1.13 Pingo-Photo Rep
User manual
15
8. Creating Templates and a Print Mask
The Pingo Photo is supplied with print mask files for some of the more popular graphics applications. If you are
not able to use a supplied mask or need to modify a mask for a different media size, the following procedure can
be used as a guide. These instructions are intentionally "generic" in that they do not use the terminology and
procedures of any specific graphics application. Therefore, the following process requires a working knowledge
of the particular application being used. Refer to the application user's manual if in doubt about how to
implement any of the instructions provided.
The following steps will work for applications that support "layers" and allow control (such as separate viewing
and printing) of the layers. The mask will allow additional layers with print content to be added beneath the mask,
such that the mask crops any content that extends beyond the edges of the disc.
1) Start with a new file in the target application.
2) Configure the page to letter and portrait orientation.
3) Display the layers used in the application; name the first layer "Non Printing Mask".
4) Measure the printable inner and outer diameters of the media to be used.
5) Create concentric circles of the diameters to be used and position them on the page approximately as shown
in Fig. 4-1, "CD Print Placement". Use one-point lines and no fill. See Fig. 5-1.
Fig. 5-1 Two concentric circles on the Non Printing Mask layer
6) Print several test discs to confirm proper placement of the circles on a CD (either right on or just beyond the
outer edge of the printable area - it may be desireable to make a slightly smaller circle first to establish
concentricity and then enlarge it). Make any necessary adjustments to the diameters or placement; maintain
concentricity. (It may be desireable to make several masks with different diameters to accomodate different
media - these can reside on different layers or in different files). When properly positioned, the circles will
become the core components of the mask. At this point, the circles can be used as templates which will be either
deleted or selected as non-printing objects prior to printing.

Alea Systems, Inc. Rev.1.13 Pingo-Photo Rep
User manual
16
Fig. 5-2 Properly placed concentric circles with rectangle mask
7) Create a square larger than the diameter of the larger circle and place it so that there is about a half inch of
space on all sides between the circle and square (Fig. 5-2). The square should not extend more than 5.60 inches
below the top of the page.
8) Select both the outer circle and the new square/rectangle objects.
9) Using the appropriate object combination tool, combine the two objects so the common area is removed
allowing anything in the background or on layers below the current one to show through.
10) Send the new object to the background of its layer. Select the center hole circle. Select a fill color and delete
the line (or make the line color white). Mark the layer for viewing only and not printing (Fig. 5-3). Group the
objects and note their coordinates (it may be possible to lock or fix the layer so it cannot be accidently changed).
Fig. 5-3 Non Printing layer mask with background color
11) Copy the grouped object to the clipboard
12) Create a new layer and place it below the Non Printing Mask; name this layer Printing Mask.
13) Paste the grouped object from the clipboard on the layer. Move it so that the coordinates match those noted
previously. This can be done with the arrow keys but will be more accurate to do it by the numbers. (see Fig. 5-
4)
14) Change the fill color of each object on the Printing Mask layer to white and select the layer to be visible and
to print (it may be possible to lock or fix the layer so it cannot be accidentally changed).

Alea Systems, Inc. Rev.1.13 Pingo-Photo Rep
User manual
17
Fig. 5-4 White printing mask layer aligned with non-printing layer
15) Create a new layer and place it below the Printing Mask layer; name this layer CD Content, set it to be
visible and to print.
16) Place some graphics or text on the CD Content layer (Fig. 5-5).
Fig. 5-5 Square content masked by both printing and non-printing layers
17) Save the file for future use (Fig. 5-6).
18) Print the image to the Pingo Photo and review the results.
Fig. 5-6 A finished file
Using layers to print to a CD is summarized in Fig. 5-6. Note the layers shown on the screen. The top layer is
non printing, the next layer down is a white mask and the layer below is content.
For convenience, it may be desireable to keep different CD images using the same mask on different layers and
only select the layer for viewing and printing when desired.
Further, it may be desireable to create different printing mask layers for different media and select the
appropriate layer for the media to be printed. (This can be accomplished with multiple files also.) Once set up,
the mask will not change.
Similiar setups can be created and saved for each application, which may be used with the Pingo photo.
Business card CD templates can be created in the same way. For 63mm X 80mm business cards, use 61mm
and 78mm as the outer print limits.

Alea Systems, Inc. Rev.1.13 Pingo-Photo Rep
User manual
18
9. Troubleshooting the Pingo Photo
If an error condition occurs, the correct approach to resolve the problem will minimize the time lost and the
unlikely occurrence of damage to the Pingo Photo. The following conditions have occurred during development
and testing. In most cases the condition described requires operator intervention. If a condition persists, call
Customer Support at (301) 776-3754 for the latest solution.
1. Blinking Light over the Paper Symbol: An error has occurred.
•Delete the print job from the print queue, power off the printer and unplug it.
•After 5 seconds with no power connection, plug the printer back in. The printer will recalibrate by moving the
tray in/out of the print area.
•If error repeats, try unplugging again until the printer returns to a solid green power light.
2. Printer shows print job pending _ nothing is happening:
•Delete the print job from the print queue, power off the printer and unplug it.
•After 5 seconds with no power connection, plug the printer back in. Printer will recalibrate by moving tray
in/out of the print area.
•If error repeats, try unplugging again until the printer returns to a solid green power light.
3. CD Tray stops in the middle of printing: Memory management is insufficient for the size of the file being
printed. Enable the Low Memory Mode located on the advanced tab in the printer driver.
4. Ink prints light lines across the disc: Clean print head at next available opportunity. See maintenance
section of this manual for print head cleaning instructions.
5. Print image is misregistered on disc: Review template and/or mask setup. Adjust as required.
6. Ink smears off the disc: Try another media type (i.e., Photo Coat, Glossy).
7. Poor print quality:
•Try increasing the print quality to Best.
•Change media type and/or adjust the settings in the Advanced Tab for Saturation, Brightness and Color
Tone.
8. Print job cancelled in mid print; printer stopped but did not eject the disc:
•Turn off the power button.
•Let it sit for one minute and turn the power back on. The disc should be ejected.
10. Printer Maintenance
The Printer will provide many hours of service with minimal maintenance. Alea systems suggests the machine
be kept clean of any obvious dirt and debris. Because the printer ejects ink onto the CD's in a fine mist, ink will
eventually appear on the printer case. Follow the cleaning instructions provided below:
To remove stains, smudges and/or dried ink from the exterior of the printer, use a soft cloth moistened with
water. DO NOT use household cleansers or detergent. In the event that a household cleaner or detergent is
used on the printer, wipe the printers exterior surfaces with a soft cloth moistened with water.
DO NOT clean the interior of the printer. Keep all fluids away from the interior.
DO NOT lubricate the rod on which the print cartridge cradles move. Noise is normal when the cradles move
back/forth.

Alea Systems, Inc. Rev.1.13 Pingo-Photo Rep
User manual
19
10.1 Using and Caring for your print cartridges
The print cartridge status light flashes when one or both of your print cartridges are low on ink, improperly
installed, or malfunctioning. It will also flash if you are trying to use the wrong print cartridge type. If the problem
is low ink, the light will stop flashing when you open the top cover. For any other print cartridge related problem,
the Print Cartridge Status Light will continue to flash.
To check the status of your print cartridges, open the lid and watch where the cartridge carrier stops. There are
5 icons on the plastic bar of the printer:
1&2 cartridges are empty
3&4 cartridges are semi full
5cartridges are full
10.2 Replacing print cartridges
Note: When buying replacement print cartridges, check the part numbers carefully. The print cartridge numbers
for your printer are:
BLACK HP C6615d SERIES
TRI-COLOR HP C6578 SERIES
When a print cartridge runs out of ink, leave the empty cartridge in the cradle until you can replace it. The printer
does not print with only one print cartridge in the cradle.
Open the top cover and raise the cradle latch. Replace the ink cartridge.
Warnings:
DO NOT touch the print cartridge ink nozzles or copper contacts. Touching these parts will result in clogs, ink
failure, and bad electrical connection. Also, DO NOT remove the copper strips. These are required electrical
contacts.
10.3 Storing Print Cartridges
To maintain excellent print quality from your print cartridges:
· Keep all print cartridges in their sealed packages at room temperature (60-78° F or 15.6-26.6° C), until you are
ready to use them.
1
2
3
1
4
5
6

Alea Systems, Inc. Rev.1.13 Pingo-Photo Rep
User manual
20
· Once installed, leave the print cartridges in their cradle at all times to keep them from drying out or becoming
clogged.
· If you store an unsealed print cartridge, do so in an airtight plastic container.
· Do not unplug the printer until printing is complete and the print cartridge cradles have returned to their home
position on the right side of the printer. The print cartridges will dry out if not stored in their home position.
WARNING: Use only the Power Button on the front of the printer to turn the printer on and off. Using a
power strip, surge protector or a wall mounted outlet switch to turn the printer on and off may cause
premature failure.
10.4 Cleaning Ink Cartridges
Clean the print cartridges if your printed CD is missing lines or dots, or if it contains ink streaks.
The print cartridges can be cleaned by a pressing the front buttons in a certain sequence. There are a couple
levels of cleaning that can be accomplished.
Level 1: Hold the Power button down, press the cancel (X) button twice. Release the Power button.
Level 2 (If Level 1 isn't enough): Hold the Power button down, press the cancel (X) button twice and the form
feed button (middle button) once. Release Power button.
Level 3 (If Level 1 isn't enough): Hold the Power button down, press the cancel (X) button twice and the form
feed button (middle button) twice.
11. Frequently Asked Questions About USB (Universal Serial Bus)
[Note: This option is only available in Windows 98
What is USB?
Universal Serial Bus (USB) makes it easy to connect devices to your computer without having to open your PC.
USB uses a standard port and plug combination for connecting devices like printers, modems, scanners, and
digital cameras. It also offers the benefit of being able to easily add, remove, and move devices.
USB is an option to customers who want to print from Windows 98 across the USB cable. If your computer's
USB port is enabled and properly set up, you can connect your Pingo Photo to it or a chain of USB devices via a
USB cable. USB is not the recommended method of connection.
SPECIAL NOTE: It is highly recommended to use the parallel cable connection as the primary connection for the
Pingo photo printer, this will eliminate the possibilities of communication errors between the printer and PC.
How can I determine if my computer's USB port is enabled?
First, follow the printer installation instructions. If you don't see the Add New Hardware Wizard screen after
connecting your printer to your computer, perform these steps:
This manual suits for next models
1
Table of contents
Popular Disc Duplicator manuals by other brands

PICO
PICO Disc Makers Getting started guide

LaCie
LaCie 108655 - Dupli Disc DVD125 Information sheet

MicroBoards Technology
MicroBoards Technology CopyWriter Series Specifications

Codonics
Codonics Virtua E manual

Forte
Forte Duplicator user manual

MicroBoards Technology
MicroBoards Technology PrintFactory PF-3 user manual