Alessi ALESSIPHONE User manual

User manual mod.
ALESSIPHONE
1
Copyright © 2008 Telecom Italia. All rights reserved.
Printed In Thailand.
January 2009
Part NO: MMBB9224201,2.0
ENGLISH
Essentially evolved
Modern lines of sober and refined elegance join up with innovative
contents and advanced functions: communication gains stile and
originality.

ENGLISH
User manual mod.
ALESSIPHONE
3
SUMMARY
1 Main characteristics...................................................................... 3
2 Technical specifications and dialling type ................................. 3
3 Content of the packaging............................................................. 4
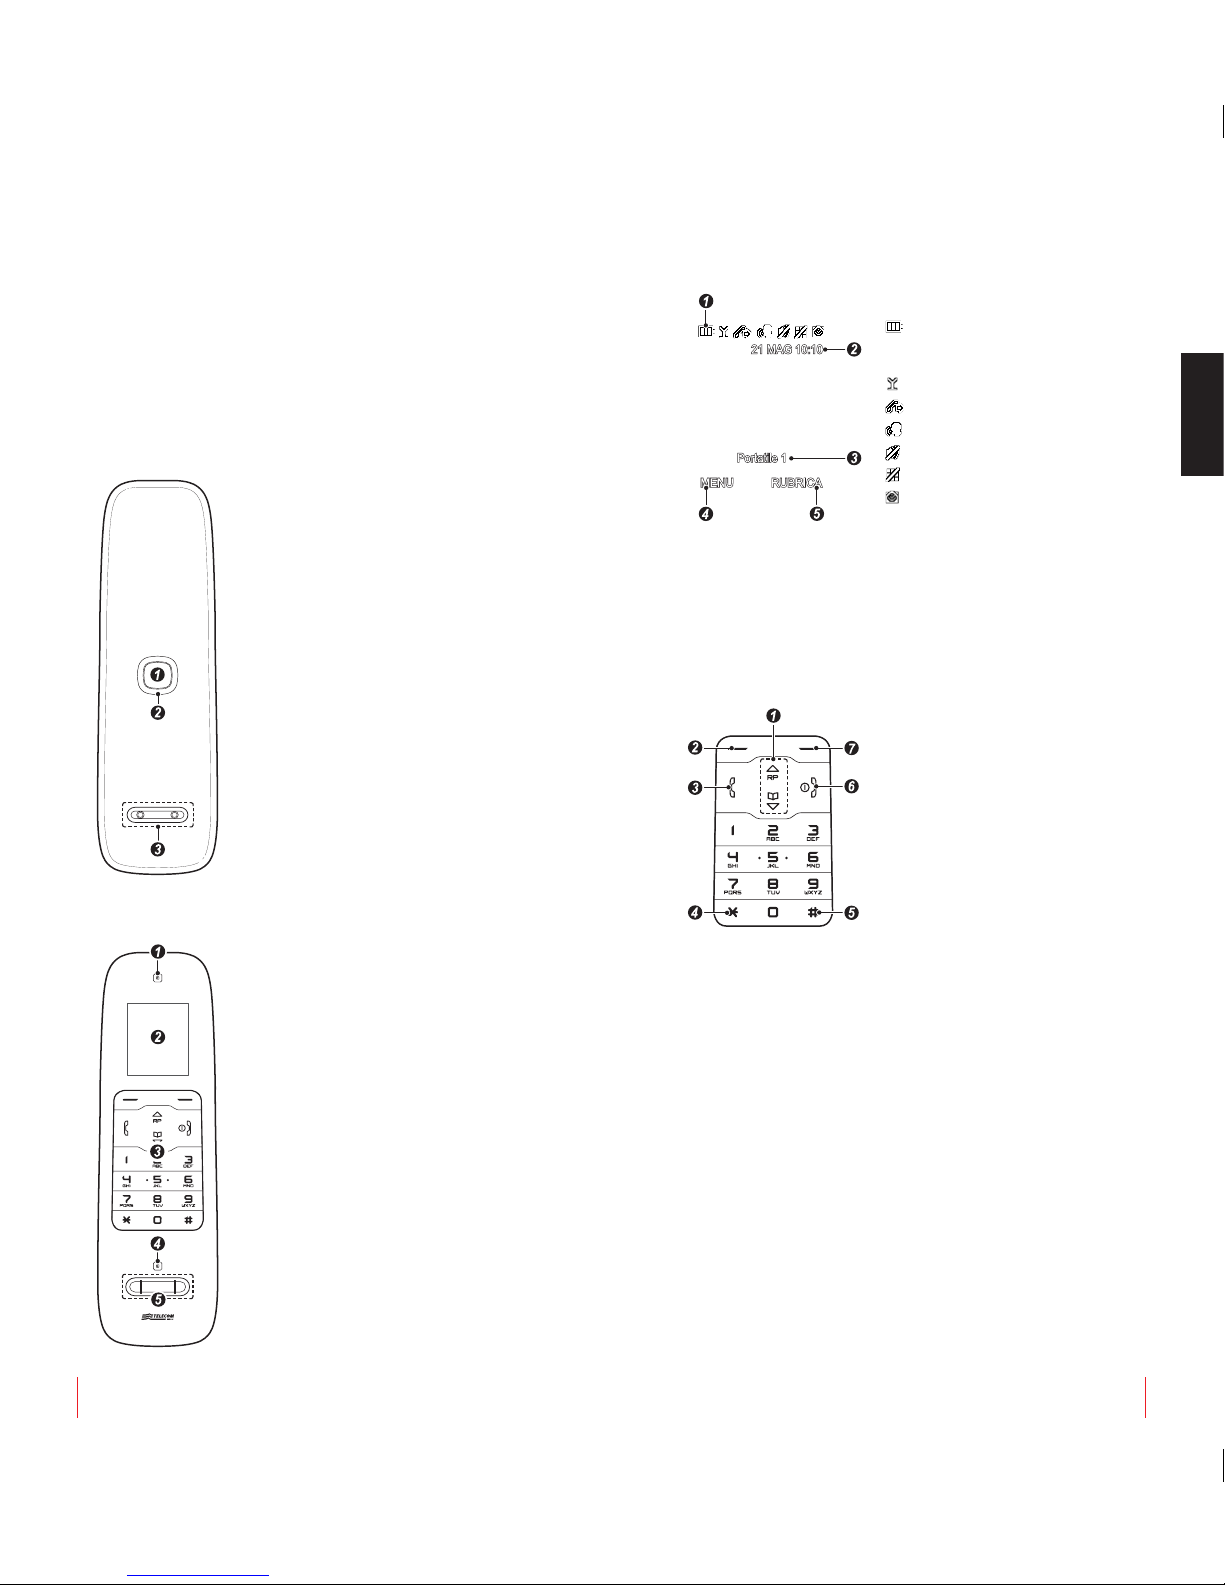
4 ALESSIPHONE Base..................................................................... 4
5
ALESSIPHONE Handset (icons on the display and keys description).....4
Icons on the display......................................................................... 5
Function of the keys ........................................................................5
6 Main factory settings .................................................................... 5
HANDSET UNIT.............................................................................. 5
BASE UNIT ..................................................................................... 5
7 Installation ..................................................................................... 6
• Phase 1: connect the base ........................................................... 6
• Phase 2: insert the battery into the handset ................................. 6
• Phase 3: place the handset on the base for charging .................. 7
8 Security notes and care of the product ...................................... 7
9 Disposal of the product................................................................ 8
10 Using the telephone.................................................................... 8
Switch the cordless on and off...................................................... 8
Placing calls .................................................................................. 8
Answering a call ............................................................................ 8
Hands-free .................................................................................... 9
Adjusting the listening volume....................................................... 9
Options during conversation ......................................................... 9
Ring tones (melody, volume, deactivation/reactivation)................ 9
Set Time and date....................................................................... 10
Set an alarm or an appointment.................................................. 10
Key Lock ..................................................................................... 10
Searching the cordless (“Paging” key)........................................ 10
Changing the background of the display ....................................10
Flash key..................................................................................... 11
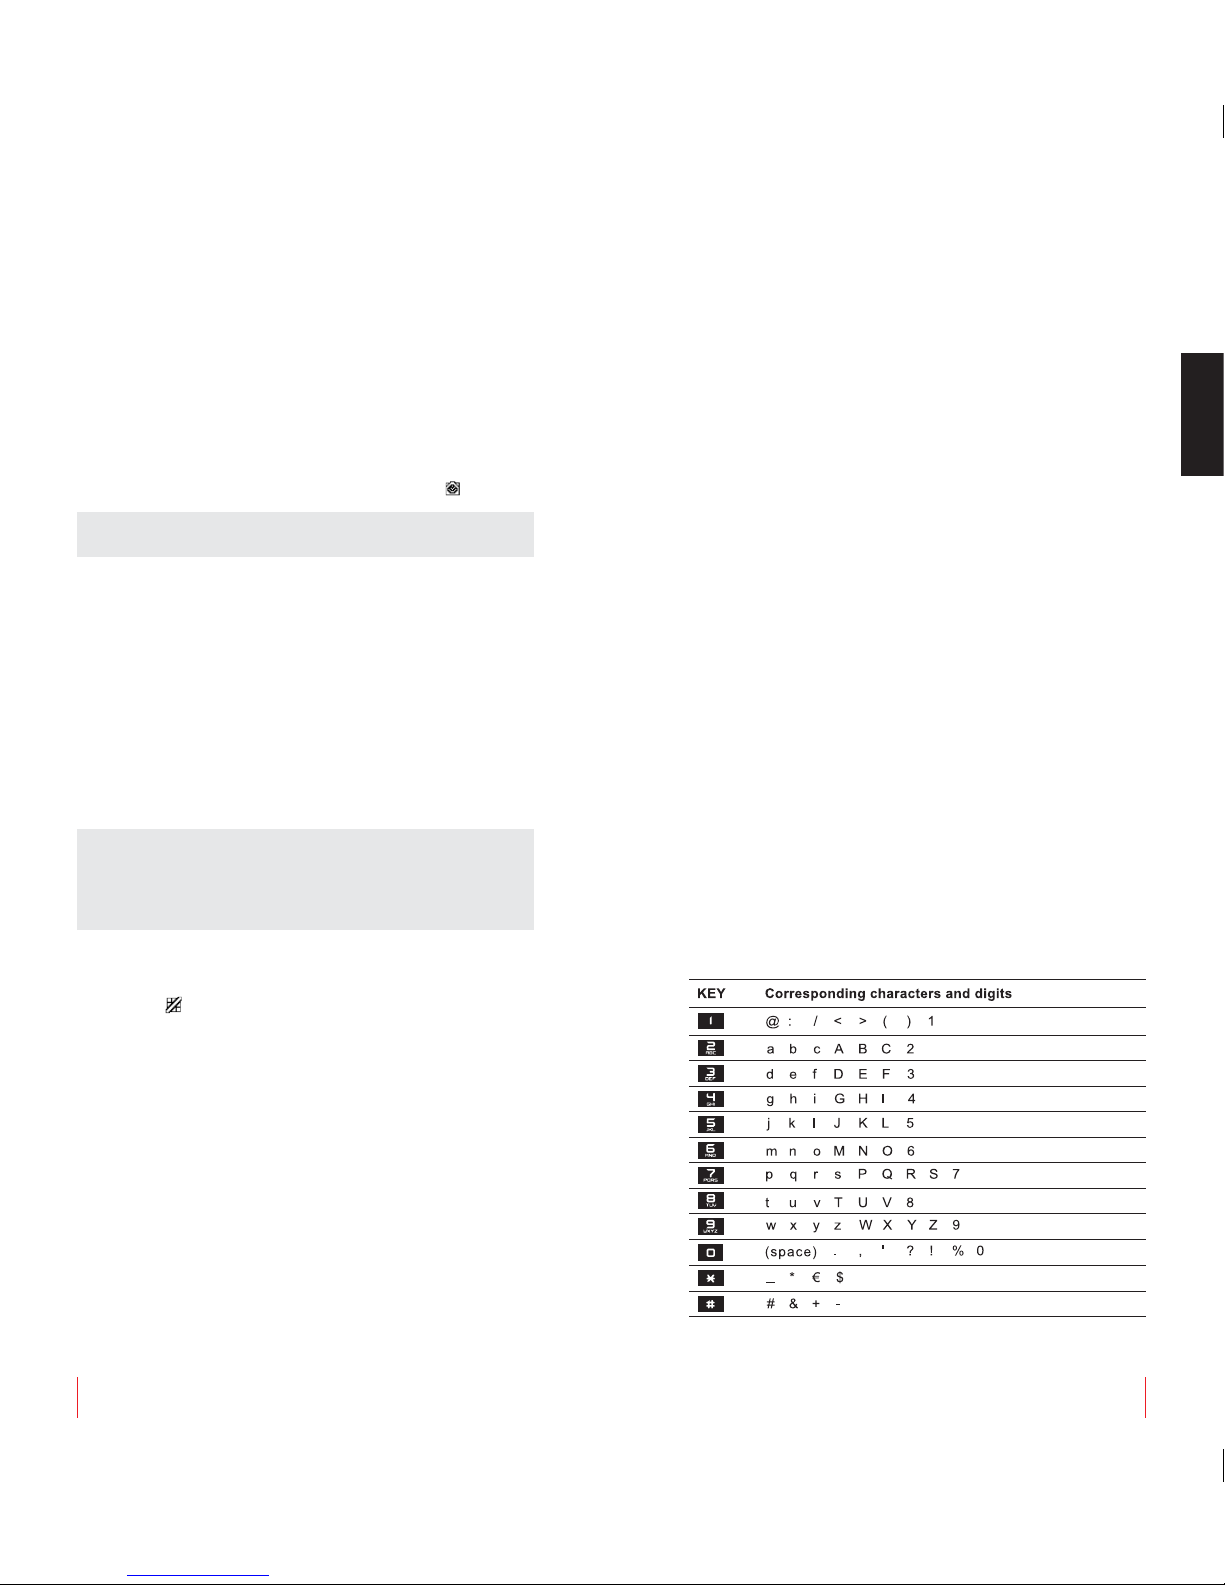
11 Phonebook................................................................................. 11
Correspondence between numbers and characters................... 11
Assigning a melody and/or image to a contact in the phonebook .........12
Options on the contacts in the phonebook .................................12
12 Call lists...................................................................................... 12
13
Registering a cordless ALESSIPHONE with a base (Affiliation) ..... 13
14 14 Multi-handset configuration................................................13
Internal calls (between handsets associated with the base) ......13
Call Transfer and Three Parties Conference (2 handsets + 1 external)...13
15 Multi-base configuration .......................................................... 14
Registering a cordless ALESSIPHONE with a second base............. 14
Registering a cordless of a different model on the ALESSIPHONE base ......14
Select a base .............................................................................. 14
Identifying a base........................................................................ 14
16 Base settings............................................................................. 14
Deactivate a cordless associated with the ALESSIPHONE base....14
Call Barring ................................................................................. 15
Set the Flash & Pause duration .................................................. 15
PBX Code ................................................................................... 15
Modifying the PIN of the Base .................................................... 15
Resetting the Base...................................................................... 15
17 Handset settings (customization) ...........................................16
Handset Name ............................................................................ 16
Language of the menus .............................................................. 16
Auto talk ...................................................................................... 16
Tones........................................................................................... 16
Display ........................................................................................16
Modifying the handset’s PIN ....................................................... 17
Handset Reset ........................................................................... 17
18
Compliance of the product to the European Safety regulations....17
1 Main characteristics
• Exclusive Alessi design by Stefano Giovannoni
• DECT Technology with GAP standard
• 10 Polyphonic Ring-tones (exclusive by Gak Sato)
• 65.000 colours OLED display
• Backlight blue keypad
▪ 5 Wallpapers, Giovannoni Design graphics
▪ High quality hands-free
▪ Phonebook with positions
▪ Association calling number - melody (the service being provided by
telephone operators)
▪ Clock, alarm and appointments
▪ Calling number display and list of the last 50 received calls (the service
being provided by telephone operators)
▪ Redial of the last 10 numbers
▪ Conversation timer
▪ Microphone bypass
▪ Keyboard lock
▪ Multilingual menu
▪ Low battery level indication
▪ Multi-handset and three-party conference configuration
2 Technical specifications and dialling type
TELEPHONE TECHNICAL SPECIFICATIONS:
• Type of technology: DECT (Digital European Cordless Telephone)
standard with GAP (Generic Access Profile) profile.
• RF channels: 10 channels
• Frequency range: 1.881 GHz ~ 1.897 GHz
• Channels spacing: 1.728 MHz
• Audio Coding: ADPCM/32 kbit per second
• Type of modulation: GFSK
• Maximum transmission power: about 250mW (24dBm)
• Operating range: max. 50 m indoor and 300 m outdoor
• Cordless power supply: Dedicated rechargeable lithium ions battery
3.7V 1030 mAh
•
Base power supply: PRI AC 100-240V 50/60 Hz 0.2A ; SEC DC 5.1V 0.7A
• Handset dimensions and weight: 19,2 cm X 5,4 cm X 2,7 cm (155 gr.)
• Base dimensions and weight: 19,2 cm X 5,4 cm X 2,5 cm (115 gr.)
• Connectable handsets to a single Base: 5 (4 + 1 equipped)
• Connectable bases to a single Cordless: 4
•
Duration: up to 100 hours in stand-by and up to 10 hours in conversatio
BATTERY TECHNICAL SPECIFICATIONS:
• Rechargeable lithium ions battery 3.7V 1030 mAh
• Time required for the first charging: 16 hours
• Time required for the next charging cycle.g.: 8 hours
•
Exposure temperature during charging: between 0°C and 40°C (approximate values)
•
Operating temperature: between -10°C and +50°C (approximate values)
• Supported charging cycle.g.: 400 (approximate values).
NOTE: The lifetime duration of the battery depends on the use made.
Notice in particular what is reported in Section 8 “Security Notes and
care of the product”.
DIALLING TYPE: The device only uses the DTMF (Multi-frequency)
dialling mode.
User manual mod.
ALESSIPHONE Ver. 2.0
2

User manual mod.
ALESSIPHONE
4
ENGLISH
User manual mod.
ALESSIPHONE
5
3 Content of the packaging
• n.1 base unit with built-in battery charger;
• n.1 handset unit;
• n.1 electrical power supply for the base unit;
• n.1 straight line cord with plug-plug termination;
• n.1 dedicated rechargeable lithium ions battery 3.7V 1030 mAh;
• n.1 instructions Manual;
• n.1 warranty certificate;
• n.1 identification bar code for the product;
4 ALESSIPHONE Base
5 ALESSIPHONE Handset (icons on the display and
keys description)
Icons on the display
The 65000 colours OLED display by AlessiPhone is able to display the
following icons and information:
Function of the keys
6 Main factory settings
HANDSET UNIT
• Number of cordless: 1
•
Name of cordless: Handset 1
• Phonebook: clear
• Auto-talk: active
• List of received / no answer / placed calls: clear
• Selected base: 1
• Handset PIN code: 0000
BASE UNIT
• Base PIN code: 0000
• Flash time (R key): 100 ms
• Pause time: 2 seconds
• Predefined associated handset: “Handset 1”
1)Earphone
2)65000 colours graphic OLED display
3)Alphanumeric keypad.
4)Microphone
5)Contacts for battery charging
1) Cordless Search / Cordless Registration
Key
2)Incoming call / Seized line / Cordless
search / Cordless registration LEDs
3)Contacts for charging the cordless
battery
1)Icons on the display
: Charging status of the battery (the
white coloured notches indicate the real
charging status)
: Coverage indication
: Line seized
: Hands-free activated
:
Ring-tone mute (for external calls)
: Key lock activated
: Alarm clock enabled
2)Date and Time
3) Name and number of the cordless (default
name when English menu language is set:
“Handset 1”)
4) Left function key
5) Right function key
1)Navigation key ▲▼/ adjustment of the listening volume (in con-
versation) / direct access to the phonebook (▼) / list of the last 10
dialled numbers (▲)
2)Left function key
3)Line seizing key / call answer / Hands
free (activate and deactivate in conver
sation)
4)
Key * : Activate and deactivate the ring-tone
(in standby, with keeping the key pressed)
5)Key # : Activate the key lock (in standby,
with keeping the key pressed)
6)
End call key / back to stand-by / cordless
switch on and off
7) Right function key

User manual mod.
ALESSIPHONE
6
ENGLISH
User manual mod.
ALESSIPHONE
7
7 Installation
• Phase 1: connect the base
1) Identify the connectors for the plug-plug telephone cable ( ) and
for the power supply cable ( ), as from the figures below.
2) Insert the jack of the power supply cable in the appropriate seat on
the back of the base ( ) then insert the electric power supply into a
wall mains socket located in the vicinity of the base.
3) Insert the telephone cord jack in the appropriate seat on the back
of the base ( ) then directly insert the other end of the cable into the
wall socket or using a suitable telephone socket (not supplied with
the equipment and not shown in the picture).
NOTE: The telephone is able to operate likewise, with both perform-
ing the connection with the telephone line using a telephone socket
(not supplied with the equipment and not shown in the picture), and
using the sole plug-to-plug telephone cable directly inserted into a
modular jack (wall socket); with both such connection modalities, the
telephone will always be connected in parallel to the line.
• Phase 2: insert the battery into the handset
Remove the white plastic shell from the back side of the handset,
exerting a light force on the opening hole with both hands, as illus-
trated in the picture.
Insert the battery as illustrated in the picture, taking care that the po-
larities indicated on the battery’s label are visible and looking upwards.
Then close the cordless. In order to verify the correct insertion of the
battery, switch on the cordless by keeping the key pressed for 1
second. Select the desired language to be used for menu’s visualiza-
tion and press OK. It’s also possible to change the menu language at
any moment as described at Chapter 17 (section “Language of the
menus”) of this manual.
For your safety and for the correct operation of the cordless use only
the rechargeable battery provided with the product or a battery of the
same type. Refer also to the security regulations reported in the para-
graph “Security notes and care of the product” in this manual.
• Phase 3: place the handset on the base for charging
Switch on the handset by keeping the key pressed for 1 second.
Place the cordless on its base to keep the battery charged: an acous-
tic tone will confirm the correct positioning of the cordless on the base
and then the charging of the battery will start. The first charging will
require 16 hours.
8 Security notes and care of the product
• Always use the original rechargeable battery or a battery of the
same type.
• Pay much attention that the battery is correctly inserted in its slot by
respecting the correct polarities
• Do not attempt to open / damage the battery.
• Do not throw the battery into the fire: it could explode.
• Perform the first charging for at least 16 hours. Later a recharge
time of 8 hours will be sufficient.
• Do not expose the battery to temperatures lower than: -10°C or
higher than +50°C during operation; only recharge the battery at a
temperature in between 0°C and + 40°C.
•
In case the telephone is unused for a prolonged time, it is recommended
to take off the battery from the battery vane.
• Use only the supplier provided with the equipment.
•
The equipment could interfere with electro-medical devices. Observe then
the indications located in the premises (e.g. surgeries, hospitals, etc.).
•
Do not keep the handset in bathrooms or in the shower. The handset
and the base are not protected against water sprays.
Connectors located in the telephone jack
located under the base:
1. not connected
2. not connected
3. a
4. b
5. not connected
6. not connected
6
5
4
3
2
1
▼
Use exclusively the original power supplier equipped with the product.
The power supplier must always be inserted into the mains socket. If
another telephone cable is purchased in a shop, make sure that the
connections are identical to the one of the supplied cable.

User manual mod.
ALESSIPHONE
8
ENGLISH
User manual mod.
ALESSIPHONE
9
• Clean the base and the cordless with a humid cloth (with no
solvents) or antistatic. Do not use under no circumstances a dry
cloth because electrostatic charges could be generated that could
damage the cordless.
• In case the cordless should come in contact with liquids, switch it off
and immediately remove the battery. Leave the liquid flow out from
the cordless. Dry all parts with a cloth and keep the cordless for at
least 72 hours with the battery vane open and the keyboard facing
downwards in a warm and dry location (by no means insert it in the
oven, either in the microwave, gas or any other type of oven). Once
completely dried off, in many cases it will be possible to reactivate
the cordless even if problems could show up.
•
In case of transportation of this product, make sure to use the original
packaging of the product in order to protect it from potential damages
.
9 Disposal of the product
INFORMATION TO THE USERS
According to art. 13 of the Decree by Law dated July, 25
2005, n. 151 (Implementation of the Directives 2002/95/
CE, 2002/96/CE and 2003/108/CE, related to the reduc-
tion of the use of dangerous substances in electric
and electronic equipment, as well as the disposal of
wastes)
The symbol of the slashed trash bin reported on the equipment
or its package indicates that the product at the end of its lifetime
must be collected separately from the other wastes.
The user shall, therefore, deliver the equipment at the end of its life-
time to suitable separate electronic and electro-technical refuse col-
lection centres, or deliver it back to the reseller at the moment of pur-
chasing a new equipment.
A suitable separate collection for the subsequent delivery of the aban-
doned equipment to the recycling, the treatment and environmentally
compatible disposal contribute to avoid possible negative effects on
the environment and the health and favours the reuse and/or recycling
of materials of which the device is composed.
The illegal disposal of the product by the user entails the application of
the sanctions provided for by the regulations in force.
10 Using the telephone
Switch the cordless on and off
Keep the key pressed for 1 second. To switch off the cordless,
keep the same key pressed for 2 seconds.
Placing calls
In pre-selection: dial the telephone number and press the key. Use
the right hand key DELETE to delete any erroneously typed digit.
With the line seized: Press the key and dial the number to call. In
case of error press and start again.
During the call the blue LED on the base remains steady on.
Answering a call
• If the cordless is not placed on the base: press the key or the
left function key ACCEPT to answer. Press or the right function key
END to terminate.
• If the cordless is placed on the base and the automatic answer
(section 17) is active (default setting), it is sufficient to lift on
to answer the call. If the automatic answer is not active, press the
key or the left key ACCEPT to answer.
During the ring phase the blue LED on the base will blink on and off
and the display will show, depending on the occasions:
• “Calling”, if the calling number identification service (CLI) is not active
on the line.
• The actual calling telephone number (after the first ring), when the
calling number identification service (CLI) is active on the line.
• “Reserved”, when the calling number identification service (CLI)
is active but the calling partner is intentionally concealing its
telephone number.
Hands-free
During a conversation press the key to activate the hands-free and
press it again to deactivate.
Adjusting the listening volume
Press the ▲▼ keys to adjust the listening volume during a conversa-
tion (both hands-free and normal conversation mode).
Options during conversation
During a conversation press the left key OPTION to access the fol-
lowing menu:
• PHONEBOOK: to have access to the phonebook (see the “Phone
book” Section in this manual).
• MUTE: to deactivate your microphone. To activate it again, press
the right key ABILITA.
• HEAR VOLUME: press the ▲▼ keys to adjust the volume. Press
BACK to return to the options menu. As an alternative it is possible
to press directly the▲▼ keys to adjust the listening volume during a
conversation (both hands-free and normal).
• WAITING: to place the other party on hold with background music.
Press RESUME to goes back to conversation.
• INTERNAL CALL:To place the external party on hold with back
ground music and call another cordless associated with the base of
ALESSIPHONE. When the called cordless answer the call, it will be
possible to have a three parties conference by pressing again
OPTION > CONFERENCE.
• FLASH:To exploit possible additional services, provided they are
offered by the telephone operator and enabled on the line. Refer to
your own operator for details on the use of these functions.
Ring tones (melody, volume, deactivation/reactivation)
Choice of the Melody: press MENU > IMAGES & SOUNDS > SOUNDS >
EXTERNAL RING (or INTERNAL RING) > RINGING TYPE > OK. Select
the melody with the ▲▼ keys, then confirm by pressing OK.
Volume adjustment : press MENU > IMAGES & SOUNDS > SOUNDS
> EXTERNAL RING (or INTERNAL RING) > VOLUME > OK. Set the
volume with the▲▼ keys, then confirm by pressing OK.
Deactivation of the ring tone: press MENU > IMAGES & SOUNDS
> SOUNDS > EXTERNAL RING (or INTERNAL RING) > RINGING
MODE > OK. Select STANDARD or ALWAYS OFF with the ▲▼ keys,
then confirm by pressing OK. When the ring tone for external calls is
deactivated (OFF), on the standby display the icon will appear. As
an alternative it is possible to keep pressed for a while the * key to
activate or deactivate the external ring tone.
ATTENTION: If the product is placed on charge with a wrong type of
battery a potential risk of explosion exists.

User manual mod.
ALESSIPHONE
10
ENGLISH
User manual mod.
ALESSIPHONE
11
Set Time and date
Press MENU > TIME SETTING > DATE & TIME. Insert the date in
the format “dd.mm.yy” and press OK. Insert the time in the format “hh.
mm” (24 hours) using the ▲▼ keys to move across the fields and
press OK to terminate.
NOTE: Time and date are automatically set into the phone if a call is
received with the time and date transmitted by the telephone operator
(CLI service activated).
Set an alarm or an appointment
To set the alarm, press MENU > TIME SETTING > ALARM CLOCK.
Select “ONCE” or “EVERYDAY” and press OK. Insert the time of the
alarm in the format “hh.mm” (24 hours) and press OK. When the alarm
is activated, the icon will appear on the standby display .
To set an appointment, press MENU > TIME SETTING > APPOINT-
MENT. Press SET and choose between “DAILY”, ”MONTHLY”, ”AN-
NUAL”, confirming again with OK. Insert the data requested on the
display until the summary screen of the date will appear on the dis-
play, with the right key showing the ENABLE option.
The appointment will be enabled (activated) by pressing this key. By
pressing instead the left key OPTION it will be possible to choose
between:
•MODIFY TIME/DATE: To modify the time and date.
• MODIFY TEXT: To modify the associated text.
• DELETE: To fully delete this date.
• VIEW TEXT: To show the associated text.
Key Lock
Press the # key for a while to activate the key lock. When the key lock
is active, the icon will appear on the standby display. To reactivate
the keyboard, press the right key UNLOCK and confirm with OK at the
unlocking request.
Searching the cordless (“Paging” key)
If you cannot find your cordless (or another cordless associated with
the ALESSIPHONE base) shortly press the Cordless Search (“Pag-
ing”) key on the base. The LED on the base will start blink and all
cordless phones associated to that base will start ringing.
Press the Search Cordless key again on the base or any key on the
cordless to stop ringing.
Changing the background of the display
Press MENU > IMAGES & SOUNDS > IMAGES. Select one out of
the 5 available backgrounds and press VIEW for preview. Once it is
shown on the display, scroll the available images using the ▲▼ keys
and press SET to set the selected image as the background.
Flash key
During a conversation press OPTION > FLASH to activate the flash
key. Refer to your own operator for the services available with this
key.
11 Phonebook
Each contact in the phonebook can be associated with:
• the name (max 16 characters/digits).
• the telephone number (max. 20 digits).
• a melody, if the calling identification service is active on the telephone
line.
• a picture, if the calling identification service is active on the telephone
line.
To have access to the phonebook, with the telephone idle press the
right key NAMES.
FIND: insert the initials of the name to be searched and press FIND,
or directly press FIND to see all contacts in the phonebook listed in
alphabetic order.
ADD ENTRY: type in the name and telephone number of the new con-
tact by using the ▲▼ keys to move from one field to another. Press
the DELETE key to delete any character/digit erroneously typed in.
Press OPTION > SAVE to immediately save the contact, or ASSIGN
TONE or ASSIGN IMAGE (see the section “Assigning a melody/image
to a contact in the phonebook” below) to further customise the con-
tact, remember to save the settings performed by pressing SAVE.
SHOW ALL: to display the list of all contacts included in the phone-
book in alphabetic order.
NOTE: The same function is available by directly pressing the ▼ key
with the telephone idle.
MODIFY: to search a contact in the phonebook and to modify some of
the related settings. Confirm by pressing SAVE.
DELETE: to search a contact to be deleted from the phonebook (DE-
LETE ONE > FIND > (select contact) > DELETE), or to delete the
whole phonebook with one single operation (DELETE ALL > OK).
Correspondence between numbers and characters
At the time programmed for the alarm, the cordless plays the alarm
melody. To stop it, press any key on the cordless.
Upon expiry of the date, the cordless will play a specific melody. To
stop it, press ESC (return to the main menu) or any other key on the
cordless to remain in the dating screen. By pressing “REMIND” it is
possible to postpone (delay) the expiry of the dating by setting the
value in minutes and confirm with OK.

User manual mod.
ALESSIPHONE
12
ENGLISH
User manual mod.
ALESSIPHONE
13
Assigning a melody and/or image to a contact in the
phonebook
These functions are only available if the calling identification service
(CLI) is active on your own telephone line. For further information con-
tact your telephone provider.
ASSIGN A MELODY: when receiving an external call, after the first
ring the cordless will play the melody that was previously associated
with that contact.
To assign a melody to a new contact, after typing in the name and tel-
ephone number select OPTION > ASSIGN TONE. Select the melody
for that contact using the ▲▼ keys and press OK.
As an alternative select an existing contact within the phonebook,
press OPTION > MODIFY > OK > OPTION > ASSIGN TONE and
proceed as described above.
ASSIGN IMAGE: when receiving an external call, after the first ring
the cordless will display the image that was previously associated with
that contact.
To assign a image to a new contact, after typing in the name and
telephone number select OPTIONS > ASSIGN IMAGE > SELECT
IMAGE. Using the ▲▼ keys select the image for that contact and
press OK. To remove the image from the contact, select ASSIGN IMAGE
> DELETE IMAGE.
As an alternative select an existing contact within the phonebook,
press OPTION > MODIFY > OK > OPTION > ASSIGN IMAGE and
proceed as described above.
Options on the contacts in the phonebook
When a contact has been selected, by pressing OPTION the below
menu will be displayed:
CALL: place a call to the contact.
VIEW: to view the related details.
MODIFY: to modify some settings of that contact. Once terminated,
confirm with SAVE.
DELETE: to delete the contact from the phonebook.
12 Call lists
By pressing MENU > CALL REGISTER, the following call lists will be
made available:
• MISSED CALL (lost calls)
• RECEIVED CALL (answered)
• DIALLED CALL (these can also be accessed by directly pressing
the ▲ key with the telephone idle).
• DELETE LIST (to delete one specific list or all lists at once)
NOTE: The lists of “no answer” and “received” calls are only avail-
able if the calling identification service (CLI) is active on your own
telephone line. For further information please contact your provider.
When a call is highlighted with the cursor in one of the above lists, by
pressing OPTION the following menu will appear:
• CALL.
• DETAILS.
• SAVE INTO PHONEBOOK.
• DELETE.
To rapidly delete a full list of calls (or even all lists), select MENU >
CALL REGISTER > DELETE LIST. Select the desired option and
confirm with OK.
13 Registering a cordless ALESSIPHONE with a
base (Affiliation)
Each base can be associated with up to 5 cordless phones (1 supplied
+ 4 optional). In this way it will be possible to use cordless phones
also to make free of charge internal communications interne, with no
seizing of the telephone line.
To register a new Cordless on your base:
On the base:
Keep pressing the “Paging” button (“search for handset” button) on
the base for about 5 seconds, until the blue LED on the base will start
blinking. Now go to the cordless.
On the cordless you wish to register:
1) Press MENU > REGISTRATION > OK. Select the SUBSCRIPTION
item and press OK.
2) Select the base (e.g.: BASE 2) where you wish to register the
phone and press OK.
NOTE: The bases where the cordless is currently registered (max
4 bases) appear in a different colour (grey) in the list. By default the
cordless is registered on “BASE 1”.
3) he display will show “Searching …” followed by the number of the
selected base; once the identification occurs with success the
identification code of the base is displayed (e.g.: 00895-XXXXXX).
Press OK to confirm the base.
4) Type in the PIN of the base (default: 0000) where you wish to
register the cordless and confirm with OK. Once the registration is
completed, the message: “Subscription done” will be displayed.
If a cordless is busy in an external conversation, the icon will
appear on the top of the display on all other associated cordless
phones. It is not possible to use these latter ones to place any call,
until the line is not made available.
14 Multi-handset configuration
Internal calls (between handsets associated with the
base)
To call another cordless associated with the same ALESSIPHONE
base (see the previous section), press the # key followed by the nu-
meric key corresponding to the number of the cordless you wish to call
(e.g.: Handset 2) and then the key.
To answer an internal call, behave the same way as for the external
calls.
Call Transfer and Three Parties Conference (2 handsets
+ 1 external)
During a call between an handset (e.g.: Handset 1) and an external
party, press the OPTION key on Cordless 1 and select INTERNAL
CALL. Select from the list on display the number of the cordless you
wish to call (e.g.: Handset 2) and press OK (the external user will
remain on hold with some background music).

User manual mod.
ALESSIPHONE
14
ENGLISH
User manual mod.
ALESSIPHONE
15
Once the Handset 2 answer, it will be possible:
1) To transfer the external call to Cordless 2: it is sufficient to press the
key on the Cordless 1.
2) Activate the three parties conference: press OPTION again on
Cordless 1 and select CONFERENCE. Pressing, instead, END INT
on Cordless 1, the second cordless will be disconnected and
Cordless 1 will be connected again with the external caller.
15 Multi-base configuration
Thanks to the GAP profile, which is available on the equipment, it
is possible to associate your cordless with more DECT bases (even
from various brands and models), provided they too have the GAP
profile available. Each ALESSIPHONE cordless can be registered on
a maximum of 4 bases.
Registering a cordless ALESSIPHONE with a second base.
To register the ALESSIPHONE cordless with another ALESSIPHONE
base, the procedure is the one illustrated in section 13 “Registering a
cordless with a base” (Affiliation).
To register instead the ALESSIPHONE cordless with a base of a
different model, place the latter one in the registration mode as de-
scribed in the relevant manual, then perform the affiliation procedure
on the ALESSIPHONE cordless as described in section 13 (typing in
the PIN code of the other base when requested).
Registering a cordless of a different model on the ALESSIPHONE
base
Press the “Paging” button (“search for handset” button) on the ALES-
SIPHONE base for about 5 seconds, then follow the instructions re-
ported on the manual of the cordless from the other manufacturer (typ-
ing in the PIN code of the ALESSIPHONE base when requested).
Select a base
If the cordless is registered on more than one base (4 different bases
are allowed as a maximum), it is possible to either manually set the
base you wish to use, or leave the cordless to search automatically
the first available base, among the ones where it was possibly regis-
tered before.
Press MENU > REGISTRATION > OK > BASE CHOICE > OK. The
bases where the cordless has already been registered appear in white
colour in the list. Select the desired base and confirm with OK, or
choose the “BEST BASE” option.
Identifying a base
To know the identification code of the base where the cordless is current-
ly affiliated, press MENU > REGISTRATION > OK > BASE ID > OK.
The display will display the identification code of the base where it is affiliated.
16 Base settings
Deactivate a cordless associated with the ALESSIPHONE base
Press MENU > SET BASE > RELEASE HS > OK. Type in the PIN of the
base (e.g.: 0000) and press OK. Using the ▲▼ keys select the cordless you
wish to deactivate and press OK, and again at the confirmation prompt.
The deactivated cordless, if registered on another base too, will start
automatically to operate under this latter one.
NOTE: It is not possible to deactivate a cordless when this is the only
one registered on the connected base.
Call Barring
Up to five dialling codes can be stored (max. 5 digits each) to block the
calls placed to such numbers.
To set the call lock, press MENU > SET BASE > CALL BARRING.
Type in the PIN of the base (e.g.: 0000) and press OK. The display
will show the field where to type in the first dialling code to be blocked
(Code1). Scroll the dialling codes to be set by using the ▲▼ keys.
Type in the dialling code to be inhibited and press OK to confirm.
To remove the call lock, repeat the above described procedure to the
point where the previously blocked dialling code appear.
Then, by pressing the function key “DELETE” delete one by one all
digits of the dialling code (once deletion is terminated, the right func-
tion key will show the “BACK” option). Confirm with OK, then when
prompted “Call barring clear?” press OK.
The message “Call barring cleared” will confirm that the operation was
successful.
Set the Flash & Pause duration
Press MENU > SET BASE > FLASH & PAUSE > OK. Type in the
PIN of the base (e.g.: 0000) and press OK. Now select the item of
interest between:
Flash time: Using the ▲▼ keys, select the value for the flashing time
(from 100ms to 600ms) and confirm with OK.
Pause time: Using the ▲▼ keys, select a value for the pausing time
(2 or 4 seconds) and confirm with OK.
PBX Code
Setting the “PBX code” allows automatically including a pausing
period (2 or 4 seconds long, see previous paragraph) between the first
digit of the telephone number and the remaining ones, in case the first
dialled digit should match the one set as “PBX code”.
Press MENU > SET BASE > PBX CODE > OK. Type in the PIN of
the base (e.g.: 0000) and press OK. Using the ▲▼ keys select the
option “Prefix YES” and confirm with OK. Type in the access code to
the external line (1 digit, e.g.: 0 or 9) and confirm with OK.
To remove the access code, repeat the procedure, select the “Prefix
No” option and confirm with OK.
Modifying the PIN of the Base
Press MENU > SET BASE > BS PIN MODIFY > OK. Type in the cur-
rent PIN of the base (e.g.: 0000) and press OK. Type in the new PIN
(4 digits) and confirm with OK. Type in again the new PIN to confirm.
Press OK.
If the operation was performed successfully, the confirmation mes-
sage: “Base PIN Modified” will appear.
Resetting the Base
NOTE: after the “Base Reset” operation, further to all settings related
to the base (section 6) all cordless phones associated with that base
will be de-registered as well, including the first one (the display in idle
status will show “Not registered”, except the case that the cordless
was registered also under another base). In general it will be therefore
necessary to perform a new affiliation (see the paragraph concerning
this procedure for more details).
Press MENU > SET BASE > BASE RESET > OK. Type in the PIN of
the base (e.g.: 0000) and press OK. The prompt “Confirm Reset Base ?”

User manual mod.
ALESSIPHONE
16
ENGLISH
User manual mod.
ALESSIPHONE
17
will appear.
Confirm by pressing the function key OK. The display will
show a notification message while the blue LED on the base will blink
for a few seconds.
17 Handset settings (customization)
Handset Name
When English menu language is set, the default name for handset
is “Handset 1”. To modify this name, press MENU > PHONE SET-
TINGS > HANDSET NAME > USER SET. Type in the customized
name (max. 12 characters) and confirm with OK.
To restore the default name (“Handset 1”) of the phone, repeat the
above sequence and choose the DEFAULT item, then confirm with
OK.
Language of the menus
The predefined language for the ALESSIPHONE menus is Italian.
To modify it, press MENU > PHONE SETTINGS > LANGUAGE.
Using the ▲▼ keys select one of the available languages and confirm
your choice by pressing OK.
Auto talk
When the automatic answer (auto talk) is active, upon incoming calls,
if the cordless is places on the base, it will be sufficient to lift it to
answer.
When the automatic answer is not active, to answer a call it is always
necessary to press the key or the function key “ACCEPT”.
Press MENU > PHONE SETTINGS > AUTOTALK. Using the ▲▼
keys, select “Enable” (to enable the automatic answer) or “Disable”
(to disable) and confirm with OK.
Tones
Press MENU > PHONE SETTINGS > TONE. Using the ▲▼ keys,
select:
KEYPAD TONE. To activate or deactivate the tones played upon
pressing the keys on the cordless (Yes/No and confirm with OK).
LOW BATTERY. To activate or deactivate the tone emitted by the
cordless when the battery requires charging (Yes/No and confirm
with OK).
HANDSET IN CHARGE. To adjust the volume (high/low) or deacti-
vate the tone emitted by the cordless when placed on the base for
battery charging (HIGH VOLUME/LOW VOLUME/DISABLE and con-
firm with OK).
Display
Press MENU > PHONE SETTINGS > DISPLAY. Using the ▲▼ keys,
select:
CONTRAST SET. Using the ▲▼ keys select the value of the contrast
between 0 % and 100% and confirm with OK.
BACKLIGHT SET. To set the period of display light on, after the
last operation. Select one of the available values and press OK
to confirm.
DIALING COLOUR. Each number appears on the display with a dif-
ferent colour (Yes/No and confirm with OK).
Modifying the handset’s PIN
The handset’s PIN allows to perform one of the 3 Reset types avail-
able for the cordless (see next paragraph).
Press MENU > PHONE SETTINGS > MODIFY PIN. Type in the cur-
rent PIN of the cordless (4 digits, the default value is 0000) and con-
firm with OK. Type in the new PIN and press OK. Type again the new
PIN and press OK. The message “Modified PIN” will be displayed.
At this point the cordless will have the new PIN.
NOTE: It is recommended to take note of the new typed in code, and
to keep the information in a safe place.
Handset Reset
Three reset levels are possible on the handset:
1) PHONEBOOK: delete all names stored inside the phonebook.
2) SETTINGS. The settings of the handset are restored as reported
in section 6 with the exception of the phonebook, the call lists and
the cordless PIN, and in the same way the registration
information of the cordless in hand with the bases will be preserved
in the memory.
3) HANDSET. All settings related to the handset will be restored to
default value as reported in section 6, including the information
related to the bases where the cordless is registered. After
resetting the Handset, the “Non registrato” (“Handset not
subscribed”) message will appear on the cordless and you will
need to proceed with a new affiliation (when the default Italian
menu is showed, press MENU > IMPOSTAZIONI > LINGUA
MENU > English > OK).
To perform one of the three reset types mentioned above, press
MENU > PHONE SETTINGS > RESET. When prompted, type in
cordless PIN and confirm with OK. Select one of the three options
previously illustrated and press OK. Confirm the reset by pressing
the function key OK.
18
Compliance of the product to the European Safety
regulations
With the present document the company “PROMELIT S.p.A.,” located
in Via Modigliani n° 20, Cinisello Balsamo (Milan - ITALY), declares
that the device ALESSIPHONE is compliant with the basic requisites
and the other relevant dispositions, as established by the Directive
R&TTE 1999/5/EC.
In particular the product is compliant with following standards:
Radio Part: ETSI EN 301-406 V 1.5.1 (TBR 6)
Electromagnetic Compatibility (EMC): ETSI EN301 489-1 V. 1.8.1,
EN301 489-6 V. 1.2.1.
Electrical Safety: EN60950-1:2001+A11:2004
The compliance with such requisites is expressed through the
marking.
The original declaration of conformity is available at the address in-
dicated above.
The information sheet for the product’s end-of-life is archived at the
Quality Department of the company “Promelit S.p.A.”.
NOTE: the phone needs electrical power supply to be operated. Use
only the power supply device provided with the equipment.
The equipment has been designed and built to be used in connec-
tion to the PSTN telephone network.

Bedienungs anleitung mod.
ALESSIPHONE
1
DEUTSCH
Copyright © 2008 Telecom Italia. Alle Rechte vorbehalten.
In Thailand gedruckt.
Januar 2009
Part No.: MMBB9224201,2.0
DEUTSCH
Evolution mit Substanz
Zeitgemäße, schlichte Eleganz in Verbindung mit innovativen Details
und fortschrittlichen Funktionen. Die Kommunikation erwirbt Stil und
Originalität.

Bedienungs anleitung mod.
ALESSIPHONE
3
DEUTSCH
INHALT
1 Hauptmerkmale ............................................................................. 3
2 Technische Daten und Wahlverfahren........................................ 3
3 Verpackungsinhalt ........................................................................ 4
4 ALESSIPHONE Basisstation ........................................................ 4
5 ALESSIPHONE Mobilteil (Displayikonen und Tasten)
..................4
Displayikonen .................................................................................. 5
Tastenfunktionen ............................................................................. 5
6 Wichtigste Herstellereinstellungen............................................. 5
MOBILTEIL...................................................................................... 5
BASISSTATION............................................................................... 5
7 Inbetriebnahme ............................................................................. 6
• Schritt 1: Basisstation anschießen................................................ 6
• Schritt 2: Akku in das Mobilteil einlegen .......................................6
• Schritt 3: Mobilteil in der Basisstation laden ................................. 7
8 Hinweise zur Sicherheit und Pflege des Produkts .................... 7
9 Entsorgung .................................................................................... 8
10 Gebrauch des Telefons............................................................... 8
Mobilteil ein- und ausschalten....................................................... 8
Anruf ausführen............................................................................. 8
Anruf annehmen............................................................................ 8
Freisprechen ................................................................................. 9
Hörlautstärke regulieren................................................................ 9
Gesprächsoptionen....................................................................... 9
Töne (Melodie, Lautstärke, Einschaltung/Ausschaltung) ............. 9
Datum und Uhrzeit einstellen...................................................... 10
Wecker oder Terminerinnerung einstellen ..................................10
Tastatursperre ............................................................................. 10
Mobilteil suchen (Paging-Taste).................................................. 10
Display-Hintergrund ändern ........................................................ 10
R-Taste (Flash-Taste).................................................................. 11
11 Telefonbuch ............................................................................... 11
Zuordnung von Zahlen und Buchstaben..................................... 11
Klingelmelodie/Bild einem Eintrag zuweisen ..........................................12
Optionen für Telefonbucheinträge............................................... 12
12 Anruflisten ................................................................................. 12
13
ALESSIPHONE Mobilteil an einer Basisstation anmelden (Zugliederung).. 13
14 Erweiterung auf mehrere Mobilteile........................................ 13
Interne Anrufe (zwischen der selben Basisstation zugegliederten Mobilteilen)
13
Anrufweiterleitung und Dreierkonferenz (2 Mobilteile + 1 externer Teilnehmer) ....13
15 Erweiterung auf mehrere Basisstationen............................... 14
ALESSIPHONE Mobilteil an einer zweiten Basisstation anmelden. . 14
Mobilteil eines anderen Modells an einer ALESSIPHONE Basisstation anmelden
.14
Basisstation auswählen .............................................................. 14
16 Einstellungen der Basisstation ...............................................14
Mobilteil an der ALESSIPHONE Basisstation abmelden ................14
Anrufsperre.................................................................................. 15
Pause- und Flash-Zeiten............................................................. 15
Vorwahlziffer (PBX-CODE) ......................................................... 15
PIN der Basisstation ändern ....................................................... 15
Basisstation auf Herstellereinstellungen zurücksetzen .............. 15
17 Einstellungen des Mobilteils (Benutzereinstellungen) ......... 16
Name des Mobilteils.................................................................... 16
Menüsprache .............................................................................. 16
Automatische Rufannahme......................................................... 16
Töne ............................................................................................16
Display ........................................................................................16
PIN des Mobilteils ändern........................................................... 17
Mobilteil auf Herstellereinstellungen zurücksetzen..................... 17
18
Übereinstimmung des Produkts mit den Sicherheitsnormen ........17
1 Hauptmerkmale
• Exklusives Alessi Design von Stefano Giovannoni
• DECT-Technologie mit GAP-Standard
• 10 polyphone Klingelmelodien (exklusiv von Gak Sato)
• OLED-Display mit 65.000 Farben
• Tastatur mit blauer Hinterleuchtung
• 5 Displayhintergründe, Grafik von Giovannoni Design
• Erstklassige Freisprechqualität
• Telefonbuch mit bis zu 200 Einträgen
• Zuweisung Anrufer-Klingelmelodie (abhängig vom Netzanbieter)
• Zeituhr, Wecker und Terminerinnerung
• Anruferanzeige und Liste der letzten 50 erhaltenen Anrufe (abhän-
gig vom Netzanbieter)
• Wahlwiederholung der letzten 10 gewählten Nummern
• Gesprächsdaueranzeige
• Stummschaltung
• Tastatursperre
• Mehrere Menüsprachen
• Akkuwarnton
• Erweiterbar auf mehrere Mobilteile und Dreierkonferenz
2 Technische Daten und Wahlverfahren
TECHNISCHE DATEN - TELEFON:
• Technologie: DECT-Standard (Digital European Cordless Tele-
phone) mit GAP-Profil (Generic Access Profile).
• Funkfrequenzkanäle: 10 Kanäle
• Frequenzbereich: 1.881 GHz ~ 1.897 GHz
• Kanalraster: 1.728 MHz
• Sprachcodierung: ADPCM/32 kbit/s
• Modulation: GFSK
• Maximale Sendeleistung: ca. 250 mW (24 dBm)
• Reichweite: max. 50 m in Innenbereichen, 300 m in Außenbereichen
•
Stromversorgung Mobilteil: Zugelassener Li-Ion-Akku 3,7 V 1.030 mAh
• Stromversorgung Basisstation: PRI. 100-240 V Wechselspannung
50/60 Hz 0,2 A; SEK. 5,1 V Gleichspannung 0,7 A
•
Abmessungen und Gewicht Mobilteil: 19,2 cm x 5,4 cm x 2,7 cm (115 gr.)
• Abmessungen und Gewicht Basisstation: 19,2 cm x 5,4 cm x 2,5 cm (115 gr.)
• An eine Basisstation anschließbare Mobilteile: 5 (4 + 1 in der Ausstattung)
• An ein Mobilteil anschließbare Basisstationen: 4
• Betriebszeit: Stan dby-Zeit bis zu 100 Stunden und Gesprächszeit
bis zu 10 Stunden
TECHNISCHE DATEN - AKKU:
• Aufladbarer Akku mit Lihium-Ion-Technologie 3,7 V 1.030 mAh
• Notwendige Zeit für die Erstaufladung: 16 Stunden
• Notwendige Zeit für die Folgeaufladungen: 8 Stunden
• Umgebungstemperatur während der Aufladung: 0°C bis 40°C (Richtwerte)
• Betriebstemperatur: -10°C bis +50°C (Richtwerte)
• Aufladezyklen: 400 (Richtwerte).
HINWEIS: Die Akku-Standzeit hängt vom Benutzerverhalten ab.
Bitte beachten Sie die Hinweise aus dem Kapitel 8 „Hinweise zur
Sicherheit und Pflege des Produkts“.
WAHLVERFAHREN: Das Gerät nutzt ausschließlich das DTMF-
Wahlverfahren (Mehrfrequenz).
Bedienungs anleitung mod.
ALESSIPHONE Ver. 2.0
2

Bedienungs anleitung mod.
ALESSIPHONE
4Bedienungs anleitung mod.
ALESSIPHONE
5
DEUTSCH
Displayikonen
Das grafische OLED-Display mit 65.000 Farben des AlessiPhone
kann die folgenden Ikonen und Informationen anzeigen:
Tastenfunktionen
6 Wichtigste Herstellereinstellungen
MOBILTEIL
• Anzahl Mobilteile: 1
• Name des Mobilteils: Mobilteil 1
• Telefonbuch: leer
• Automatische Rufannahme: Ein
• Listen der angenommenen Anrufe / entgangenen Anrufe / abgegan-
genen Anrufe: leer
• Ausgewählte Basisstation: 1
• PIN des Mobilteils: 0000
BASISSTATION
• PIN der Basisstation: 0000
• Flash-Zeit (R-Taste): 100 ms
• Pause-Zeit: 2 s
• Zugewiesenes vordefiniertes Mobilteil: Mobilteil 1
1)Displayikonen
: Ladezustand des Akkus (die
weißen Segmente geben den Ist
Ladezustand an)
: Empfangsstärke
: Leitung belegt
: Freisprechfunktion eingeschaltet
:
Leisestellung (für externe Anrufe)
: Tastatursperre eingeschaltet
: Wecker eingeschaltet
2)Datum und Uhrzeit
3) Name und Nummer des Mobilteils (Stan-
dard: Mobilteil 1)
4) Linke Funktionstaste
5) Rechte Funktionstaste
1)Navigationstasten ▲▼/ Einstellung der Hörlautstärke
(Gesprächslautstärke) / Direktzugang zum Telefonbuch (▼) / Liste
der letzten 10 gewählten Nummern (▲)
2)Linke Funktionstaste
3)Abheben-Taste / Anrufannahme /
Freisprechen (im Gespräch ein- oder
ausgeschaltet)
4)
Taste * : Klingelmelodie Ein/Aus (im
Ruhezustand, lang drücken)
5)Taste # : Tastatursperre Ein/Aus (im
Ruhezustand, lang drücken)
6)
Auflegen-Taste / Rückkehr in den
Standby-Betrieb / Mobilteil Ein/Aus
7) Rechte Funktionstaste
3 Verpackungsinhalt
• 1 Basisstation mit integriertem Akku-Ladegerät
• 1 Mobilteil
• 1 Steckernetzgerät für die Basisstation
• 1 Plug/Plug-Telefonkabel
• 1 Zugelassener Li-Ion-Akku 3,7 V 1.030 mAh
• 1 Bedienungsanleitung
• 1 Garantieheft
• 1 Balkencode für die Produktidentifikation.
4 ALESSIPHONE Basisstation
5 ALESSIPHONE Mobilteil (Displayikonen und Tasten)
1)Hörkapsel
2)Grafisches OLED-Display mit 65.000
Farben
3)Alfanumerische Tastatur
4)Mikrofon
5)Kontakte für die Akku-Ladung.
1) Anmelde-/Paging-Taste.
2) LED für die Anzeige Anrufeingang/Lei-
tung belegt/Mobilteil suchen/Mobilteil
anmelden.
3)Ladekontakte für den Mobilteil-Akku.

Bedienungs anleitung mod.
ALESSIPHONE
6Bedienungs anleitung mod.
ALESSIPHONE
7
DEUTSCH
7 Inbetriebnahme
• Schritt 1: Basisstation anschließen
1) Die jeweilige Steckbuchse für das Plug/Plug-Telefonkabel ( ) und das
Steckernetzgerätkabel ( ) bestimmen, siehe Darstellungen unten.
2) Den Stecker des Netzkabels in die hierfür vorgesehene Steckbuchse an der
Rückseite der Basisstation ( ) stecken und anschließend das Stecker-
netzgerät an eine Wandsteckdose in der Nähe des Basisteils anschließen.
3) Den Stecker des Telefonkabels in die hierfür vorgesehene Steckbuchse an
der Rückseite der Basisstation ( ) stecken und anschließend das andere
Kabelende direkt an die Wandanschlussdose oder über eine hierfür vorge-
sehene Telefonsteckdose (nicht in der Verpackung enthalten und nicht ab-
gebildet) anschließen.
HINWEIS: Der Betrieb des Telefons ist sowohl mit einem Anschluss an das
Telefonnetz über einen Telefonstecker (nicht in der Verpackung enthalten und
nicht abgebildet) oder über das Plug/Plug-Telefonkabel möglich, das direkt in
ein Steckmodul (Wandtelefondose) gesteckt wird. Bei beiden Anschlussarten
ist das Telefon parallel zur Leitung geschaltet.
• Schritt 2: Akku in das Mobilteil einlegen
Den weißen Kunststoffdeckel an der Mobilteilrückseite abnehmen,
indem er mit beiden Händen an der Aussparung aufgedrückt wird,
siehe Bild.
Den Akku wie im Bild dargestellt einlegen und darauf achten, dass die
auf dem Etikett angegebene Polung sichtbar und nach oben gerich-
tet ist. Das Mobilteil wieder schließen. Um die richtige Einlegung des
Akkus zu überprüfen, ist das Mobilteil einzuschalten, indem die Taste
eine Sekunde lang gedrückt wird. Die gewünschte Menüsprache
unter den auf dem Display angezeigten Sprachen auswählen und die
Auswahl mit OK bestätigen. Für spätere Wechsel der Menüsprache, die
jederzeit vorgenommen werden können, siehe Abschnitt „Menüsprache“
in Kapitel 17.
Für Ihre Sicherheit und einen einwandfreien Betrieb des schnurlosen
Telefons verwenden Sie bitte nur den mit dem Produkt mitgelieferten
Akku oder einen Akku vom gleichen Typ. Bitte beachten Sie auch die
Sicherheitshinweise aus dem Kapitel „Hinweise zur Sicherheit und
Pflege des Produkts“.
• Schritt 3: Mobilteil in der Basisstation laden
Das Mobilteil einschalten. Hierzu die Taste eine Sekunde lang drück-
en. Das Mobilteil in seine Basisstation abstellen, damit der Akku geladen
bleibt. Ein Bestätigungston gibt die richtige Positionierung des Mobilteils
in der Basisstation an. Anschließend wird die Batterie geladen. Für den
ersten Ladevorgang sind 16 Stunden erforderlich.
8 Hinweise zur Sicherheit und Pflege des Produkts
• Verwenden Sie stets den wieder aufladbaren Original-Akku oder
einen Akku vom gleichen Typ.
• Achten Sie genau darauf, dass der Akku korrekt und mit der richtigen
Polung in seine Aufnahme eingesetzt ist.
• Der Akku darf nicht geöffnet / beschädigt werden.
• Den Akku nicht ins Feuer werfen. Es besteht Explosionsgefahr.
• Der erste Ladevorgang soll mindestens 16 Stunden dauern. An-
schließend ist eine Wiederaufladezeit von 8 Stunden ausreichend.
• Der Akku darf während seines Gebrauchs nicht Temperaturen unter
-10°C oder über +50°C ausgesetzt werden. Den Akku nur bei einer
Raumtemperatur von 0°C bis +40°C laden.
• Bei längerer Nichtbenutzung des Telefons wird empfohlen, den Akku
aus dem Akkufach zu nehmen.
• Verwenden Sie nur das mitgelieferte Steckernetzgerät.
• Medizinische Geräte könnten in ihrer Funktion beeinflusst werden.
Bitte beachten Sie die diesbezüglichen Anweisungen im Arbeitsbere-
ich (z.B. Ambulatorien, Krankenhäuser etc.).
• Bewahren Sie das Mobilteil nicht in Bädern oder Duschräumen auf.
Das Mobilteil und die Basisstation sind nicht spritzwassergeschützt.
Steckerbelegung des Telefonsteckers:
1. frei
2. frei
3. a
4. b
5. frei
6. frei
6
5
4
3
2
1
▼
Es darf nur das mitgelieferte Steckernetzgerät verwendet werden, das stets
an die Netzsteckdose angeschlossen sein muss. Falls Sie im Fachhandel
ein anderes Telefonkabel kaufen, ist darauf zu achten, dass die Stecker-
belegung mit dem mitgelieferten Kabel übereinstimmt.

Bedienungs anleitung mod.
ALESSIPHONE
8Bedienungs anleitung mod.
ALESSIPHONE
9
DEUTSCH
• Reinigen Sie die Basisstation und das Mobilteil mit einem feuchten
(ohne Lösemittel) Tuch oder Antistatiktuch. Verwenden Sie niemals
ein trockenes Tuch. Es besteht die Gefahr der statischen Aufladung,
die Geräteschäden zur Folge haben könnte.
• Falls das Mobilteil mit Flüssigkeit in Kontakt gekommen ist, dann
schalten Sie es aus und entnehmen Sie sofort den Akku. Lassen Sie
die Flüssigkeit aus dem Mobilteil abtropfen. Alle Teile mit einem Tuch
trocken tupfen. Das Mobilteil anschließend mindestens 72 Stunden
mit geöffnetem Akkufach und mit nach unten gerichteter Tastatur an
einem warmen, trockenen Ort lagern (nicht in der Mikrowelle, im Back-
ofen o. Ä.). Nach vollständigem Austrocknen ist die Inbetriebnahme
des Mobilteils in den meisten Fällen wieder möglich, wenngleich Prob-
leme auftreten können.
• Für den eventuellen Transport des Gerätes ist ausschließlich die
Originalverpackung zu verwenden.
9 Entsorgung
BENUTZERINFORMATION
gemäß Art. 13 der Gesetzesverordnung Nr. 151 vom
25. Juli 2005 (Umsetzung der Richtlinien 2002/95/EG,
2002/96/EG und 2003/108/EG über die Verringerung der
Verwendung von Gefahrenstoffen in Elektro- und Ele-
ktronikgeräten und die Abfallentsorgung)
Das Symbol des durchgestrichenen Abfalleimers auf dem Gerät
oder seiner Verpackung weist darauf hin, dass das Produkt am
Ende seiner Betriebszeit getrennt von den anderen Abfällen zu
entsorgen ist.
Der Benutzer hat das Altgerät den Entsorgungsstellen für Elektronik- und
Elektrogeräte zuzuführen oder bei Erwerb eines neuen Gerätes dem Fach-
händler zurückzugeben.
Die Getrenntsammlung von Altgeräten für die Rückführung, die Weiterver-
arbeitung und die umweltfreundliche Entsorgung dient der Vorbeugung von
potenziellen Umwelt- und Gesundheitsschäden und begünstigt die Wied-
erverwendung bzw. das Recycling der Materialien, aus denen das Altgerät
besteht.
Die gesetzeswidrige Entsorgung des Produktes durch den Benutzer wird
gemäß den geltenden Bestimmungen bestraft.
10 Gebrauch des Telefons
Mobilteil ein- und ausschalten
Die Taste 1 Sekunden lang drücken. Zum Ausschalten dieselbe
Taste 2 Sekunden drücken.
Anruf ausführen
Telefonnummer eingeben und Taste drücken. Mit der rechten Taste
LÖSCHEN können falsch eingetippte Ziffern gelöscht werden.
Oder: Taste drücken und die anzurufende Nummer eingeben. Bei
fehlerhafter Eingabe Taste drücken und erneut beginnen.
Während des Anrufs ist die blaue LED an der Basisstation mit Dauer-
anzeige eingeschaltet.
Anruf annehmen
• Wenn das Mobilteil nicht in die Basisstation gestellt ist: Taste
oder die linke Funktionstaste ANNEHMEN drücken, um den Anruf an-
zunehmen. Taste oder die rechte Funktionstaste BEENDEN drücken,
um das Gespräch zu beenden.
• Wenn das Mobilteil in die Basisstation gestellt ist und die au-
tomatische Anrufannahme (Kap. 17) eingeschaltet ist (werkseit-
ige Einstellung), braucht das Mobilteil nur aus der Basisstation
genommen zu werden, um den Anruf anzunehmen. Wenn die au-
tomatische Anrufannahme nicht eingeschaltet ist, ist die Taste
oder die linke Funktionstaste ANNEHMEN zu drücken, um den Anruf
anzunehmen.
Während des Klingelns blinkt die blaue LED an der Basisstation und er-
scheint am Display jeweils die folgende Anzeige:
• „Anruf“, wenn die Rufnummernübertragung nicht freigeschaltet ist.
• Die Rufnummer des Anrufers (nach dem ersten Rufton), wenn die Ruf-
nummernübertragung freigeschaltet ist.
• „Reserviert“, wenn die Rufnummernübertragung freigeschaltet ist, der
Anrufer jedoch seine Rufnummer nicht übermittelt.
Freisprechen
Während eines Gesprächs ist die Taste zu drücken, um die Funktion ein-
zuschalten, und erneut zu drücken, um die Funktion auszuschalten.
Hörlautstärke regulieren
Die Tasten ▲▼ drücken, um die Hörlautstärke während eines Gesprächs
zu regulieren (im Normal- oder Freisprechmodus).
Gesprächsoptionen
Während eines Gesprächs erhalten Sie über die linke Funktionstaste OP-
TIONEN Zugriff auf das folgende Menü:
• ADRESSBUCH: Zugriff auf das Telefonbuch (siehe Kapitel „Telefon-
buch“).
• MUTE: Zum Ausschalten des Mikrofons an Ihrem Mobilteil. Zum erneu-
ten Einschalten ist die rechte Funktionstaste FREIGEBEN zu drücken.
• LAUTST KONVERS.: Die Tasten ▲▼ drücken, um die Lautstärke zu
regulieren. ZURÜCK drücken, um zum Optionsmenü zurückzukehren.
Andernfalls ist es möglich, direkt die Tasten ▲▼ zu drücken, um die
Hörlautstärke während eines Gesprächs zu regulieren (im Normal- oder
Freisprechmodus).
• WARTESCHLANGE: Die Verbindung mit dem Teilnehmer wird unter-
brochen und der Teilnehmer hört eine Wartemelodie. FORTSETZEN
drücken, um das Gespräch wieder aufzunehmen.
• INTERNER RUF: Die Verbindung mit dem externen Teilnehmer, der eine
Wartemelodie hört, wird unterbrochen, und es wird ein anderes Mobilteil
angerufen, das an der ALESSIPHONE Basisstation angemeldet ist. Bei
Antwort des angerufenen Mobilteils kann eine Dreierkonferenz geschaltet
werden, indem OPTIONEN > KONFERENZ gedrückt wird.
• TASTE R (Taste-Flash): Für etwaige zusätzliche Netzdienste des Net-
zanbieters, die freigeschaltet sind. Für ausführliche Informationen über
die Benutzung dieser Funktionen wenden Sie sich bitte an Ihren Netzan-
bieter.
Töne (Melodie, Lautstärke, Einschaltung/Ausschaltung)
Melodie auswählen: MENÜ > BILDER UND KLÄNGE > KLÄNGE > EXT
KLINGELT (oder INT KLINGELT) > KLINGELTONE > OK drücken. Die Melo-
die mit ▲▼ auswählen und mit OK bestätigen.
Einstellung der Laufstärke: MENÜ > BILDER UND KLÄNGE > KLÄNGE >
EXT KLINGELT (oder INT KLINGELT) > LAUTSTÄRKE > OK drücken. Die
Lautstärke mit ▲▼ einstellen und mit OK bestätigen.
Klingelmelodie ausschalten: MENÜ > BILDER UND KLÄNGE > KLÄNGE >
EXT KLINGELT (oder INT KLINGELT) > STATUS KLINGELTON > OK drück-
en. STANDARD oder IMMER AUS mit ▲▼ auswählen und mit OK bestätigen.
Wenn die Klingelton für externe Anrufe ausgeschaltet ist, erscheint auf dem
Display im Ruhezustand die Ikone
. Andernfalls ist es möglich, die Klin-
gelmelodie für externe Anrufe ein- oder auszuschalten, indem die Taste *
lang drückt wird.
ACHTUNG: Falls das Produkt mit einem falschen Akkutyp geladen
wird, könnte der Akku explodieren.

Bedienungs anleitung mod.
ALESSIPHONE
10 Bedienungs anleitung mod.
ALESSIPHONE
11
DEUTSCH
Datum und Uhrzeit einstellen
MENÜ > UHR > DATUM UND UHRZEIT drücken. Das Datum im Format
„TT.MM.JJ“ eingeben und OK drücken. Die Uhrzeit im Format „hh.mm“ (24-
Stunden-Modus) eingeben, wobei mit den Tasten ▲▼ die Eingabeposition
verändert wird, und mit OK bestätigen.
HINWEIS: Datum und Uhrzeit werden automatisch im Telefon eingestellt,
wenn ein Anruf mit Datum- und Uhrzeitübertragung durch den Netzanbieter
angenommen wird (CLI ist freigeschaltet).
Wecker oder Terminerinnerung einstellen
Zur Einstellung des Weckers ist MENÜ > UHR > WECKER zu drücken.
„EINMALIG“ oder „TÄGLICH“ wählen und OK drücken.
Die Weckuhrzeit im Format „hh.mm“ (24-Stunden-Modus) eingeben und OK
drücken. Bei eingeschaltetem Weckruf wird am Display im Ruhezustand die
Ikone angezeigt.
Zur Einstellung einer Terminerinnerung ist MENÜ > UHR > TERMIN
zu drücken. Anschließend EINST drücken und zwischen „TÄGLICH“,
„MONATLICH“ und „JÄHRLICH“ auswählen. Die Auswahl mit EINST be-
stätigen.
Die auf dem Display angeforderten Daten eingeben, bis die Gesamtüber-
sicht für die Terminerinnerung angezeigt wird und die rechte Taste die Op-
tion AKTIV angibt. Mit Betätigung dieser Taste wird die Terminerinnerung
eingeschaltet. Wenn hingegen die linke Taste OPTIONEN gedrückt wird,
besteht die Wahl zwischen:
• DAT/UHR ÄND: Für die Veränderung von Datum und Uhrzeit.
• TEXT ÄNDERN: Für die Veränderung des zugeordneten Textes.
• LÖSCHEN: Die Terminerinnerung wird vollständig gelöscht.
• TEXT ANZEIGEN: Für die Veranschaulichung des Textes.
Tastatursperre
Die Taste # zur Einschaltung der Tastatursperre lang drücken. Wenn
die Tastatursperre aktiv ist, erscheint auf dem Display im Ruhezustand
die Ikone . Um die Tastatursperre auszuschalten, ist die rechte Taste
ENTSPERR zu drücken und anschließend mit OK zu bestätigen.
Mobilteil suchen (Paging-Taste)
Wenn Sie Ihr Mobilteil (oder ein anderes Mobilteil, das an der ALESSI-
PHONE Basisstation angemeldet ist) verlegt haben, drücken Sie kurz die
Paging-Taste an der Basisstation. Die LED an der Basisstation blinkt und
alle an der Basisstation angemeldeten Mobilteile beginnen zu klingeln.
Erneut die Paging-Taste oder eine beliebige Taste am Mobilteil drücken,
um die Suche zu beenden.
Display-Hintergrund ändern
MENÜ > BILDER UND KLÄNGE > BILDER drücken. Einen der fünf ver-
fügbaren Hintergründe auswählen und OK drücken, um ihn auszuwählen.
Bei Anzeige des Hintergrunds auf dem Display können mit den Tasten ▲▼
die verfügbaren Bilder gescrollt werden. Zur Einstellung des Bildes als
Hintergrund ist EINST zu drücken.
Taste R (Taste-Flash)
Während eines Gesprächs OPTIONEN > TASTE R drücken, um die Flash-
Taste einzuschalten. Erkundigen Sie sich bei Ihrem Netzanbieter über das
diesbezügliche Dienst Angebot.
11 Telefonbuch
Jedem Eintrag kann Folgendes zugeordnet werden:
• Name (max. 16 Zeichen/Ziffern).
• Telefonnummer (max. 20 Ziffern).
• Klingelmelodie (bei freigeschalteter Rufnummernübertragung).
• Bild (bei freigeschalteter Rufnummernübertragung).
Für den Zugriff auf das Telefonbuch ist im Ruhezustand die rechte Taste
ADRESSB zu drücken.
SUCHEN: Die Initialen des gesuchten Namens eingeben und SUCHEN
drücken oder direkt SUCHEN drücken, um alle Einträge im Telefonbuch in
alphabetischer Reihenfolge anzuzeigen.
NEUER EINTRAG: Den Namen und die Telefonnummer des neuen Eint-
rags eingeben, wobei mit den Tasten ▲▼ die Eingabeposition verändert
wird. Mit der Taste LÖSCHEN können falsch eingetippte Buchstaben/Ziffern
gelöscht werden. OPTIONEN > SPEICHERN drücken, um den Eintrag so-
fort zu speichern, oder KLINGELTON ZUWEISEN oder BILD ZUWEISEN
(siehe „Klingelmelodie/Bild einem Eintrag zuordnen“ weiter unten) drücken,
um den Eintrag zu personalisieren. Die diesbezüglichen Einstellungen sind
anschließend mit SPEICHERN zu speichern.
ALLE ANZEIGEN: Für die Anzeige der vollständigen Telefonbuchliste in
alphabetischer Reihenfolge.
BEACHTE: Funktion kann auch direkt im Ruhezustand durch Drück-
en der Taste ▼ abgerufen werden.
ÄNDERN: Für die Suche eines Telefonbucheintrags und die Änderung von
Einstellungen. Mit SPEICHERN bestätigen.
LÖSCHEN: Für die Suche eines zu löschenden Telefonbucheintrags (EIN-
EN LÖSCHEN > SUCHEN > (Eintrag auswählen) > LÖSCHEN) oder alle
Einträge mit nur einem einzigen Löschvorgang aus dem Telefonbuch zu
löschen (ALLE LÖSCHEN > OK).
Zuordnung von Zahlen und Buchstaben
Bei Erreichen der für den Weckruf eingestellten Uhrzeit, gibt das Mobil-
teil die Weckmelodie aus. Zum Abschalten der Melodie ist eine beliebige
Taste am Mobilteil zu drücken.
Bei Fälligkeit des Termins gibt das Mobilteil eine spezifische Klingelmelo-
die aus. Zum Abschalten der Melodie ist BEENDEN (für die Rückkehr
zum Hauptmenü) oder eine beliebige andere Taste am Mobilteil zu drück-
en, um die Anzeige der Terminerinnerung beizubehalten. Durch Drücken
von „ERINNERN“ kann die Terminerinnerung auf eine spätere Uhrzeit
verschoben werden. Hierzu das entsprechende Zeitintervall in Minuten
eingeben und OK drücken.
Taste Buchstaben und Zahlen
@ : / < > ( ) 1
a b c A B C 2 ä Ä ß
d e f D E F 3
g h i G H I 4
j k l J K L 5
m n o M N O 6 ö Ö
p q r s P Q R S 7
t u v T U V 8 ü Ü
w x y z W X Y Z 9
(Leerzeichen) . , ’ ? ! % 0
_ * € $
# & + -

Bedienungs anleitung mod.
ALESSIPHONE
12 Bedienungs anleitung mod.
ALESSIPHONE
13
DEUTSCH
Klingelmelodie/Bild einem Eintrag zuordnen
Für die Einschaltung dieser Funktionen muss die Rufnummernübertragung
(CLI) freigeschaltet sein. Für Informationen wenden Sie sich bitte an Ihren
Netzanbieter.
KLINGELMELODIE ZUWEISEN: Bei Eingang eines externen Anrufes gibt
das Mobilteil nach dem ersten Klingelton die Klingelmelodie aus, die dem
betreffenden Eintrag zugewiesen wurde.
Um einem neuen Eintrag eine Klingelmelodie zuzuweisen, sind zuerst der
Name und die Telefonnummer einzugeben und anschließend OPTIONEN
> KLINGELTON ZUWEISEN zu drücken. Mit den Tasten ▲▼ die für den
Eintrag gewünschte Melodie wählen und OK drücken.
Es kann auch ein bereits vorhandener Eintrag im Telefonbuch ausgewählt
werden. Hierzu ist OPTIONEN > ÄNDERN > OK > OPTIONEN > KLIN-
GELTON ZUWEISEN zu drücken und wie oben zu verfahren.
BILD ZUWEISEN: Bei Eingang eines externen Anrufes gibt das Mobilteil
nach dem ersten Klingelton das Bild aus, das dem betreffenden Eintrag
zugewiesen wurde.
Um einem neuen Eintrag ein Bild zuzuweisen, sind zuerst der Name und
die Telefonnummer einzugeben und anschließend OPTIONEN > BILD ZU-
WEISEN zu drücken. Mit den Tasten ▲▼ das für den Eintrag gewünschte
Bild wählen und OK drücken. Um das Bild aus dem Eintrag zu entfernen,
ist BILD ZUWEISEN > BILD LÖSCHEN zu drücken.
Es kann auch ein bereits vorhandener Eintrag im Telefonbuch ausgewählt
werden. Hierzu ist OPTIONEN > ÄNDERN > OK > OPTIONEN > BILD
ZUWEISEN zu drücken und wie oben zu verfahren.
Optionen für Telefonbucheinträge
Wenn ein Eintrag ausgewählt ist, wird bei Drücken von OPTIONEN das
folgende Menü angezeigt:
ANRUF: Nummer anrufen.
ANZEIGEN: Details ansehen.
ÄNDERN: Einstellungen des Eintrags ändern. Zum Abschluss mit
SPEICHERN bestätigen.
LÖSCHEN: Eintrag aus dem Telefonbuch löschen.
12 Anruflisten
Nach Drücken von MENÜ > ANRUFLISTE werden die folgenden Anruflis-
ten angezeigt:
• VERPASSTE ANRUFE
• EMPFANGENE ANRUFE
• GEWÄHLTE NUMMERN (auf diese Liste ist auch der Direktzugriff über
die Taste ▲ im Ruhezustand möglich).
• LISTE LÖSCHEN
BEACHTE: Die Listen der entgangenen und angenommenen Anrufe sind
nur verfügbar, wenn die Rufnummernübertragung (CLI) freigeschaltet ist.
Informationen erhalten Sie bei Ihrem Netzanbieter.
Wenn ein Anruf in einer dieser Listen mit dem Cursor markiert ist, dann
erscheint bei Drücken von OPTIONEN das folgende Menü:
• ANRUFEN.
• DETAILS.
• IM ADRESSB SPEICH
• LÖSCHEN.
Um eine Anrufliste (oder alle Listen) zu löschen, ist MENÜ > ANRUFLISTE
> LISTE LÖSCHEN auszuwählen. Die gewünschte Option auswählen und
mit OK bestätigen.
13 ALESSIPHONE Mobilteil an einer Basisstation
anmelden (Zugliederung)
An jeder Basisstation können Sie bis zu 5 Mobilteile (1 mitgeliefertes Mo-
bilteil + 4 optionale Mobilteile) anmelden. Auf diese Weise können die Mo-
bilteile auch für kostenfreie interne Anrufe genutzt werden, ohne die Tel-
efonleitung zu belegen.
Neues Mobilteil an Ihrer Basisstation anmelden:
Am Mobilteil:
An der Basisstation die Paging-Taste ca. 5 Sekunden lang drücken, bis die
blaue LED an der Basisstation zu blinken beginnt.
Gehen Sie nun zum Mobilteil über.
Am Mobilteil:
1) MENÜ > AUFNAHME > OK drücken. Die Option VERKNÜPFUNG
auswählen und OK drücken.
2) Die Basisstation (z.B. BASIS 2) auswählen, an der das Mobilteil an-
gemeldet werden soll, und OK drücken.
BEACHTE: Die Basisstationen, an denen das Mobilteil gegenwärtig
angemeldet ist (max. 4 Basisstationen) werden in der Liste in einer an-
deren Farbe (Grau) angezeigt. In der Herstellereinstellung ist das Mo-
bilteil an der „BASIS 1“ angemeldet.
3) Das Display zeigt „Suche…“ gefolgt von der Nummer der ausgewählten
Basisstation an. Nach erfolgter Erkennung wird die Kennnummer der
Basisstation (z.B. 00895-XXXXXX) angezeigt. OK drücken, um die er-
kannte Basisstation zu bestätigen.
4) Die PIN der Basisstation (Standard: 0000) eingeben, an der das Mo-
bilteil angemeldet werden soll, und mit OK bestätigen. Nach erfolgter
Anmeldung erscheint auf dem Display die Meldung „Verknüpfung OK“.
Nach der Anmeldung klingeln bei Eingang eines Anrufs gleichzeitig alle
Mobilteile, die derselben Basisstation zugeordnet sind.
Wenn an einem Mobilteil ein externer Anruf durchgeführt wird, erscheint
auf allen anderen Mobilteilen die betreffende Ikone im oberen
Displaybereich. Mit diesen Mobilteilen können keine externen Anrufe
getätigt werden, solang die Leitung belegt ist.
14 Erweiterung auf mehrere Mobilteile
Interne Anrufe (zwischen derselben Basisstation zugeg-
liederten Mobilteilen)
Um ein anderes Mobilteil anzurufen, das derselben ALESSIPHONE Ba-
sisstation zugeordnet ist (siehe vorangegangenes Kapital) ist die Taste #,
gefolgt von der Nummerntaste in Übereinstimmung mit der Nummer des
anzurufenden Mobilteils (z.B. Mobilteil 2), und anschließend die Abhebens-
Taste zu drücken.
Das Annehmen eines internen Anrufs erfolgt nach dem gleichen Verfahren
wie für einen externen Anruf.
Anrufweiterleitung und Dreierkonferenz (2 Mobilteile + 1
externer Teilnehmer)
Während eines Gesprächs zwischen einem Mobilteil (z.B. Mobilteil 1) und
einem externen Teilnehmer ist am Mobilteil 1 die Taste OPTIONEN zu
drücken und INTERNER RUF auszuwählen.
Aus der angezeigten Liste das anzurufende Mobilteil (z.B. MOBILTEIL 2)
auswählen und OK drücken (der externe Teilnehmer hört die Wartemelo-
die).
Bei Gesprächsannahme des Mobilteils 2 bestehen die folgenden Mögli-
chkeiten:
1) Weiterleitung des externen Anrufes zum Mobilteil 2: Am Mobilteil 1 die
Taste drücken.

Bedienungs anleitung mod.
ALESSIPHONE
14 Bedienungs anleitung mod.
ALESSIPHONE
15
DEUTSCH
2) Dreierkonferenz freischalten: Am Mobilteil 1 erneut OPTIONEN drücken
und KONFERENZ auswählen. Wenn hingegen ENDE INT am Mobilteil
1 gedrückt wird, wird die Verbindung mit dem zweiten Mobilteil unterbro-
chen und ist das Mobilteil 1 erneut mit dem externen Teilnehmer verbun-
den.
15 Erweiterung auf mehrere Basisstationen
Dank dem GAP-Profil Ihres Geräts können Sie Ihr eigenes Mobilteil mehr-
eren DECT-Basisstationen (auch anderer Marken und Modelle) zugliedern,
sofern auch diese über ein GAP-Profil verfügen. Jedes ALESSIPHONE
Mobilteil kann an maximal 4 Basisstationen angemeldet sein.
ALESSIPHONE Mobilteil an einer zweiten Basisstation an-
melden
Um das ALESSIPHONE Mobilteil an einer anderen ALESSIPHONE Ba-
sisstation anzumelden ist das gleiche Verfahren wie unter Kapitel 13 „Mo-
bilteil an einer Basisstation anmelden“ auszuführen.
Wenn das ALESSIPHONE Mobilteil an einem anderen Basisstationmodell
angemeldet werden soll, ist die betreffende Basisstation gemäß ihrer Bedi-
enungsanleitung in den Anmeldemodus zu schalten. Anschließend ist die
Anmeldung am ALESSIPHONE Mobilteil gemäß Kapitel 13 fortzusetzen
(unter Einfügung der PIN der anderen Basisstation, wenn die diesbezügli-
che Aufforderung erfolgt).
Mobilteil eines anderen Modells an einer ALESSIPHONE Basissta-
tion anmelden
An der ALESSIPHONE Basisstation die Paging-Taste ca. 5 Sekunden lang
drücken. Anschließend den Anweisungen aus der Bedienungsanleitung
für das Mobilteil des anderen Fabrikats folgen (unter Einfügung der PIN
der ALESSIPHONE Basisstation, wenn die diesbezügliche Aufforderung
erfolgt).
Basisstation auswählen
Wenn das Mobilteil an mehreren Basisstationen angemeldet ist (es sind
maximal 4 Basisstationen zugelassen), können Sie die zu verwendende
Basisstation manuell einstellen oder das Mobilteil so einstellen, dass es
sich automatisch die erste verfügbare Basisstation unter den Basisstatio-
nen aussucht, an denen es zuvor angemeldet wurde.
MENÜ > AUFNAHME > OK > BASIS-AUSWAHL > OK drücken.
Die Basisstationen, an denen das Mobilteil angemeldet ist, werden in der
Liste in weißer Farbe angezeigt. Die gewünschte Basisstation auswählen
und mit OK bestätigen oder die Option „BESTE BASE“ auswählen.
Basisstation identifizieren
Um den Namen der Basisstation in Erfahrung zu bringen, welcher das Mo-
bilteil zugegliedert ist, ist MENÜ > AUFNAHME > OK > BASIS IDENTIFI-
ZIEREN > OK zu drücken.
Auf dem Display wird der Name der betreffenden Basisstation angezeigt.
16 Einstellungen der Basisstation
Mobilteil an der ALESSIPHONE Basisstation abmelden
MENÜ > STATION EINSTELLEN > MOBILT DEAKT > OK drücken. Die PIN
der Basisstation (z.B. 0000) eingeben und OK drücken. Mit Hilfe der Tasten ▲▼
das abzumeldende Mobilteil auswählen und nach der Bestätigungsanforderung
OK drücken.
Wenn das Mobilteil an einer anderen Basisstation angemeldet ist, wird es automa-
tisch an dieser Basisstation weiter betrieben.
BEACHTE: Die Abmeldung eines Mobilteils ist nicht möglich, wenn es als
einziges Mobilteil an der Basisstation angemeldet ist.
Anrufsperre
Es können bis zu fünf Vorwahlnummern (mit jeweils max. 5 Ziffern) ges-
peichert werden, an welche abgehende Anrufe gesperrt werden.
Zur Einstellung der Anrufsperre MENÜ > STATION EINSTELLEN > AN-
RUFSPERRE drücken. Die PIN der Basisstation (z.B. 0000) eingeben und
OK drücken. Auf dem Display wird das Eingabefeld für die erste zu sper-
rende Vorwahlnummer (PrZfix1) angezeigt. Mit Hilfe der Tasten ▲▼ die
einzustellenden Vorwahlnummern scrollen. Die zu sperrende Vorwahlnum-
mer eingeben und zur Bestätigung OK drücken.
Um die Anrufsperre auszuschalten, ist das obige Verfahren bis zu der
Stelle zu wiederholen, an welcher die zuvor gesperrte Vorwahlnummer
erscheint.
Durch Drücken der Funktionstaste LÖSCHEN werden die Ziffern der be-
treffenden Vorwahlnummer einzeln gelöscht (nach Beendigung des Lösch-
vorgangs zeigt die rechte Funktionstaste die Option „ZURÜCK“ an). Mit
OK bestätigen und anschließend nach der Anfrage „Anrufsperre clear?“
OK drücken.
Die Meldung „Anrufsperre cleared” bestätigt die erfolgreiche Ausführung
des Vorgangs.
Pause- und Flash-Zeiten
MENÜ > STATION EINSTELLEN > FLASH & PAUSE > OK drücken. Die
PIN der Basisstation (z.B. 0000) eingeben und OK drücken. Die gewün-
schte Option wählen:
FLASH-TIME: Mit Hilfe der Tasten ▲▼ die gewünschte Flash-Zeit (100 ms
bis 600 ms) auswählen und mit OK bestätigen.
PAUSE-TIME: Mit Hilfe der Tasten ▲▼ die gewünschte Pause-Zeit (2 s
oder 4 s) auswählen und mit OK bestätigen.
Vorwahlziffer (PBX-CODE)
Mit der Vorwahlziffer (PBX-CODE) können Sie eine automatische Pause
(2 s oder 4 s, siehe vorangegangener Abschnitt) zwischen der ersten Ziffer
der Telefonnummer und allen folgenden Ziffern eingeben, wenn die erste
gewählte Ziffer der als „Vorwahlziffer“ eingestellten Ziffer entspricht.
MENÜ > STATION EINSTELLEN > PBX-CODE > OK drücken. Die PIN
der Basisstation (z.B. 0000) eingeben und OK drücken. Mit Hilfe der Tasten
▲▼ die Option „PrZfix Ja“ auswählen und mit OK bestätigen. Die Vor-
wahlziffer für die externe Leitung (1 Ziffer, z.B. 0) eingeben und mit OK
bestätigen.
Zur Ausschaltung der Vorwahlziffer ist das Verfahren zu wiederholen, die
Option „PrZfix Nein“ auszuwählen und mit OK zu bestätigen.
PIN der Basisstation ändern
MENÜ > STATION EINSTELLEN > PIN ÄNDERN > OK drücken. Die PIN
der Basisstation (z.B. 0000) eingeben und OK drücken. Die neue PIN (4
Ziffern) eingeben und mit OK bestätigen. Die neue PIN zur Bestätigung
erneut eingeben. OK drücken.
Die Meldung „Basis PIN modified“ bestätigt die erfolgreiche Ausführung
des Vorgangs.
Basisstation auf Herstellereinstellungen zurücksetzen
BEACHTE: Bei der Zurücksetzung der Basisstation auf die Hersteller-
einstellungen werden alle Einstellungen der Basisstation (Kap. 6) gelöscht
und auch alle Mobilteile abgemeldet, die der Basisstation zugeordnet sind.
Darin inbegriffen ist auch das mitgelieferte Mobilteil (das Display zeigt
im Ruhezustand „Nicht verknüpft“ an, sofern das Mobilteil nicht noch an
einer weiteren Basisstation angemeldet ist). Im Allgemeinen ist daher an-
schließend eine neue Anmeldung erforderlich (siehe diesbezüglichen Ab-
schnitt).

Bedienungs anleitung mod.
ALESSIPHONE
16 Bedienungs anleitung mod.
ALESSIPHONE
17
DEUTSCH
MENÜ > STATION EINSTELLEN > RESET BASIS > OK drücken. Die PIN der
Basisstation (z.B. 0000) eingeben und OK drücken. Es erfolgt die Anfrage „Con-
firm Reset Basis?“. Zur Bestätigung Funktionstaste OK drücken. Das Display
zeigt eine Bestätigungsanzeige an und die blaue LED an der Basisstation blinkt
einige Sekunden lang.
17 Einstellungen des Mobilteils (Benutzereinstel-
lungen)
Name des Mobilteils
Als Herstellereinstellung ist dem Mobilteil der Name „Mobilteil 1“ zugewi-
esen. Zur Änderung des Namens MENÜ > EINSTELLUNGEN > MO-
BILTEIL ID > INDIVIDUELL drücken. Den individuell zugewiesenen Na-
men (max. 12 Zeichen) eingeben und mit OK bestätigen.
Um den herstellerseitig eingestellten Namen des Telefons („Mobilteil 1“)
wieder einzustellen, ist das obige Verfahren zu wiederholen und die Option
VOREINGESTELLT auszuwählen, die mit OK zu bestätigen ist.
Menüsprache
Die Herstellereinstellung für die Menüsprache von ALESSIPHONE ist Itali-
enisch.
Zur Änderung MENÜ > EINSTELLUNGEN > MENÜSPRACHE drücken.
Mit Hilfe der Tasten ▲▼ eine der verfügbaren Sprachen auswählen und die
Auswahl mit OK bestätigen.
Automatische Rufannahme
Wenn die automatische Rufannahme eingeschaltet ist, dann braucht das
Mobilteil bei Eingang eines Anrufes lediglich aus der Basisstation genom-
men werden, um das Gespräch anzunehmen.
Wenn die automatische Rufannahme nicht eingeschaltet ist, ist zur An-
nahme eines ankommenden Anrufs stets Taste oder die Funktionstaste
ANNEHMEN zu drücken.
MENÜ > EINSTELLUNGEN > AUTOM. RUFANN drücken. Mit Hilfe der
Tasten ▲▼ „Aktivieren“ (für die Einschaltung der automatischen Rufan-
nahme) oder „Deaktivieren“ (für die Ausschaltung) wählen und mit OK be-
stätigen.
Töne
MENÜ > EINSTELLUNGEN > TON drücken. Mit Hilfe der Tasten ▲▼ die
folgenden Optionen auswählen:
TASTENTÖNE. Ein- oder Ausschaltung der Quittierungstöne für die Tas-
tenbetätigung am Mobilteil (Ja/Nein und mit OK bestätigen).
BATTERIE LEER. Ein- oder Ausschaltung des vom Mobilteil ausgege-
benen Warntons, wenn der Akku geladen werden muss (Ja/Nein und mit
OK bestätigen).
TEL. WIRD AUFGEL. Regulierung der Lautstärke (laut/leise) oder Auss-
chaltung des Hinweistons, wenn das Mobilteil zum Laden des Akkus in die
Basisstation gestellt wird (LAUTST HOCH/LAUTST NIED/DEAKTIVIERT
und mit OK bestätigen).
Display
MENÜ > EINSTELLUNGEN > DISPLAY drücken. Mit Hilfe der Tasten ▲▼
die folgenden Optionen auswählen:
KONTRAST. Mit Hilfe der Tasten ▲▼ den Kontrast zwischen 0 % und 100
% auswählen und mit OK bestätigen.
EINSCHALTDAUER. Einstellung der Zeit für die Displaybeleuchtung nach
der letzten Aktion. Einen der verfügbaren Werte auswählen und mit OK
bestätigen.
FARBIGE ZIFFERN. Jede Nummer wird auf dem Display in einer anderen
Farbe angezeigt (Ja/Nein und mit OK bestätigen).
PIN des Mobilteils ändern
Die PIN des Mobilteils ist erforderlich, um eine der drei Zurücksetzungen
auszuführen, die für das Mobilteil verfügbar sind (siehe nächster Ab-
schnitt).
MENÜ > EINSTELLUNGEN > PIN ÄNDERN drücken. Die aktuelle PIN des
Mobilteils (4 Ziffern, Herstellereinstellung: 0000) eingeben und OK drücken.
Die neue PIN eingeben und mit OK bestätigen. Die neue PIN zur Bestä-
tigung erneut eingeben. OK drücken. Es wird die Meldung „PIN geändert“
angezeigt. An dieser Stelle hat das Mobilteil eine neue PIN.
BEACHTE: Es wird empfohlen, die neue PIN zu notieren und an einem
sicheren Ort aufzubewahren.
Mobilteil auf die Herstellereinstellungen zurücksetzen
Es gibt drei Zurücksetzungsstufen:
1) ADRESSBUCH. Alle Namen werden aus dem Telefonbuch gelöscht.
2) EINSTELLUNGEN. Das Mobilteil wird auf die Einstellungen zurück-
gestellt, die im Kap. 6 angegeben sind, mit Ausnahme des Telefon-
buchs, der Anruflisten und der PIN des Mobilteils. Außerdem bleiben
auch die Anmeldungen des Mobilteils an den jeweiligen Basisstationen
erhalten.
3) TELEFON. Alle Einstellungen des Mobilteils, die in Kap. 6 angege-
ben sind, sowie die Informationen bezüglich der Basisstationen, an
denen das Mobilteil angemeldet ist, werden auf die Herstellereinstel-
lungen zurückgesetzt. Nach der Zurücksetzung wird die Meldung „Nicht
verknüpft“ angezeigt und ist eine neue Anmeldung erforderlich.
Zur Ausführung einer der drei vorgenannten Zurücksetzungen ist MENÜ
> EINSTELLUNGEN > RESET MOBILTEIL zu drücken. Die PIN des
Mobilteils eingeben, wenn sie erfragt wird, und mit OK bestätigen.
Eine der drei vorgenannten Optionen wählen und OK drücken. Die
Zurücksetzung mit der Funktionstaste OK bestätigen.
18
Übereinstimmung des Produkts mit den Sicher-
heitsnormen
Hiermit erklärt die Gesellschaft PROMELIT S.p.A., mit Sitz in Cinisello Bal-
samo (Mailand), Via Modigliani 20, dass das Gerät ALESSIPHONE mit den
grundlegenden Anforderungen und allen weiteren einschlägigen Bestim-
mungen gemäß Richtlinie 1999/5/EG (FTEG) übereinstimmt.
Das Produkt entspricht insbesondere den folgenden Vorschriften:
Funkteil: ETSI EN 301-406 V 1.5.1 (TBR 6)
Elektromagnetische Verträglichkeit (EMC): ETSI EN301 489-1 V. 1.8.1,
EN301 489-6 V. 1.2.1.
Elektrische Sicherheit: EN60950-1:2001+A11:2004
Die Übereinstimmung mit den vorgenannten Anforderungen wird mit dem
CE-Kennzeichen bescheinigt.
Die Originalfassung der Konformitätserklärung ist unter der vorgenannten
Adresse erhältlich.
Das Informationsblatt für das Betriebsende des Produkts ist bei der Qual-
itätssicherungsabteilung des Unternehmens „Promelit S.p.A.“ hinterlegt.
BEACHTE: Für den Betrieb muss das Telefon mit elektrischem Strom
versorgt werden. Es darf nur das mitgelieferte Steckernetzgerät verwendet
werden.
Das Gerät ist für den Gebrauch einem Anschluss an das PSTN-Telefon-
netz konzipiert und gebaut.
Table of contents
Languages: