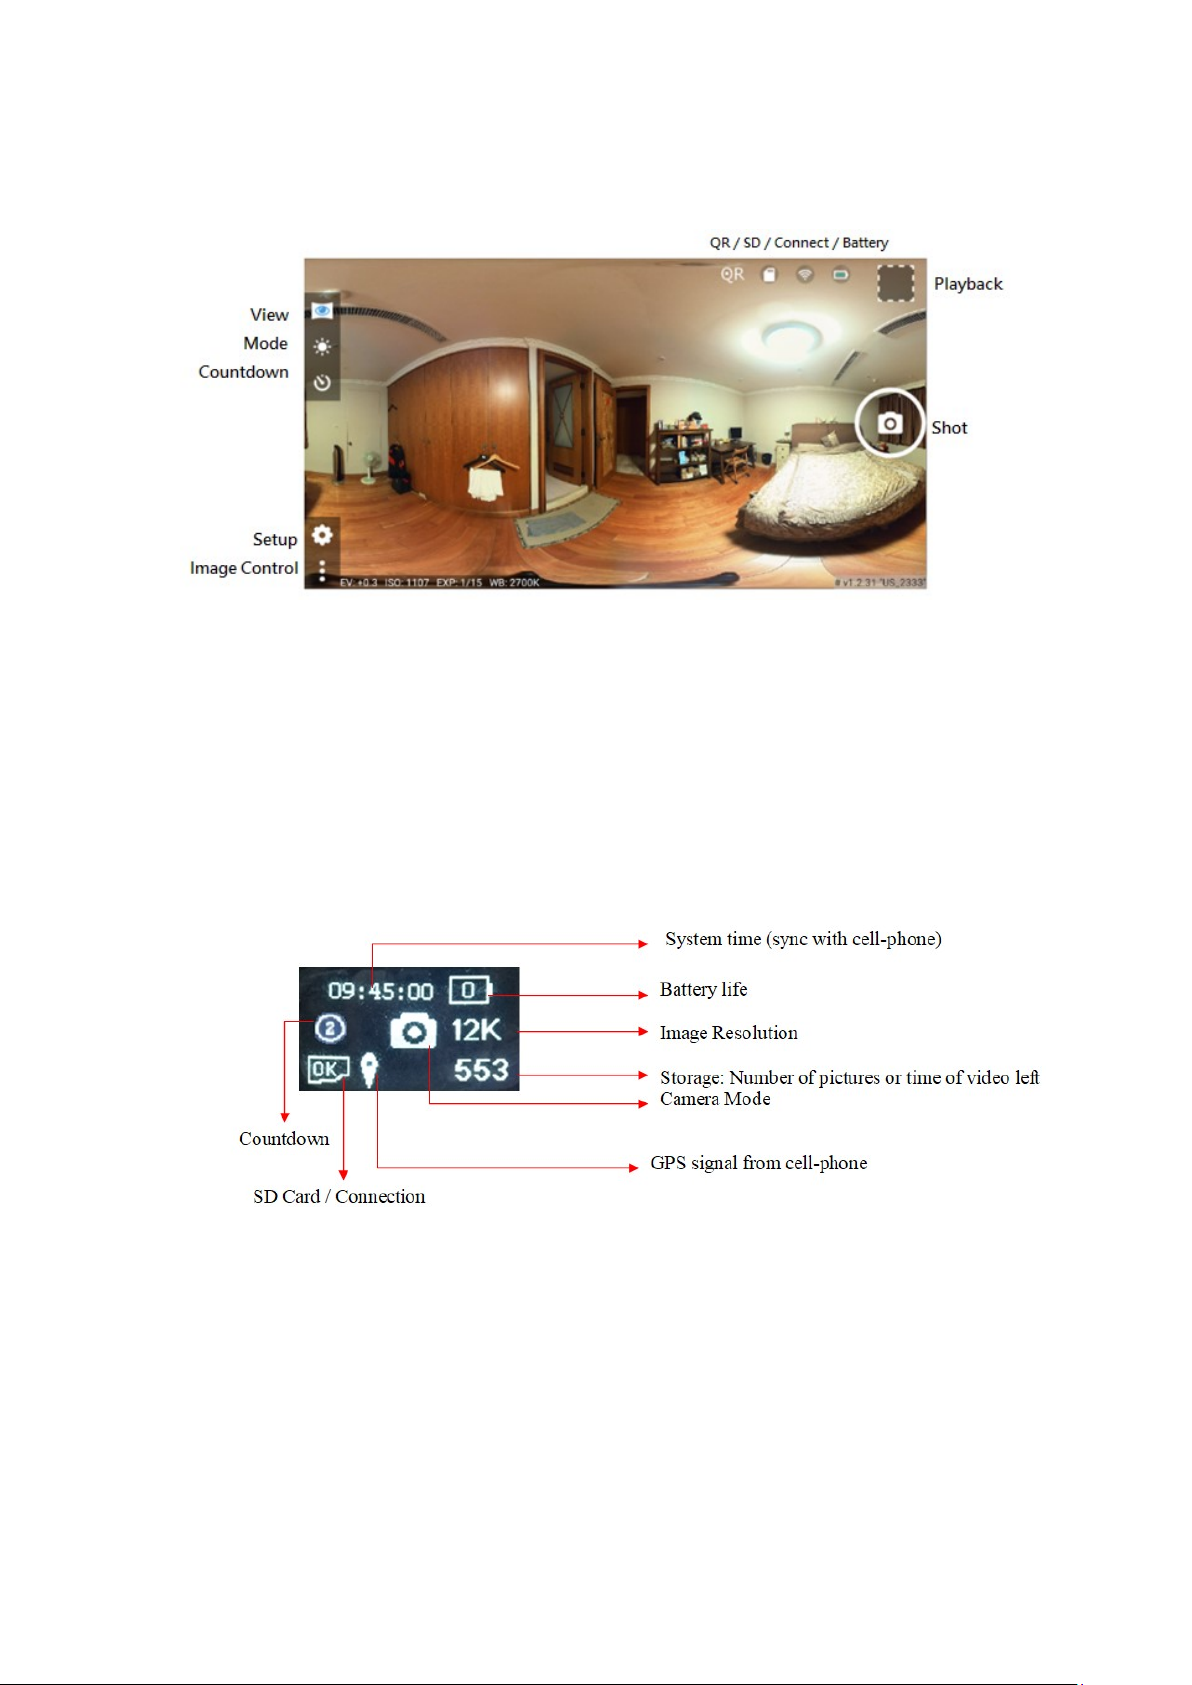
Aleta S2C User manual

ALETA S2C 360 Camera User Manual
V2.2
Appearance
-Camera Version: 1.08.20
-iOS APP Version: 1.3.6.4
-Android APP Version: 1.2.40
Micro HDMI
Micro USB
(For USB to LAN or
USB MIC, no Power
supply.)
SD card slot
Tripod Socket
Battery Cover
Power button
LED indicator
Shot button
OLED
MIC / Line-in
12V DC Jack

1. Battery:
The camera uses standard 18650 batteries x 2.
+ -
Follow the direction to insert batteries.
To purchase the batteries, please follow the suggestions below:
(1) The length has to be less than 68mm to fit into the slot.
(2) 2600mAH - 3400mAH. (Most of the batteries that labeled over 3500mAH are
faked that are not suggested to buy)
(3) The camera has voltage protection itself, so do not use batteries with
protection board, which may be short of voltage.
Examples:
Flat / w/o protection board: Yes
Button top / w/o protection board: Yes
Button top / with protection board: No

While changing batteries, please use full charged batteries to get accurate battery
life indicator.
Charging:
Please use the bundled USB charger and follow the direction to insert batteries to
charge.
Red: Charging
Green: No charging or full charged
※Note that the charger is the only way to charge the batteries. Connect USB power
or 12V DC to the camera will not charge the batteries in the camera.
2. Install APP
Search “AletaS2C Viewer” on APP store or Google Play. For iOS it need to be be
11.4or above.
3. Run APP
Click the icon to run the APP. Please access all permissions for full function.

4. APP Interface
5. Connect to camera
(1) Power on camera: Hold the power button for 1 second to power on the camera.
Please wait until the OLED to display camera mode and resolution.
※ To shut down the camera, please hold the power button for 5 seconds. Holding it
for one second will enter sleep mode.

(2) Use the APP to connect to the camera
Method 1: Use the Wi-Fi setting of the cell-phone to connect. For the first time
connection, please use this method.
After booting up, the camera will start a Wi-Fi: US_XXXX.OSC (XXXX are 4 digits).
The default password is: 88888888.
Connect to this Wi-Fi by the cell-phone’s Wi-Fi setting. Run the APP after finishing
connecting.
Method 2: Use the APP to connect.
Run the APP and Click the icon on the upper-right.
Select camera’s Wi-Fi (US_XXXX.OSC) and input password: 88888888.
iOS Android

6. SD card
The camera uses micro SD card and supports the spec below:
Capacity: Max. 128GB
Speed: U-3 or V30
Format: FAT32
Example:
Insert the card into the slot on the bottom.
If it shows format error after inserting, the APP will ask to format the card. It can also
be formatted manually by clicking Format SD Card in the setup menu. Note that all of
the data will be erased after formatting. Please make sure to backup important data in
the card.

7. Taking Photo
7.1 Setup
Click the mode icon to enter mode selection
Select Capture to enter setup menu
Modes:
Day: Supports HDR and deghosting. The slowest shutter is 1/15 second. Best
for outdoor daytime, mounted, and few moving objects shooting.
Night: Supports HDR. The slowest shutter is 4 seconds. Best for Indoor or
outdoor nighttime, mounted, and no moving object shooting.
Sports: No HDR. The slowest shutter is 1/60 second. Best for bright, mobile,
and many moving objects shooting.

M mode: No HDR. The slowest shutter is 720 seconds. Best for extremely low
light shooting.
7.2 Change nadir logo
Android: Enter the image setting
Off Default Mirror Stretch Custom Select custom file
iOS: Click the setup bottom to enter the menu
Custom setting:
(1) Make a 1024 x 1024 JPEG file.
(2) Save the file into the cell-phone’s album or folder.
(3) Select Setting for iOS or click the Folder icon for Android to select the saved file.

7.3 Shooting
Make sure the camera finished booting up before shooting. The OLED should display
camera mode, resolution, and OK for SD card.
Method 1: Press the shut button on the APP.
Method 2: Press the shut button on the camera.
There will be 3 steps. The APP and OLED will both show hints.
(1) Countdown: According to the countdown setting, the camera will count a certain
number of seconds before shooting. The user can find a place to hide during this
period of time.
(2) Exposure: The camera starts to take image. Please do not move the camera at this
step.
iOS: Android: OLED: All white
(3) File processing: The camera starts to process image and save the file into the SD
card.
iOS: Android: OLED: Processing bar

7.4 Playback
After finishing shooting, the upper-right playback icon will refresh. Click it to enter
the album.
7.5 Download files to the cell-phone
Click the files to download and display. Un-downloaded files are labeled purple and
need to be downloaded to be viewed. Downloaded files are labeled blue and can be
displayed directly. Click the view icons to change display mode.
iOS: Android:

8. Recording Video
Select view modes to record video
Record: Up to 4K normal 360 video (4K@10 FPS / 3K@24 FPS / 2K@30 FPS)
Time-lapse: Up to 8K time-lapse 360 video. Select H264 to record 30 FPS time-lapse
video, and select JPEG to save time-lapse pictures. (Only JPEG supports 12K)

Q&A:
Firmware Upgrade
Q: How to upgrade camera firmware?
A: The camera supports both SD card and APP upgrading. (Now only Android APP
supports upgrading. iOS APP would be ready soon.)
(1) SD card:
■ Put the upgrade file (.zip) to the root of the SD card and make sure that there is
no other zip file in the same root.
■ Insert the SD card into the camera.
■ Turn on the camera and while the SD card status is “OK”, the camera will start
to upgrade. The display during upgrading will be up-side-down.
■ After finishing upgrading, the camera will reboot. Please wait until reboot
successfully and the image can be displayed correctly before turning off the
power.
■ The file name used for the last upgrading will be remembered, so the camera will
not keep upgrading by the same file.
■ If the zip file is not recognized successfully, the camera will stop upgrading and
show “aborted” on the OLED screen. Please press power button to shut down the
camera and check the file again.
(2) APP:
Install the latest Android AletaS2C Viewer APP.
Run the APP and it will ask to download the latest firmware file.
After finishing downloading, connect to the Wi-Fi of the camera.
The APP will check the camera’s firmware version. If it is not the latest one, it
will ask the user to upgrade.
Make sure the power is enough and confirm to upgrade.
The APP will upload firmware to camera first. After uploading, the camera will
start to upgrade. The camera’s OLED display during upgrading will be
up-side-down.
After finishing upgrading, the camera will reboot. Please wait until reboot
successfully and the image can be displayed correctly before turning off the
power.

Connecting
Q: Why can’t I connect to the camera through Wi-Fi by the APP?
A: Please try the tips below:
1. Use the cell-phone’s setting to connect to camera’s Wi-Fi directly. (SSID:
US_XXXX.OSC, 88888888). Run the APP after finishing connecting.
2. Temporally forget the Wi-Fi that accepts internet to avoid some systems to switch
Wi-Fi for internet automatically.
3. Turn on the GPS function of the cell-phone.
4. Restart the APP.
Q: Why is there no live view even the Wi-Fi is connected?
A: Please make sure that the OLED has displayed mode and resolution. If it is still
showing “Waiting…” please wait until it fully boot up. Besides, some Android
cell-phone may not be able to display 4K h.264 streaming. Please set Live Stream
Codec to MJEPG to view at lower fps.
SD card
Q: Why can’t my SD card work?
A: The camera uses micro SD card and supports the spec below:
Capacity: Max. 128GB
Speed: U-3 or V30
Format: FAT32

Insert the card into the slot on the bottom.
※Most new SD cards are ex-FAT format. It is stronglly recommended to use the
camera to format them rather than using softwares on PC.
If it shows format error after inserting, the APP will ask to format the card. It can also
be formatted manually by clicking Format SD Card in the setup menu. Note that all of
the data will be erased after formatting. Please make sure to backup important data in
the card.
Stitching
Q: Why are there stitching errors on near objects?
A: The camera has 1 meter of minimum stitching distance. If there must be near
objects, please try to face them to one single lens to avoid stitching error.

Q: Why are there still stitching errors while the distance is far enough?
A: The camera has optical flaw stitching that can identify most of the scene to stitch,
but it still has chance to get error for some special cases, such as two different
distance located on the same stitching line. It would help to use the APP preview to
check the errors and rotate the camera to fix them.
Example:
(1) Use the APP preview to find an error.
(2) Rotate the camera.
(3) Error fixed. Keep checking errors.
※For some specials, it might be hard to find a certain angle to fixed every error. You
can change the camera’s location or height a bit to find a better result.

There is also manual and semi-manual stitching that allows you to input distance to
stitch.
Distance for the top image.
Distance for surrounding image.
Color
Q: Why is the color not accurate for some pictures?
A: The auto white balance should get correct color, but for special light source it
might get color issues. There is manual color temperature and tint setting to adjust
CT: Yellow < - > Blue
Tint: Green < -> Purple
*Remember to switch WB to AUTO after taking special light source pictures.

Image Quality
Q: Why is the image not clear?
A: There are some main causes for image quality:
(1) Lens cleanliness: If the lens is not clean, it would strongly effect the image quality,
especially for lights. Please make sure to wipe the lens before sooting.
Before wiping
After wiping

(2) Image setting: Select the right mode can help you to get better quality. Night
mode has better brightness but is not good for moving objects. Sports mode can
take moving objects but doesn’t support HDR. Select different modes may help
you to solve the quality issues.
Example: Suggested indoor house shooting:
Picture Mode: Night (less noise)
HDR: Auto
Deghosting: Off (no moving objects)
Battery life
Q: The battery went down fast. How can I use it for longer time?
A: One pair of 2600mAH 18650 batteries should work for about 1 hour. To prepare
more batteries is one way to get more working time. Sleep mode is another way to
save the power. While you moving between each shot, you can click the power
button for 1 second to enter sleep mode. Click the power button for 1 second again
can wake it up and it would take about 15 seconds. If it sleeps over 10 minutes then
it will shut down automatically. If the camera idles for 5 minutes it will also enter
sleep mode. You can change the time in the Sleep setting menu.
After V1.08.20 there is a new Power Saving mode. It can save signification power.
Turn on Power Saving in the setup menu.

The live preview will not refresh during power saving.
Minimum countdown time would be 5 seconds.
Click for image adjustment will wake up preview.
※ Power saving is mainly for photo taking. I won’t save much power for long term
video recording.
Hiding
Q: How can I hide myself since the Wi-Fi has limited working distance?
A: Please use the countdown function.
Just setup the countdown time and click the shut bottom. You should have enough
time to find a place to hide during the countdown.
If there is no place to hide, you can use the Removal mode.

After clicking shooting, the OLED will be all white and you can just walk around the
camera. While finishing shooting, your own image will be erased.
Audio
Q: Does the camera record audio?
A: There are 2 ways to record audio:
(1) Cell-phone: If the cell-phone is connected to the camera and the APP is running
during recording, the audio will be received by the cell-phone.
(2) USB MIC: No matter APP is running or not, if you connect an USB MIC to the
camera, it will receive audio by the MIC. You may need a micro USB adaptor to
connect a USB MIC.
Example:
Adapter and USB MIC
OLED will show MIC icon
Table of contents