ALFA living Dolce Vita Top User manual

IT
EN
ES
FR
DE
LPG gas oven
DOLCE VITA TOP
USER MANUAL

DETTAGLI PRODOTTO / PRODUCT DETAILS
SCRIVI IN QUESTA SEZIONE I DATI DEL TUO PRODOTTO
WRITE IN THIS SECTION THE DATA OF YOUR PRODUCT
Modello / Model: ...............................................................................................................................
Lotto / Lot: ........................................................................................................................................
Data di acquisto / Purchase date: .....................................................................................................
La targhetta identicativa è posizionata sul retro del prodotto.
The identification label is located on the back of the product.
IT Collegatevi al sito www.alfaliving.it e registrate il vostro forno oggi.
EN Visit www.alfaliving.it and register your oven today.
ES Visite www.alfaliving.it y registre su horno.
FR Rendez-vous sur le site www.alfaliving.it et enregistrez votre four dès aujourd’hui.
DE Besuchen Sie uns im Internet unter www.alfaliving.it und registrieren Sie Ihren Ofen
noch heute.

IT
EN
ES
FR
DE
1. Scheda Tecnica / Technical sheet / Ficha Técnica / Fiche technique / Technisches Datenblatt 2
3. Montaggio / Installation / Instalación / Ensemble / Montage 4
2. Manuale d’uso 6
- Avvertenze
- Consigli per l’uso
- Cottura
- Manutenzione pulizia e stivaggio
- Risoluzione anomalie
- Garanzia
3. User manual 10
- Caution
- Tips for use
- Cooking
- Cleaning maintenance and storage
- Anomalies resolution
- Warranty information
4. Manual de usuario 16
- Advertencias
- Recomendaciones para el uso
- Cocción
- Mantenimiento, limpieza y almacenamiento
- Anomalías resolución
- Garantía
5. Notice d’utilisation 22
- Recommandations
- Conseils d’utilisation
- Cuisson
- Entretien, nettoyage et enfournage
- Résolution des anomalies
- Garantie
6. Handbuch 28
- Warnungen
- Verwendungshinweise für
- Backen
- Wartung, reinigung and stillegung
- Auösung anomalien
- Garantie
SOMMARIO / SUMMARY / ÍNDICE / SOMMAIRE / INHALT

4
SCHEDA TECNICA / TECHNICAL SHEET
a
b
j
c
d
e
f
k
l
m
n
o
g
h
i
CODICE N° DESCRIZIONE
aSDGT-01-047 1 comignolo cpl
bTI_180_750_SAT 1 tubo inox aisi 304 d.180mm l:750 satinato monob. (solo lav.)
cSDGT-01-021 1 kit gas gpl 18,5 kW gpl
dSDGT-01-040-GR 1 carter gas
eMAN708X6.5 1 manopola nera 70 albero 8x6.5
fGENELP003IQ 1 generatore elettronico serie p003/iq senza pila tappo nero
g411576 1 batteria stilo 1.5 volts
hSDGT-01-050 1 sportello forno cpl
iSDGT-01-044 1 davanzale inox cpl
jDGT-01-046 1 angia canna
kSDGT-01-040-GR 1 cupola grigia
lSDGT-01-032 1 arco inox cpl
mYT63-135 1 termometro D.63 L:135mm °C/°F
nSDGT-01-002 1 camera di combustione inox cpl
oRRA3020 16 tavella rossa alfa 30x20x3

A
B
C
E
F
GH
I
D
5
SCHEDA TECNICA / TECHNICAL SHEET
Peso
Weight
142 kg
312 lbs
Temperatura massima
Max oven temperature
400°C
752°F
Area piano forno
Oven oor area
0,48 m2
5,16 ft2
Combustibile raccomandato
Recommended fuel
Gas GPL (G30 / G31)
LPG gas (G30 / G31)
Dim. piano forno
Oven oor dim.
80 x 60 x 5,4 cm
31,5 x 23,6 x 2 in
Categoria gas
Gas category
I3+ GPL
Minuti per scaldare
Heating time (min)
15 Consumo massimo (G30/G31)
Maximum consumption (G30/G31)
1,35 / 1,32 kg/h
N° pizze alla volta
Pizza capacity
4Potenza nominale
Heat capacity
18,5 kW
Infornata di pane
Bread capacity
4 kg
8,8 lbs
Funzionamento a G30 / G31
G30 / G31 operation
28..30 / 37 mbar
A155,6 cm 61,2 in
B71,7 cm 28,2 in
C18 cm 7 in
D111 cm 43,7 in
E22,1 cm 8,7 in
F77,4 cm 30,5 in
G87,1 cm 34,3 in
H3,5 cm 1,4 in
I24 cm 9,4 in

6
INSTALLAZIONE / INSTALLATION / INSTALACIÓN / ENSEMBLE / MONTAGE
EN
IT
ES
DE
-The unit will be placed on a non-combustible surface such as stone or concrete surface for nal
installation.
-Install the oven on surface with adequate load-bearing capacity.
-Safety must be the rst priority. When the oven is in operation ensure that no other fuel and materials that
may be damaged by heat and sparks are close to it.
-The outer walls of the oven may reach high temperatures greater than 50°C.
FR -L’appareil doit être placé sur une surface non-combustible comme la pierre.
-Installer le four sur surface avec une capacité portante susante.
-La sécurité doit passer au premier plan. Pendant que le four est en marche s’assurer qu’aucun autre com-
bustible ou matériaux pouvant être endommagés par la chaleur et par les étincelles se trouvent à proximité
de celui-ci.
-Les parois externes de Dolce Vita peuvent atteindre des températures de plus de 50°C.
- Il forno deve essere posizionato su una supercie non combustibile come pietra o muratura con alta
capacità portante.
- La sicurezza deve essere prioritaria. Quando il forno è in funzione assicurarsi che nessun materiale
combustibile che può essere danneggiato da scintille o calore sia vicino all’apparecchio.
- Le pareti esterne del forno raggiungono temperature maggiori di 50°C.
- La unidad se colocará en una supercie no combustible, como piedra o supercie de concreto para la
instalación nal.
-Instale el horno en la supercie con capacidad de carga adecuada.
-La seguridad debe ser la primera prioridad. Cuando el horno esté en funcionamiento, asegúrese de que no
haya otros combustibles y materiales que puedan resultar dañados por el calor y las chispas.
-Las paredes exteriores del horno pueden alcanzar altas temperaturas superiores a los 50 °C.
- Das Gerät wird auf einer nicht brennbaren Oberäche wie Stein- oder Betonoberäche für die Endmontage
aufgestellt.
-Installieren Sie den Ofen auf der Oberäche mit ausreichender Tragfähigkeit.
-Sicherheit muss die erste Priorität sein. Wenn der Ofen in Betrieb ist, stellen Sie sicher, dass kein anderer
Brennsto und Materialien, die durch Hitze und Funken beschädigt werden können, nahe daran sind.
-Die Außenwände des Ofens können hohe Temperaturen von mehr als 50 °C erreichen.

7

8
IT
AVVERTENZE
LEGGERE ATTENTAMENTE LE SEGUENTI INFORMAZIONI PER UNA CORRETTA INSTALLAZIONE ED UN FUN-
ZIONAMENTO OTTIMALE DEL FORNO.
SE SI AVVERTE ODORE DI GAS:
1. Chiudere il gas.
2. Spegnere eventuali amme libere.
3. Aprire lo sportello del forno.
LE FUGHE DI GAS POSSONO PROVOCARE INCENDI O ESPLOSIONI E CAUSARE LESIONI PERSONALI GRAVI
O MORTALI, O DANNI ALLE COSE. NEL CASO SI AVVERTANO STRANI ODORI O PERDITE DI GAS NON AC-
CENDERE IL FORNO E ACCERTARE IL MALFUNZIONAMENTO PER EVITARE RISCHI DI INCENDI O SCOPPIO.
- Usare posate ed attrezzi resistenti ad alte temperature.
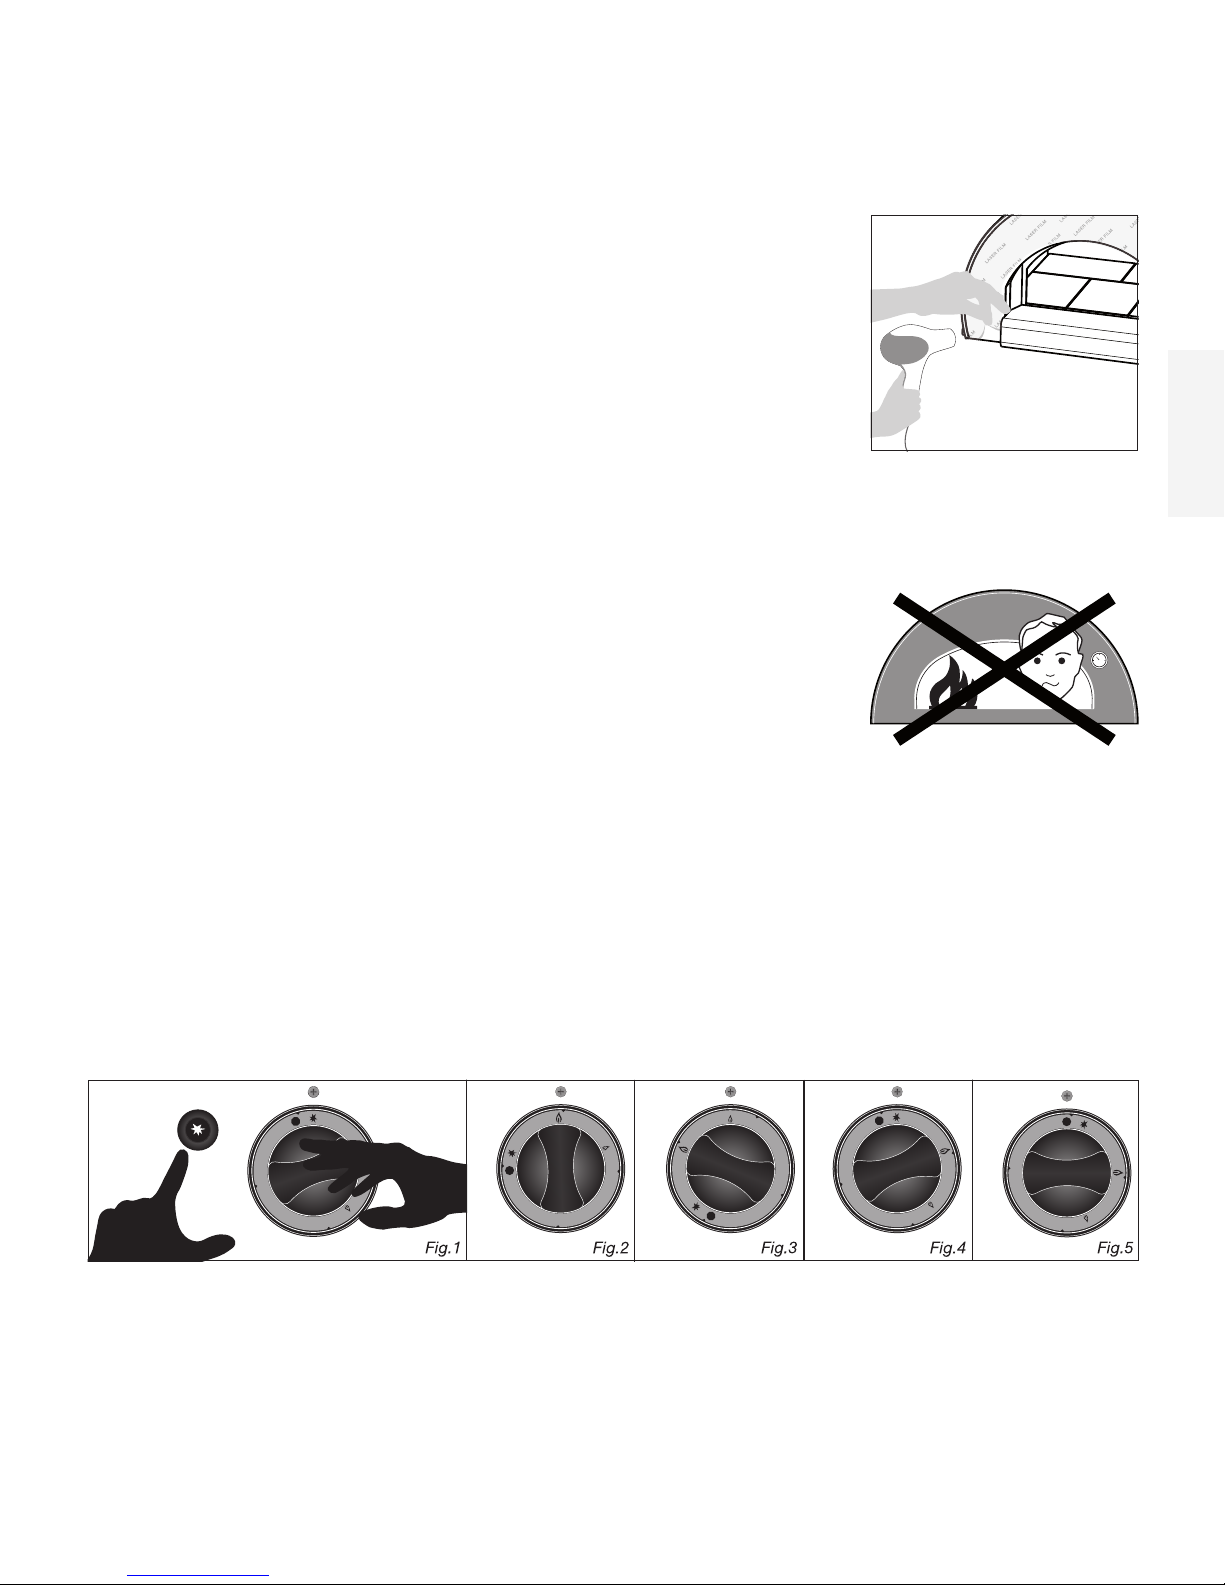
- Per motivi di sicurezza tenere fuori dalla portata dei bambini e degli animali domestici.
- Tenere eventuali cavi elettrici e tubi di alimentazione carburante lontano dalle superci calde.
- Per effetto della temperatura il colore delle superci può variare.
- Posizionare il forno su una supercie piana e stabile e lontana da forti rafche di vento, il forno non deve essere
mai collocato su superci in legno o altre superci inammabili e sotto tetti o tettoie in materiale combustibile
non protetti.
- Non utilizzare il forno in caso di funzionamento anomalo o sospetto di rottura.
- Non spostare il forno a gas durante l’utilizzo o quando è caldo.
- Non appoggiarsi né appoggiare oggetti al forno, potrebbe esserne compromessa la stabilità.
- Questo forno è stato progettato esclusivamente per uso all’aperto e non deve mai essere utilizzato in garage,
portici, verande chiuse o coperte.
- Non cercare mai di estinguere le amme con acqua.
- Non spegnere il forno gettando acqua all’interno.
- Non usare amme libere vicino al forno.
- Non riporre nelle vicinanze bombole di gas non utilizzate.
- Non colorare o applicare nessun oggetto sul forno.
- Non usare carbone, legna o roccia lavica, o combustibile differente dal gas GPL.
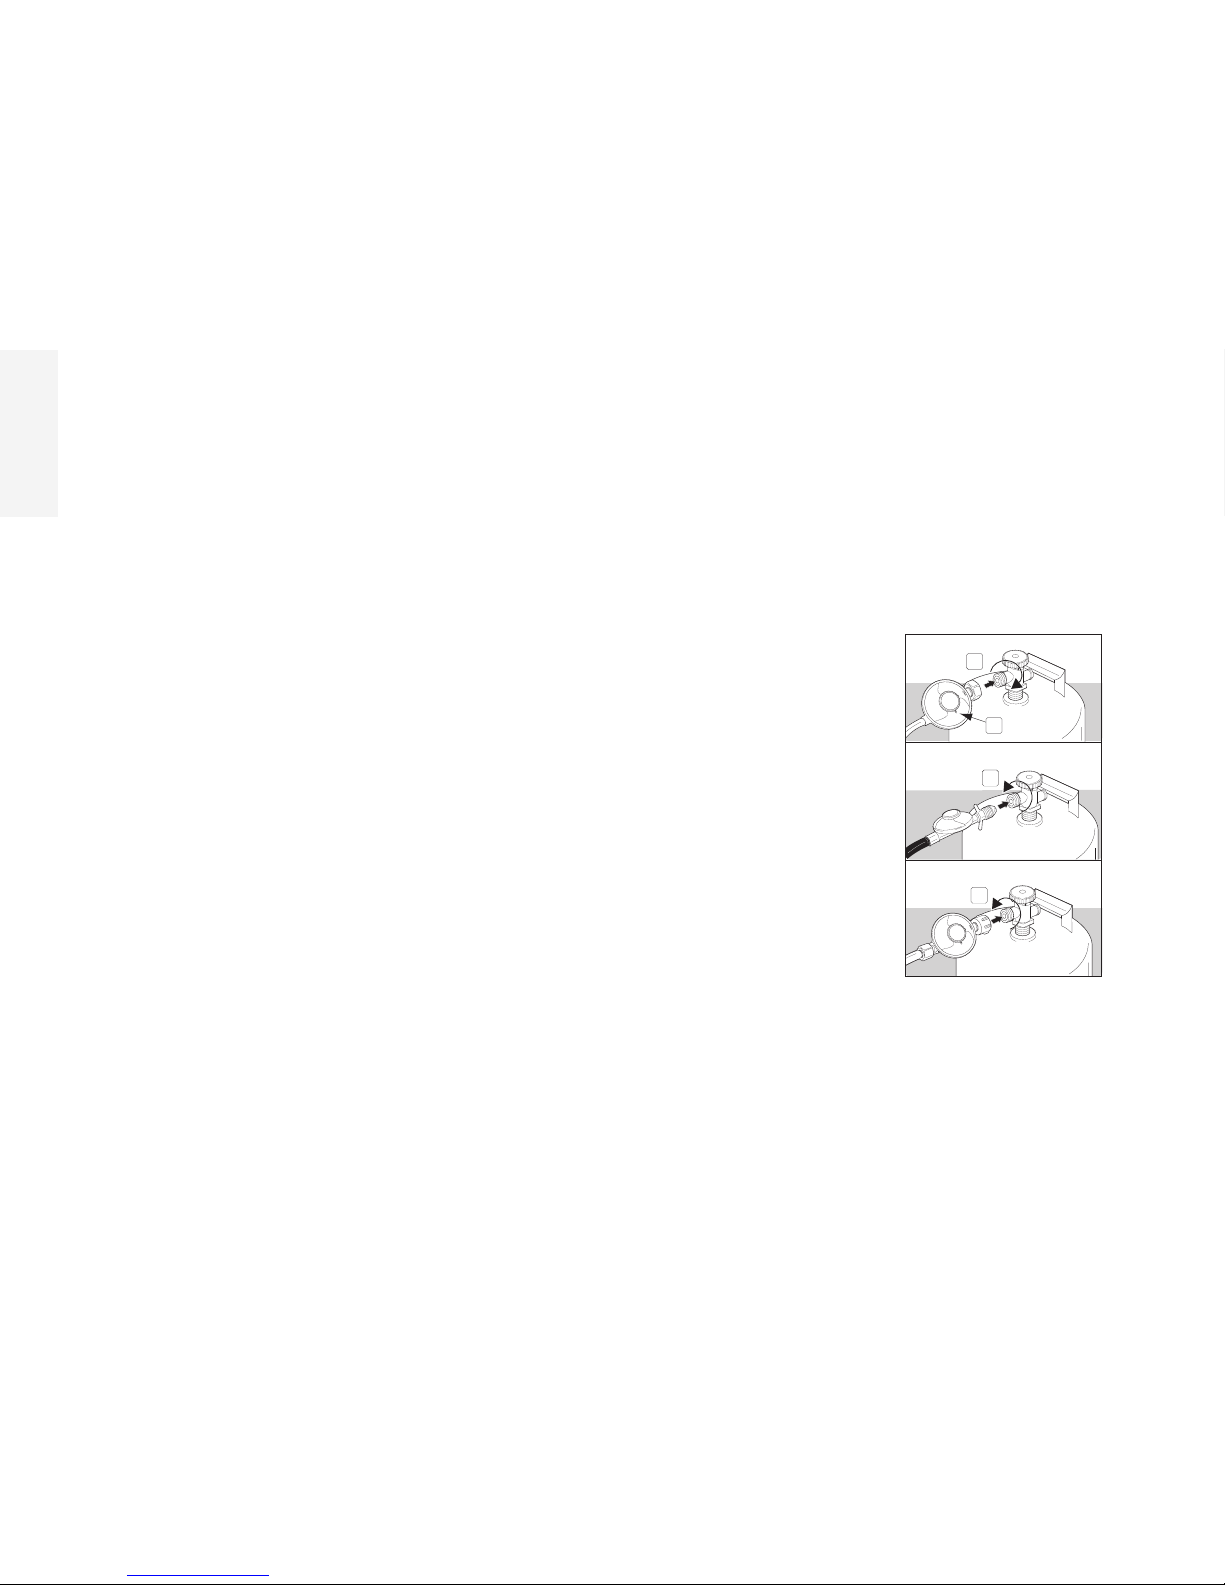
- Per l’allacciamento del regolatore, seguire le istruzioni.
- Dopo un periodo di inattività vericare che non vi siano perdite di gas e che i bruciatori non siano ostruiti.
- Eventuali materiali inammabili non devono trovarsi nel raggio di 100 cm dal forno.
- Nel caso di ammate incontrollate, spostare il cibo lontano dalle amme no al loro spegnimento.
- Nel caso in cui il grasso prendesse fuoco, spegnere il gas e lasciare lo sportello chiuso no a quando il fuoco si
estingue.
- IL GAS PROPANO LIQUIDO (GPL) NON E’ METANO. E’ pericoloso convertire o cercare di utilizzare il metano in
unità alimentate a gas propano liquido. In tal caso la garanzia non sarà più valida.
- Una bombola di gas arrugginita o ammaccata potrebbe essere pericolosa e deve essere controllata dal proprio
fornitore di apparecchi a gas. Non utilizzare bombole di gas con valvola danneggiata.
- Anche una bombola di gas apparentemente vuota potrebbe contenere ancora gas. Questa andrà quindi tra-
sportata e conservata tenendo conto di ciò.
- Durante l’utilizzo del forno indossare o guanti da cucina resistenti al calore.
- Le parti sigillate dal costruttore non devono essere modicate dall’utilizzatore.

9
IT
CONSIGLI PER L’USO
- Rimuovere la pellicola protettiva prima dell’accensione, per facilitarne il di-
stacco, utilizzare aria calda (es. Asciugacapelli).
- Qualsiasi modica apportata all’apparecchio è potenzialmente pericolosa.
- Utilizzare solo tubi essibili a bassa pressione e regolatori consentiti dalla
normativa vigente.
- Per la sostituzione dei regolatori di pressione e dei tubi essibili utilizzare i
pezzi indicati dal costruttore.
- Prima di ogni utilizzo controllare che il tubo essibile non presenti tacche,
crepe, abrasioni o tagli. Se il tubo essibile risulta in qualche modo danneg-
giato, non utilizzare il forno.
- Manovrare lo sportello impugnando i manici.
ACCENSIONE
- Si raccomanda di controllare tutti gli allacciamenti del gas prima dell’utilizzo
del forno.
- Non chinarsi sul forno durante l’accensione del gas; tenersi con il viso ed il
corpo ad una distanza non inferiore a 50 cm dallo sportello del forno.
- Al momento dell’accensione la bocca del forno deve essere aperta.
- La manopola di controllo del gas deve essere in posizione di zero, Fig.8.
1. Per accendere la amma pilota occorre pigiare e ruotare la manopola assieme al pulsante che fa scoccare la
scintilla per l’accensione della amma pilota, Fig.1. La prima accensione può risultare difcoltosa in quanto
occorre un certo tempo per far si che esca tutta l’aria contenuta nel tubo di collegamento. Occorre insistere
nché sulla testa della pilota si saranno accese tre amme.
2. Pigiare e ruotare in senso antiorario la manopola e posizionarla sulla amma alta posizione Fig.2.
3. Pigiare e ruotare la manopola e posizionarla sulla amma bassa posizione Fig.3.
4. Per spegnere la amma del bruciatore principale e lasciare acceso solo il pilota occorre posizionare la mano-
pola sulla stella Fig.4.
5. Per spegnere completamente il bruciatore principale e la amma pilota occorre posizionare la manopola sul
pallino nero Fig.5.
- Se la amma non si accende, rilasciare la manopola riportandola in “posizione di zero”, attendere circa 3 minuti
e ripetere la procedura di accensione.
- Non tenere mai acceso a massimo per più di 20 minuti.
- Non superare la temperatura limite di 400°C.
- In nessun caso si dovrà tentare di scollegare il tubo del gas o altri raccordi durante l’utilizzo del forno.
- Non toccare le superci esterne e la canna fumaria durante l’uso, potrebbero surriscaldarsi.

1
2
3
4
10
IT
CONSIGLI PER L’USO
- Il GPL ha un peso superiore a quello dell’aria. Eventuali perdite di GPL potrebbero raccogliersi in basso evitan-
done la dispersione.
- La bombola di GPL deve sempre essere installata, trasportata e riposta in posizione verticale. Maneggiare con
attenzione e non lasciar cadere le bombole di GPL.
- Non tenere mai una bombola di gas di ricambio vicino al forno a gas.
- Non lasciare né trasportare mai le bombole di GPL in luoghi in cui le temperature possono raggiungere i 50 °C
(troppo calde da maneggiare. Ad esempio: non lasciare la bombola in auto in giornate molto calde).
- Trattare le bombole di GPL “vuote” con la stessa attenzione di quelle piene. Anche se nella bombola non c’è
più liquido potrebbe sempre essere rimasto del gas in pressione. Chiudere sempre la valvola della bombola
prima di scollegarla.
- Assicurarsi che il regolatore sia stato montato con il foro di sato girato verso il basso, in modo da non racco-
gliere l’acqua. Assicurarsi che il foro non sia ostruito da sporco, grasso, insetti etc.
- Si raccomanda di controllare tutti gli allacciamenti del gas prima dell’utilizzo del forno.
- Assicurarsi che la valvola della bombola di GPL o del regolatore sia chiusa. La sostituzione della bombola deve
essere fatta lontano da fonti di calore e accensione.
A. Collegare la bombola di GPL.
a) Avvitare il regolatore NON in dotazione alla bombola ruotando in senso orario (1).
Installare il regolatore in modo che il foro di sato (2) sia rivolto verso il basso.
b) Avvitare il regolatore alla bombola ruotando in senso antiorario (3) (4).
B. Posizionare la bombola a terra, dietro il vano portaoggetti.
C. Ruotare la bombola di GPL in modo che l’apertura della valvola sia rivolta verso
la parte posteriore del forno.
D. Collegare il tubo di gomma NON in dotazione posteriormente al forno al raccordo
portagomma (a), ssandolo con le fascette di sicurezza in dotazione.
Utilizzare un regolatore di pressione adeguato (non fornito in dotazione) con porta-
ta di 10kg/h e funzionamento a G30/G31 di 28..30/37 mbar, e un tubo DN 12mm CE
EN14800.
- E’ consigliabile sostituire il tubo del gas ogni 2-3 anni.
- Non attorcigliare il tubo essibile.
- La lunghezza del tubo essibile non deve superare 1,5 metri.
CONSERVARE IL FORNO
- Se il forno a gas non viene utilizzato chiudere la valvola di alimentazione della bombola di gas.
- Se il forno a gas viene riposto in un locale chiuso, scollegare l’alimentazione del gas. La bombola del gas deve
essere lasciata all’esterno in una zona ben ventilata.
- Nel caso in cui la bombola non venga rimossa dal forno a gas, riporre l’intero dispositivo e la bombola in una
zona esterna ben ventilata.
- Le bombole a gas devono essere riposte all’esterno in posizione ben ventilata e fuori dalla portata dei bambini.
Le bombole non utilizzate NON devono essere riposte in edici, garage o altri luoghi chiusi.
CONSIGLI SULL’UTILIZZO DI UNA BOMBOLA A GAS GPL

250 °C
300 °C
350 °C
220 °C
020’ 50’ 80’ 120’ min
°C
Temperature e tempi per la cottura
11
IT
COTTURA
- Preriscaldare sempre il forno prima di cucinare; riscaldare per 5-10 minuti, o no a quando il termometro rag-
giunge i 300-330 C°
- Calcolare un tempo maggiore di cottura per le giornate fredde o ventilate o ad elevate altitudini. Calcolare un
tempo di cottura inferiore se la temperatura esterna è particolarmente elevata.
- I tempi di cottura variano in base alle condizioni atmosferiche o alla quantità, dimensioni e forma del cibo da
cuocere.
- In base alle condizioni di cottura può rendersi necessario regolare la manopola del bruciatore per raggiungere la
giusta temperatura di cottura.
CONSIGLI PER LA COTTURA DELLA PIZZA
Dopo circa 15 minuti dall’accensione, con la manopola del bruciatore al massimo e lo sportello chiuso si raggiun-
ge la temperatura ideale per cuocere una ottima pizza napoletana (con maggiore grado di umidità):
- temperatura aria di 400°C,
- temperatura piano refrattario pari a 350°C.
Una volta raggiunta la temperatura ottimale basta regolare il bruciatore in posizione minimo e aprire lo sportello, il
forno manterrà la temperatura costante e sarà possibile infornare le pizze.
- Vericare che non vi siano accumuli di grasso, e, se presenti, rimuoverli per evitare che prendano fuoco.
- Durante la cottura, non chinarsi sul forno aperto e non appoggiare le mani o le dita sul bordo anteriore del for-
no.
- Se il gas si spegne durante la cottura, chiudere la manopola ed il rubinetto del gas. Attendere cinque minuti
prima di riaccendere la amma del gas.
- Durante la cottura il forno avrà alte temperature, pertanto, non dovrà mai essere spostato né lasciato
- incustodito.

12
IT
MANUTENZIONE PULIZIA E STIVAGGIO
- Spegnere il forno a gas e attendere che si raffreddi prima di pulirlo.
- Per pulire il forno non utilizzare detersivi per forno, detergenti abrasivi (detersivi per cucina) o contenenti prodot-
ti agli agrumi, ne’ pagliette abrasive.
- Il bruciatore a gas deve essere pulito aspirando periodicamente in modo accurato i residui della cottura.
- Durante la pulizia di valvole e bruciatori, fare attenzione a non danneggiare il bruciatore.
Termometro - pulire con acqua calda e sapone con una paglietta in plastica morbida.
Forno - rimuovere eventuali residui dai bruciatori con una spazzola.
Non allargare i fori dei bruciatori (aperture).
Superci in acciaio inox - lavare con uno straccio morbido e una soluzione di acqua e sapone. Fare attenzione
a stronare seguendo la bratura dell’acciaio inox. Non utilizzare detersivi contenenti acidi, acquaragia o xilolo.
Risciacquare bene dopo aver pulito il forno.
COME MANTENERE INALTERATO L’ACCIAIO INOX
Il far brillare l’acciaio inox è cosa facile. Basta lavarlo con acqua e sapone, sciacquare con acqua ed asciugare
completamente. Nel caso di residui particolarmente resistenti, è possibile usare una spazzola non in metallo.
RICOVERO INVERNALE
Si consiglia di riporre il forno al coperto e all’asciutto nei mesi invernali per proteggerlo dagli agenti atmosferici.
Altrimenti è consigliato un telo impermeabile traspirante. Prima di riporre il forno si consiglia inoltre di ingrassare
leggermente le parti metalliche con olio di vaselina per evitare che si corrodano.
Al primo riutilizzo vericare che non vi siano anomalie nel funzionamento.
PULIZIA E SMONTAGGIO DEL BRUCIATORE
Il bruciatore a gas deve essere pulito aspirando periodicamente in modo accurato i residui della cottura.
Durante la pulizia di valvole e bruciatori, fare attenzione a non danneggiare il bruciatore.
Prima di procedere alla pulizia occorre estrarre il bruciatore dal forno eseguendo la seguente procedura:
1. Estrarre la manopola anteriore (a).
2. Svitare la vite di ssaggio (b).
3. Togliere il carter di protezione (c) svitando le 2 viti.
4. Estrarre la scatola gas (d) no a scoprire il collegamento dei cavi di accensione piezoelettrica (e).
5. Scollegare i due cavi di accensione piezoelettrica. Se necessario rimuovere il carter di protezione svitando la
vite (f), e rimuovere quindi il bruciatore.
Per rimontare il bruciatore basta eseguire la procedura in senso inverso.

13
IT
RISOLUZIONE ANOMALIE
SE IL FORNO SI RAFFREDDA PRESTO
- Vericare che nel forno non si inltri umidità e acqua.
- Potrebbe trattarsi di prima accensione o accensione dopo lunga inattività.
- Evitare di fare un fuoco repentino a breve, che non scalderebbe a fondo il forno.
- Vericare che il bruciatore sia funzionante e chiudere quindi lo sportello.
SE IL FORNO NON CUOCE COME VOI DESIDERATE
- Assicuratevi che il forno sia alla temperatura giusta.
- Fare fuoco per circa 10 minuti con amma alta.
- Assicuratevi che il forno mantenga la temperatura scelta per tutta la durata della cottura; usate lo sportello
come regolatore di potenza oltre al regolatore di amma: aprire e chiudere per determinare l’aumento o l’abbas-
samento della temperatura.
- Contattateci direttamente per un consiglio di un esperto sul sito www.alfaliving.it
Alfa Living non risponde per venature, crepe, cavillature del piano, perché caratteristica intrinseca di tale materia-
le.
GARANZIA
Alfa Living, con la presente, garantisce l’acquirente originale del forno Dolce Vita GPL contro difetti di materiale o
di lavorazione dalla data dell’acquisto comprovata da scontrino o fattura per 2 (due) anni se utilizzato conforme-
mente alle istruzioni stampate fornite con il forno.
SI RICHIEDE DI CONSERVARE LO SCONTRINO
O LA FATTURA D’ACQUISTO
NON GARANTITI
La garanzia non viene applicata nelle seguenti opzioni:
1. Asperità, difetti minimi e differenze cromatiche nella vernice.
2. Difetti causati da uso errato o negligente e da un’installazione non corretta.
3. Modica dei colori e formazione di corrosione e ruggine causate da fenomeni atmosferici o da un utilizzo
inappropriato di prodotti chimici.
4. Difetti causati da modiche, utilizzo diverso da quello previsto, danni intenzionali e nel caso in cui il prodotto
non sia più nella condizione riscontrata alla consegna.
5. Danni causati da una mancanza di manutenzione regolare o da manutenzione e riparazione non conformi
6. Danni causati dal trasporto.
7. Danni dovuti a causa di forza maggiore.
8. Normale usura del bruciatore, termometro, accensione, elettrodi, cavo di accensione, tubo del gas e tavelle
refrattarie.
9. I costi di montaggio e trasporto in relazione alla garanzia.
10. Danni causati da usura dovuta ad un uso professionale (in alberghi, ristoranti, manifestazioni, ecc.)
11. Danni dovuti al superamento della temperatura limite di 400 °C.
12. Lo sportello non è in garanzia.

14
EN
CAUTION
BEFORE USING YOUR GAS FIRED PIZZA OVEN, PLEASE FOLLOW THE INSTRUCTION BELOW.
IF YOU SMELL GAS:
1. Close the gas.
2. Extinguish free ames.
3. Open the oven door.
THE GAS ESCAPE COULD CAUSE FIRE OR EXPLOSIONS CAUSING SERIOUS INJURIES OR DAMAGES TO
OBJECTS. IN CASE OF A GAS LEAK, DO NOT LIGHT THE OVEN AND DETERMINE THE REASON FOR MAL-
FUNCTION IN ORDER TO PREVENT FIRE AND/OR EXPLOSION.
- Always use heat resistant utensiles while cooking. Plastic spoons, forks, tongs etc and other similar materials
will not withstand the high temperatures in your oven and should be avoided.
- Always keep children and pets away from the oven during use. The oven temperatures can be extremely high
and can cause severe burns.
- Keep electric cables and fuel supply pipes far from hot surfaces.
- The colour of oven surfaces can change due to high temperatures.
- Always place the oven on a level surface and out of strong winds. Never place the oven on wood or ammable
surfaces during operation and it has not to be used in garages, in porches or verandas closed or covered.
- Do not use the oven in case of malfunction.
- Do not move the oven when it is in use or hot.
- Do not lean against the oven or lay objects on it, in order to not compromise its stability.
- This oven has been design only for the outside use and it has not to be used in garages, in porches or verandas
closed or covered.
- Never extinguish the ames with water.
- Do not extinguish res using water .
- Do not use open ames near the oven.
- Do not place empty gas cylinders near the oven.
- Do not paint or apply anything on the oven.
- Do not use coal, wood, briquettes and lava rock, do not use any fuel different from LGP gas.
- Please follow the instructions for the connection of the regulator.
- After a period of non-use, please check for gas leaks or burner obstructions.
- Any ammable materials must be at least 100 cm /39,3 in far from the oven.
- Should a grease re occur, turn the gas off and close the oven door until the re is out.
- The liqueed petroleum gas (LGP) is not natural gas. The conversion or attempted use of natural gas in a LGP
unit is dangerous and will void your warranty.
- A rusty or dented gas cylinder may be hazardous and must be controlled by your gas supplier. Do not use gas
cylinders with a damaged valve.
- Even an apparently empty cylinder could still contain gas. The cylinder should be transported and stored ac-
cordingly.
- During operation, use heat resistant mittens or cooking gloves.
- All parts sealed by the manufacturer must not be tampered.

15
EN
TIPS FOR USE
- Remove the protective lm before the rst red.
- Any alteration of the product may be potentially hazardous .
- Use only low pressure exible pipes and regulators allowed by the current
regulation.
- To replace the pressure regulators and exible pipes please refer only to
the manufacturer instructions.
- Check hose each time before using the oven for nicks, cracking, abra-
sions or cuts. If the hose is found to be damaged in any way,do not use
the oven.
- Move the oven door holding the wood handles.
LIGHTING
- Check all gas connections for gas leak before starting your oven.
- Do not lean over the oven when lighting. Keep your face and body at least
50 cm / 19,6 inches far from the oven door.
- When lighting the oven, the oven door must be open.
- The burner control knob must be in the off position before turning on the
LGP cylinder valve.
1. 1. To ignite the pilot light, press and rotate the knob together with the piezo ignition button that discharges a
spark to ignite the pilot light, Pic.1. Lighting the pilot light for the rst time can be difcult as it takes time for the
air in the connection tube to be expelled and gas to ow out.
2. Persist until three ames are lit on the head of the pilot light.
3. 2. Press and rotate the knob anti-clockwise and turn it on high ame, Pic.2.
4. 3. Press and rotate the knob and position it on low ame, Pic.3.
5. 4. To extinguish the ame on the main burner and leave only the pilot light on, turn the knob to the star Pic.4.
6. 5. To turn the main burner and the pilot light off completely, turn the knob to the black dot Pic.5.
- If the ame does not light, leave the knob turning it to “off position” (black point). Wait 3 minutes and try again.
- Do not keep on oven at the maximum power more than 20 minutes.
- Do not exceed the limit temperature of 400°C / 752°F.
- During operation, never disconnect the gas regulator or other junctions.
- Do not touch external surfaces and the chimney ue during oven operation.

1
2
3
4
16
EN
TIPS FOR USE
- The LPG is heavier than air. Any LPG leak may collect in low areas and prevent dispersion.
- The LPG cylinder must be installed, transported and stored in upright position. LGP cylinders should not be
dropped or handled roughly.
- Never place the replacement gas cylinder near the gas red oven.
- Never store or transport the LGP cylinder in places where temperatures can reach 50°C/112° F (they are too hot
to hold by hand for example: do not leave the LGP cylinder in a car during a hot day).
- Treat “empty” LGP cylinders with the same care as when full. Even when the LGP tank is empty of liquid there
still may be gas pressure in the cylinder. Always close the cylinder valve before disconnecting.
- Be sure the regulator is assembled with the vent hole pointed downward so that it will not collect water. Make
sure the vent hole is free of dirt, grease, insects etc.
- Check all gas connections for gas leak before starting your oven.
- Make sure the valve of the LGP cylinder or regulator is closed. The LGP cylinder must be replaced away from
any source of heat or ignition.
A. Connect the LGP cylinder.
a) Screw the cylinder regulator (NOT included) turning clockwise (1).Position the
regulator so that the vent hole (2) faces down.
b) Screw the gas cylinder regulator turning anti-clockwise (3) (4).
B. Place the cylinder on the oor behind the compartment.
C. Place the LGP cylinder so the valve opening faces to the rear of the oven.
D. Connect the hosepipe (NOT included) to the junction (a) at the back of the oven.
Fix the hosepipe with the included security straps.
Use a pressure control adapter (not supplied) with a ow rate of 10kg/h and G30/
G31 operation at 28..30/37 mbar, utilize a pipe ND 12mm CE EN14800.
- It is advisable to substitute the gas hose every 2-3 years.
- Do not twist the exible gas hose.
- The length of the exible hose should not exceed 1,5 m / 59 In.
WHERE TO KEEP THE OVEN
- If the gas red oven is not used please close the gas cylinder feeding valve.
- If the gas red oven is stored in an enclosed area, please disconnect the gas feeding. The gas cylinder must be
placed outside in a well aired area.
- If the gas cylinder is not disconnected from the oven, please put them outside in a well aired area.
- The gas cylinder must be placed outside in a well aired place and must be kept away from the children reach.
The unused cylinders must NOT be stored in buildings, garages or other enclosed places.
LPG CYLINDER USES ADVICES

250 °C
300 °C
350 °C
220 °C
020’ 50’ 80’ 120’ min
°C
Temperatures and cooking times
17
EN
COOKING
- Always preheat your oven before cooking. Heat for 5-10 minutes or until the thermometer reaches 300-330 °C /
572-626 °F.
- Calculate a longer cooking time in cold or windy days or high altitudes. Calculate a shorter cooking time if the
external temperature is particularly hot.
- The cooking time depends on the weather conditions or the quantities, dimensions and shape of food.
- Depending on the cooking condition, you may need to regulate the burner knob in order to reach the right co-
oking temperature.
ADVICE FOR COOKING PIZZA
Wait for around 15 minutes after lighting the oven, with the burner knob at maximum and the door closed to reach
the optimum temperature for cooking an excellent Neapolitan pizza (with an higher moisture degree):
- air temperature of 400°C,
- refractory oor temperature of 350°C.
Once the optimal temperature is reached, turn the burner to the minimum position and open the door. The oven
will maintain a constant temperature and you can begin inserting the pizzas.
- Check and remove any residual grease to avoid a grease re.
- While cooking, do not lean over the open oven or place hands or ngers on the front edge of the oven.
- If the ames go out during cooking, turn off the gas knob and the gas cylinder knob. Wait ve minutes before
lighting up the oven again.
- During operation the oven can reach high temperatures. Do not move the oven or leave it unattended while
- burning.

FRONT BACK
18
EN
CLEANING MAINTENANCE AND STORAGE
- Switch off the gas red oven and wait it to cool down before cleaning.
- To clean the oven don’t use traditional oven detergents,abrasive detergents, (kitchen detergents) or detergents
containing citrus extracts, nor use abrasive steel woll.
- The gas burner must be cleaned periodically, and remove any food residue.
- Make sure to not damage the valves and the burners during cleaning.
Thermometer - Clean with warm water, soap and a soft cloth.
Oven - Remove any residual food from the burner with a brush. Do not enlarge burner orices.
Stainless steel surfaces - Wash with a soft cloth and soapy water. Pay attention to follow the grain of the stainless
steel. Do not use detersives with acids, turpentine or xylene. Rinse well after cleaning. Making the steel shine is
very easy. Just wash it with soapy water, rinse out with water and dry properly. In case of resistant residuals, you
can use a non-metal brush.
HOW TO MAINTAIN UNALTERED THE STAINLESS STEEL
Making the steel shine is very easy. Just wash it with water and soap, rinse out with water and dry properly. In
case of resistant residuals, it is possible use a non metal brush.
COLD SEASON
We suggest to store the oven during the cold season in an enclosed dry area to protect it from weathering. Before
storage, lightly lubricate the metal parts with Vaseline oil in order to avoid corrosion. After storage, please check
for any malfunction.
GAS BURNER DISASSEMBLY AND CLEANING
The gas burner should be cleaned periodically by carefully sucking up any cooking residues.
When cleaning valves and burners, be careful not to damage the burner.
Before cleaning is necessary to remove the burner from the oven by running the following procedure:
1. Remove the knob (a).
2. Unscrew the screw (b).
3. Remove the cover (c) by unscrewing the 2 screws.
4. Remove the gas box (d) to discover the connection of the cable piezoelectric ignition (e).
5. Disconnect the two cables piezoelectric ignition. If necessary, remove the protective casing unscrewing the
screw (f), and then remove the burner.
To replace the burner just perform the procedure in reverse.

19
EN
ANOMALIES RESOLUTION
IF THE OVEN COOLS DOWN TOO QUICKLY
- The cause could be either from the rst starting or starting the oven after a long period of inactivity.
- Avoid making a small or fast re that would not heat the oven to capacity.
- Verify that water and/or humidity have not inltrated the oven.
- Please verify that the burner is working well, so close the door.
IF THE OVEN DOES NOT COOK AS DESIRED
- Check that the oven has reached the right temperature.
- Make a re with approximately 10 minutes of high ame.
- Ensure the oven maintains the desired temperature for the duration of the cooking time; use the door to adjust
the heat intensity as well as the ame adjuster: open and close the door to raise or lower the temperature as
necessary.
- May you need advise from an expert, please feel free to contact us on our web site www.alfaliving.It
Alfa Living does not reply to questions regarding micro-veins, cracks, or breaks in the oven oor, because these
are intrinsic characteristics of the refractory material itself.
WARRANTY INFORMATION
Alfa Living hereby warrants to the original purchaser of this LPG Dolce Vita Gas oven, against material or process-
ing defects, from date of purchase, proved by receipt, for 2 (two) years, when assembled and operated in accord-
ance with the printed instructions with the oven.
PLEASE RETAIN YOUR SALES RECEIPT OR INVOICE
NOT INSUREDS
Warranty is considered void in the following circumstances:
1. Small defects, slight imperfections and differences of paint.
2. Defects arising from an improper or careless use and wrong installation.
3. Color alteration, corrosion and rust formation resulting from exposure to atmospheric agents or improper use
of chemical products.
4. Defects resulting from physical alteration, improper use or intentional damage,and is no longer in the same
condition it was when it left the factory.
5. Damages resulting from lack of regular maintenance or improper maintenance and repair.
6. Damages caused by transport.
7. Damages arising from circumstances beyond our control.
8. Normal wear of burner, thermometer, ignition electrodes, ignition cable, gas pipe, gas pressure regulator and
refractory oor pieces.
9. Costs for assembly and delivery of parts under warranty.
10. Damages resulting from professional use (in hotel, restaurant, events, etc.)
11. Damages resulted from the exceeding of the limit temperature of 400 °C / 752 °F.
12. The door is not covered by the guarantee.

20
ES
ADVERTENCIAS
LEA DETENIDAMENTE LA SIGUIENTE INFORMACIÓN PARA UNA INSTALACIÓN CORRECTA Y UN FUNCIONA-
MIENTO ADECUADO DEL HORNO.
SI PERCIBE OLOR A GAS:
1. Cierre el gas.
2. Apague las llamas desnudas que pueda haber.
3. Abra la puerta del horno.
LOS ESCAPES DE GAS PUEDEN PROVOCAR INCENDIOS O EXPLOSIONES Y CAUSAR LESIONES PERSO-
NALES O INCLUSO LA MUERTE, ASÍ COMO DAÑOS A LA PROPIEDAD. SI LLEGAN A PERCIBIRSE OLORES
EXTRAÑOS O ESCAPES DE GAS, NO ENCIENDA EL HORNO PARA EFECTUAR NINGUNA VERIFICACIÓN, YA
QUE DE LO CONTRARIO PUEDEN PROVOCARSE RIESGOS DE INCENDIO O EXPLOSIÓN.
- Use cubiertos y utensilios resistentes a las altas temperaturas.
- Por motivos de seguridad mantenga el producto fuera del alcance de los niños y de animales domésticos.
- Mantenga los cables eléctricos y los tubos de alimentación del carburante lejos de las supercies calientes.
- El color de la supercie puede variar debido a la temperatura.
- Coloque el horno en una supercie plana y protegido contra ráfagas fuertes de viento, el horno no debe colo-
carse sobre supercies de madera u otros materiales que puedan prenderse, nunca bajo techos o cobertizos
de material combustible no protegidos.
- No utilice el horno en caso de funcionamiento anómalo o sospechas de daño.
- No desplace el horno de gas durante el uso ni cuando está caliente.
- No se apoye ni apoye objetos en el horno; de lo contrario puede comprometer su estabilidad.
- Este horno ha sido diseñado exclusivamente para el uso al aire libre y no debe utilizarse bajo ninguna circuns-
tancia en garajes, porches, soportales o cobertizos.
- Nunca intente apagar las llamas con agua.
- No apague el horno echando agua en su interior.
- No use llamas desnudas cerca del horno.
- No guarde cerca del horno cilindros de gas no utilizados.
- No pinte el horno ni le aplique ningún objeto.
- No use carbón, leña, pellets o roca lávica, o combustibles distintos del gas GLP.
- Para la conexión del regulador, siga las instrucciones.
- Tras un período de inactividad, compruebe que no haya escapes de gas y que los quemadores no estén obs-
truidos.
- Asegúrese de que no haya material inamable en un radio de 100 cm alrededor del horno.
- En caso de llamas incontroladas, aleje los alimentos hasta que se apaguen.
- Si la grasa se prende, apague el gas y deje la puerta cerrada hasta la extinción completa del fuego.
- El propano o gas licuado de petróleo (GLP) no es metano. Es peligroso convertir o intentar utilizar metano en
unidades alimentadas con GLP. En ese caso, la garantía perderá toda validez.
- Un cilindro de gas oxidado o abollado puede ser peligroso y debe someterse a inspección por parte del pro-
veedor de equipos de gas. No utilice cilindros de gas que presenten una válvula dañada.
- También un cilindro de gas aparentemente vacío puede contener gas. Transpórtelo y consérvelo teniendo en
cuenta esta advertencia.
- Durante el uso del horno, use manoplas o guantes de cocina resistentes al calor.
- Las partes selladas por el fabricante no deben ser modicadas por el usuario.
Table of contents
Languages: