Alfa Network NEXT 30 IRON User manual


NEXT 30 Iron Mod.7806
Get To Know Your Iron
FIGURE3
1.Pilotlight 6.Waterinletcover
2. Handgrip. 7.Spraynozzle
3. Steam Control knob 8. Temperature Indicator
4. Water spray button 9. Self-Cleaning knob.
5. Burst of Steam button 10. Temperature dial.
11. Back cover rubber
Hints for Ironing
1. Sort out the articles to be ironed according to the type of fabric. This will minimize the frequency
of temperature adjustment for different garments.
2. Test ironing a small area on the backside or inside the garment if you are unsure about the type of
fabric. Start with a low temperature and increase gradually.
3. Wait for about three minutes before ironing heat sensitive fabrics. Temperature adjustment needs
certain time to reach the required level no matter it is higher or lower.
4. Delicate fabrics such as silk, wool, velour, etc. are best ironed with an ironing cloth to prevent
shine marks.


NEXT 30 Iron Mod.7806
4. Connect the iron to a suitable mains supply outlet, pilot light will glow for a second then
goes off.
5. Turn the Temperature Dial in clockwise direction to 'MAX' position; Pilot light will
glow to indicate that the iron is heating up.
6. Pilot light goes off, when the required temperature is reached.
7. Move the Steam Control knob to position; steam starts to come out from the vents on the
sole plate.
8. Begin first time ironing with an old towel.
9. When the water tank is empty and there is no more steam can be produced; the preparation work
is completed. The iron is ready for proper use.
Spray
This function can be used at any time and it does not affect other
functions
1. Fill the iron as described in the section of How to Fill Water.
2. Aim the nozzle to the garment.
3. Press the Spray Button.
Note: It may be necessary to press the spray button a few times to
start the function.
Dry Ironing
1. Connect the iron with a suitable mains supply outlet,pilot light will glow for a second then
goes off..
2. Move the steam control knob to .
3. Turn the Temperature Dial in clockwise direction,select ‘x’ (1 dot), ‘xxx’ (2 dot) or 'xxx ’(3 dot)
or to MAX position according to the recommendation of garment label.
4. Pilot light will glow to indicate that the iron is heating up.
5. When the required temperature is reached,pilot light goes off.
6. The iron is ready to use.
7. After use,turn the Temperature Dial in anti-clockwise direction to ‘MIN’; then switched off.
8. Disconnect the iron from mains supply outlet.
9. When the iron gets cool completely, store it vertically in a safe place.
Steam Ironing
1. Fill the iron as described in the section of How to Fill Water.
FIGURE 5

NEXT 30 Iron Mod.7806
2.SettheSteamcontrolknobto .
3. Connect the iron with a suitable mains supply outlet,pilot light
will glow for a second then goes off.
4. Turn the Temperature Dial in clockwise direction to a position MAX
with indication (Do not use 1 dot or 2 dots setting for steam ironing).
5. Pilot light will glow to indicate that the iron is heating up.
6. Pilot light goes off when the required temperature is reached.
7. The iron is ready for use.
8. Adjust steaming by moving the steam control knob on forward and backward.
9. After use,turn the Temperature Dial in anti-clockwise direction to ‘MIN’;
then switched off.
10. Disconnect the iron from mains supply outlet.
11. After every use, follow the instructions in Draining the water.
Burst of Steam in Horizontal Position
This function provides extra amount of steam to remove stubborn wrinkles.
1. Fill the iron as described in the section of How to Fill Water.
2. Connect the iron with a suitable mains supply outlet,
pilot light will glow for a second then goes off.
3. Turn the Temperature Dial to ‘xxx (3-dot) or MAX’ position.
4. Pilot light will glow to indicate that the iron is heating up.
5. Pilot light goes off when the required temperature is reached.
6. The iron is ready to use.
7. Press the Burst of Steam Button.
8. Steam will penetrate into the garment to remove the wrinkles.
9. Wait for few seconds before pressing the Burst of steam button
again when there are stubborn wrinkles.
Note:It may be necessary to press the burst of steam button few times
to start this function.For optimum steam quality, do not operate the
Burst of steam more than three times in succession.
FIGURE 6

NEXT 30 Iron Mod.7806
Burst of Steam in Vertical Position
Warning: Do not apply steam on any clothes or fabrics that are being worn by human or pets.
Temperature of steam is very high.
This function provides extra amount of steam to remove wrinkles on delicate garments in hanging
position, hanging curtains, or other hanging fabrics.
1. Fill the iron as described in the section of How to Fill Water.
2. Connect the iron with a suitable mains supply outlet,
pilot light will glow for a second then goes off.
3. Turn the Temperature Dial to ‘‘xxx (3-dot)’ or 'MAX' position.
4. Pilot light will glow to indicate that the iron is heating up.
5. Pilot light goes off when the required temperature is reached.
6. The iron is now ready for use.
7. Hold the iron between 15 to 30 centimeters away from the garment.
8. Press the Burst of steam button.
9. Steam will penetrate into the garment to remove the wrinkles.
10. Wait for few seconds before pressing the Burst of Steam Button again.
Note:It may be necessary to press the burst of steam button few times to start this function.For
optimum steam quality, do not operate the Burst of steam more than three times in succession.
FIGURE 8
FIGURE 7

NEXT 30 Iron Mod.7806
Self-Cleaning
This function removes the scales and minerals built up in the Steam Chamber. The iron will remain
in the best condition if this function is performed at least once a month or more regularly depending
on the hardness of the water used.
1. Fill the iron as described in the section of How to Fill Water, Fill the water tank up to half.
2. Set the Steam control knob to .
2. Place the iron on a surface in upright standing position.
3. Connect the iron to mains supply outlet, pilot light will glow for a second then goes off.
4. Turn the Temperature Dial in clockwise direction to 'MAX' position.
5. Pilot light will glow to indicate the iron is heating up.
6. Pilot light will go off when the required temperature is reached.
7. Wait for one more cycle; pilot light glows and goes off.
8. Turn the Temperature Dial in anti-clockwise direction to ‘MIN’.
9. Disconnect the iron from mains supply outlet.
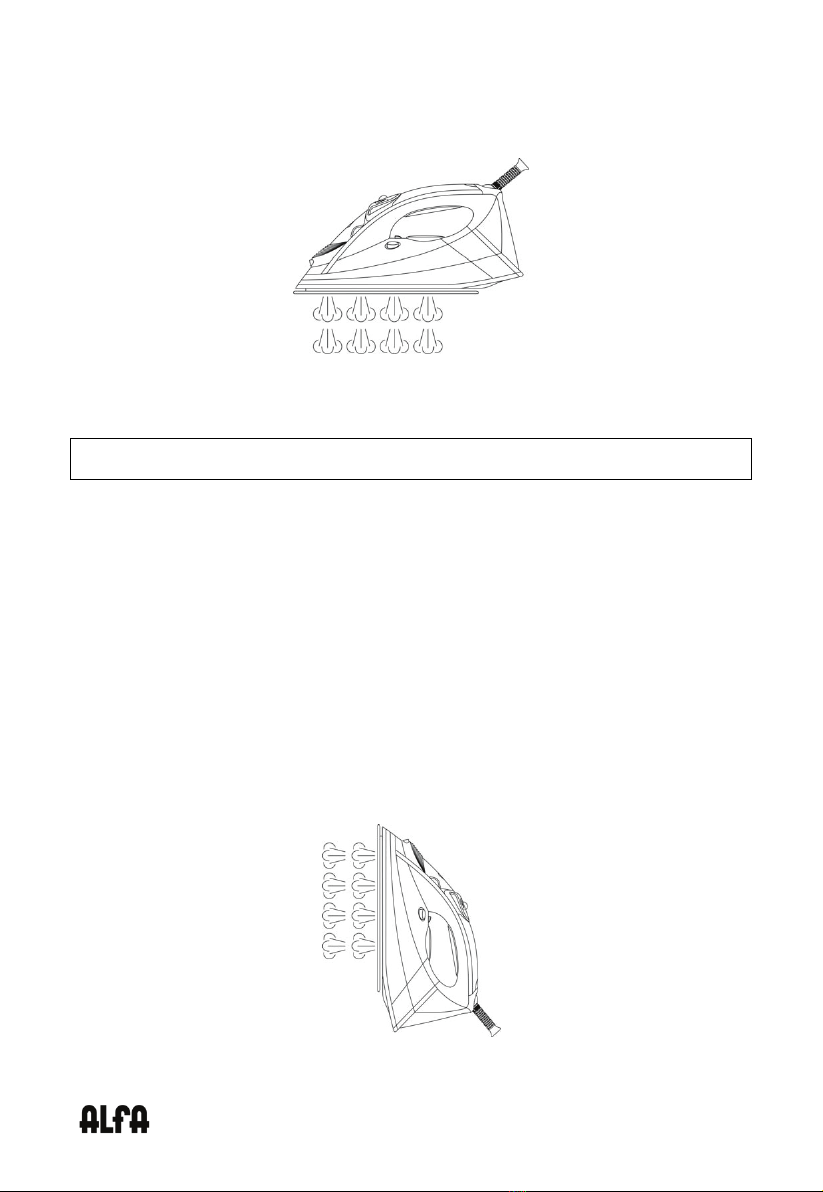
10. Hold the iron horizontally over a sink.
11. Press and hold the Self-Cleaning button.
12. Steam and boiling hot water will emit from the holes on the sole plate which contains scales
and minerals that deposited in Steam Chamber in previous uses.
13. Gently move the iron back and forth until the water tank is empty.
14. When Self-Cleaning is completed, release the Self-Cleaning button.
15. Rest your steam iron back on its heel rest and allow to fully cool down.
16. Wipe the soleplate with a cold damp cloth.
Caution: Keep skin/body away from the hot water.
Anti-Drip
1. Anti-drip system, which is designed to prevent the water escapes from
the soleplate automatically when the iron is too cold.
2. During use, the anti drip system may emit a loud clicking sound,
particularly during heat-up or whilst cooling down. This is perfectly
normal and indicates that the system is functioning correctly.
FIGURE 9

NEXT 30 Iron Mod.7806
Build-in Anti-scale System
The build-in anti-scale cartridge is designed to reduce the build-up of lime scale which occurs
during steam ironing. This will prolong the working life of your iron.
Note; The anti-scale cartridge will not completely stop the natural process of lime scale build-up.
Auto Shut-off Features:
The Auto shut-off feature will operate automatically when the iron is connected to a mains supply
outlet but immobile for a period of time.
Auto shut-off in horizontal
1. The iron will switch off automatically at around 30 seconds if the iron is immobile in the
ironing
position (horizontal).
2. Pilot light blinks, indicating the iron is in Auto-Off mode.
3. To use again, simply move the iron it will be ON.
Auto-shut off in vertical
1. The iron will switch off automatically at around 8 minutes if the iron is left on its
heel rest position(vertically).
2. Pilot light blinks, indicating the iron is in Auto-Off mode
3. To use again, simply move the iron it will be ON.
Note: The iron will take about 60 seconds to reach its previous soleplate
temperature.
Draining the Water
1. Disconnect the iron from the mains supply outlet.
2. Move the Steam control knob to position.
3. Open the water inlet cover and remove water from water tank as Fig 10.
4. shake it to remove any remaining water out of filling hole.
5. When the iron gets cool completely, store it vertically in a safe place.
FIGURE 10


NEXT 30 Iron Mod.7806
Trouble-shooting of the Steam Iron
If your Steam Iron does not perform well, please check the following points.
Problem Possible Cause Solution
The iron is plugged in but the
soleplate is cold.
Socket doesn’t work. Plug-in other socket
There is a connection problem. Check if the plug is
connected to the wall socket
properly.
The temperature setting has been
set to MIN
Set the temperature setting to
the required temperature.
No Steam comes out There may not be enough water in
the water tank
Fill the water tank,see “HOW
TO FILL THE WATER”
Steam Knob is in Steam Off
position.
Turn the Steam Control Knob
to Steam ON position
No Steam Burst come out There may not be enough water in
the water tank
Fill the water tank,see “HOW
TO FILL THE WATER”
First time usage. Press the Burst of Steam
Button few times until the
Steam burst comes out.
No Spray mist come out There may not be enough water in
the water tank.
Fill the water tank,see “HOW
TO FILL THE WATER”
First time usage. Press the Spray Button few
times until the spray mist
come out.
Soleplate's heat is not enough Incorrect Temperature setting. Turn the Temperature Dial
with respect to the garment.
Water leakage from soleplate Steam Iron's heat is not enough to
produce the steam.
Steam control knob is in 'ON'
position while refilling the water
tank.
Set Temperature Dial to
Max position with
indication.
Turn the steam control knob
to (steamoff)
position before refilling the
water tank.
Damage textile Over heat. Follow the garment guide or
test on the inside of the hem
of the garment.
Flakes and impurities come out
from the soleplate holes during
ironing.
You have been using hard water,
which has caused scale flakes to
develop inside the soleplate.
Perform SELF-CLEANING
once or more times. see
“SELF-CLEANING”.

NEXT 30 Iron Mod. 7806
NEXT 30 IRON
PLANCHAA VAPOR
Manual de instrucciones

NEXT 30 Iron Mod. 7806
2
IMPORTANTE
Por motivos de seguridad, lea atentamente las instrucciones antes de utilizar el
electrodoméstico por primera vez. Guarde las instrucciones para futuras consultas.
El electrodoméstico está diseñado para su uso doméstico y solo puede utilizarse siguiendo
estas instrucciones.
El electrodoméstico genera vapor a alta temperatura. Utilícelo con cuidado y advierta a otros
usuarios sobre los posibles peligros.
QUÉ DEBE HACER
1. Compruebe que la tensión indicada en la placa identificadora se corresponde con el
suministro eléctrico local.
2. Desenrolle y enderece los cables antes de utilizar el electrodoméstico.
3. Coloque el electrodoméstico sobre una superficie firme y lisa.
4. La plancha debe utilizarse y permanecer sobre una superficie estable.
5. Evite que los cables entren en contacto con la base.
6. El enchufe del cable de suministro debe extraerse de la toma de corriente antes de llenar de
agua el depósito.
7. Mantenga los electrodomésticos fuera del alcance de los niños o de personas enfermas o
débiles. No les deje utilizar los electrodomésticos sin ser vigilados.
8. Cuando coloque la plancha sobre su soporte, asegúrese de que la superficie sobre la que se
encuentra el soporte es estable.
9. Si los cables están dañados, deben ser cambiados por el fabricante, su responsable de
mantenimiento o una persona cualificada para evitar peligros.
10. Vacíe el depósito de agua después de utilizar la plancha.
11. Los niños no deben jugar con el electrodoméstico.
12. Este electrodoméstico puede ser utilizado por niños mayores de 8 años y por personas con
discapacidad física, sensorial o mental o que carecen de experiencia y conocimiento si se les
vigila o si han recibido instrucciones sobre el uso seguro del electrodoméstico y comprenden
los peligros que implica dicho uso.
13. Mantenga la plancha y el cable fuera del alcance de los niños menores de 8 años cuando está
encendida o se está enfriando.
QUÉ NO DEBE HACER
1. No deje el electrodoméstico desatendido cuando esté conectado a la toma de corriente
2. No utilice un alargador de cable a menos que la autoridad competente lo autorice.
3. No vierta perfume, vinagre ni demás líquidos químicos en el depósito de agua porque
pueden dañar seriamente el electrodoméstico.
4. No sumerja el electrodoméstico en agua ni en otros líquidos.
5. No utilice el electrodoméstico si está dañado o funciona mal.
6. La plancha no puede utilizarse si se ha caído, si tiene muestras visibles de daños o si gotea.
7. No toque el soporte de la plancha durante el planchado ni inmediatamente después. ¡Está
caliente!
8. No enrolle los cables alrededor de la plancha ni de la base hasta que se haya enfriado
completamente.
9. No intente abrir la plancha ni desmontar sus piezas. En su interior, no hay ninguna pieza
reparable.
10. No deje que los niños toquen el electrodoméstico cuando esté planchando.
11. No deje que los niños realicen labores de limpieza y mantenimiento en el electrodoméstico
sin ser supervisados.
12. Durante el planchado o inmediatamente después, no toque las superficies que llevan el


NEXT 30 Iron Mod. 7806
4
Conozca su plancha
Figura 3
1. Luz piloto 6. Tapa del depósito de agua
2. Asa 7. Boquilla pulverizadora
3. Mando de control de vapor 8. Indicador de temperatura
4. Botón pulverizador de agua 9. Botón de autolimpieza
5. Botón de ráfaga de vapor 10. Rueda de temperatura
11. Goma de cubierta trasera
Consejos de planchado
1. Agrupe las prendas que va a planchar por tipo de tejido. Así no necesitará ajustar tantas
veces la temperatura para cada tipo de prenda.
2. Pruebe planchando una pequeña zona del revés o del interior de la prenda si no conoce con
seguridad el tipo de tejido. Comience con una temperatura baja y vaya subiéndola
gradualmente.
3. Espere unos tres minutos antes de planchar los tejidos sensibles al calor.Se requiere algo de
tiempo para ajustar la temperatura al nivel deseado, independientemente de si es más alta o
más baja.
4. Se recomienda planchar tejidos delicados como la seda, la lana o el terciopelo con un paño
especial para evitar brillos.

NEXT 30 Iron Mod. 7806
5
LEA LA ETIQUETA DE LA PRENDA Y SIGA LAS INSTRUCCIONES DE PLANCHADO DEL
FABRICANTE, QUE A MENUDO APARECEN EN FORMA DE SÍMBOLOS SIMILARES A
ESTOS:
Cómo llenar el depósito de agua
El depósito de esta plancha puede llenarse en posición horizontal.
1. Desenchufe la plancha de la toma de corriente.
2. 2. Desplace el mando de control de vapor a la posición .
3. Abra la tapa del depósito (Ver Fig. 4).
4. Vierta agua por el orificio hasta alcanzar el nivel MÁX indicado en el depósito de agua.
5. Cierre la tapa y seque cualquier vertido de agua en la plancha.
Nota: Para obtener los mejores resultados, se recomienda utilizar agua desmineralizada o destilada.
No utilice agua químicamente descalcificada ni demás líquidos.
Primer planchado
1. Retire las películas protectoras o adhesivos de la base y de la caja, si los hubiere.
2. Desenrolle y enderece los cables antes de utilizar el electrodoméstico.
3. Llene el depósito de agua según se describe en el apartado “Cómo llenar el depósito de agua”.
4. Enchufe la plancha a la toma de corriente. La luz piloto brillará un segundo y, después, se
apagará.
5. Gire la rueda de temperatura en el sentido de las agujas del reloj, hasta la posición 'MAX'. La
Fi
g
ura 4
Ajuste de control de la temperatura
.Acetato
. Elastano
. Poliamida
. Polipropileno
. Poliéster
. Seda
. Triacetato
. Viscosa
. Lana
. Algodón
. Lino

NEXT 30 Iron Mod. 7806
6
luz piloto brillará, indicando que la plancha se está calentado.
6. La luz piloto se apaga cuando se alcanza la temperatura necesaria.
7. Desplace el mando de control de vapor a la posición . El vapor empieza a salir de los
orificios de la base.
8. Cuando planche por primera vez, hágalo con una toalla vieja.
9. Cuando el depósito de agua esté vacío y no pueda generarse más vapor, la plancha ya estará
lista para su uso.
Pulverizador de agua
Esta función puede utilizarse en cualquier momento y no afecta a ninguna otra función
1. Llene el depósito de agua según se describe en el apartado “Cómo llenar el depósito de
agua”.
2. Dirija la boquilla hacia la prenda.
3. Pulse el botón del pulverizador.
Nota: Es probable que necesite pulsar el botón varias veces para activar esta función.
Figura 5
Planchado en seco
1. Enchufe la plancha a la toma de corriente. La luz piloto brillará un segundo y, después, se
apagará.
2. Desplace el mando de control de vapor a la posición .
3. Gire la rueda de temperatura en el sentido de las agujas del reloj y seleccione x(un punto),
xx(dos puntos) o xxx (tres puntos) o la posición MAX siguiendo las recomendaciones de la
etiqueta de la prenda.
4. La luz piloto brillará, indicando que la plancha se está calentado.
5. La luz piloto se apaga cuando se alcanza la temperatura necesaria.
6. Ahora, la plancha está lista para su uso.
7. Después de utilizar la plancha, gire la rueda de temperatura en el sentido contrario a las
agujas del reloj, hasta la posición ‘MIN’ y, a continuación, apague la plancha.
8. Desenchufe la plancha de la toma de corriente.
9. Cuando la plancha se haya enfriado por completo, guárdela en posición vertical en un lugar
seguro.
Planchado al vapor
1. Llene el depósito de agua según se describe en el apartado “Cómo llenar el depósito de
agua”.

NEXT 30 Iron Mod. 7806
7
2. Desplace el mando de control de vapor a la posición .
3. Enchufe la plancha a la toma de corriente. La luz piloto brillará un segundo y, después, se
apagará.
4. Gire la rueda de temperatura en el sentido de las agujas del reloj, hasta la posición MAX (No
utilice los ajustes de un punto y dos puntos para el planchado al vapor).
5. La luz piloto brillará, indicando que la plancha se está calentado.
6. La luz piloto se apaga cuando se alcanza la temperatura necesaria.
7. Ahora, la plancha está lista para su uso.
8. Ajuste el vapor desplazando el mando de control de vapor hacia delante y hacia atrás.
9. Después de utilizar la plancha, gire la rueda de temperatura en el sentido contrario a las
agujas del reloj, hasta la posición ‘MIN’ y, a continuación, apague la plancha.
10. Desenchufe la plancha de la toma de corriente.
11. Después de cada uso, siga las instrucciones del apartado de Drenaje del agua.
Figura 6
Ráfaga de vapor en posición horizontal
Con esta función, se suministra más vapor para eliminar arrugas difíciles.
1. Llene el depósito de agua según se describe en el apartado “Cómo llenar el depósito de
agua”.
2. Enchufe la plancha. La luz piloto brillará un segundo y, después, se apagará.
3. Gire la rueda de temperatura a la posición xxx (3 puntos) o MAX.
4. La luz piloto brillará, indicando que la plancha se está calentado.
5. La luz piloto se apaga cuando se alcanza la temperatura necesaria.
6. Ahora, la plancha está lista para su uso.
7. Pulse el botón de ráfaga de vapor.
8. El vapor penetrará en la prenda y eliminará las arrugas.
9. Espere unos segundos antes de volver a pulsar el botón de ráfaga de vapor cuando haya
arrugas difíciles.
Nota: Es probable que necesite pulsar el botón varias veces para activar esta función. Para obtener
la cantidad adecuada de vapor, no aplique más de tres ráfagas de vapor seguidas.

NEXT 30 Iron Mod. 7806
8
Figura 7
Ráfaga de vapor en posición vertical
Advertencia: No aplique vapor en prendas o tejidos utilizados en ese momento por personas o
animales. El vapor alcanza temperaturas muy altas.
Con esta función, se expulsa más vapor para eliminar arrugas de prendas delicadas colgadas,
cortinas colgadas u otros tejidos colgados.
1. Llene el depósito de agua según se describe en el apartado “Cómo llenar el depósito de
agua”.
2. Enchufe la plancha. La luz piloto brillará un segundo y, después, se apagará.
3. Gire la rueda de temperatura a la posición xxx (3 puntos) o MAX’.
4. La luz piloto brillará, indicando que la plancha se está calentado.
5. La luz piloto se apaga cuando se alcanza la temperatura necesaria.
6. Ahora, la plancha está lista para su uso.
7. Mantenga la plancha a 15 - 30 centímetros de la prenda.
8. Pulse el botón de ráfaga de vapor.
9. El vapor penetrará en la prenda y eliminará las arrugas.
10. Espere unos segundos antes de volver a pulsar el botón de ráfaga de vapor.
Nota: Es probable que necesite pulsar el botón varias veces para activar esta función. Para obtener
la cantidad adecuada de vapor, no aplique más de tres ráfagas de vapor seguidas.
Figura 8
This manual suits for next models
1
Table of contents
Languages: