All Medicus metene AGM-513S User manual
This summary is intended only as a
quick reference and is not a substitute
for Blood Glucose Monitoring
System User Manual. Please read the
entire User Manual before you begin
the test.
TEST SUMMARY
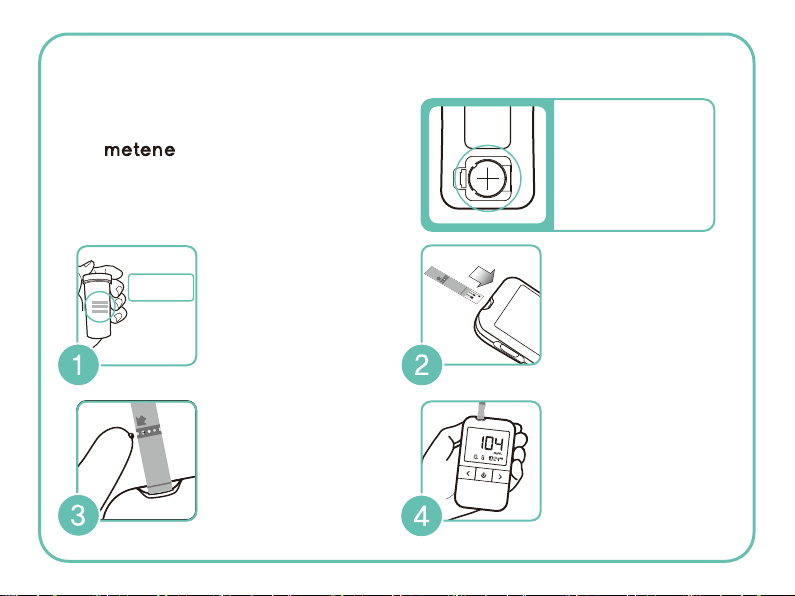
Check the expiration date
printed on the strip vial
label.
Insert a test strip. The
meter will
automatically turn on.
The blood glucose
result will be displayed
on the meter in just
5 seconds.
Apply the blood drop to
the side edge of the
yellow window of the test
strip.
Wait for the blood drop to
completely ll the yellow
window of the test strip
and then the meter will
begin the countdown.
Remove the battery
cover and put the
battery with “+” sign
facing up.
Lot No.:
Exp. Date:

Test Principle
The Blood Glucose Monitoring System is based on measurement of electric currents caused by
the reaction of glucose with the reagents on the gold electrode of the test strip. The blood sample is
drawn into the test strip's reaction chamber through capillary action. Glucose in the sample reacts with
glucose dehydrogenase and mediator on the test strip. This reaction creates electric currents. The
consequent electric currents are proportional to the glucose concentration in the blood and converted
to the equivalent glucose concentration by the algorithm programmed in the Meter.
LIMITATION
- The Blood Glucose Monitoring System is only for use with capillary whole blood.
- Inaccurate results may occur when in shock, hypotensive, hyperglycemic, or hyperosmolar state and with
or without ketosis.
- The Blood Glucose Monitoring System should not be used in critically ill patients, patients in
shock, dehydrated patients or hyper-osmolar patients.
- The Blood Glucose Monitoring System should not be for diagnosis of or screening for diabetes
mellitus.
Blood Glucose Monitoring System is intended to be used for the quantitative measurement
of glucose (sugar) in fresh capillary whole blood from ngertip. Blood Glucose Monitoring
System is intended to be used by a single person and should not be shared. It is intended for self-testing
outside the body (in vitro diagnostic use) by people with diabetes at home as an aid to monitor the
eectiveness of diabetes control.
Blood Glucose Monitoring System should not be used for the diagnosis of or screening for
diabetes. Blood Glucose Monitoring System is not for use in neonates.
Blood Glucose Test Strips are for use with Blood Glucose Meter to quantitatively
measure glucose (sugar) in fresh capillary whole blood samples drawn from the ngertips.
Control Solution is for use with Blood Glucose Meter and Test Strips to check that
the meter and test strips are working together properly.
Intended Use
PRECAUTIONS
- A hematocrit that is either very high (above 65%) or very low (below 20%) can cause false test results.
- Not for neonatal use.
- Dehydration may cause higher test results.
- The system has not been tested above 10,000ft.
- The Meter is designed for use only with Test Strips.
(manufactured by All Medicus Co., Ltd.)
- The Blood Glucose Monitoring System is calibrated to produce values equivalent to the
results on plasma specimens on a laboratory analyzer (YSI 2300 STAT Plus).
-The Blood Glucose Monitoring System should be used for 50~104℉(10~40℃).
- The Blood Glucose Monitoring System is for in vitro diagnostic use.
-Do not drop the meter.
-Do not disassemble, repair or remodel without consultation. The sensitive parts could be damaged
and the warranty will then become invalid.
- Handle all the reagents with care knowing that they are capable of transmitting infection.
- Used test strips, lancets and meter may be considered bio-hazardous waste in your area. Please contact
your health provider for instructions on how to discard them.
- The Blood Glucose Monitoring System are for single patient use only and for over the
counter use.
Carefully read and follow the instructions in the User Manual and package inserts for the test strips and
control solution and practice the testing procedures before using the Blood Glucose
Monitoring System. It is very important to follow the instructions in order to avoid an incorrect test
result that leads to improper therapy.
Take note of information and cautions throughout this User Manual.
This device is not intended for use in healthcare or assisted-use settings such as hospitals, physician oces,
or long-term care facilities because it has not been cleared by FDA for use in these settings, including for
routine assisted testing or as part of glycemic control procedures.
Use of this device on multiple patients may lead to transmission of Human Immunodeciency Virus (HIV),
Hepatitis C Virus (HCV), Hepatitis B Virus (HBV), or other bloodborne pathogens.
Precautions for Use
Other All Medicus Blood Glucose Meter manuals


