ALL POWER AMERICA PW3200 User manual
Pressure Washer
MODEL NO. PW3200
OWNER’S MANUAL

2 | ALL POWER™ PW3200 PRESSURE WASHER www.allpoweramerica.com
IMPORTANT INFORMATION
This manual contains important notations that
you need to know and understand to protect
YOUR SAFETY and to PREVENT EQUIPMENT
PROBLEMS.
READ AND UNDERSTAND ALL SAFETY PRECAUTIONS
IN THIS MANUAL BEFORE OPERATING. FAILURE
TO COMPLY WITH INSTRUCTIONS IN THIS MANUAL
COULD RESULT IN PERSONAL INJURY, PROPERTY
DAMAGE, AND/OR VOIDING YOUR WARRANTY.
ALLPOWER™ AMERICA WILL NOT BE LIABLE FOR ANY
DAMAGE DUE TO FAILURE OF COMPLYING THESE
INSTRUCTIONS.
This is a safety alert symbol. This is used to
alert you to potential personal injury hazard.
Obey all safety messages that follow this
symbol to avoid possible injury or death.
A WARNING indicates a hazardous
situation which, if not avoided, could result
in death or serious injury.
A NOTE indicates special precautions that
must be taken to avoid damage to the
machine or other property.
Congratulations on your purchase of an
All Power™PW3200 Pressure Washer!
All Power™designs and builds pressure washers with the consumer in mind. With
proper use and maintenance, this Pressure Washer will bring years of service. This
‘Owner’s Manual’ will provide you with a good basic understanding of the operation
and maintenance of this machine. Every effort has been made to ensure the
accuracy and completeness of the information in this package. We reserve the
right to change, alter and/or improve the product and this document at any time
without prior notice. WARNING
2ALL POWER PW3200 PRESSURE WASHER

ALL POWER™ PW3200 PRESSURE WASHER | 3
SAFETY INFORMATION .............................................4
Important Safety Tips...........................................4 - 5
Safety Features.......................................................... 6
Removing Pressure Washer from Carton .................. 6
COMPONENTS & FEATURES .....................................7
Parts Included............................................................ 7
Pressure Washer Features ......................................... 7
INSTALLATIONS .........................................................8
Installing the Wheel Kit ............................................. 8
Pressure Hose to Pump............................................. 8
Pressure Hose to Spray Gun...................................... 8
Connecting Spray Wand to Spray Gun ..................... 8
Selecting the Right Nozzle...................................8 - 9
Connecting Nozzles to Spray Wand.......................... 9
Connecting Water Supply to Pump .......................... 9
PRE-OPERATION ......................................................10
Adding Engine Oil................................................... 10
Adding Fuel............................................................. 10
TECHNICAL DATA ....................................................10
OPERATION..............................................................11
Start-up Procedure.................................................. 11
Starting Engine........................................................ 11
Using Detergents .................................................... 12
Cleaning Techniques ............................................... 12
Application of Soap or Degreaser....................12 - 13
Application of Wax.................................................. 13
MAINTENANCE........................................................13
Connections ............................................................ 13
Nozzle...................................................................... 13
Engine Maintenance................................................ 13
STORAGE .................................................................14
Pump Storage.......................................................... 14
Engine Storage....................................................... 14
NOTES......................................................................15
TROUBLESHOOTING.........................................16 - 17
NOTES...............................................................18 - 21
CONSUMER INFORMATION ....................................22
IdenticationNumberRecords ............................... 22
OWNER’S MANUAL | CONTENTS

4 | ALL POWER™ PW3200 PRESSURE WASHER www.allpoweramerica.com
4SAFETY INFORMATION | OWNER’S MANUAL
Read and understand all Safety Precautions
in this manual before operating. Failure to
comply with instructions in this manual could
result in personal injury, property damage
and/or voiding of your warranty. All Power
will not be liable for and damage because of
failure to follow these instructions.
Pressure Washer
The following safety precautions apply
whenever using, storing, or servicing your
pressure washer to reduce the possibility of
personal injury. Overlooking or ignoring these
precautions can lead to personal injury or
product damage.
SAFETY GUIDELINES - DEFINITIONS
This manual contains important information
that you need to know and understand in
order to protect YOUR SAFETY and to
PREVENT EQUIPMENT PROBLEMS. The
following symbols help you recognize this
information. Please read the manual and pay
attention to these sections.
SAVE THESE IMPORTANT SAFETY
INSTRUCTIONS!
A WARNING indicates a
certainty or strong possibility
of personal injury or death if
instructions are not followed.
WARNING
A CAUTION indicates a
possibility of equipment
damage if instructions are not
followed.
CAUTION
A NOTE indicates helpful
information.
WARNING
IMPROPER OPERATION OR MAINTENANCE OF
THIS PRODUCT COULD RESULT IN SERIOUS
INJURY AND PROPERTY DAMAGE. READ AND
UNDERSTAND ALL WARNINGS AND OPERATING
INSTRUCTIONS BEFORE USING THIS
EQUIPMENT. WHEN USING PRESSURE WASHER,
BASIC SAFETY PRECAUTIONS SHOULD ALWAYS
BE FOLLOWED TO REDUCE THE RISK OF
PERSONAL INJURY.
IMPORTANT SAFETY TIPS
• Thisequipmentisdesignedforspecic
applications. Do not modify or use for any
application other than which it is designed
for.
• Store the pressure washer in a well ventilated
area with the fuel tank empty. Fuel should
notbestorednearthepressurewasher.
• Never operate pressure washer under these
conditions:
a.Anoticeablechangeinenginespeed.
b.Anoticeablelossofpressure.
c.Enginemisres.
d.Smokeoramesarepresent.
e. Enclosed area.
f. Excessivevibration.
g.Rainorbadweather.
• Waterspraymustneverbedirectedtowards
people, pets, electric wiring or directly
towards the pressure washer.
• Do not allow the hose to come in contact
withthehotmufer.

ALL POWER™ PW3200 PRESSURE WASHER | 5
OWNER’S MANUAL | SAFETY INFORMATION 5
IMPORTANT SAFETY TIPS (cont’d)
• Equipmentmustbeplacedonarm
supporting surface.
• Removethesparkplugorcablefromthe
spark plug to prevent accidental starting
when not in use, or prior to detaching the
high pressure hose.
• Keep the pressure washer clean and free of
oil, mud and other foreign matter.
• Do not wear loose clothing, jewelry or
anythingthatmaybecaughtintheengine.
• Never direct spray at people or animals.
• Never allow children to operate pressure
washer at any time.
• Usebothhandstocontrolthewand.
• Do not touch the nozzle or water spray while
operating.
• Allhoseconnectionsmustbeproperly
sealed.
• In extremely cold conditions, prior to
starting,besureicehasnotformedinany
part of the pressure washer. Do not operate
under 40° fahrenheit.
• Use only recommended chemicals.
• Outdoor use only.
• Place pressure washer away from cleaning
site during operation.
• To prevent accidental discharge, the spray
gunshouldbesecuredbylockingthetrigger
when not in use.
• Do not run the pressure washer more than
5 minutes without depressing the trigger or
damage to the pump may occur.
• Check the pressure washers periodically for
damage, leaks or signs of deterioration. All
defectsshouldbecorrectedbefore
operating the pressure washer.
• Donottouchhotmufer.
• Service, operate and refuel under the
following conditions:
a. Good ventilation
b.Refuelthepressurewasherinawelllit
area.
c. Avoid fuel spills and never refuel while the
pressure washer is running.
d. Avoid any ignition source when refueling.
e. Use unleaded gasoline with a pump
octane rating of 90 or higher.
• Do not smoke near pressure washer.
6 | ALL POWER™ PW3200 PRESSURE WASHER www.allpoweramerica.com
SAFETY FEATURES
Thermal Relief Valve
A thermal relief valve is provided to protect
the pump from overheating if the spray gun is
closed for an extended amount of time or the
nozzlebecomesplugged.However,itis
intendedtobeusedasabackupsystemand
everyeffortshouldbemadetonotpermitthe
pump to heat up.
We recommend to turn the pressure washer
OFFifitwillnotbeusedformorethan5
minutes. This saves wear on the unit, reduces
fuel consumption and extends the life
ofthepumpbyavoidingoverheating.
Safety Lock Latch
To prevent accidental discharge of high
pressure water, the safety latch on the trigger
shouldbeengagedwheneverthepressure
washer is not in use.
Low-Oil Shutdown
Some engines are equipped with low-oil
shutdown systems. If the engine oil level
becomeslowerthanrequired,thepressure
washer will automatically shut off. Refer to the
engine manual for this feature. This protects
your pressure washer engine from operating
withoutproperlubrication.
If the pressure washer engine shuts off and
theoillevelisaccordingtospecication,
check to see if the pressure washer is sitting
on an angle that forces the oil to shift.
Place on even surface to correct this. If the
enginefailstostart,theremaynotbeenough
oil to deactivate the low oil level switch.
WARNING
Pump will overheat and may be damaged, or
cause damage if allowed to circulate more than
5 minutes.
Before Operation
NOTE: The engine and pump on your
pressure washer will often have improved
performance after a break-in period of
several hours.
YourPressureWasherrequiressomeassembly.
This unit ships from our factory without oil.
Itmustbeproperlyservicewithfuelandoil
beforeoperation.
If you have any questions regarding the
assemblyofyourPressureWasherormissing
parts, call our Customer Care Center at
1-888-896-6881. Please have your serial
numberandmodelnumberavailable.
Removing the Pressure Washer
from the Shipping Carton
1. Set the shipping carton on a solid,
atsurface.
2. Remove everything from the carton except
the pressure washer.
3.Carefullycuteachcorneroftheboxfrom
toptobottom.Foldeachsideatonthe
ground to provide a surface area.
4. Inspect for completeness of all loose parts
and components.
6SAFETY INFORMATION | OWNER’S MANUAL
ALL POWER™ PW3200 PRESSURE WASHER | 7
PARTS INCLUDED
Check all loose parts against the
following list:
- 10 in. Wheel................................... 2
- Frame Support...............................2
- Axle................................................ 2
- Carriage Bolt..................................4
- Flat Washer 10 mm ........................4
- Wingnut .........................................4
Other:
- Oil .............................0.63 qt. (0.6 L)
- Oil Funnel.......................................1
- Spark Plug Socket..........................1
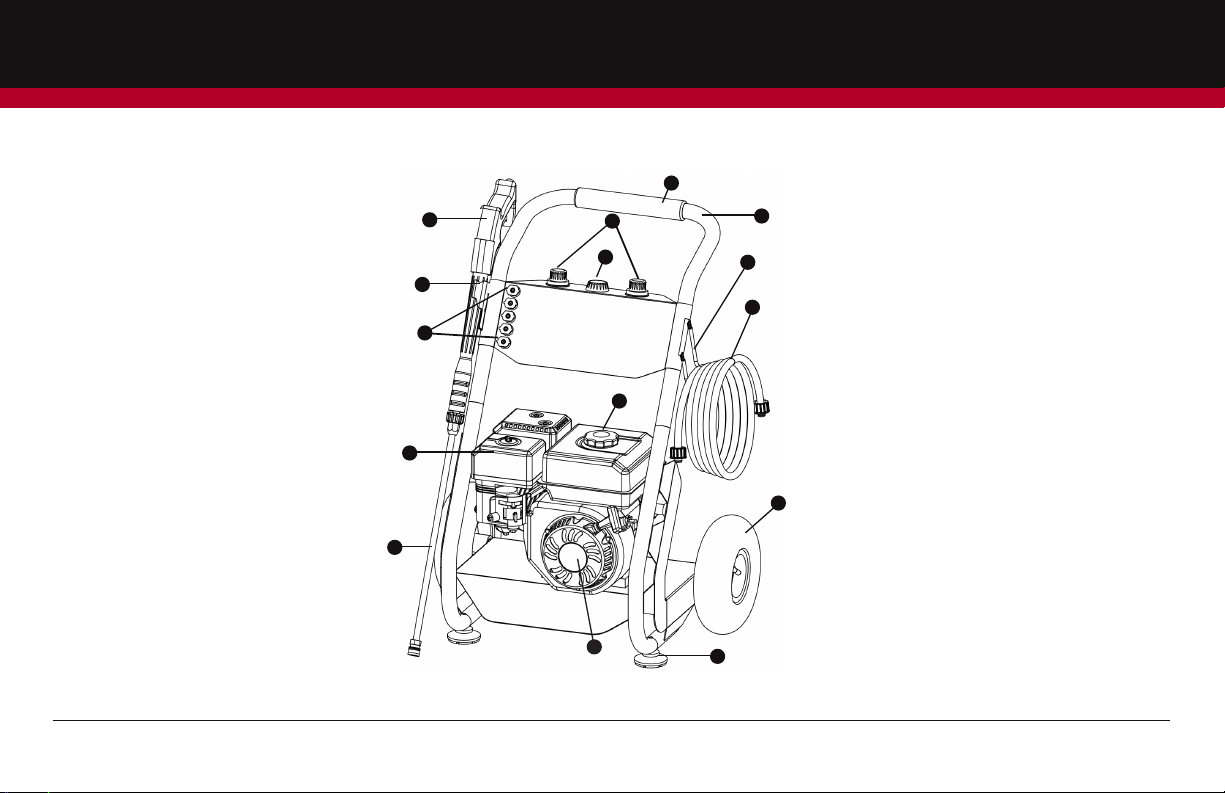
PRESSURE WASHER FEATURES:
1. Spray Wand
2. Spray Gun
3. Gun Holder
4. Pressure Nozzles (5)
5. Handle Grip
6. Handle
7. High Pressure Hose Holder
8. High Pressure Hose
9. Detergent Bottle Cap
10. Detergent Bottle Switch
11. Fuel Tank Cap
12. Air Filter
13. Recoil Starter
14. Wheel Kit
15. Feet
1
2
3
12
6
15
8
11
13
10
5
9
14
7
4
OWNER’S MANUAL | COMPONENTS & FEATURES 7
8 | ALL POWER™ PW3200 PRESSURE WASHER www.allpoweramerica.com
Installing the Wheel kit
1. Before adding oil to the engine, carefully
tip the pressure washer forward and
place on its front side.
2. Slide the axle through the washer and
front of wheel.
3. Slideanotherwashertothebackof
wheel and through the mount point on
the frame.
4. Repeat steps 2 and 3 to attach the
second wheel.
5. Assemblethehandletotheframe
tubing.
NOTE: Align threaded connections
carefully to prevent damaging threads
during assembly. Tighten connections
securely to prevent leaks during
operation.
PRESSURE HOSE TO PUMP
Connect the pressure hose to the pump
outletandFIRMLYtightenthenutbyhand.
NOTE: Do not use pressure hose from
another manufacturer.
PRESSURE HOSE TO SPRAY GUN
Connect the hose to the spray gun and FIRMLY
tightenthenutbyhand.
8
Owner’s Manual
Operating Connections
HIGH PRESSURE HOSE
• Attach the high pressure hose to the pressure washer by pulling back on the collar of
the quick-connect coupling on the hose and pushing it over the coupling half on the
pressure washer outlet.
NOTE: Do not use pressure hose from another manufacturer.
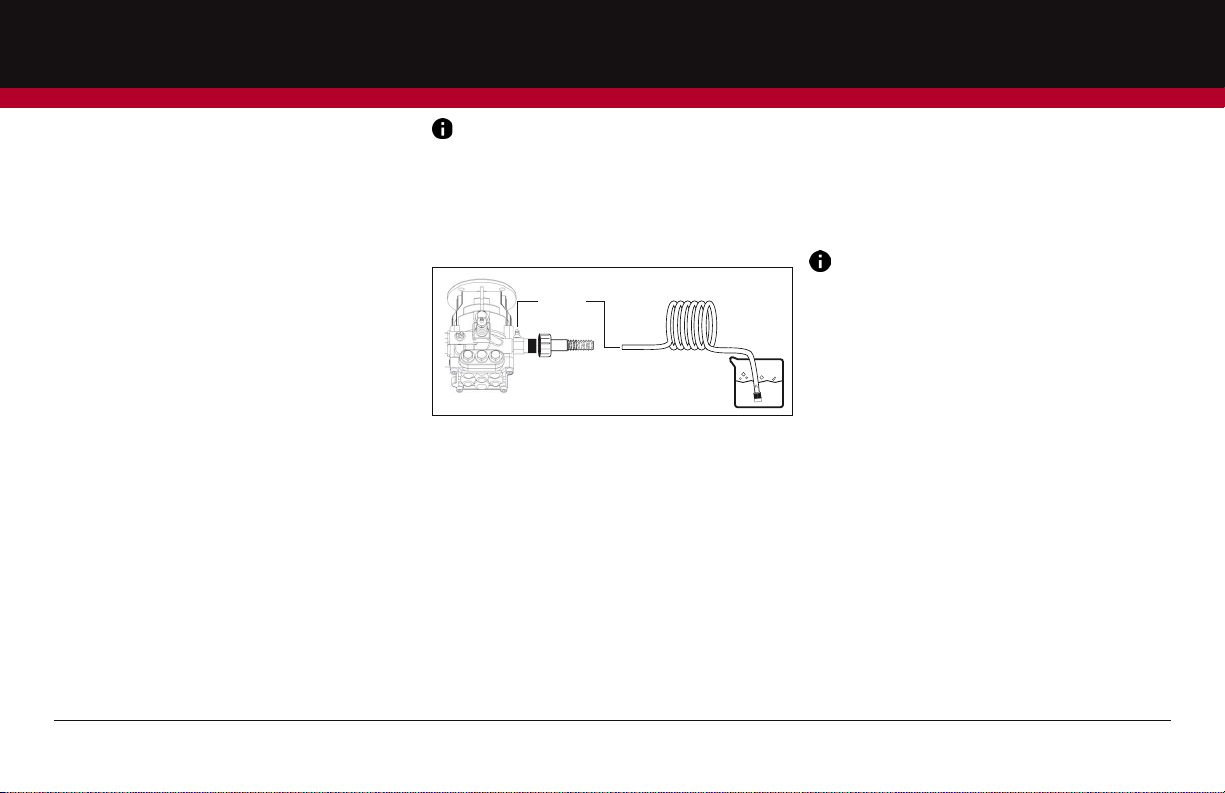
WATER CONNECTION
Before connecting the garden hose to your pressure washer, run water through the
garden hose (not supplied) to flush out any foreign matter.
• Attach garden hose quick-connect to the garden hose (see below).
• Then attach that to the quick-connect inlet on the pressure washer pump. Make sure
it locks into place by pulling back on the garden hose quick-connect collar and
inserting it into the quick-connect inlet.
NOTE: The water supply must supply a minimum of 4 gpm at 20 PSI, or the pump
can be damaged.
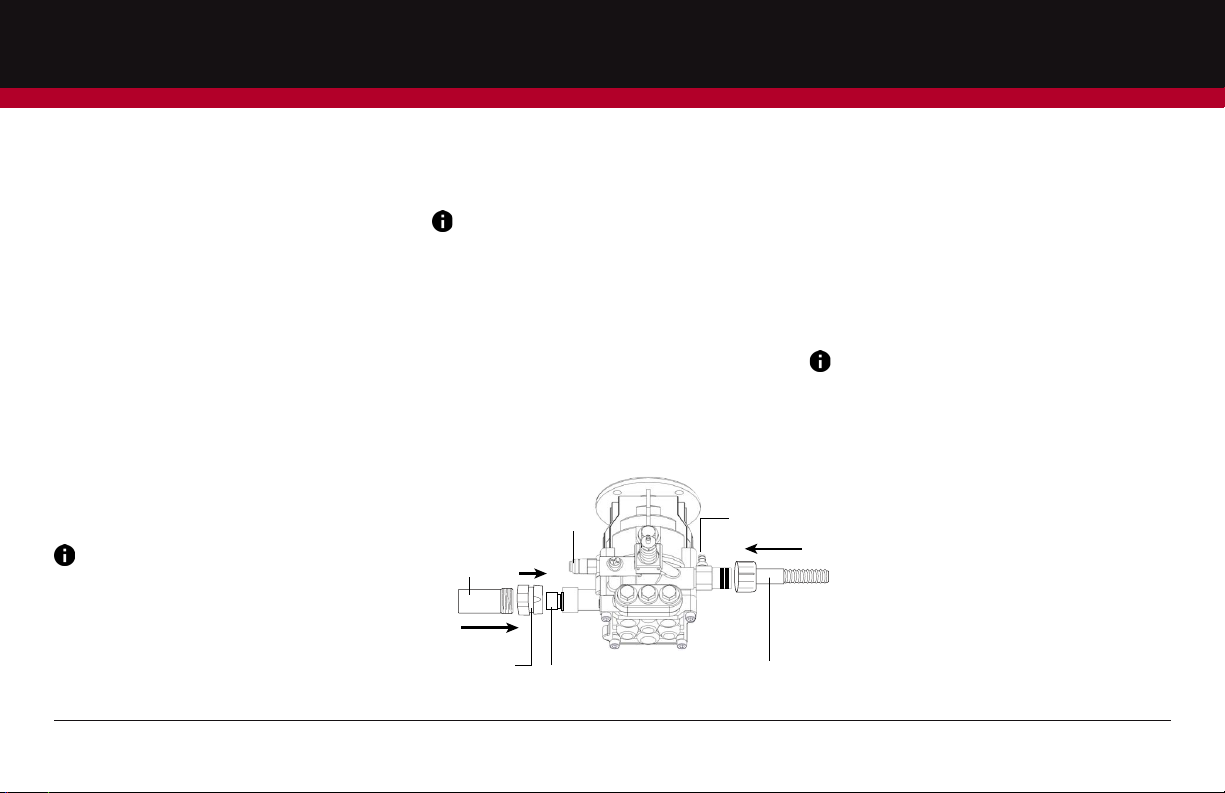
PRESSURE WASHER PUMP
High Pressure Hose
Garden Hose
Quick-Connect
Thermal Relieve
Valve Connection
Garden
Hose
Detergent
Connection
Quick-Connect Inlet
9
Owner’s Manual
Operating Instructions
Start-up Procedure
1. Make sure water supply is connected and turned on.
2. Release gun safety if locked.
3. To allow air to escape from the hose, squeeze trigger on the gun until there is a
steady flow of water coming out from the nozzle.
Starting Engine
1. Check oil and gas.
2. Connect hose and turn on water.
3. Squeeze trigger.
4. Make sure the engine switch is on the ON position (illustration 1).
5. Set the fuel valve to open (illustration 2).
6. Set choke to CLOSE position (illustration 3) & set throttle to slow (illustration 4).
7. When starting engine, pull cord slowly until resistence is felt, then pull rapidly.
8. If engines starts and fails to continue running or if increase resistance is felt during
starting pull attemps repeat step 3 - 7.
4) Throttle Control
1) ON/OFF Switch 2) Fuel Valve
3) Choke
CONNECTING SPRAY WAND TO
SPRAY GUN
Remove the protective plastic cap at the inlet
of the wand.
Connect the spray wand to the spray gun and
FIRMLYtightenthenutbyhand.
SELECTING THE RIGHT NOZZLE
NOTE: To prevent damage to your surface
and to select an appropriate nozzle size for
your application, always start with lowest
pressure nozzle size (White) and continue
changing to the higher nozzle size until the
best work result is achieved.
8INSTALLATION | OWNER’S MANUAL

ALL POWER™ PW3200 PRESSURE WASHER | 9
ThePressureWashercomesfurnishedwithve
spray nozzles. Each nozzle is color coded and
deliversaspecicspraypatternandpressure
foraparticularcleaningjob.Thesizeofthe
nozzle determines the size of the fan spray and
the pressure out of the nozzle.
0° Nozzle - Red: Cutting
This nozzle delivers a pinpoint stream of
pressurized water and is extremely powerful.
It covers only a small area of cleaning. This
nozzleshouldonlybedirectedatsurfacesthat
can withstand high pressure such as metal
or concrete. Do not use this nozzle to clean
wood.
15° Nozzle - Yellow: Chiseling
This nozzle delivers a powerful 15 degree
spray pattern for intense cleaning of small
areas.Thisnozzleshouldonlybeusedonareas
and materials that can withstand high pressure.
25° Nozzle - Green: Flushing
This nozzle delivers a 25 degree spray pattern
for intense cleaning of larger areas. This
nozzleshouldonlybeusedonareasthatcan
withstand pressure from this nozzle.
40° Nozzle - White: Washing
This nozzle delivers a 40 degree spray pattern
and a less powerful stream of water. This
nozzlecancoverawideareaandshouldbe
usedformostgeneralcleaningjobs.
Chemical Nozzle - Black: Detergent
Application
This nozzle is used to apply special chemicals
and cleaning solutions. This nozzle produces
theweakestpressurestreamofthevenozzles.
CONNECTING NOZZLES TO
SPRAY WAND
Never place hands in front of nozzle.
Never grasp hose or ttings during
Pressure Washer operation. Never attempt
to attach or remove spray wand or hose
ttingswhilePressureWashersystemis
pressurized. Turn off Pressure Washer and
lock the Gun Trigger beforeattemptingto
change pressure nozzles.
WARNING
1.To attach, insert nozzle into female
quick-disconnect spray wand and press to
snap in the nozzle.
2.To detach, slide down slip ring on female
quick-disconnect to eject the nozzle.
CONNECTING WATER SUPPLY TO PUMP
1. Connect the garden hose to the water
supplyandturnwatersupplyontollthe
hose with water and also remove any
debrisinthehose.TurnOFFwatersupply.
2.MakesurethatthelterinsidePressure
Washer water inlet is clean and
undamaged. Thread the garden hose
ttingintowaterhoseinlet.FIRMLYhand
tighten the inlet nut.
3. Turn on water supply.
NOTE: The Pressure Washer requires a
minimumof20PSIandowrateof
4 GPM.
OWNER’S MANUAL | INSTALLATION 9
10 | ALL POWER™ PW3200 PRESSURE WASHER www.allpoweramerica.com
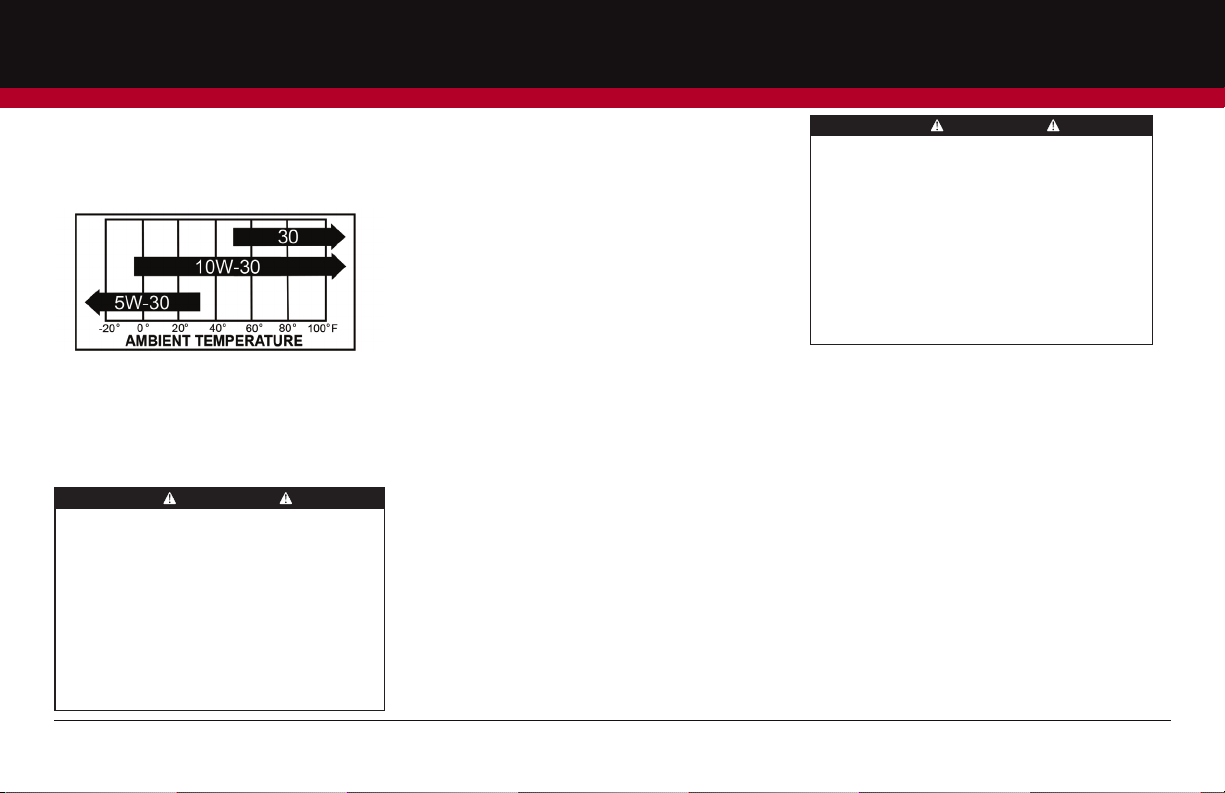
Add Engine Oil
Oil is a major factor affecting performance and
service life. Use 4-stroke automotive detergent oil.
Recommended Oil
TheSAEoilviscosityandserviceclassication
areintheAPIlabelontheoilcontainer.The
manufacture recommends that you use API
SERVICE category SJ or SL oil.
Do not attempt to start the pressure
washer engine without lling the
engine crank case with the proper
amount of oil. Your pressure washer
has been shipped without oil in the
crankcase. Operating the pressure
washer without oil will ruin the
engine. Use oil that is recommended
(10W-30). DO NOT OVERFILL!
CAUTION
1. Place the Pressure Washer OUTSIDE
onaatandlevelsurface.
2.Removeoilllcap/dipsticktoaddoil.
3. Add the supplied engine oil and replace
oil dipstick.
3. Hand tighten oil dip stick and wipe off
any spilled oil.
4. Check engine oil level daily and add
as needed.
Add Fuel
1. Use clean, fresh, regular fuel with a
pump octane rating of 90 or higher.
2. DO NOT mix oil with fuel.
3. Clean the area around the fuel cap.
4. Remove the fuel cap.
5. Slowly add fuel to the tank. DO NOT
overll.Allowapproximately1/4inch
of space for fuel expansion.
6. Screw on the fuel cap and wipe
away any spilled fuel.
• Use regular unleaded gasoline with a
pump octane rating of 90 or higher.
• Do not mix oil and gasoline.
• Fill tank to approximately 1/4” below
the top of the tank to allow for fuel
expansion.
• Do not ll fuel tank indoors.
• Do not ll fuel tank when the engine
is running or hot.
• Do not overll the fuel tank.
• Do not light cigarettes or smoke
when lling the fuel tank.
CAUTION
TECHNICAL DATA
Max. Pressure: 3200 PSI
Rated Flow: 2.7 GPM
Engine Model: GE208
Displacement: 208 cc
RPM: 3400 RPM
Fuel Tank: 1 gallon
Temp. of Pumped Fluids: Up To 104°F
Discharge Ports: M22*1.5 ɸ14mm
Weight: 91.30lbs
Engine Oil: 10W-30 (SJ or SL)
Fuel: Unleaded Gas with
pump octane rating
of 90 or higher
10 PRE-OPERATION/TECHNICAL DATA | OWNER’S MANUAL
ALL POWER™ PW3200 PRESSURE WASHER | 11
Start-up Procedure
1. Make sure water supply is connected
and turned on.
2. Release gun safety if locked.
3. To allow air to escape from the hose,
squeeze trigger on the gun until there is
asteadyowofwatercomingoutfrom
the nozzle.
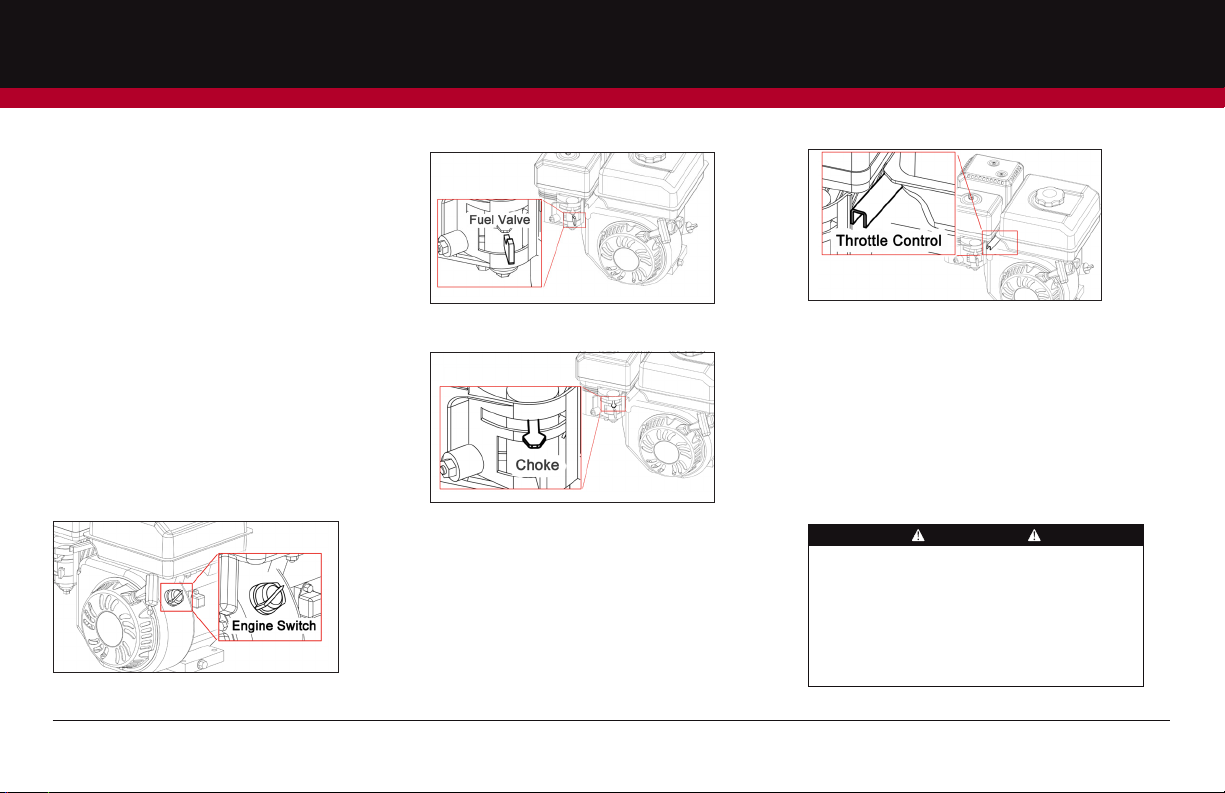
Starting Engine
1. Check oil and gas.
2. Connect hose and turn on water.
3. Squeeze and hold trigger.
4. Make sure the engine switch is on the
ON position (Fig 1).
Fig 1. Engine Switch
Starting Engine (cont’d)
Fig 2. Fuel Valve
Fig 3. Choke
5. Set the fuel valve to open (Fig 2).
6. Set choke to CLOSE position (Fig 3)
& set throttle to slow (Fig 4).
Fig 4. Throttle Control
(Fig 1)
7. When starting engine, pull cord slowly until
resistance is felt, then pull rapidly.
8. If engines starts and fails to continue
running or if increase resistance is felt
during starting pull attempts, repeat
step 3 - 7.
The pressure washer can be used for a variety
of applications including washing cars, boats,
patios, decks, garages etc. where high pressure is
necessary to remove dirt and debris. High-pressure
water ow can damage the work surface if not
used properly! See the section titled “Operating
Instructions” for more details. Always test the
spray in an open area rst.
CAUTION
OWNER’S MANUAL | OPERATION 11
12 | ALL POWER™ PW3200 PRESSURE WASHER www.allpoweramerica.com
This pressure washer is intended for use only
with liquid car wash detergents, developed
specicallyforpressurewashersandwithmild
soaps.Onlyusechemicalscompatiblewith
thealuminumandbrassparts.Powdered
soaps may clog the injection system. Always
use chemicals according to the manufacturers
directions.Weassumenoresponsibility
foranydamagescausedbychemicalsinjected
through this pressure washer.
1. Attachinjectiontubeassemblytothe
detergent connection on the pump.
2. Open a container of chemicals and place
nexttotheunitneartheinjectiontube.
3. Visually inspect strainer at the end of
theinjectiontubetoverifythatitisnot
clogged
4.Inserttheinjectiontubeintothecontainer
allthewaytothebottom.
5. Remove the high pressure nozzle from the
wandandinstalltheblackinjectionnozzle.
The solution will automatically mix with the
water and discharge through the nozzle.
NOTE: For certain models, if the
engine throttle is not in the fast
position, the injection of the solution
may be decreased or stopped.
10
Owner’s Manual
This pressure washer is intended for use only with liquid car wash detergents, developed
specifically for pressure washers and with mild soaps. Only use chemicals compatible with
the aluminum and brass parts. Powdered soaps may clog the injection system. Always
use chemicals according to the manufacturers directions. We assume no responsiblity
for any damages caused by chemicals injected through this pressure washer.
1. Attach injection tube assembly to the detergent connection on the pump.
2. Open a container of chemicals and place next to the unit near the injection tube.
3. Visually inspect strainer at the end of the injection tube to verify that it is not clogged
4. Insert the injection tube into the container all the way to the bottom.
5. Remove the high pressure nozzle from the wand and install the black injection nozzle.
The solution will automatically mix with the water and discharge through the nozzle.
NOTE: For certain models, if the engine throttle is not in the fast position, the injection
of the solution may be decreased or stopped.
CLEANING TECHNIQUES
When cleaning with the pressure washer, many cleaning tasks can be solved with water
alone, but for most tasks, it is advantageous to use a detergent. A detergeng ensures a
quick soaking of the dirt allowing the high pressure water to penetrate and remove the
dirt more effectively.
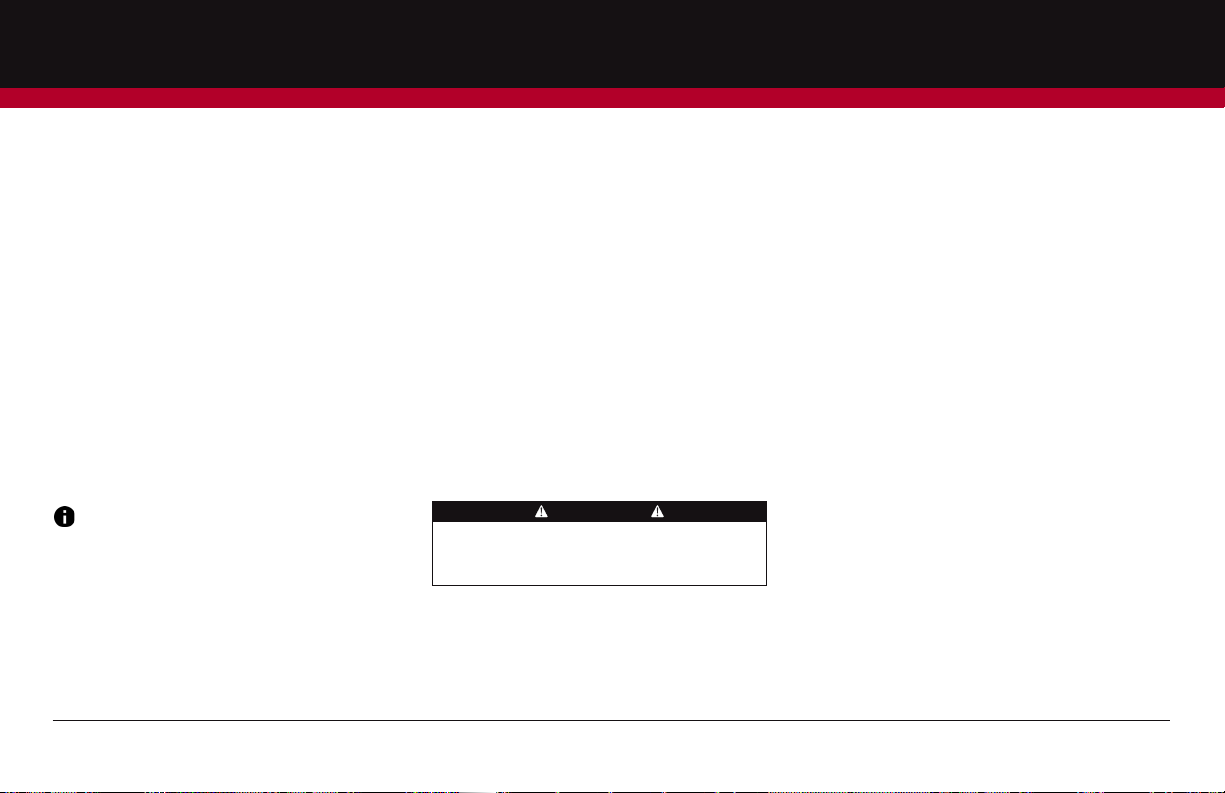
APPLICATION OF SOAP OR DEGREASER
1. Apply the solution to the dry work surface. On a vertical surface, apply horizontally
from side to side starting from bottom to avoid streaking.
NOTE: Wetting the surface first is not recommended, it dilutes the detergent and
reduces its cleaning effects.
Please disconnect the Detergent Hose from the Pressure Washer when do not use
the soap or degreaser.
CAUTION
Detergent
Connection
Detergent
Hose
11
Owner’s Manual
Operation
Avoid working on hot surfaces or in direct sunlight to minimize the chances of the
chemical damaging painted surfaces. Damage may occur to painted surfaces if the
chemical is allowed to dry on the surface. Hold the nozzle far enough away from surface
to prevent damage to the surface.
2. Allow chemical to remain on the surface for a short time before rinsing.
3. Rinse with clean water under high pressure. On a vertical surface, first rinse from
the bottom up, then rinse from top down. Hold nozzle 6 to 8 inches from the work surface
at a 45° angle using the flat spray as a peeling tool rather than a scrub brush.
APPLICATION OF WAX
1. Immediately after cleaning, apply wax. Place injection tube in container of wax.
2. Apply the wax sparingly in an even layer. Apply to wet surfaces from bottom up for even
distribution and to avoid streaking.
3. Remove the suction tube from the wax bottle rinse off the surplus wax.
NOTE: If surplus wax is not removed, a hazy finish may result.
4. Wipe dry to reduce water spotting.
END OF OPERATION
When you have completed use of chemical injection system, remove tube from container.
Continue to run in low pressure position and inject clean water through the tube and
injection system by placing end of tube in a container of clean water. Continue to run
until it is thoroughly cleaned.
Maintenance
CONNECTIONS
Connection on pressure washer hoses, gun and spray wand should be cleaned
regularly and lubricated with the manufacturers recommended grease to prevent leakage
and damage to the O-ring.
NOZZLE
Clogging of the nozzle causes the pump pressure to be too high, cleaning is immediately
required.
A nozzle cleaner must only be used when the spray
wand is disconnected from the gun or personal injury
may occur.
1. Seperate the wand from the gun.
Fig 7
CLEANING TECHNIQUES
When cleaning with the pressure washer, many
cleaningtaskscanbesolvedwithwateralone,
butformosttasks,itisadvantageoustouse
a detergent. A detergent ensures a quick
soaking of the dirt allowing the high pressure
water to penetrate and remove the
dirt more effectively.
Application of Soap Or Degreaser
1. Apply the solution to the dry work surface.
On a vertical surface, apply horizontally
fromsidetosidestartingfrombottomto
avoid streaking.
NOTE: Wetting the surface rst is not
recommended, it dilutes the detergent
and reduces its cleaning effects.
Please disconnect the Detergent Hose from
the Pressure Washer when not in use.
Avoid working on hot surfaces or in direct
sunlight to minimize the chances of the
chemical damaging painted surfaces.
Damage may occur to painted surfaces if the
chemical is allowed to dry on the surface.
Hold the nozzle far enough away from
surface to prevent damage to the surface.
2. Allow chemical to remain on the surface for
ashorttimebeforerinsing.
12 OPERATION | OWNER’S MANUAL
ALL POWER™ PW3200 PRESSURE WASHER | 13
Application of Soap Or Degreaser (cont’d)
3. Rinse with clean water under high pressure.
Onaverticalsurface,rstrinsefromthe
bottomup,thenrinsefromtopdown.Hold
nozzle 6 to 8 inches from the work surface
ata45°angleusingtheatsprayasa
peelingtoolratherthanascrubbrush.
Application of Wax
1. Immediately after cleaning, apply wax. Place
injectiontubeincontainerofwax.
2. Apply the wax sparingly in an even layer.
Applytowetsurfacesfrombottomupfor
evendistributionandtoavoidstreaking.
3.Removethesuctiontubefromthewax
bottlerinseoffthesurpluswax.
NOTE: If surplus wax is not removed,
ahazynishmayresult.
4. Wipe dry to reduce water spotting.
End of Operation
When you have completed use of chemical
injectionsystem,removetubefromcontainer.
Continue to run in low pressure position and
injectcleanwaterthroughthetubeand
injectionsystembyplacingendoftubeina
container of clean water. Continue to run
until it is thoroughly cleaned.
MAINTENANCE
Connections
Connection on pressure washer hoses, gun
andspraywandshouldbecleanedregularly
andlubricatedwiththemanufacturers
recommended grease to prevent leakage
and damage to the O-ring.
Nozzle
Clogging of the nozzle causes the pump
pressuretobetoohigh,cleaningis
immediately required.
WARNING
A nozzle cleaner must only be used when the
spray wand is disconnected from the gun or
personal injury may occur.
1. Separate the wand from the gun.
2. Clear the nozzle with a small rigid piece of
wire such as a paper clip.
3.Flushthenozzlebackwardswithwater.
4. Reconnect the wand to the gun.
Restart the pressure washer and depress the
trigger on the spray gun. If the nozzle is still
pluggedorpartiallyplugged,repeatabove
instructions 1-4.
If the previous procedure does not clear the
nozzle, replace with a new nozzle.
Engine Maintenance
During the winter months, rare atmospheric
conditions may develop which will cause
anicingconditioninthecarburetor.Ifthis
develops, the engine may run rough, lose
power and may stall. This temporary condition
canbeovercomebydeectingsomeofthe
hotairfromtheengineoverthecarburetor
area.
OWNER’S MANUAL | OPERATION/MAINTENANCE 13
14 | ALL POWER™ PW3200 PRESSURE WASHER www.allpoweramerica.com
14 MAINTENANCE | OWNER’S MANUAL
STORAGE
Pump Storage
If you must store your pressure washer in a
locationwherethetemperatureisbelow32°F,
you can minimize the chance of damage to
yourmachinebyutilizingthefollowing
procedure:
1. Shut off water supply and relieve pressure
tothespraygunbydepressingthetrigger.
Disconnect the garden hose from the
pressurewasher,butleavethehigh
pressure hose connected.
2. Tip the unit on its side with the inlet
connection pointing up.
3. Insert a small funnel (to prevent spilling)
into the inlet and pour in approximately
1/4cupofantifreeze.
4. Disconnect spark plug wire.
5. Without connecting garden hose pull the
recoil several times to circulate the
antifreeze in the pump system.
6. Reconnect spark plug wire.
Prior to starting, thaw out any possible ice from
the pressure washer hoses, spray gun and wand.
CAUTION
MAINTENANCE
Another method of reducing risks of freeze
damage is to drain your pressure washer as
follows:
1. Stop the pressure washer and detach
supply hose and high pressure hose.
Squeeze the trigger of the discharge gun to
drain all water from the wand and hose.
2. Restart the pressure washer and let it run
brieyabout5seconds)untilwaterno
longer discharges from the high pressure
outlet.
Engine Storage
Whenthepressurewasherisnotbeingusedor
isbeingstoredformorethanamonth
follow these instructions:
1. Replenish engine oil to upper level.
Engine Storage (cont’d)
2. Drain gasoline from fuel tank, fuel line, fuel
valveandcarburetor.
3.Pouraboutoneteaspoonofengineoil
through the spark plug hole. Pull the recoil
starter slowly until you feel increase
pressure which indicates the piston is on its
compression stroke. Leave it in the
position.Thisclosesboththeintakeand
exhaust valves to prevent the inside of the
cylinder from rusting.
4. Cover the pressure washer and store in a
clean, dry place that is well ventilated
awayfromopenameorsparks.
NOTE: The use of a fuel additive, such
as STA-BIL, or an equivalent, will
minimize the formulation of fuel gum
deposits during storage.

ALL POWER™ PW3200 PRESSURE WASHER | 15
OWNER’S MANUAL | NOTES 15
NOTES

16 | ALL POWER™ PW3200 PRESSURE WASHER www.allpoweramerica.com
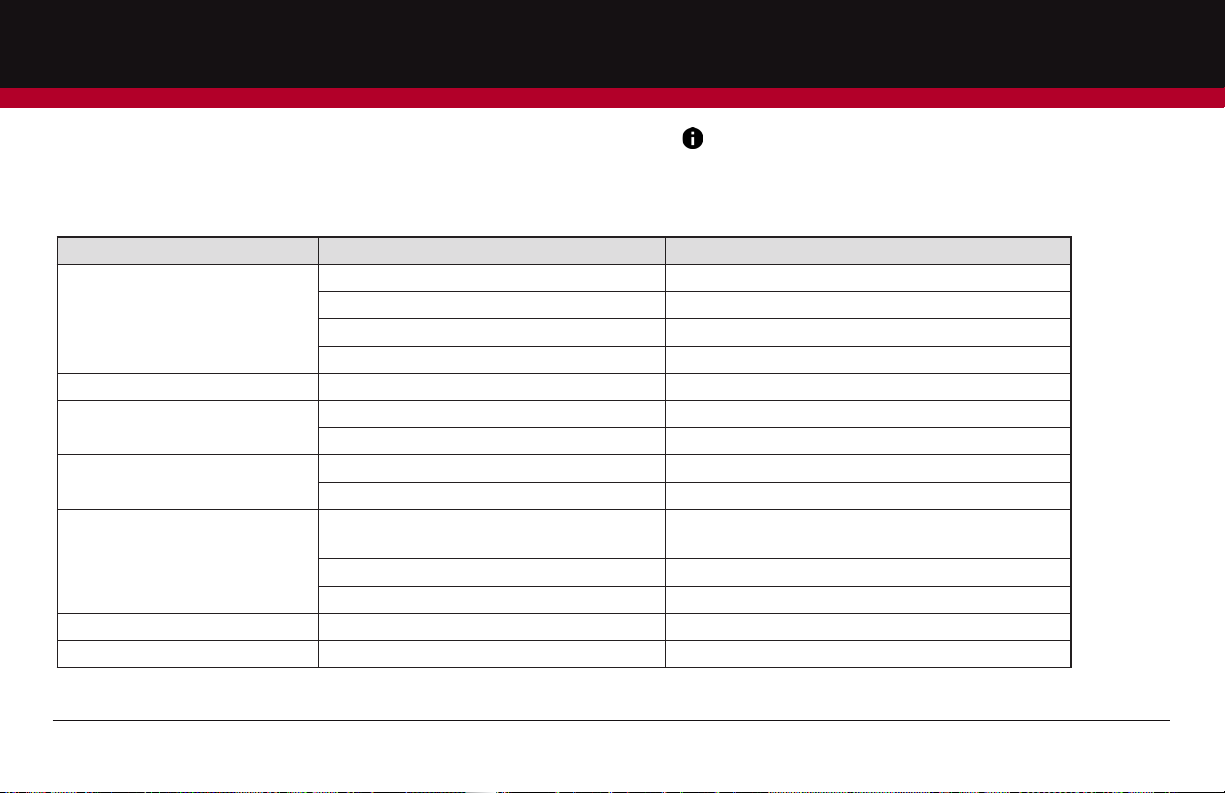
Problem Probable Cause Solution
Engine will not start
Low oil shutdown Fill engine with oil
Engine switch not in “ON” position Turn engine switch to the “ON” position
Pressure built up in hose Squeeze trigger while starting
Engine is overloaded Nozzle partially blocked Clean nozzle
Excessive pressure Shorten the spring coil on the reux valve
Pressure increases when gun is locked Bypass valve blocking Clean the bypass valve
Engine is running but pump won’t
build maximum pressure or has
irregular pressure.
Faucet closed partially Open faucet fully
Unit has been stored in freezing temperatures Thaw out unit completely
Inadequate water supply Provide a minimum of 4 GPM at 20 PSI
Water inlet screen clogged Clean screen
Kink in garden hose Straighten garden hose
Wand nozzle worn or damaged Replace nozzle
Air in pump Run with gun open & wand removed until steady
stream of water is released.
Adjustable pressure knob not set to maximum position Set to maximum position
Suction or discharge valves clogged or worn out Clean the suction or discharge valves
Bypass valve not operating effectively Clean the bypass valve
TROUBLESHOOTING GUIDE
Thefollowingtroubleshootingguideisrecommendedforbasicor
commonproblems;ifthere’sanissuewiththePressureWasherthatis
not listed, please call 1-888-896-6881.
NOTE: Troubleshootingproblemsmayhavesimilarcauses
and solutions.
16 TROUBLESHOOTING | OWNER’S MANUAL
ALL POWER™ PW3200 PRESSURE WASHER | 17
Problem Probable Cause Solution
No intake of chemicals
Injection tube not securely inserted into unit Push rmly into injector
Tube cracked or split Replace tube
Wrong nozzle Switch to low pressure nozzle
Injector turned off Turn collar counterclockwise
Trigger will not move Gun safety lock engaged Release safety lock
Water in crankcase High humidity Change oil more frequently
Worn seals Change the oil seals
Noisy operation Worn bearings Change the bearings
Air mixed with water Check inlet lines for restrictions and/or proper sizing
Rough/pulsating, operating with
pressure drop
Inlet restriction Check system for stoppages, air leaks, correctly
sized inlet plumbing to pump
Unloader Check unloader for proper operation
Air mix in water Check inlet lines for restrictions and or proper sizing
High crankcase temperatures Wrong grade of oil Use recommended oil
Improper amount of oil in crankcase Adjust oil to proper amount
NOTE: Troubleshootingproblemsmayhavesimilarcauses
and solutions.
Thefollowingtroubleshootingguideisrecommendedforbasicor
commonproblems;ifthere’sanissuewiththePressureWasherthatis
not listed, please call 1-888-896-6881.
TROUBLESHOOTING GUIDE
OWNER’S MANUAL | TROUBLESHOOTING 17

18 | ALL POWER™ PW3200 PRESSURE WASHER www.allpoweramerica.com
18 NOTES | OWNER’S MANUAL
NOTES
ALL POWER™ PW3200 PRESSURE WASHER | 19
OWNER’S MANUAL | NOTES 19
NOTES
20 | ALL POWER™ PW3200 PRESSURE WASHER www.allpoweramerica.com
20 NOTES | OWNER’S MANUAL
NOTES
Table of contents
Other ALL POWER AMERICA Pressure Washer manuals


