Allavino Reserva VSW6771S-1BR-WD User manual

www.allavino.com 1.888.980.48091
INSTRUCTION MANUAL
BUILT-IN WINE REFRIGERATOR
MODEL: VSW6771S-1
BEFORE USE, PLEASE READ AND FOLLOW ALL SAFETY RULES AND OPERATING INSTRUCTIONS.
ALLAVINO
8520 Miralani Dr., San Diego, CA 92126
Allavino has a policy of connuous improvement on its products and
reserves the right to change materials and specicaons without noce

www.allavino.com 1.888.980.48092
Diagram and
Description .................................................................................................................................... 3
Safety Tips .................................................................................................................................... 4-5
Installation Instructions .................................................................................................................................... 5
Handle Installation .................................................................................................................................... 6
Operation Instructions .................................................................................................................................... 6
Setting Temperature .................................................................................................................................... 7
Light Settings .................................................................................................................................... 8
Wall Bracket Installation .................................................................................................................................... 9
Racking Conguration .................................................................................................................................... 10
Induction of Opening
the Door .................................................................................................................................... 10
Care and Maintenance .................................................................................................................................... 11
Troubleshooting .................................................................................................................................... 12
Technical Specications .................................................................................................................................... 13
Warranty Information .................................................................................................................................... 14
Table of Contents

www.allavino.com 1.888.980.48093
Diagram and Description
1. Control Panel
2. Wine shelves
3. Front Ventilation Base
4. Door hinge
5. Adjustable feet
6. Door handle
7. Lock
1
2
3 7
4
5
6

www.allavino.com 1.888.980.48094
Safety Tips
Before using this appliance, it must be properly posioned and installed as described in this manual, so please
read carefully. To reduce the risk of re, electrical shock or injury when using this appliance, follow these basic
precauons.
• The wine cooler is designed to be xed on the wall. If it is not xed on the wall, the machine can easily
p over, resulng in personal injury or death.
• Plug into a grounded 3-prong outlet. Do not under any circumstances cut or remove the third ground
prong from the power cord supplied, do not use an adapter, and do not use an extension cord.
• It is recommended that a separate circuit, serving only your appliance be used. Do not use outlets that
can be turned o by a switch or pull chain.
• Never clean appliance parts with ammable uids and do not store or use gasoline or other ammable
vapors and liquids in the vicinity of this or any other appliance. The fumes can create a re hazard or
explosion.
• Unplug the appliance or disconnect power before cleaning or servicing. Failure to do so can result in
electrical shock or death.
• Do not aempt to repair or replace any part of your appliance unless it is specically recommended in
this manual. All other servicing should be referred to a qualied technician.
• Use two or more people to move and install appliance. Failure to do so can result in back or other
injury.
• To ensure proper venlaon for your appliance, the front of the unit must be completely unobstructed.
Choose a well-venlated area with temperatures above 60°F (16°C) and below 90°F (32°C). This unit
must be installed in an area protected from the element, such as wind, rain, water spray or drips.
• The appliance should not be located next to ovens, grills or other high heat sources or in areas of
extreme cold.
• The appliance must be installed in accordance with state and local codes. A standard electrical supply
(115 V AC only, 60 Hz), properly grounded in accordance with the Naonal Electrical Code and local
ordinances is required.
• Do not kink or pinch the power supply cord of appliance.
• The fuse (or circuit breaker) size should be 15 amperes.
• It is important for the appliance to be leveled in order to work properly. You may need to make several
adjustments to level it.
• Never allow children to operate, play with or crawl inside the appliance. Child entrapment and
suocaon are not just problems of the past, junked or abandoned appliances are sll dangerous.
When no longer using your old wine cellar, take o the door and leave the shelves in place so that
children may not climb inside easily.
• Do not use solvent-based cleansers or abrasives on the interior as they may damage or discolor the
interior.

www.allavino.com 1.888.980.48095
Installation Instructions
• Because of potenal safety hazards under certain condions, it is strongly recommended that you
do not use an extension cord with this appliance. However, if you must use an extension cord, it is
absolutely necessary that it be a UL/CUL-Listed, 3-wire grounding type appliance extension cord having
a grounding type plug and outlet and that the electrical rang of the cord be 115 volts and at least 10
amperes.
• If the appliance is going to be used in an area that is prone to power surges/outages, it is suggested
that you use a power surge protector. The surge protector that you select must have a surge block high
enough to protect the appliance it is connected to. Damages due to power surges are not considered a
manufacturer covered defect and will void your product warranty.
• The cord should be secured behind the appliance and not le exposed or dangling to prevent accidental
injury. Never unplug the appliance by pulling the power cord. Always grip the plug rmly and pull
straight out from the receptacle. Repair or replace immediately all power cords that have become
frayed or otherwise damaged. Do not use a cord with cracks or abrasion damage along its length or at
either end. When moving the appliance, be careful not to damage the power cord.
• Do not use this apparatus for other than its intended purpose.
• California Proposion 65 Warning: This product may contain a substance known to the State of
California to cause cancer, birth defects or other reproducve harm.
Failure to heed these safety warnings may result in extensive product damage, serious personal injury, or
death.
BEFORE USE:
• Remove the exterior and interior packaging.
• Before connecng the unit to the power source, let it stand upright for approximately 4 hours. This will
reduce the possibility of a malfuncon in the cooling system from handling during transportaon.
• Clean the interior surface with lukewarm water using a so cloth.
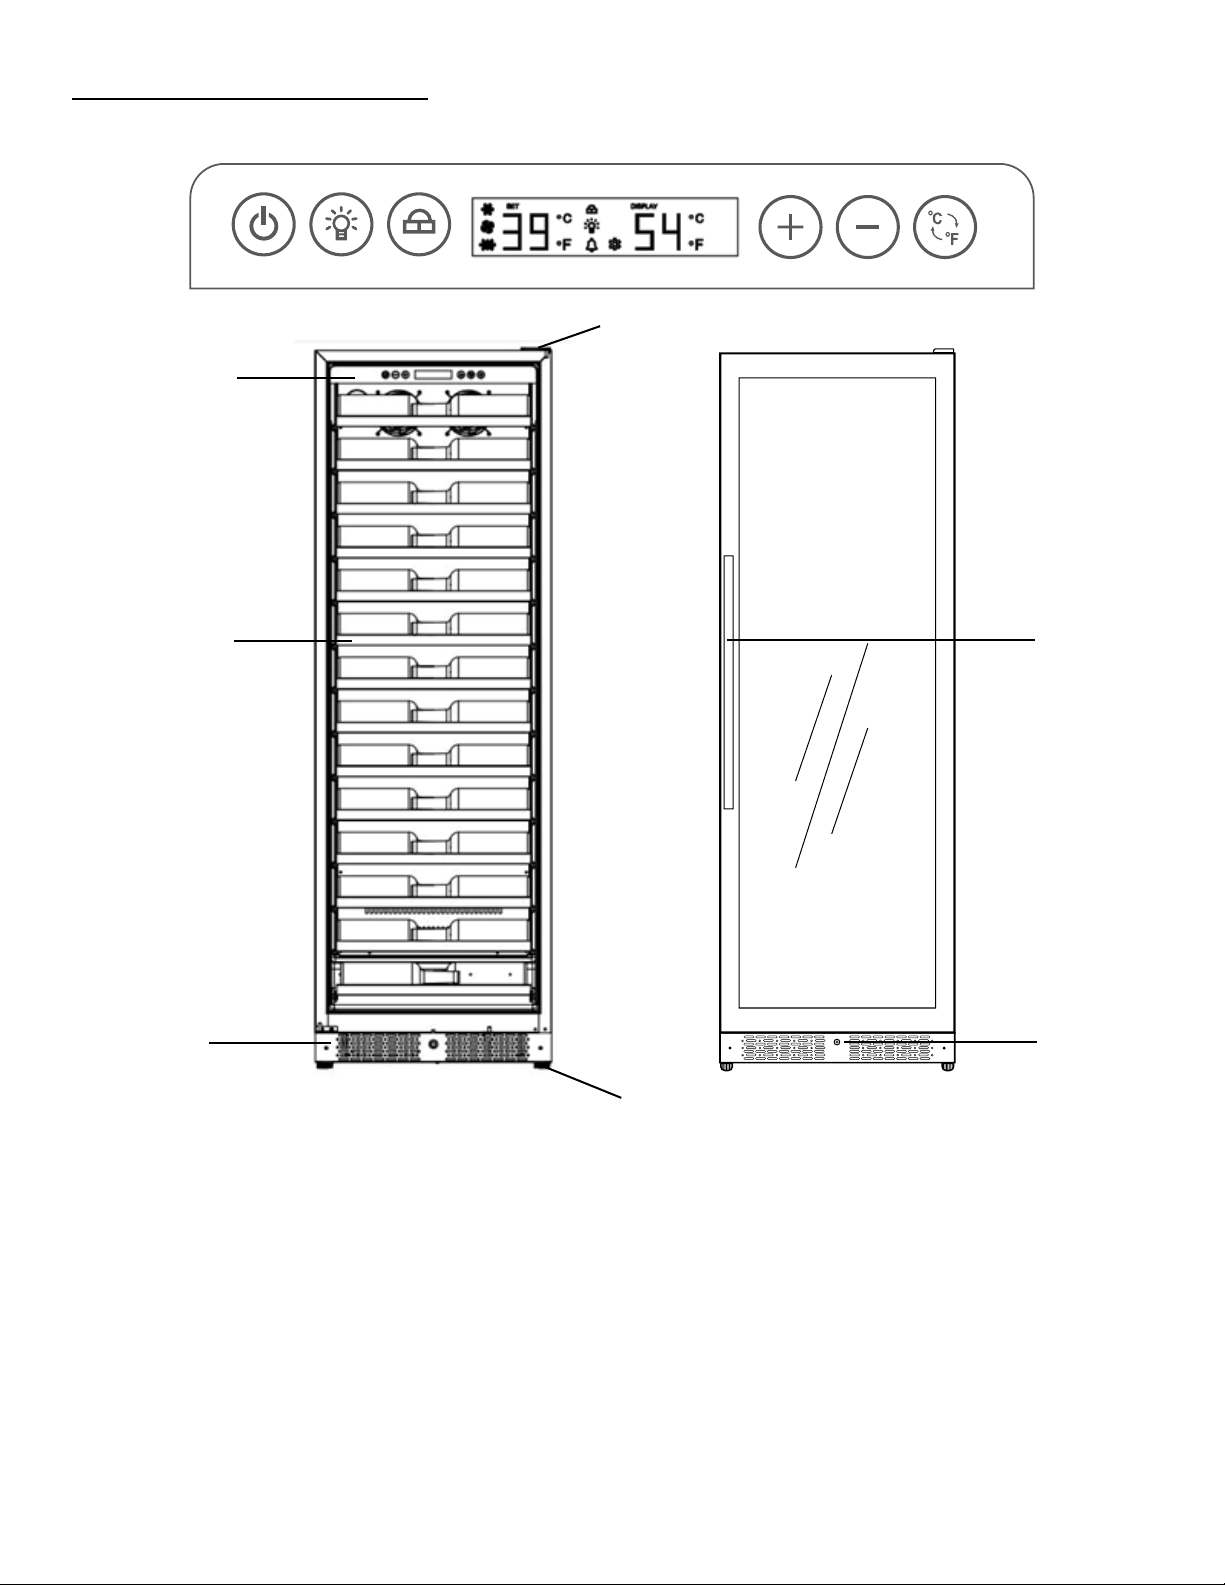
• Install handles.
• This appliance is designed for free standing or built-in (fully recessed) installaon.
• Place the unit on a at, solid oor that is strong enough to support it when it is fully loaded. To level the
appliance, adjust the front leveling leg at the boom of the unit.
• When moving your wine cellar, please do not incline it more than 45 degrees.
• Locate the appliance away from direct sunlight and sources of heat (stove, heater, radiator, etc.). Direct
sunlight may aect the acrylic coang and heat sources may increase electrical consumpon. Extreme
cold ambient temperatures may also cause the unit to perform improperly. The opmal ambient
temperature range is 32°F - 100°F.
• The wine cellar should be placed in an area where the ambient temperature is less than 77 degrees
Fahrenheit and higher than the lowest temperature you want to store your wine. If the ambient
temperature is lower than the set temperature, the internal temperature will match the ambient
temperature.
• Avoid locang the unit in damp areas.
• Plug the appliance into an exclusive, properly installed and grounded wall outlet. Do not under any
circumstances cut or remove the third (ground) prong from the power cord. Any quesons concerning
power and/or electrical grounding should be directed to a cered electrician or authorized products
service center.
• Aer plugging the appliance into a wall outlet, allow the unit to cool down for 3 to 4 hours before
placing wine boles in the appliance.

www.allavino.com 1.888.980.48096
Handle Installation
Operation Instructions
Step 1: Remove the box containg the handle and screws from the wine unit.
Step 2: Pull out a bit of the rubber gasket from the back side of the holes.
Step 3: Insert the screws through the holes and connect with the handle.
The wine unit should be placed in an area where the ambient temperature is between 32-100 degrees
Fahrenheit. If the ambient temperature is above or below this range, the performance of the unit may be
aected. For example, placing your unit in extreme cold or hot condions may cause the interior temperatures
to uctuate.
Your Allavino wine unit includes an operang panel on the front of the unit. The operang panel includes
several features to operate and control the temperature of the wine refrigerator, including:
Power – Turns the unit on or o
Light – Turns the interior light on or o
Lock – Press LOCK for 1.5 seconds to unlock the display panel,
if nothing is pressed on the screen for 20 seconds, the LOCK will turn back on
+ – Increases the temperature in 1 degree increments
- – Decreases the temperature in 1 degree increments
°C/°F – Toggles the temperature display between Celsius and Fahrenheit

www.allavino.com 1.888.980.48097
The unit has a locking door and two keys are provided. To lock the door, turn the key clockwise and turn it
counterclockwise to unlock the door. Keep the keys in a safe place.
If you are going on vacaon, you may leave the Wine and Beverage Center operang during vacaons of less
than three weeks. If the appliance will not be used for several months, you should remove all items and turn
o the appliance. Clean and dry the interior thoroughly. To prevent mold growth, leave the door open slightly,
blocking it open if necessary.
Symbols:
SET
DISPLAY
Displays the desired temperature on an LED display
Displays the current temperature on an LED display
The “snowake” symbol indicates that it is cooling when it is on, and stops cooling when it is o.
The “fan” symbol,When on, it indicates that the evaporator fan is running, and when o, it indicates that it
stops running.
When on, it indicates that the machine is in rapid cooling (120Hz), and when o, it is not rapid cooling
This Symbol Indicates in defrosng
Lock Symbol- show the screen is locked when it is on
Light Symbol-when it is on, it indicates that the led is turned on, and when it is o, led light is turned o
Bell Symbol- When there is an alarm, the it will ash
This Symbol indicates that the unit is in internal sengs.
Setting Temperature
This Allavino refrigerator has a wide enough temperature range to store red, white, or sparkling wine.
Dierent varietals of wine require dierent temperature sengs. Red wine is generally stored between 50 and
65 degrees Fahrenheit, while white wines are stored between 40 and 50 degrees Fahrenheit. White wine can
be stored at red wine temperatures for a short period of me (less than three months), and ash chilled before
serving.
You can set the temperature as you desire by touching the + or - buon. When you touch the buons for the
rst me, the LED readout will show the original temperature set at the manufacturing facility. Each push
of the buon will adjust the temperature by one degree in the desired direcon. Please be aware that the
desired temperatures may uctuate depending on whether the interior light is ON or OFF and depending on
the orientaon of the boles.

www.allavino.com 1.888.980.48098
Light Settings
The Allavino wine refrigerator has 9 dierent color opons and 5 dierent brightness levels to choose from.
Color Opons: C1=Red, C2=Orange, C3=Yellow, C4=Green, C5=Cyan, C6=Blue, C7=Purple, C8=White, and
C9=Rotate All Colors
Light Brightness: b1=20%, b2=40%, b3=60%, b4=80%, and b5=100%
Factory default seng: Color: C9=All color rotaon; Brightness: 40%
• Light On/O: Press the “LIGHT” buon for less than 3 seconds and then release to turn the light on or o.
The light will turn on or o gradually. The light on/o buon controls lights on both zones together.
• Color Selecon: Press the “LIGHT” buon for more than 3 seconds, unl C1 as an example is shown on
the display panel to enter the “LIGHT SELECTION” mode. Press the “UP” or “DOWN” buons to select the
color. The display panel will return to normal operaon aer 10 seconds of no acvity.
• Brightness Selecon: Press the “LIGHT” buon for more than 3 seconds. Aer C1 is displayed on the
panel, press “LIGHT” buon again to enter into “BRIGHTNESS SELECTION” mode. b1 will be displayed on
the panel.
Press “LIGHT” again to return to “COLOR SELECTION” mode.
During either “COLOR SELECTION” or “BRIGHTNESS SELECTION” mode, press “LIGHT” buon for more
than 3 seconds to end the modes or leave it for 10 seconds.
• The unit is programmed to remember your previous light sengs in case the unit is powered o.
PLEASE NOTE:
• In the event of a power interrupon, all previous temperature sengs will be automacally saved and
each compartment will return to the previous temperature seng.
• If the unit is unplugged, loses power, or is turned o, you must wait 3 to 5 minutes before restarng.
Aempng to restart the Wine and Beverage Center before this me has elapsed may prevent it from
starng.
• When you use the wine cooler for the rst me or restart the appliance aer having been shut o for
a long me, there will be a few degrees variance between the temperature you select and the one
indicated on the LED readout for the rst few hours of operaon. Aer a few hours of operaon, the
temperature will normalize to the displayed temperature.

www.allavino.com 1.888.980.48099
Wall Bracket Installation
Posion the unit in the desired locaon. Using a stud nder, locate the wall studs behind the unit and
mark on the wall the locaon where the bracket and the unit line up with the stud.
Using the marks as your guides, mount the wall bracket to the wall using the provided bronze screws (1).
If you don’t have a stud nder, or if there aren’t any studs available in your ideal locaon, you will need to
rst install the yellow rubber expansion plugs into the dry wall to anchor the screws in place (2).
Once the wall bracket has been mounted, remove the two screws located at the top back of the unit (3).
Align the back of the unit with the wall bracket and reinsert the screws back into place through the
wall bracket slots (4).
CAUTION: This product is not intended to be a substute for proper supervision. Manufacturer assumes
no liability for improper installaon or excessive loads placed on screw or brackets.

www.allavino.com 1.888.980.480910
Racking Conguration
Disperse your boles evenly throughout the unit so as not to concentrate weight in any one area. This also
helps to provide an even temperature range throughout the unit. Make sure that boles are not all grouped
together either at the top or boom of the cabinet. Never try to pull out more than one sliding shelf at a me
as it can cause the appliance to p forward.
The shelves are removable to help with cleaning and maintenance. To remove a shelf, pull it out as far as you
can. There are levers on each side of the shelf near the rollers. Li the lever on the le hand side and push
down the lever on the right hand side to release the shelf from the tracks.
The Allavino wine refrigerator has 13 shelves that can hold up to 5 boles each, with a boom shelf that can
hold an extra 2 boles for a maximum bole capacity of 67 boles. The maximum capacity can be reached
with many dierent bole sizes and is only aected when adding larger Pinot or Champagne boles.
Induction of Opening the Door
1. When the le or right door is opened, the le or right fan stops running and the fan returns to normal
aer 1 minute. Aer 3 minutes, it will alarm. At this me, press any buon casually, the alarm will be
eliminated and return to the state of just opening the door. The alarm is eliminated aer 5 minutes.
2. Opening the door when the light is o, the light will be on automacally. Close the door, the light will
turn o automacally.

www.allavino.com 1.888.980.480911
Care and Maintenance
Cleaning your wine unit:
• Turn o the power, unplug the appliance, and remove all items.
• Wash the inside surfaces with warm water and baking soda soluon. The soluon should be about 2
tablespoons of baking soda to a quart of water.
• Wash the shelves with a mild detergent soluon.
• Wring excess water out of the sponge or cloth when cleaning area of the controls, or any electrical
parts.
• Wash the outside cabinet with warm water and mild liquid detergent. Rinse and wipe dry with a clean
so cloth.
• Dust the front grill and back of the unit twice yearly. Make sure the power is o before cleaning.
• It is recommended to clean the unit completely inside and out yearly to maximize the longevity of the
product.
Moving your wine unit:
• Remove all boles and any other items you may have inside the unit.
• Securely tape down all loose items (shelves) inside your appliance and tape the door shut.
• Turn the adjustable leg up to the base to avoid damage.
• Be sure the appliance stays secure in the upright posion during transportaon.
• Protect the outside of the appliance with a blanket or similar item.

www.allavino.com 1.888.980.480912
Troubleshooting
There are many common issues you may experience with you wine unit that can be solved very easily, without
the need of a service call. Try the ps below to troubleshoot your unit should you experience and problems:
PROBLEM POSSIBLE CAUSE
Wine cellar does not operate Not plugged in or the appliance is turned o
The circuit breaker tripped or a fuse has blown out
Wine cellar is not cold enough Check the temperature control seng
External environment may require a higher seng
The door is opened too oen
The door is not closed completely
The door gasket is not sealing properly
Wine cellar is turning on and o frequently The room temperature is hoer than normal.
The door is opened too oen.
The door is not closed completely.
The temperature control is not set correctly.
The door gasket does not seal properly.
The light does not work Not plugged in.
The circuit breaker tripped or a fuse has blown.
The light bulb has burned out.
The light buon is “OFF”.
Vibraons Check to assure that the wine unit is on a level surface.
The wine cellar seems to make too much noise A faint humming noise may come from the ow of the
refrigerant, which is normal.
As each cycle ends, you may hear gurgling sounds caused by
the ow of refrigerator in your wine unit.
Contracon and expansion of the inside walls may cause
popping and crackling noises.
The wine unit is not on a level surface.
The door will not close properly The unit is not on a level surface.
The gasket is dirty.
The shelves are out of posion.
ERROR CODE C1 on screen The UPPER ZONE temperature is Open circuit
ERROR CODE U1 on screen The UPPER ZONE temperature is short circuit
ERROR CODE C2 on screen The LOWER ZONE temperature is Open circuit
ERROR CODE U2 The LOWER ZONE temperature is short circuit
ERROR CODE HH on screen High-temperature alarm
ERROR CODE LL on le and right screen Low-temperature alarm
ERROR CODE DO on le and right screen Shows when door is open for 3 minutes and alarms

www.allavino.com 1.888.980.480913
Technical Specications
Wine Bole Capacity Up to 67 Wine Boles
Dimensions 71.5” H x 23.5” W x 16.8” D (18.4“ w/ handle)
Weight 225 lbs.
Voltage / Frequency 115v / 60 Hz
Running Amps 2.1A
Operang Temperature 41°F - 64°F
Ambient Temperature 32°-100°F

www.allavino.com 1.888.980.480914
Warranty Informaon
WHAT IS COVERED LIMITED ONE-YEAR WARRANTY:
For one year from the date of purchase by the original owner, Allavino will, at its opon, repair or replace any part of the
unit, which proves to be defecve in material or workmanship under normal use. During this period Allavino will provide
all parts and labor necessary to correct such defects free of charge, so long as the unit has been installed and operated in
accordance with the wrien instrucons in this manual. Allavino will provide you with a reasonably similar replacement
product that is either new or factory refurbished. In rental or commercial use, the warranty period is 90 days. All Allavino
Appliances of 3.5 cubic feet capacity or less must be brought/sent to the appliance service shop for repair.
LIMITED SECOND THROUGH FIFTH YEAR WARRANTY:
For the second through the h year from date of original purchase, Allavino Products will provide a replacement
compressor free of charge due to a failure. You are responsible for the service labor and freight charges. In rental or
commercial use, the limited compressor warranty is one year and nine months. Cost to move the appliance to the
servicers’ shop and back to the user’s home, as may be required, are the user’s responsibility.
WHAT IS NOT COVERED:
• Content losses of food or other, due to spoilage.
• Incidental or consequenal damages.
• Parts and labor costs for the following will not be considered as warranty:
o Door springs, and/or frames.
o Inner door panels, door rails and/or door supports.
o Light bulbs and/or plasc housing.
o Plasc cabinet liners.
o Punctured evaporator that voids the warranty on the complete sealed system.
o Repairs performed by unauthorized servicers.
o Shipping and handling costs associated with the replacement of the unit.
o Service calls that do not involve defects in material or workmanship such as customer educaon, door
reversal, or proper installaon.
o Surcharges including, but not limited to, any aer hour, weekend, or holiday service calls, tolls, ferry trip
charges, or mileage expense for service call to remote areas, including the State of Alaska.
o Service calls that are related to external problems, such as abuse, misuse, inadequate electrical power,
accidents, re, oods, or acts of God.
o Replacement of house fuses or reseng circuit breakers.
• Failure of the product if it is used for other than its intended purpose.
• This warranty does not apply outside the Connental USA.
SERVICE FOR YOUR WINE UNIT:
With the purchase of your Allavino appliance, you can have the condence that if you ever need addional informaon
or assistance, the Allavino Customer Service team will be here for you. Whatever your quesons are about our products,
help is available. Just call us toll-free.
ALLAVINO PRODUCT CUSTOMER SERVICES:
Product Informaon, Part Orders and In-Home Repair Service: 888-980-4809

www.allavino.com 1.888.980.480915

www.allavino.com 1.888.980.480916
This manual suits for next models
4
Table of contents
Other Allavino Refrigerator manuals