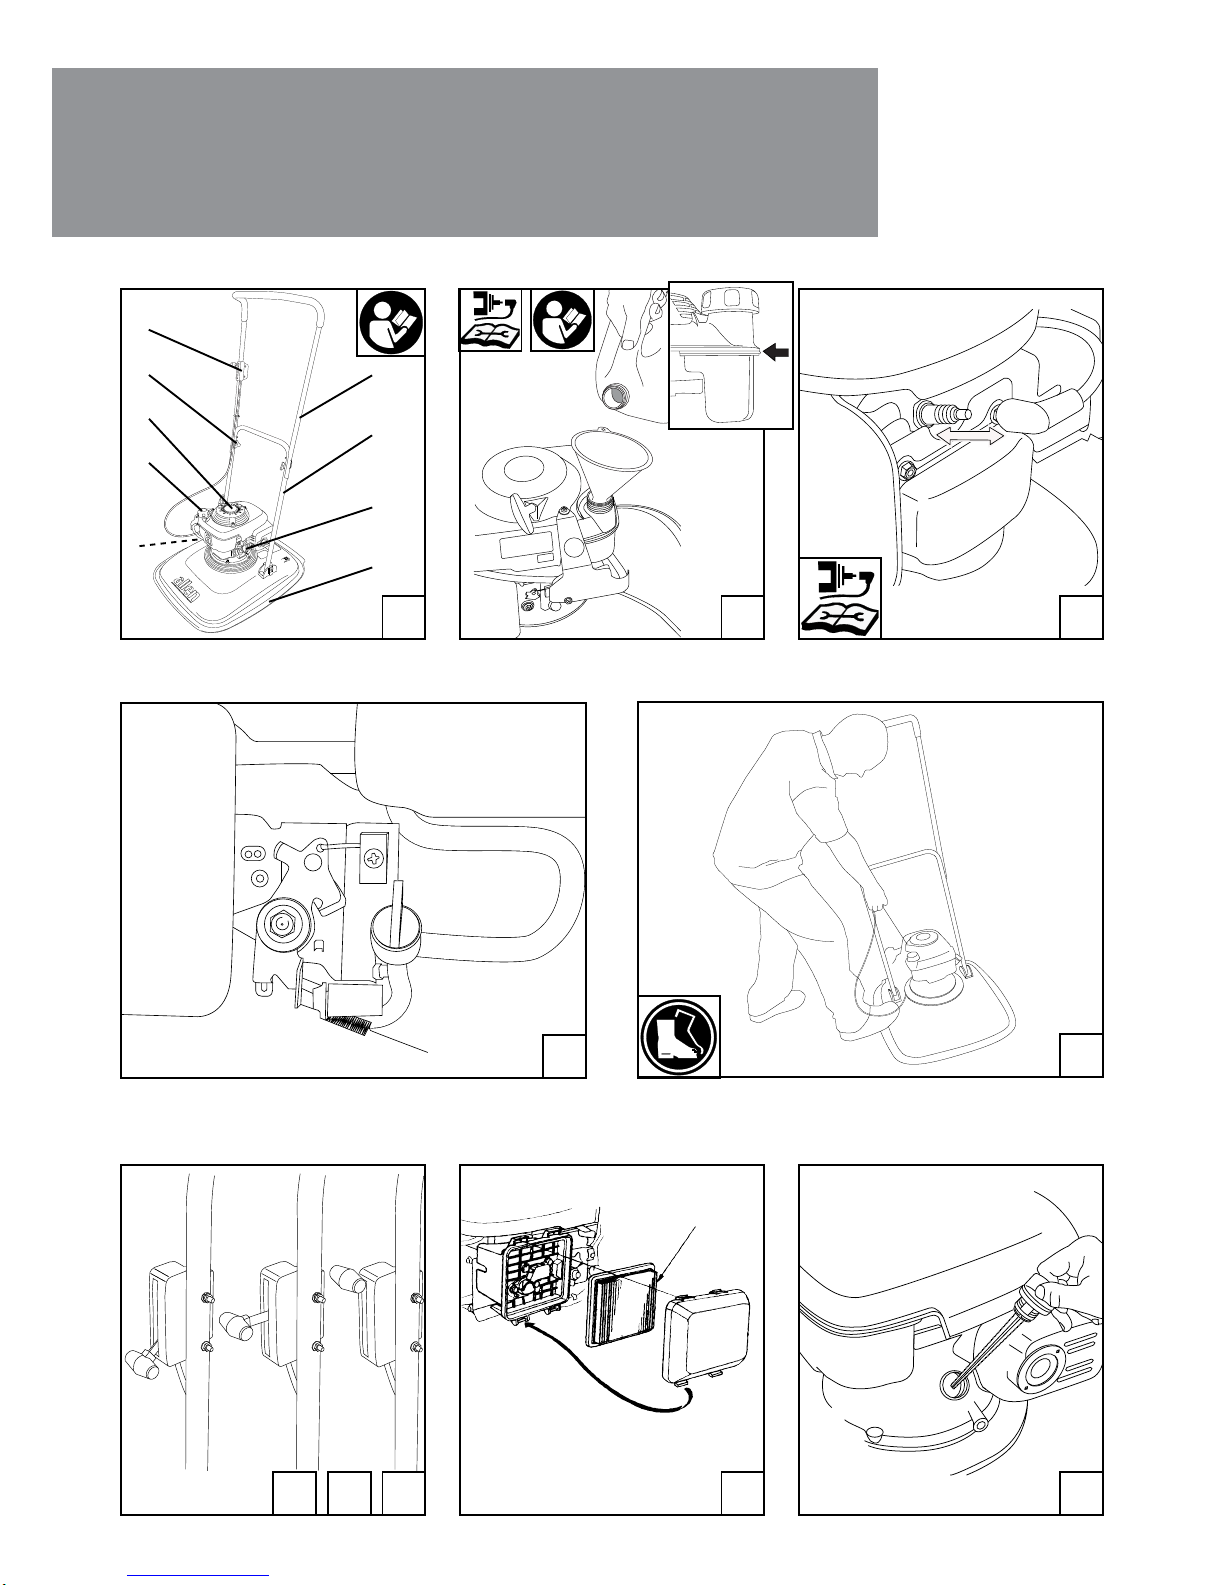
allen 418H Guide


2
3 4
5
12

6
7
7a
7d
7b 7c
p1

11
10
TIP
THIS SIDE
UP
FOR
SERVICE
98
16 17
A
E
H
I
D
C
BF
G
151413
12
p2

18
24 2523
19
p3
20 21 22

10½¨
9½¨
8½¨
7½¨
10¨
9¨
8¨
7¨
26b 27
31
28
29 30
21
18
1
2
3
26a
22 23
p4

Read the user
instructions carefully
to make sure that
you understand all
of the controls and
what they do.
Always keep the
lawnmower on
the ground when
mowing. Lifting
or tilting the
lawnmower may
cause objects to be
thrown out.
Disconnect spark
plug, before replacing
any spare parts and
when unit is put
away for storage.
Keep bystanders at a
safe distance. Do not
mow whilst people,
children or pets are
in the mowing area.
The wearing of
protective footwear
is required
Ear defenders
should be worn.
Warning
Safety goggles
should be worn.
p5
Opening the box:
• Place box with the title “Allen” upright. Slit the tape see fig 1
• Remove staples with a screwdriver see fig 2
• Open out box fully see fig 3
• Lift out top packing assembly see fig 4
• Check box contents see fig 5
Assembling the unit:
• Fit the LOWER HANDLE first, and position the
white bushes as shown see fig 6
• Place lower handle between bushes, with
KICK STOP assembly on correct side see fig 7b
• Attach lower handle using fixings see fig 6
• Position UPPER HANDLE assembly and line up holes see fig 7
• Fix top and bottom handle assemblies using U-bolts
and handwheels see fig 7c
• Attach throttle assembly see fig 7a
• Secure throttle cable, using ties supplied see fig 7d
ASSEMBLING THE UNIT and
EXPLANATION OF WARNING SIGNS
Guide to General features of the unit [fig 8]:
A Throttle assembly
B Handwheel
C Recoil handle
D Fuel tank cap
E Fuel ON/OFF tap
F Upper handle assembly
G Lower handle assembly
H Oil filler cap
I Cover

p6
PARTS LIST
Ref Part No. [US] Description Qty
1 H292276 Grip 2 All
2 H290237 Upper Handle 1 All
3 H190139 Cable Securing Kit 1 All
4 H292328 Cable Assy 1 All
5 H290288 H290238 Lower Handle 1 All
6 H192204 Handwheel 2 All
7 H292026 U Bolt 2 All
8 H290286 Footstop 1 All
9 H290097 Deck Fixing Kit 1 All
10 H290267 Engine Fixing Kit 1 All
11 H290003 Engine Frame Fixing Kit 1 All
12 H290272 Upstop Fixing Kit 1 All
13 H292269 Bracket Upstop 1 421H
14 H290270-USA H290077 Deck Assy Kit - 18” 1 418H /418H - 4.5HP
14 H290271-USA H290078 Deck Assy Kit - 21” 1 421H
15 H290004 Engine Frame to Deck Fixing Kit 1 All
16 H292329 Key Engine Shaft 1 All
17 H192267 H290011 Drive Kit 1 All
18 H192268 Impeller 1 All
19 H192270 Spacer Large 1 All
20 H192025 Spacer Small 3 418H / 421H
20 H192025 Spacer Small 2 418H - 4.5HP
21 H292340 SE18369 Trim Disc 18” 1 418H
21 H292341 SE21369 Trim Disc 21” 1 421H
21 H292401 SB13166 Safeway Disc 1 418H - 4.5HP
22 H292318 SE00603 Plastic Blade 3 Pack 1 418H / 421H
22 H292318 - 60 SE01206 Plastic Blade 60 Pack A/R 418H / 421H
22 H292385 Safeway Cutting Line - 0.5kg Spool A/R 418H - 4.5HP
22 H292384 Safeway Cutting Line - 2kg Spool A/R 418H - 4.5 HP
23 H290276 Blade Plastic Retaining Kit 1 418H / 421H
24 H192272 Retaining Spigot 1 All
25 H292018 Securing Bolt 1 All
26 H290279 SE010QC Kit - Trim Disc 18” 1 418H*
26 H290280 SE020QC Kit - Trim disc 21” 1 421H*
27 H190210 Spanner 1 All*
28 H292343 Allen Key - Plastic Blades 1 418H / 421H*
29 H190118 Oil Seal Engine Crank 1 All*
30 H292310 Engine - GCV160EN7 1 418H / 421H*
31 H292311 Engine - GCV135EN7 1 418H - 4.5HP*
32 H295128 Label Allen 1 All*
33 H295129 Logo A 1 All*
34 H295158 Operators Manual 1 All*
A/R - as required
*Item not illustrated

OPTIONAL EXTRAS:
Wheel kit:
see fig 29
Hi-Rise kit:
see fig 30
p7
6
7
9
9
9
8
5
2
3
3
4
1
10
10
14
11
15 16
17
18
19
20
21
22 22
24
25
19
20
24
25
23
20
21
12
13
PARTS BREAKDOWN

p8
Starting the unit:
• Lock the handles in the upright position
• Slide the throttle from “STOP” to “START” see fig 15
• Turn on the fuel supply tap see fig 11
• Connect the spark plug see fig 10
• Place foot and tilt machine see fig 12
and pull starting cord.
• Gently tip the machine back onto the level.
• When the engine is warm, slide
the throttle to the “RUN” position see fig 14
Remember! Blades continue to rotate for a short time after the engine has been turned off!
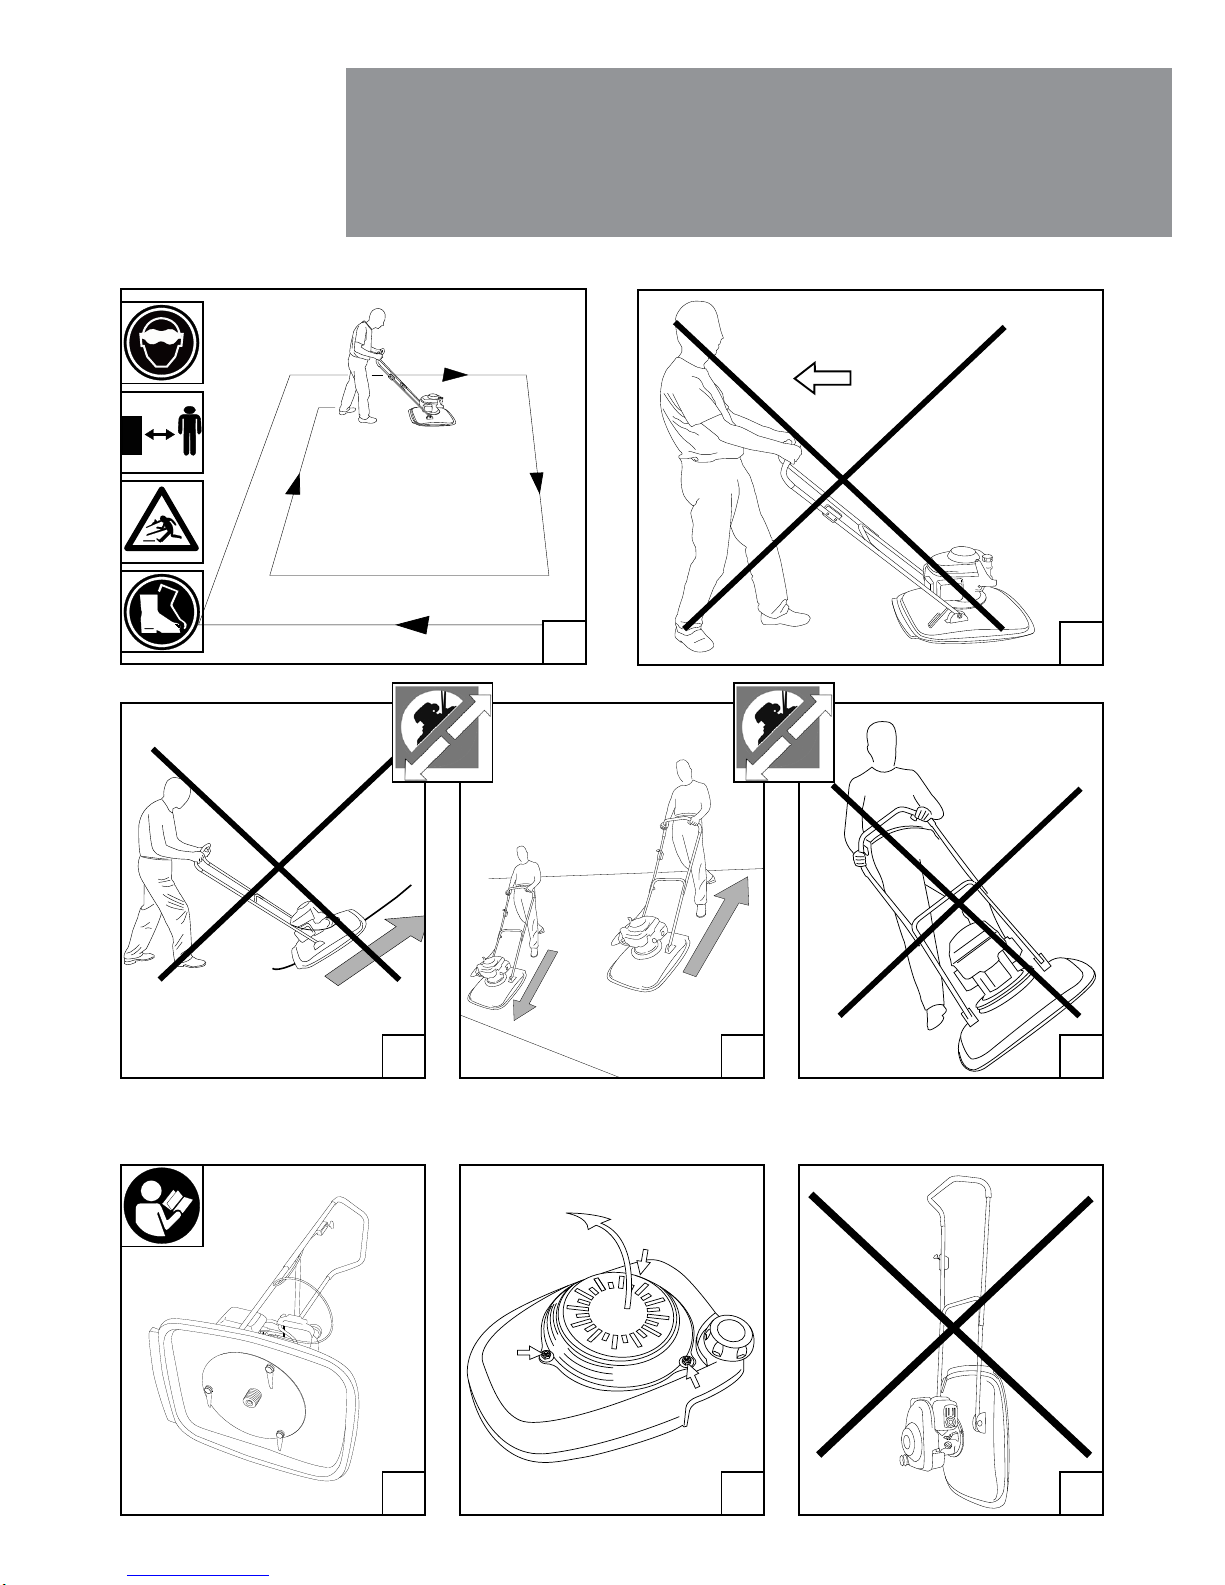
Changing the cutter height: [method applies to “Clean Cut” and “Safeway”]
1) Stop Machine.
2) Remove Spark Plug
3) Tilt machine on side [see fig 23] and support it to avoid it falling over.
IMPORTANT - DO NOT TURN THE MACHINE UPSIDE DOWN
(Also, do not leave the machine like this, return it to level ground as soon as possible)
4) Remove bolt (p7, item 25)
5) HEIGHTS: There are three heights available, using combinations of the spacers - see fig 26a & 26b.
NOTE: The large spacer must be positioned directly below the impeller at all times and the retaining spigot
must be entered into the bottom most spacer adjacent to the retaining bolt.
TIGHTEN THE CUTTER RETAINING BOLT - USE ONLY THE SPANNER PROVIDED.
6) To change the SAFEWAY line (3.5mm Flexi Blade):
pull out old line, pulling it out towards centre of disk, see fig 27.
The line can be changed with the head fitted to the machine.
7) Insert new line, pushing it in and pulling it through - see fig 27.
8) Trim line to required length - using guide: fig 31
STARTING, STOPPING and
CHANGING THE CUTTING HEIGHT
Before starting the
engine, read the
manufacturer’s
instructions carefully,
paying particular
attention to levels of oil
in the crankcase, and
ensure there is sufficient
fuel in the tank.
See figs 17 & 9
Stopping the unit:
• Tip the mower slightly, as in fig 12
• Slide the throttle to “STOP” see fig 13
• DO NOT PLACE the unit back on the level
until the engine has stopped.
• Close the fuel supply tap see fig 11
• Disconnect the spark plug [IT MAY BE HOT!] see fig 10
6) To change the CLEAN CUT tips:
undo Allen pin with key supplied.
Replace blade and return washer.
7) Re-tighten Allen pin - see fig 28.

p9
IMPORTANT
UNDER NO CIRCUMSTANCES SHOULD ANY THREAD-LOCKING MATERIAL BE USED ON FIXINGS HOLDING
ENGINE TO FRAME AND FRAME TO DECK, OR ANY FIXING COMING INTO CONTACT WITH PLASTIC
PARTS. THE ONLY EXCEPTION IS THE DRY LOCTITE PATCH APPLIED TO HANDLE TO DECK FIXING BOLTS.
FAILURE TO OBSERVE WILL LEAD TO SERIOUS WEAKENING OF PLASTIC PARTS.
Cutting the grass:
We recommend the method of operation as shown in fig. 18 to obtain the maximum cutting performance from your
mower. It is better to cut from the outside border of the lawn and go round the borders in a clockwise direction,
working towards the centre. Always control the mower with two hands and keep it flat on the grass.
Do not PULL the mower to cut grass. It should always be pushed.
It is normally recommended never to cut more than one third of the length of the grass at one time.
Never allow the mower to struggle continuously in difficult conditions. This will only occur in long tough grass with
the blade set too low.
When cutting long tough grass, always have the blade at its highest setting, using a gentle ‘pecking’ motion and not
forcing the mower through the grass.
If used on undulating ground set the blade at a height so that it does not ‘scalp’ the grass.
When cutting slopes, DO NOT mow “across” them and DO NOT push machine UP slope. See figs 21,22 & 23.
If cutting wet grass for a prolonged period ensure that there is not a build up of grass on the underside of the deck.
If the build up becomes too great, SWITCH OFF THE ENGINE, WAIT FOR THE BLADE TO STOP ROTATING,
disconnect the spark plug lead, then tip the mower on its side, as fig 23, and scrape away the damp grass.
As a general practice, try to avoid using the mower in these conditions, as it can be detrimental to the condition of
your lawn.
The Handles
The handles on your mower automatically lock when placed upright; this is a “stationary” or “parking” position.
The handles must NOT be released from this position when starting the engine.
To release from any limit position, depress the footstop.
CUTTING THE GRASS
PLEASE REMEMBER:
WHEN TILTING THIS UNIT, HAVE THE CARBURETTOR UPPERMOST, OTHERWISE OIL WILL DRAIN FROM
THE BREATHER PIPE. THIS WILL MAKE RE-STARTING DIFFICULT, AND LOSS OF OIL WILL DAMAGE THE
ENGINE.
Before cutting the grass!
Check the operator has:
a. read and understood
the Instruction manual
b. been made aware of
the Safety Instructions.
ALWAYS MAKE SURE THE GRASS IS CLEAR OF STONES, STICKS
AND SIMILAR OBJECTS BEFORE MOWING
Please read the following
instructions before using the
mower.

p10
If not used correctly
this lawn mower can be
dangerous; it can cause
serious injury to the
operator and others.
The warnings and safety
instructions must be
followed to ensure
reasonable safety and
efficiency.
The operator is
responsible for
following the warning
and safety instructions
in this manual and on
the lawn mower.
Instructions:
Read the instructions carefully. Familiarise yourself with the controls and with the
correct operation of the equipment. Never allow the mower to be used by children or
by persons who are unfamiliar with these instructions.
Never mow when people, and in particular children or animals, are in the vicinity.
Always remember that it is the operater who is responsible for accidents or injuries
caused to other people on his property.
Never operate the lawnmower when you are tired, ill or under the influence of
alcohol, drugs or medicine.
Preparation:
Do not use a metal/bar blade as a cutting mechanism on this machine; use only the SAFEWAY
or CLEAN CUT safety blade mower head device approved by Allen Power Equipment.
Use safety glasses while operating this machine.
Safety shoes with spikes and steel toes must always be worn while operating this
machine.
The use of ear protection is recommended.
Use:
1) Never operate the machine with a damaged enclosure deck.
2) Do not operate the engine in a confined space, where exhaust fumes (carbon monoxide) could accumulate.
3) Use the mower only in daylight or under good artificial lighting.
4) The use of the equipment on grass that is wet should be avoided where possible.
5) Always ensure that your feet have a good grip when working on slopes.
6) Do not walk backwards when in use; you could trip. WALK - DON’T RUN.
7) Take great care when cutting on slopes - see figs 20, 21 & 22.
8) Exercise great care when changing directions on slopes.
9) Use the mower with the greatest of care, when pushing it. Never pull it when cutting the grass. [fig. 19]
10) To stop the engine, move the throttle control lever to stop position. [fig. 13]
11) The cutters must be stopped if the mower is to be transported over areas without grass, and when it is
being brought to the area which is to be mown.
12) Never vary the settings of the engine speed regulator or run the engine at an excessive speed.
This is dangerous and shortens lawnmower life.
13) Exercise care when starting the engine, keeping feet and hands well away from the cutting area.
14) When starting the engine do not tilt the mower more than necessary and raise only the part which is
furthest from the operator. [fig. 12]
15) Do not put hands and feet near or beneath the rotating components.
16) NEVER lift or carry the unit when the engine is running.
SAFETY PRECAUTIONS
This product must only be used for cutting grass.
Note:
Stop the engine and disconnect the sparking plug lead: [figs 13 & 10]
a. before cleaning out any obstructions,
b. before checking, cleaning or repairing the mower,
c. after having collided with a foreign body (inspect the unit for any damage, and repair before re-starting.),
d. if the mower begins to vibrate in an abnormal manner (a check must be made immediately).
e. before leaving the mower unattended;
f. before refilling the fuel tank;
g. before adjusting the height of the cut.
Remember! Blades continue to rotate for a short time after the engine has been turned off.

p11
DANGER: Petrol is highly flammable – see engine manufacturers instructions for fuel recommendations.
(a) Always wear protective clothing when handling any fuels and lubricants.
(b) Keep fuel in containers, which are specially intended for that purpose.
(c) Always fill the fuel tank out of doors. Never smoke when filling the tank.
(d) Avoid contact with skin. If affected, wash liberally with soap and water.
(e) Store fuel in a cool place, in a container specifically designed for the purpose.
(f) Use fresh, clean, regular unleaded petrol.
(g) Wipe dirt and grass clippings from fuel tank filler cap to avoid getting dirt into fuel tank.
(h) Fuel should be added before starting the machine. Never remove the lid from the tank or add petrol when
the engine is running or still hot.
(i) If petrol has overflowed from the tank, do not attempt to start the engine. Remove the machine from the
area where the petrol is present and avoid creating a source of ignition until the petrol vapour has
dissipated.
(j) Always change your clothes if you get fuel on them.
SAFETY & MAINTENANCE
Maintenance and Storage
1) Ensure that all nuts, bolts and screws are kept tight in order to be certain that the machine is in sound
working order.
2) Replace worn or damaged parts for safety.
3) Always replace faulty silencers and spark plugs.
4) Only use the replacement disk, cutting lines, spacers, and impeller specified for this product.
5) The machine must never be stored with petrol in the tank inside any building in which a flame or a spark
could be reached.
6) The engine must be allowed to cool down before being placed inside any kind of container.
7) In order to reduce the risk of fire, the engine and the silencer should be kept free of any grass, leaves or
grease.
8) If the fuel tank has to be drained, this should be done outdoors.
9) Use a funnel when filling the fuel tank to avoid spillage on to the mower. [see fig. 9]
Routine Maintenance
A few minutes spent on this after every mowing session will ensure that your mower is in a good state of repair.
Please ensure that the engine maintenance is carried out as recommended by the manufacturer, paying particular
attention to the air cleaner system. [see fig 16]
FAILURE TO DO THIS MAY RESULT IN PREMATURE ENGINE FAILURE AND WILL RENDER THE GUARANTEE VOID.
Ensure the engine cooling fins, carburettor and impeller air vents are clear.
Regularly check that there is no grass build up under the re-coil cover [see fig 24]. To clear it out, remove the cover
by undoing the screws and clearing away the debris.
Always keep the underneath deck clean, this will ensure that the mower operates efficiently.
Check that the cutting disk is tightly bolted and not damaged, the spacers are correctly fitted and that the impeller
has sustained no damage. An out of balance cutting disk causes vibration and may damage the engine.
In the event of your unit hitting an obstruction and damaging either the cutting assembly, the impeller, or both,
please replace before further use.
DO NOT OPERATE THE MOWER WITH AN OUT OF BALANCE CUTTING ASSEMBLY or IMPELLER.
Check all nuts and bolts occasionally and tighten when necessary.

p12
Fault finding:
Poor Starting
1. Make sure the petrol tap is open.
2. If the engine is COLD, the throttle control should be in the START [fig 15] position.
If WARM, in the RUN [fig 14] position.
3. If the mower has been out of use, the petrol may be stale. Drain and replace.
4. Check the air filter for excessive oil. If this is the case, fit a new filter [see fig. 16].
5. The engine may be flooded with fuel, in which case, remove and dry the spark plug. Before replacing, crank
the engine to remove excess fuel.
6. Check the plug for spark by placing the end of the plug (with lead connected) against the engine casing and
away from the plughole. DO NOT HOLD THE PLUG OR LEAD BY HAND.
Crank the engine and watch for a spark at the plug points. If there is no spark, the plug should be replaced.
7. Make sure the cutting disk is correctly fitted and tight.
If none of the above steps solve the problem - see your local dealer.
Poor hovering
1. Check that the cutting disk is fitted firmly.
2. Check that the impeller air vents are not blocked.
3. Check that the underside of the deck is really clean.
4. Check that the engine is running at the correct speed - see your local dealer.
Excessive vibration
1. Check cutting disk and spacers are fitted correctly.
2. Check all screws and bolts are tight.
3. If the blade has hit a heavy object the impeller crankshaft may be damaged. (See dealer.)
Engine Overheating
1. Make sure the engine cooling fins are dirt-free.
Ordering parts
When ordering a part please state the Allen Power model number.
The serial number may be needed - it is located on the sticker shown on p13.
There are two stickers located on your mower beneath the handlebars behind the engine.
Winter storage:
We recommend your lawnmower is serviced after the last cut of the season, before storage.
Before storing, carry out the following:
1. Ensure the petrol is drained from the tank.
2. Then run the engine until it uses up the remaining fuel.
3. Close the fuel tap - see fig 11.
4. Disconnect the spark plug lead and remove the spark plug - see fig 10.
5. Drain and replace the engine oil. [See manufacturers handbook]
6. Store the machine so that the deck and engine are horizontal to the ground.
N.B. - Stale fuel is a major cause of non-starting at the beginning of a season.

p13
Allen Power Equipment Limited
Model: xxx - USA
Serial No:________________
xxxx @ xxxxRPM
The Broadway Didcot
Oxfordshire OX11 8ES
Made in England
Serial no.: ..................................................................................................
Date of purchase: ....................................................................................
Purchased from: .......................................................................................
......................................................................................................................
GUARANTEE
If there is any component, or components, manufactured by ALLEN POWER EQUIPMENT LTD
that are found to be defective within 12 months from the date of purchase (or in the case of a
machine used for hire purposes, 45 days), ALLEN POWER EQUIPMENT LTD undertake to replace
the faulty component/components free of charge through their authorised dealers.
The following are NOT covered by this Guarantee.
1. ENGINES - which are guaranteed separately by their respective manufacturers.
2. A NEW MACHINE - which has been subject to operation in excess of recommended capacities,
misuse, negligence or accident, or has been altered or modified in a manner not authorised by
ALLEN POWER EQUIPMENT LTD.
3. TRANSPORTATION CHARGES - to and from an authorised dealer.
ALLEN POWER EQUIPMENT LTD operate a policy of continual improvement and reserve the
right to alter product specification without giving prior notice.
After each season, we recommend that you have your machine serviced by your dealer, preferably
between October and January, to avoid delay at the start of the following season.
SAFETY SPECIFICATIONS
This mower meets or exceeds the B71.4 - 1984 specifications of the American National Standards
Institute for walk-behind rotary mowers. However, improper use or maintenance by the operator
or owner can result in injury.
To reduce the potential for injury, comply with these safety instructions and always pay attention
to the safety alert symbol
Failure to comply with these instructions may result in personal injury.
This product does not comply with the Consumer Product Safety Commission’s safety
requirements for walk behind lawn mowers.
This product is intended for commercial use only.

p14

Siempre mantenga
la cortadora de
césped sobre el
suelo cuando la
traslade. Elevar o
inclinar la máquina
puede hacer que
objetos salgan
desprendidos.
Desconecte
la bujía antes
de reemplazar
cualquier repuesto,
y cuando guarde la
máquina.
Mantenga a la gente
a una distancia
prudente. No
corte el césped
mientras haya gente
o animales en el
área de corte.
Se requiere el
uso de calzado de
protección.
Deben emplearse
protecciones para
los oídos.
Aviso
Deben usarse
protecciones
para los ojos.
p15
Lea
minuciosamente las
instrucciones de
uso para asegurarse
de comprender
todos los controles
y lo que hacen.
Apertura de la caja:
• Coloque la caja con el nombre “Allen” hacia arriba.
Corte la cinta adhesiva Ver Fig. 1
• Use un destornillador para sacar las grampas Ver Fig. 2
• Abra bien la caja Ver Fig. 3
• Saque la unidad de la caja Ver Fig. 4
• Verifique el contenido de la caja Ver Fig. 5
Ensamblaje de la unidad:
• Instale primero el MANGO INFERIOR,
y coloque los bujes blancos del modo indicado Ver Fig. 6
• Coloque el mango inferior entre los bujes, con la unidad
de PEDAL del lado correcto Ver Fig. 7b
• Monte el mango inferior utilizando las fijaciones Ver Fig. 6
• Coloque la unidad de MANGO SUPERIOR y alinee
los orificios Ver Fig. 7
• Fije las unidades de mango superior e inferior
utilizando los pernos en U y las ruedas de mano Ver Fig. 7c
• Montar la unidad de regulador Ver Fig. 7a
• Afiance el cable del regulador utilizando las ataduras
provistas Ver Fig. 7d
ENSAMBLAJE DE LA UNIDAD y EXPLICACIONES
SOBRE LAS SEÑALES DE AVISO
Lista de los componentes principales de la máquina
[Fig. 8]:
A Unidad de regulador
B Rueda de mano
C Manija de rebobinado
D Tapa de tanque de combustible
E Paso de combustible ABIERTO/CERRADO
F Unidad de mango superior
G Unidad de mango inferior
H Tapa de llenado de aceite
I Cubierta

p16
Arranque de la unidad:
• Trabe los mangos en la posición hacia arriba
• Pase el regulador de “STOP” (PARADA)
a “START” (ARRANQUE) Ver Fig. 15
• Abra el paso de combustible Ver Fig. 11
• Conecte la bujía Ver Fig. 10
• Coloque el pie, incline la máquina Ver Fig. 12
y tire de la correa de arranque.
• Suavemente vuelva a nivelar la máquina.
• Una vez caliente el motor, pase el regulador
a la posición de “RUN” (OPERAR) Ver Fig. 14
Cambio de la altura de corte: [el método se aplica a “Clean Cut” y “Safeway”]
1) Pare la máquina.
2) Saque la bujía
3) Vuelque la máquina sobre su costado [Ver Fig. 23] apoyándola en algo para evitar que se caiga.
IMPORTANTE: NO PONGA LA MÁQUINA HACIA ABAJO
(Tampoco deje la máquina en esta posición, y colóquela en la posición nivelada normal lo antes posible)
4) Retire los pernos (p7, art. 25)
5) ALTURAS: Hay tres alturas disponibles, utilizando las combinaciones de las piezas de distancia - Ver
Fig. 26a y 26b.
NOTA: La pieza de distancia de mayor tamaño debe colocarse directamente por debajo de la rueda de paletas en
todo momento, y la espiga de retención debe colocarse en la pieza de distancia más inferior, adyacente al perno de
retención.
AFIANCE EL PERNO DE RETENCIÓN DE LA CUCHILLA. SÓLO USE LA LLAVE PROVISTA.
6) Para cambiar la línea SAFEWAY (Cuchilla Flexi 3,5mm):
saque la línea vieja, tirando hacia el centro del disco. Ver Fig. 27.
La línea puede cambiarse con el cabezal instalado en la máquina.
7) Inserte una línea nueva, empujándola hacia adentro y haciéndola
pasar a través - Ver Fig. 27.
8) Corte la línea según la longitud requerida, utilizando la guía: Fig. 31
ARRANQUE, PARADA y CAMBIO DE LA
ALTURA DE CORTE
Antes de arrancar
el motor, lea
minuciosamente las
instrucciones del
fabricante, prestando
particular atención a
los niveles de aceite en
el cárter, y asegurando
que haya suficiente
combustible en el
tanque.
Ver Figs. 17 y 9
Parada de la Unidad:
• Incline levemente la cortadora, como en la Fig. 12
• Pase el regulador a “STOP” Ver Fig. 13
• NO VUELVA A NIVELAR la máquina hasta
que el motor se haya detenido.
• Cierre el paso de combustible Ver Fig. 11
• Desconecte la bujía [CUIDADO: ¡PUEDE ESTAR CALIENTE!] Ver Fig. 10
6) Para cambiar las puntas CLEAN CUT:
Afloje la clavija Allen utilizando la llave
provista.
Reemplace la cuchilla y arandela de
retorno.
7) Vuelva a afianzar la clavija Allen - Ver
Fig. 28.
¡Recuerde que las
cuchillas siguen
girando por cierto
tiempo después de
que el motor se haya
apagado!

p17
IMPORTANTE:
BAJO NINGUNA CIRCUNSTANCIA DEBE UTILIZARSE MATERIAL PARA TRABAR ROSCAS EN LAS
FIJACIONES QUE SUJETAN EL MOTOR AL CUADRO Y EL CUADRO A LA PLATAFORMA, NI EN NINGUNA
OTRA FIJACIÓN QUE ENTRE EN CONTACTO CON LAS PIEZAS PLÁSTICAS. LA ÚNICA EXCEPCIÓN ES EL
PARCHE DE LOCTITE SECO APLICADO A LOS PERNOS DE FIJACIÓN DEL MANGO A LA PLATAFORMA. EL
NO RESPETAR ESTO RESULTARÁ EN UN SERIO DEBILITAMIENTO DE LAS PIEZAS PLÁSTICAS.
Corte del césped:
Recomendamos el método de operación ilustrado en la Fig. 18 para obtener un máximo rendimiento de corte de la
cortadora. Lo mejor es cortar desde el borde exterior del césped, dando vueltas siguiendo las agujas del reloj hasta
llegar al centro. Siempre controle la cortadora con las dos manos, y manténgala nivelada contra la hierba.
NO TIRE de la cortadora para cortar el césped. La cortadora siempre debe empujarse.
Normalmente se recomienda no cortar más de un tercio de la longitud de la hierba por vez.
Nunca permita que la cortadora se esfuerce para abrirse paso en condiciones difíciles. Esto sólo sucede con hierba
larga y dura, cuando la cuchilla está muy baja.
Cuando corte hierba larga y dura, siempre coloque la cuchilla en la posición más alta, y emplee pequeños
empujones, sin forzar a la cortadora a través del césped.
Si la cortadora se usa en suelo ondulante, coloque la cuchilla a una altura que no corte la hierba al ras.
Para cortar declives, NO corte “al través” y NO empuje la máquina cuesta arriba. Ver Figs. 21,22 y 23.
Si se corta césped mojado durante un período prolongado, asegúrese que no se acumule hierba por debajo de la
plataforma.
Si hay demasiada acumulación de hierba, APAGUE EL MOTOR, ESPERE A QUE LA CUCHILLA DEJE DE GIRAR,
desconecte la bujía, vuelque la cortadora de costado, como lo indica la Fig. 23, y quite la hierba mojada.
Como práctica general, evite usar la cortadora bajo estas condiciones, dado que puede perjudicar la condición del
césped.
Los Mangos
Los mangos de la cortadora se traban automáticamente en posición vertical, o sea, en posición “estacionaria”.
Los mangos NO deben moverse de esta posición al arrancar el motor.
Para salir de una posición límite, oprima el pedal.
CORTE DEL CÉSPED
SIEMPRE RECUERDE:
AL INCLINAR LA UNIDAD, SIEMPRE HÁGALO CON EL CARBURADOR HACIA ARRIBA, O DE LO
CONTRARIO, SALDRÁ ACEITE POR EL TUBO DE RESPIRACIÓN. ESTO DIFICULTARÁ EL ARRANQUE, Y LA
PÉRDIDA DE ACEITE DAÑARÁ EL MOTOR.
Antes de cortar el césped,
verifique que el operador
haya
a. leído y comprendido el
Manual de Instrucciones
b. conozca las
Instrucciones de
Seguridad.
SIEMPRE ASEGÚRESE QUE LA HIERBA NO TENGA PIEDRAS, PALOS
Y OBJETOS SIMILARES ANTES DE INICIAR EL CORTE
Por favor lea las siguientes
instrucciones antes de usar
la cortadora.

p18
Si esta cortadora no se
emplea correctamente
puede ser peligrosa,
puede ocasionar serias
lesiones al operador y a
otros.
Deben seguirse
los avisos y las
instrucciones de
seguridad a fin de lograr
una razonable eficiencia
y seguridad.
El operador es
responsable de
seguir los avisos y
las instrucciones
de seguridad en
este manual y en la
cortadora de césped.
Instrucciones:
Lea cuidadosamente las instrucciones. Familiarícese con los controles y con la
correcta operación del equipo. Nunca permita que usen la cortadora niños o
personas que no estén familiarizadas con estas instrucciones.
Nunca corte el césped con gente, y en particular niños o animales, en las
proximidades.
Siempre recuerde que el operador es responsable de los accidentes o lesiones
ocasionados a otras personas en su propiedad.
Nunca use la cortadora cuando esté cansado, o si está bajo la influencia de alcohol,
drogas o medicamentos.
Preparación:
No use la cuchilla metálica o de barra como mecanismo de corte en esta máquina.
Sólo use el dispositivo de cabezal de cuchilla de seguridad SAFEWAY o CLEAN CUT
aprobado por Allen Power Equipment.
Use gafas de seguridad cuando opere esta máquina.
Siempre utilice calzado de seguridad con púas y punteras metálicas cuando opere esta
máquina.
Se recomienda el uso de protecciones en los oídos.
Uso:
1) Nunca opere la máquina con la carcasa de la plataforma dañada.
2) No opere el motor en un espacio reducido en el que podrían acumularse las emanaciones del escape
(monóxido de carbono).
3) Use la cortadora sólo con luz de día o con buena iluminación artificial.
4) El uso del equipo sobre hierba mojada debe evitarse siempre que sea posible.
5) Siempre asegúrese de tener buena sujeción al trabajar en pendientes.
6) NO camine hacia atrás cuando use la cortadora: podría tropezar. CAMINE, NO CORRA.
7) Tenga mucho cuidado al cortar el césped en pendientes. Ver Figs. 20, 21 y 22.
8) Tenga mucho cuidado al cambiar de dirección en pendientes.
9) Use la cortadora con sumo cuidado cuando la empuje. Nunca tire de ella para cortar el césped. [Fig. 19]
10) Para parar el motor, pase la palanca de control del regulador a la posición de parada. [Fig. 13]
11) Las piezas de corte deben detenerse para desplazar la cortadora sobre áreas sin césped, o cuando se la lleva
hasta el área a cortar.
12) Nunca varíe las pautas del regulador de velocidad del motor, ni haga funcionar el motor a velocidad excesiva.
Es peligroso y puede acortar la vida útil de la cortadora.
13) Tenga mucho cuidado al arrancar el motor, manteniendo las manos y los pies bien alejados del área de corte.
14) Al arrancar el motor, no incline la cortadora más de lo necesario, y sólo eleve la parte que esté más alejada
del operador. [Fig. 12]
15) No ponga las manos o los pies cerca o por debajo de los componentes rotativos.
16) NUNCA levante o porte la unidad con el motor en marcha.
PRECAUCIONES DE SEGURIDAD
Este producto sólo debe usarse para cortar césped.
Nota:
Pare el motor y desconecte el cable de la bujía: [Figs. 13 y 10]
a. antes de limpiar cualquier obstrucción,
b. antes de inspeccionar, limpiar o reparar la cortadora,
c. tras la colisión con un objeto extraño (inspeccione si hay daños en la unidad y repárelos antes de volverla a
arrancar),
d. si la cortadora comienza a vibrar de forma anormal (debe efectuarse una inspección de inmediato).
e. antes de dejar la cortadora desatendida;
f. antes de volver a llenar el tanque de combustible;
g. antes de ajustar la altura de corte.
Siempre recuerde: las
cuchillas siguen girando
por un tiempo después de
apagarse el motor.
This manual suits for next models
1
Table of contents
Languages:
Other allen Lawn Mower manuals