Allis-Chalmers Simplicity Snowbuster 220 User manual

7
Operator's
|||
anual
EAS
PA
a
:
7
7
x
:
k
|
^r
â
SY
y
A
I
di
Un
AAA
-
fi
NS
“Wr
lll
(E
Ž
fois
Ts.
2
H.P.
SNOW
THROWER
JEI
f
am
ames
Es
A
2
Da
e
>
l
>
i
MANUAL
START.
=
:
is
B
|
i
:
i
2
5
I
III
sl
10.2...
.
MFG.
NO.
1690354
«oY
ll...
2HP.
SNOW
THROWER
EB
ae
eT».
"ELECTRIC
START:
==-
BE
co...
MFG.
NO.
1690357
BI
i
SS
A
AN
ALLIS-CHALMERS
COMPANY

=
Dear
Customer,
|
Your
Snowbuster
220.
snow.
thrower
hasi
been.
carefully
designed
and
constructed
to
help
you
do
your
snow.
removal
jobs
efficiently
and
to
give
you
years
of
dependable
service.
We
at
Simplicity
believe
this
snow
thrower
.
--
|
is
versatile
enough
to
handle,
intact
ideal
for,
most
snow
removal
tasks.We
also
believe
this
snow
thrower
has
Eor
É
features
which
make
it
Superior
to
most
other
snow
SMOWeIS
oF
its
size.
„This
Operator
s
Manual
contains
TN
ior
operating,
maintaining,
ana
ain
your
snow
thrower.
For
|
o
your
own
safety,
as
well.as
that
of
others,
read
and
understand
the
safety
rules.
Also
read
the
technical
CF
Me
a
information:and
be
sure
you
are
familiar
with
all
controls
before
operating.
Review
this
information
often;itis
||
“there
for
your.
benefit
and
it
is
HON
df
NGIPI
is
needed
with
204
of
the
eee
your
dealer
will
be
peppy
Be
to
assist
you.
a
Measurements
:
are
given
in
this
manual
with
metric
e
lled
in
parentheses.
|
For.
ain:
behind
the
e
„measurement
1/8
inch
will
appear.
(3
mm).
So,
the
metric
eguivalent
of
1/8
inch
is
3
millimetres.
These
metric
2
"measurements
are
provided
for
your
convenience
as
an
aid
in
cU
to
the
metric
on
The
HOOD
OI
Is.
a
list
of
metric.
terms
and
API
ODS
used:
in
this.
manual.
|
Pee
=
LIST
MS
METRIC
TERMS
|||
ooa
em?
=.
`
cubic
centimetre
B
mm
millimetre
—
-kg
T
—
kilogram
a
SM”
7
Nem
23
y
|
newton-
metre
|
kW...
=
kiowatb
ES
degrees
Celsius
o
Pen
ao.
ot,
SF
Se
Md
ATN
(c)
Simplicity
Manufacturing
Co..
An
Allis:Chalmers
Company.
1978.

SAFETY
RULES
0...
o
iw
Gk
ADA
eee
i
a
a
a
Y
RA
AAA
p
2
SAFETY
DECALS
wos
ius
d
ss
d
as
PAS
L
dobar
ee
AR
AAA
ee
A
ees
4
OWNER
BENEFITS
Ludus
A
UR
AA
A
WAA
a
i
a
A
6
BEFORE
OPERATING
i
Y
k
S
ins
AA
AA
NND
hte
eee
7
PRE-START
PREPARATION
..........
0.2
ccc
ccc
FFY
FF
FF
ee
eee
aaa
aaa
as
8
FUEL
INFORMATION.
ccc
esos
a
oe
eS
Oe
obs
cat
DAA
AAA
ARS
as
8
SNOW
THROWER
CONTROLS
ene
ein
ee
eee
si
UY
YW
ADA
eee
seme
ted tes
10
OPERATION
pusiera
ee
Ge
a
eee
ED
hae
eee
11
OPERATING
PROCEDURES
ui.
99
ad
us
as
GU
A
ae
Y
AA
11
OPERATION
INFORMATION..........
ccc
cece
cece
reece
eee
a
aaa
as
aaa
aaa
EDD
YDD
oo.
13
NORMAL
CARE
Li
r
i
ros
de
Sa
Ei
GGDS
DA
i
on
I
i
k
e
e
16
BEFORE
AND:
AFTER
USE
au
ain
L
bis
i
i
A
i
A
o
Sa
ease
16
SPARK
PLUG:
See
ti
A
AAA
AAA
16
STORAGE
(Handle
Folding)........
0...
cece
ccc
cere
eee
ee
ee
renee
Y
FY
DH]
17
SERVICE
INFORMATION
.........
0...
I
FI
ec
ee
ee
ee
Y
FE
FN
Y
Yng
20
TROUBLESHOOTING
sitiada
DA
ears
r
is
20
DRIVE
BELT
REPLACEMENT
Ui
RW
FR
seksas
k
ki
AA
ete:
21
ADJUSTMENTS
<<
oidos
y
ra
r
tee
a
he
UED
a
o
as
ae
24
BELT
GUARD
AND
SHROUD
REMOVAL
.........
0.
ccc
cee
eee
Y
eee
ees
Sis
24
ADJUSTMENT
PROCEDURES
Ai
susu
a
i
i a
i
i
a
RA
AAA
25
SPECIFICATIONS
L.L
nis
is
rd
AAA
AA
eee
a
WYD
ARCANO
29
MAINTENANCE
RECORD
................
Liosas
ra
NN
RE
DR
UE
AE
Rae
ee
a
an
eee
31
IDENTIFICATION:
osuna
A
E
r
od
AA
ea
r
32

Safety
Rules
-—-—-—-—-—-—_
mmm
sm
¿ar
_
eDo
not
run
engine
indoors.
Exhaust
:
Read
these
safety
rules
and
follow
them
closely.
Failure
to
obey
these
.
mes
alo
deadly:
\
A
rules
can
result
in
loss
of
control
of
machine,
severe
personal
injury
to
|
yourself
or
bystanders,
or
damage
to
property
or
equipment
affecting
)
\
safety.
The
triangle
&
in
the
text
signifies
im
which
must
be
followed.
a
a
——-
S
O
S
E
S
S
S
S
S
S
ES
S
as
anos
„EP
4
A“
7
AS
AA
2
SO
7
A
7
AS
Y
GENERAL
eRead
the
Operator's
Manual
carefully.
Be
thoroughly
familiar
with
all
controls
and
proper
eguipment
use.
eNever
allow
children
to
operate
the
machine.
Do
not
allow
adults
to
operate
it
without
proper
instruction.
eKeep
the
area
of
operation
clear
of
all
persons,
particularly
small
children,
and
..
pets.
_
Never
discharge
material
toward
by-
standers
or
allow
anyone
near
the
ma-
chine
while
in
operation.
eMake
sure:
a.
snow
thrower
is
in
good
operating
condition,
b.
all
safety
devices
and
shields
are
in
place
and
working,
and
c.
all
adjustments
have
been
made.
PREPARATION
eNever
attempt
to
make
any
adjustment
while
engine
is
running.
eThoroughly
inspect
the
area
where
the
snow
thrower
is
to
be
used
and
remove
any
object
which
could
cause
personal
injury
should
it
be
picked
up
and
thrown.
*Do
not
engage
impeller
control
when
starting
engine.
“Do
not
operate
snow
thrower
without
wearing
proper
winter
clothing.
Wear
footwear
which
improves
footing
on
slip-
pery
surfaces.
eHandle
gasoline
with
care
—
itis
highly
flammable.
a.
Use
approved
gasoline
container.
b.
Never
remove
the
fuel
tank
cap
or
add
gasoline
to
a
running
or
hot
engine,
or
fill
the
fuel
tank
indoors.
Wipe
up
spilled
gasoline.
portant
cautions
or
warnings
|
OPERATION
J
eDo
not
use
snow
thrower
on
a
roof.
*Do
not
use
on
unpaved
surfaces.
eOccasionally
it
may
be
necessary
to
remove
snow
from
areas
where
debris
may
be
present
in
or
under
the
snow.
If
this
debris
is
of
the
nature
that
eye
injury
could
be
caused
by
ricochetting
objects,
approved
eye
protection
should
be
worn.
eKeep
hands
and
feet
away
from
rotat-
ing
parts.
Keep
clear
of
discharge
open-
ing
at
all
times.
eAfter
striking
an
object,
disengage
impeller,
stop
the
engine,
and
remove
the
key.
Inspect
the
snow
thrower
for
damage
before
restarting.
eNever
clear
snow
from
steep
slopes.
eStay
alert
for
hidden
hazards
and
traffic
when
operating
near
or
on
roads.

eBe
especially
careful
not
to
touch
snow
thrower
parts
which
might
be
hot
from
operation.
Allow
such
parts
to
cool
be-
fore
attempting
to
maintain,
adjust,
or
service.
eNever
operate
snow
thrower
without
guards,
plates,
or
other
safety
protective
devices.
elf
unit
starts
to
vibrate
abnormally,
disengage
impeller,
stop
the
engine,
and
remove
the
key.
Check
immediately
for
the
cause.
Vibration
is
generally
a
warn-
ing
of
trouble.
eDisengage
impeller
drive,
stop
engine,
and
remove
ignition
key
when
leaving
the
operator's
position
to
unclog
the
housing
or
to
make
repairs,
adjustments,
or
inspections.
eTake
every
precaution
when
leaving
the
machine
unattended.
Stop
the
en-
gine
and
remove
the
key.
eWhen
cleaning,
repairing,
or
inspect-
ing,
make
certain
all
moving
parts
have
stopped.
Remove
key
to
prevent
acci-
dental
starting.
eNever
operate
the
snow
thrower
near
glass
enclosures,
window
wells,
drop-
offs,
etc,
without
proper
adjustment
of
the
snow
thrower
discharge
angle.
eDisengage
impeller
drive
when
trans-
porting
or
not
in
use.
eNever
operate
the
snow
thrower
with-
|
out
good
visibility
or
light.
Always
be
sure
of
your
footing:
walk
never
run.
ELECTRIC
START
MODELS
eWarning
—
This
starter
is
equipped
|
with
a
three-wire
power
cord
and
plug
and
is
designed
to
operate
on
120
volt
AC
household
current.
It
must
be
pro-
perly
grounded
at
all
times
to
avoid
the
possiblity
of
electric
shock
which
may
be
injurious
to
the
operator.
Follow
all
instructions
carefully
as
set
forth
below.
Determine
that
your
house
wiring
is
a
three-wire
grounded
system.
Ask
a
li-
censed
electrician
if
you
are
not
sure.
If
your
house
wiring
system
is
not
a
three-
wire
grounded
system,
do
not
use
this
electric
starter
under
any
condition.
s
When
connecting
120
volt
AC
“Power
Cord,”
always
connect
cord
to
recept-
acle
on
dash
first,
and
then
plug
the
other
end
into
three-hole
grounded
power
outlet.
eWhen
disconnecting
power
cord,
al-
ways
unplug
the
end
in
the
three-hole
grounded
power
outlet
first.
MAINTENANCE
AND
STORAGE
"Never
store
eguipment
with
gasoline
in
the
tank
in
a
building
where
fumes
may
reach
an
open
flame
or
spark.
Allow
the
engine
to
cool
before
storing
in
any
enclosure.
eKeep
all
nuts,
bolts,
and
screws
tight
to
be
sure
the
eguipment
is
in
safe
working
condition.
-
sAlways
refer
to
the
Operator's
Manual
for
important
details
if
snow
thrower
is
to
be
stored
for
an
extended
period.
ALL
warning,
caution,
and
instructional
messages
on
your
snow
thrower
should
be
carefully
read
and
obeyed.
Personal
bodily
injury
can
result
when
these
in-
structions
are
not
foliowed.
The
infor-
mation
is
for
your
safety
and
it
is
impor-
tant.
The
safety
and
instructional
mes-
sages
following
on
the
next
pages
are
on
your
snow
thrower.

VANE
7
O
SNOWBUSTER
220
4
PULL
TO
CHOKE
He
m
|
LOCATION:
Control
Panel
on
Manual
Start
Models
VANE
Ms
O)
SNOWBUSTER
f
ELECTRIC
220
PULL
TO
CHOKE
eb
STARTER
|
o
.:
0
|
IGNITION
LOCATION:
Control
Panei
on
Electric
Start
Models

WARNING
Keep
Clear
Of
Impeller
And
Discharge
Areas
While
Engine
Is
Running
LOCATION:
Embossed
on
Both
Sides
of
the
impeller
Housing
+
Read
Owner's
Manual
careful-
e
Always
direct
discharge
so as
*
Stop
engine
before
servicing
‘©
Keep
clear
of
impeller
and
dis-
|
ly
before
operating
unit.
Never
to
avoid
injury
or
damage
to
or
removing
debris.
Keep
ali
charge
while
engine
is
running.
allow
children
to
operate
snow
persons
or
property.
shields
and
guards
in
place
|
-
thrower.
|
while
running.
LOCATION:
At
Top
of
Impeller
Housing
Just
Behind
Discharge
Vanes.
Safety
warning
signs
reproduced
on
these
pages
are
placed
at
strategic
locations
on
the
snow
thrower
as
a
constant
reminder
to
the
operator
of
the
most
important
safety
precautions.
If
any
of
these
signs
are
lost
or
damaged,
replace
them
at
once.
They
can
be
purchased
from
your
dealer.
Simplicity
Owner
Benefits
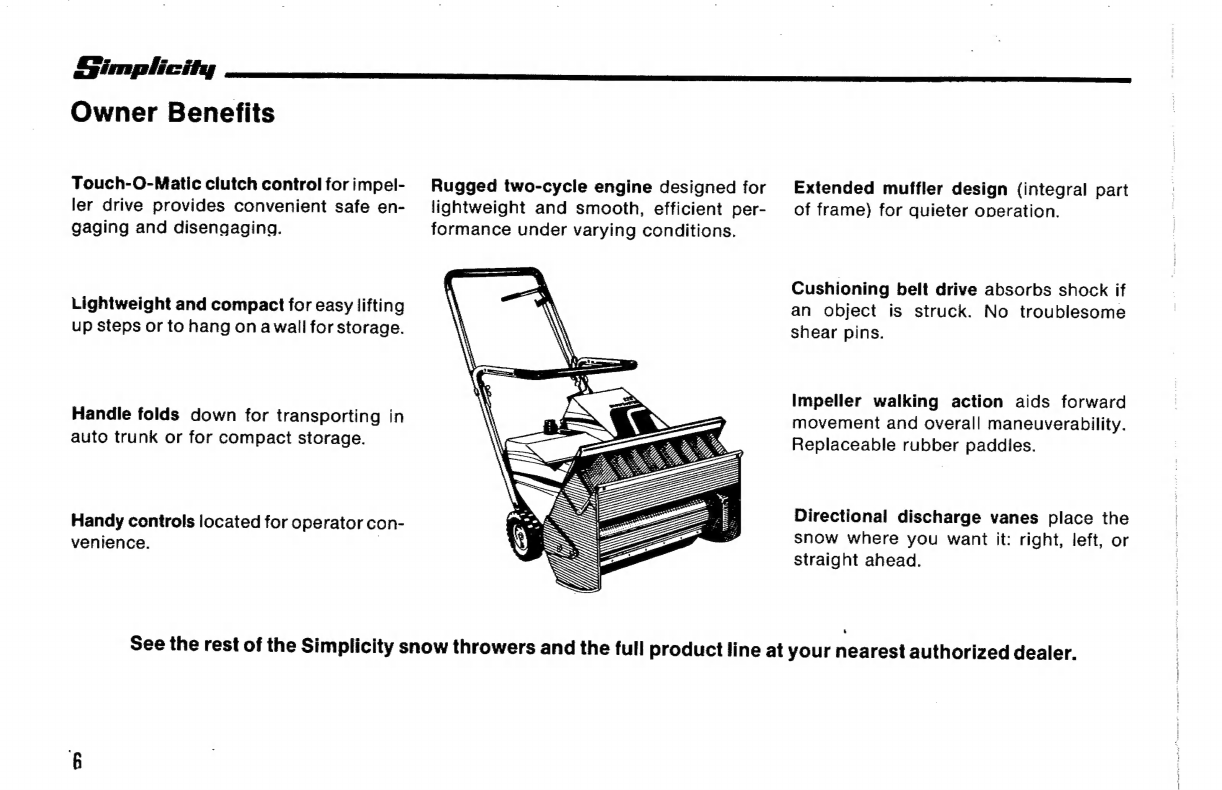
Touch-O-Matic
clutch
control
for
impel-
ler
drive
provides
convenient
safe
en-
gaging
and
disengaging.
Lightweight
and
compact
for
easy
lifting
up
steps
or
to
hang
on
a
wall
for
storage.
Handle
folds
down
for
transporting
in
auto
trunk
or
for
compact
storage.
Handy
controls
located
for
operator
con-
venience.
Rugged
two-cycle
engine
designed
for
lightweight
and
smooth,
efficient
per-
formance
under
varying
conditions.
aS
J
is
K
cC
Extended
muffler
design
(integral
part
of
frame)
for
guieter
operation.
Cushioning
belt
drive
absorbs
shock
if
an
object
is
struck.
No
troublesome
shear
pins.
Impeller
walking
action
aids
forward
movement
and
overall
maneuverability.
Replaceable
rubber
paddles.
Directionai
discharge
vanes
place
the
snow
where
you
want
it:
right,
left,
or
straight
ahead.
,
See
the
rest
of
the
Simplicity
snow
throwers
and
the
full
product
line
at
your
nearest
authorized
dealer.

=
Simplicity
BEFORE
OPERATING
|
This
snow
thrower
is
shipped
completely
assembled.
Do
not
use
it
without
reading
the
Operator’s
Manual.
Read
the
entire
operator’s
manual
and
besure
you
understand
safe
operating
procedures
and
the
proper
use
of
this
machine.
Your
safety,
as
well
as
that
of
others
around
you,
is
certainly
worth
the
time
it
will
take.
Serious,
permanent
damage
can
also
be
done
to
your
snow
thrower
if
operated
incorrectly.
To
remove
the
snow
thrower
from
the
carton,
remove
all
packing
cardboard
and
lift
the
unit
out.
Manual
start
models
weigh
about
40
lbs.
(18
kg).
Electric
start
models
weigh
about
44
lbs.(20
kg)
©
and
are
shipped
with
a
three
prong
extension
cord.
Check
the
carton
to
be
sure
no
hardware
vibrated
loose
during
transit.
Read
the
Operator’s
Manual
before
proceeding
any
further.
The
various
sections
explain
how
to
raise
the
handle,
prepare
the
unit
for
operation,
and
then
how
to
operate
safely
and
efficiently.
NOTE
This
snow
thrower
is
powered
by
a
two-cycle
engine
which
requires
a
fuel
mixture
of
gasoline
and
oil.
Failure
to
use
the
proper
gasoline/
oil
mixture
can
ruin
the
engine
in
about
a
minute.
See
the
Pre-Start
Preparation
section
for
complete
fuel
infor-
mation.
This
manual
covers
both
manual
and
electric
start
models,
so
some
photos
may
differ
slightiy
from
your
machine.
Simplicity
Pre-Start
Preparation
This
section
contains
information
on
fuel
'
preparation,
filling
the
fuel
tank,
and
on
the
'
snow
thrower
controls
you
should
be
fam-
'
lliar
with
before
attempting
to
start
the
.
engine.
Read
this
section
carefully
and
then
go
on
to
the
Operation
section.
FUEL
The
Tecumseh
two-cycle
engine
powering
this
snow
thrower
reguires
a
fuel
mixture
of
gasoline
and
oil
for
lubrication
of
bearings
and
other
moving
parts.
The
correct
fuel
mixture
is
32:1
(32
parts
gasoline
to
one
part
oil,
or
one
gallon
of
gasoline
to
4
ounces
of
oil).
Use
the
following
fuel
tips
to
select
your
gasoline
and
oil.
1.
Use
SAE
30
or
40
outboard
or
two
cycle
oil.
Disregard
instructions
on
oil
con-
tainers.
Do
not
use
multi-viscosity
oils;
they
may
not
provide
adeguate
lubri-
cation
and.can
contain
additives
which
cause
plug
fouling.
2.
Use
regular
grade,
leaded
gasoline.
The
use
of
lead-free
gasoline
is
not
recom-
mended
in
this
engine.
3.
Gasoline
companies
blend
fuel
for
sea-
sonal
usage.
Purchase
fresh
winter
gas-
oline
which
is
blended
for
cold
weather
starting
and
operation.
Do
not
use
gasoline
left
from
summer
lawn
mower
operation.
To
premix
gasoline
and
oil
proceed
as
follows:
A
WARNING
Gasoline
is
highly
flammable
and
must
be
handled
and
stored
with
care.
Never
mix-
gasoline
or
fill
tank
indoors,
while
smoking,
or
near
an
open
flame
or
spark.
Never
fill
the
fuel
tank
when
the
engine
is
running
or
hot
from
recent
operation.
Wipe
up
any
fuel
spills.
Store
gasoline
container
(cap
secure)
in
a
cool,
well
venti-
lated
place
away
from
flame
or
spark.
Allow
for
fuel
expansion
in
container
and
in
fuel
tank.
Use
care
with
oil
too.
At
high
tempera-
tures
or
near
an
open
flame
oil
is
also
flammable.
l.
Use
a
clean,
approved
container
to
premix
and
store
fuel.
Do
not
mix
oil
and
gasoline
in
snow
thrower
fuel
tank.
.
Store
oil
at
temperatures
above
50
degrees
(10°
celsius)
if
possible
so
it
will
mix
more
readily
with
gasoline.
Once
mixed,
oil
and
gasoline
will
not
separ-
ate.
.
Mix
gasoline
and
oil
for
a
32:1
ratio
using
the
amounts
specified
in
figure
I.
Measure
oil
carefully.
It
is
best
to
mix
oil
with
only
a
portion
of
the
gasoline
first.
For
a
one
gallon
example,
put
4
ounces
(.125
L)
of
oil
and
one
guart
(.94
L)
of
gasoline
in
a
one
gallon
container.
Secure
cap
and
shake
container
vigorously.
Keep
con-
tainer
away
from
face
and
eyes
while
shaking.
After
shaking
add
the
remain-
ing
3
guarts
(2.8
L)
of
gasoline.

Figure
1
Filling
the
Fuel
Tank
To
fill
the
snow
thrower
fuel
tank,
proceed
as
follows:
|
A
WARNING
For
your
personal
safety,
never
fill
the
fuel
tank
indoors,
while
smoking,
or
near
open
flame
or
spark.
Do
not
fuel
a
running
or
hot
engine.
Wipe
up
all
spills.
Gasoline
is
highly
flammable.
|
FUEL
MIX
CHART
Mixture
32:1
(3%
mixture)
or
|
ao
ft
em
[B
Be
Added
Be
Added
Be
Added
6251
Remove
the
fuel
tank
cap
from
the
snow
thrower.
See
figure
2.
Use
a
funnel
or
telescoping
spout
to
help
avoid
spills.
Fill
the
fuel
tank.
Be
sure
to
leave
1/4to
1/2
inch
(6.4
to
12.7
mm)
at
the
top
for
expansion.
Reinstall
caps
on
fuel
tank
and
fuel
supply
and
wipe
up
all
spills.
Simplicity
Figure
2
A.
Fuel
Tank
Cap
Simplicity
Figure
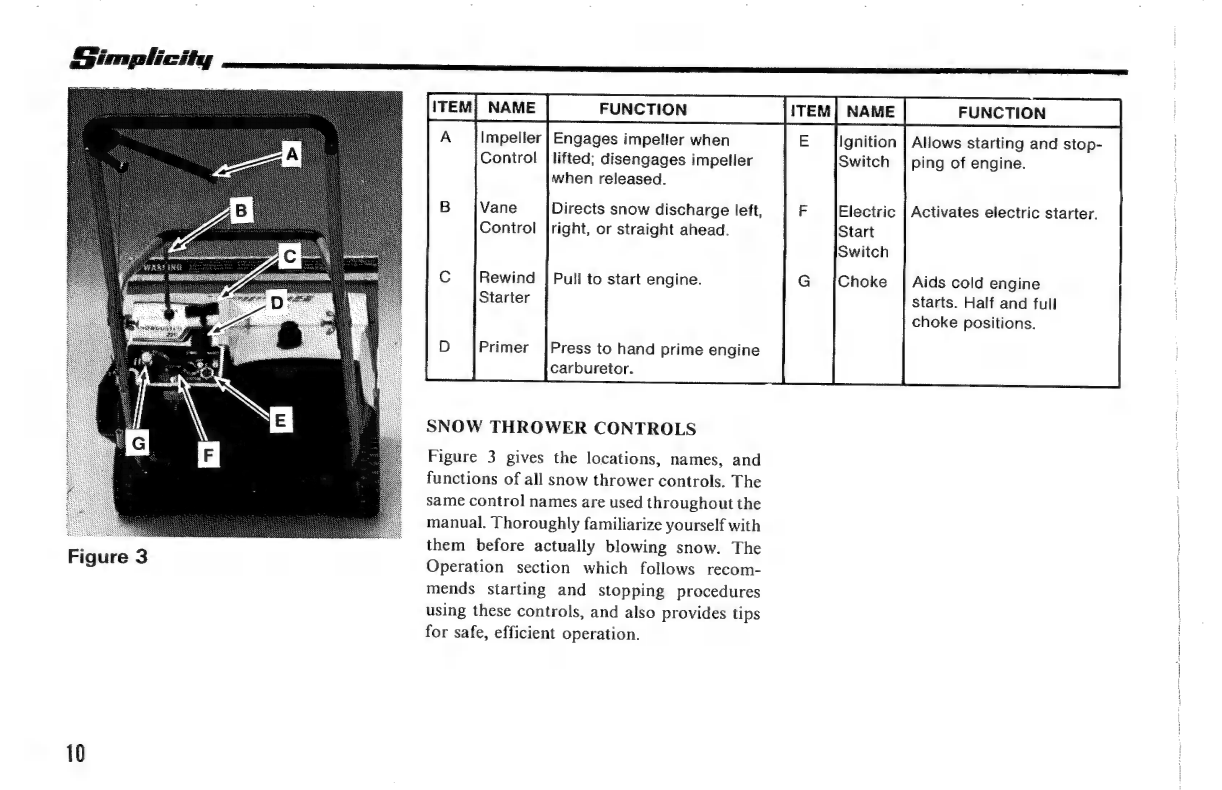
3
10
5
PRD
Engages
impeller
when
lifted;
disengages
impeller
when
released.
Directs
snow
discharge
left,
right,
or
straight
ahead.
Rewind
|
Pull
to
start
engine.
Starter
Primer
|Press
to
hand
prime
engine
carburetor.
SNOW
THROWER
CONTROLS
Figure
3
gives
the
locations,
names,
and
functions
of
all
snow
thrower
controls.
The
same
control
names
are
used
throughout
the
manuai.
Thoroughly
familiarize
yourself
with
them
before
actually
blowing
snow.
The
Operation
section
which
follows
recom-
mends
starting
and
stopping
procedures
using
these
controls,
and
also
provides
tips
for
safe,
efficient
operation.
FUNCTION
Allows
starting
and
stop-
ping
of
engine.
Activates
electric
starter.
Aids
cold
engine
Starts.
Half
and
full
choke
positions.

Operation
This
section
is
designed
to
provide
you
with
starting
and
stopping
procedures
and
with
information
on
safe,
efficient
snow
thrower
operation.
All
directions
assume
that
your
machine
is
in
operational
condition
and
working
properly.
If
not,
refer
to
the
Service
Information
section
in
this
manual
or
see
your
nearest
authorized
Simplicity
dealer.
NOTE
When
first
operating
the
snow
thrower,
take
time
to
get
the
feel
of
the
machine
before
blowing
snow
at
full
capacity.
Give
yourself
plenty
of
room
and
practice
engaging
and
disengaging
the
impeller
and
adjusting
the
discharge
vanes.
OPERATING
PROCEDURES
Read
and
become
familiar
with
the
follow-
ing
operating
directions
in
the
order
given:
e
Checks
before
starting
e
Stopping
the
snow
thrower
e
Starting
the
engine
e
Starting
snow
thrower
in
motion
e
Before
leaving
snow
thrower
CHECKS
BEFORE
STARTING
Read
this
manual
completely
before
the
first
use
of
your
snow
thrower,
and
thereafter
as
often
as
necessary
to
ensure
safe
and
effi-
cient
operation.
Check
the
following
before
each
use
of
your
snow
thrower.
1.
Follow
all
safety
precautions
and
know
the
locations
and
uses
of
operating
controls.
See
the
Safety
Rules
and
Pre-
Start
Preparation
sections.
2.
Be
sure
all
covers
and
guards
are
in
place
and
all
nuts,
bolts,
and
clips
are
secure.
Be
sure
impeller
and
directional
vanes
are
free
of
ice
and
that
impeller
control
engages
and
disengages
freely.
3.
Refer
to
Normal
Care
section
of
this
manual
to
check
for
any
needed
care,
especially
if
snow
thrower
has
been
in
storage.
4.
Fill
fuel
tank
with
gasoline/
oil
mixture.
See
Pre-Start
Preparation
section.
STOPPING
THE
SNOW
THROWER
Your
snow
thrower
is
equipped
with
a
Touch-O-Matic
impeller
control
as
a
safety
feature.
All
that
is
necessary
to
stop
the
impeller
from
rotating
is
to
release
the
Simplicity
impeller
control
on
the
handle.
All
mechani-
cal
movement
except
the
engine
then
stops.
Turning
the
ignition
key
to
OFF
stops
the
engine.
STARTING
THE
ENGINE
Complete
all
“Checks
Before
Starting”
steps
and
then
proceed
as
follows:
1.
Do
not
engage
Touch-O-Matic
impeller
control.
Leave
the
impeller
disengaged
(control
released)
when
starting
engine.
2.
Pull
choke
control
out
to
full
choke
position.
See
figure
4.
When
starting
a
warm
engine,
leave
the
choke
OFF
and
DO
NOT
use
the
primer.
Then
use
the
choke
only
if
engine
fails
to
start.
NOTE
When
starting
a
new
unit
for
the
first
time,
extra
measures
are
needed
to
get
the
fuel
from
the
tank
to
the
carburetor.
Prime
engine
four
times,
then
pull
starter
four
times.
Repeat
the
four
primes
and
four
starter
pulls
procedure
until
the
engine
starts.
This
sequence
may
also
be
useful
for
starting
after
off-season
storage
when
the
fuel
tank
was
drained.
For
all
other
starts,
follow
normal
priming
procedures
in
Step
3.
11

Simplicity
3.
Prime
engine.
If
unit
has
been
idle
for
over
several
hours
and
stored
inan
area
159
F
{-9.4°
C)
or
colder,
or
weather
conditions
are
below
159
F,
prime
engine
four
times.
If
unit
has
been
stored
in
an
area
15°
F
or
warmer,
or
weather
conditions
are
above
15°
F,
then
two
primes
should
provide
good
starting.
To
prime
engine,
fully
depress
primer
bulb
making
sure
that
the
vent
hole
is
covered.
Release
and
allow
bulb
to
return
to
original
position
before
next
prime.
See
figure
4.
Put
key
in
ignition
switch
and
turn
it
to
ON.
A
WN
For
your
personal
safety,
do
not
start
or
run
the
engine
in
an
enclosed
area.
Exhaust
fumes
are
deadly.
5.
Manual
Start
Models.
Grasp
the
re-
12
wind
starter
handle
and
pull
upward
with
a
smooth,
rapid,
full
arm
stroke.
Always
return
starter
rope
slowly
by
hand.
If
engine
fires
but
does
not
start
after
several
pulls,
engine
may
be
flood-
ed.
Take
choke
off
and
pull
starter
several
times
again.
If
engine
again
fires
but
does
not
start,
repeat
steps
2
and
3
and
try
starting
again.
Electric
Start
Models.
Plug
the
exten-
sion
cord
provided
to
the
snow
thrower
first
then
to
a
grounded
3
wire
plug-in
Figure
4
Choke
Primer
Bulb
Rewind
Starter
Key
Electric
Start
Button
Electric
Start
Cord
us
O
M
a
outlet
(110
volt).
See
electric
start
warn-
ings
on
p.
3
of
Safety
Rules.
Press
starter
button
on
dash
to
crank
engine
(see
figure
4).
If
engine
fires
but
does
not
start
after
10
seconds,
take
choke
off
and
try
starting.
If
engine
again
fires
but
does
not
start,
repeat
steps
2
and
3
and
repeat
starting
pro-
cedure.
Release
starter
button
when
engine
starts.
Unplug
cord
from
power
source
and
then
from
snow
thrower.
NOTE
Electric
starter
motor
can
be
overheated.
Do
not
run
starter
more
than
30
seconds
with-
out
cooling
for
3
minutes.
6.
When
the
engine
starts,
push
the
choke
in
to
the
half-choke
position.
As
engine
warms
up
and
is
running
smooth,
push
choke
in
fully
to
OFF.
In
some
instances
it
may
be
necessary
to
operate
with
the
choke
on,
or
partially
on,
until
engine
is
thoroughly
warmed.
STARTING
SNOW
THROWER
IN
MO-
TION
Although
this
snow
thrower
does
not
have
wheel
drive,
the
forward
rotation
of
the

impeller
paddles
striking
the
ground
pro-
vides
a
certain
amount
of
“walking
action”
when
the
impeller
control
is
engaged.
This
walking
action
aids
in
propelling
the
snow
thrower
forward,
but
it
should
only
be
used
when
blowing
snow.
Do
not
engage
the
impeller
for
transport
purposes
only.
To
use
the
walking
action,
lift
up
on
the
handle
so
the
impeller
paddles
make
full
contact
with
the
surface
and
aid
in
propel-
ling
the
unit
forward.
To
start
throwing
snow,
engage
the
impeller
control
and
move
forward
into
the
snow.
Lift
up
on
handle
as
desired
to
provide
walking
action.
To
stop
the
snow
thrower,
release
the
impeller
control.
PREPARATION
FOR
SNOW
REMOVAL
Before
starting
a
snow
removal
job,
prepare
yourself
and
your
snow
thrower:
£
caution
The
breathing
of
cold,
wet
vapor
can
be
hazardous
to
your
health.
On
very
cold,
windy
days
keep
your
nose
and
mouth
well
covered.
1.
Wear
suitable
winter
clothing,
includ-
ing
footwear
to
improve
footing
on
slippery
surfaces.
Do
not
wear
loose
clothing.
or
scarves
which
might
get
caught
in
your
machine.
2.
Clear
the
area
of
all
objects
which
could
be
caught
in
or
thrown
by
the
snow
thrower.
OPERATION
INFORMATION
Determine
the
best
snow
removal
pattern.
The
size,
shape,
terrain,
and
obstructions
of
the
area
to
be
cleared
should
be
considered.
Whenever
possible,
begin
snow
removal
on
the
upwind
side
of
the
driveway
or
sidewalk
so
as
not
to
blow
snow
over
an
area
already
cleared.
Rotate
the
directional
vanes
to
discharge
snow
downwind,
not
into
it.
Always
adjust
the
vanes
so
you
are
well
out
of
the
path
of
the
snow
stream.
See
figures
5
and
6.
Light
to
medium
depth
snow
can
be
cleared
using
the
full
width
of
the
impeller
on
each
pass,
overlapping
the
passes
a
few
inches
to
prevent
side
spillover.
See
figure
6.
In
deep
or
heavy,
wet
snow,
the
snow
thrower
front
panel
usually
controls
for-
ward
speed
by
its
contact
with
the
snow.
See
figure
5.
In
such
cases
let
the
snow
thrower
Simplicity
Figure
5
A.
Directional
Vanes
B.
Front
Panel
work
at
its
own
pace.
If
engine
rpm
drops
in
deep
snow
the
impeller
control
can
be
dis-
engaged
to
let
engine
regain
momentum
before
moving
back
into
snow.
On
subsequent
passes
in
heavy
snow,
slice
off
less
than
the
full
width
of
the
auger
to
prevent
overloading.
Judge
how
wide
a
slice
to
take
by
watching
the
snow
stream
as
it
leaves
the
housing.
The
snow
should
flow
freely.
13

If
not,
take
a
narrower
slice.
Any
time
snow
stops
flowing
freely,
stop
or
back
up
to
let
the
snow
thrower
clear
itself.
Then
inch
back
into
the
snow
again.
You
will
soon
get
the
feel
of
how
fast
to
go
and
how
wide
aslice
to
take.
A
WARNING
For
your
personal
safety,
always
stop
the
engine
and
remove
the
key
before
checking
or
clearing
the
impeller
and
discharge
vanes.
If
the
impeller
stalls
or
the
vanes
plug,
RELEASE
THE
IMPELLER
CONTROL
IMMEDIATELY.
STOP
THE
ENGINE
AND
REMOVE
THE
KEY.
Remove
any
debris
and
clear
out
the
housing
and
dis-
charge
vanes.
When
clearing
snow
from
steps
or
cutting
through
deep
drifts,
the
snow
thrower
can
be
operated
from
the
side
using
a
sweeping
motion
as
shown
in
figure
7.
When
operat-
ing
from
the
side
be
sure
to
have
solid
Figure
6
A.
Overlap
as
necessary
to
prevent
side
spillover.
B.
Set
vanes
to
discharge
snow
downwind
and
away
from
cleared
area.
14

Gimplicity
footing,
hold
both
handles
securely,
and
keep
your
head
and
body
behind
the
for-
ward
handle
well
out
of
the
snow
stream.
BEFORE
LEAVING
SNOW
THROWER
1.
Release
impeller
control
to
stop
snow
thrower
motion.
2.
Turn
key
to
OFF
and
remove
it.
3.
Wipe
ice
and
snow
off
control
panel,
upper
shroud,
and
directional
vanes
to
prevent
melting
and
freezing
on
the
unit.
If
snow
thrower
is
to
be
stopped
for
an
extended
period,
see
AFTER
EACH
USE
in
the
Normal
Care
sec-
tion.
FOLDING
THE
HANDLE
The
upper
snow
thrower
handle
can
be
folded
down
if
desired
for
transport
in
an
auto
trunk
or
for
compact
storage.
See
STORAGE
in
the
Normal
Care
section
for
handle
folding
procedure.
Be
sure
snow
thrower
has
cooled
fully
before
placing
in
auto
trunk.
Figure
7
A.
Grip
both
handles
firmly.
Keep
head
and
body
well
back
from
snow
stream.
15

Simplicity
Normal
Care
Your
snow
thrower
was
designed
and
built
to
provide
service
with
only
minor
care.
The
low
maintenance
two-cycle
engine
does
not
have
crankcase
oil
to
change.
Certain
tasks,
however,
must
be
performed
to
keep
your
snow
thrower
in
top
operating
condition
and
to
avoid
costly
repair.
Read
and
become
familiar
with
the
following
normal
care
procedures
in
the
order
given:
e
After
each
use
Spark
plug
in-season
storage
Off-season
storage
Starting
after
storage
e
Idler
pivot
lubrication
âd
warnine
For
your
personal
safety,
stop
the
engine
and
remove
the
key
before
attempting
to
inspect
or
service
your
snow
thrower.
16
AFTER
EACH
USE
After
each
use
of
the
snow
thrower
check
impeller
housing,
discharge
vanes,
and
con-
trols
for
ice
or
snow.
Clean
out
any
snow
that
could
melt
and
later
refreeze
on
controls
or
housing.
Start
the
engine
and
let it
run
for
a
few
minutes
to
help
dry
the
engine
area
and
minimize
freeze-ups.
The
impeller
control
can
be
engaged
and
disengaged
to
help
clear
„snow
out
of
housing.
Also
rotate
vanes
to
clear
vane
control
linkage.
Refill
the
snow
thrower
fuel
tank
to
help
prevent
condensation
in
the
tank.
See
“Fill-
ing
the
Fuel
Tank”
in
the
Pre-Start
Prepara-
tion
section.
Follow
all
safety
procedures
during
refueling.
SPARK
PLUG
If
fouling
occurs,
check
plug
gap
setting
and
overall
condition,
Proceed
as
follows:
1.
Remove
upper
shroud.
See
Adjustment
section
for
shroud
removal
instruc-
tions.
2.
Clean
area
around
spark
plug
to
pre-
vent
dirt
from
entering
engine.
See
figure
8.
|
Figure
8
A.
Clean
Entire
Area
B.
Spark
Plug
3.
Remove
plug
wire.
Remove
spark
plug
with
a
13/16
inch
spark
plug
socket.
Dry
plug
with
a
clean
rag.
NOTE
A
cracked,
burnt,
or
badly
fouled
plug
should
be
replaced.
Never
sandblast
a
plug,
as
grit
can
get
into
cylinder
causing
unneces-
sary
wear.

4.
Check
plug
setting
with
feeler
gauge
and
regap
electrodes
to
.035”
(.89
mm).
Reinstall
plug
and
torgue
to
15
Ft.
Lbs.
(20.3
N«m).
5.
Reinstall
spark
plug
wire
and
upper
shroud.
NOTE
If
spark
plug
needs
replacing,
use
Champion
RJ-18Y
or
eguivalent
plug.
IN-SEASON
STORAGE
When
storing
your
snow
thrower
for
short
periods
between
snow
removal
jobs,
be
sure
to
clean
the
unit
thoroughly.
Also,
it
is
best
to
store
the
snow
thrower
with
the
fuel
tank
full
to
prevent
condensation
in
the
tank.
See
“Filling
the
Fuel
Tank”
in
the
Pre-Start
Preparation
section
to
fuel
your
snow
throw-
er.
Be
sure
to
leave
1/4
to
1/2
inch
(6.4
to
12.7
mm)
room
at
top
of
tank
for-fuel
expansion
during
storage.
Store
snow
thrower
in
a
clean,
dry
place
away
from
heat,
open
flame,
or
spark.
One
good
way
to
store
the
snow
thrower
Is
to
hang
it
out
of
the
way
on
a
garage
wall.
Figure
9
(see
next
page)
A.
Handle
bolt
B.
Wing
nut
C.
Nut
The
snow
thrower
handles
can
also
be
folded
for
compact
storage,
such
as
under
a
garage
workbench.
To
fold
handles,
loosen
the
wing
nuts
holding
handles
(see
figure
9).
Simplicity
Loosen
wing
nuts
fully.
The
nuts
on
handle
bolts
will
keep
wing
nuts
from
being
lost.
Then
fold
upper
handle
back
and
down
as
shown
in
figure
10.
Figure
10
To
return
upper
handle
to
operating
posi-
tion,
raise
it
back
into
place.
Be
sure
the
cable
for
the
impeller
clutch
control
remains
connected.
Tighten
wing
nuts
to
secure
handle.
17

Simplicity
OFF-SEASON
STORAGE
If
snow
thrower
is
to
be
stored
for
over
30
days,
prepare
for
storage
as
follows:
A
WARNING
Gasoline
mixture
in
fuel
tank
is
highly
flammable.
Drain
fuel
tank
outdoors
away
from
open
flame
or
spark.
Do
not
smoke
while
draining
tank.
l.
To
drain
fuel
tank
either:
a.
Remove
fuel
tank
cap
and
tip
snow
thrower
upside
down
to
drain
fuel
into
container,
or:
b.
Remove
fuel
line
at
gas
tank
and
drain
fuel
into
container
(see
figure
11).
See
the
Adjustment
section
to
remove
and
reinstall
the
upper
shroud.
Be
sure
to
remove
cap
and
tip
unit
forward
while
draining
tank.
Reinstall
fuel
line.
2.
Reinstall
fuel
tank
cap
and
wipe
up
any
fuel
spills.
3.
Try
starting
engine
to
run
carburetor
dry.
Crank
engine
several
times
to
be
sure
all
fuel
is
gone.
18
Figure
1
A.
Fuel
Tank
Cap
B.
Fuel
Tank
C.
Fuel Line
4.
Pull
rewind
starter
slowly
until
resist-
ance
is
felt
due
to
compression,
then
stop.
Return
starter
rope
slowly
to
prevent
engine
from
reversing
due
to
the
compression.
In
this
position
both
intake
and
exhaust
ports
are
closed
to
prevent
corrosion
of
the
cylinder
and
piston.
|
5.
Clean
unit
thoroughly.
6.
Store
snow
thrower
in
a
clean,
dry
place.
-Do
not
store
unit
in
an
attic,
unventilated
garage,
or
garden
shed
where
temperatures
can
exceed
110°
F.
(43°
C).
7.
Cover
unit
if
necessary
for
protection
from
dust
and
dirt
ôr
direct
sunlight.
For
electric
start
models,
store
exten-
sion
cord
with
unit
to
avoid
losing
it.
A
WARNING
Snow
thrower
fuel
mixture
and
fumes
are
highly
flammable
in
an
enclosed
area.
Do
not
store
snow
thrower
in
house
or
basement
unless
fuel
tank
has
been
completely
drained
and
carburetor
has
been
run
dry.
|
STARTING
AFTER
STORAGE
When
taking
your
snow
thrower
out
of
storage
after
an
extended
period,
proceed
as
follows:
l.
Reread
this
Operator’s
Manual
to
re-
familiarize
yourself
with
safety
rules,
controls,
and
proper
operating
proce-
dures.
-
o
This manual suits for next models
2
Table of contents
Popular Snow Blower manuals by other brands


SNOWJOE
SNOWJOE 24V-SS11-XR-RM Operator's manual

Steiner
Steiner 75-71215B4 Operations & parts manual

Meyer
Meyer Path Pro2 Owner's manual and user's guide

Walker Rider Lawnmowers
Walker Rider Lawnmowers SB36 Owner's manual and illustrated parts manual

Cub Cadet
Cub Cadet 524 SWE Operator's manual

Ariens
Ariens 924124-ST926DLE, 924125-ST1152 Owner's/operator's manual