ALLITHATO ASZTAL BeActive Quick setup guide

Assembly
&
use instructions
BeActive
electric table
1/15
1270 top position
620 bottom
position Stroke lenght 650

2/15
Parts and accessories:
Tools needed:
Allen wrench 4mm
Tape measure (not included)
Phillips scewrdriver and/or power drill (not included)
The desktop is not included in delivery!
(1) Leg
(2) Foot Part
(3) Upper Frame A
(4) Upper Frame B
(5) Center Rail
(6) Side Bracket
(7) Handset
(8) Power Cord
(9) Cable (1,3m)
(10) Cable Clip
(11) Cable Cover
2 pcs
2 pcs
1 pc (+ Control Box)
1 pc
2 pcs
2 pcs
1 pc
1 pc
1 pc
10 pcs
1 pc
1
1
2
2
3
4
5
5
6
6
7
8
9
10
A
B
C
D
E
16x machine screw KM6x10
4x machine screw KM6x14
8x machine screw KM6x35
2x wood screw K5x16
7x wood screw K5x20
11

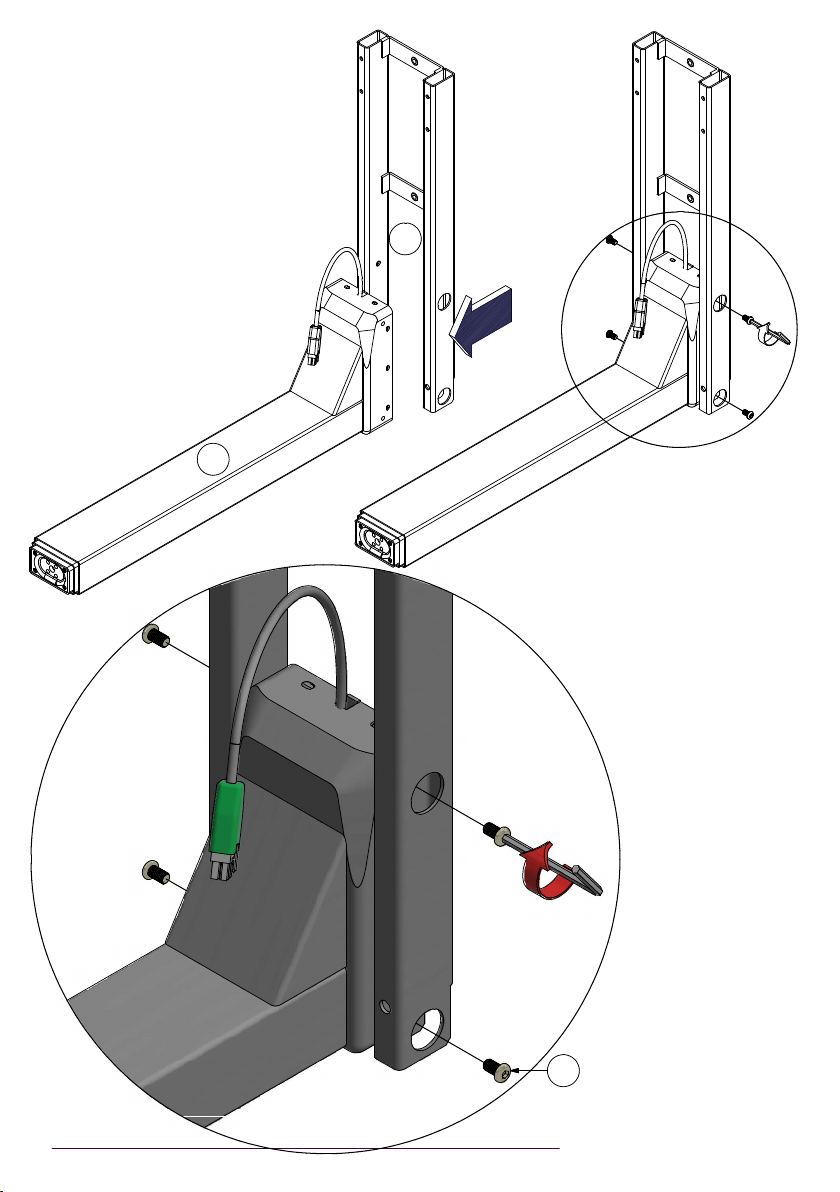
3/15
1
3
A
Warning!
10mm longer screws are able
to break the motor of lifting
column
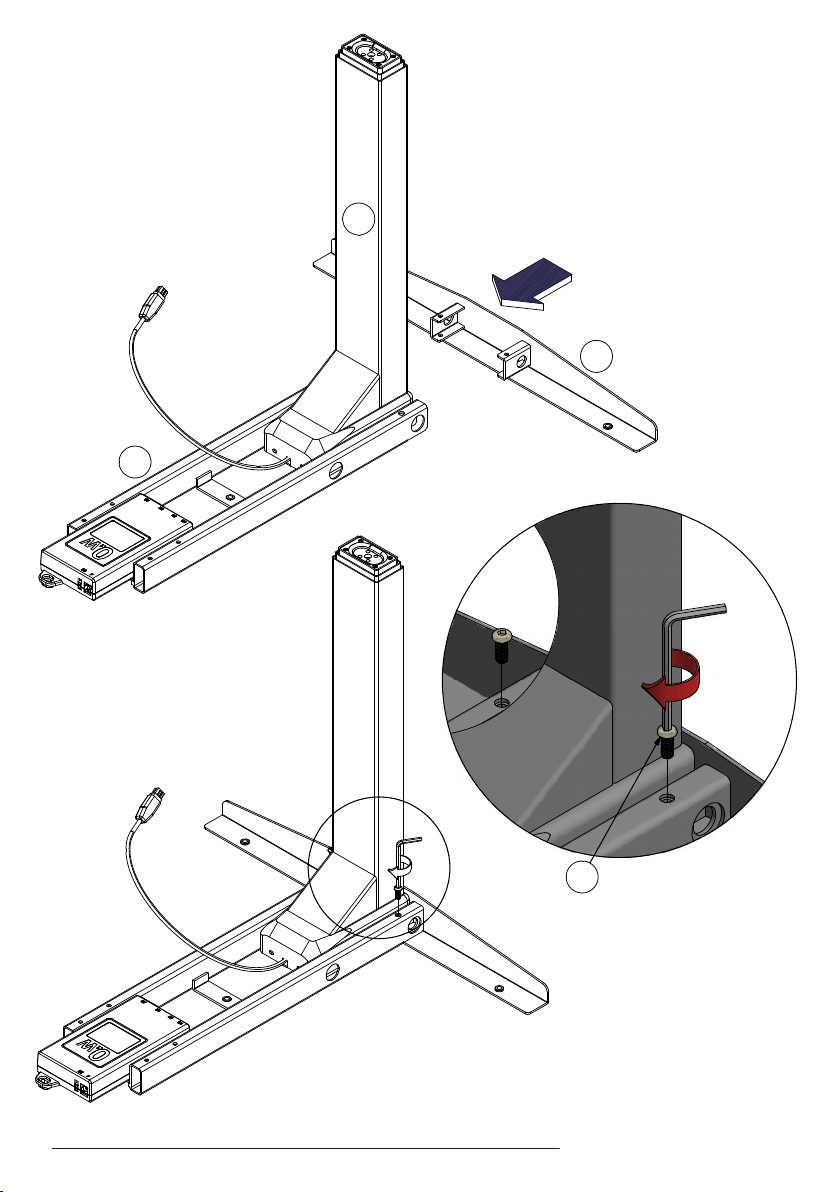
4/15
1
4
A
Warning!
10mm longer screws are able
to break the motor of lifting
column
5/15
3
1
6
B

6/15
14
6
B

7/15
Upwards!!
Measure the center of the rails and
make a mark at the top
5
5
5
5

8/15

9/15
Desktop
A
Adjust the rails symmetrically before
inserting screws
Adjust the width of the desk base to fit the
desktop by sliding the two halves outward
10/15
E
E
9

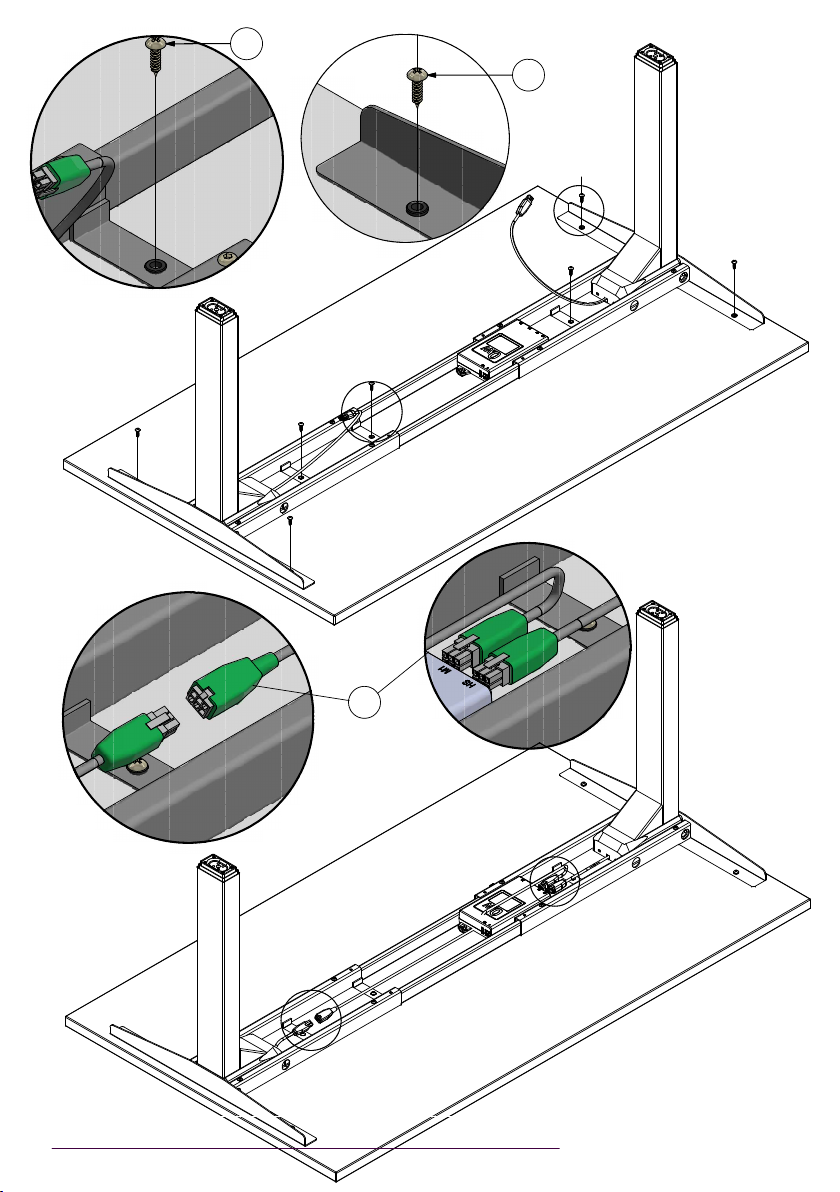
11/15
7
12/15
7
D
Variant side for handset
8
8
10

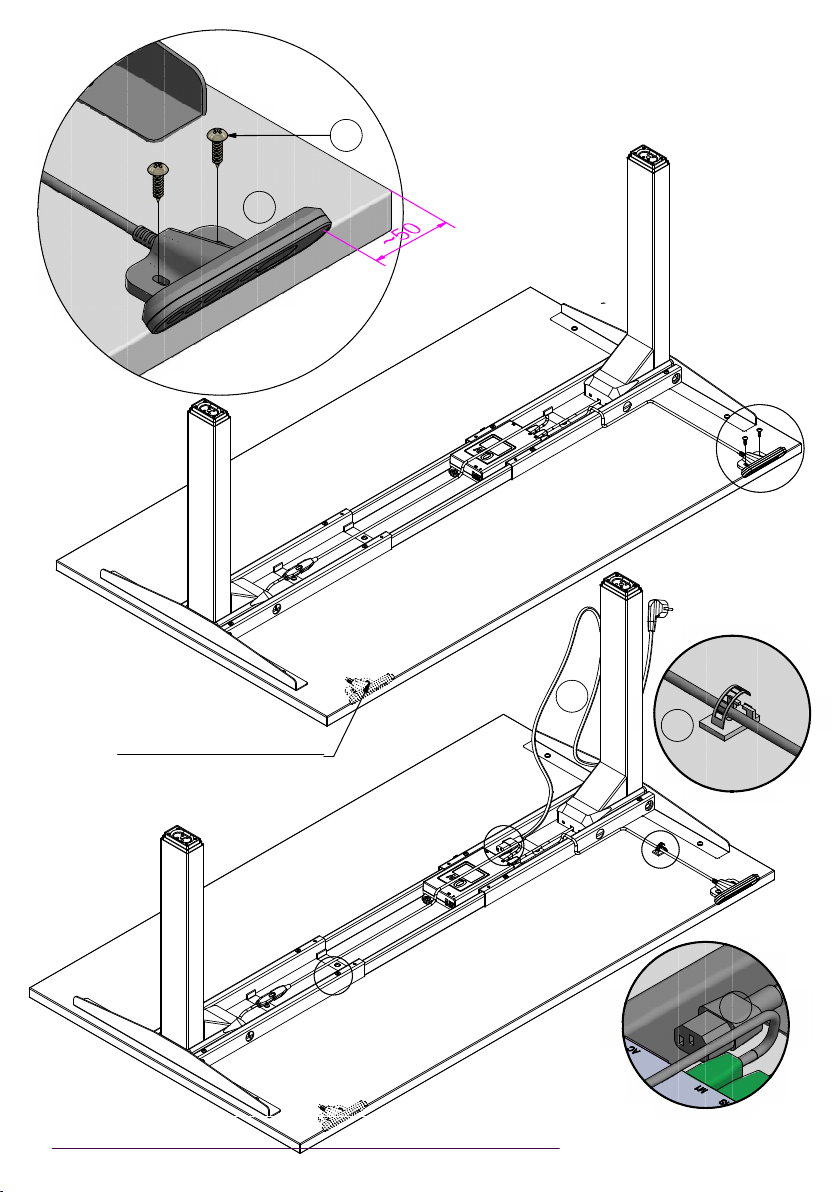
13/15
A
Remove screws
(4pcs)
11
A
At minimum width
adjust the table cover
by using 4 screws
The minimum width for
cable cover to use
11

14/15
C
2
2
2
15/15
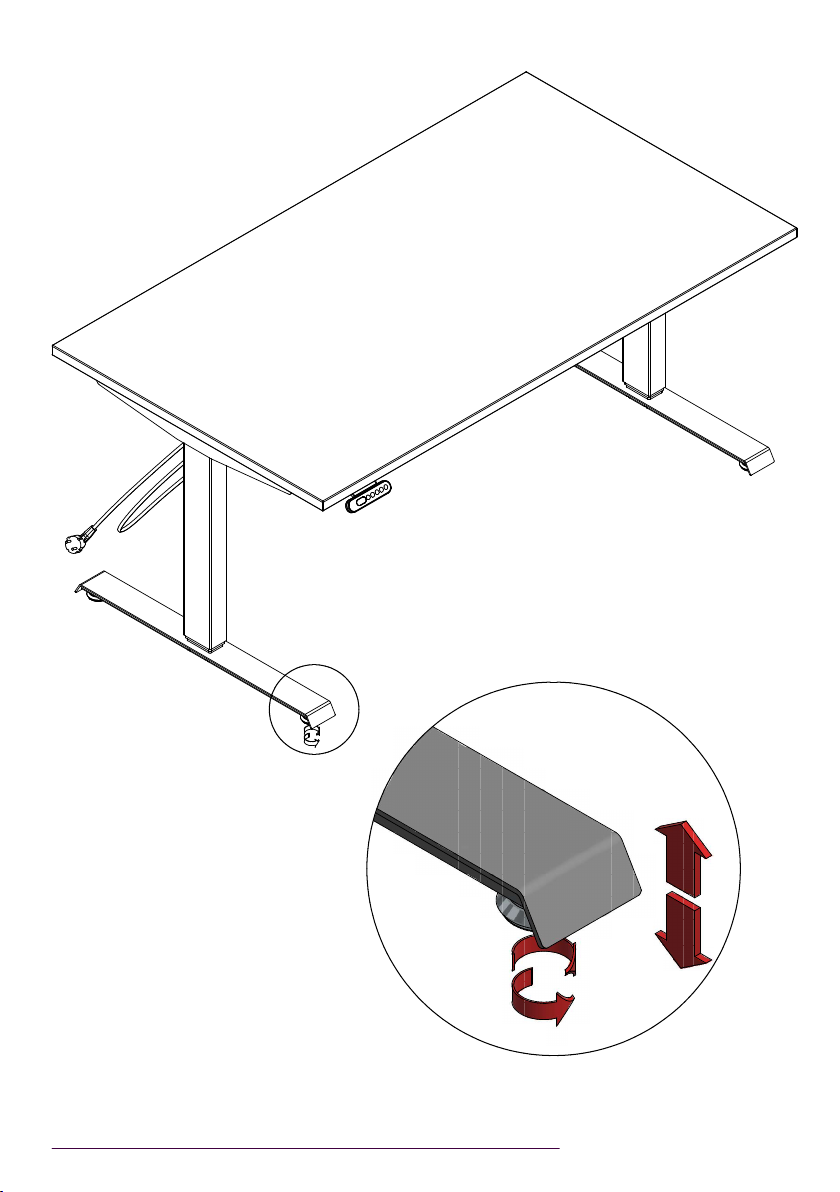
Pre-installed glides (adjust according to the
floor)
Control box JC 4.1
- Program version
advanced settings
1. Adjust the maximum and the
minimum height*
The primary setting for the frame height adjustment
range is 62 – 127 centimeters. NOTE! If the frame needs
reset/reset, it ALWAYS takes place with an adjustment
range of 62 – 127 cm. If the minimum and maximum
dimensions of the body height were different before the
reset, they should be changed again.
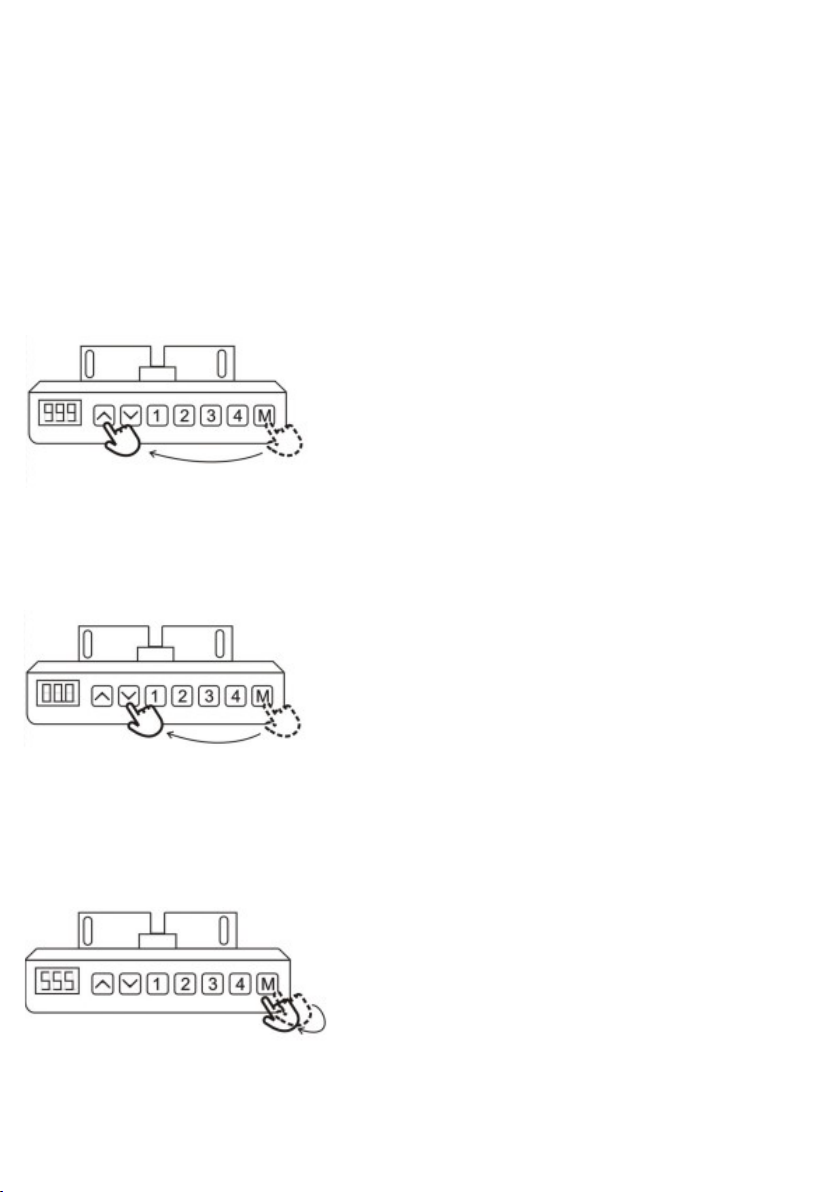
To Set the Upper-Limit Position:
Use the UP /DOWN buttons to move the base to the
desired maximum-height position. Press the "M" button
and release. Press the UP button and release. The LED
display will flash "S -". Press and hold the "M" button
(about 2 seconds) until the LED display changes to "999".
The display will automatically return to the selected
height. The new upper limit is now set.
To Set the Lower-Limit Position:
Use the UP /DOWN buttons to move the base to the
desired minimum-height position. Press the "M" button
and release. Press the DOWN button and release. The
LED display will flash "S -". Press and hold the "M" button
(about 2 seconds) until the LED display changes to "000".
The display will automatically return to the selected
height. The new lower limit is now set.
To Remove the Upper/Lower Limit
Positions:
Press and hold the "M" button until the LED
display flashes "S -" and then release it. Within
5 seconds, press the "M" button again and
hold for 2 seconds.The LED display will
change to "555" and then automatically return
to the height display. The upper and lower
limits are now removed.

- alhaalla
että
näyttöön
ilmestyy
’RST’ .
- Pidä M-
painike
alhaalla,
kunnes
näytöss
ä alkaa
vilkkum
aan
minimik
orkeus.
- NYT voit
YLÖS/
ALAS-
painikke
ellä
valita
kantesi
kanssa
todellise
n
minimik
orkeude
n.
- Päästä
irti
YLÖS/
ALAS-
painikke
esta ja
odota
muutam
a
sekunti,
kunnes
näyttöön
ilmestyy
jälleen
’RST’ ja
minimik
orkeude
n
resetoint
i on
valmis.
2. HANDSET LOCK
To lock the handset:
Press and hold the "M" button (about 8 seconds) until the
LED display switches to "S -" and then to "LOC." Release
the button.
To unlock the handset:
Press and hold the "M" button (about 8 seconds) until the
LED switches from "LOC" to the height display. Release
the button.
3. SETTING THE LED RETRACTED HEIGHT
Press the DOWN button on the Handset until the base
reaches its lowest position. Measure the distance from
floor to the top surface of the desktop. lf the number on the
LED display does NOT match your measurement, follow
these steps:
Press and hold the DOWN button until the LED display
reads "RST".
Press and hold the "M" button (about 5 seconds) until the
LED displays the flashing height. (lf the display returns to
"RST" before the next step is taken, repeat this step.) Use
the UP /DOWN buttons to change the value of the starting
height so that it matches your measurement. Wait about 5
seconds and the display will return to "RST."
4. RESET PROCEDURE:
lf the LED readout displays an error message ("E1" -
"E13 ") confirm that all wired connections are secure
(legs to cables, cables to control box).
Press and hold the DOWN button on the Handset
until the desk reaches its lowest height. Release the
DOWN button. Press and hold the DOWN button
again until the LED display reads "RST" or about 10
seconds on non-LED handset models. Release the
DOWN button. Press and hold the DOWN button
again until the desk lowers a little bit more, slightly
rises and stops. Release the DOWN button. Your
desk is now ready to use.

5. Programming
Press the DOWN button on the Handset until the base
reaches its lowest position. Press and hold the DOWN
button again until the LED display reads "RST". Press and
hold the button (about 5 seconds) while the LED flashes
"RST" and then switches ta either:
10.1 = One-touch
10.2 = Constant-Touch
Release the 1 button. Press the 1 button again until the
desired setting is reached. Once the chosen setting is
displayed, release the button and wait about 5 seconds for
the display to return to "RST". Finish the reset process (4.).
6. Changing inches to centimeters
Press the DOWN button on the Handset until the base
reaches its lowest position. Press and hold the DOWN
button again until the LED display reads "RST".
Press and hold the 2 button (about 5 seconds) while the
LED flashes "RST" and then switches to either:
10.3 = cm
10.4 = inches
Release the 2 button. Press and hold the 2 button again
until the desired setting is reached. Once the chosen setting
is displayed, release the button and wait about 5 seconds
for the display to return to "RST". Finish the reset process
(4.).
7. Changing anti-collision sensitivity
Press the DOWN button on the Handset until the base
reaches its lowest position. Press and hold the DOWN
button again until the LED display reads "RST".
Press and hold the UP button (about 5 seconds) while the
LED flashes "RST" and then switches to either:
10.5 = 10 kg pressure (most sensitive) 10.6 = 15 kg
pressure (middle setting) 10.7 = 20 kg pressure (least
sensitive)
Release the UP button. Press and hold the UP button again
until the desired setting is reached. Once the chosen setting
is displayed, release the button and wait about 5 seconds
for the display to return to "RST".
Finish the reset process by pressing and holding the DOWN
button until the desk lowers a little bit more, slightly rises
and stops.
The LED display reads:
- ’10.3’ = cm
-’10.4’ = inches
Sensitivity
- ’10.5’=10kg(most sensitive)
-’10.6’= 15 kg (middle setting)
-’10.7 ’=20kg(least sensitive)
The LED display reads:
- ’10.1’ = One touch
-’10.2’ = Constant-touch

Benefits of using a memory program:
- Table users of different heights
can deposit a suitable working
height for each.
- Different work tasks require
different heights.
- To facilitate changing the
working position.
Sensitivity of anti-collision on
zones 1-3.
The sides of the deck (zones 1
and 3) are more sensitive than
the center of the tabletop.
Zone Sensitivity
1 10 kg
2 20 kg
3 10 kg
8. Height memory programming:
The desk base can be adjusted by pressing
and holding either the UP or DOWN button
until the desired height is reached.
To program up to four presets (on some
models): Use the up/down buttons to find a
desired height, then press "M" followed by
a number
1 - 4.
CAUTION: Once a preset button is pushed,
the desk will move to the programmed
height (see caution box above).
MAKE SURE THERE IS SPACE AROUND THE TABLE
(ON THE SIDES, BELOW AND ABOVE).
Anti-collision gets activated when the table hits an obstacle.
The collision prevention is located in the control box.
It should be placed properly, that the box does can't shake and causing
the activation of anti-collision.

• Check all connections that are in the
bottom and correctly closed.
• The wires are secured under the
cover and cannot swing to activate the
anti-collision.
• Unplug the power cord and plug it
back in.
• Change the ports on the lifting
column connectors.
• If the frame does not move
downwards, perform a reset.
• If E07-E09 is shown on the display
of the handset, perform a reset.
• Check that the control unit is
attached to the upper frame by the
rails so that it does not activate the
anti-collision when swinging.
•If the lifting pillar makes a rattling
sound, check the screw length
lifting when fixing the pillars.
Correct size M6x10mm.
•resetting the table
(you should be patient here).
Press the button at the bottom
until it starts moving, about 30
sec.).
• This step may need to be repeated
several times. Next, push the table to
the lowest possible height. Release
your finger from the button and press
down on the bottom of the controller.
After this, the letter combination RST
appears on the screen. Release your
finger from the controller and press it
down on the bottom, pulling the
controller.
The RST letter combination should
disappear, and the table should
shake slightly. The table should now
be at its lowest height, and the
display should show a height reading.
Great, you managed to reset
and the table should work
correctly!
Instructive videos:
Assembly video:
https://www.youtube.com/
watch?v=UBFCmcrpu4A
More help:
BeActive Troubleshooting
Table of contents
Popular Indoor Furnishing manuals by other brands

Furniture of America
Furniture of America CM7689Q Assembly instructions

Happy Babies
Happy Babies HAPPY SZ06-B Assembly instructions

Eagle Group
Eagle Group RedHots Operating manual and instructions

Diphano
Diphano Cubic instruction manual

Vivo
Vivo CHAIR-K07SD instruction manual

Next
Next 104710 Assembly instructions


Songmics
Songmics LPC44 manual

Style selections
Style selections EDWARDS 30DC NO manual

Schildmeyer
Schildmeyer 734185 Assembly instructions

Universal Furniture
Universal Furniture 192380 instruction sheet

THB
THB Balcao Counter 2 Doors 4 Drawers Gourmet... Assembly manual

Indaux
Indaux OFFIBOX Assembly instructions