ALLPOWER APSB1810E User manual

2
Content Content
Parts List Operation
Technical Data Maintenance
Safety Instructions Storage
Getting Started
10
11
6
5
4
3
2
1
9
8
7
Parts List Technical Data
1. Handle Rated Voltage: 120V~ 60Hz
2. Connection knob
3. Operation panel Ampage: 13.5 A
&KXWH'HÀHFWRU Plowing Capacity: Max. 720M2/HR
5. Discharge Chute Idling/Rotation Speed:1700rpm
6. Auger Plow depth and width: Approx. 11.8” and 18”
7. Side cover Max Spraying Distance: 1.5-3 feet
8. Housing Weight: 16.20kg
9. Below handle
10. Switch box
11. Handle sponge

3
IMPORTANT!
Safety Instructions
GENERAL SAFETY INSTRUCTIONS
Warning: Read all instructions. Failure to follow all instructions listed below may result in electric
VKRFN¿UHDQGRUVHULRXVSHUVRQDOLQMXU\7KHWHUP³SRZHUWRRO´LQDOORIWKHZDUQLQJVOLVWHGEHORZ
UHIHUVWR\RXUPDLQVRSHUDWHGFRUGHGSRZHUWRRORUEDWWHU\RSHUDWHGFRUGOHVVSRZHUWRRO
SAVE THESE INSTRUCTIONS
:25.$5($
D.HHSZRUNDUHDFOHDQDQGZHOOOLW&OXWWHUHGDQGGDUNDUHDVLQYLWHDFFLGHQWV
E'RQRWRSHUDWHSRZHUWRROVLQH[SORVLYHDWPRVSKHUHVXFKDVLQWKHSUHVHQFHRIÀDPPDEOH
liquids, gases, or dust. Power tools create sparks which may ignite the dust or fumes.
F.HHSFKLOGUHQSHWVDQGE\VWDQGHUVDZD\ZKLOHIURPZRUNDUHD%HDZDUHWKDWWKHQRUPDO
QRLVHRIWKHPDFKLQHZKHQWXUQHGRQPD\PDNHLWGLI¿FXOWIRU\RXWRKHDUDSSURDFKLQJ
people.
(/(&75,&$/6$)(7<
D(OHFWULFDOSOXJVPXVWPDWFKWKHRXWOHW1HYHUPRGLI\WKHSOXJLQDQ\ZD\'RQRWXVHDQ\
DGDSWHUSOXJVZLWKHDUWKHGJURXQGHGSRZHUWRROV8QPRGL¿HGSOXJVDQGPDWFKLQJRXWOHWV
will reduce risk of electric shock.
E$YRLGERG\FRQWDFWZLWKHDUWKHGRUJURXQGHGVXUIDFHVVXFKDVSLSHVUDGLDWRUVUDQJHVDQG
refrigerators. There is an increased risk of electric shock if your body is earthed or grounded.
F'RQRWH[SRVHSRZHUWRROVWRUDLQRUZHWFRQGLWLRQV:DWHUHQWHULQJDSRZHUWRROZLOOLQFUHDVH
the risk of electric shock.
G'RQRWDEXVHWKHFRUG1HYHUXVHWKHFRUGIRUFDUU\LQJSXOOLQJRUXQSOXJJLQJWKHSRZHUWRRO
Keep cord away from heat, oil, sharp edges or moving parts. Damaged or entangled cords
increase the risk of electric shock.
H:KHQRSHUDWLQJDSRZHUWRRORXWGRRUVXVHDQH[WHQVLRQFRUGVXLWDEOHIRURXWGRRUXVH8VH
of a cord suitable for outdoor use reduces the risk of electric shock.
3(5621$/6$)(7<
D6WD\DOHUWZDWFKZKDW\RXDUHGRLQJDQGXVHFRPPRQVHQVHZKHQRSHUDWLQJDSRZHU
WRRO'RQRWXVHDSRZHUWRROZKLOH\RXDUHWLUHGRUXQGHUWKHLQÀXHQFHRIGUXJVDOFRKRO
or medication. A moment of inattention while operating power tools may result in serious
personal injury.
E8VHVDIHW\HTXLSPHQW$OZD\VZHDUH\HSURWHFWLRQ6DIHW\HTXLSPHQWVXFKDVDGXVWPDVN
QRQVNLGVDIHW\VKRHVKDUGKDWRUKHDULQJSURWHFWLRQXVHGIRUDSSURSULDWHFRQGLWLRQVZLOO
reduce personal injuries.
F$YRLGDFFLGHQWDOVWDUWLQJ(QVXUHWKHVZLWFKLVLQWKHRIISRVLWLRQEHIRUHSOXJJLQJLQ&DUU\LQJ
SRZHUWRROVZLWK\RXU¿QJHURQWKHVZLWFKRUSOXJJLQJLQSRZHUWRROVWKDWKDYHWKHVZLWFKRQ
invites accidents.
G5HPRYHDQ\DGMXVWLQJNH\RUZUHQFKEHIRUHWXUQLQJWKHWRRORQ$ZUHQFKRUDNH\WKDWLVOHIW
attached to a rotating part of the power tool may result in personal injury.
H'RQRWRYHUUHDFK.HHSSURSHUIRRWLQJDQGEDODQFHDWDOOWLPHV7KLVHQDEOHVEHWWHUFRQWURO
RIWKHSRZHUWRROLQXQH[SHFWHGVLWXDWLRQV
I 'UHVVSURSHUO\'RQRWZHDUORRVHFORWKLQJRUMHZHOOHU\.HHS\RXUKDLUFORWKLQJDQGJORYHV
away from moving parts. Loose clothes, jewellery or long hair can be caught in moving parts.
J,IGHYLFHVDUHSURYLGHGIRUWKHFRQQHFWLRQRIGXVWH[WUDFWLRQDQGFROOHFWLRQIDFLOLWLHVHQVXUH
WKDWWKHVHDUHFRQQHFWHGDQGSURSHUO\XVHG8VHRIWKHVHGHYLFHVFDQUHGXFHGXVWUHODWHG
hazards.
32:(5722/686($1'&$5(
D'RQRWIRUFHWKHSRZHUWRRO8VHWKHFRUUHFWSRZHUWRROIRU\RXUDSSOLFDWLRQ7KHFRUUHFW
power tool will do the job better and safer at the rate from which it was designed.
E'RQRWXVHWKHSRZHUWRROLIWKHVZLWFKGRHVQRWWXUQLWRQDQGRII$Q\SRZHUWRROWKDWFDQQRW
be controlled with the switch is dangerous and must be repaired.
F'LVFRQQHFWWKHSOXJIURPWKHSRZHUVRXUFHEHIRUHPDNLQJDQ\DGMXVWPHQWVFKDQJLQJ
accessories, or storing power tools. Such preventive safety measures reduce the risk of
4
starting the power tool accidentally.
G6WRUHLGOHSRZHUWRROVRXWRIWKHUHDFKRIFKLOGUHQDQGGRQRWDOORZSHUVRQVXQIDPLOLDUZLWK
the power tool or these instructions to operate the power tool. Power tools are dangerous in
the hands of untrained users.
H0DLQWDLQSRZHUWRROV&KHFNIRUPLVDOLJQPHQWRUELQGLQJRIPRYLQJSDUWVEUHDNDJHRISDUWV
and any other conditions that may affect the power tools operation. If damaged, have the
power tool repaired before use. Many accidents are caused by poorly maintained power
tools.
I.HHSFXWWLQJWRROVVKDUSDQGFOHDQ3URSHUO\PDLQWDLQHGFXWWLQJWRROVZLWKVKDUSFXWWLQJ
edges are less likely to bind and are easier to control.
J8VHWKHSRZHUWRRODFFHVVRULHVDQGWRROELWVHWFLQDFFRUGDQFHZLWKWKHVHLQVWUXFWLRQVDQG
in the manner intended for the particular type of power tool, taking into account the working
conditions and the work to be performed. Use of the power tool for operations different from
intended could result in a hazardous situation.
6(59,&(
D+DYH\RXUSRZHUWRROVVHUYLFHGE\DTXDOL¿HGUHSDLUSHUVRQXVLQJRQO\LGHQWLFDOUHSODFHPHQW
parts. This will ensure that the safety of the power tools is maintained.
ADDITIONAL SAFETY RULES FOR SNOW THROWER
Ɣ .QRZ\RXUWRRO5HDGRZQHU¶VPDQXDOFDUHIXOO\/HDUQLWVDSSOLFDWLRQVDQGOLPLWDWLRQVDVZHOO
DVWKHVSHFL¿FSRWHQWLDOKD]DUGVUHODWHGWRWKLVWRRO
Ɣ 'RQRWRSHUDWHWKLVXQLWZKHQWLUHGLOORUXQGHUWKHLQÀXHQFHRIDOFRKROGUXJVRUPHGLFDWLRQ
Ɣ $OOJXDUGVDQGVDIHW\DWWDFKPHQWVPXVWEHLQVWDOOHGSURSHUO\EHIRUHXVLQJWKHXQLW
Ɣ ,QVSHFWWKHXQLWEHIRUHXVH(QVXUHWKHSDUWVDUHLQVWDOOHGFRUUHFWO\DQGVHFXUH
Ɣ &OHDUWKHDUHDWREHSORZHGEHIRUHHDFKXVH5HPRYHDOOREMHFWVVXFKDVURFNVEURNHQJODVV
nails, wire, or string which can be thrown or become entangled in this tool.
Ɣ .HHSWKHDUHDRIRSHUDWLRQFOHDURIDOOSHUVRQVSDUWLFXODUO\FKLOGUHQDQGSHWV
Ɣ $YRLGGDQJHURXVHQYLURQPHQW'RQ¶WXVHSRZHUWRROVLQGDPSRUZHWORFDWLRQVRUH[SRVHWR
rain. Keep work area well lit.
Ɣ .HHSZRUNDUHDFOHDQ&OXWWHUHGDUHDVDQGEHQFKHVLQYLWHDFFLGHQWV
Ɣ %HFDXWLRXVWRDYRLGHOHFWULFVKRFN:KHQXVLQJWKHPDFKLQHNHHS\RXUERG\DZD\IURP
GLIIHUHQWJURXQGWHUPLQDORISRZHUHJXSSHUDQGORZHUZDWHUSLSHVRXWHUIUDPHRIKHDWLQJ
equipment, microwave oven, or in a place that is locked.
Ɣ 7KHPDFKLQHVKRXOGEHVWRUHGFDUHIXOO\DQGVDIHO\LQDGU\HQYLURQPHQWZKHQQRWXVHGIDU
from the reach of children, or in a place that is locked.
Ɣ 3OHDVHGRQRWXVHWKHPDFKLQHLQDQ\SXUSRVHVRWKHUWKDQLWLVGHVLJQHGIRURWKHUZLVHLWPD\
cause mechanical defaults or serious damage or injuries.
Ɣ 6SHFLDOFDUHVKRXOGEHGUDZQWRWKHIROORZLQJLVVXHVZKHQXVLQJWKLVPDFKLQHRSHUDWLRQ
methods, procedures, surroundings, and environment states, etc.
Ɣ :KHQXVLQJWKLVPDFKLQHWKHXVHUVKRXOGEHFDXWLRXVDERXWWKHQHDUE\VWDWXVRUFKDQJHV
The user should constantly observe the position and movement of other people, nearby
ZLQGRZYHKLFOHVREVWDFOHVHWF([HUFLVHFDXWLRQWR¿QGDQ\VPDOOSLHFHRIURFNVRURWKHU
DUWLFOHVLQWKHVQRZWRDYRLGWKHPIURPÀ\LQJRXWDQGFDXVLQJSHUVRQDOLQMXU\
Ɣ ,QFDVHRIIROORZLQJFRQGLWLRQVSOHDVHWXUQRIIWKHPDFKLQHDQGSXOORXWWKHSRZHUSOXJ
When not used, being repaired, replaced of some parts, being cleaned and checked as well
DVDQ\RWKHUFRQGLWLRQVLQZKLFKGDQJHURXVIDFWRUVH[LVW,IFRUGLVGDPDJHGLQPDQQHUZKLOH
SOXJJHGLQSXOOH[WHQVLRQFRUGIURPZDOOUHFHSWDFOH
Never carry snow thrower by cord yank it to disconnect from receptacle.
Ɣ 'RQRWXVHKDQGVWRXQFORJFKXWH6WRSPRWRUEHIRUHUHPRYLQJ'HEULV'RQRWZDONLQIURQWRI
running machine. Do not direct discharge at bystander.
Ɣ :KHQXVLQJWKHPDFKLQHWKHXVHUPXVWNHHSFRUUHFWSRVWXUHV+HHOVVKRXOGEHSODFHG¿UPO\
RQWKHJURXQGZKLOHWKHKDQGVKROGWKHKDQGOHV¿UPO\3LF
Ɣ %HIRUHXVLQJWKHPDFKLQHWKHXVHUVKRXOGKDYHDFDUHIXOLQVSHFWLRQRIWKHPDLQPDFKLQH
Carefully check the different parts of the machine before starting, solving any problem
LPPHGLDWHO\,I\RX¿QGDQ\DEQRUPDOFRQGLWLRQSOHDVHGRQ¶WXVHWKHPDFKLQHEHIRUHUHSDLULQJ

5
Ɣ ,I\RX¿QGWKHPDLQSRZHUFDEOHRUWKHH[WHQVLRQFDEOHGDPDJHGSOHDVHSXOORXWWKHSOXJIURP
the socket and disconnect the power immediately. Repair the cable for replace it if necessary.
When adding the lubricant or replacing any parts, you must strictly observe the instructions
and procedures described in this User Manual.
Special care should be paid to any rubber parts, since these parts may increase the engine
load and decrease its mechanical power if damaged.
Ɣ :KHQ\RXH[DPLQHVHUYLFHFOHDQWKHPDFKLQHRUUHSODFHSDUWV\RXPXVWWXUQRIIWKHSRZHU
switch and disconnect the power cable. Any such operation should be performed after
revolving part inside the machine stops completely.
Ɣ 7KH¿UVWWLPH\RXXVHWKHPDFKLQHRUDIWHUUHSODFLQJVRPHSDUWV\RXVKRXOGSHUIRUPDWHVW
UXQQLQJDQGHQVXUHQRDEQRUPDOFRQGLWLRQVH[LVWWRDYRLGDQ\SRWHQWLDOGDPDJHVRULQFLGHQWV
Ɣ 'RQRWPRYHRUWUDQVSRUWWKHPDFKLQHZKHQWKHSOXJLVFRQQHFWHGLQWRWKHSRZHUVRFNHWDQG
the switch is turned on.
Ɣ :KHQXVLQJWKHPDFKLQH\RXPXVWUHVSHFWORFDOODZVDQGUHJXODWLRQVUHJDUGLQJQRLVHFRQWURO
and environment protection. To avoid any noise disturbance to other people, you should
carefully decide operation time and consider the surrounding conditions.
Ɣ :KHQWKHPDFKLQHLVUXQQLQJEHFDXWLRXVWRSUHYHQW\RXUKDQGVIHHWRUKHDGIURPPRYLQJ
QHDUWRWKHUHYROYLQJSDUWRUWKHVQRZH[LWRIWKHPDFKLQH
Ɣ ,QFDVH\RXIDOORUFROOLGHZLWKWKHPDFKLQHSOHDVHFKHFNWKHPDLQPDFKLQHDQGSDUWVIRUDQ\
damages or cracks.
Ɣ :KHQVWHSSLQJEDFNZDUGVEHFDXWLRXVDERXWDQ\REVWDFOHVEHQHDWK\RXUIHHWRUEHKLQG\RX
to avoid falling.
Ɣ :KHQXVLQJWKHPDFKLQHLI\RXQRWLFHWKHPDFKLQHUXQQLQJLQDQXQVWDEOHVWDWHRUKHDU
abnormal sound from the engine, please stop the machine and disconnect the power
immediately and contact your original distributor.
Ɣ :KHQRSHUDWLQJWKHPDFKLQHZKLOHWDNLQJFDUHRI\RXUVDIHW\\RXVKRXOGDOVREHFDXWLRXVWR
DYRLGDQ\KDUPWRRWKHUSHRSOH&DOOQHDUE\SDVVHQJHUV¶DWWHQWLRQWRDYRLGSRWHQWLDOSHUVRQDO
injury.
Ɣ 8VHIRUVQRZUHPRYDORQO\
Ɣ 3OHDVHGRQRWWDNHEDFNDQGVWRUHWKHPDFKLQHZKLOHLWLVVWLOOFRQQHFWHGWRWKHSRZHUVRXUFH
It may cause damage and injury.
Ɣ .HHSWKHSOXJFOHDUIURPZDWHU
Ɣ 7RSUHYHQWHOHFWULFVKRFNXVHRQO\ZLWKDQH[WHQVLRQFRUGVXLWDEOHIRURXWGRRUXVH'RHVQRW
DSSO\WREDWWHU\RSHUDWHG6QRZ7KURZHU
Ɣ .HHSKDQGVDZD\IURPPRYLQJSDUWV6KXWRIIHQJLQHEHIRUHXQFORJJLQJGLVFKDUJHFKXWH
Ɣ 'UHVVSURSHUO\'RQRWZHDUORRVHFORWKLQJRUMHZHOOHU\7KH\FDQEHFDXJKWLQPRYLQJSDUWV
5XEEHUJORYHVDQGQRQVNLGIRRWZHDUDUHUHFRPPHQGHGZKHQZRUNLQJRXWGRRUV7KHXVHU
should wear a protective helmet to avoid your hair from getting in contact with any revolving
part of the machine.
Ɣ .HHSFKLOGUHQDQGYLVLWRUVDZD\9LVLWRUVVKRXOGZHDUVDIHW\JODVVHVDQGEHNHSWDVDIH
GLVWDQFHIURPZRUNDUHD'RQRWOHWYLVLWRUVFRQWDFWWRRRUH[WHQVLRQFRUG
Ɣ 8VHULJKWWRRO'RQ¶WIRUFHVPDOOWRRORUDWWDFKPHQWWRGRWKHMRERIDKHDY\GXW\WRRO'RQ¶WXVH
tool for purpose not intended.
Ɣ 'RQRWIRUFHXQLW,WZLOOGRWKHMREEHWWHUDQGZLWKOHVVOLNHOLKRRGRILQMXU\DWDUDWHIRUZKLFKLW
was designed.
Ɣ $OZD\VZHDUVDIHW\JODVVHV(YHU\GD\H\HJODVVHVKDYHRQO\LPSDFWUHVLVWDQFHOHQVHV7KH\
are not safety glasses.
Ɣ .HHSKDQGVIDFHDQGIHHWDWDGLVWDQFHIURPDOOPRYLQJSDUWV'RQRWWRXFKRUWU\WRVWRSWKH
machine when they are rotating. Do not operate without guards in place.
6
Safety and Instruction Decals
Safety decals and instructions are easily visible to the operator and are located near
areas of potential danger. Lost or damaged decals should be replaced.
WARNUNG!
Electric shock can cause serious injury or death.
To avoid electric shock: DO NOT USE SNOWT HROWER IF WIRE INSULATION IS
'$0$*('5($'$66(0%/<,16758&7,216$1'23(5$72560$18$/
TO START
Press Swetch
Squeeze Bar
TO STOP
Release Bar
Pic.1 Pic.2 Pic.3
GETTING STARTED
5HPRYHWKHVQRZWKURZHUDQGDOORWKHULWHPVIURPER[
&KHFNDOOLWHPVIRUVKLSSLQJGDPDJH,I\RX¿QGDQ\GDPDJHRUDQ\SDUWVDUHPLVVLQJ
promptly inform the dealer where you bought the Snow Thrower.
The snow thrower is to be assembled before the operation. To assemble the snow thrower
following the instructions below.
Upper, Middle and Lower Frame Assembly
/RRVHQDQGUHPRYHWKHIRXUVHWVRIMRLQW¿[LQJ7EROWVFRQQHFWRUVZDVKHUVDQGMRLQW¿[LQJ
knobs to separate the upper frame from the middle frame and middle frame from the lower
frame.
1. Hold the upper frame so that the screw holes align with the holes on the middle frame. Insert
WKH7EROWZLWKFRQQHFWRUDQGZDVKHULQWRWKHKROHVRQHDFKVLGHDQGXVHWKHMRLQW¿[LQJ
NQREVWRVHFXUHWKHFRQQHFWLRQRQERWKVLGHV7KHMRLQW¿[LQJEROWVDQGZDVKHUVVKRXOGEH
LQVHUWHGLQVLGHWKHIUDPHRIWKHXQLWVRWKDWWKHMRLQW¿[LQJNQREVDUHIDVWHQHGWRWKHRXWVLGH
RIWKHIUDPH6HH3LF
2. Follow same instructions to assemble the middle frame with the lower frame.
1RWH'RQRWRYHUWLJKWHQWKHMRLQW¿[LQJNQREV
3. Locate the three cable clips in the parts bag. Secure the power cord to the frame of the unit
by clipping them onto the frame at evenly spaced intervals.

7
Discharge Chute Assembly
1. Locate the discharge chute from the carton See Pic a
2. Put the chute on the main cover, aligning the teeth on the discharge chute with that on the
main cover .See Pic b
3. Loosen the bolt on the chute and align the hole on the chute with that on the main cover,
Fasten the bolt. See. Pic.c
Pic.a Pic.b Pic.c
Operation
Note: Before using this machine, make sure that the power source you will use complies with
WKHVSHFL¿FDWLRQVGHWDLOHGLQWKLVPDQXDO%HIRUHLQVHUWLQJWKHSOXJLQWRWKHVRFNHWYHULI\WKDWWKH
VQRZWKURZHU¶VUROOVKDIWDQGUXEEHUSODWHVDUH¿UPO\VHFXUHGZLWKVFUHZVDQGWKDWWKHUXEEHU
plates are facing the correct direction. Perform a test run to ensure that the rotor turns freely.
Securing the Extension Cord
)RUVDIHDQGHI¿FLHQWXVHRI\RXVQRZWKURZHUXVHRQO\D8/UDWHGRU&6$H[WHQVLRQFRUG
UHFRPPHQGHGIRURXWGRRUXVH5HIHUWRWKH([WHQVLRQ&RUG&KDUWWKDWIROORZV
(OHFWULFVKRFNPD\FDXVH6(9(5(,1-85<RU'($7++HHGWKHVHZDUQLQJV
Ɣ 'RQRWDOORZDQ\SDUWRIVQRZWKURZHUWRPDNHFRQWDFWZLWKZDWHUZKLOHSRZHUHGRQ
If the appliance becomes wet while turned off, wipe dry before starting.
Ɣ 8VHRQO\D8/UDWHGRU&6$UDWHGH[WHQVLRQFRUGIRURXWGRRUDOOZHDWKHUXVH'RQRW
XVHDQH[WHQVLRQFRUGRYHUIHHWPHWHUV
Ɣ 'RQRWWRXFKWKHDSSOLDQFHRULWVSOXJZLWKZHWKDQGVRUZKLOHVWDQGLQJLQZDWHU
Wearing rubber boots offers some protection.
EXTENSION CORD CHART
WARNING
Cord Length is:
Wire gauge is:
IWP
16
IWP
14
7RSUHYHQWWKHH[WHQVLRQFRUGIURPGLVFRQQHFWLQJGXULQJXVHWLHWKHIHPDOHHQGRIWKH
H[WHQVLRQFRUGLQWRDORRVHNQRWRQWKHWRSULJKWVLGHRIWKHPLGGOHIUDPHEHIRUHFRQQHFWLQJ
to the make plug in the switch housing socket of the snowthrower.
3. Note that the snowthrower has a polarized make plug, with one prong in the switch housing
VRFNHWVOLJKWO\ORQJHUDQGZLGHUWKDQWKHRWKHU7KHH[WHQVLRQFRUGIHPDOHHQGVKRXOGEH
OLNHZLVHSRODUL]HGVRWKDWWKHH[WHQVLRQFRUG¿WVVQXJO\LQWRWKHVZLWFKKRXVLQJVRFNHW
8
pic.4 pic.5
3XOOWKHKDQGOHEDUWRZDUG\RXDQGFDWFKKROGRIWKHKDQGOHEDU¿UPO\ZLWKERWKKDQGVDQG
WKHPDFKLQHLVVWDUWHGSLF7KHPDFKLQHFDQRQO\EHVWDUWHGE\SUHVVLQJWKHVZLWFKEXWWRQ
¿UVWIROORZHGE\VTXHH]LQJWKHKDQGOHEDU5HYHUVHRSHUDWLRQFDQQRWVWDUWWKHPDFKLQH
3. To power off, release your grip on the handle bar.
1. Keep the area of operation free of foreign objects that can become thrown by the rotor
blades. Perform a thorough inspection of the area since some objects may be hidden from
view by surrounding snow. If the snow thrower hit an obstruction or picks up a foreign object
GXULQJXVHVWRSWKHVQRZWKURZHUGLVFRQQHFWWKHH[WHQVLRQFRUGUHPRYHWKHREVWUXFWLRQ
and inspect the unit for damaged part before restarting and operating the unit.
2. Keep children, pets and bystanders away from the area of operation. Be aware that the
QRUPDOQRLVHRIWKHPDFKLQHZKHQWXUQHGRQPD\PDNHLWGLI¿FXOWIRU\RXWRKHDUDSSURDFKLQJ
people.
3. When moving the snow thrower, use the wheels on one side as the pivot point. Slightly tilt the
snow thrower on this pivot point to move it forward or backward.
4. Start your clearing path near the electrical outlet and work outward, throwing snow in a back
and forth motion. To clear in the opposite direction, step over the cord and pivot the snow
thrower on its wheels. Make sure to overlap clearing paths.
5. Note wind direction. If possible, move in the same direction as the wind so that the snow is
QRWWKURZQDJDLQVWWKHZLQGDQGWKXVEDFNLQWR\RXUIDFHDQGRQWKHMXVWFOHDUHGSDWK
6. While moving the snow thrower, do not drag the power cable violently or roughly. The snow
thrower should move within the range that the cable can catch.
'RQRWSXVKWKHVQRZWKURZHUZLWKH[FHVVLYHIRUFH<RXVKRXOGSXVKWKHPDFKLQHJHQWO\DQG
HYHQO\LQDFFRUGDQFHZLWKWKHXQLW¶VWKURZUDWH
Powering On and OFF
7RSRZHURQ¿UVWSUHVVWKHVZLWFKNQREDORQJVLGHWKHVZLWFKKRXVLQJSLF
Moving the machine and plowing the snow
'DPDJHGHOHFWULFDOFRUGVSUHVHQWULVNRI¿UHHOHFWULFDOVKRFNDQGVHULRXVERGLO\LQMXU\
%HIRUHRSHUDWLQJWKHVQRZWKURZHUFDUHIXOO\H[DPLQHWKHHOHFWULFDOFRUG,IWKHFRUG
is damaged, do not use the snow thrower. Replace or repair the damaged cord
immediately.
Foreign objects, such as rocks, broken glass, nails, wire, or string, can be picked up and
thrown by the snow thrower, causing serious personal injury.
Remove all foreign objects from the area to be plowed before operating the snow
thrower.
WARNING
WARNING
9
'RQRWDSSO\DGGLWLRQDOPDQGPDGHORDGWRWKHHQJLQHVLQFHWKLVPD\FDXVHHQJLQHGDPDJH
6RPHSDUWVRIWKHVQRZWKURZHUPD\IUHH]HXQGHUH[WUHPHWHPSHUDWXUHFRQGLWLRQV'R
not attempt to operate the snowthrower with frozen parts. If the parts freeze while the
VQRZWKURZHULVLQXVHVWRSWKHVQRZWKURZHUXQSOXJWKHH[WHQVLRQFRUGDQGLQVSHFWIRU
frozen parts. Free all parts before restarting or operating the snowthrower. Never force
controls that have frozen.
10. Working on pebbles, gravel or unpaved surfaces—To avoid throwing loose surface material
along with the snow, push down on the handle to raise the scraper at the base of the unit
above the pebbles or gravel.
1. The discharge chute can be adjusted by 180 degree by rotating the chute direction handle.
Rotate the handle clockwise to move the discharge chute to the left; counterclockwise to
move the chute to the right.
7KHFKXWHGHÀHFWRURQWKHWRSRIWKHGLVFKDUJHFKXWHFRQWUROVWKHKHLJKWRIWKHVQRZVWUHDP
/RRVHERWKFKXWHGHÀHFWRUNQREVWRUDLVHRUORZHUWKHGHÀHFWRUWRWKHGHVLUHGKHLJKWRIVQRZ
\RXZLVKWRWKURZ7LJKWHQWKHNQREVWRVHFXUHWKHGHÀHFWRU
1RWH'RQRWRYHUWLJKWHQWKHFKXWHGHÀHFWRUNQREV
1. Do not attempt to repair the machine unless you have the proper tools and instructions for
disassembly and repair of the machine.
2. Check the shear bolts and other bolts at frequent intervals for proper tightness to ensure that
the equipment is in safe working condition.
3. After each snow removal season, run the snowthrower for a few minutes to prevent the
FROOHFWRULPSHOOHUIURPIUHH]LQJ6KXWRIIWKHPRWRUZDLWIRUDOOUHYROYLQJSDUWVWRVWRS
completely, and wipe residual ice and snow off the unit. Rotate the chute direction handle
VHYHUDOWLPHVWRUHPRYHDQ\H[FHVVVQRZ
Changing Throw Direction and Throw Height
Maintenance
Never direct the snow discharge chute at the operator, at bystanders, at vehicles or at nearby
windows. The discharged snow and foreign objects accidentally picked up by the snowthrower
can cause serious damage and personal injury.
Always orient the discharge chute in the opposite direction from where you, bystanders,
surrounding vehicles, or windows are located.
Lifetime Lubrication
Lubrication is not necessary an may damage the unit. The snowthrower is lubricated for lifetime
use at the factory before shipment.
General Maintenance Tips
WARNING
WARNING
0DNHVXUHWRWXUQRIIWKHVZLWFKDQGGLVFRQQHFWWKHH[WHQVLRQFRUGEHIRUH
performing any maintenance task on your snowthrower.
Replacing the Rubber Plates
Note: When replacing worn rubber plates, pay close attention to carefully distinguish between the
coarse and smooth side of the plates. Place the coarse side inside and the smooth side outside.
1. Detach the worn rubber plate by removing the two sets of nuts, bolts, and washers used to
secure it.
2. Install the new rubber plate so that the coarse side faces inward and the smooth side faces
outward.
10
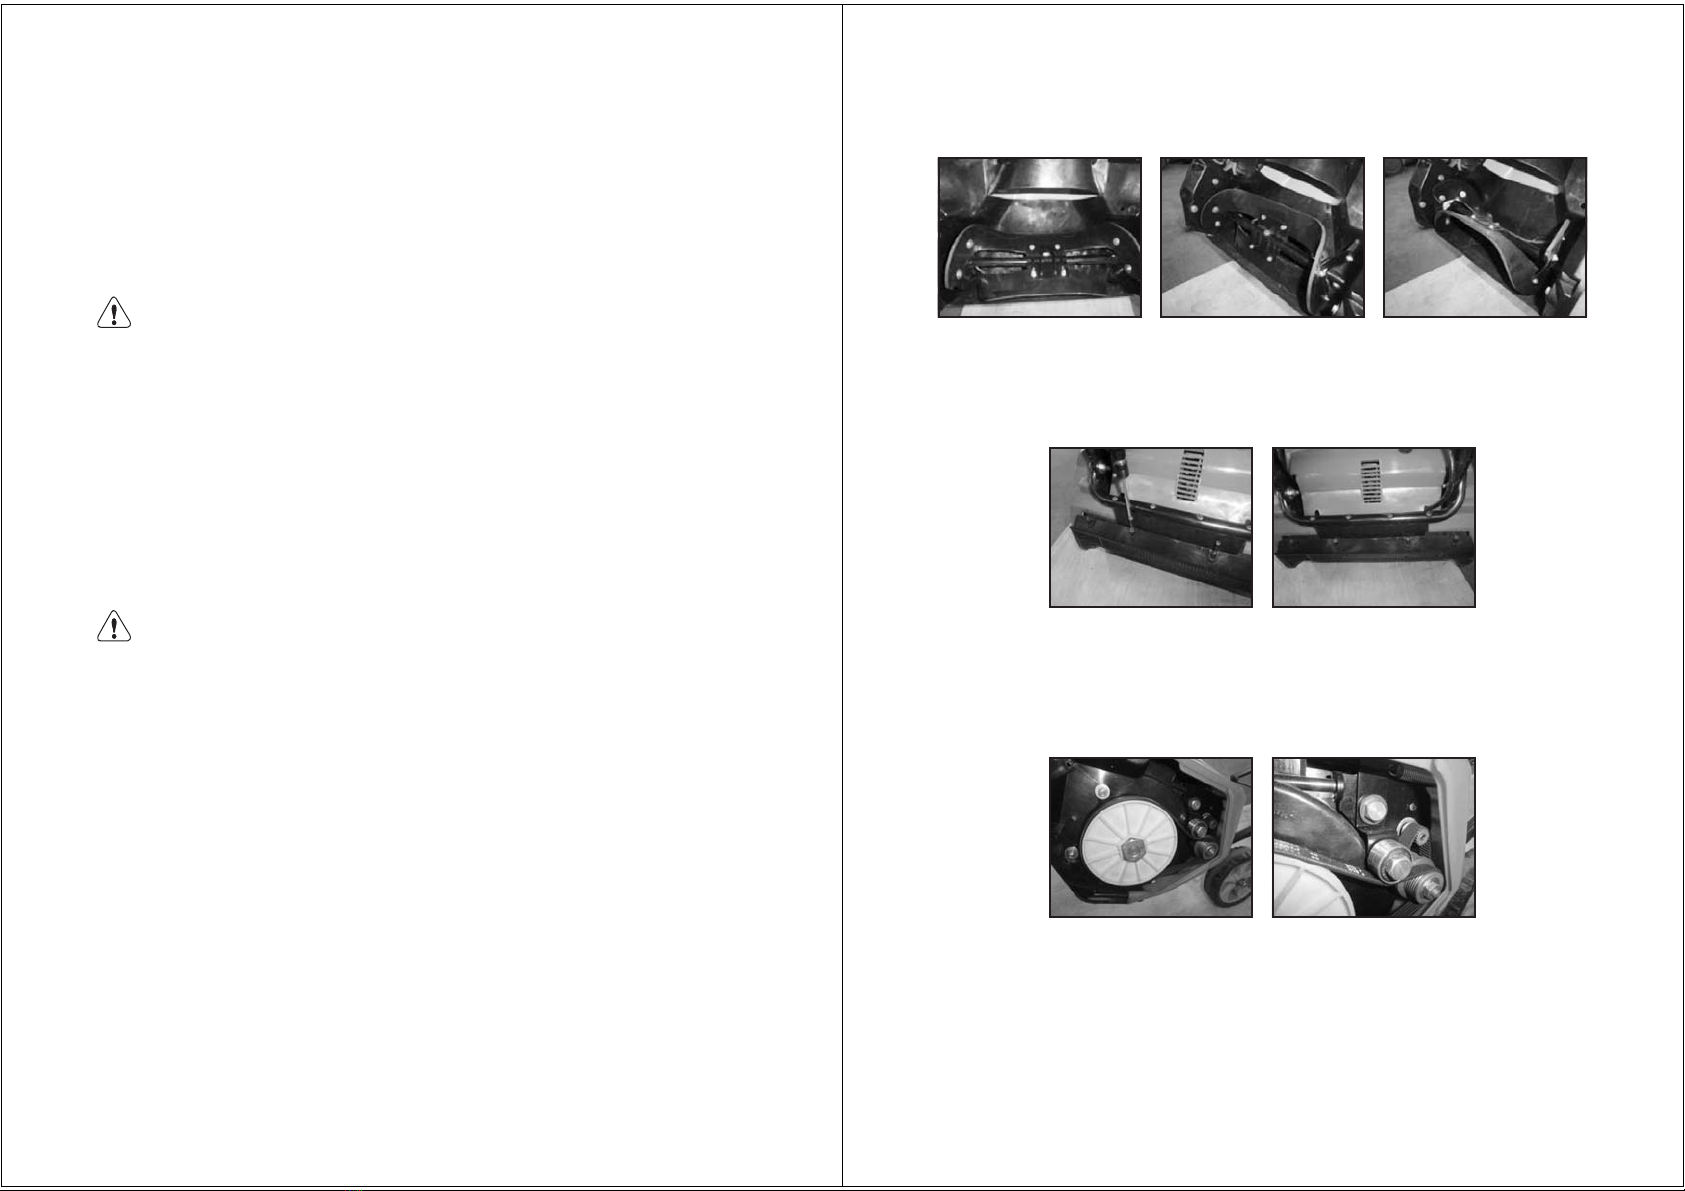
Replacing the Scraper
The scraper is located at the base of the snowthrower beneath the rotor housing.
1. Detach the worn scraper from the snowthrower by removing the 3 screws that hold it in
place. See Pic.9&10
2. Install the new scraper and fasten it securely to the snowthrower with 3 screws. See Pic.11
Replacing the Belt
Note: Determine the left and right sides of the snowthrower by standing behind the unit in the
normal operating position.
1. Remove the screws from the left panel of the snowthrower.
2. Lift the belt tension and roll the belt off the big pulley. See Pic. 12
3. Replace the belt by following instructions in reverse order. See. Pic.13
Pic.6 Pic.7 Pic.8
Pic. 9 Pic. 10
,QVHUWWKHEROWZLWKWKHVPDOOÀDWZDVKHULQWRWKHFRUUHVSRQGLQJKROHVRQHDFKHQGRIWKH
UXEEHUSODWH8VHWKHODUJHÀDWZDVKHUDQGORFNQXWWRVHFXUHWKHEROWRQHDFKHQG,QVWDOOWKH
RWKHUUXEEHUSODWHLQWKHVDPHZD\3LF
Storage
1. Allow the unit to cool and clean the unit before storing or transporting. Be sure to secure the
unit while transporting.
'LVFRQQHFWWKHH[WHQVLRQFRUGIURPWKHVQRZWKURZHU
,QVSHFWWKHH[WHQVLRQFRUGFORVHO\IRUVLJQVRIZHDURUGDPDJH5HSODFHLWLILWLVZRUQRU
damaged.
4. Inspect the snowthrower carefully for worn, loose, or damaged parts. Check connections and
screws and tighten if necessary.
Pic.11 Pic.12

11
6WRUHWKHXQLWDORQJZLWKWKHGLVFRQQHFWHGH[WHQVLRQFRUGLQDORFNHGGU\SODFHRXURIWKH
reach of children to prevent unauthorized use or damage. Cover loosely with a tarp for added
protection.
LIMITED WARRANTY
All-Power warrants to the original purchaser who uses the product in a consumer
application (personal, residential or household usage) that all products covered under this
warranty are free from defects in material and workmanship for two years from the date of
purchase. All products covered by this limited warranty which are used in commercial
applications (i.e. income producing) are warranted to be free of defects in material and
workmanship for 90 days from the date of original purchase. Products covered under this
warranty include air compressors, air tools, service parts, pressure washers and generators.
All-Power will repair or replace at All-Power sole option, products or
components which have failed within the warranty period. Service will be scheduled
according to the normal work flow and business hours at the service center location, and
the availability of replacement parts. All decisions of All-Power with regard to this
limited warranty shall be final. This warranty gives you specific legal rights, and you may
also have other rights which vary from state to state.
RESPONSIBILITY OF ORIGINAL PURCHASER (Initial User):
To process a warranty claim on this product, DO NOT return item to the retailer. The
product must be evaluated by an Authorized Warranty Service Center. For the location of
the nearest Authorized Warranty Service Center contact the retailer or place of purchase.
Retain original cash register sales receipt as proof of purchase for warranty work.
Use reasonable care in the operation and maintenance of the product as described in the
Owner’s Manual(s).
Deliver or ship the product to the nearest Authorized Warranty Service Center. Freight
costs, if any, must be paid by the purchaser.
Air compressors with 60 and 80 gallon tanks will be inspected at the site of installation.
Contact the nearest Authorized Warranty Service Center that provides on-site service calls
for service call arrangements.
If the purchaser does not receive satisfactory results from the Authorized Warranty Service
Center, the purchaser should contact All-Power.
12

LIMITED WARRANTY (cont’d)
THIS WARRANTY DOES NOT COVER:
Merchandise sold as reconditioned, used as rental equipment, or floor or display
models.
Merchandise that has become damaged or inoperative because of ordinary wear,
misuse, cold, heat, rain, excessive humidity, freeze damage, use of improper
chemicals, negligence, accident, failure to operate the product in accordance
with the instructions provided in the Owner’s Manual(s) supplied with the
product, improper maintenance, the use of accessories or attachments not
recommended by All-Power, or unauthorized repair or alterations.
Repair and transportation costs of merchandise determined not to be defective.
Costs associated with assembly, required oil, adjustments or other installation and
start-up costs.
Expendable parts or accessories supplied with the product which are expected to
become inoperative or unusable after a reasonable period of use.
Merchandise sold by All-Power which has been manufactured by and
identified as the product of another company, such as gasoline engines. The
product manufacturer's warranty, if any, will apply.
ANY INCIDENTAL, INDIRECT OR CONSEQUENTIAL LOSS, DAMAGE, OR
EXPENSE THAT MAY RESULT FROM ANY DEFECTS, FAILURE OR
MALFUNCTION OF THE PRODUCT IS NOT COVERED BY THIS
WARRANTY. Some states do not allow the exclusion, so it may not apply to you.
IMPLIED WARRANTIES, INCLUDING THOSE OF MERCHANTABILITY OR
FITNESS FOR A PARTICULAR PURPOSE, ARE LIMITED TO TWO YEARS
FROM THE DATE OF ORIGINAL PURCHASE. Some states do not allow
limitations on how long an implied warranty lasts, so the above limitations may not apply.
13
Distributed by:
ALL-POWER AMERICA
www.allpoweramerica.com
Exploded Drawing
14

Parts List
15
APA Parts No. Pos No. Manufacturer Part No. Description Qty.
SB1810E-01-YAT 18231-660101 Scrape snow blade 2
SB1810E-02-YAT 28063-660104 61hsuB
SB1810E-03-YAT 38SFCC06-16D 0261*6tlobxeH
SB1810E-04-YAT 48187-660103 Middle support plate 2
SB1810E-05-YAT 58NH-06D Nylon locking nut M6 22
SB1810E-06-YAT 68SFDD08-35D8.8 353*8tlobxeH
SB1810E-07-YAT 78NH-08D Nylon locking nut M8 7
SB1810E-08-YAT 88SJAB50-20B Self tapping screw 5*20 41
SB1810E-09-YAT 98021-660101 1lenapedistfeL
SB1810E-10-YAT 10 8345-660102 1tleB
SB1810E-11-YAT 11 8440-660103 Driven wheel assembly 1
SB1810E-12-YAT 12 8BC-401712-ST03 2gniraeb
SR3026
SB1810E-13-YAT 13 8292-660101 2troppusnorI
SB1810E-14-YAT 810C60-FW841
SB1810E-15-YAT 15 8230-660101 Twisted seaming assy' 1
SB1810E-16-YAT 16 8WF-06D01 3rehsawgiB
SB1810E-17-YAT 17 8SFDD08-12D 121*8tlobxeH
SB1810E-18-YAT 18 8021-660102 1lenapedisthgiR
SB1810E-19-YAT 19 8SFDD08-35D 253*8tlobxeH
SB1810E-20-YAT 20 8440-915404 2packcableehW
SB1810E-21-YAT 21 8202-660104 2rehsaW
SB1810E-22-YAT 22 8440-915403 2'yssaleehW
SB1810E-23-YAT 23 8210-660101 2hsubnolyN
SB1810E-24-YAT 24 8210-660102 2eveelsnolyN
SB1810E-25-YAT 25 8081-660102 1tfahsleehW
SB1810E-26-YAT 26 8206-660103 Tensioning wheel bolt 1
SB1810E-27-YAT 27 8BC-281208-ST01 6001Z Tensioning bearing 2
SB1810E-28-YAT 28 8188-660101 Tensioning wheel rocking arm 1
SB1810E-29-YAT 29 8WF-12B 3reh
saW
SB1810E-30-YAT 30 8206-660102 1tlobmragnikcoR
SB1810E-31-YAT 31 8WF-8D 3rehsaW
SB1810E-32-YAT 32 8230-660102 Tensioning panel assy' 1
SB1810E-33-YAT 33 8291-660101 Motor front support 1
SB1810E-34-YAT 34 8BC-261008-SS01 6000 2RS Bearing 3
SB1810E-35-YAT 35 8CB-26B 2gnirgniniateR
SB1810E-36-YAT 36 8402-660101 1'yssarotoR
SB1810E-37-YAT 37 8405-660101 1'yssarotatS
SB1810E-38-YAT 38 8291-481002 Motor back support 1
SB1810E-39-YAT 39 8403-660101 1lee
hwnaF
SB1810E-40-YAT 40 8409-481601 2redlohhsurB
SB1810E-41-YAT 41 8406-545202 2hsurbnobraC
SB1810E-42-YAT 42 8181-481004 2revochsurB
Parts List (cont’d)
16
SB1810E-43-YAT 43 8SNAB30-08B Flange self tapping screw 3*8 4
SB1810E-44-YAT 44 8BC-220807-SS01 608 2RS Bearing 2
SB1810E-45-YAT 45 8NA-04D01 2tunxeH
APA Parts No. Pos No. Manufacturer Part No. Description Qty.
SB1810E-46-YAT 46 8SJAN04-80B 208*4wercS
SB1810E-47-YAT 47 8SJAC48-24B Self tapping screw 4.8*20 6
SB1810E-48-YAT 48 8063-660103 Driving wheel sleeve 1
SB1810E-49-YAT 49 8122-660102 1leehwgnivirD
SB1810E-50-YAT 50 8342-660101 1gnirpsnoisnetxE
SB1810E-51-YAT 51 8122-660103 Middle belt wheel 1
SB1810E-52-YAT 52 8345-660101 1tlebcraralucriC
SB1810E-53-YAT 53 8063-660101 Middle belt wheel sleeve 1
SB1810E-54-YAT 54 8NH-08D Nylon locking nut 1
SB1810E-55-YAT 55 8101-660101 1tuopswole
B
SB1810E-56-YAT 56 8101-660103 1tuopspU
SB1810E-57-YAT 57 8SBJC08-30D 203*8tloB
SB1810E-58-YAT 58 8202-660101 2rehsawrebbuR
SB1810E-59-YAT 59 8313-516301 4'yssabonkpU
SB1810E-60-YAT 60 8024-660101 Scrape snow cover 1
SB1810E-61-YAT 61 8020-660101 1revocpU
SB1810E-62-YAT 62 8SJAB50-30B Self tapping screw 5*30 7
SB1810E-63-YAT 63 8321-660101 Scrape snow shovel 1
SB1810E-64-YAT 64 8341-629901 2dapkcohS
SB1810E-65-YAT 65 8411-333101 1rotcen
noC
SB1810E-66-YAT 66 8SJAB30-22B Self tapping screw 3*22 1
SB1810E-67-YAT 67 8184-282102 3pmalcelbaC
SB1810E-68-YAT 68 8185-660101 1revocrotoM
SB1810E-69-YAT 69 8424-660101 Overcurrent protect 1
SB1810E-70-YAT 70 8413-660103 Connecting wire 3 1
SB1810E-71-YAT 71 8210-660104 1gnirrebbuR
SB1810E-72-YAT 72 8061-660101 1eldnahwoleB
SB1810E-73-YAT 73 8007-517001 2kooheriW
SB1810E-74-YAT 74 8087-660104 Connector handle 2
SB1810E-75-YAT 75 8087-660105 4tloB-U
SB1810E-76-YAT 76 8SJAB50-35B Self tapping screw 5*35 7
SB1810E-77-YAT 77 8313-660101 Locking knob assy' 1
SB1810E-78-YAT 78 8087-660106 1mrarekcorpU
SB1810E-79-YAT 79 8187-660104 1lenaplortnoC
SB1810E-80-YAT 80 8304-660101 1etalpgnikcoL
SB1810E-81-YAT 81 8CC-09B Shaft retaining ring 1
SB1810E-82-YAT 82 8331-660103 Rocking arm sleeve 1
SB1810E-83-YAT 83 8210-660103 2hsubgnikcoR
SB1810E-84-YAT 84 8202-660103 2rehsaW

Parts List (cont’d)
17
SB1810E-85-YAT 85 8141-660102 2daehtsujdatfeL
SB1810E-86-YAT 86 8312-660101 Adjust divider rod 2
SB1810E-87-YAT 87 8086-670101 21tfahsniP
SB1810E-88-YAT 88 8141-660103 Right adjust head 2
SB1810E-89-YAT 89 8342-670101 2gnirpssserP
APA Parts No. Pos No. Manufacturer Part No. Description Qty.
SB1810E-90-YAT 90 8086-670102 Pin shaft 2 1
SB1810E-91-YAT 91 8202-660104 Washer 2
SB1810E-92-YAT 92 8NH-05D Hex nylon locking nut M5 2
SB1810E-93-YAT 93 8087-660103 Up handle 1
SB1810E-94-YAT 94 8313-512101 Hook line 1
SB1810E-95-YAT 95 8331-660101 Handle sleeve 1
SB1810E-96-YAT 96 8SJAB40-18B Self tapping screw 4*18 9
SB1810E-97-YAT 97 8SJAB40-25B Self tapping screw 4*25 3
SB1810E-98-YAT 98 8087-660102 Switch handle 1
SB1810E-99-YAT 99 8145-660101 Assistance handle left cover 1
SB1810E-100-YAT 100 8292-670105 Support 1
SB1810E-101-YAT 101 8SJAC35-10B Self tapping screw 3.5*10 2
SB1810E-102-YAT 102 8145-660102 Assistance handle right cover 1
SB1810E-103-YAT 103 8020-512504-01 Switch box below cover 1
SB1810E-104-YAT 104 8044-670101 Switch handle 1
SB1810E-105-YAT 105 8042-512401 Switch 1
SB1810E-106-YAT 106 8422-620201 Cable wire 1
SB1810E-107-YAT 107 8020-512503-01 Switch box up cover 1
SB1810E-108-YAT 108 8332-516201 Cable sleeve 2
SB1810E-109-YAT 109 8342-512401 Button spring 1
SB1810E-110-YAT 110 8312-512401 Switch button 1
SB1810E-111-YAT 111 8413-660104 Cable wire 1
SB1810E-112-YAT 112 8WF-16D Washer M16 1
SB1810E-113-YAT 113 8130-660104 Gear base 1
SB1810E-114-YAT 114 8086-660101 Open pin 1
SB1810E-115-YAT 115 8091-660102 Spring pin 1
SB1810E-116-YAT 116 8123-660101 Gear 1
SB1810E-117-YAT 117 8101-660102 Out snow mouth 1
Table of contents
Other ALLPOWER Snow Blower manuals


