AllSportSystems SUPERBAY User manual

SuperBay™ Installation Guide
1
2/17/2023

USE THIS PRODUCT AT YOUR OWN RISK. NO CLAIM IS MADE AS TO ITS
SAFETY, FITNESS, OR RELIABILITY FOR ANY PURPOSE. HITTING GOLF
BALLS IN AN INDOOR ENVIRONMENT IS EXTREMELY DANGEROUS!
ALWAYS EXERCISE CAUTION WHEN USING YOUR SYSTEM. WE
RECOMMEND HITTING 'ALMOST GOLF' BALLS OR SIMILAR
LIGHTWEIGHT GOLF BALLS FOR INCREASED SAFETY. NEVER SWING A
GOLF CLUB IN CLOSE PROXIMITY TO PETS OR PEOPLE. ALWAYS
STAND AS CLOSE AS POSSIBLE TO THE HITTING BAY TO MINIMIZE THE
RISK OF STRAY SHOTS FLYING OUTSIDE THE ENCLOSURE. NEVER
ALLOW ANYONE TO STAND IN FRONT OF YOU, OR ON EITHER SIDE OF
THE ENCLOSURE WHILE YOU ARE HITTING!
IMPORTANT WARNING
2

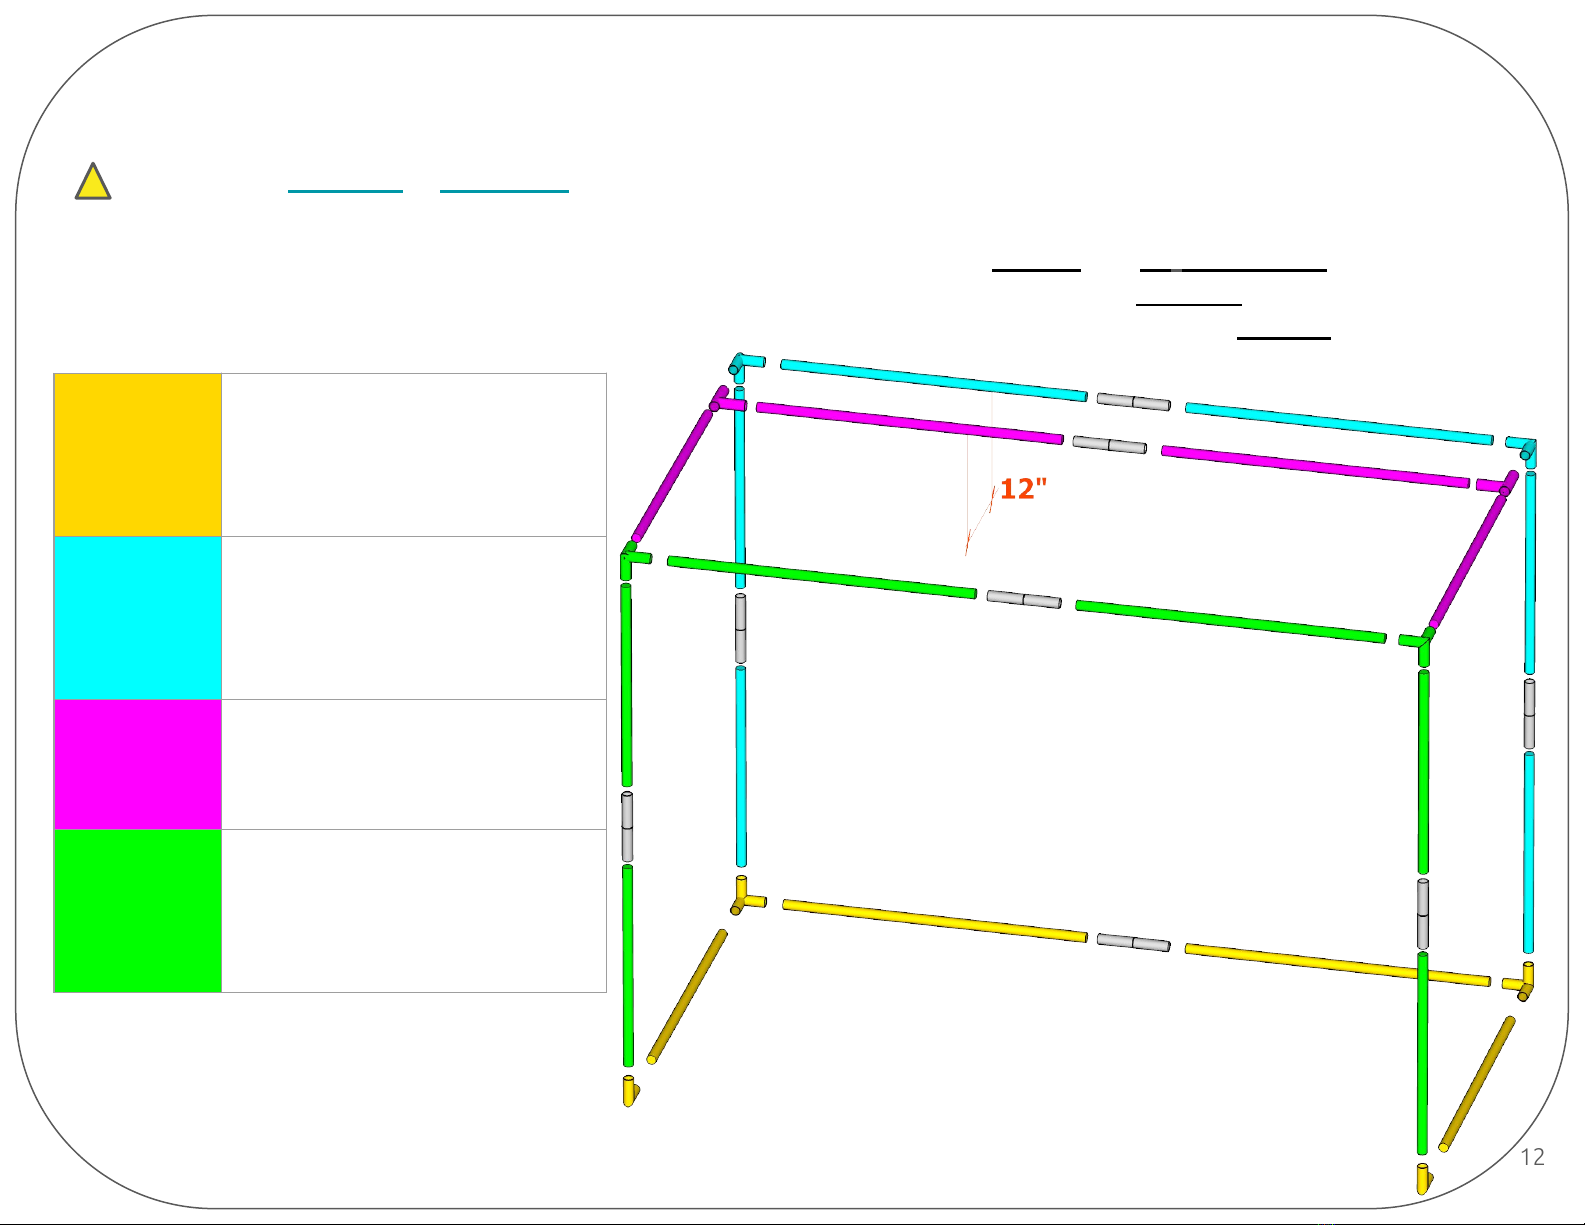
Connector Kit:
6 x 3-Way Connectors
2 x 90° Connector
2 x T-Connectors
4 x Pole Couplers
(only if wider than 10ft)
SuperBay™ Parts List
Fabric Parts:
●2 x Black Fabric Side Panels
●2 x Black Fabric Corner Panels
●1 x Black Fabric Top Center Panel
●1 x Black Fabric Back Panel
●4 x Black Fabric Pole Sleeves
●1 x Impact Screen
Netting:
●1 x Interior Net (4 nets sewn together to
cover top, sides and back of enclosure)
●1 x Baffle Net (single net hangs behind
screen)
Additional Hardware:
●1 x package of cable (zip) ties
●3 x nylon coated cable wire &
turnbuckle assembly
3
EMT Pole Kit (optional upgrade):
●8 x Height EMT Poles + 4 x couplers
●8 x Width EMT Poles + 4 x couplers
●4 x Depth EMT Poles

4
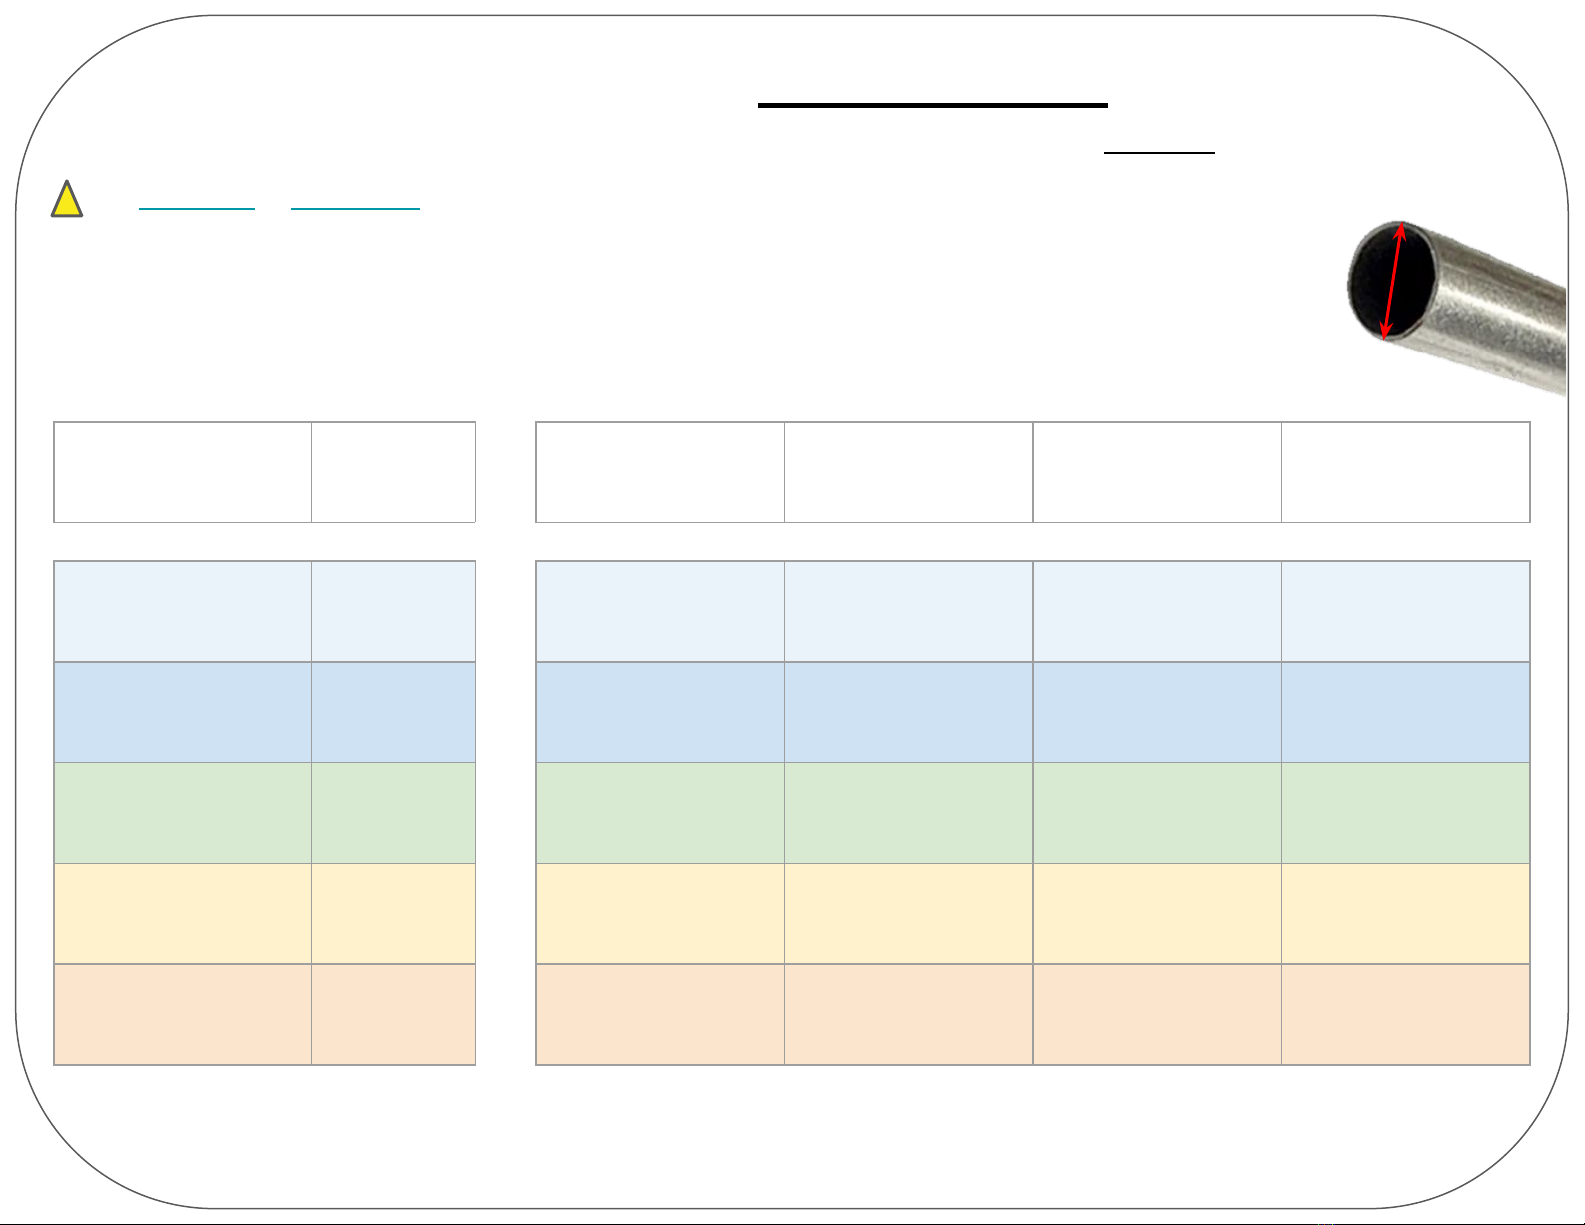
Couplers & Corner Connectors
Insert poles ¼” from crimp
For couplers only, replace
eye-bolts with hex bolts ●For couplers only replace
eye-bolts with hex bolts.
●Do not insert pole all the way into
couplers. Pull pole about ¼” back
from the crimp point.
Forcing poles all the way to
crimp may cause poles to
exit coupler at an angle.
●Mark and insert poles 4-½” into
3-Ways and 90° Connectors.
!

5
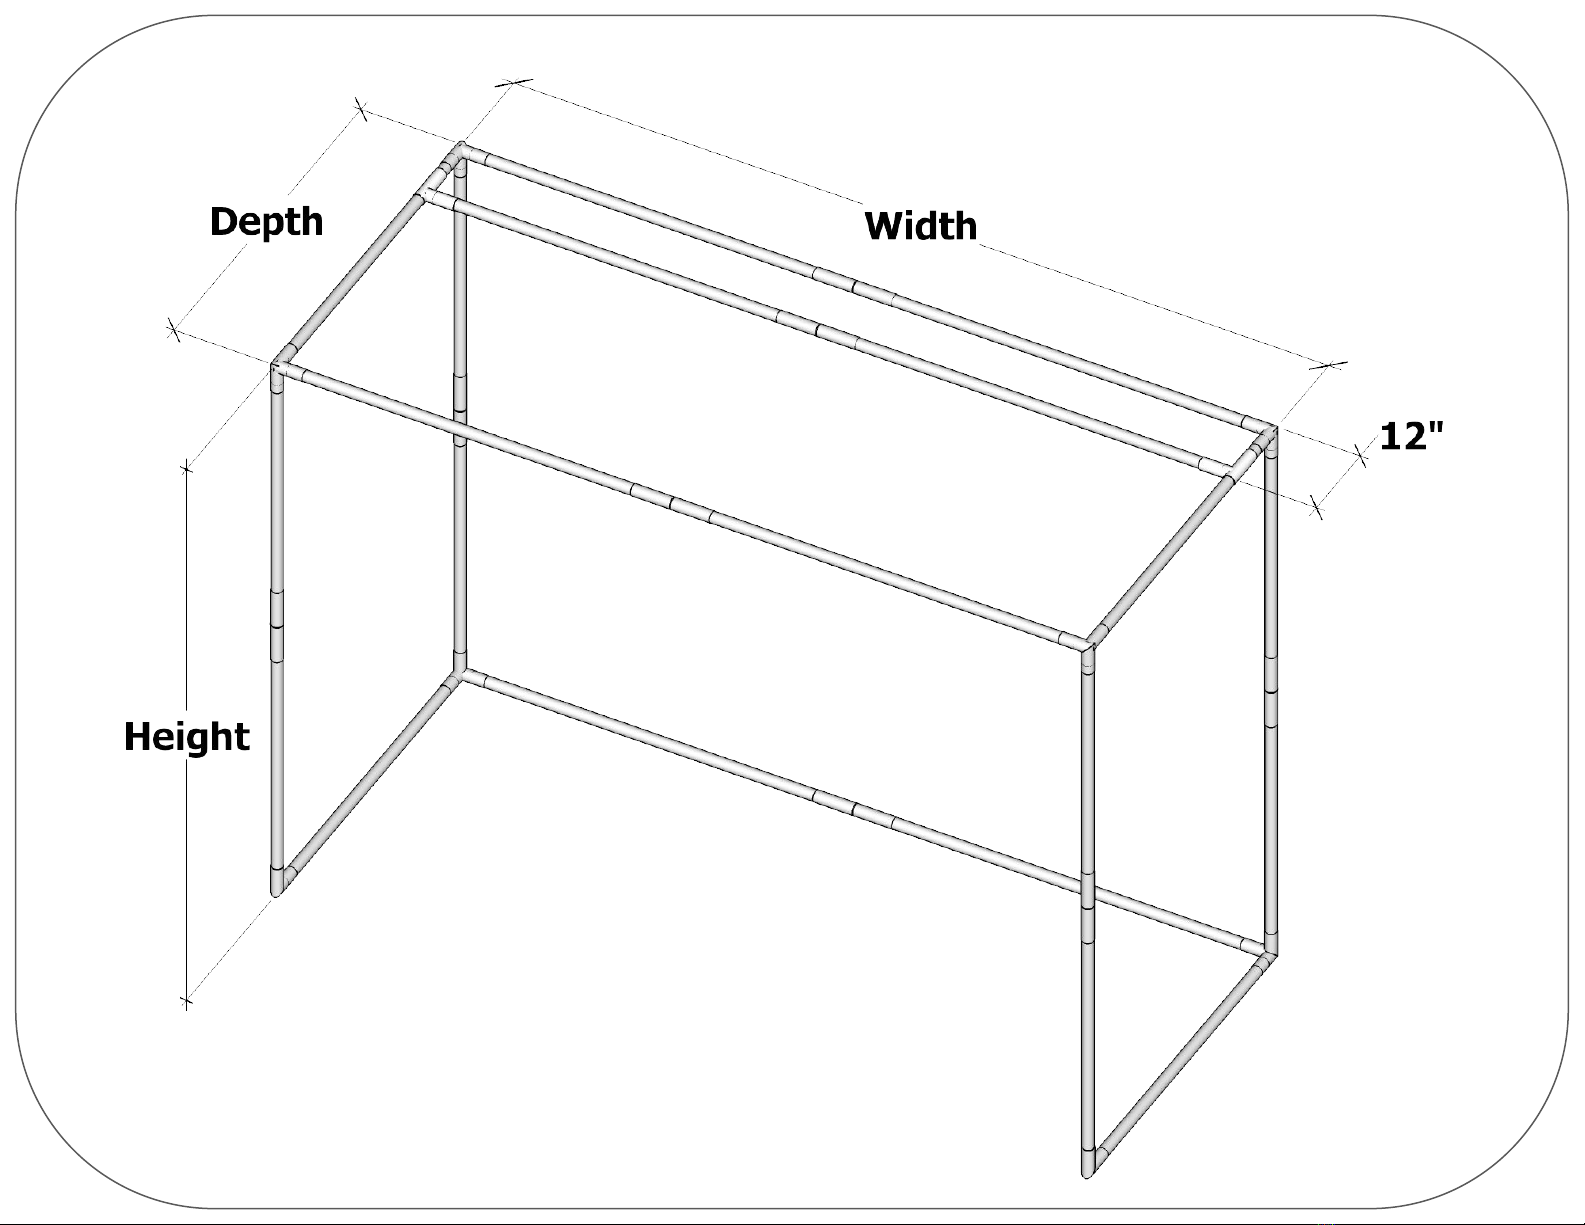
SuperBay Size 10’ Poles
Needed Height Width Width Extension Depth
8’H x 10’W x 5’D 10 QTY 4 Poles
7’-9”
QTY 4 Poles
9’-9” None needed QTY 2 Poles to 4
pieces 4’-9”
9’H x 10’W x 5’D 10 QTY 4 Poles
8’-9”
QTY 4 Poles
9’-9” None needed QTY 2 Poles to 4
pieces 4’-9”
9’H x 12’W x 5’D 11 QTY 4 Poles
8’-9”
QTY 4 Poles 10’
(no cuts)
QTY 1 pole to
4 pieces 1’9”
QTY 2 Poles to 4
pieces 4’-9”
9’H x 14’W x 5’D 12 QTY 4 Poles
8’-9”
QTY 4 Poles 10’
(no cuts)
QTY 2 poles to
4 pieces 3’9”
QTY 2 Poles to 4
pieces 4’-9”
9’H x 16’W x 5’D 14 QTY 4 Poles
8’-9”
QTY 4 Poles 10’
(no cuts)
QTY 4 poles to
4 pieces 5’9”
QTY 2 Poles to 4
pieces 4’-9”
Tip: If you ordered custom bay, all poles are cut 3” shorter than desired cage dimension.
SuperBay™ EMT Pole Cutting Chart (5ft Deep)
Use this chart to purchase and cut your own EMT Poles for cages 5ft Deep Actual dia 1-3/16”
(30.16 mm)
●1” Common EMT 10-ft conduit can be purchased from a local home improvement store. Use the
chart below to purchase correct quantity and cut to the proper lengths.
See SkyBridge or SkyRailPlus setup guides for modified cage assembly if these upgrades are included.
Note that your EMT pole count will be reduced by 1 or 2 width poles respectively.
!
6
SuperBay Size 10’ Poles
Needed Height Width Width Extension Depth
8’H x 10’W x 8’D 12 QTY 4 Poles
7’-9”
QTY 4 Poles
9’-9” None needed QTY 4 Poles to 4
pieces 7’-9”
9’H x 10’W x 8’D 12 QTY 4 Poles
8’-9”
QTY 4 Poles
9’-9” None needed QTY 4 Poles to 4
pieces 7’-9”
9’H x 12’W x 8’D 13 QTY 4 Poles
8’-9”
QTY 4 Poles 10’
(no cuts)
QTY 1 pole to
4 pieces 1’9”
QTY 4 Poles to 4
pieces 7’-9”
9’H x 14’W x 8’D 14 QTY 4 Poles
8’-9”
QTY 4 Poles 10’
(no cuts)
QTY 2 poles to
4 pieces 3’9”
QTY 4 Poles to 4
pieces 7’-9”
9’H x 16’W x 8’D 16 QTY 4 Poles
8’-9”
QTY 4 Poles 10’
(no cuts)
QTY 4 poles to
4 pieces 5’9”
QTY 4 Poles to 4
pieces 7’-9”
SuperBay™ EMT Pole Cutting Chart (8ft Deep)
Use this chart to purchase and cut your own EMT Poles for cages 8ft Deep Actual dia 1-3/16”
(30.16 mm)
●1” Common EMT 10-ft conduit can be purchased from a local home improvement store. Use the
chart below to purchase correct quantity and cut to the proper lengths.
See SkyBridge or SkyRailPlus setup guides for modified cage assembly if these upgrades are included.
Note that your EMT pole count will be reduced by 1 or 2 width poles respectively.
!
Tip: If you ordered custom bay, all poles are cut 3” shorter than desired cage dimension.

7
SuperBay Size 10’ Poles
Needed Height Width Width Extension Depth
8’H x 10’W x 10’D 12 QTY 4 Poles
7’-9”
QTY 4 Poles
9’-9” None needed QTY 4 Poles to 4
pieces 9’-9”
9’H x 10’W x 10’D 12 QTY 4 Poles
8’-9”
QTY 4 Poles
9’-9” None needed QTY 4 Poles to 4
pieces 9’-9”
9’H x 12’W x 10’D 13 QTY 4 Poles
8’-9”
QTY 4 Poles 10’
(no cuts)
QTY 1 pole to
4 pieces 1’9”
QTY 4 Poles to 4
pieces 9’-9”
9’H x 14’W x 10’D 14 QTY 4 Poles
8’-9”
QTY 4 Poles 10’
(no cuts)
QTY 2 poles to
4 pieces 3’9”
QTY 4 Poles to 4
pieces 9’-9”
9’H x 16’W x 10’D 15 QTY 4 Poles
8’-9”
QTY 4 Poles 10’
(no cuts)
QTY 4 poles to
4 pieces 5’9”
QTY 4 Poles to 4
pieces 9’-9”
SuperBay™ EMT Pole Cutting Chart (10ft Deep)
Use this chart to purchase and cut your own EMT Poles for cages 10ft Deep
●1” Common EMT 10-ft conduit can be purchased from a local home improvement store. Use the
chart below to purchase correct quantity and cut to the proper lengths.
Actual dia 1-3/16”
(30.16 mm)
See SkyBridge or SkyRailPlus setup guides for modified cage assembly if these upgrades are included.
Note that your EMT pole count will be reduced by 1 or 2 width poles respectively.
!
Tip: If you ordered custom bay, all poles are cut 3” shorter than desired cage dimension.
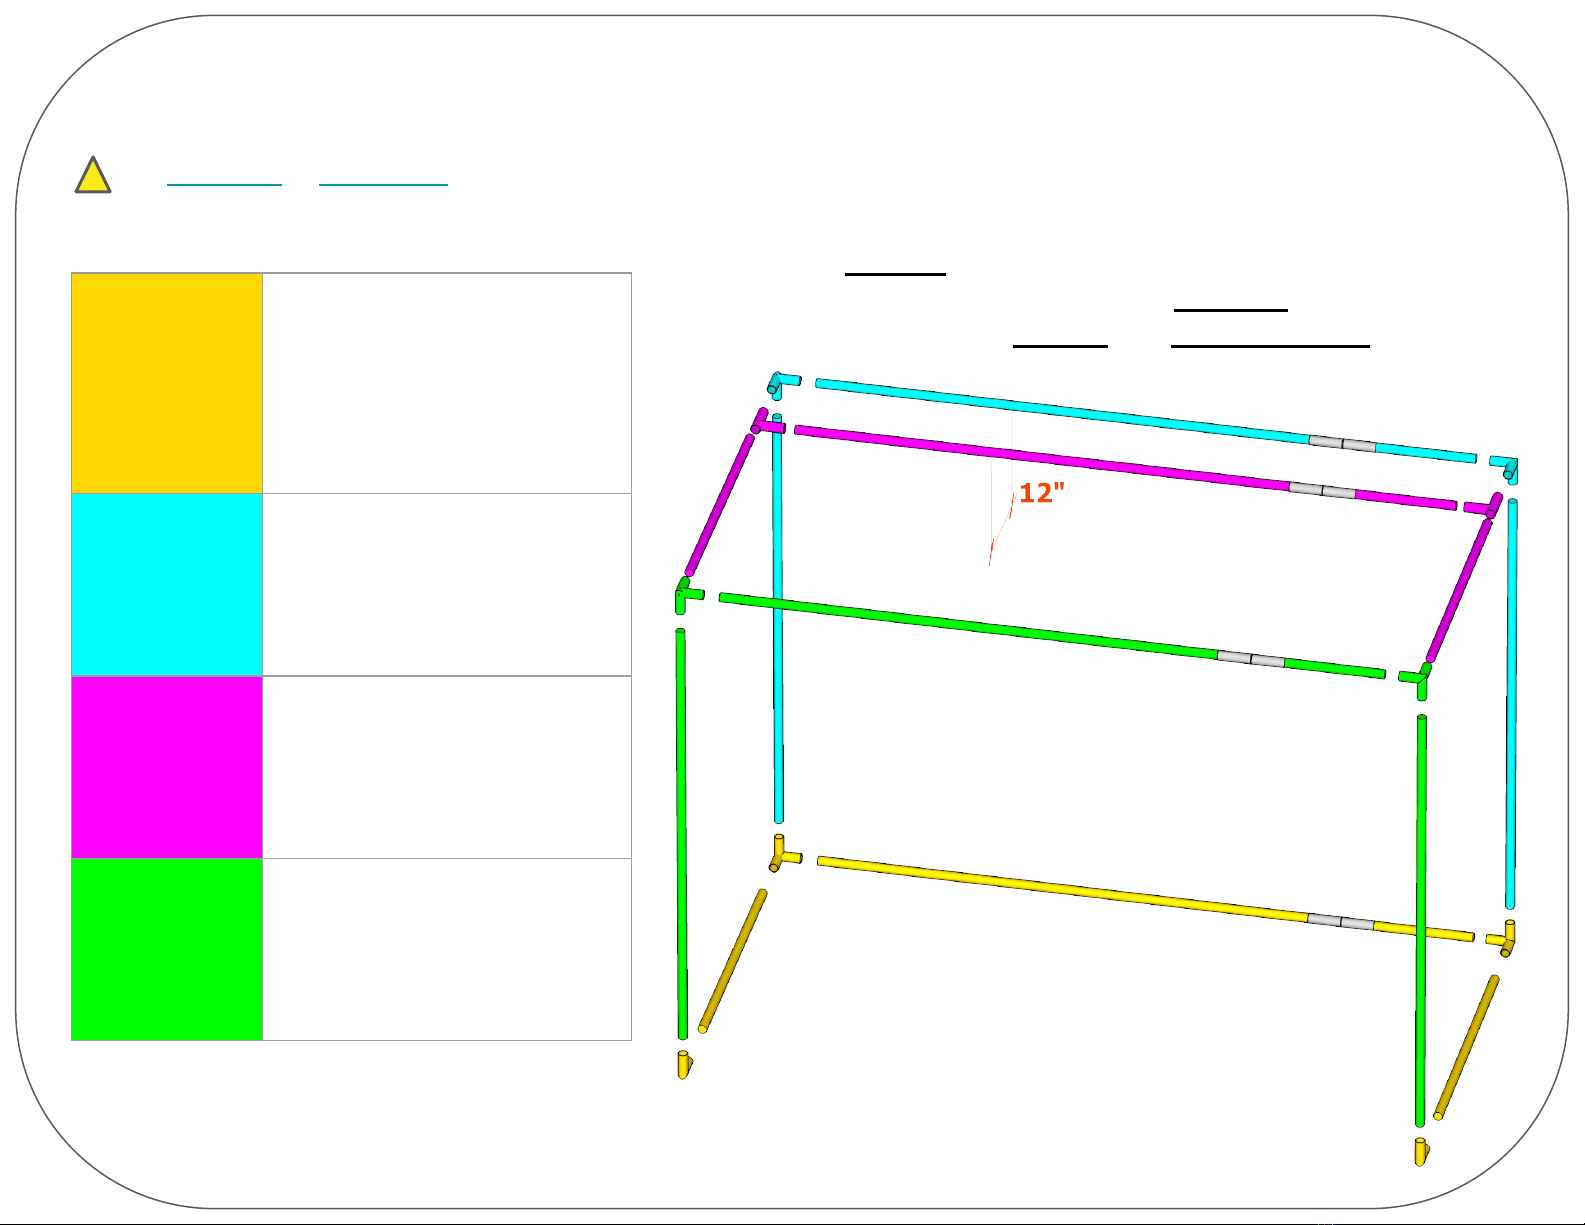
CAGE ASSEMBLY - EMT’s Purchased Locally
8
1) BUILD
BOTTOM
2 x 3-Ways
2 x 90°
2 x Depth poles
1 x Width pole
1 x Coupler + extender*
2) BUILD
REAR
2 x 3-Ways
2 x Height poles
1 x Width pole
1 x Coupler + extender*
3) BUILD
DEPTH
2 x Depth poles
2 x T-Connectors
1 x Width pole
1 x Coupler + extender*
4) BUILD
FRONT
2 x 3-Ways
2 x Height poles
1 x Width pole
1 x Coupler + extender*
* Couplers + extender poles only needed
for bays larger than 10ft wide.
Use this diagram to assemble your cage from EMT’s purchased and cut locally
See SkyBridge or SkyRailPlus setup guides for modified cage assembly if these upgrades are included. Note that your
EMT pole count will be reduced by 1 or 2 width poles respectively.
!
●On each coupler replace eye-bolts with hex bolts.
●Insert poles ¼” from the crimp in couplers.
●Insert poles 4½” into 3-Ways and 90° connectors.
SuperBay™ 1” EMT Pole Kit Chart (5ft Deep)
9
SuperBay Size Height Poles Width Poles Depth Poles Pole Coupers
8’H x 10’W x 5’D QTY 8 Poles
46.5”
QTY 8 Poles
58.5”
QTY 4 Poles
57” 8
9’H x 10’W x 5’D QTY 8 Poles
52.5”
QTY 8 Poles
58.5”
QTY 4 Poles
57” 8
9’H x 12’W x 5’D QTY 8 Poles
52.5”
QTY 8 Poles
70.5”
QTY 4 Poles
57” 8
9’H x 14’W x 5’D QTY 8 Poles
52.5”
QTY 8 Poles
82.5”
QTY 4 Poles
57” 8
9’H x 16’W x 5’D QTY 8 Poles
52.5”
QTY 8 Poles
94.5”
QTY 4 Poles
57” 8
If custom bay, assembled pole lengths will be 3” shorter than desired cage dimension.
This chart shows quantity and length of poles for the Precut 1” EMT Pole Kit upgrade, for 5ft deep cages
See SkyBridge or SkyRailPlus setup guides for modified cage assembly if these upgrades are included.
Note that your EMT pole count will be reduced by 1 or 2 width poles respectively.
!
SuperBay™ 1” EMT Pole Kit Chart (8ft Deep)
10
SuperBay Size Height Poles Width Poles Depth Poles Pole Coupers
8’H x 10’W x 8’D QTY 8 Poles
46.5”
QTY 8 Poles
58.5”
QTY 8 Poles
46.5” 12
9’H x 10’W x 8’D QTY 8 Poles
52.5”
QTY 8 Poles
58.5”
QTY 8 Poles
46.5” 12
9’H x 12’W x 8’D QTY 8 Poles
52.5”
QTY 8 Poles
70.5”
QTY 8 Poles
46.5” 12
9’H x 14’W x 8’D QTY 8 Poles
52.5”
QTY 8 Poles
82.5”
QTY 8 Poles
46.5” 12
9’H x 16’W x 8’D QTY 8 Poles
52.5”
QTY 8 Poles
94.5”
QTY 8 Poles
46.5” 12
This chart shows quantity and length of poles for the Precut 1” EMT Pole Kit upgrade, for 8ft deep cages
See SkyBridge or SkyRailPlus setup guides for modified cage assembly if these upgrades are included.
Note that your EMT pole count will be reduced by 1 or 2 width poles respectively.
!
If custom bay, assembled pole lengths will be 3” shorter than desired cage dimension.

SuperBay™ 1” EMT Pole Kit Chart (10ft Deep)
11
SuperBay Size Height Poles Width Poles Depth Poles Pole Coupers
8’H x 10’W x 10’D QTY 8 Poles
46.5”
QTY 8 Poles
58.5”
QTY 8 Poles
58.5” 12
9’H x 10’W x 10’D QTY 8 Poles
52.5”
QTY 8 Poles
58.5”
QTY 8 Poles
58.5” 12
9’H x 12’W x 10’D QTY 8 Poles
52.5”
QTY 8 Poles
70.5”
QTY 8 Poles
58.5” 12
9’H x 14’W x 10’D QTY 8 Poles
52.5”
QTY 8 Poles
82.5”
QTY 8 Poles
58.5” 12
9’H x 16’W x 10’D QTY 8 Poles
52.5”
QTY 8 Poles
94.5”
QTY 8 Poles
58.5” 12
This chart shows quantity and length of poles for the Precut 1” EMT Pole Kit upgrade, for 10ft deep cages
See SkyBridge or SkyRailPlus setup guides for modified cage assembly if these upgrades are included.
Note that your EMT pole count will be reduced by 1 or 2 width poles respectively.
!
If custom bay, assembled pole lengths will be 3” shorter than desired cage dimension.
Be sure to see SkyBridge or SkyRailPlus setup guides for modified cage assembly if these upgrades are included.
Note that your EMT pole count will be reduced by 1 or 2 width poles respectively.
12
1) BUILD
BOTTOM
2 x 3-Ways
2 x 90°
2 x Depth poles
2 x Width pole + coupler
2) BUILD
REAR
2 x 3-Ways
4 x Height poles + couplers
2 x Width poles + coupler
3) BUILD
DEPTH
2 x T-Connectors
2 x Depth poles
2 x Width pole + coupler
4) BUILD
FRONT
2 x 3-Ways
4 x Height poles + couplers
2 x Width poles + couplers
CAGE ASSEMBLY - EMT Pole Kit
!
●Insert poles 4 ½” into 3-Ways and 90° connectors
●Insert poles ¼” from the crimp in couplers
●Replace eye-bolts with hex bolts for each coupler.
Use this diagram to assemble your cage from the Precut 1” EMT Pole Kit upgrade
13
●Verify and adjust outer
dimensions to match
ordered enclosure size

14
Add Blackout Sleeves
●4x Blackout Velcro sleeves

Hardware:
3 x Nylon coated steel cable wire
3 x Turnbuckles
12 x Wire nuts
3 x Cables
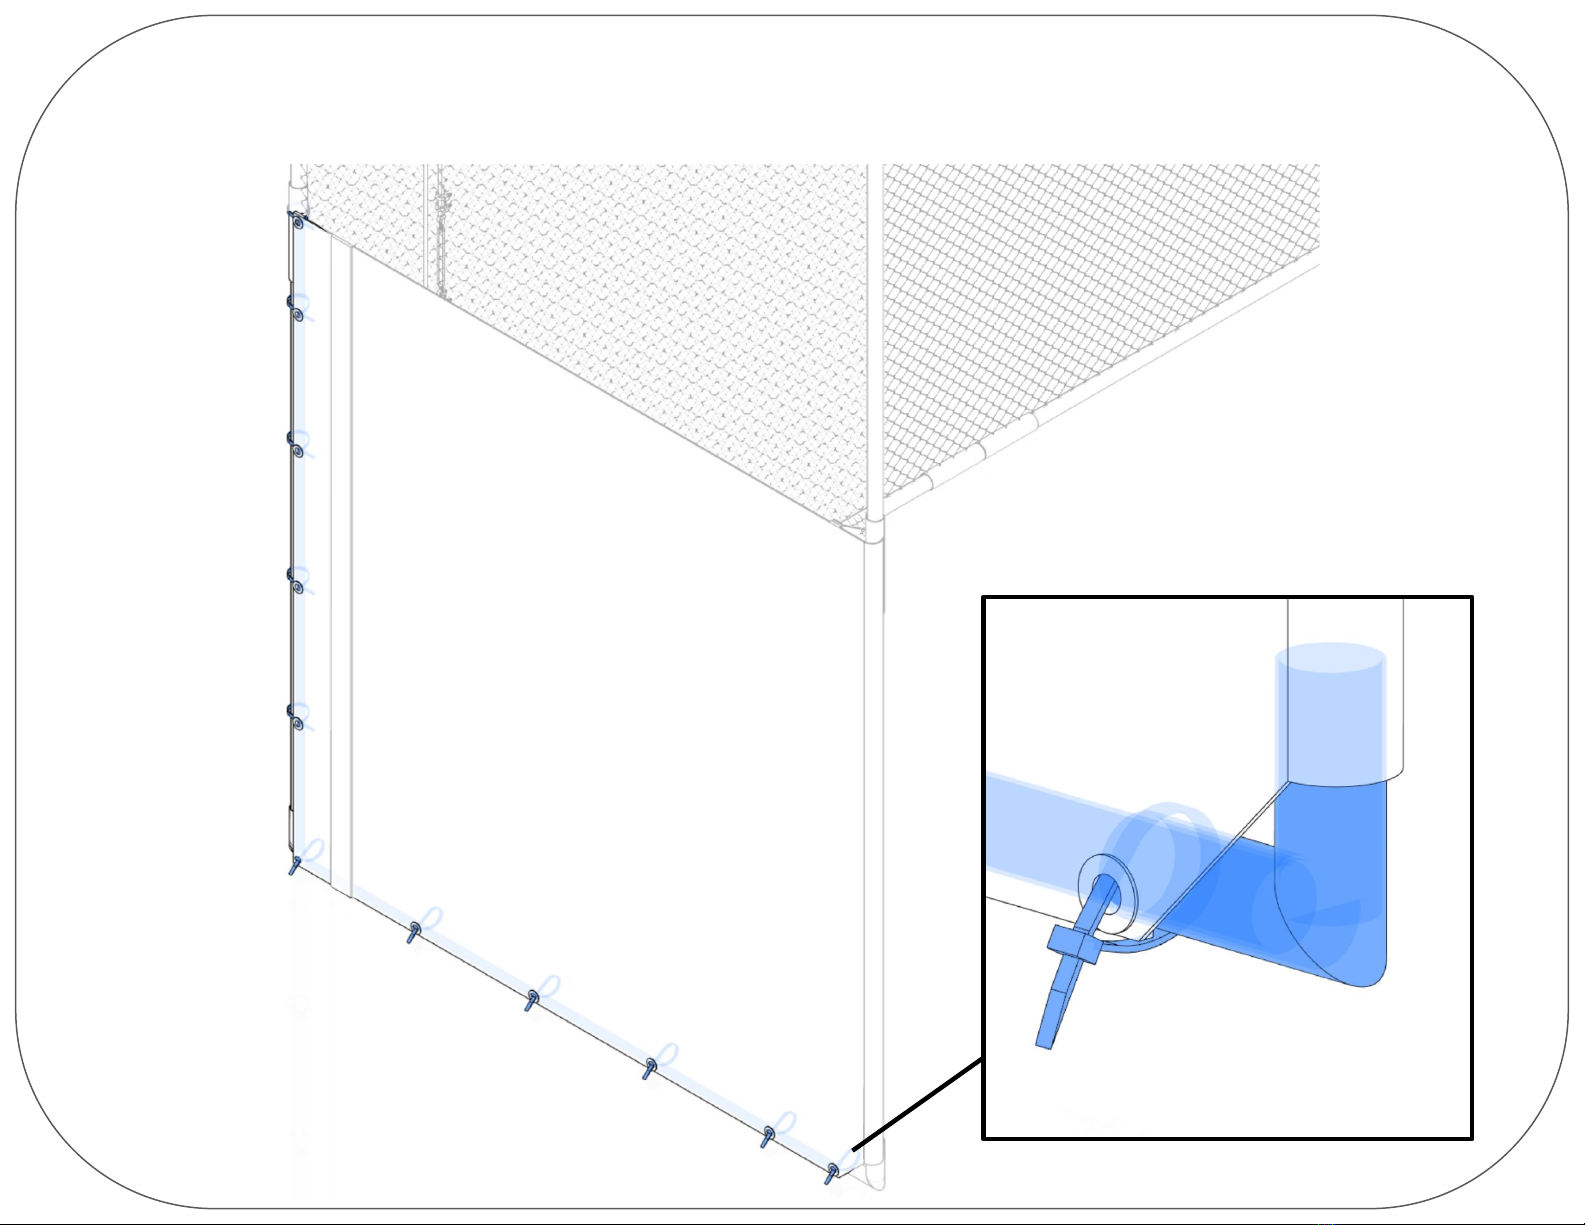
15
Loop 2 x SideRite cables
around upper and lower
depth poles 12” from back
Loop 1 x ShotDefender cable
around upper depth poles
6” in front of screen pole.
CABLE ASSEMBLY
Loosen turnbuckles. Do not
completely unscrew
eyelets/hooks from
turnbuckle.
Thread cable through eyelet
end of turnbuckle and secure
cable back onto itself using
wire nuts.
Pull opposite end of cable
over hook end of turnbuckle
and secure cable back onto
itself using clamps.
Turn turnbuckles to tighten
cables and trim excess cable.
Install Cables

Attach 1 x Interior Net
●Pull netting over cage.
●Secure with cable ties.
16

17
●2 x Side Panels
●2 x Corner Panels
●1 x Top Center Panel
See following pages for more information
on attaching this panels…
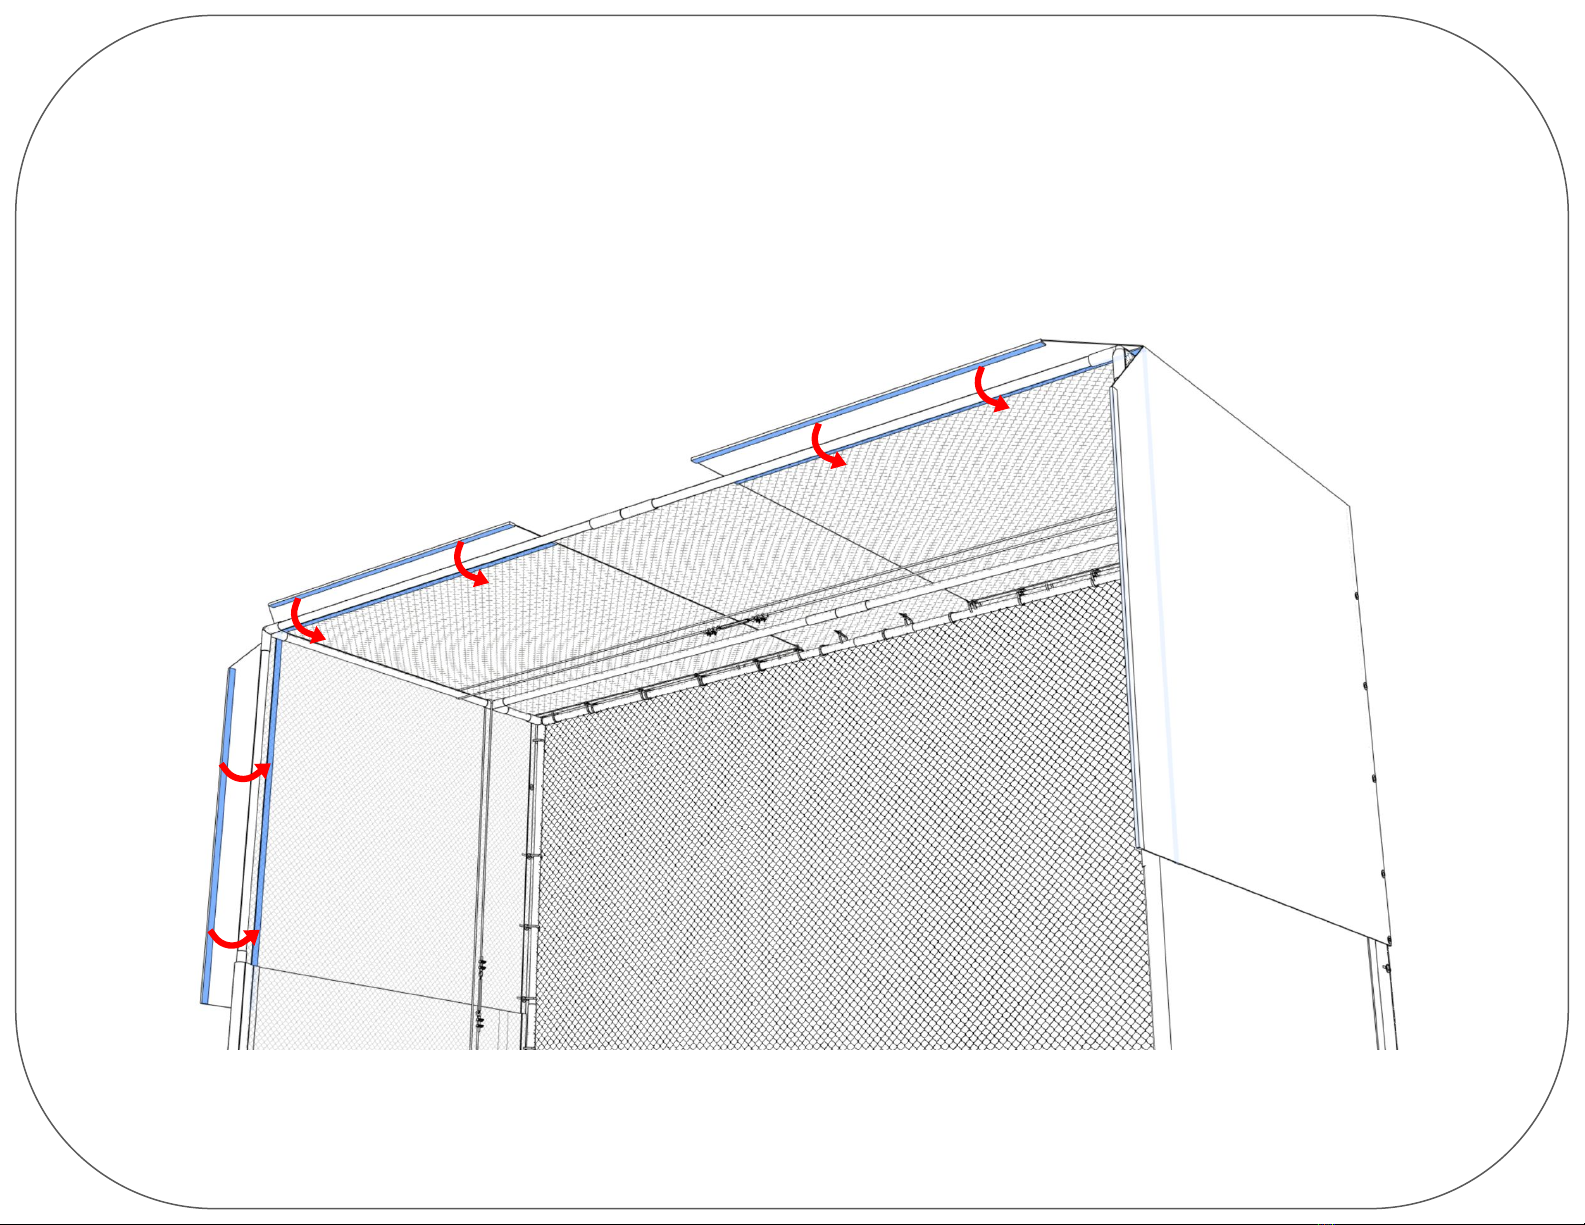
Install Overlapping Blackout Panels

Wrap side panels around front
pole with bottom of panels
flush with floor.
Side panel will velcro to inside
of cage through the netting.
Install on left and right side of
enclosure.
18
Install Side Panels
Attach bottom and back edge
of side panels to cage using
cable ties.
19
Install Side Panels
Wrap corner panels around
front poles. Triangle cutout
will go around front corner
pole connector.
Corner panel will velcro to
inside of cage through the
netting.
Install on left and right corners of enclosure.
20
Install Corner Panels
Other manuals for SUPERBAY
1
Table of contents
Other AllSportSystems Projector Accessories manuals


