Alpine iLX-107 User manual

R
R
Designed by ALPINE Japan
68-30368Z57-A
• OWNER’S MANUAL
Please read before using this equipment.
• MODE D’EMPLOI
Veuillez lire avant d’utiliser cet appareil.
•MANUALDEOPERACIÓN
Léalo antes de utilizar este equipo.
ALPINE ELECTRONICS OF AMERICA, INC.
19145 Gramercy Place, Torrance,
California 90501, U.S.A.
Phone 1-800-ALPINE-1 (1-800-257-4631)
EN
Thank you for purchasing this Alpine product. Please take a moment to protect your purchase by
registering your product now at the following address: www.alpine-usa.com/registration.
You will be informed of product and software updates (if applicable), special promotions, news
about Alpine.
Merci d’avoir acheté ce produit Alpine. Nous vous invitons à consacrer un moment à la protection
de votre achat en enregistrant votre produit dès maintenant à l’adresse suivante :
www.alpine-usa.com/registration.
Vous serez tenu informé des mises à jour des produits et des logiciels (le cas échéant), des
promotions spéciales et de l’actualité d’Alpine.
Gracias por adquirir este producto Alpine. Con solo unos pocos pasos podrá proteger su producto,
registrándolo a través de la siguiente dirección: www.alpine-usa.com/registration.
Recibirá información sobre nuevos productos y software, promociones especiales y novedades
sobre Alpine.
iLX-107

ALPINE ELECTRONICS MARKETING, INC.
1-7, Yukigaya-Otsukamachi, Ota-ku,
Tokyo 145-0067, JAPAN
Phone: 03-5499-4531
ALPINE ELECTRONICS France S.A.R.L.
184 allée des Erables
CS 52016 - Villepinte
95 945 Roissy CDG cedex
FRANCE
Phone : + 33(0)1 48 63 89 89
ALPINE ELECTRONICS OF AUSTRALIA PTY. LTD.
161-165 Princes Highway,
Hallam Victoria 3803, Australia
Phone 03-8787-1200
ALPINE ELECTRONICS GmbH
Wilhelm-Wagenfeld-Str. 1-3, 80807 München, Germany
Phone 089-32 42 640
ALPINE ELECTRONICS OF U.K. LTD.
Alpine House
Fletchamstead Highway, Coventry CV4 9TW, U.K.
www.alpine.co.uk
ALPINE ITALIA S.p.A.
Viale Cristoforo Colombo, 8
20090 Trezzano sul Naviglio MI, Italy
Phone +39 02 484781
ALPINE ELECTRONICS DE ESPAÑA, S.A.
Portal de Gamarra 36, Pabellón, 32
01013 Vitoria (Alava)-APDO 133, Spain
Phone 945-283588

3-EN
ENGLISH
Contents
Operating
Instructions
WARNING
WARNING ................................................. 5
CAUTION .................................................. 5
NOTICE ..................................................... 5
Features
About Apple CarPlay ....................................... 7
About Home Screen ......................................... 7
Getting Started
Accessory List .................................................. 8
Location of Controls ........................................ 8
Touch Operation ............................................... 8
Turning Power On or Off ................................. 8
Turning the System On ..................................... 9
Adjusting the Volume ....................................... 9
Muting the Sound ............................................. 9
Operating an Item in a List ............................... 9
Using Siri ......................................................... 9
About Hands-Free Phone ............................... 10
Applying Alpine TuneIt App ......................... 10
Adjusting the sound Settings using Alpine
Tunelt App ............................................... 10
Radio/RBDS
Listening to the Radio .................................... 11
Presetting Stations Manually .......................... 11
Presetting Stations Automatically .................. 11
Tuning to Preset Stations ................................ 11
PTY (Program Type) Tuning
(RBDS mode only) ..................................... 11
Displaying Radio Text
(RBDS mode only) ..................................... 11
Apple CarPlay (Optional)
Connecting your iPhone ..................................12
Access to Apple CarPlay ................................12
Auxiliary Device (Optional)
Operating Auxiliary Devices (Optional) .........13
Camera Operation (Optional)
Rear Camera Operation ..................................14
Displaying the rear view video while the car
is in reverse ...............................................14
Display the Rear View Video Manually ......14
Guide Display On/Off Setting .....................14
Adjusting the Caution Display Location .....14
Calling the Adjusted Values of the
Camera .....................................................14
About the Rear Camera Guide ........................14
Other Camera Operation .................................16
About the Adjustment of the Caution Display
Location ...................................................16
About the Adjusted Value of Image
Quality ......................................................16
Setup
Audio Setup
Audio Setup Operation ...................................16
Adjusting Balance (Between Left and
Right) ...........................................................17
Adjusting Fader (Between Front and Rear) ....17
Setting the Bass Level .....................................17
Setting the Treble Level ..................................17
Setting the Subwoofer .....................................17
Turning Subwoofer ON/OFF .......................17
Adjusting the Subwoofer Level ...................17
Setting the Subwoofer Phase .......................17
Setting the Bass Engine SQ ............................17
Turning the Bass Engine SQ ON/OFF ........17
Setting the Bass Engine SQ Type ................17
Adjusting the Bass Engine SQ Level ..........18
Setting the Volume for Each Application .......18
Setting the MX (Media Xpander) ...................18
Equalizer Presets (EQ Presets) .......................18
Setting Defeat .................................................18

4-EN
Display Setup
Display Setup Operation ................................. 19
Switching Display Modes ........................... 19
Adjusting Brightness ................................... 19
Adjusting Color of Picture .......................... 19
Adjusting Image Contrast ........................... 19
Adjusting Picture Quality ............................ 19
Saving and calling the adjusted picture
quality ...................................................... 20
General Setup
General Setup Operation ................................ 20
Time Setting .................................................... 20
Setting the Clock Display ............................ 20
Setting the Time .......................................... 20
Setting the Daylight Saving Time ............... 20
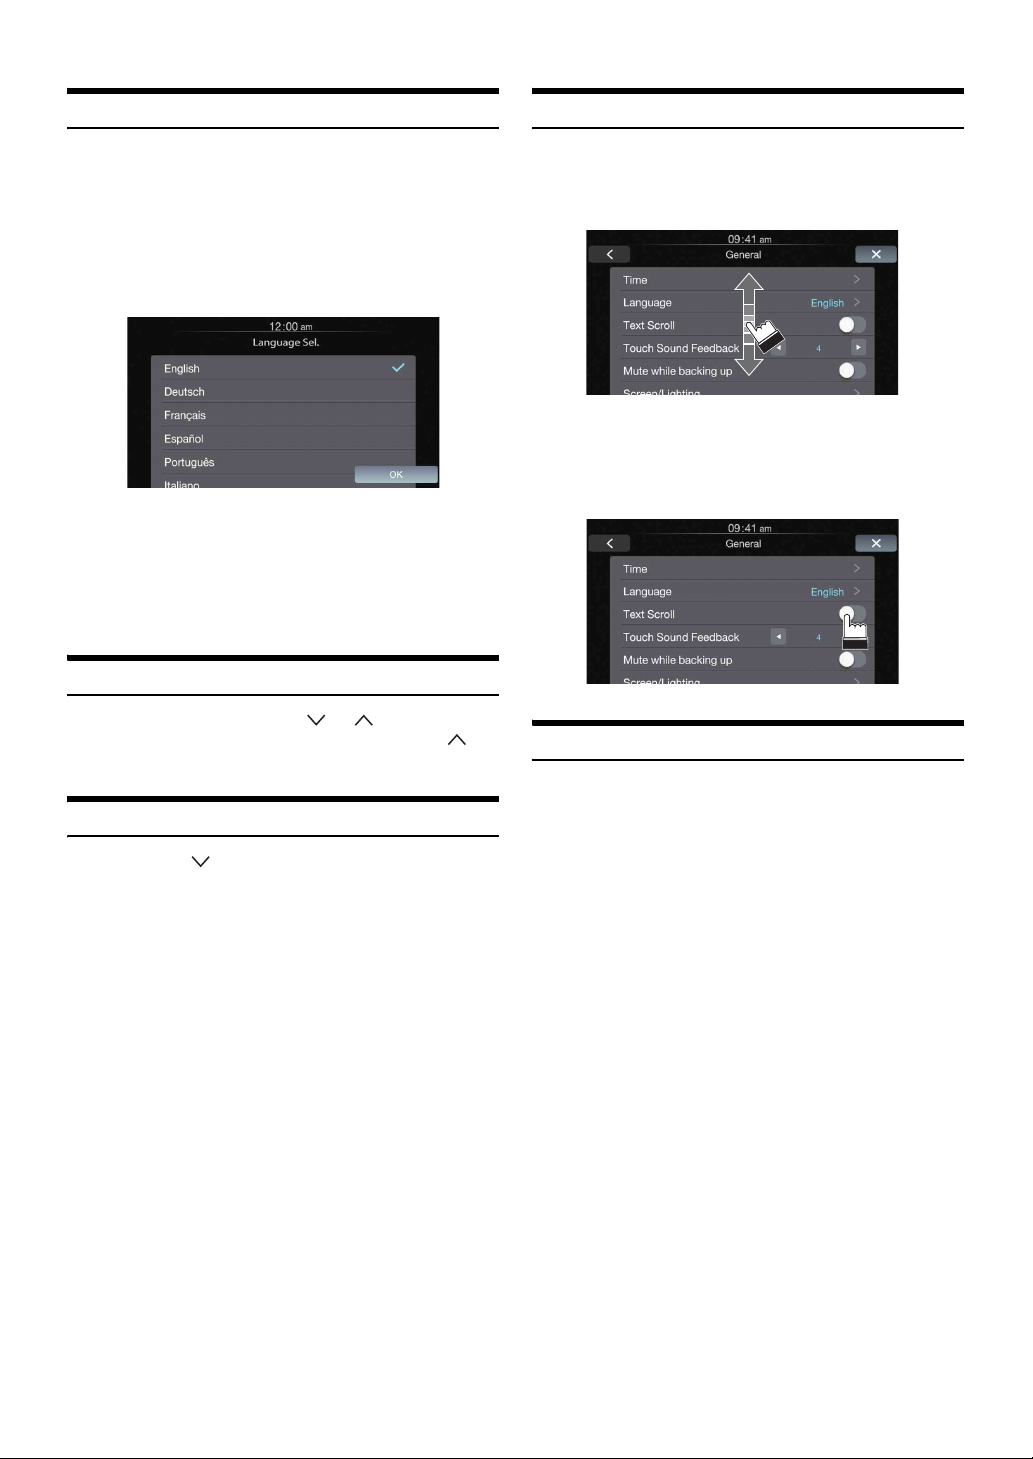
Language Setting ............................................ 20
Setting the Menu Language ........................ 20
Text Scroll Setting .......................................... 21
Setting the Scroll ......................................... 21
Key Sound Setting .......................................... 21
Adjusting the Operating Sound ................... 21
Setting Mute when Reversing ......................... 21
Screen/Lighting Setting .................................. 21
Setting the Brightness of the
Backlighting ............................................. 21
Button Backlighting Adjustment ................. 21
Display Backlighting Adjustment ............... 21
Changing the Opening Image ...................... 21
About iLX-107 ............................................... 21
Displaying the Product Information ............ 21
Initializing the System ................................. 22
Demonstration Setup ...................................... 22
Canceling the Demonstration ...................... 22
Application Setup
Application Setup Operation .......................... 22
Camera Setting ............................................... 22
Setting the Camera Input ............................. 22
Setting the Camera Signal Input ................. 22
Adjusting the Rear Camera Guide .............. 23
Camera Interrupt Setting (Power OFF Mode)
(Rear Camera Only) ................................. 23
Auxiliary (AUX) Setting ................................ 23
Setting the Auxiliary (AUX) Mode ............. 23
Factory System Setup ..................................... 23
Setting the Source Category ........................ 23
Setting the Maestro Module ........................ 23
Apple CarPlay Setting .................................... 24
Setting the Wi-Fi ON/OFF .......................... 24
Registering the Apple CarPlay Device ........ 24
Steering wheel Setting ................................. 24
Setting the Siri Microphone Effect .............. 24
Selecting the Output Speaker ...................... 24
Adjusting the Microphone Level ................. 24
External Accessory Control Setup .................. 24
Setting the External Accessory Control ...... 24
iDataLink Operation
Access to iDataLink Mode ............................. 25
About Parking Sensor screen ...................... 26
External Accessory Control Operation ........... 27
Information
Product Software Update ................................ 28
In Case of Difficulty ....................................... 28
If this Message Appears ................................. 28
Specifications .................................................. 29
Installation and
Connections
Warning .................................................. 30
Caution ................................................... 30
Precautions ............................................ 30
Installation ...................................................... 31
Uninstalling the original car stereo ............. 31
Mounting the GPS Antenna inside the
vehicle ...................................................... 31
Mounting the Microphone. .......................... 31
Installing the Unit ........................................ 31
Fix the Cables etc. ....................................... 32
Connections .................................................... 34
System Example ............................................. 36
LIMITED WARRANTY

5-EN
Operating Instructions
INSTALL THE PRODUCT CORRECTLY SO THAT THE DRIVER
CANNOT WATCH TV/VIDEO UNLESS THE VEHICLE IS
STOPPED AND THE EMERGENCY BRAKE IS APPLIED.
It is dangerous (and illegal in many states) for the driver to watch
TV/Video while driving a vehicle. Installing this product
incorrectly enables the driver to watch TV/Video while driving.
This may cause a distraction, preventing the driver from looking
ahead, thus causing an accident. The driver or other people could be
severely injured.
DO NOT WATCH VIDEO WHILE DRIVING.
Watching the video may distract the driver from looking ahead of
the vehicle and cause an accident.
DO NOT OPERATE ANY FUNCTION THAT TAKES YOUR
ATTENTION AWAY FROM SAFELY DRIVING YOUR VEHICLE.
Any function that requires your prolonged attention should only be
performed after coming to a complete stop. Always stop the vehicle
in a safe location before performing these functions. Failure to do
so may result in an accident.
KEEP THE VOLUME AT A LEVEL WHERE YOU CAN STILL
HEAR OUTSIDE NOISES WHILE DRIVING.
Excessive volume levels that obscure sounds such as emergency
vehicle sirens or road warning signals (train crossings, etc.) can be
dangerous and may result in an accident. LISTENING AT LOUD
VOLUME LEVELS IN A CAR MAY ALSO CAUSE HEARING
DAMAGE.
MINIMIZE DISPLAY VIEWING WHILE DRIVING.
Viewing the display may distract the driver from looking ahead of
the vehicle and cause an accident.
DO NOT DISASSEMBLE OR ALTER.
Doing so may result in an accident, fire or electric shock.
USE ONLY IN CARS WITH A 12 VOLT NEGATIVE GROUND.
(Check with your dealer if you are not sure.) Failure to do so may
result in fire, etc.
KEEP SMALL OBJECTS SUCH AS SCREWS OUT OF THE
REACH OF CHILDREN.
Swallowing them may result in serious injury. If swallowed,
consult a physician immediately.
USE THE CORRECT AMPERE RATING WHEN REPLACING
FUSES.
Failure to do so may result in fire or electric shock.
DO NOT BLOCK VENTS OR RADIATOR PANELS.
Doing so may cause heat to build up inside and may result in fire.
USE THIS PRODUCT FOR MOBILE 12V APPLICATIONS.
Use for other than its designed application may result in fire,
electric shock or other injury.
DO NOT PLACE HANDS, FINGERS OR FOREIGN OBJECTS IN
INSERTION SLOTS OR GAPS.
Doing so may result in personal injury or damage to the product.
HALT USE IMMEDIATELY IF A PROBLEM APPEARS.
Failure to do so may cause personal injury or damage to the
product. Return it to your authorized Alpine dealer or the nearest
Alpine Service Center for repairing.
NOTICE
Product Cleaning
Use a soft dry cloth for periodic cleaning of the product. For more
severe stains, please dampen the cloth with water only. Anything
else has the chance of dissolving the paint or damaging the plastic.
Temperature
Be sure the temperature inside the vehicle is between +45°C
(+113°F) and 0°C (+32°F) before turning your unit on.
Maintenance
If you have problems, do not attempt to repair the unit yourself.
Return it to your Alpine dealer or the nearest Alpine Service
Station for servicing.
Installation Location
Make sure the iLX-107 will not be installed in a location subjected
to:
• Direct sun and heat
• High humidity and water
• Excessive dust
• Excessive vibrations
WARNING
WARNING
This symbol means important instructions.
Failure to heed them can result in serious injury
or death.
CAUTION
This symbol means important instructions.
Failure to heed them can result in injury or
material property damage.

6-EN
Operation of some of the functions of this unit is very complex.
Because of this, it was deemed necessary to place these functions
into a special screen. This will restrict operation of these functions
to times when the vehicle is parked. This ensures the focus of the
driver’s attention will be on the road and not on the iLX-107. This
has been done for the safety of the driver and passengers.
Some setup operations cannot be made if the car is moving. The car
must be parked and the parking brake must be engaged for the
procedure described in the Owner’s Manual to be valid. The
warning “Unable to operate while driving.” will be displayed if any
attempts are made to perform these operations while driving.
•The iLX-107 draws minimal current even when its power switch is
turned off. If the switched power (ignition) lead of the iLX-107 is
connected directly to the positive (+) post of the vehicle’s battery, the
battery may be discharged.
An SPST (Single-Pole, Single-Throw) switch (sold separately) can be
added to simplify this procedure. Then, you can simply place it in the
OFF position when you leave the vehicle. Turn the SPST switch back
ON before using the iLX-107. For connecting the SPST switch, refer
to the “Connection Diagram of SPST Switch (sold separately)”
(page 33). If the power (ignition) lead is unswitched, it must be
disconnected from the battery post should the vehicle be left unused
for an extended period of time.
Protecting the USB connector
• Only an iPhone 5 or later or Flash memory can be connected to
the USB connector on this unit. Correct performance using other
USB products cannot be guaranteed.
• If the USB connector is used, be sure to use only the supplied
connector cable with the unit. A USB hub is not supported.
• USB Flash memory is used for data file transfer or updates only.
• This unit does not support Flash memory’s Audio/Video
playback or photo browse.
•iPhone, iTunes and CarPlay are trademarks of Apple Inc.,
registered in the U.S. and other countries.
•“Made for iPhone” means that an electronic accessory has been
designed to connect specifically to iPhone, respectively, and has
been certified by the developer to meet Apple performance
standards. Apple is not responsible for the operation of this
device or its compliance with safety and regulatory standards.
Please note that the use of this accessory with iPhone may affect
wireless performance.
CAUTION
Alpine accepts no responsibility for lost data, etc., even if data, etc.,
is lost while using this product.

7-EN
About Apple CarPlay
Apple CarPlay allows your iPhone 5or later to operate smoothly from this head unit.
About Home Screen
The Home Screen for this unit gives direct access to those applications designed to work with Apple CarPlay.
The Apple CarPlay icon will indicate whether the appropriate iPhone is connected.
•Available source differs depending on the connected device and settings.
When iPhone is connected When iPhone is not connected
Touch to change to Apple CarPlay Device list screen while “Wi-Fi” is ON.
Audio Setup icon.
Setup icon.
Features

8-EN
Accessory List
•iLX-107.................................................................................1
•Power cable.........................................................................1
•GPS Antenna .......................................................................1
•Antenna mounting plate ......................................................1
•Cable clamp for antenna................................................1set
•USB extension cable ...........................................................1
•PRE OUT cable....................................................................1
•Interface cable ....................................................................1
•W.REMOTE cable ................................................................1
•Flush head screw (M5×8) ...................................................4
•Screw (M5×8) ......................................................................4
•Microphone..........................................................................1
•Face plate ...........................................................................1
•Owner’s Manual ..............................................................1set
Location of Controls
button
Touch to turn down the volume. Touch and hold for at least 2
seconds to mute.
button
Touch to turn up the volume.
Siri button
Press (or press and hold) to start the Siri function of the
iPhone. When no iPhone is connected, press and hold for at
least 2 seconds to activate Apple CarPlay Device list screen
while “Wi-Fi” is ON.
Home button
Press to call up the Home Screen.
Press and hold for at least 5 seconds to turn the power off.
/ button
This action varies according to the Audio/Visual application.
(Track Up/Down, Fast reverse/Fast forward, etc.)
•You can reset the unit by pressing and holding Home and Siri
buttons at the same time for 10 seconds.
Touch Operation
Many of the operations for this unit are accessible through a light touch
on the integrated touch panel.
•Be sure to touch the onscreen button lightly with the pad of your
finger to protect the display.
•If you touch a button and there is no reaction, remove your finger
from the display once, and try again.
•Onscreen buttons that cannot be operated appear dull in color.
Common onscreen buttons
[]:Returns to the previous screen. Depending on the
function, this button may cancel the operations
performed on the screen.
[]:Closes the window.
Turning Power On or Off
1
Turn the ignition key to the ACC or ON position.
The system turns on.
2
Press and hold the Home button for at least 5
seconds to turn the power OFF.
•The unit can be turned on by pressing Home button or Siri button.
•The iLX-107 is a precision device. Careful handling of the unit
should provide you with years of trouble-free operation.
Getting Started
Steering Wheel remote interface compatible
With an optional Alpine Steering Wheel Remote Control Interface
Box (not included), this unit is controllable from the vehicles
steering wheel controls. For details, contact your Alpine dealer.
About the button descriptions used in this Owner’s
Manual
The buttons found on the face of the unit are expressed in
bold (e.g. Home). The buttons found on the touch-screen
display are shown in bold within brackets, [ ] (e.g. []).

9-EN
Turning the System On
With the Alpine system, when the ignition key is turned to ACC or ON,
the opening screen will be automatically displayed.
1
When the system is used for the first time, the
language selection menu is displayed. There are 20
languages to choose from. Touch the screen and
slide your finger up or down, and then touch the
desired language.
2
Touch [OK].
The radio screen is displayed.
•Some of this unit’s functions cannot be performed while the vehicle is
in motion. Be sure to stop your vehicle in a safe location and apply
the parking brake before attempting these operations.
Adjusting the Volume
Adjust the volume by touching or .
Volume increases continuously by touching and holding .
Volume: 0 - 35
Muting the Sound
Touch and hold for at least 2 seconds to activate the
MUTE mode.
Operating an Item in a List
1
To scroll through a list, touch the screen and slide
your finger up or down.
The screen will scroll along with your finger movement.
•To make a selection, touch the screen at the desired item, and
then lift your finger without moving the screen up or down.
2
Touch the button and slide your finger right or left to
change ON/OFF.
Using Siri
You can use the Siri function of your iPhone. To use Siri from this unit,
make sure that this function is enabled in your iPhone settings.
Press Siri.

10-EN
About Hands-Free Phone
When connected to this unit, your iPhone can be used as hands-free.
Incoming calls are displayed with the caller’s ID when available.
•About iPhone models usable with this unit, refer to Apple CarPlay
section (page 12).
•You can adjust the volume of the phone or select the speakers to be
used for the call’s audio. Refer to “Apple CarPlay Setting”
(page 24).
•Avoid hands-free calls in heavy traffic or on narrow or winding
roads. Keep your focus on driving to prevent an accident.
•Close the windows while calling to reduce background noise.
•When using a microphone, speak as directly as you can into the
microphone to obtain the best sound quality.
Applying Alpine TuneIt App
This unit’s sound tuning is programmable from a connected iPhone. It is
also possible to download specific parameters for certain vehicles from
Alpine’s TuneIt database stored in the Cloud. Using the Alpine TuneIt
App, customized parameters can also be uploaded for others to share
and rate.
The installed Alpine TuneIt App should be launched on the iPhone
before connecting to the head unit.
Alpine TuneIt App, is downloadable from Apple’s App Store. For
details, consult your Alpine dealer.
•The application program and related specifications and data may be
deleted or terminated without notice.
•About iPhone models usable with this unit, refer to Apple CarPlay
section (page 12).
After completing the procedure above, your iPhone can be used to make
audio adjustments for this unit.
1
Make sure the unit is powered on.
2
Launch the Alpine TuneIt App on the iPhone. Adjust
the unit’s sound accordingly on the iPhone.
•Volume level cannot be adjusted via the iPhone.
•The setting cannot be done on both the iPhone and this unit at the
same time.
•When the unit is powered off , sound setting cannot be done via the
iPhone.
•Please obey all local traffic laws while using this function.
The RBDS (Radio Broadcast Data System) is a radio information
system. This system allows you to receive a variety of information such
as traffic information, station names.
•RBDS mode is only available during FM broadcast reception.
Display example for Radio main screen
Band display
Preset No. indicator display
Audio Setup button (see “Audio Setup Operation” on
page 16)
Info area
Preset button
Adjusting the sound Settings using Alpine
Tunelt App
Radio/RBDS

11-EN
Listening to the Radio
1
Press the Home button.
The Home screen is displayed.
2
Touch [Radio].
The radio mode is activated and the display changes to the
Radio mode screen.
3
Touch []to select the desired radio band.
Each touch changes the bands as follows:
4
Touch [Tune] to select the tuning mode.
•There are two modes you can select for auto tuning, DX and
Local:
-DX (Distance) mode;
Both strong and weak stations will be tuned in.
-Local mode;
Only strong stations will be tuned in.
The initial setting is DX.
•If “Preset” or “PTY” appears, touch [Tune] repeatedly until a
tuning mode is displayed.
5
Touch [], []or [], []to change the radio
frequency up or down respectively.
In manual mode, touch and hold to change the frequency
continuously.
Presetting Stations Manually
1
Tune in a desired radio station you wish to store in
the preset memory by manual or automatic seek
tuning.
2
Touch and hold any one of the preset buttons for at
least 2 seconds.
The selected station is stored.
3
Repeat the procedure to store up to 5 other stations
onto the same band.
To use this procedure for other bands, simply select the
desired band and repeat the procedure.
A total of 18 stations can be stored in the preset memory
(6 stations for each band; FM-1, FM-2 or AM).
•If a preset memory has already been set in the same preset number, it
will be cleared and the new station will be memorized.
Presetting Stations Automatically
The tuner can automatically seek and store 6 strong stations in the
selected band in order of frequency from low to high.
After selecting the desired band, touch and hold
[A.Memo] for at least 2 seconds.
The tuner automatically seeks and stores 6 strong stations into
the preset buttons in order of frequency from low to high.
When automatic storing has completed, the station stored in the
preset 1 is selected.
•If no stations are stored, the tuner will return to the original station
you were listening to before the automatic storing procedure began.
•You can cancel this process by touching [A.Memo] while the tuner is
automatically seeking stations. Cancelling will return the tuner
preset to the previous setting.
Tuning to Preset Stations
Select the desired preset in any band to tune to the station stored in that
preset number.
1
Touch []repeatedly until the desired band is
displayed.
2
Touch any one of the preset buttons that has a
station stored to it.
The preset station is received.
PTY (Program Type) Tuning (RBDS mode
only)
1
Touch [PTY Search].
The Select PTY list screen is displayed.
2
Touch the selected program type to start searching
for a station of that type.
If no PTY station is found, “No PTY.” will be displayed.
3
To select the station in PTY, touch [Tune] repeatedly
during reception of a PTY station to display “PTY.”
And then, touch [], [].
Displaying Radio Text (RBDS mode
only)
Text messages from a radio station can be displayed.
1
Tune in a radio station that transmits text messages.
2
Touch the Info area ( ) (page 10) in FM radio mode
repeatedly to switch to the desired display.
FM-1 FM-2 AM FM-1
DX Seek Local Seek Manual
Radio Text Mode (Radio Text)
Song Info Mode (PS/PTY/Title Name/Artist Name/Album
Name)

12-EN
Apple CarPlay is a smarter, safer way to use your iPhone in the car.
Apple CarPlay takes the things you want to do with your iPhone while
driving and puts them right on iLX-107. You can get directions, make
calls, send and receive messages, and listen to music, all in a way that
allows you to stay focused on the road. Just plug in or wirelessly
connect your iPhone via Wi-Fi to iLX-107 and go.
•Before using this function, plug in your iPhone using Lighting to
USB Cable (Supplied with iPhone) and make USB connection or
wirelessly connect your iPhone via Wi-Fi to iLX-107. For details,
refer to “Connecting your iPhone” (page 12).
•Some functions may not be available while driving.
About iPhone models usable with this unit
•The following devices have been tested and shown to work with this
unit. Correct function of earlier versions cannot be guaranteed.
iPhone SE: Ver.9.3
iPhone 6s Plus: Ver.9.1
iPhone 6s: Ver.9.1
iPhone 6 Plus: Ver.9.1
iPhone 6: Ver.9.1
iPhone 5s: Ver.9.1
iPhone 5c: Ver.9.1
iPhone 5: Ver.9.1
Connecting your iPhone
You can connect your iPhone to this unit via USB connection or Wi-Fi
by your prefer.
By USB
Just plug in your iPhone using Lighting to USB Cable (Supplied with
iPhone) to iLX-107. If an iPhone has been connected to this unit via Wi-
Fi, you should switch connection on Apple CarPlay Device list screen.
By Wi-Fi
Make sure to turn on Wi-Fi on your iPhone and iLX-107. Also turn on
Bluetooth on your iPhone before making this connection.
1
Select the “Alpine iLX-107” from the Bluetooth
pairing list of your iPhone for pairing.
Make sure the unit is on Apple CarPlay devices screen for
paring.
2
Touch [pair] or [OK] after the same 6 character
Passkey appears on your iPhone and this unit.
3
If the connection was successful, the Apple CarPlay
screen is displayed.
•In order to use Apple CarPlay over Wi-Fi, the vehicle’s Bluetooth
must be turned off. Please do not pair to the vehicle’s Bluetooth
connection to enable Apple CarPlay.
•You can also connect your iPhone from this unit. For details, refer to
“Registering the Apple CarPlay Device” (page 24).
•When you disconnect a registered iPhone from USB connection on
Apple CarPlay screen, it will change to Wi-Fi connection
automatically.
Access to Apple CarPlay
1
Press the Home button.
The Home screen is displayed.
2
Touch [Apple CarPlay].
The Apple CarPlay mode is activated.
Touch the desired App icon on iLX-107, or use Siri function
by pressing Siri button.
•The App must be Apple CarPlay compatible in order to appear in the
Home screen.
Apple CarPlay
(Optional)

13-EN
Operating Auxiliary Devices (Optional)
To operate devices connected to the AUX terminals of iLX-107, follow
the procedure described below.
•Turn on the “AUX In”. Refer to “Setting the Auxiliary (AUX) Mode”
(page 23).
•The video is disabled while driving.
1
Press the Home button.
The Home screen is displayed.
2
Touch [AUX].
The Auxiliary (AUX) mode screen is displayed.
AUX Operation Screen Display During Video File
Playback
Touch the screen.
The Auxiliary (AUX) operation screen is displayed.
Example for AUX main screen
[]
Calls up the Display Setup screen. (See “Display Setup
Operation” on page 19)
•The operation screen changes to the visual screen in the
Auxiliary (AUX) mode for 5 seconds after an operation has
been performed.
Touch the display panel to display the operation screen
again.
[]
Calls up the Audio Setup screen. (See “Audio Setup
Operation” on page 16)
Auxiliary Device
(Optional)
WARNING
It is dangerous (and illegal in many states) for the
driver to watch TV/video while driving the vehicle. The
driver may be distracted from looking ahead and an
accident could occur.
Install the iLX-107 correctly so that the driver cannot
watch TV/video unless the vehicle is stopped and the
emergency brake is applied.
If the iLX-107 is not installed correctly, the driver will
be able to watch TV/video while driving the vehicle
and may be distracted from looking ahead and cause
an accident. The driver or other people could be
severely injured.

14-EN
The video from an optional camera can be viewed from this head unit’s
display.
Depending on your camera, please choose the camera type first. For
details, refer to “Setting the Camera Input” (page 22).
Front camera:
When a HCE-C212F is connected, conditions in front of the
vehicle, such as objects, people and other hazards, can be
seen.
Rear camera:
If a HCE-C252RD/HCE-C155/HCE-C125, etc., camera is
connected, when the vehicle is reversed, the rear camera view
(guide marks for vehicle width and available distance) is
displayed automatically on the screen of this unit.
Side camera:
If a side camera is connected, you can check for obstacles in
the blind spot on the passenger side.
Rear Camera Operation
Set “Camera” to “Rear”. Refer to “Setting the Camera Input” (page 22).
1
Shift the gear lever to the reverse (R) position.
The rear view image is displayed while the car remains in
reverse.
2
If you shift the gear lever to a position other than
reverse (R), the monitor returns to the previous
screen.
•Never depend solely on the camera when backing up. Always turn
and look and only use the camera for additional assistance.
•The Reverse wire must be properly connected for this function to be
effective.
1
Press the Home button.
The Home screen is displayed.
2
Touch [Camera].
1
Touch the screen when the image from the camera is
displayed.
The operation screen is displayed on the screen.
•After a 5-second time-out, the operation screen returns to the
camera display screen.
2
Touch [Guide Off] on the Rear camera display
screen.
The guide disappears, and then the [Guide Off] switch
changes to [Guide On].
3
Touch [Guide On] to turn on the guide.
1
Touch the screen when the image from the camera is
displayed.
The operation screen is displayed on the screen.
•After a 5-second time-out, the operation screen returns to the
camera display screen.
2
Touch [Caution ↑] or [Caution ↓].
•For each touch, the caution location moves to the top or bottom of the
screen.
You can call the preset values of the camera in “Display Setup”
(page 20).
1
Touch the screen when the image from the camera is
displayed.
The operation screen is displayed on the screen.
After a 5-second time-out, the operation screen returns to
the camera display screen.
2
Touch [Preset].
About the Rear Camera Guide
To display the guide, set “Guide Display On/Off Setting” (page 14) to
On. Also, to adjust the guide, refer to “Adjusting the Rear Camera
Guide” (page 23). You can also turn off the guide in the Rear camera
display screen.
Indication mark meaning
When the car is put into reverse gear, the monitor switches to the rear
view camera image. Guides appear to help visualize the car’s width and
distance from the rear bumper.
1Car width extension marks (red, yellow and green in
order of distance)
If properly calibrated, the marks indicate the car’s width.
This helps guide the car’s path when backing up in a
straight line.
The marks represent the distance from the rear of the car (at
the end of the bumper).
Camera Operation
(Optional)
You can adjust the quality of the camera image.
Setting items: Brightness / Color / Contrast
Refer to “Display Setup Operation” (page 19).
Displaying the rear view video while the
car is in reverse
Display the Rear View Video Manually
Guide Display On/Off Setting
Adjusting the Caution Display Location
Calling the Adjusted Values of the Camera

15-EN
•The marks do not move in synchronization with the
steering wheel.
•Set the marks to suit the car’s width.
2Distance guidance marks
The marks represent the distance from the rear of the car
(from the end of the bumper).
•The marks do not move in synchronization with the
steering wheel.
•We recommend that you measure the actual distance to
the marks when parked on a level surface.
•Depending on the condition of the car or road surface, the range of
vision may vary.
•The camera has a limited range of vision. Objects at extreme angles
to the camera (e.g. under the bumper or at opposite ends of the
bumper) may not be in the its field-of-vision.
•The rear camera image may have a tint which is different from the
actual surroundings.
•Depending on the car, the guidance may deviate to the right or left.
This is not a malfunction.
Distance guidance mark
The distance guides represent the ground level distance from the rear
bumper. It is difficult to accurately estimate the distance to objects
above ground level.
In the following example, the distance to A is 0.5 m and the distance to
B is 1 m.
<Screen>
<Positions of A, B and C>
In the screen, according to the distance guidance marks,
the truck seems to be parked about 1 m away (at the
position B). In actual fact, however, if you reversed to
position A, you would collide with the truck.
In the screen, positions A, B and C seem to be located in
order of proximity. However, in actual fact, the position A
and C are the same distance, and B is farther away than
positions A and C.
•The car width extension mark represents the distance to the road
surface. The distance to an object on the road is not accurately
represented by the guides.
•In the following conditions, screen visibility may be impaired. This is
not a malfunction.
-When it is dark (during the night, etc.).
-Under very high or very low temperature conditions.
-When water drops adhere to the camera, or when the humidity
is high (such as rainy weather, etc.).
-When foreign bodies (such as mud, etc.) adhere to the camera
or its peripheral area.
-When sunlight or headlights directly strike the camera lens.
Error between the screen and the actual road surface
In the following conditions, errors are produced between the screen
guidance and the actual road surface. (The illustrations represent a case
when the camera is installed in the standard position.)
When there is a steep upward slope behind the car
(example)
<Screen>
<Situation of the car>
The distance guidance mark represents the distance to a
flat road surface. Therefore in the case of an upward
slope behind the car, the distance guides are displayed
closer to the rear bumper than the actual distance. For
example, if there is an obstacle on the upward slope, it
may appear farther away than its actual position.
Also, an error may occur between the guidance and the
actual path of the car on the road surface.
When there is a steep downward slope behind the
car (example)
<Screen>
<Situation of the car>
C
B
A (about 0.5 m)
about 1 m
Distance guidance marks
Actual distances
Error Error
Error Error

16-EN
In the case of a downward slope behind the car, the
distance guides are displayed farther from the rear
bumper than the actual distance.
If there is an obstacle on the downward slope, it seems
closer than its actual position.
Also, an error may occur between the guidance and the
actual path of the car on the road surface.
Other Camera Operation
Set “Front” or “Side” for “Camera” (page 22).
1
Press the Home button.
The Home screen is displayed.
2
Touch [Camera].
The Caution display location for other cameras can be adjusted. Refer to
“Adjusting the Caution Display Location” (page 14) for the operations.
You can call the preset values of the camera in “Display Setup”
(page 19).
Refer to “Calling the Adjusted Values of the Camera” (page 14) for the
operations.
Audio Setup Operation
1
Touch []on the Home screen.
The Setup main screen is displayed.
2
Touch [Audio].
The Audio Setup screen appears.
•You can display the Audio Setup screen from each application
screen. Touch []on any application screen.
3
Select the desired item.
If “ ” appears, there is another hierarchy. Touch the desired
item.
If “ ” does not appear, proceed to step 4.
Setting items: Balance / Fader / Bass / Treble / Subwoofer /
Subwoofer Level / Subwoofer Phase / Bass Engine
SQ / Bass type / Bass level / Application Volume /
Media Xpander / EQ Presets / Defeat
•Depending on the setting, displayed items may differ.
4
Touch []or []etc., to change its setting.
5
Touch []to return to the main application screen.
Touch []to return to the previous screen.
•Immediately after changing the Audio Setup (while the system is
writing data automatically) do not turn the ignition key to OFF.
Otherwise, the settings may not be changed.
•For details on how to operate the list screen, refer to page 9.
About Alpine TuneIt App
You can also set the Audio Setup of this unit through the Alpine TuneIt
App installed to your iPhone.
It is also possible to download specific parameters for certain vehicles
from Alpine’s TuneIt database.
Using the Alpine TuneIt App, customized parameters can also be
uploaded for others to share and rate.
In Sound control mode, “TuneIt connected.” is displayed on the Audio
Setup screen, and you cannot perform any operation.
About the Adjustment of the Caution
Display Location
About the Adjusted Value of Image Quality
Setup
Audio Setup
The following steps 1 to 5 are common operations to each
“Setting item” of Audio Setup. Refer to each section for details.

17-EN
•Alpine TuneIt App is downloadable from Apple’s App Store.
•Time Correction, Crossover and Parametric EQ can be set only
through the Alpine TuneIt App.
•Also refer to “Applying Alpine TuneIt App” on page 10.
Adjusting Balance (Between Left and
Right)
Adjust the right and left speaker volumes.
Setting item: Balance
Setting contents: L (left) 15 to R (right) 15 (Initial setting: 0)
Adjusting Fader (Between Front and
Rear)
Adjust the front and rear speaker volume.
Setting item: Fader
Setting contents: F (front) 15 to R (rear) 15 (Initial setting: 0)
Setting the Bass Level
You can emphasize or weaken the bass level.
Setting item: Bass
Setting contents: -7 to +7 (Initial setting: 0)
•The function is disabled when Defeat is set to “ON”.
•The function is disabled when Bass Engine SQ is set to “ON”.
Setting the Treble Level
You can emphasize or weaken the treble level.
Setting item: Treble
Setting contents: -7 to +7 (Initial setting: 0)
•The function is disabled when Defeat is set to “ON”.
•The function is disabled when Bass Engine SQ is set to “ON”.
Setting the Subwoofer
If an optional subwoofer is connected to the unit, make the following
setting.
Setting item: Subwoofer
Setting contents: ON / OFF (Initial setting)
•The function is disabled when Bass Engine SQ is set to “ON”, and
the Bass Engine SQ parameter downloaded from Alpine TuneIt App
is applied.
You can set the Subwoofer level when a Subwoofer is connected.
Setting item: Subwoofer Level
Setting contents: 0 to 15 (Initial setting: 0)
•If the Subwoofer setting is “OFF”, the setting cannot be set.
•The function is disabled when Bass Engine SQ is set to “ON”.
The subwoofer output phase is toggled Subwoofer Normal (0°) or
Subwoofer Reverse (180°).
Setting item: Subwoofer Phase
Setting contents: 0° (Initial setting) / 180°
•If the Subwoofer setting is “OFF”, the setting cannot be set.
Setting the Bass Engine SQ
Bass Engine SQ is used to easily add impact of varying levels to your
music. Using the different levels available, the Bass impact can be
adjusted for different types of music.
•Using the Alpine TuneIt App, you can download the optimal Bass
Engine SQ tuning data for your speaker system.
Set to “ON” to use the Bass Engine SQ function.
Setting item: Bass Engine SQ
Setting contents: OFF (Initial setting) / ON
•The function is disabled when Defeat is set to “ON”.
You can set your favorite Bass Engine SQ type.
Setting item: Bass type
Setting contents: Standard (Initial setting) / Punch / Low Bass /
Mid Bass / Rich
•The function is disabled when Defeat is set to “ON”.
•The function is disabled when Bass Engine SQ is set to “OFF”.
Turning Subwoofer ON/OFF
Adjusting the Subwoofer Level
Setting the Subwoofer Phase
Turning the Bass Engine SQ ON/OFF
Setting the Bass Engine SQ Type
Standard: A mild low-end boost to overcome road noise.
Punch: A heavier boost with more low-end impact (punch).
Low Bass:Enhance the very low bass to give a much heavier
presence without the punchy mid-bass.
Mid Bass: Focused more on mid-bass for systems with smaller
subwoofers.
Rich: Add boost to all low-end bands for a more bass-filled
sound.

18-EN
With BASS ENGINE SQ ON, adjusting the Bass level uniformly effects
various sound parameters for optimum Bass effect.
Setting item: Bass level
Setting contents: 0 to 6 (Initial setting: 3)
•Adjustable only when Defeat is Off.
•The Bass parameters affected contain Bass Level, Treble Level, EQ
PRESETS, Parametric EQ*, SUBWOOFER*, Subwoofer Level,
Media Xpander, X-Over* and Time correction*. These items are set
automatically in BASS ENGINE SQ mode and cannot be adjusted
separately.
•From Level 0 to Level 6, the effect of BASS ENGINE SQ increases
level by level.
* When set this item via Alpine TuneIt App.
About Setup when the external power amplifier is
connected
In order to optimize the Bass Engine SQ, we recommend the following
procedure to set up the power amplifier.
After setting up, the Bass Engine SQ Level will be adjusted according to
the music.
1) Set GAIN of the power amplifier to “MIN”.
2) Set the Crossover Mode Sector switch to “OFF”.
3) Set the Bass Engine SQ of this unit to “ON”, and the Bass Engine
SQ Level to “3”.
4) Play a song of the genre you frequently listen to, and adjust GAIN
of the power amplifier.
Setting the Volume for Each Application
The volume level for each application can be adjusted.
Setting item: Application Volume
Further setting item: Radio / Factory Audio / Apple CarPlay /
Auxiliary (AUX)
Setting contents*: -14 to +14 (Initial setting: 0)
* Only for Radio, Factory Audio and Auxiliary (AUX) mode.
•Settable applications differ depending on the connected device and
settings.
Setting the Volume for Apple CarPlay
When an iPhone 5 or later is connected, after touching [Apple CarPlay],
you can adjust Media, Phone Calls, Ringtones & Alerts level,
Notifications & Guidance level and Siri for Apple CarPlay mode.
Setting item: Media / Phone Calls / Ringtones & Alerts /
Notifications & Guidance / Siri
Setting contents for Media: -14 to +14 (Initial setting: 0)
Setting contents for Phone Calls / Ringtones & Alerts /
Siri: 1 to 11 (Initial setting: 5)
Setting contents for Notifications & Guidance: 1 to 7 (Initial
setting: 4)
Setting the MX (Media Xpander)
The FM radio, Factory Audio, Apple CarPlay and Auxiliary (AUX),
will be able to reproduce the music clearly, even in cars when there is a
lot of road noise.
Setting item: Media Xpander
1
Turn on the Media Xpander.
2
Touch []or []to select your preferred level, or
Off.
FM
The medium to high frequencies become more clear, and
produces well balanced sound in all the bands.
Factory Audio
This corrects information that was omitted at the time of
compression. This reproduces a well-balanced sound close to
the original.
Apple CarPlay (CMPM)
This corrects information that was omitted at the time of
compression. This reproduces a well-balanced sound close to
the original.
Auxiliary (AUX)
Choose the MX mode (CMPM, MOVIE, or MUSIC) that
corresponds to the media connected.
•Settable applications differ depending on the connected device and
settings.
•To cancel MX mode for all music applications, turn off Media
Xpander in step 1.
•There is no MX mode for AM radio.
•Factory Media (USB/iPod)/Factory SiriusXM correspond to Factory
Audio.
•The function is disabled when Defeat is set to “ON”, or Bass Engine
SQ is set to “ON”.
Equalizer Presets (EQ Presets)
10 typical equalizer settings are preset at the factory for a variety of
musical source material.
Setting item: EQ Presets
Setting contents: FLAT (Initial setting) / POP / ROCK / NEWS /
JAZZ / ELECTRONIC / HIP HOP / EASY
LISTENING / COUNTRY / CLASSICAL
•“USER” is displayed when Bass/Treble level is adjusted or any
change of Parametric is adjusted via Alpine TuneIt App.
•Only one type is selectable for playback.
•The function is disabled when Defeat is set to “ON”.
•The function is disabled when Bass Engine SQ is set to “ON”.
Setting Defeat
If Defeat is “On”, Bass Level, Treble Level, Bass Engine SQ, MX and
EQ Presets functions are turned OFF. This disables any settings made
for these functions.
Setting item: Defeat
Setting contents: OFF (Initial setting) / ON
Adjusting the Bass Engine SQ Level

19-EN
Display Setup Operation
1
Touch []on the Home screen.
The Setup main screen is displayed.
2
Touch [Display].
The Display Setup screen appears.
•You can display the Display Setup screen from each application
screen. Touch []on any application screen (video mode).
3
Touch the desired application.
•“Auxiliary (AUX)” can be selected while in AUX mode.
•The camera names set under the “Camera” settings are
displayed. The camera names are not displayed when “Off” is
set (page 22).
4
Touch []of the desired item.
Settable items differ depending on the application.
[Auxiliary (AUX)]:
Display Mode / Brightness / Color / Contrast / Sharpness
[Camera]:
Brightness / Color / Contrast
5
Touch []or []to change its setting.
6
Touch []to return to the main application screen.
Touch []to return to the previous screen.
•Immediately after changing the settings of Display Setup (While the
system is writing data automatically) do not turn the ignition key to
OFF. Otherwise, the settings may not be changed.
Setting item: Display Mode
Setting contents: WIDE (Initial setting) / NORMAL
In WIDE mode, the picture is stretched horizontally to fill the
entire display.
In NORMAL mode, the monitor displays a normal picture at the
center of the screen with a vertical black band at each side.
Setting item: Brightness
Setting contents: -15 to +15 (Initial setting: 0)
You can adjust the brightness between MIN (-15) and MAX
(+15). When it reaches the minimum or maximum point, the
display shows “MIN” or “MAX” respectively.
Setting item: Color
Setting contents: -15 to +15 (Initial setting: 0)
You can adjust the Color between MIN (-15) and MAX (+15).
When it reaches the minimum or maximum point, the display
shows “MIN” or “MAX” respectively.
Setting item: Contrast
Setting contents: -15 to +15 (Initial setting: 0)
You can adjust the contrast between MIN (-15) and MAX (+15).
When it reaches the minimum or maximum point, the display
shows “MIN” or “MAX” respectively.
Setting item: Sharpness
Setting contents: -3 to +3 (Initial setting: 0)
Picture quality adjustment range is -3 to +3. “SOFT” and “HARD”
appear as the minimum and maximum values.
Display Setup
To display the Display Setup Menu screen:
Your vehicle must be parked with the ignition key in the ACC or
ON position. To do this, follow the procedures below.
1 Bring your vehicle to a complete stop at a safe
location. Engage the parking brake.
2 Release the parking brake. (For safety, release the
parking brake while depressing the foot brake pedal).
3 Engage the parking brake again.
•For automatic transmission vehicles, place the transmission lever
in the Park position.
Now, the locking system for the Setup operation has been
released. Engaging the parking brake can reactivate the Display
Setup Menu, as long as the car’s ignition has not been turned off.
It is not necessary to repeat the above procedure (1 through 3) of
“To display the Display Setup Menu screen.”
Each time the ignition is turned OFF, perform the procedure of “To
display the Display Setup Menu screen.”
The following steps 1 to 6 are common operations to each
“Setting item” of Display Setup. Refer to each section for
details.
Switching Display Modes
Adjusting Brightness
Adjusting Color of Picture
Adjusting Image Contrast
Adjusting Picture Quality

20-EN
When adjusting Camera, you can store the settings made for “Adjusting
Brightness, Color, and Contrast”.
Setting item: Preset1 / Preset2
1 After completing “Adjusting Brightness, Color, and
Contrast” (page 19), touch and hold [Preset1] or
[Preset2] to save the settings.
2 Touch [Preset1] or [Preset2] to call the saved settings.
General Setup Operation
1
Touch []on the Home screen.
The Setup main screen is displayed.
2
Touch [General].
The General Setup screen appears.
3
Touch []or []etc., of the desired item to change
its setting. For items that have “ ,” touch the item to
display the screen for the next hierarchy.
Setting items: Time / Language / Text Scroll / Touch Sound
Feedback / Mute while backing up / Screen /
Lighting / About / Demo mode
•Depending on the item, repeat step 3.
•Depending on the setting, displayed items may differ.
4
Touch []to return to the main application screen.
Touch []to return to the previous screen.
•Immediately after changing the settings of General Setup (While the
system is writing data automatically) do not turn the ignition key to
OFF. Otherwise, the settings may not be changed.
Time Setting
You can select the clock display type, 12-hour or 24-hour, depending on
your preference.
Setting item: Clock Mode
Setting contents: 12h (Initial setting) / 24h
Setting item: Clock Adjust
Additional items: Hour / Minute
Setting contents: 1-12 or 0-23 / 0-59
•Touch and hold []or []to run through a change sequence
automatically.
Setting item: Daylight Saving
Setting contents: ON / OFF (Initial setting)
Language Setting
The Setup menu, feedback information, etc. for this unit can be changed
to appear in the selected language.
Setting item: Language
Setting contents:
•Touch [OK] to confirm the language and display the screen in the
specified language.
Saving and calling the adjusted picture
quality
General Setup
To display the General Setup Menu screen:
Your vehicle must be parked with the ignition key in the ACC or
ON position. To do this, follow the procedures below.
1 Bring your vehicle to a complete stop at a safe
location. Engage the parking brake.
2 Release the parking brake. (For safety, release the
parking brake while depressing the foot brake pedal).
3 Engage the parking brake again.
•For automatic transmission vehicles, place the transmission lever
in the Park position.
Now, the locking system for the General mode operation has
been released. Engaging the parking brake can reactivate the
General Setup Menu, as long as the car’s ignition has not been
turned off. It is not necessary to repeat the above procedure
(1 through 3) of “To display the General mode screen.”
Each time the ignition is turned OFF, perform the procedure of “To
display the General mode screen.”
The following steps 1 to 4 are common operations to each
“Setting item” of General Setup. Refer to each section for details.
Setting the Clock Display
Setting the Time
Hour: Adjust the hour.
Minute: Adjust the minute.
Setting the Daylight Saving Time
ON: Turn Daylight Saving Time mode ON. The time
advances by one hour for areas observing Daylight
Saving Time.
OFF: Return to the ordinary time.
Setting the Menu Language
Table of contents
Other Alpine Car Receiver manuals

Alpine
Alpine CDM-7874R User manual

Alpine
Alpine CDA-117 User manual

Alpine
Alpine CDE-180R User manual

Alpine
Alpine CDE-121E User manual

Alpine
Alpine CDM-7871 User manual

Alpine
Alpine CDA-9883 User manual

Alpine
Alpine CDE-W265BT User manual

Alpine
Alpine CDE-W235BT User manual

Alpine
Alpine CDA-9813 User manual

Alpine
Alpine ICS-X8 User manual

Alpine
Alpine CDE-7828E User manual

Alpine
Alpine CDE-133EBT User manual

Alpine
Alpine IVE-W585BT User manual

Alpine
Alpine X009-TND 9" User manual

Alpine
Alpine CDE-133BT User manual

Alpine
Alpine CDA-7842 User manual

Alpine
Alpine CDE-193BT User manual

Alpine
Alpine CDE-125BT User manual

Alpine
Alpine CDA-105 User manual

Alpine
Alpine CDM-7871 User manual