ALTAN ROBOTECH GIDDEL User manual

1
Toilet Cleaning Robot
FROM ALTAN ROBOTECH
Owner’s Manual
BC
Certifications

2
INSTRUCTIONS PERTAINING TO RISK OF FIRE,
ELECTRIC SHOCK, OR INJURY TO PERSONS
IMPORTANT SAFETY INSTRUCTIONS
WARNING –When using electric appliances, basic precautions should be
followed, including the following:
a) Read all the instructions before using the appliance.
b) To reduce the risk of injury, close supervision is necessary when an appliance is used near
children. Other times, keep the robot out of reach of children and pets.
c) Do not contact moving parts, while the appliance is in operation.
d) Only use attachments recommended or sold by the manufacturer.
e) Do not use outdoors or expose your robot to freezing temperatures. Store your robot in a
cool, clean, and dry place.
f) To disconnect the robot, first turn all controls to the off position, then remove the robot.
g) To disconnect the Charging Station, first turn all controls to the off position, then remove
plug from outlet.
h) Do not unplug the Power Cord by pulling on cord. To unplug, grasp the plug, not the cord.
i) Turn the power switch to the off position when the robot is not in use and before servicing
and cleaning.
j) Unplug the Power Cord from the wall outlet when the Charging Station is not in use and
before servicing and cleaning.
k) Do not charge the appliance with a damaged Power Cord, or after the appliance
malfunctions or is dropped or damaged in any manner; please contact our Customer
Service.
l) To reduce the risk of electrical shock, do not pour water or any liquid on your robot or
submerge the robot under liquid partially or fully. Do not place or store the robot where it
can fall or be pulled into a tub, toilet or sink. The robot is not intended for use under
water/liquid.
m) Use only the Power Cord supplied by the manufacturer to recharge the robot.
n) This appliance is provided with double insulation.

3
o) To reduce the risk of electric shock and injury, please follow mounting instructions
carefully.
p) Pay attention to all warnings on the robot and its parts.
q) This is not a toy. Do not play with the robot. Do not sit or stand on or place anything on
the robot.
r) Do not start the robot without first mounting it in the toilet, by inserting it into the Mounting
Bracket provided. Under no circumstances, should you unmount the appliance while it is
in use.
s) Do not use non-rechargeable batteries. Only use the rechargeable battery supplied with the
robot by Altan Robotech. For replacement inquiries, please contact our Customer Service.
t) The robot must be charged by the Charging Station included in the carton.
u) Do not mount and/or operate the robot when your toilet is clogged. If the robot is mounted
while the toilet is clogged, please unmount it immediately.
v) Do not use the robot to clean a baby toilet.
w) Please ensure that the robot is mounted firmly in the Mounting Bracket. This will avoid
any risk of injury. Please ensure that you hear a click as it is mounted in the Mounting
Bracket which should be installed under the seat as indicated.
x) Always follow applicable laws if you transport the product with the battery inside it.
y) Your robot is designed for a standard power outlet only. The product may not be used with
any type of power converter. Use of power converters will immediately void your Limited
Warranty.
z) This robot should not be used by persons with reduced physical, sensory or mental
capabilities or lack of experience and knowledge of this product.
SAVE THESE INSTRUCTIONS

4
Table of Contents
1. Welcome Address............................................................................................................................... 13
2. Giddel Toilet Cleaning Robot.............................................................................................................. 13
3. Installation Instructions...................................................................................................................... 14
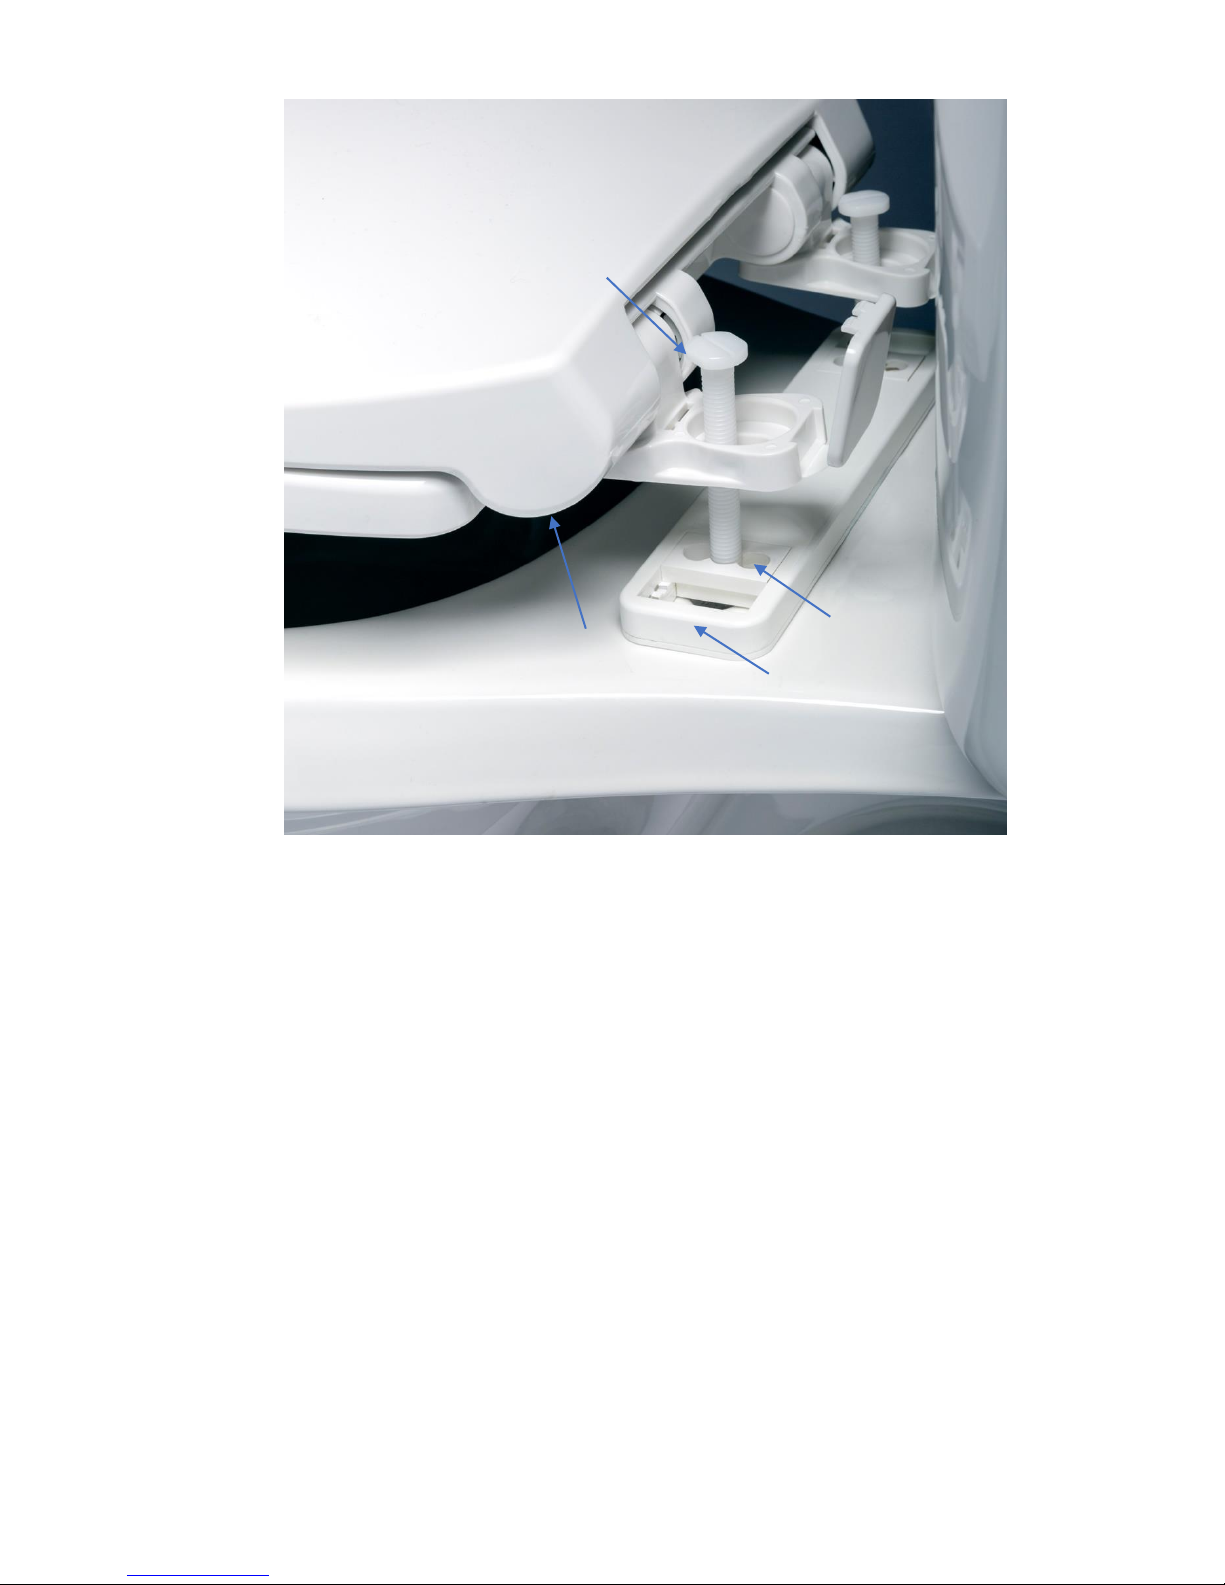
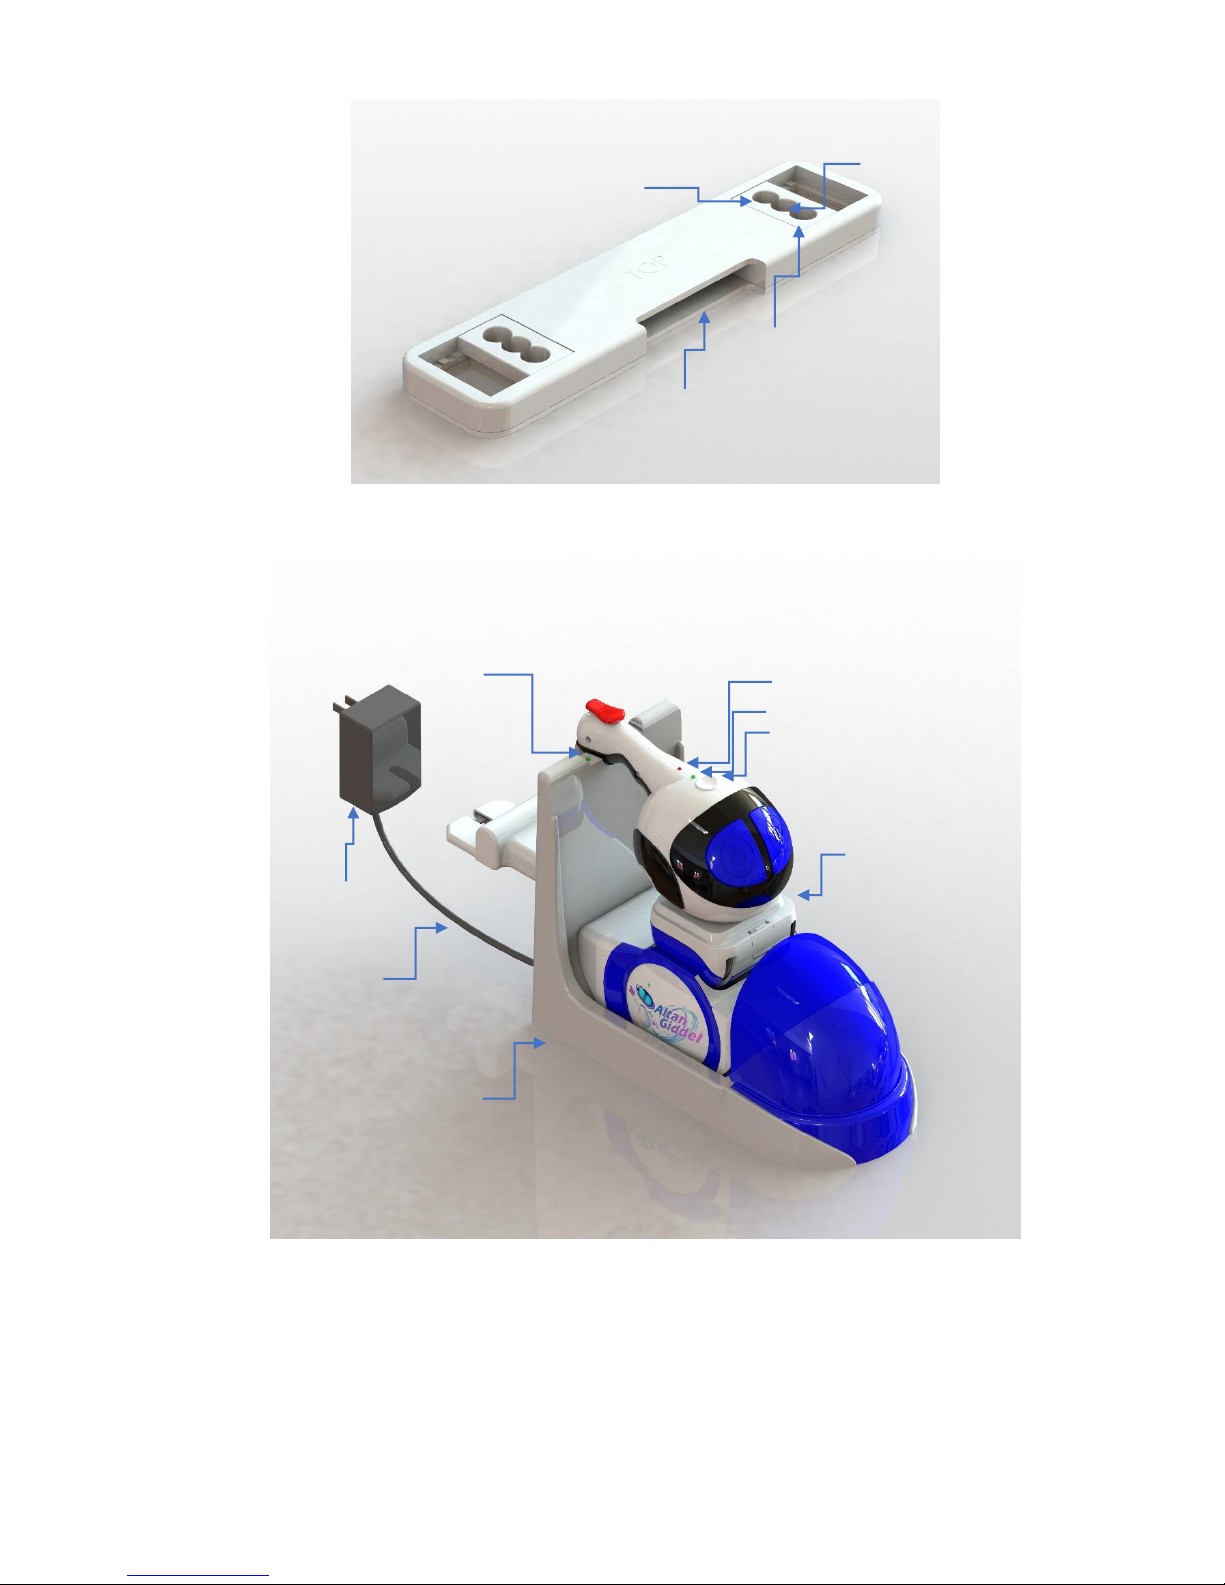
3.1 Installing the Mounting Bracket................................................................................................. 14
4. Operating Instructions........................................................................................................................ 14
4.1 Using Giddel ............................................................................................................................... 14
4.2 Charging Your Battery Pack........................................................................................................ 15
4.3 Regular Cleaning......................................................................................................................... 15
Applying Toilet Bowl Cleaner ............................................................................................................. 15
Mounting Your Robot......................................................................................................................... 16
Cleaning Your Toilet ........................................................................................................................... 16
4.4 Replacing the Cleaning Brush..................................................................................................... 17
5. Maintenance Instructions .................................................................................................................. 18
5.1 General Instructions................................................................................................................... 18
5.2 Servicing the Double-Insulated Charging Station....................................................................... 18
6. Troubleshooting ................................................................................................................................. 18
Transportation Instructions for Lithium-Ion Battery.......................................................................... 19
7. Customer Service................................................................................................................................ 20
USA & Canada..................................................................................................................................... 20
Customer Service: .............................................................................................................................. 20
US Residents:...................................................................................................................................... 20
www.altanrobotech.com ........................................................................................................................... 20
Canadian Residents:........................................................................................................................... 20
Altan Robotech Inc............................................................................................................................. 20
www.altanrobotech.ca............................................................................................................................... 20
8. Limited Warranty ............................................................................................................................... 20
9. Declaration of Conformity.................................................................................................................. 20
9.1 FCC Compliance Statement........................................................................................................ 20
9.2 BC Compliance............................................................................................................................ 21

5
9.3 CE Compliance............................................................................................................................ 21
10. Disposal Notices ............................................................................................................................. 21
Toilet Cleaning Robot ......................................................................................................................... 21
Battery................................................................................................................................................ 21

6
Figure 1: Product Box Contents
Giddel
Refill Bottle
Cleaning Brush
Power Plug
Charging Station
Mounting Bracket

7
Figure 2: Altan Giddel –a Robotic Device
Pause/Play Button
Reset Button
Power Switch
Release Button
Cleaning Brush
Cleaning Robot
Mounting Rod
Robot Status LED
Battery Status LED
Mounting End
Handle
Reservoir

8
Figure 3: Charging Station for Altan Giddel
Charging LED
Connector Pins

9
Figure 4: Installing the Mounting Bracket
Three Holes
Screws
Mounting Bracket
Toilet Seat

10
Figure 5: Mounting Bracket
Figure 6: Charging Giddel using Charging Station and Power Cord
Power Cable
Robot Status LED
Battery Status LED
Power Switch
Charger LED
Power Plug
Charging Station
Altan Giddel
Third Hole
First Hole
Second Hole
Mounting rod
end goes here

11
Figure 7: Altan Giddel Mounted on the Toilet, in HOME position
Figure 8: Altan Giddel Cleaning the Toilet
Release Button
Altan Giddel
Charging Station
Handle
Telescopic Arm
Altan Giddel
Handle
Release Button

12
Figure 9: Cleaning Brush

13
1. Welcome Address
Thank you for purchasing your new Altan Giddel Toilet Cleaning Robot and welcome to
the Altan Robotech family. This Owner’s Manual will provide all the detailed information
you need to know, so please read it before using your product. It is easy and will guide you
through the installation and operational process.
This robot is for cleaning your toilet. It is important to note down and retain the model and
serial number of this product in this manual. So, please do that first in the space provided
below in this section. The model number is written at the bottom of Giddel and the serial
number is written at the bottom end of the mounting rod. Please use these to register Your
Limited Warranty on our website www.altanrobotech.com.
Model Number:
Serial number:
2. Giddel Toilet Cleaning Robot
Inside the product box, you will find the following contents as shown in Figure 1:
•One Giddel Toilet Cleaning Robot
•Three Mounting Brackets
•One Charging Station
•One Power Cord
•Three Cleaning Brushes
•One Refill Bottle
•One Owner’s Manual
•One Warranty Registration
Figure 2 shows your Giddel with the Mounting Rod. There are two spare Mounting
Brackets provided that can be installed on other toilets in your house so that you can clean
three toilets with this robot. A few commercially available toilet seats block access to the
Mounting Bracket after installation. In such a case, please buy our toilet seat to ensure
compatibility with Giddel. There are also three Cleaning Brushes provided. Once all the
Brushes are worn out, you can order more at our website.
Figure 3 shows a Charging Station that is used for charging the battery pack while resting
on it.

14
3. Installation Instructions
PLEASE NOTE THAT THIS ROBOT CANNOT BE USED IN CONJUCTION WITH
A BIDET. ALTAN ROBOTECH (USA) INC. IS NOT RESPONSIBLE FOR ANY
HARM CAUSED BY THIS KIND OF USE.
3.1 Installing the Mounting Bracket
Before using your Giddel, you need to first install the Mounting Bracket under the toilet
seat. To do that, simply undertake the following steps:
•Your toilet seat is firmly secured on your toilet by a nut and screw arrangement. Your
first step is to remove the toilet seat by unscrewing the nuts.
•The word “TOP” is molded onto one of the faces of the Mounting Bracket. Orient the
Mounting Bracket with the word “TOP” facing upwards and the edge with the open
slot facing the front of the toilet bowl, and place it on the horizontal surface of the bowl
where the toilet seat was screwed. See Figure 4 above.
•Note that the Mounting Bracket has three holes on either end to accommodate various
sizes of toilets. Depending on your toilet size, you need to align a pair of Mounting
Bracket holes with the pair of holes in the toilet bowl and in the toilet seat. Please try
the first set of holes closest to the bowl first. The objective is to have a free motion of
the robot without colliding with the toilet bowl. If you see any collision while rotating
the robot by hand, try the second set of holes and so on.
•Place the toilet seat bolts through the holes and mount the toilet seat on top of the
Mounting Bracket as shown in Figure 4 and Figure 5.
•Tighten the nuts firmly, keep the toilet seat upright and you are done.
4. Operating Instructions
Giddel is a product for household use only. Before operating Giddel, please read the
“IMPORTANT SAFETY INSTRUCTIONS” given at the very beginning of this manual.
4.1 Using Giddel
Giddel is ready to start cleaning your toilet as soon as its batteries are fully charged. The
following major topics are covered in this chapter.
•Charging your battery pack
•Regular cleaning

15
4.2 Charging Your Battery Pack
Giddel has a rechargeable battery pack inside its body. Before you use the robot to clean
your toilet, you should charge the battery pack fully, as shown in Figure 6. Follow the
steps below to charge your batteries using the Charging Station.
•Place the Charging Station on the floor or a place convenient to you near an available
wall outlet. Plug the adapter end of the supplied Power Cord into the wall outlet.
•Place your robot on the Charging Station. Please click it gently but firmly in place so
that the contact is made with the charging Connector Pins (Figure 3) at the top of the
Charging Station.
•Please turn on the switch on your wall outlet, if such a switch exists. The Charging
LED light on the Charging Station should turn on.
•It takes approximately 1 hour to charge the battery pack fully.
•When the battery pack is fully charged, the LED light on the Charging Station will turn
off.
•DO NOT turn the Power Switch on when the robot is in the Charging Station.
4.3 Regular Cleaning
To clean your toilet, there are four steps –apply toilet bowl cleaner, fill water in the
reservoir, mount the robot and start the robot.
Applying Toilet Bowl Cleaner
A thick household toilet bowl cleaner like LYSOL TOILET BOWL CLEANER or
CLOROX TOILET BOWL CLEANER should be applied directly to the toilet bowl.
Take your favorite toilet bowl cleaner and gently apply it on the inside surface of your
toilet bowl under the rim. Please do not use a toilet bowl cleaner in the reservoir.
Fill Water in the Reservoir
Please do not use a toilet bowl cleaner in the reservoir. Use only WATER in the reservoir
for automatic dispensing by Giddel.
Before Giddel can thoroughly clean your toilet, there must be a sufficient quantity of water
in Giddel’s reservoir. Please check the water level in the reservoir window before
cleaning. If the level is low, the Reservoir needs to be refilled. Unscrew the Spout on the
supplied Refill Bottle (see Figure 1) and fill 100 ml of water in it. Screw the Spout back
on and fill the Giddel Reservoir as follows:
•While the robot is off, pick up the robot by the handle from its Charging Station.

16
•Open the Giddel reservoir by folding the lid down with your other hand.
•Place the spout of the refill bottle at the mouth of the Giddel reservoir. Care must be
taken to avoid spilling while refilling the reservoir. Any spillage must be cleaned
immediately by a dry paper towel or soft cloth.
•Tilt the refill bottle upside down and squeeze to pour into the Giddel reservoir.
•Do not fill to the brim to avoid spilling.
•When you are done, place the Refill Bottle down.
•Close the Giddel reservoir by flipping the lid up and clicking it shut.
•Place the robot back in its Charging Station or Mounting Bracket.
•Store the Refill Bottle in a closed, dry space, out of reach of children and pets.
Warning: DO NOT, under any circumstance, use harsh chemicals, or acids and bases of
extreme PH in your robot. Altan Robotech Inc. does not assume responsibility for any harm
caused by chemicals or other products used in conjunction with Giddel.
Mounting Your Robot
Figure 7 shows the mounted position of the robot in the toilet bowl. To mount your robot,
please follow the instructions:
•Lift the seat up if it is not already up.
•Hold the robot by its handle and press the red Release Button on the end of the handle
(see Figure 7).
•Insert the mounting rod end into the Mounting Bracket’s open slot under the seat and
release the release button. There should be a click. Gently check that the mounting rod
is secured in its Mounting Bracket.
•Leave the seat up as shown in Figure 7.
Cleaning Your Toilet
Figure 8 depicts how Giddel cleans your toilet. Please follow the following steps:
•Turn the Power Switch on (from ‘0’ to ‘1’). The Battery Status LED light
(GREEN/RED) on the robot will turn on. If the light flickers or is RED you need to
recharge the battery pack before you can use Giddel for cleaning. A GREEN light
means Giddel is ready to go.

17
•When the robot is ready to clean, press the Pause/Play button (labelled in Figure 2).
The Pause/Play button will not work unless the Power Switch (See Figure 6 for
location of Power Switch) is on AND the robot is mounted in its Mounting Bracket.
•Once the Pause/Play button is pressed, Giddel will start cleaning your toilet
autonomously and the Robot Status LED light turns to solid BLUE.
•If the Giddel Reservoir is empty or has too little water, the internal pump may operate
noisily as it starts feeding air instead of water. This is a gentle reminder that the Giddel
reservoir needs to be refilled, and is not a cause for concern.
•If you press the Pause/Play button in the middle of the cleaning operation, Giddel will
pause. You may press the Pause/Play button again to resume the Cleaning Cycle.
•Giddel cleans your toilet in a systematic fashion –the rim (surface, inner, under) and
the toilet bowl interior down to the exit in approximately 5 minutes.
•Once the Cleaning Cycle is finished the robot returns to its HOME position (see Figure
7) and beeps to get your attention, indicating that the cleaning cycle is complete.
•If you wish to clean your toilet one more time, please turn the Power Switch off (from
‘1’ to ‘0’), wait around 10 seconds and restart Giddel; otherwise, turn Giddel off,
unmount Giddel from the Mounting Bracket, by squeezing the Release Button (Figure
7) and then pulling Giddel out of the Mounting Bracket by the handle and Mounting
Rod (Figure 2) if necessary. Flush the toilet and replace Giddel in its Charging Station
or carry it to the next toilet to be cleaned. Any time you press the Reset button shown
in Figure 2 (the robot’s right eye), the power will go off momentarily and come back
on again. This will restart and re-initialize the robot to its HOME position. In case of
an emergency, for example, if the robot gets stuck, you may use the Reset button.
Alternatively, you may turn the Power Switch off.
Disclaimer: While Giddel makes every effort to clean the toilet thoroughly, the results of
cleaning may vary from toilet to toilet due to large variability in the size and shape of
toilets. Altan Robotech does not guarantee any particular finish or level of cleaning.
4.4 Replacing the Cleaning Brush
There are 3 Cleaning Brushes supplied with your Giddel. Figure 9 shows one such brush.
It has a female thread at the back which screws on to the male thread on the end of the
telescopic arm (Figure 8). To attach a new Cleaning brush, simply rotate the Cleaning
Brush in a clockwise direction onto the male thread of the telescopic arm, until it clicks
into place and turns no more. To remove the Cleaning Brush, wear disposable gloves and
unscrew the brush in an anti-clockwise direction and dispose of safely.

18
5. Maintenance Instructions
To keep your robot in good condition and clean your toilet with peak performance, you
need to maintain your robot properly.
5.1 General Instruction
The following actions will help you to do that.
•It is advisable to charge your robot fully after every use
•Replace your Cleaning Brush every three months. Only use the Altan Robotech
supplied Cleaning Brush.
•Each time you change your Cleaning Brush, wipe the telescopic arm gently including
its extended portion with an antibacterial soft cloth or paper towel.
•Regularly, at least once a month, check the Mounting Bracket to ensure that the bracket
and the toilet seat are firmly fastened without loosening of the nuts and bolts.
•To keep Giddel clean and germ free, it is recommended that you occasionally wipe the
outside with an antibacterial wet-wipe or spray, and then wipe with a damp soft cloth/
paper towel.
•Call Customer Service if you need further assistance.
5.2 Servicing the Double-Insulated Charging Station
Servicing of a double-insulated appliance requires extreme care and knowledge of the
system and should be done only by qualified service personnel. Replacement parts of a
double-insulated appliance must be identical to those parts in the appliance.
6. Troubleshooting
The following are steps you should consider if the robot is not working.
•If you start your robot but it is not moving, check the Battery Status LED light.
•If the light is RED, you must charge the battery pack first before your robot can
clean the toilet.
•If the light is GREEN, press the reset button and start again.
•If both fail, please contact Customer Service.

19
•If your robot stops working in the middle of its Cleaning Cycle, check the Battery
Status LED light.
•If the light is RED, please recharge the battery pack and try it again.
•If the light is GREEN, switch off the Power Button and unmount the robot from
the mounting bracket. Wear a pair of disposable gloves and wipe out the telescopic
arm gently including its extended portion with an antibacterial soft cloth or paper
towel and try it again.
•If both fail, please contact Customer Service.
•If you find difficulty in pressing the Release Button, or don’t hear the clicking sound
while inserting the mounting rod into the bracket, or for some reason you think that the
mounting system has stopped working, please contact Customer Service.
•If you cannot unlatch the robot, try grasping the robot Handle and squeezing the
Release Button (Figure 7) with the thumb of the same hand and then pulling Giddel
out of the Mounting rod by the Handle, and the Mounting Rod (Figure 2) with the
other hand if necessary. If that does not work, ensure the robot is off, remove the toilet
seat and Mounting Bracket by unscrewing the screws and nuts. Unlatch the finger
latches through the access hole located at the bottom of the bracket, with a narrow tool.
•If the robot is not discharging fluid but the pump noise is clearly heard, fill out the
Reservoir with hot water to clean the hoses.
•If the robot is neither discharging fluid nor producing audible pump noise, please
contact Customer Service for repair.
•If the robot beeps continuously, please contact Customer Service for repair.
•If the robot has lost its full range of motion, please contact Customer Service for repair.
Transportation Instruction for Lithium-Ion Battery
Important: This product contains Lithium-ion batteries and is subject to stringent
transportation regulations. If you need to ship your robot for service, travel or any other
reason, please note that you must follow applicable laws for transporting Lithium batteries.
Do not open the body; any attempt to repair the robot yourself will disqualify your rights
under the Limited Warranty provided.

20
7. Customer Service
USA & Canada
If you have any questions and/or comments about your Altan Giddel, please contact Altan
Robotech Customer Service. Please visit our website where you will find Giddel
Accessories, useful information, support tips, and Frequently Asked Questions. Should you
need further assistance, please contact Customer Service.
Customer Service:
(844)-564-7978
support@altanrobotech.com
Monday to Friday: 8:30 AM to 5:00 PM (ET)
US Resident:
Altan Robotech (USA) Inc.
224A Main Street
Goshen, NY 10924
www.altanrobotech.com
Canadian Resident:
Altan Robotech Inc.
6685 Tomken Road, Unit 211,
Mississauga, Ontario,
Canada L5T 2J6
www.altanrobotech.ca
8. Limited Warranty
A “Limited Warranty” statement is included along with this purchase and is available
inside the package. It is also available at www.altanrobotech.com.
9. Declaration of Conformity
9.1 FCC Compliance Statement
This device has been tested and found to comply with part 15, subpart B, Class B of the
FCC rules as stated below.
•This device may not cause harmful interference.
Table of contents