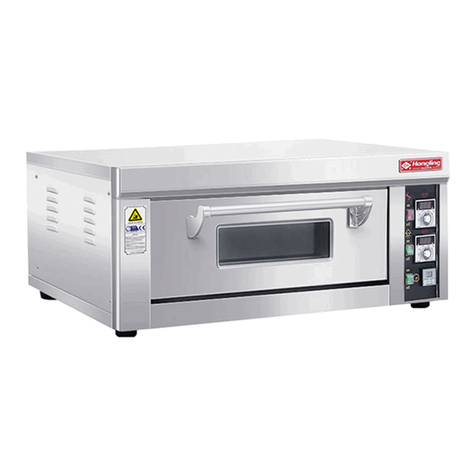
ALZAIN HLY-101E User manual

1
Operation Manual
Alzain™ Gas Oven
(Gas burner warranty 6 years)
(Please read the manual carefully and keep it)

2
Thank you for your purchase of our Alzain™ oven, please read this manual
carefully to get more information about the installation, operation and
features of this product.
Contents
1. Feature .......................................................................................... 3
2. Technical Parameter ..................................................................... 4
3. Installation .................................................................................... 4
4. Operation ...................................................................................... 5
5. Notice ........................................................................................... 6
6. Electrical Circuit .......................................................................... 6
7. Common Failure and Solution ..................................................... 7
8. Maintenance ................................................................................. 7
9. Warranty ....................................................................................... 7

3
1. Feature
HLY series gas ovens are high class food oven that take electricity as control source, and gas as heating
source. The unique advantage as following:
1.1 The burner of gas ovens is different from gas stoves or gas water heaters. It uses the fan blower to
mix the gas and air to the perfect proportion, force it into the burner so that they could complete burnt.
The completed burnt flame heating and the half water and air heat convection circle, make the baked
food no pollution, color is more ideal, stronger flavor and more tasty.
1.2 The oven thermostat is very precise. The baking temperature range at 20-350℃, and automatic
constant temperature. When the temperature exceeds the setting value > 4%, the alarm indicator will
flash.
1.3 Baking range: bread, pastries, cakes, etc.
1.4 Automatic flame extinguishing safety valves in case of failure igniting. Whenever the power failure
or run out of gas that lead to gas flame went out, the "IC" flame detector system will automatically cut
off gas valve and send alarm, ensure secure and reliable.
1.5 Double tempered glass window and oven lamp, the baking process are very easy to check.
1.6 Low gas consumption, baking more quickly and energy-saving, it is suitable for commercial use.

4
2. Technical parameter:
2.1. Gas type: LPG (LNG need another gas connector)
2.2 Gas pressure: 2.8±0.2 KPA.
2.3 Technical data
3. Installation
3.1 The oven need fresh air when it is working, to avoid security threat such as CO poisoning, the oven
must be installed in well-ventilated place where have exhaust fan, keep indoor air clean and circulate.
And leave at least 15 CM gap between the oven (all sides) and the wall (other objects) so as to keep the
air circulating.
3.2 Connect the smoke outlet with a metal tube to discharge the smoke outside; the exhaust pipe shall
not near any combustible material. The exhaust pipe opening should be downward, prevent rain or
debris entering.
3.3 The oven must be used with the pressure relief valve which come with the oven, otherwise the
oven can not work properly. Connect the gas hose in order: cylinder - valve - gas hose - oven.
3.4 Connect the gas hose to gas cylinder and the oven, the oven should be away from the gas cylinder 2
meters but not more than 3 meters, Make sure they are well-connected and sealed and turn on the gas
cylinder. Make a leakage test with soapy water to ensure safe working conditions. Do not put any
combustible goods near oven within 3.5 meters.
3.3 Connect plug to the socket which fully meets the safety standards (220-240V single phase ).
3.4 The screw which mark "equipotential terminal" is the external equipotential conductor. It should be
well connected to safety grounding wire with plastic copper wire that bigger or equal to 2.5 mm².
DISCRIPTION MODEL DIMENSION (mm) VOLTAGE GAS
CONSUMPTION WEIGHT
Gas oven
1 deck 1 tray HLY-101E 1080*680*650 220-240 V 0.25 KG/H 100 KG
Gas oven
1 deck 2 trays HLY-102 1395*965*710 220-240 V 0.35 KG/H 150 KG
Gas oven
1 deck 3 trays HLY-103E 1760*900*650 220-240 V 0.5 KG/H 250 KG
Gas oven
2 deck 4 trays HLY-204 1395*965*1240 220-240 V 0.7 KG/H 260 KG
Gas oven
2 deck 6 trays HLY-206E 1760*900*1240 220-240 V 0.85 KG/H 300 KG
Gas oven
3 deck 6 trays HLY-306 1395*965*1720 220-240 V 1.05 KG/H 380 KG
Gas oven
3 deck 9 trays HLY-309E 1760*900*1720 220-240 V 1.5 KG/H 500 KG
Gas oven
3 deck 12 trays HLY-312 1940*1420*2100 220-240V 2.0 KG/H 750KG

5
3.5 Electrical Circuit
4. Operation
Leakage test: Turn on the gas cylinder to make leakage test with soapy water to ensure the safe working
conditions before operating. If there is a gas leakage and strong smell of gas, the gas valve should be
turn off immediately and open windows to get fresh air. But if the gas leak out of control, everyone
should get out of the working place asap, and call the gas emergency service center for help:
4.1 Turn on the oven power switch.
4.2 Open the oven door and turn on the gas cylinder, then rotate the temperature controller to set the
temperature (must be > room temperature, otherwise can not igniting) and igniting, the oven start
heating. (If failed to ignite for three times in a row, ignition shall be suspended for five minutes. Open
the oven door and the push the exhaust port puller to get the smoke out of the chamber and try again).
4.3 Preheat: Close the oven door, wait oven temperature up to the setting value, the oven can start
baking. Press the oven lamp on/off button to check the baking process through the glass window.
4.4 Turn on the timer if needed, when the baking ends, the oven buzzer will beeping.
4.5 After finish baking, rotate the thermostat temperature to minimum (0℃) first, then turn off the oven power
off switch, finally turn off the gas cylinder.
(Caution: The oven is very hot, a pair of oven gloves is needed.)

6
5. Notice
5.1 On the front left side of the oven, there is an adjusting exhaust port puller. Through the red puller of
push and pull to control the exhaust port . Usually the exhaust port in full closed position, It would be
open for a short time only when the oven need to reduce temperature or reduce wetness. Adjustable
distance is 50mm.
5.2 To ensure the baked goods are heated evenly, the up and down of the oven chamber are have fire
regulation plate. If the baked goods color uniform, according to the degree of physical white to brown,
use tools to adjust fire plate position front and back to the appropriate position, if the front side color
more brown,The fire plate should be moved inside; Oppositely, the fire plate should be moved to
another side.
5.3 The electrical control room on the right side panel of the oven, there are blower fans control of
gas-air proportional regulation. If the flame is cyan color, it means lack of air, at this point please loosen
the fan blower screw and rotate the adjusting plate to enlarge the gap, If the flame turns to blue, tighten
the screw. If the flame is away suggests that air volume is too large, reduce the gap to appropriate
position. The factory has already regulated the mixture of air and gas proportion for each oven and
marked.
5.4 If in cold weather, the oven is difficult to ignite, open the right side panel of the electrical control
room, reduce the gap on the blower fan to reduce the air flow, after success igniting, adjust the gap to
normal position.
Warning: the oven chamber is very hot when it is working, it is forbidden to touch, children should
stay away from it! Do not put any flammable and explosive material (such as on the oven , in case of
fire accident.
6. Common failure and solutions
Failure Cause Solution
Igniting failure,
no spark at all
1. The electric parts failure.
2.The setting temperature is lower than chamber
temperature
3. Run out of gas.
1.Check the electric parts.
2. Reset the temperature.
3. Check the gas cylinder.

7
Igniting failure,
but the ignition
stick has spark,
and slight gas
smell
1.the air volume too large, such as winter morning or
just change new gas cylinder
2. the cylinder pressure is not sufficient.
3. The ignition needle install place is incorrect.
4. The nozzle is blocked by debris
1. Reduce the air volume.
2. Check and replace.
3. The ignition needle should be 2-3
mm above the fire mouth.
4. Remove the copper nozzle and
remove debris.
Success igniting
but soon go off
and alarm
1.the fire needle shift or damage
2.The electronic ignition controller is damaged.
1, adjust or replace the fire needle
2.Replace the electronic ignition
controller.
Dark flame The fan blower failure. Repair the fan blower.
Return flame Inappropriate air volume. Adjust the air flow
Away from the
flame Air flow too large Reduce air volume
Keep lighting
after catch a fire. Inappropriate placement of the ignition needle. The ignition needle should be placed
in 2 - 3 mm above fire mouth.
Temperature
control failure Temperature controller failure Replace new thermostat
7. Warning
6.1 The installation、operation and maintenance must strictly according to the manual.
6.2 The gas cylinder should be connected with pressure relief valve which the factory provided.
It is strictly forbidden to turn the gas cylinder upside down to prevent the residual liquid gas get into the
gas system, in case the parts be damaged and cause security threat.
Warning: This product is not for the disables, sensory and mental disorders or whom lack of
experience or knowledge (including children).
The oven power must be cut off when the baker leaving the working area.
8. Maintenance
8.1 Please coat both sides of the oven door hinge with oil once a week, in order to make the door hinge
move smoothly and durably.
8.2 Please clean up residues in the oven regularly (when the oven power off), and wipe the oven surface
with dry cloth.
8.3 Although the gas oven has common waterproof function, it is strictly forbidden to clean the oven
with running water or spray water, in case the electrical components breaks down or cause an
electric shocks, even damage the oven!
8.4 Check the electrical parts, gas hose and all connectors regularly, if damaged should be replaced
promptly.
9. Warranty
9.1 The installation、operation and maintenance must be strictly according to the manual.
Warning: This product is not for the disables, sensory and mental disorders or whom lack of
experience or knowledge (including children).
The oven power must be cut off when the baker leaving the working area.
9.2 The warranty period is 12 months (from the date of purchase), during this period, this products
proves defective under normal use, the company will provide free repair and/or replacement of

8
spare part of the machine; but if the machine breaks down due to abnormal installation or improper
operation or any other wrong way, the company should not be responsible.
9.3.1 The warranty is only valid when the warranty card is properly completed, and upon presentation
of the proof of purchase consisting of original invoice or sales slip confirmation, indicating the
date of purchase, dealer’s name, product name and model serial No.
9.3.2 The warranty card is considered as a certificate, please keep it.
Note: Each oven with <<warranty card>> , please fill the full contents when repair the oven; keep
track of maintenance contents and related time.
The followings are not covered in warranty:
1. Periodic checks, maintenance, repair and replacement of parts due to normal wear and tear.
2. Accidents or any causes beyond the control of the company by lightning, flood, fire or any force
majeure of natural disasters.
3. Improper operation, installation, debugging or maintenance, and voltage instability.
4. The model serial No. And product information has been altered, deleted, removed or made illegible.
5. The product has been repaired by non-authorized service centers or dissembled by non-authorized
person.
Warranty Card
ALZAIN EQUIPMENTS PVT. LTD.
Customer name: Product name:
Date of purchase: Model number:
Phone number: Retailer:
Date Model Maintenance content Repairman Remark
This manual suits for next models
7
Table of contents
Other ALZAIN Oven manuals