Amana NAH6800 User manual

A/12/06 Pa_t No= 2207_75
@ @
Litho U.S.A. :¢2006. Aml Rights Reserved.
"[ous d_oits r6serv_s.
Todos los derechos reservados.

\&!elcome and congratulations on your
purchase of an Amana _swasher! Your
complete satisfaction is very important to us.
For best results, we suggest reading this
material to help acquaint you with proper
operating and maintenance procedures.
Should you need assistance in the future, it is
helpful to:
I) Have complete model and serial number
identification of your washer. This is
located on a data plate on the back door.
Date of Purchase
Model Number
Serial Number
2) IMPORTANT: Keep this guide
and the sales receipt in a safe
place for future reference, Proof
of original purchase date is
needed for warranty service.
If you have questions, write us (include your
model,serialnumberand phone number)
or call:
Maytag Services, LLC
1-800-688-9900 USA
1-800-688-2080 USA TTY
(for deaf, hearing impaired or speech
impaired)
(Mon.-Fri., 8am-8pm Eastern Time)
http:i/www, maytag.com
NOTE: In our continuing effort to
improve the quality of our
app|iances_ it may be necessary to
make changes to the appliance
without revising this guide°
For service and warranty
information_ see page 15°
MPORTANT SAFETY iNSTRUCTIONS
I_e_d be_bre opera, ring your w_shen
What you need to know about safety instructions
Warnings and Important Safety Instructions appearing in this guide are not
meant to cover all possible conditions and situations that may occur.
Common sense, caution, and care must be exercised when installing,
maintaining or operating appliance.
Always contact your manufacturer about problems or conditions you do
not understand.
I. Read all instructions before using the appliance.
2. As with any equipment using electricity and having moving parts, there are
potential hazards.To use this appliance safely, the operator should become
familiar with the instructions for operation of the appliance and always
exercise care when using it.
3. Do not install or store this appliance where it will be exposed to
the weather.
4. Install and level washer on a floor that can support the weight.
5. This appliance must be properly grounded. Never plug the appliance
cord into a receptacle which is not grounded adequately and in
accordance with local and national codes. See installation instructions for
grounding this appliance.
6. To avoid the possibility of fire or explosion:
a. Do not wash items that have been previously cleaned in, washed in,
soaked in or spotted with gasoline, dry-cleaning solvents, other flammable
or explosive substances as they give off vapors that could ignite or
explode. Hand wash and line dry any items containing these substances.
Any material on which you have used a cleaning solvent, or which is
saturated with flammable liquids or solids, should not be placed in
the washer until all traces of these liquids or solids and their fumes
have been removed. These items include acetone, denatured alcohol,
gasoline, kerosene, some liquid household cleaners, some spot
removers, turpentine, waxes and wax removers.

iMPORTANT SAFETY iNSTRUCTiONS CONT.
b. Do not add gasoline, dry-cleaning solvents or other [ 1. Unplug power supply cord before attempting to service
flammable or explosive substances to the ,Hash water.
These substances give off vapors that could ignite or
explode.
c. Under certain conditions, hydrogen gas may be
produced in a hot ,Hater system that has not been
used for two weeks or more. HYDROGEN GAS IS
EXPLOSIVE. Ifthe hot water system has not been
used for such a period, before using a ,Hasher or
combination washer-dryer, turn on all hot water
faucets and Eet the ,Hater flow from each for several
minutes.This wilt release any accumulated hydrogen
gas. As the gas is flammable, do not smoke or use
an open flame during this time.
d. Do not wash or dry items that are soiled with
vegetable or cooking oil.These items may contain
some oil after laundering. Due to the remaining oil,
the fabric may smoke or catch fire by itself.
7. Do not reach into the appliance if the tub or tumblers
are moving.
8. Do not: allow children or pets to play on, in or in
front of the appliance. Close supervision is necessary
when the appliance is used near children and pets.
9. Do not tamper with controls.
10. Do not repair or replace any part of the appliance or
attempt any servicing unless specifically recommended
in published user-repair instructions that you
understand and have the skills to carry out.
your washen Service is to be done only by qualified
service personnel.
12. Keep all laundry aids such as detergents, bleach, etc.,
out of the reach of children, preferably in a locked
cabinet_ Use laundry aids only as directed by the
manufacturer. Observe all warnings on container labels.
13. Keep the area around and underneath washer free from
the accumulation of combustible materials, such as lint,
paper, rags, gasoline, and aH other flammable vapors and
liquids.
14. Do not use chlorine bleach and ammonia or acids
(such as vinegar or rust remover) in the same wash.
Hazardous fumes can form.
15.
16.
17.
18.
Do not machine wash fiberglass materials. Small
particles can stick to fabrics washed in following loads
and cause skin irritation.
For flame resistant finishes - follow garment
manufacturer's instructions carefully. Improper
laundering could remove the finish.
Before the appliance is removed from service or
discarded, remove the door to the washing
compartment.
Inlet hoses are subiect to damage and deterioration
over time. Check the hoses periodically for bulges, kinks,
cuts, wear or leaks and replace them every five years
SAVE "tHESE |NSTRUCTiON$
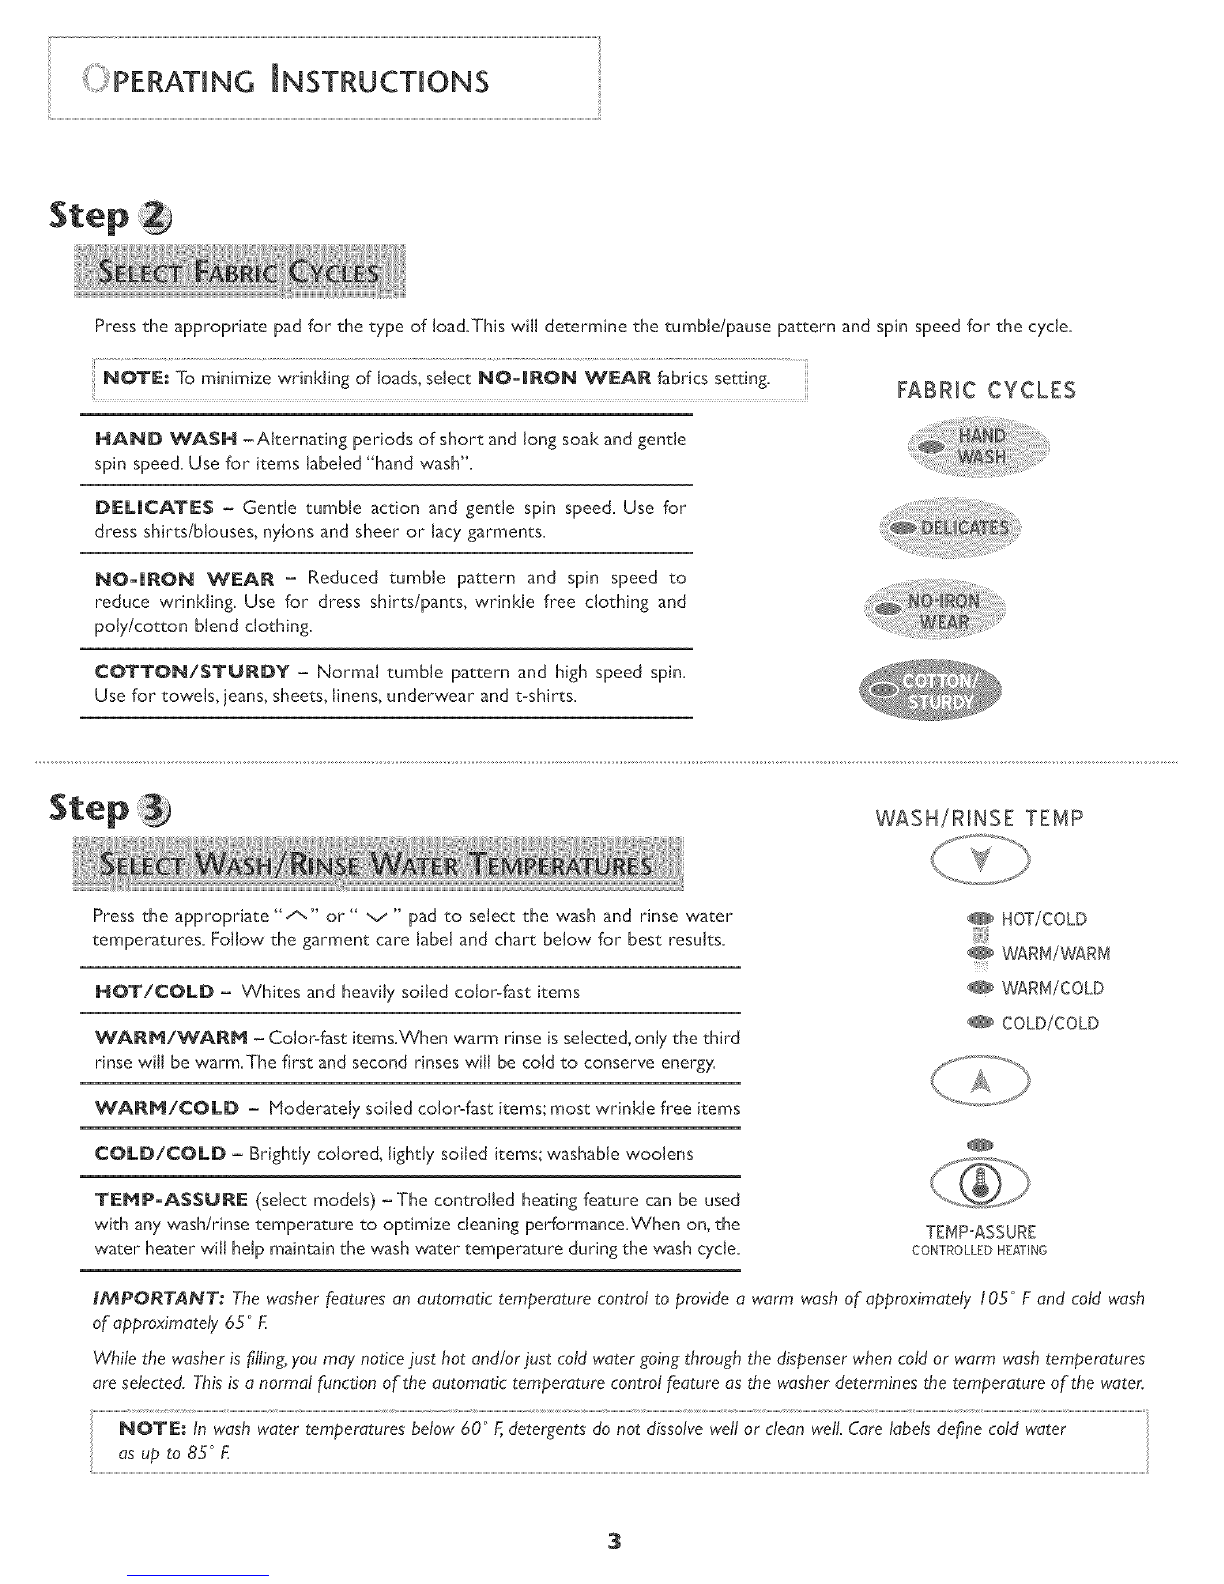
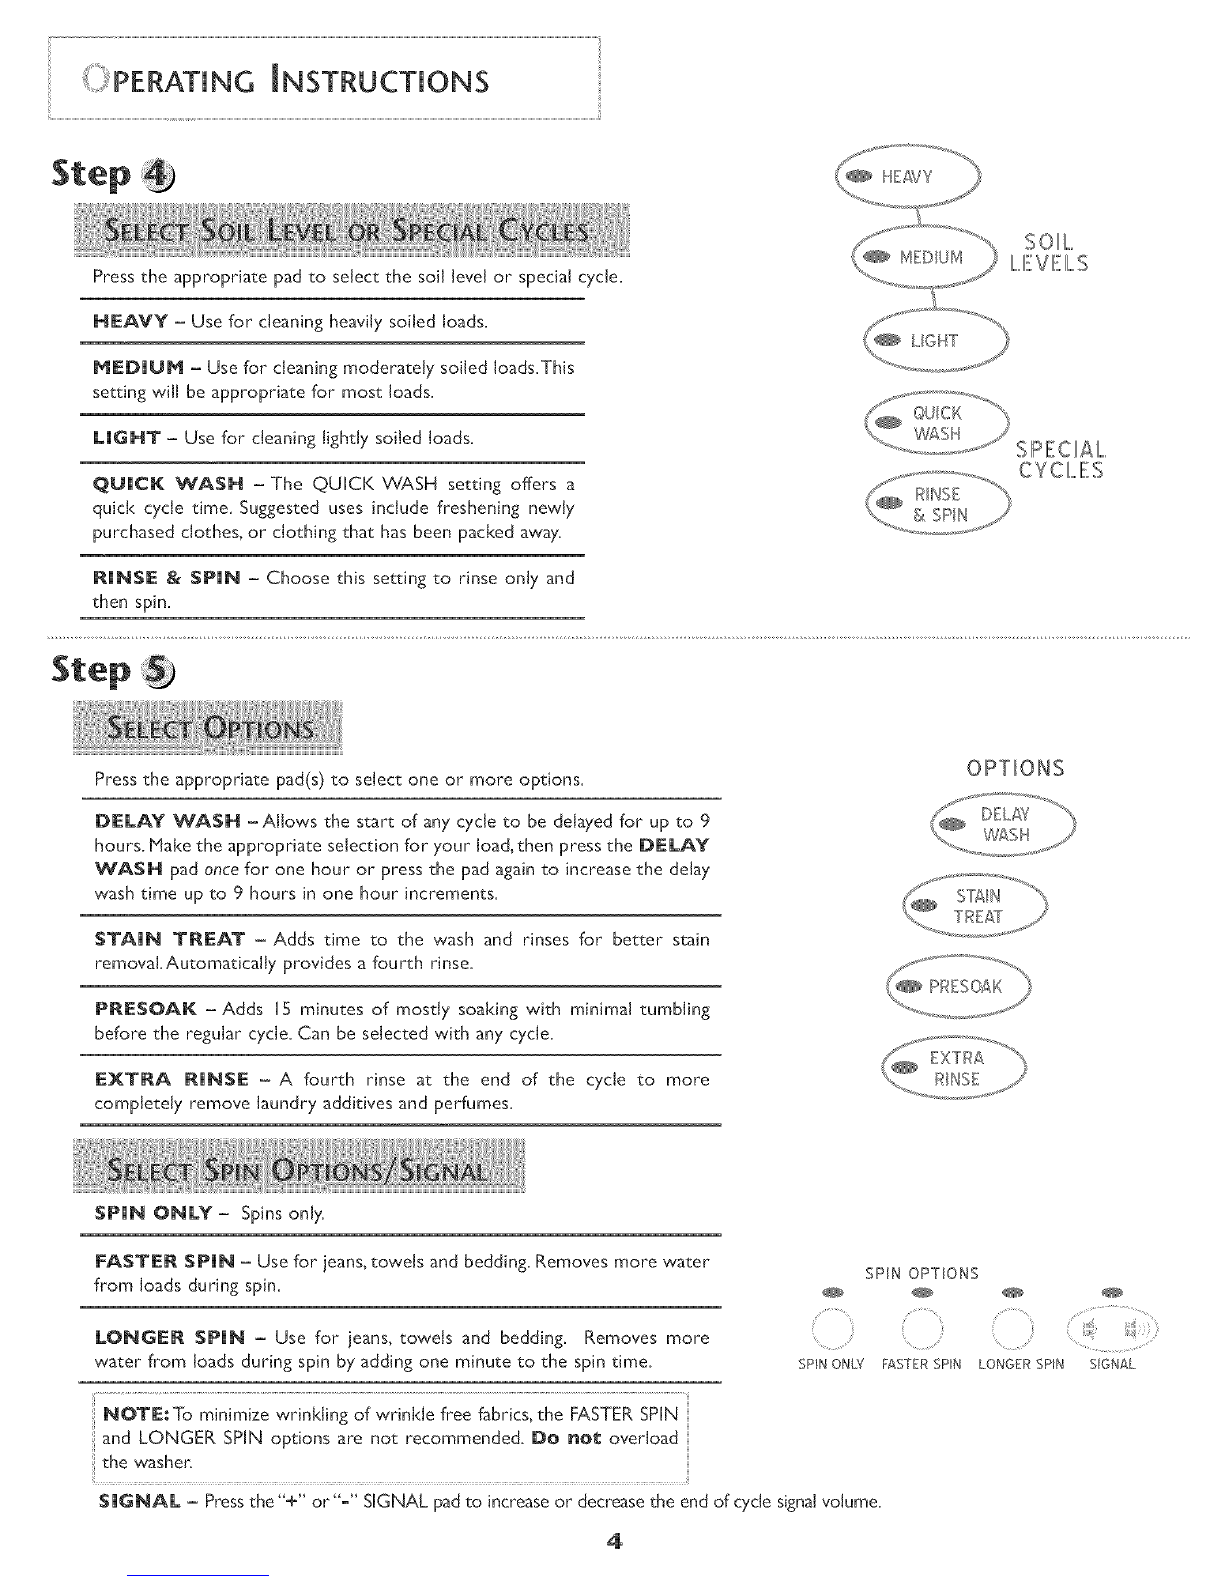
Step Control features vdry by model.
The tub can be loaded completely full with dry, unfolded
clothes, However, do not pack the tub tightly,
Overloading may reduce washing efficiency and possibly
cause creasing or wrinkling of the load,
When washing big, bulky items or a couple of small items
that do not fill the tub completely, such as a rug or two
sweaters, a few towels should be added for improved
tumbling and spin performance,
o To assure good cleaning results, it is very important to avoid
overloading the washer when washing heavily soiled loads,
" To load a forgotten item, press the START/PAUSE pad,
add the item, close the door and press the START/
PAUSE pad again.After a 15 to 30 second pause, the cycle
will resume,
2
•Close door carefully to avoid slamming.
NOTE: To assurethat your additional items get dean, do not
wait more than five minutes after the cycle has started to add
the item.
COnt.

INSTRUCTIONS
Step
Press the appropriate pad for the type of load.This will determine the tumble/pause pattern and spin speed for the cycle.
Ho.E.Tom,n,m, owr,nk.,ngof.oads,so.oct.0-,.0. WEA.fabr,css0tt,ng. FABRICC¥CLES
HAND WASH -Alternating periods of short and long soak and gentle
spin speed. Use for items labeled "hand wash".
DELICATES -Gentle tumble action and gentle spin speed. Use for
dress shirts!blouses, nylons and sheer or lacy garments.
Ha-iRON WEAR - Reduced tumble pattern and spin speed to
reduce wrinkling. Use for dress shirts/pants, wrinkle free clothing and
poly/cotton blend clothing.
COTTON/STURDY - Normal tumble pattern and high speed spin.
Use for towels, jeans, sheets, linens, underwear and t-shirts=
Step WASH!RINSE TEMP
Press the appropriate "A" or" v" pad to select the wash and rinse water
temperatures. Follow the garment care label and chart below for best results.
HOT/COLD - Whites and heavily soiled color-fast items
WARM/WARM - Color-fast items,When warm rinse is selected, only the third
rinse will be warm.The first and second rinses will be cold to conserve energy=
WARM/COLD - Moderately soiled color-fast items; most wrinkle free items
COLD/COLD - Brightly colored, lightly soiled items; washable woolens
TEMP-ASSURE (select models) -The controlled heating feature can be used
with any wash!rinse temperature to optimize cleaning performance. When on, the
water heater will help maintain the wash water temperature during the wash cycle.
HOT/COLD
WARM/WARM
WARM/COLD
COLD/COLD
TEMP=ASSURE
COFITROLLED HEATING
IMPORTANT: The washer features an automatic temperature control to provide a warm wash of approximately !05 °F and cold wash
of approximately 65 ° £
While the washer is #lling,you may notice just hot and/or just cold water going through the dispenser when cold or warm wash temperatures
are selected. This is a normal function of the automatic temperature control feature as the washer determines the temperature of the water.
NOTE: In wash water temperatures below 60 °F,detergents do not dissolve well or clean well. Care labels define cold water
as up to 83 °E
3

Press the appropriate pad to select the soil level or special cycle.
HEAVY -Use for cleaning heavily soiled loads.
MEDIUM -Use for cleaning moderately soiled loads.This
setting will be appropriate for most loads.
EIGHT - Use for cleaning lightly soiled loads.
QUICK WASH - The QUICK WASH setting offers a
quick cycle time. Suggested uses include freshening newly
purchased clothes, or clothing that has been packed away.
RINSE & SPIN -Choose this setting to rinse only and
then spin.
SPECHA/......
CYCL,,,IES
Step
Press the appropriate pad(s) to select one or more options.
DELAY WASH -Allows the start of any cycle to be delayed for up to 9
hours, btake the appropriate selection for your load, then press the DELAY
WASH pad once for one hour or press the pad again to increase the delay
wash time up to 9 hours in one hour increments.
STAIN TREAT -Adds time to the wash and rinses for better stain
removal.Automatically provides a fourth rinse.
PRESOAK -Adds IS minutes of mostly soaking with minimal tumbling
before the regular cycle. Can be selected with any cycle.
EXTRA RIHSE - A fourth rinse at the end of the cycle to more
completely remove laundry additives and perfumes.
SPIH OHLY- Spins only.
FASTER SPIH -Use for ieans, towels and bedding. Removes more water
from loads during spin.
LOHGER SPIH -Use for jeans, towels and bedding. Removes more
water from loads during spin by adding one minute to the spin time.
OPTIONS
SPIN OPTIONS
SPIN ONLY FASTER SPIN LONGER SPIN S_GNAL
HOTE:To minimize wrinkling of wrinkle free fabrics, the FASTER SPIN
and LONGER SPiN options are not recommended. Do .or overload
the washer.
SIGHAJ. - Press the "+" or"-" SIGNAL pad to increase or decrease the end of cycle signal volume.
4

Close the doon
START
° Add detergent and additives to the dispenser (See page 6).
Push the START/PAUSE pad.
,When the washer is started after a pause, there will be a 30-second delay
before continuing the cycle=
Pressing OFF cancels the cycle and stops the washer,
NOTE:When the cycle is complete,the DOOR LOCKED light will go out.
The door will open easily. Do not attempt to open the washer door when
thedoor,ock0d, ght,s,,,um natedToaddaforgotten,tern,seepage2
P&USE
OFF
After pressing START/PAUSE, this display will show the estimated time
remaining in the cycle=The estimated time remaining may fluctuate to better
indicate the wash time left in the cycle=
ESTIMATED TIME
DOOR LOCKED - Lights whenever the door of the washer is locked.The door
can be unlocked by pressing the START/PAUSE pad to stop the washer=
Pad indicator Lights -The indicator lights above the pads will illuminate when
the pad is selected=
@
DOOR LOCKED
_ "ATER USE
The amount of water used wiJJvary with each load=The washer uses an
adaptive fill valve to provide the appropriate amount of water for efficient
cleaning performance and conservation of water and energy= Fill time will vary
depending on water pressure=
5

Your washer is designed to use either
high efficiency (HE) detergents or
regular detergents normally used with
top=loading washers.
For best cleaning results, use a high efficiency
detergent such asTide HE orWisk HE. High
efficiency detergents contain suds suppressors
which reduce or eliminate suds.When less suds
are produced, the load tumbles more efficiently
and cleaning results are maximized.
When using regular detergent formulated for
top=loading washers, it is important to pay close
attention to the soil level of the load, load size
and water hardness _'_'.To avoid over-
sudsing_ reduce the amount of
detergent used with soft water or with
small or lightly soiled loads.
1. Pour the recommended amount of laundry
detergent directly into the detergent compartment
before starting the washer or as it is filling.
2. If color-safe bleach is to be used, it should be
added with detergent to the detergent
compartment for best results.
oWhen adding color-safe bleach with detergent, it
is best if both laundry products are in the same
form; granular or liquid.
The automatic dispenser consists of three
compartments which hold U) liquid or granular
detergent and color safe bleach, 2) liquid chlorine
bleach and 3) liquid fabric softener. All laundry
products can be added at once in their respective
dispenser compartments.They will be dispensed at
the appropriate time for most effective cleaning.
After loading the laundry additives into the dispenser,
close the dispenser lid.
Brand names are trademarks of the respective manufacturers.
ee To determine water hardness in your area, contact your local water utility or State University Extension office in >,our area.
6

(Liquid Chlorine Bleach Only)
2.
3.
4.
Add chlorine bleach to the bleach compartment.
Do not exceed the HAX FiLL line.The liquid
chlorine bleach compartment will hold 3/4 of a
cup.
Avoid splashing or over-filling the compartment.
Over-filling the compa_ment will
release the liquid chlorine bleach into
the washer too early,
The washer automatically dispenses bleach into
the tub at the appropriate time in the wash cycle.
The dispenser automatically dilutes liquid chlorine
bleach before it reaches the wash load.
NOTES:
Never pour undiluted liquid chlorine bleach
directly onto the load or into the tub. [t is a
powerful chemical and can cause fabric
damage, such as weakening of the fibers or
color loss, if not used properly=
" If you prefer to use color-safe, non-chlorine
bleach, add it to the detergent compartment.
Do not pour color-safe bleach into
ii
the bleach compartment°
2.
3.
Pour the recommended amount of liquid fabric
softener into the softener compartment. For
smaller loads use less than one capful.
Fabric softener should be diluted with warm
water until it reaches the HAX FILL line on the
compartment. Do not fill above the MAX
FILL line. If the compartment is filled
above the MAX FILL line, fabric
softener will enter the washer too early,
This compartment automatically releases liquid
fabric softener at the proper time during the
rinse cycle.
.OTES:
Use the softener compartment only for liquid
•fabric softeners=
Using the Downy Ball* is not recommended
] with this washer. It will not add fabric softener
at the appropriate time. Use the dispenser on
topofthewasher
'? Brand names are trademarks of the respectivemanufacturers,
7

Turn off ehe water faucets after finishing the
day's washing. This will shut off the water supply to the
washer and prevent the unlikely possibility of damage from
escaping waten Leave the door open to allow the inside of the
washer to dry out
Use a soft cloth to wipe up all detergent, bleach or other
spills as they occur,
Clean the following as recommended:
Control Panel -Clean with a soft, damp cloth.
Do not use abrasive powders or cleaning pads.
Do not spray cleaners directly on the panel.
Cabinet - lean with soap and water.
Antimicrobial Product Protection
This washer is equipped with antimicrobial
component protection. The rubber door seal is
treated to be resistant to mold, mildew and
odor<ausing bacteria.
Clean the interior of the washer periodically to remove any
dirt, soil, odor, mold, mildew or bacteria residue that may
remain in the washer as a result of washing clothes. We
recommend taking the following steps every 60 to [ 20 days
to clean and freshen your washer interion The frequency
with which the washer should be cleaned and freshened
depends on factors such as usage, the amount of dirt, soil
or bacteria being run through your washer or the use of
cold water: Failure to follow these instructions may result in
unsatisfactory conditions, including unpleasant odor and/or
permanent stains on the washer or washload.
To
2,
3,
4,
5.
dean and freshen the washer interior:
Make a solution of one cup chlorine bleach and
two cups warm water. Be careful not to spill or
splash the bleach solution.
Wipe the lower portion of gray door seal with
bleach solution and soft cloth.
Fill the bleach dispenser with chlorine bleach.
Run the washer through a complete cycle using
hot water_
Repeat the wash cycle if necessary.
Hard water deposits may be removed, if needed, using
a recommended cleaner labeled "clothes washer safe?
The dispenser may need to be cleaned periodically due to
laundry additive build-up. For easy cleanup of the dispenser,
grasp the removable two-compartment container (for bleach
and softener) as shown in illustration #1. As you begin to lift
the two-compartment container, tilt slightly inward, according
to illustration #2 and remove from the main dispenser_
Once the two-compartment container is removed from the
main dispenser, take it to a sink. Follow illustration #3 to
remove the cap covering the siphon tube for the
bleach and softener. Run warm water and a soft
brush or cloth over the two parts to remove any
excess laundry additives.
Clean the main dispenser area using water and a soft
cloth. Once the main dispenser is clean_ follow the
illustrations in reverse order to replace the two
compartment container to its original location.
NOTE: Do not use any cleaning substance but water in the main dispenser. It is possible for cleaning substances to
drain into the tub. If this should happem set the washer for a rinse and spin cycle to remove any cleaning substance from
thewasherber0redoingaloadoflaundry
8

Washers can be damaged if water is not removed from hoses
and internal components before storage. Prepare the washer for
storage as follows:
•Select the COTTON/STURDY and QUICK WASH
settings and add one clip of bleach to the detergent dispenser
without clothes in the tumbler. Run the washer through a
complete cycle using hot water.
Turn the water faucets off and disconnect the inlet hoses.
Disconnect the washer from the electrical supply and leave
the washer door open to let air circulate inside the
tumbler.
If the washer has been stored in below-freezing
temperatures, allow time for an), water left over in the
washer to thaw out prior to use.
call Maytag Services_ LLC toU-free at 1-800-688-9900 USA,
U°S° customers using TTY for deaf, hearing impaired or speech impaired, call ! -800-688-2080.
Washer door swing direction can be changed using the following procedure:
I) Swing door fully open and support it while removing four hinge screws (which hold hinges to door assembly).
2) Hove the door to a work surface and transfer four door screws to the opposite side of the door assembly.
3) Remove one screw holding top hinge to cabinet and one screw holding top hinge cover to cabinet (opposite side).
4) Remove hinge and bracket from cabinet by moving them up and down to a position where they are released.
S) Install hinge and bracket in swapped locations and drive screws to attach them securely to the cabinet.
6) Compare top hinge and top bracket to bottom hinge and bottom bracket for correct hinge assembly position.
7) Repeat procedures 4 through 6 for bottom hinge to cabinet and bottom bracket to cabinet.
8) Support door in fully open position on hinge side and drive four screws to securely attach hinges to door assembly.
9) Close door and check to see that washer operates properly.
Hole
Counter Sunk Screw _.
_ _ Door
__es 1_)) "- screws
...... s °°e'ws
9

ROUBLESHOOTING
Use FASTER SPiN and LONGER SPiN options,
Load is Too Wet Try using a high efficiency detergent to reduce sudsing.
at End of Cycle Load is too small.Very small loads (one or two items) may become unbalanced and not
spin out completely.
Make sure door is firmly closed.
Make sure hose connections are tight,
Leaks Water Make sure end of drain hose is correctly inserted and secured to drain facility.
Avoid overloading.
Use high efficiency detergent to prevent over-sudsing.
Check fuse or reset circuit breaken
Straighten drain hoses. Eliminate kinked hoses, If there is a drain restriction, call for service.
Won*t Spin Close the door and push the START/PAUSE pad. For your safety, washer will not
or Drain tumble or spin unless the door is closed.
After pressing the START/PAUSE pad, it will take 30 seconds before the washer begins to
spin.The door must lock before spin can be achieved.
See Tubis Completely Full of Suds below.
Plug cord into live electrical outlet,
Check fuse or reset circuit breaker.
Close door and push the START/PAUSE pad to start the washer. For your safety,
Stops washer will not tumble or spin unless door is closed.
This may be a pause or soak period in the cycle, Wait briefly and it may start.
Check screens on inlet hoses at the faucets for obstructions. Clean screens periodically.
Run the washer through another complete cycle using cold water.
Tub is Completely Reduce dete%ent amount for that specific load size, soil level and water hardness.
Full of Suds Use high efficiency or low sudsing detergent specially formulated for front load washers,
Turn both faucets on fully,
Make sure temperature selection is correct,
Make sure hoses are connected to correct faucets, Hush water lines.
Check the water heater. It should be set to deliver a minimum of 120 ° F (49 ° C) hot water
at the tap. Also check water heater capacity and recovery rate.
Fi|ls with the Disconnect hoses and clean screens. Hose filter screens may be plugged.
Wrong When warm rinse is selected, only the final rinse will be warm.The first two
Temperature rinses will be cold=
Water As the washer is filling, the water temperature may change as the automatic temperature
control feature checks incoming water temperature. This is normal.
While the washer is filling, you may notice just hot and!or just cold water going through the
dispenser when cold or warm wash temperatures are selected. This is a normal function of the
automatic temperature control feature as the washer determines the temperature of the wate_
Cont.
MO

Be sure the door is tightly closed.
Plug cord into a live electrical outlet.
Check fuse or reset circuit breaker=
Press the START/PAUSE pad.
Won't Fil! Turn both faucets on fully.
Straighten inlet hoses.
Disconnect hoses and clean screens. Hose filter screens may be plugged.
Open and close the door, then push the START/PAUSE pad.
° Check fuse or reset circuit breaker.
Won't Tumble , Close the door and press the START/PAUSE pad. For your safety, the washer will
not tumble or spin unless the door is closed.
Door Locked Shut; "Press the START/PAUSE pad to stop the machine.
W!!! Not Open , It may take a few moments for the door lock mechanism to disengage.
"See Oeaning the interior, page 8,
Your Washer
° Washer should be leveled properly as outlined in installation instructions.
° Check that the leveling leg loci< nuts are tightened.
Is Noisy "Be sure rubber feet are installed on leveling legs.
,\_Veak floors can cause vibration and walking.
"For information on normal operating sounds, see page 13.
For further assistance_ ca!! Maytag $ervices_ LEe to!!ofree at ! -800-688o9900 USA.
U.$. customers using TTY for deaf_ bearing impaired or speech impaired_ ca!! !-800-688-2080o
M!

ROU BLES14OOTU NG CONT.
Help codes may be displayed to help you better understand what is occurring with the washer.
Code
Symbol Neaning Solution
_1 The washer detects that the door isopen when Close the door tightly and restart the cycle=
_ZHZ_ starting a cycle or the door is not locking=
_ The washer failed to loci< the door= Close the door tightly and restart the cycle=
FL
I | Oversudsing has occurred. If this code Reduce the amount of detergent used for that
Z_ disappears, the suds recovery cycle was specific load.0successful=
_l Z The washer experienced a power failure. Restart the cycle. If code is still displayed, check
to make sure power cord is securely plugged in.
The washer experienced difficulty draining. Check for a kinked drain hose.
Check for a plugged stand pipe.
Make sure door is tightly closed. Push the OFF
button and then wait two minutes for the door
t The washer has repeatedly tried to unlock the to unlock=
door but has been unsuccessful. OR
Unplug the washer for two minutes and plug
back in.
Motor not running properly. Call for service. See below.
LI-
_ The washer has tried to fill. sure water are open
Make the faucets all the
[_[[_ way.Checkforkinkedhoses.
The washer door must be opened. This is a safety feature. The door must be
opened before another cycle is started.
For any codes not listed above_ call Maytag Services_ LLC toll-free at 1-800-688-9900 USA.
U°S° customers using TTY for deaf_ hearing impaired or speech impaired, call 1-800-688-2.080.
[2

The motor increases speed to spin the tub to remove moisture from the
High-pitched sound during a spin cycle, load.
Flushing water sound coming Detergent is dispensed at the start of the cycle. Bleach is dispensed at the
from the dispenser area. appropriate time in the wash cycle. Fabric softener is dispensed during the
third rinse while the washer is filling.
Sloshing or gurgling water The sealed balance ring around the tub contains a liquid and is designed to
sound when washer is off and the tub make the washer spin smoothly.
is rotated.
Whirring or sloshing sound The tub rotates one direction followed by a pause.The tub reverses
followed by a pause_ repeated direction and pauses.This action continues throughout the cycle.
throughout the wash cycle.
\_/asher maintains a slightly After reaching the maximum spin speed, the machine may reduce spin
reduced spin speed after achieving speed slightly for maximum performance.
a higher spin speed.
The spin speed slows down The tumbler will begin to accelerate to speed, then slows back down to
dramatically when it sounds like an redistribute the load more evenly when an unbalanced load occurs.
out-of-balance load.
The washer uses a true adaptive fill and adds more water during the wash
cycle as it is needed.
Water is added after the OR
washer has been tumbling
for a while. Water flows through the dispenser to dilute and add bleach or fabric
softener at the appropriate time.This will occur even if bleach and fabric
softener are not used.
Clicking/draining sounds when Before the washer starts to fill, it will make a series of clicking noises to
washer is started, check the door loci< and do a quick drain.
M3

UESTIONS AND ANSWERS
Q. What's the best cycle to use if Jhave stains on my laundry?
A. Select the STAIN TREAT option pad and HEAVY (see page 4) setting= Pretreat the stains with a laundry
pre-treat product.
Q_ How large of a load can J wash in my washer?
A_ The tub can be loaded completely full with dr),, unfolded clothes= However, do not pack the tub tightly= If the load is heavily
soiled it is very important not to overload the washer=
Q_
A_
At the end of the eye|e my |oad comes out wetter than normal. What causes this?
During tumble and spin the washer may have had difficulty getting to a full spin speed because the load was not evenly
distributed=This can occur with small loads, heavy items or a load in which too much detergent was used, causing
over-sudsing=
Q. Hy laundry items seem to be very wrinkled at the end of the cycle. What can I do to correct
the problem?
A_ Wrinkling is caused by the combination of heat and pressure= Be sure wrinkle free or permanent press fabrics are washed
on the HO-IROH WEAR cycle, and a cold rinse is used= (See pg= 3 for Wash/Rinse _!ater Temperatures)= DO NOT
USE FASTER SPIH OR LOHGER SPIH OPTIOH$=
Q_
Ao
My whites are not as white as J_d |ike° What can I do?
Wash white loads using the COTTOH/$TURDY fabric selection= Select the HOT/COLD temperature setting and put
3/4 cup of chlorine bleach in the bleach dispensenThe bleach will be dispensed at the appropriate time in the wash cycle for
optimal performance= A hot water wash temperature of 120 ° 140° F (49 ° ° 60 ° C) is recommended=
M4

AMANA ®MAJOR APPLIANCE WARRANTY
ONE YEAR L_M_TED WARRANTY
For one year from the date of purchase, when this major appliance is operated and maintained according to instructions attached to or
furnished with the product, Amana brand of Maytag Corporation or Maytag Limited (hereafter "Amana') will pay for factory specified
replacement parts and repair labor to correct defects in materials or workmanship. Service must be provided by a Amana designated
service company. This limited warranty applies only when the major appliance is used in the country in which it was purchased.
_TEMS AMANA W_LL NOT PAY FOR
!. Service calls to correct the installation of your major appliance, to instruct you how' to use your major appliance, to reptaceor repair
house fuses or to correct house wiring or plumbing.
2. Service calls to repair or replace appliance light bulbs, air filters or water filters. Those consumable parts are excluded from warranty
coverage.
3. Repairs when your major appliance is used for other than normal, single-family household use.
4. Damage resulting from accident, alteration, misuse, abuse, fire, flood, acts of God, improper installation, installation not in
accordance with electrical or plumbing codes, or use of products not approved by Amana.
5. Any food toss due to refrigerator or freezer product failures.
6. Replacement parts or repair labor costs for units operated outside the United States or Canada.
7. Pickup and delivery. This major appliance is designed to be repaired in the home.
8. Repairs to parts or systems resulting from unauthorized modifications made to the appliance.
9. Expenses for travel and transportation for product service in remote locations.
!0. The removal and reinstattation of your appliance if it is installed in an inaccessible location or is not installed in accordance with
published installation instructions.
!!. Replacement parts or repair labor costs when the major appliance is used in a country other than the country in which it was
purchased.
DiSCLAiMER OF _MPL_ED WARRANTIES; LiMiTATiON OF REMEDIES
CUSTOMER'S SOLE AND EXCLUSIVE REMEDY UNDER THIS LIMITED WARRANTY SHALL BE PRODUCT REPAIR AS PROVIDED
HEREIN. IMPLIED WARRANTIES, INCLUDING WARRANTIES OF MERCHANTABILITY OR FITNESS FOR A PARTICULAR PURPOSE,
ARE LIMITED TO ONE YEAR OR THE SHORTEST PERIOD ALLOWED BY LAW. AMANA SHALL NOT BE LIABLE FOR INCIDENTAL OR
CONSEQUENTIAL DAMAGES. SOME STATES AND PROVINCES DO NOT ALLOW THE EXCLUSION OR LIMITATION OF INCIDENTAL
OR CONSEQUENTIAL DAMAGES, OR LIMITATIONS ON THE DURATION OF IMPLIED WARRANTIES OF MERCHANTABILITY OR
FITNESS, SO THESE EXCLUSIONS OR LIMITATIONS MAY NOT APPLY TO YOU. THIS WARRANTY GIVES YOU SPECIFIC LEGAL
RIGHTS AND YOU MAY ALSO HAVE OTHER RIGHTS, WHICH VARY FROM STATETO STATE OR PROVINCE TO PROVINCE.
Outside the 50 United States and Canada, this warranty does not apply. Contact your authorized Amana dealer to determine if anc¢her
warranty applies.
If you need service, first see the "Troubleshooting" section of the Use & Care Guide. After checking "Troubleshooting," additional help
can be found by checking the 'Assistance or Service" section or by calling Amana. In the U.S.A. catt! -800-688-9900. In Canada, call
! -800-688-2002.


iNuestra bienvenida yfelicitadones por [a
compra de una [avadora Amana<_! Su
compJeta satisfacci6n es muy importante
para nosotros, Para obtener los mejores
resu[tados [e sugerimos que lea esta g@a
para familiarizarse con los procedimientos
apropiados de fundonamiento y
mantenimiento,
Siusted neceska ayuda en el futuro_ es _til
_ener:
U) El n_mero completo de modelo y de serie
para identificaci6n de su lavadora. Se
encuentran en una placa de datos situada
en Ia puerta.
Fecha de Compra
N6mero de Modelo
N_mero de Serie
2) IMPORTANTE: Conserve esta
guia y el recibo de ¢ompra en un
lugar seguro par_ referencia
futura° Para obtener servi¢io baio
la garantia es necesaHo
¢omprobar la re€ha de ¢o_pra
original
Si tiene alguna consulta, escribanos (induya el
n_mero de modelo y de serie y su n_mero
de tel6fono) o flame a:
Maytag Services, LLC
1-800-688-9900 EE.UU.
(Lunes aViernes_ 8:00 a.m.- 8:00 p.m.
Hora del Este)
http://www, maytag.com
NOTA: En nuestro ¢ontinuo af_n de
mejorar ta ¢alidad de nuestros
electrodom_sticos_ puede que sea
necesaHo hacer modificaciones _ I_
P_r_ inform_¢i6n sobre servi¢io y
g_r_n_i_ vet I_ Olti_ p_gin_°
Lea est_s instr _cc ones an_es de porter en f_nc o_amient_ su law,dora,
A_oY_ debe conocer l_s ins_r_c¢iones _e seg_ri_e_
Las advertencias y las instrucdones importantes de seguridad que aparecen en
este manual no tienen el prop6sito de cubrir todas las condiciones posibles
que podrfan ocurrir. Debe usars6 senodo com0n, precauci6n ycuidado cuando
se instale, se presente maintenimiemto o se opere el electrodom6stico.
$ie_p_e comunfquese con el distribuidor, concesionario, agente de servicio
o fabricante para los asuntos relacionados con problemas o condiciones que
no entienda.
RECONOZCA LOS S[MBOLOS DE SEGURIDAD_
ADVERTENCIAS, ETIQUETAS
I. Lea todas las instrucciones antes de usar el electrodom6stico.
2. AI igual que con cualquier equipo que utiliza electricidad y que tiene
piezas m6viles, existen ciertos riesgos potenciales. Para usar este
electrodom6stico con seguridad, el usuario debe familiarizarse con las
instrucciones de funcionamiento del electrodom6stico y tener siempre
cuidado cuando Io usa.
3. _o instale ni almacene este electrodom6stico donde pueda estar
expuesto a las inclemencias del tiempo.
4. Instale y nivele la lavadora sobre un piso firme que pueda soportar
el peso.
5. Este electrodom6stico debe set puesto a tierra de manera apropiada.
_n¢_ enchufe el cord6n del electrodom6stico en un tomacorriente
que no est6 debidamente puesto a tierra y de acuerdo con el c6digo
nacional y local. Vea las instrucciones de instalaci6n para la puesta a
tierra de este electrodom6stico.
6. Para evkar la posibilidad de incendio o explosi6n:
a. _o lave artfculos que han sido previamente limpiados, lavados,
sumergidos o manchados con gasolina, solventes de limpiar en seco
u otras sustancias inflamabJes o explosivas pues pueden emitir
vapores inflamables o producir una explosi6n. Lave a mano y
cuelgue en una cuerda de secar cualquier artfc@o que contenga
estas sustancias.
i7Co_t

agente de limpieza o que est6 saturado con h'quidos
o s61idos inflamabies, no debe ser colocado en la
lavadora hasta que todos los restos de estos
Ifquidos o s61idos ysus vapores hayan sido
etiminados. Estos artfculos inc[uyen acetona,
alcohol desnaturalizado, gasolina, keros_n, algunos
Ifquidos de limpieza dom_sticos, algunos
quitamanchas, agua ras, ceras y quitaceras.
No agregue gaso[ina, solventes de lavado en
seco ni arras sustancias inflamables o
explosivas a[ agua de[ [avado. Estas sustandas
emiten vapores que pueden encenderse o
explotar.
c. Bajo ciertas condiciones, se puede producir gas
hidr6geno en un sistema de agua caJiente que
no ha sido usado durante dos semanas o m_s.
EL GAS HIDROGENO ES EXPLOSIVO. Si el
sistema de[ agua caliente no ha sido usado
durante tal periodo, antes de usar una [avadora
o una combinad6n de [avadora y secadora,
abra todas [as Ilaves de[ agua caliente y deie
que el agua escurra durante varios minutos.
Esto eIiminar_ cuaiquier gas hidr6geno
acumulado. Debido a que el gas es inflamable,
no fume ni use una llama abierta durante
este periodo.
d. No lave ni seque arficulos que est_n sudos con
aceite vegetal o de codnar. Estos ardculos
pueden contener alga de aceite despu6s de set
[avados.Debido a[ aceite remanente, [a tela puede
echar humo o prenderse fuego par sf sola.
II.
12.
13.
14.
15.
16.
[avadora nJ intente efectuar ning0n servicio a menos
que se recomiende especfficamente en las
instrucciones de reparad6n par el usuario yque
usted las comprenda )' tenga habilidad para
efectuar[as.
Desenchufe el cord6n de alimentaci6n antes de
intentar reparar su [avadora.
Ouarde los detergentes yarras materiales en un
lugar fresco yseco donde los nifos no puedan
alcanzarlos. Use los aditivos del lavado solamente
de acuerdo con las instrucdones del fabricante.
Observe todas [as advertendas en [as etiquetas de
los envases.
No lave ni seque arficulos que est_n sucios con
aceite vegetal o de cocinan Estos arficulos pueden
contener un poco de aceite despu_s del [avado.
Debido a esto, [a tela puede ahumarse o encenderse
par si sola.
No use blanqueador de clara ni amom'aco o _cidos
(tales coma vinagre o desoxidantes) en el mismo
[avado. Se pueden formar vapores peIigrosos.
No lave en la lavadora matedales de fibra de vidrio.
Se pueden pegar partfculas en las ropas que se
vayan a [avar a continuaci6n y causar irritaci6n a
la piel.
Para los acabados de telas resistentes a [as llamas -
siga cuidadosamente [as instrucciones de[ fabricante
de la ropa. El lavado incorrecto puede remover el
acabado.
7. No introduzca su mano en [a [avadora si [atina est_
en movimiento.
8. No deie que los nifos iueguen en la lavadora o
dentro de ella. Es necesario supervisar
estrictamente a los nifos cuando [a [avadora est_
siendo usada cerca de elias.
9. No altere los controles.
17.
18.
Antes de que [a [avadora sea puesta fuera de
servicio o descartada, retire [a puerta del
compartimiento del [avado.
Las mangueras de admisi6n de[ agua est_n suietas a
dafo ydeterioro con el pasar de[ tiempo. Verifique
peri6dicamente [as mangueras para comprobar que
no tengan protuberancias, torceduras, cortes,
desgaste o escapes y reempi_celas cada cinco afros.
ONSERVE ESTA$ [NSTRUCCIONE$
M8

NSTRUCCIONES DE FUNCIONAMIENTO
L_sc_mcteristic_s de contro! y los esti!os wd_n segSn el modelo.
Paso
La tina puede llenarse completamente con ropa seca
desdoblada, Sin embargo, no es conveniente que la tina quede
apretada con ropa,
Si se coloca demasiada ropa puede afectarse la eficiencia X
posiblemente causar pliegues oarrugas en la ropa,
Cuando lave art[culos voluminosos o un par de artlculos
peque_os que no llenan completamente la tina, tales como una
alfombra o dos su_teres, es conveniente agregar unas pocas
toallas para mejorar la eficacia de la agitaci6n y del
centrifugado.
o Para agregar alg6n art_culo que se ha olvidado, oprima lateda
_$TART/PAUSE' (Puesta en marcha/Pausa), agregue el
art_culo, cierre la puerta y oprima la teda %TART/PAUSE'
otra vez. El cido se reanudar_ despu6s de una pausa de 15 a
30 segundos.
o Cierre cuidadosamente la tapa para evitar golpearla.
NOTA: Para asegurar [a buena limpieza de los artlculos
adicionales, para agregarlos no espere m_s de cinco minutos
despu_s de que haya comenzado el ciclo,
o Cuando lave ropas que est_n extremadamente sucias, es muy
importante evitar que se sobrecargue la lavadora a fin de
asegurar una buena limpieza,
Po$o
Oprima la tecla correspondiente al tipo de ropa de lavado, Esto determinar_,
el modulo de agitad6n/pausa y la rapidez de centrifugado del dclo.
NOTA: Para reducir a un mlnimo las arrugas de las ropas, selecdone
'NO-URON WEAR' (Telasque no se arrugan).
_HANID WASH' (Lavado a mano) - Per[odos alternos de remojo largo
ycorto y velocidad de centrifugado lenta. Usar para art[culos que deben
set "lavados a mano'.
FABRHC CYCLES
_DELJCATE$' (Telas delicadas) - Agitaci6n suave y veloddad de
centrifugado lenta. Usar para vestidos/blusas de vestir, medias, ropas
transparentes o de encaje.
_NO-JRON WEAR' (Telas que no se arrugan) -btodo de agitaci6n y
de centrifugado reducidos para disminor las arrugas. Usar para
camisas/pantalones de vestir, ropas inarrugables, ropas de mezda de
poli6ster/algod6n.
_COTTON/STURDY' (AIgod6mtelas fuertes) -Plodo de agitaci6n
normal ycentrifugado a alta velocidad, Usar para toallas, vaqueros,
s_banas, manteles, ropa interior, camisetas,
M9
Other manuals for NAH6800
1
Table of contents
Languages:
Other Amana Washer manuals

Amana
Amana NFW7200TW User manual

Amana
Amana NFW5800DW User manual

Amana
Amana CW3303 User manual

Amana
Amana 2201045 User manual

Amana
Amana NTW5400TQ2 User manual

Amana
Amana NTW4500X User manual

Amana
Amana NTW4516FW3 User manual

Amana
Amana NAV3330AWW User manual

Amana
Amana ALW210RMC Manual

Amana
Amana NTW4605EW User manual

Amana
Amana LW8253 User manual

Amana
Amana NTW4500VQ1 User manual

Amana
Amana NTW4501XQ0 User manual

Amana
Amana Top-Loading Washer User manual

Amana
Amana NFW7200TW0 User manual

Amana
Amana NTW4500XQ0 User manual

Amana
Amana NTW4500X User manual

Amana
Amana 4KNTW3100JW2 User manual

Amana
Amana NTW5400T User manual

Amana
Amana NFW7200TW Parts list manual