Amarina LECTEUR MOBILITY CLASSIC MP3 User manual

LECTEUR MOBILITY CLASSIC MP3
www.amarina.fr USER MANUAL

Security Advice
1 Do not use any liquid or aerosol products. Clean with a damp cloth.
2 Never use the device near water.
3 Ensure that no furniture or any other object is touching the cord.
4 All repairs must be carried out by qualified technicians.
5 Follow the installation instructions provided by the manufacturer.
Warranty conditions
x AMARINA products are sold with a 12-month factory guarantee dating from the time of purchase.
x If the product is faulty, return it in its entirety, plus proof of purchase, to your dealer. Specify the nature of the
fault.
x If parts, such as manual, software or any other part, is missing, please contact your dealer or email our
technical service department (hotline@amarina.fr).
x The warranty will be void if this product is altered, damaged, used incorrectly, modified, neglected, repaired
by a third party agent or used for any purpose other than that for which it was designed.
The following are not covered under warranty
x Damage caused by natural disasters and accidents such as fire, flood, earthquakes, war, vandalism or theft.
x Incompatibility with other software or computer material not mentioned in the minimum system requirements.
x Accessories such as batteries and fuses, headset
x The manufacturer cannot be held responsible for any accidental or consequential damages, including the
loss of income or any other commercial loss that may be a result of using this product.

TABLE OF CONTENTS
FEATURES SUMMARY ................................................................................. 4
INTRODUCTION ............................................................................................. 5
xButtons and controls definition .......................................................... 5
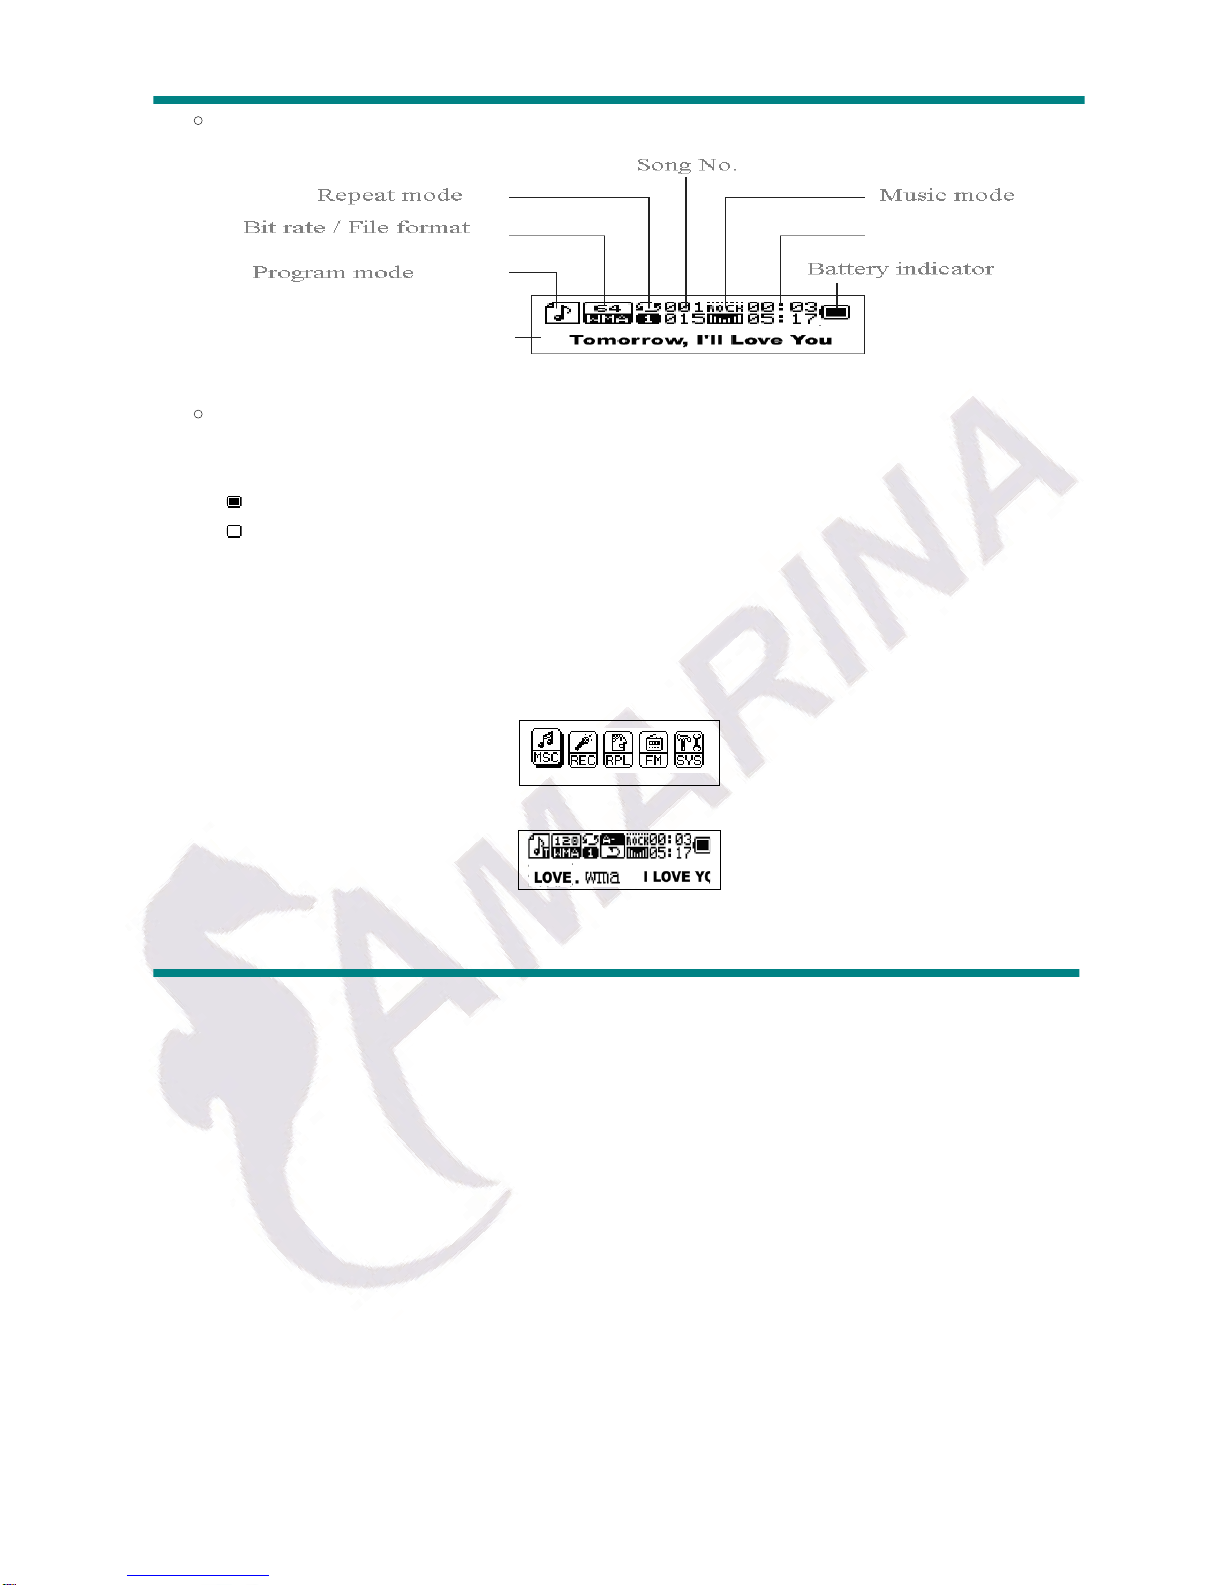
xDisplay screen ................................................................................. 6
xBattery indicator ........................................................................... 6
MAIN FUNCTIONS ....................................................................................... 6
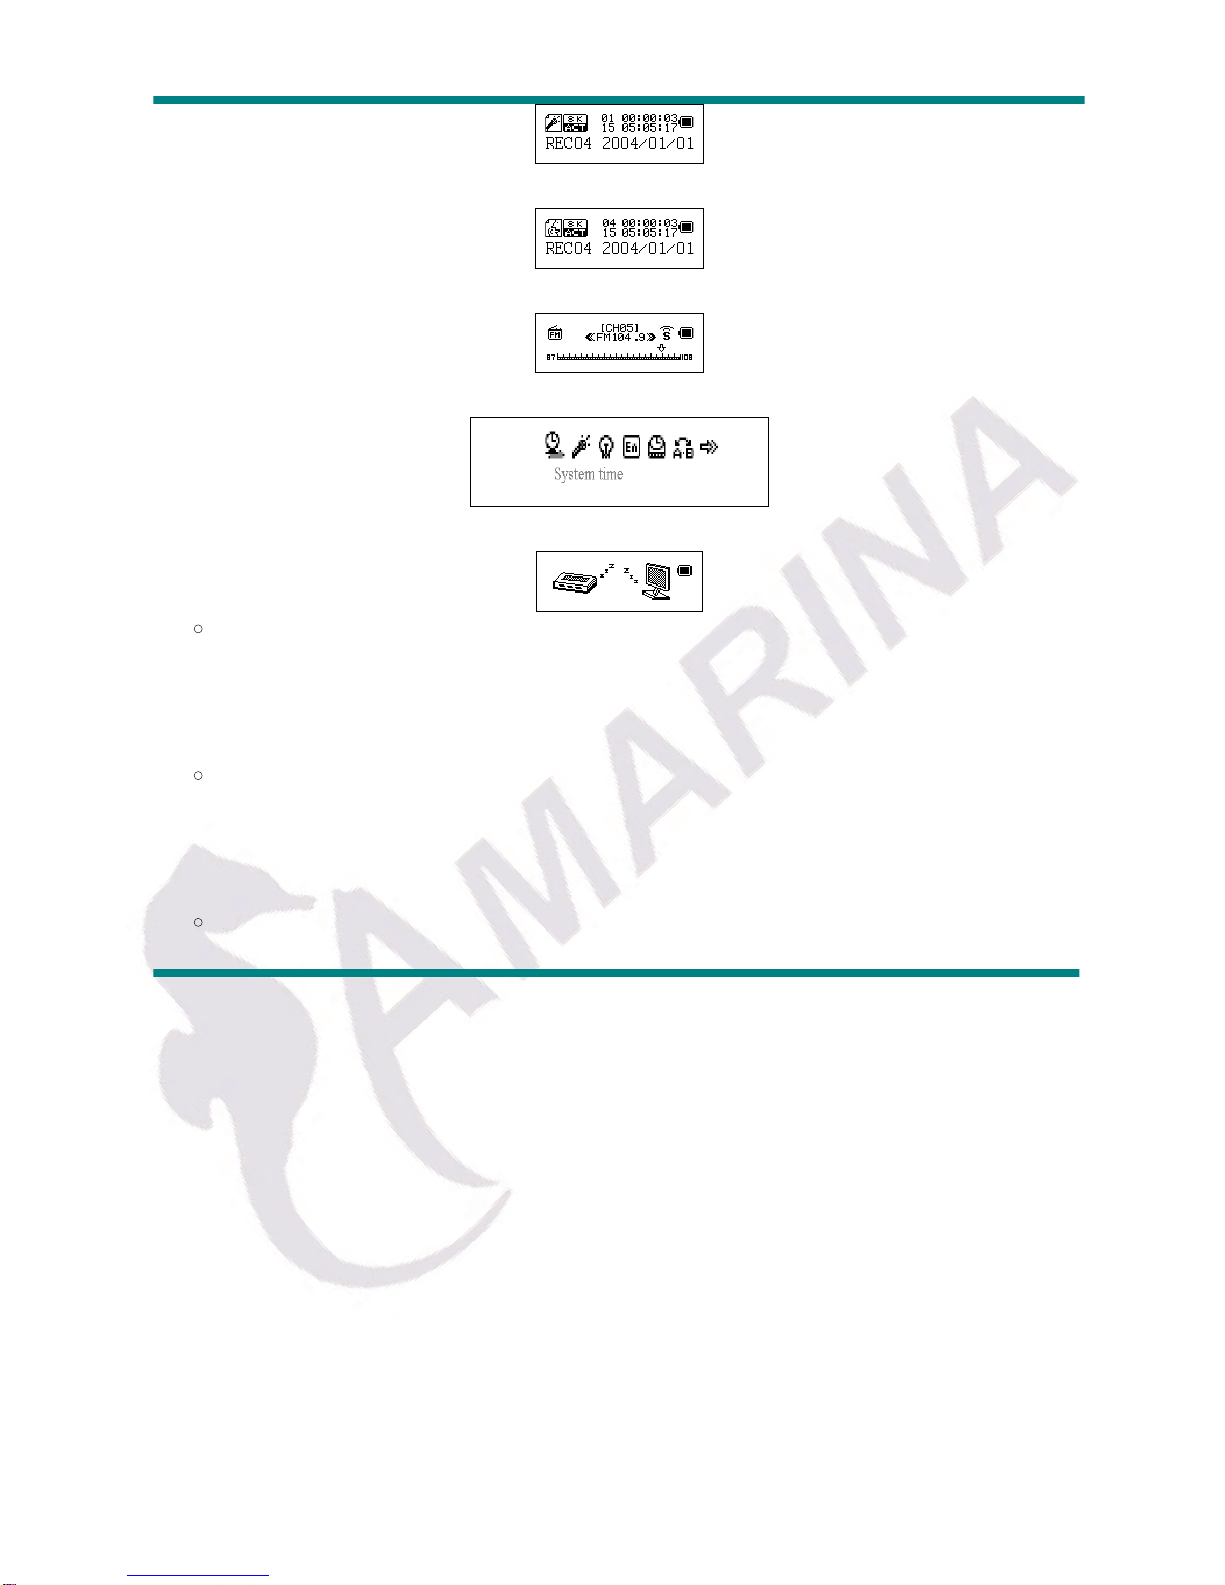
xEnter the menu ................................................................................ 6
xDisplay preview ................................................................................ 6
xVolume adjustment .......................................................................... 7
xPower ON/OFF ................................................................................ 7
xPlay/Pause ...................................................................................... 8
xRecord/Pause ................................................................................. 8
x Music playback…………................................................................ 8
x Display song name ……………….................................................. 8
xVoice recording ................................................................................ 9
R Recording……………………………............................................. 9
R Select record type………………................................................ 10
R Playback Recorded file………………......................................... 11
x .ACT file convert to .WAV……………….......................................... 11
SYSTEM SETTINGS …………………………………..................................... 14
x Entry on system settings …………….............................................. 14
x System settings list ……………….................................................... 14
xSystem settings explanation ............................................................ 15
x Use MP3 player as a USB Disk …................................................ 16
xUpdate MP3 player firmware …....................................................... 17

OTHER SETTINGS …………………………………......................................... 20
xSelect different directory ……………................................................... 20
xDelete file .......................................................................................... 20
xRepeat Mode (Playback submenu) ................................................. 22
x Play speed ………………................................................................... 22
xRepeat Mode ..................................................................................... 23
R A-B Repeat ……………….............................................................. 23
R Compare function ………………………........................................ 24
R Repeat time …………………........................................................ 25
R Repeat interval …………………................................................... 25
x Disk encryption function ………………………....................................... 25
TROUBLESHOOTING …………………………................................................ 28
SPECIFICATIONS …………………………………………….............................. 29

This product represents a new generation of MP3 players supporting MP1, MP2, MP3, WMA,
WAV.
FEATURES SUMMARY
ƔCompact size.
ƔSupports virtually all music file formats such as: MP1,MP2,MP3,WMA,
ƔSupports firmware update.
ƔSupports FM radio. Using Auto-search or manual search, the player can save up to 40
different radio stations. The frequency varies from 87Khz to 108Khz.
ƔNo need to have any driver for Windows 2000 or above. The MP3 player can be used as a
removable USB disk
ƔDisk encrypt and Disk partition. Using the enclosed software tools it is possible to encrypt
and partition the disk space as you like.
ƔRecord/Repeat. With built-in voice recorder the recorded files can be saved in WAV or ACT
file formats. It is possible to mark a recorded segment for subsequent compare or repeat;
useful feature for the language self-study.
ƔEqualizer settings include Natural, Rock, Pop, Classic, Soft, Jazz, DBB
Ɣ7-color backlight display.
ƔMusic repeat modes include Normal, Folder, Repeat one, Repeat folder, Repeat all, Random,
Introduction.
ƔTiming off. Automatic off time and sleep time can be set.

INTRODUCTION
Congratulations on purchasing of this MP3 player! Before starting to use it please, read this
manual carefully. Due to the constant production improvement, the MP3 Player you have
purchased might be slightly different from the one described in this manual.
xButtons and controls definition
- Express Forward; - Express Backward; - Play/Pause
1� “Play/Pause”: Power ON/PLAY/STOP/OFF.
2� “Mode”: General confirmation button.
3� “VOL+”: Increase volume. Speed up.
4� “VOL–”: Decrease volume. Speed down.
5� “Forward”: Next one. Fast Forward. Next
6� “Backward”: Previous one. Fast Backward. Last
7� “USB”: USB plug.
8� “Earphone jack”: Standard earphone connector.
Buttons usage definition
The buttons can be used in 3 different ways:
Press: Press the button then release it immediately.
Long time press: Press and hold the button for about 2 seconds, then release it.
Press and hold: Press and keep holding the button.

xDisplay screen
xBattery indicator
Displays the battery current charging status.
When the battery is fully charged it will be displayed as on the picture (black square).
When the battery is low the square will became empty.
MAIN FUNCTIONS
x Enter the Menu
Press “Mode” button to enter the menu. There is the main menu and lots of submenus.
x Display preview
oThe main menu screen looks like that:
oMusic mode screen:
oRecord mode screen:

oRecording playback mode screen:
oFM mode screen:
oSystem settings screen:
oConnection with PC screen:
xVolume adjustment
Press “VOL+” to increase the volume.
Press “VOL–” to decrease the volume.
xPower ON/OFF
Press and hold “Play/Pause” button to turn the Mp3 player on.
While the MP3 is playing, press and hold the “Play/Pause” to turn the MP3 player
off.
xPlay/Pause

In the Music mode press the “Play/Pause” button to playback the music.
xRecord/Pause
In the Record mode press this button to start or stop recording, press the button for
more than 2 seconds (long time press) to stop the recording.
In any mode press the “Mode” button for 2 seconds (long time press) to enter the
main menu.
x Music playback
Please, follow the steps below
1. Connect your earphone to the earphone jack of the MP3 player.
2. Press the “Play/Pause” button for 2 seconds (long time press) to turn your MP3
player on, enter the Music mode, then press “Play/Pause” again to playback the
music.
3. Select music: Press the button to select the next, to select the previous
one.
4. Volume control: VOL+ : Increase the volume VOL� : Decrease the volume
xDisplay of the song name and song text
This MP3 Player supports “*.LRC” file format song text, with the .LRC file the MP3 player
can display the song text synchronously with the song playback.
oHow to use the song text file (*.LRC)?
The .LRC should have the same file name as the song.
For example:

If the song name is: Love.mp3
Then the song text file should be: Love.lrc
oHow to make sure the MP3 player has recognized the .LRC file with the song text?
The icon in the left corner of the screen during the music playback will look like if
the song has the text, otherwise the icon will look like “ ”.
Below is the example of the screen with the song text:
xVoice recording
The MP3 player can save up to 99 recorded files in its memory.
RRecording
1. Enter the Main menu:
2. Press the ” button to select the record mode.
3. Press the “Mode” button to enter the record mode:
4. Press the “Play/Pause” to start recording.
Recorded file can be saved either in the root directory or in the sub-directory.

If you get the message “Disk full” on the screen, that means there is not enough space to
save the recorded file, you should delete the file to get the space.
If you get the message “Directory full” on the screen, that means that the recorded files
quantity exceeded 99, you should save the recorded file to another directory.
During the recording, only the “Play/Pause” button can be used.
RSelect recording type
1. Enter the Record submenu pressing the “Mode” button
2. Press the “ ” button to select the record type, press “Mode” button to confirm the
choice:
RThe record type can be one of the following:
: Fine Record, .WAV file format, the best quality sound but creates much bigger files.
: Long time record, .act file format, average quality sound.
: High quality voice control recording, .WAV format. In this mode the MP3 will not
record anything if there is no sound around. Recording is performed in .WAV file format for the
best quality sound.
: The same as above but .ACT file format.
5. Press the “Play” button to start recording.

RPlayback the recorded file
1. Enter the main menu.
2. Press the button until you select “RPL”
3. Press the “Mode” button to enter the submenu.
4. Press the “Play” button to start the playback.
5. Press “ /” to select the recorded file.
6. Volume control
VOL+ : Increase volume
VOL� :Decrease volume
xFile recorded in .ACT format can be converted to .WAV
Use the supplied utility software to convert the recorded .ACT file to the .WAV file.
1. Run the “Sound Converter” software utility. You will see the following dialog box:

2. Select the recorded file.
3 .Click “Convert” to create .WAV file.

You can also convert the .WAV file to MP3 format using the same utility.
FM Radio
To use the FM radio please, follow the steps below:
1. Enter the main menu
2. Press the button until you select “FM”
3. Press the “Mode” button to enter the “FM” menu.
4. Auto search for the Radio station
Press the “ /” button for 2 seconds (long time press), the player will auto search for
the next Radio station with the 100KHz increment forward or backward, it will not stop until the
a clear radio station has been found. If you want to cancel the auto search, just press the “
/” button again.
5. Manual search
Press the button to try the next FM frequency backwards
Press the button to try the next FM frequency forwards
6. Save Radio Station
Press the “Mode” button enter the “FM” submenu

Press the “Mode” button to save this radio station.
7. To choose the previously saved radio station
Press the “Play/Pause” button to select and listen to the saved radio station.
8. Volume Control
Press Vol+ or Vol- to increase or decrease the volume.
: You can save up to 20 radio stations in your MP3 player.
: To delete the radio station please refer to the section Delete file below.
SYSTEM SETTINGS
xHow to change the System settings
1. Enter the main menu
2. Press the button to select “SYS”
3. Press “Mode” button to enter the “SYS” system settings submenu.
x The system settings are listed below
(Record Time) Sets the date and time of the recorded files.
(Back Light) Sets the timing of the backlight.
(Back Light Mode) Sets backlight color
(Language) Sets the language
(Power off ) Sets the time of the auto-power off.
(Replay Mode) Sets the Replay mode.

(Contrast) Sets the Contrast of your LCD
(Online Mode) Sets the function of the MP3 removable disk
(Memory Info) Checks capacity of the flash memory
(Firmware Version) Displays the date of the current firmware
version
(Firmware Update) Use this setting for the firmware update
(Exit) Exit the submenu
xSystem settings explanation
ż Setting “Record Time”
1. The screen will look as shown below:
2. Press the “Mode” button to enter the submenu.
The screen will look as shown below:
3. Press “VOL+” (VOL-)to select the date and time.
4. Press the button to increase or press to decrease.
5. Having finished adjusting the time, Press the “Mode” button to confirm.
ż Setting “Back Time”

1.Enter the system settings menu 2. Press the button to
select ”Back time”
3. Press “Mode” enter the setting
as shown below: 4. Press “ /” buttons to
set the time.
5. Press the “Mode” button to
confirm and exit.
ż Setting “Language”. Please, operate in a similar fashion as the “Back time” setting.
ż Setting “Power off“. The same as the “Back time”. There are two settings here:
Off time: Set your auto-off time, the unit is in seconds
Sleep time: Set your sleep mode time, the unit is in minutes, the max setting is 120
minutes.
ż Settings “Replay mode”/ “Contrast”/“Online mode”. The same as the “Back time”.
ż “Memory Info.” Shows the percentage of the disk storage space which is currently used
and free.
ż “Firmware Version”. Displays the current Firmware Version.
ż “Firmware Update”. Use this setting only if you want to perform the firmware update.
Press “Mode” button to confirm your setting, then press “Play/Pause” button to exit the
submenu.

x Use MP3 player as a USB Disk
This MP3 player can be used as a USB disk. There is no need to install any driver (with
exception of Windows 98) under Windows 2000/XP, Mac OS 10.3 or above, Linux Reshat 8.0
or above.
The MP3 player can use the USB port power, so when it is connected to the PC the battery
is not used. If you want to playback the music when MP3 player is connected to the computer,
during the “wait mode” press the “Mode” button, then you will enter the main menu.
After connection with the PC has been established, there are three kinds of MP3 modes which
are shown on the screen in the following way: 2.A file being downloaded1.Waiting status
3. A file being uploaded
xMP3 player firmware update
Your MP3 player can be updated use the utility software supplied with it. To upgrade the
MP3 player firmware please, follow the steps below:

1. Enter the main menu
2. Press the button to select “Sys Set”
3. Press the “Mode” button to enter the “Sys Set” submenu.
4. Press the button to select the “firmware update”, then press the “Mode” button to
enter the submenu.
5. Connect your MP3 player to PC.
6. Run“MP3 Player Update” utility
8. Select the new firmware file (you can download it from the www.gembird.nl website)

9. Click the “Begin Upgrading” button to update the player.
If update is successful the mp3 player will display the following:
Other manuals for LECTEUR MOBILITY CLASSIC MP3
1
Table of contents
Other Amarina MP3 Player manuals