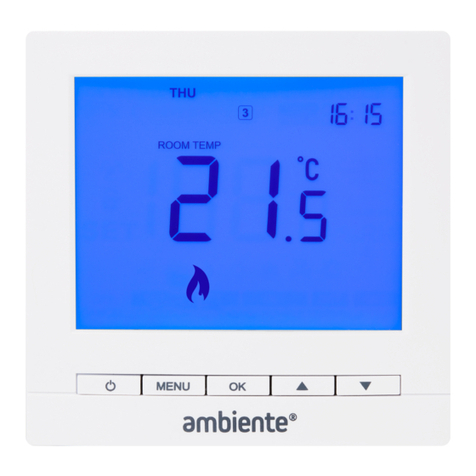
Ambiente LUNASTAT V2 User manual

AMBIENTE LUNASTAT V2 | 43521

2CONTENTS
TABLE OF CONTENTS
What is the LunaStat? 3
Installation procedure 7
Setting program mode 8
Programmable mode 10
LCD display 11
Setting the clock 13
Change/check temperature 14
Schedule and comfort
settings
15
Setting the holiday mode 17
Setting the hold mode 18
Optimum start 19
Non-programmable mode 20
LCD display 21
Change/check temperature 23
Setting the hold mode 24
Setback thermostat mode 25
LCD display 26
Change/check temperature 28
Setback temperature 29
Other features available 30
Frost protection 30
Keypad lock 30
Floor limit protection 30
Single channel timer 31
LCD display 32
Setting the clock 34
Setting timer times 35
Setting the holiday mode 38
Setting the hold mode 39
Overriding timer o 39
Factory reset 40
Optional features explained 41
Changing optional features 44
Optional features table 45
Error codes 47
Wiring diagrams 48

3
WHAT IS THE LUNASTAT?
The LunaStat is a multi-function thermostat/timer for any part of
your heating or hot water system where thermostatic or
programmable control is required
The LunaStat consists of three main modes:
1. Standalone programmable/non-programmable thermostat
2. Setback thermostat with central programmer
3. Single channel timer
WHAT IS THE LUNASTAT?

4
PROGRAMMABLE/NON-PROGRAMMABLE THERMOSTAT
1. PROGRAMMABLE/NON-PROGRAMMABLE THERMOSTAT
The LunaStat operates by itself as independent control to the
rest of the heating system as a thermostat in either
programmable or non-programmable operation.
A. Non-programmable – operates as a simple thermostat where
the temperature is held at the set point continuously.
B. Programmable – operates as a fully programmable thermostat
with 4 times at which to set a target temperature. This enables
you to regulate the temperature in your home by setting
specific temperatures for times of day.
This way the thermostat doesn’t operate the heating as On/Off
but as an Up/Down control to the specific temperatures you set
on your LunaStat.
This enables you to have intricate control in each room creating
a micro climate in different areas of your home and regulating
the temperature for night, for when your home is unoccupied,
or even when individual rooms are unoccupied or not used.

5
SETBACK THERMOSTAT WITH CENTRAL PROGRAMMER
2. SETBACK THERMOSTAT WITH CENTRAL PROGRAMMER
The LunaStat operates as temperature control on a room by
room basis in conjunction with a single programmer (supplied
separately) providing central timed control for larger areas or
whole houses.
The LunaStat is set to non-programmable and maintains the
temperature at the set point whilst the programmer is on. When
the programmer is off the LunaStat automatically drops the set
temperature by up to 5oC for example during the night or whilst
the property is unoccupied.
This enables the operation of an efficient system with simple to
use thermostat and central programmer rather than multiple
thermostats that need programming one at a time.

6
SINGLE CHANNEL TIMER
3. SINGLE CHANNEL TIMER
The LunaStat operates by itself as 8am independent timer
control for any part of your heating or hot water system.
This enables you to have accurate timer control of your heating
and hot water system, with the LunaStat ensuring the system
operates at the time you require and set, available in 5 minute
increments.

7
INSTALLATION PROCEDURE
Care should be taken on where the LunaStat is installed as being the
ultimate control of your heating it is important that it is not installed
near any secondary hot or cold sources. The LunaStat should be
installed at chest/eye level and where it will receive an even reading
of the temperature of the room. It should be installed out of direct
sunlight, away from draft or heat sources such as airing cupboards.
The LunaStat is designed to be mounted flush and will require an
electrical back box with a depth of at least 35mm.
INSTALLATION PROCEDURE
Step 1
Separate the two halves of the
thermostat by using a small flat
screwdriver to disengage the
clips in the top edge of the
LunaStat.
Step 2
Ensure that the front (Screen)
part of the thermostat is kept
somewhere safe and clean.
Terminate the cable for the
thermostat in accordance with
wiring diagrams on pages 48-51.
Step 3
Fix the thermostat back plate
back to the back box with the
screws provided, ensuring this
is secure.
Step 4
Clip the front on to the back
plate engaging the bottom
clips first.

8
SETTING YOUR PROGRAM MODE SELECTION
This LunaStat has been set by default to a programmable
thermostat in 5+2 day programming (Weekdays + Weekend).
To change between programmable, non-programmable,
setback thermostat and single channel timer follow these steps.
1. Press and hold the button to turn the screen off
2. Press and hold MENU until the ‘SET SETUP’ main menu item
flashes.
3. Press OK 5 times or until the small digit shows ‘05’.
4. Press to change the large number for the following modes
• 00 – Non-programmable/setback thermostat
• 01 – Weekday/Weekend programmable
• 02 – 7 day programmable
5. Press OK 10 times or until the small digit shows ‘15’.
6. Press to change the large number for the following modes
• 00 – Setback thermostat disabled
• 01 – Setback thermostat enabled (non-programmable only)

9
SETTING YOUR PROGRAM MODE SELECTION
7. Press OK 2 times, or until the small digit shows ’17’
8. Press to change the large number for the following modes
• 00 – Thermostat
• 01 – Timer
9. Press button to return to the home screen.

10 PROGRAMMABLE MODE (5+2 AND 7 DAY)
PROGRAMMABLE MODE (5+2 AND 7 DAY)

11
LCD DISPLAY
1 2 3 4
7
8
10
14
12
16
15
13
11
9
6
5
PROGRAMMABLE MODE (5+2 AND 7 DAY)

12
PROGRAMMABLE MODE (5+2 AND 7 DAY)
LCD DISPLAY
1. Day of the week – Displays the current day.
2. Temperature unit – Degrees Celsius (oC) or Fahrenheit (oF).
3. Hold left indicator – Displays when the HOLD FOR function is
active along with the hours of hold remaining.
4. Holiday left indicator – Displays when the holiday function is
active along with the number of days remaining.
5. Time period – Displays the current program period as set in
the program of the thermostat.
6. Room/floor Temperature – Indicates the current sensor set up
and point of temperature measurement.
7. Time – Displays the current time in 24 or 12 hour format.
8. Copy function – Enables the copying of times between days.
9. Keypad lock – Displays when the keypad is locked.
10. Override – Displays when a temporary override is set.
11. SET – Displays when any program or parameter is being
changed.
12. Temperature – Displays the current sensor temperature.
13. Frost shield – Displays when the thermostat is in frost
protection mode.

13
LCD DISPLAY
13. Frost shield – Displays when the thermostat is in frost
protection mode.
14. Flame symbol – Displays when the thermostat is calling
for heat.
15. Floor protection – Displays when the floor limit temperature
is reached.
16. Main menu – Displays when setting schedule and feature
parameters.
PROGRAMMABLE MODE (5+2 AND 7 DAY)
SETTING THE CLOCK
To set/change the clock and day follow these steps. This is not
applicable if the thermostat is in non-program mode.
1. Press MENU so the ‘SET CLOCK’ main menu item flashes.
2. Press OK to confirm. The current hour will flash
3. Press to change the hour and press OK.
4. Press to change the minute and press OK.
5. Press to change the day and press OK.
6. Press MENU to save the change and the button to return to
the home screen.

14 CHANGE/CHECK THE TEMPERATURE SETTINGS
To set/change the temperature (temporary override) follow
these steps. Note, this only changes the temperature until the
next program time.
1. Press once to view the current temperature setting.
2. Press repeatedly to change the thermostat in increments
of 0.5oC.
3. Press OK to save the new temperature and return to the home
screen. The thermostat will display ‘OVERRIDE’ to confirm a
different temperature has been set.
The symbol will show when the thermostat is calling for heat.
If a floor sensor has been installed this temperature can be
checked by pressing and holding the ‘OK’ button. The
thermostat will return to the home screen after 10 seconds.
You can also change the temperature this way in the Frost,
Holiday and Hold modes.
PROGRAMMABLE MODE (5+2 AND 7 DAY)

15
PROGRAMMABLE MODE (5+2 AND 7 DAY)
SCHEDULE AND COMFORT SETTINGS
The LunaStat comes pre-programmed with comfort levels set.
These factory default settings are:
To set/change the program comfort levels follow these steps.
1. Press MENU to display the main menu items.
2. Press MENU until the ‘SCHEDULE’ main menu item flashes.
3. Press OK to confirm. ‘MON ~ FRI’ will flash.
4. Press to select different day(s) and press OK.
• ‘Period 1’ is displayed and the corresponding hour flashes.
Weekday and weekend – 5/2 day programming
Mon-Fri 5.30-20oC 8.00-16oC 16.00-20oC 22.00-16oC
Sat-Sun 6.30-20oC 9.00-16oC 16.00-20oC 23.00-16oC
Monday to Sunday – 7 day programming
Mon-Sun 5.30-20oC8.00-16oC16.00-20oC22.00-16oC

16 SCHEDULE AND COMFORT SETTINGS
5. Press to change the hour for ‘Period 1’.
6. Press OK to confirm and minute for ‘Period 1’ flashes.
7. Press to change the minute for ‘Period 1’.
8. Press OK to confirm and temperature for ‘Period 1’ flashes.
9. Press to change the temperature for ‘Period 1’.
10. Press OK to confirm.
• ‘Period 2’ is displayed and the corresponding hour flashes.
11. Repeat steps 5 to 10 for Periods 2, 3 & 4.
12. After pressing OK for ‘Period 4’, ‘COPY TO’ will flash.
a. Press to cancel copy function and set other days manually.
b. Press OK to apply copy function.
Note: When set to 5+2 day programming, pressing OK skips
points c and d.
c. Press to select a day, press to deselect a day.
Note: Selected days are shown without flashing.
d. Press OK to save the copy and LunaStat returns to main menu.
13. Repeat steps 2-12 to set and/or copy further days.
14. Press MENU to save the change and the button to return to
the home screen.
PROGRAMMABLE MODE (5+2 AND 7 DAY)

17
PROGRAMMABLE MODE (5+2 AND 7 DAY)
SETTING THE HOLIDAY MODE
To set/change the holiday mode follow these steps (this is not
applicable in non-programmable mode.)
1. Press MENU until the ‘SET HOLIDAY’ main menu item flashes.
2. Press OK to confirm. The ‘HOLIDAY LEFT’ symbol will show
and the number of days will flash.
3. Press to change the number of days the holiday should be
set for (Note: Holiday starts from 00:00 of the next day and
ends on 23:59 of the last day).
4. Press OK to confirm and the temperature for the holiday
will flash.
5. Press to change the temperature for the holiday period.
6. Press MENU to save the holiday and the button to return to
the home screen.
Note:
Setting holiday mode will remove any hold mode set -
see page 18.

18
PROGRAMMABLE MODE (5+2 AND 7 DAY)
SETTING THE HOLD MODE
To set/change the hold mode follow these steps. Note: This
function is also applicable in non-programmable mode.
1. Press MENU until the ‘SET HOLD’ main menu item flashes.
2. Press OK to confirm. The ‘HOLD LEFT’ symbol will show and
the number of hours flash.
3. Press to change the number of hours the hold should be
set for.
4. Press OK to confirm and the temperature for the hold period
flashes.
5. Press to change the temperature for the hold period.
6. Press MENU to save hold period and the button to return to
the home screen.
Note:
Hold mode cannot be set if there is a holiday mode
already set
.

19
PROGRAMMABLE MODE (5+2 AND 7 DAY)
OPTIMUM START
The LunaStat will typically turn the heating on at the time set in
the program. With the optimum start feature enabled the
LunaStat will display a flashing symbol and turn the heating on
beforehand in order to reach the required temperature for the
time set. See page 41 for further details and page 44 for details
on enabling this optional feature.

20
NON-PROGRAMMABLE MODE
This manual suits for next models
1
Table of contents
Other Ambiente Thermostat manuals
Popular Thermostat manuals by other brands

Danfoss
Danfoss ST-D1 installation guide

nest
nest Learning Installation & configuration guide

HomeMatic
HomeMatic HmIP-eTRV-B Mounting instruction and operating manual

Beok Controls
Beok Controls TDS21 quick guide

Honeywell Home
Honeywell Home CG511A1000 Quick installation guide

Tekmar
Tekmar 562 Installation & operation manual