American Gardener YE75 User manual

Instruction Manual for Electric Edger
ReadyEdger™
Model: YE75
BEFORE RETURNING THIS PRODUCT FOR ANY REASON
PLEASE FIRST CALL 1-800-637-2867.
IN MOST CASES AN AMERICAN GARDENER
REPRESENATIVE WILL BE ABLE TO HELP YOU SOLVE
YOUR ISSUE OVER THE PHONE.
IMPORTANT OPERATING HINTS:
•To ensure a tight electrical connection, utilize cord-
retention holder (see Operations Section).
•When starting unit, first push in the safety switch
and then squeeze the main trigger. It is NOT neces-
sary to keep the safety switch pushed in during use.
•Stay to the left and behind the edger when in use.
The edger will push clippings and other debris for-
ward, away from the user.
•This is a powerful cutting tool. Be AWARE of your
surroundings.
CAUTION:
Before using this product, read this manual and follow
all its Safety Rules and Operating Instructions.
American Gardener, Duluth, GA 30096
1 (800) 637-2867 - American-Gardener.com
2
TABLE OF CONTENTS:
Warranty…………………………………………………………………... 2
Safety Instructions……………………………………………………….. 2
Assembly………………………………………………………………….. 5
Operation……………………………………………………………….…. 6
Maintenance…………………………………………………………….… 9
Storage……………………………………………………………………. 9
Service…………………………………………………………………..… 9
Troubleshooting………………………………………………………….. 10
Español……………………………………………………………………. 11
READ ALL INSTRUCTIONS BEFORE OPERATING TOOL
SAFETY INSTRUCTIONS
WARNING TO CALIFORNIA RESIDENTS: Handling the cord on this units (or
cords with accessories sold for this product) will expose you to lead, a chemical
known to the State of California to cause cancer, and birth defects or other repro-
ductive harm. Please wash hands after handling the cord.
WARNING: Certain dusts created when using lawn and garden power tools contain
chemicals that are known to cause cancer, birth defects, or other reproductive
harm. Examples of these chemicals are: compounds in fertilizers, compounds in
insecticides, herbicides, and pesticides, arsenic and chromium from chemically
treated wood products and crystalline silica from sand, bricks, and other masonry
dust.
The health risk from these chemicals varies based on working environment and
frequency and length of exposure. To limit exposure to these chemicals, please
Two Year Warranty on American Gardener ReadyEdge
r
™
During normal residential use, if this ReadyEdger™fails due to a defect in
material or workmanship within two years from the date of purchase,
American Gardener, at its sole discretion, will repair or replace the unit
free of charge.
For warranty services or questions please call (800) 637-2867.
This warranty applies only while this ReadyEdger™is used in the United
States.
The warranty does not cover components that are subject to normal wear,
such as the batteries and edger blade. It also does not cover abuse, mis-
use, or use of the product in a commercial setting. Replacement parts are
available for purchase from the retailer you bought your product from, or
by calling us at (800) 637-2867 or visiting our web site at www.american-
gardener.com.
Please read and follow the instructions for this product carefully.
This warranty gives you specific legal rights, and you may also have other
rights, which vary from state to state.

3
follow product instructions when applying or working with fertilizers, insecticides,
herbicides, and pesticides. When using the edger, always wear safety glasses and
gloves and dust masks that are designed to filter out microscopic materials.
SAVE THIS MANUAL FOR FUTURE REFERENCE
WARNING: When using this tool, basic safety precautions should always be fol-
lowed to reduce the risk of fire, electric shock, and personal injury, including the
following:
To reduce risk of injury:
•Before any use, be sure everyone using this electric product reads and under-
stands all safety and operation instructions contained in this manual.
•Save these instructions and review frequently prior to use.
•AVOID DANGEROUS ENVIRONMENTS and weather conditions when using this
tool.
•DO NOT USE IN RAIN.
•KEEP CHILDREN AWAY – All visitors should be kept at a safe distance from
work area.
•STORE IDLE UNIT INDOORS - When not in use, the unit should be stored in-
doors in a dry location – out of reach of children.
•DON’T FORCE THE TOOL – It will do the job better and with less likelihood of a
risk of injury at the rate for which it was designed.
•USE RIGHT TOOL – Do not use the tool for any job except that for which it is
intended.
ELECTRICAL SAFETY WARNINGS AND INFORMATION
•This tool is double-insulated – repair or replace damaged cords.
•Since this tool is double-insulated, a two wire extension cord (an extension cord
without a ground) may be used. A three-wire extension cord (an extension cord
with a ground) that uses a NEMA type connector (parallel blade, U ground) is
recommended. Use only round-jacketed extension cords approved for outdoor
use.
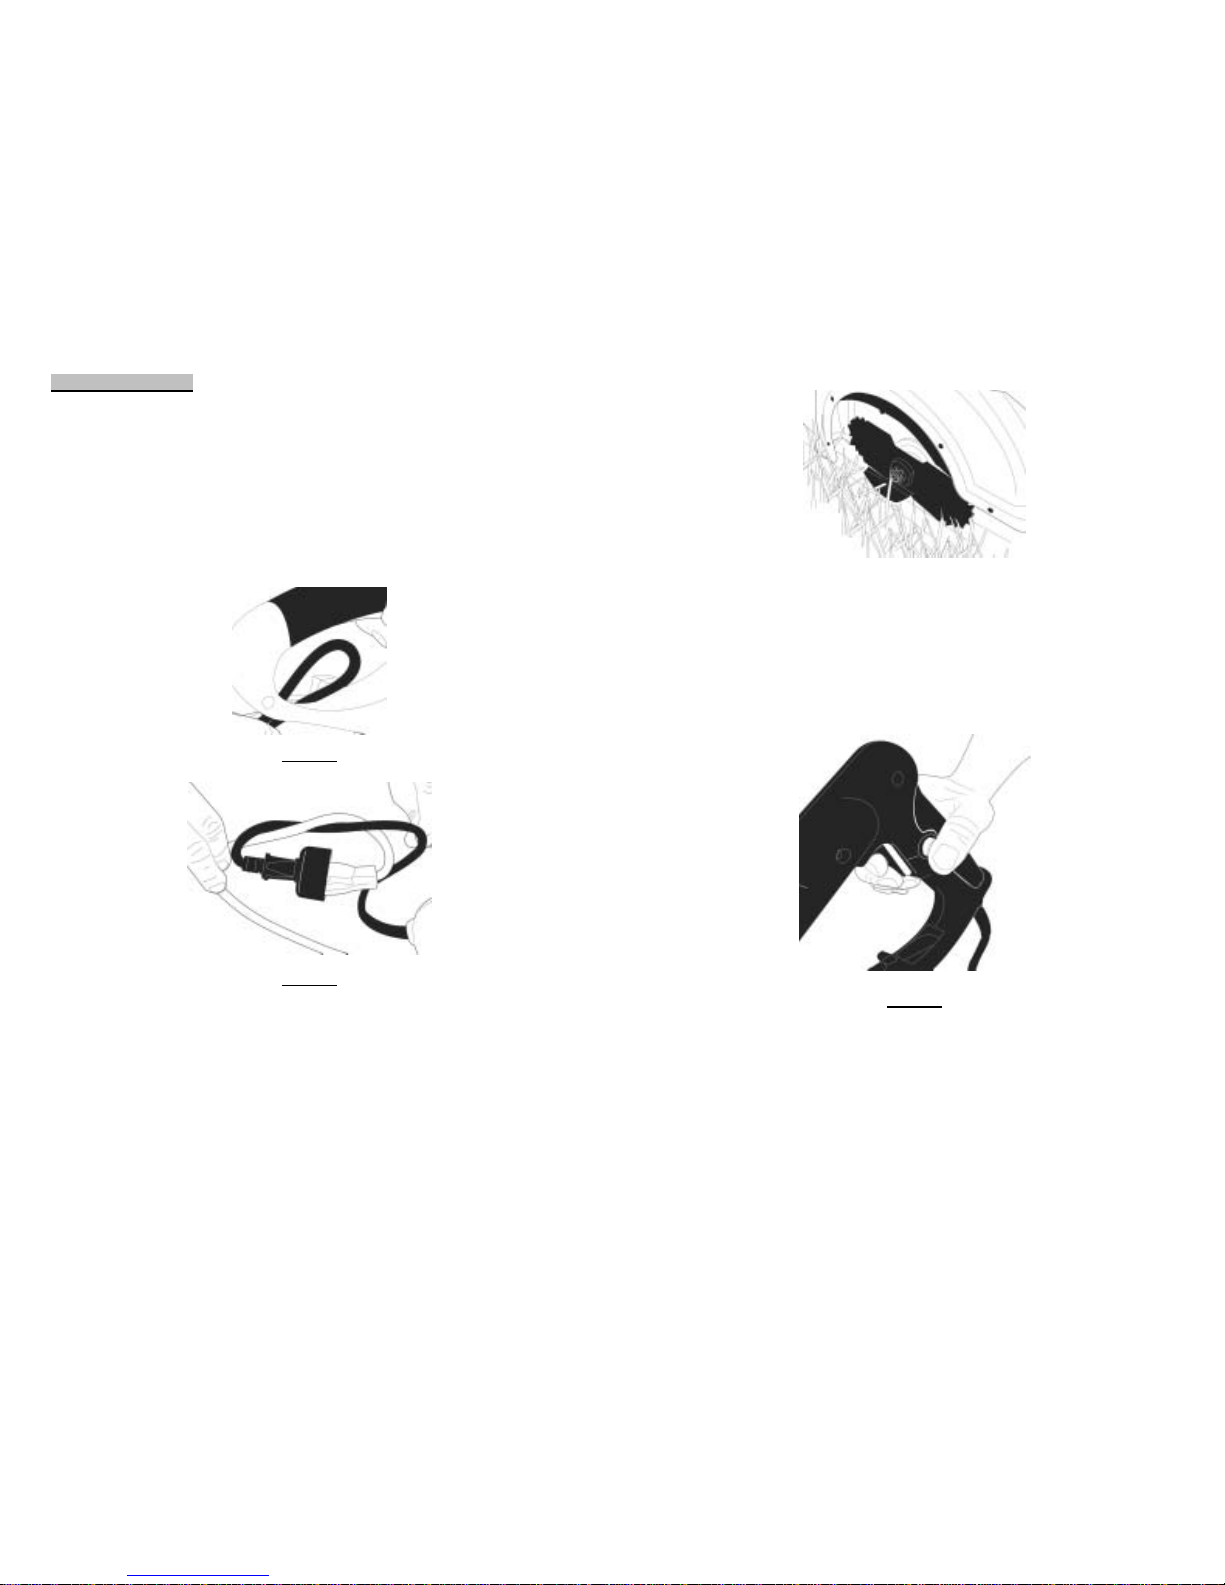
•To reduce risk of electric shock, this unit has a polarized plug (one blade is wider
than the other). This unit will fit with a polarized plug only one way. If the exten-
sion cord plug will not completely fit on the units plug, reverse the plug. If the ex-
tension cord will still not fit, use an extension cord with the proper polarized con-
nection. Do not alter the unit’s plug or extension cord in any way.
•A nameplate on the unit will indicate the voltage used. This information is
needed to determine the wire size (AWG) of the extension cord you should use.
Never connect the unit to an AC voltage that differs from this voltage.
•WARNING: To reduce the risk of electric shock, use the unit only with an exten-
sion cord intended for outdoor use, such as SW-A, STW-A, STOW-A, SJW-A,
SJOW-A, SJTW-A, or SJTOW-A cord types.
MINIMUM WIRE SIZE FOR EXTENSION CORDS FOR 120 VOLT APPLIANCES
USING 0-12 AMPS
Cord length 25 50 100 150
*Wire Size (AWG) 16 16 16 14
*The wire size (AWG) for 120-Volt appliances using 12-16 amps is 14 AWG for 25
feet, 12 AWG for 50 feet, and NOT RECOMMENDED for 100 or 150 feet.
4
•GROUND FAULT CIRCUIT INTERRUPTER (GFCI) PROTECTION should be
provided on the circuits(s) or outlet(s) to be used for the edger. Use receptacles
with built-in GFCI protection for an extra measure of safety.
•CORD SETS: Make sure the cord on the unit and the extension cord are in good
condition. The extension cord should be heavy enough to carry the current the
unit will draw. An undersized cord will cause a drop in line voltage that will cause
the unit to loose power and overheat. The above table shows the correct exten-
sion cord sized based on the cord length and nameplate ampere rating. If you
are not sure what cord size to use, use the next heavier size line gauge. The
smaller the gauge number, the heavier the cord.
•DO NOT ABUSE THE CORD – Never carry the unit by its cord or pull on it to
disconnect it from the receptacle. Keep the cord away from heat, oil, and sharp
edges and corners.
•ROUTINELY INSPECT CORDS - Routinely inspect the units cord as well as the
extension cord used. Look for cuts, nicks, or cracks in the cords insulation. Also
inspect the connections to see if they are bent or broken. Repair or replace cords
if any defects appear.
OPERATIONAL SAFETY WARNINGS
•CLEAR WORK AREA: Use of this edger may cause debris such as stones, dirt,
wood, or metal to be propelled at a high rate of speed. Be sure work area is clear
of other persons and pets when using the edger.
•STAY CLEAR OF BLADE: Always stand to the left of the unit when using to
avoid being hit by debris from the blade.
•CHECK FOR BURIED CABLES BEFORE USE: Before edging or trenching with
this product, be sure to inspect area for any buried electrical or other cables.
•AVOID HITTING CURBS, TREES, WALLS, ROCKS, SIDEWALKS AND
OTHER SOLID OBJECTS WITH EDGER WHILE USING.
•DANGER: KEEP HANDS, FEET AND ALL BODY PARTS AWAY from the
blade.
•CAUTION: Blade coasts after the unit is turned off. Unplug unit and wait for
blade to come to a complete stop before placing hands or feet near the blade.
•DRESS PROPERLY – Wear long pants to shield legs when using edger. Use of
gloves and substantial hard toed footwear is recommended when working out-
doors.
•DON’T OVERREACH – Maintain proper footing and balance at all times. Use
both hands to operate unit safely.
•USE SAFETY GLASSES – Always wear proper eye protection and use a face or
dust mask.
•MAINTAIN UNIT WITH CARE – Keep the unit clean for best performance and to
reduce the risk of injury. Follow instructions for service. Keep handles dry, clean,
and free from oil and grease.
•UNINTENTIONAL STARTING – Don’t hold the switch area while carrying the unit
while it is plugged in. This may cause it to start inadvertently if not handled prop-
erly. Be sure the switch is in the off position when plugging in the unit.
•CHECK DAMAGED PARTS – If the unit experiences a hard impact, check that
no parts were damaged and verify that the unit operates properly. Check for mis-
alignment or bending of moving parts, breakage of parts, and any other condition
that may affect operation. A part that is damaged should be properly repaired or
replaced by an authorized service center.
•STAY ALERT – Pay attention to what you are doing and the position of the unit’s
blade. Use common sense. Do not operate the tool when you are tired.

5
•DON’T GRASP THE EXPOSED EDGING BLADE when picking up or holding the
unit. Do not attempt to remove dirt or debris when the blade is moving. Make sure
the unit’s switch is off when clearing jammed material from blade area.
•USE BOTH HANDS TO OPERATE THE UNIT. Keep one hand on the trigger
handle and the other on the front accessory handle. NEVER use the unit’s guard
as a handle.
•STOP THE MOTOR WHEN THE UNIT BECOMES ENTANGLED WITH A FOR-
EIGN OBJECT. Inspect for damage. Do not operate with loose or damaged
parts.
•UNPLUG UNIT – while cleaning debris and during other maintenance or repair.
•KEEP INSTRUCTIONS AND REFER TO THEM OFTEN. If you loan this tool to
someone please also loan them these instructions so they may safely understand
how to use this unit.
SAVE THESE INSTRUCTIONS
ASSEMBLY
1. Remove the Edger and all its parts from the packaging.
NOTE: The shaft of the edger MUST be extended before attempting to as-
semble the shaft to the motor housing. This will draw the excess wire up into
the shaft and will allow the shaft to be fully inserted into the motor housing.
Figure-1
2. Chromed Shaft Extension – Pull the smaller diameter shaft out to extend
the shaft to full-length. See Figure 1. The cord will feed through the
smaller shaft. Secure the shaft in ONE of THREE height settings with a
screw and “handle”-nut.
Figure-2
6
3. Shaft-to-Edger Connection – Insert the end of the shaft into the socket in
the motor housing. See figure 2. Twist the shaft back and forth while
pushing firmly until the shaft is fully seated. Make sure the holes in the
motor housing line up with the holes in the shaft. Secure the shaft to the
motor housing with the bolt and locking-nut using the tools included. See
Figure 3.
Figure-3
4. Front Handle Assembly – Line up front handle as shown in Figure 4,
then push handle onto upper assembly so the holes line up. Secure the
shaft with the screw and plastic knob.
Figure-4
OPERATIONS
ATTACHING EXTENSION CORD
The unit has an extension cord retainer built into the back of the housing that will
help keep the extension cord from becoming unplugged from the unit during use.
To use the cord retainer: Create a loop of the extension cord and feed it through
the slot in the housing. See Figure 5. The extension cord loop should hook over
the tab on the housing. Slightly pull on the extension cord loop so that it tightens
around the hook. Once the cord is retained in the handle, plug the receptacle end
of the cord into the pigtail cord of the trimmer. If your extension cord is too big to fit
in the cord retainer, you can securely fasten the cord by tying it in a knot with the
pigtail cord as shown in Figure 6.

7
Figure-5
Figure-6
EDGING DEPTH
DANGER – Never attempt to adjust the depth while the edger is running.
The ReadyEdger™ can be adjusted to edge at three different depths. To adjust the
depth of the cut, loosen the knob on the left front of the edger and move the front
wheel up or down to the desired depth setting (see depth indicator label). Then,
retighten the knob securely.
EDGE GUIDE
The ReadyEdger™ is equipped with a fixed edge guide that makes it easy to follow
a sidewalk or curb.
CAUTION – Make sure the edger blade will only contact dirt before turning on.
8
TURNING THE READYEDGER™ ON
Once the unit is plugged in and you are ready to start edging simply push the unit’s
safety trigger in with your thumb while pulling up on the trigger (under the handle)
with your fingers. See Figure 7. The thumb safety switch is only for starting the
unit and can be released during edging. To turn off the unit, release the trigger
and the safety switch will snap out to prevent the trigger switch from being acciden-
tally depressed.
Figure-7
EDGING INSTRUCTIONS AND TECHNIQUES
•Always keep the extension-cord away from the area being edged. Make sure
the extension cord is behind the edger. If you cut or damage the cord, unplug
it immediately. AFTER the cord is unplugged, inspect it for damage and repair
or replace it if necessary.
•Maintain proper balance at all times. Keep hands away from blades. Wear eye
protection when using the unit. Hold the trimmer firmly with both hands and
turn ON.
•Do not use the edger with wet growth or in the rain.
CAUTION: If the edger becomes jammed or stalled on a branch, sticks, or foreign
object, release the trigger immediately. Failure to stop the unit when the unit jams
may cause excessive damage to the unit’s motor.
Clearing Jams
After the blade has completely stopped, carefully remove the obstruction
CAUTION: To prevent injury, keep hands away from trigger during clearing of jams.
To prevent injury, do not use the ReadyEdger™with any damaged parts. If issues
continue, call the customer service at: 1-800-637-2867
REMEMBER THAT THE BLADE COASTS AFTER THE UNIT IS TURNED OFF!

9
MAINTENANCE
CAUTION: To prevent injury, always unplug the edger before performing mainte-
nance such as cleaning or changing the blade.
BLADE CLEANING – After you have finished edging, you may find that dirt and
vegetation have accumulated on the blade. Use a dry scrub brush to clean debris
off of blades. WARNING: To prevent injury, keep hands away from the trigger dur-
ing cleaning of blade or other edger parts.
BLADE CHANGE/TURN – The ReadyEdger™ comes with a DOUBLE-SIDED
BLADE that can be flipped over to effectively double the life of the blade. To
change or flip the blade, use the large wrench (included) to hold the blade retainer
while loosing the lock nut with the smaller wrench (included) by turning counter-
clockwise. Either change or flip the blade, put the blade retainer in place on the
shaft and secure in place with the lock nut by tightening in a clockwise direction.
CLEANING OF PLASTIC PARTS – Use only a dry brush or a cloth with warm wa-
ter and mild soap to clean plastic parts. Many household cleaners contain chemi-
cals, which could damage the plastic. Never use gasoline, turpentine, paint thinner
or similar fluids. Never spray-wash tool or immerse in water. Water or liquid inside
the tool can cause serious damage to the unit.
DROPPING THE UNIT – If you drop the unit, carefully inspect it for any damage
before using it again.
STORAGE
PREVENTING CORROSION – Fertilizers and other garden chemicals contain
compounds that greatly accelerate the corrosion of metals. Do not store the unit on
or adjacent to fertilizers or chemicals.
Keep the unit stored in a place that is away from children. The blades on the unit
are sharp and can be dangerous even when the unit is not plugged in.
SERVICE
Two Year Warranty on American Gardener ReadyEdger™
During normal residential use, if this ReadyEdger™fails due to a defect in material
or workmanship within two years from the date of purchase, American Gardener, at
its sole discretion, will repair or replace the unit free of charge.
For warranty services or questions please call (800) 637-2867.
This warranty applies only while this ReadyEdger™is used in the United States.
The warranty does not cover components that are subject to normal wear, such as
the batteries and edger blade. It also does not cover abuse, misuse, or use of the
product in a commercial setting. Replacement parts are available for purchase
from the retailer you bought your product from, or by calling us at (800) 637-2867 or
visiting our web site at www.american-gardener.com.
Please read and follow the instructions for this product carefully.
10
This warranty gives you specific legal rights, and you may also have other rights,
which vary from state to state.
DROPPING THE UNIT – If you drop the unit, carefully inspect it for any damage
before using it again.
If you see any condition that may affect safe operation, or if you have any ques-
tions, contact our customer service number at: 1-800- 637-2867.
TROUBLE SHOOTING
Problem: Thumb safety switch is too difficult to hold on during use.
Solution: The thumb safety switch need only be engaged when starting the unit.
There is no need to keep safety thumb switch in the forward position while using the
product.
Problem: Unit will not operate .
Solution: Make sure that all of the connections are properly made between the unit,
the extension cord, and the rectable. If the rectable has Ground Fault Circuit
Interrupter (GFCI) protection, make sure that it is working properly and is in the “on”
position.
Problem: Motor seems to be running slow
Solution: You may need to use a heavier gauge (AWG) extension cord. Please
refer to the information on Page 3 of this manual concerning proper extension cord
wire size.

11
Manual de Instrucciones para Bordeadora Eléctrica
ReadyEdger™
Modelo: YE75
ANTES DE DEVOLVER ESTE PRODUCTO POR
CUALQUIER RAZÓN, POR FAVOR LLAME AL 1-800-637-
2867.
EN LA MAYORÍA DE LOS CASOS, UN REPRESENTANTE
DE AMERICAN GARDENER PODRÁ RESOLVER SU
PROBLEMA POR TELÉFONO.
CONSEJOS IMPORTANTES DE FUNCIONAMIENTO:
•Para asegurar la conexión eléctrica, use el
retenedor del cable (vea Sección de
Funcionamiento).
•Cuando encienda la unidad, debe primero empujar
el seguro hacia el frente y luego presionar el gatillo
(vea la Figura). No es necesario mantener el
seguro presionado durante el uso.
•Esté a la izquierda y detrás de la bordeadora
cuando la use. Ésta empujará los desperdicios
hacia adelante, alejándolos del usuario.
•Esta herramienta es poderosa. Esté PENDIENTE a
su entorno.
PRECAUCIÓN:
Lea el manual antes de usar el producto y siga las reglas
de seguridad y las instrucciones de funcionamiento.
American Gardener, Duluth, GA 30096
1 (800) 637-2867 - American-Gardener.com
12
LEA TODAS LAS INSTRUCCIONES ANTES DE USAR LA
HERRAMIENTA
INSTRUCCIONES DE SEGURIDAD
ADVERTENCIA A RESIDENTES DE CALIFORNIA: Manejar el cable de
este producto (o los cables de accesorios vendidos para este producto) le
expondrá al plomo, una sustancia que el Estado de California reconoce como
causante de cáncer, defectos de nacimiento y otros daños reproductivos. Por favor
lávese las manos después de manejar el cable.
ADVERTENCIA: Algunos polvos creados cuando use herramientas eléctricas de
jardín contienen sustancias que son reconocidas como causantes de cáncer,
defectos de nacimiento, y otros daños reproductivos. Ejemplos de estas
sustancias son los compuestos en fertilizantes, insecticidas, herbicidas y
pesticidas; arsénico y cromo de madera tratada químicamente; y silicatos en arena,
ladrillos y polvos de albañilería.
Los riesgos de salud de estas sustancias varían de acuerdo al entorno de trabajo y
a la frecuencia y duración de la exposición. Para limitar la exposición a estas
sustancias químicas, por favor siga las instrucciones cuando aplique o trabaje con
fertilizantes, insecticidas, herbicidas y pesticidas. Cuando use la bordeadora,
siempre use gafas protectoras y guantes, además de máscaras para el polvo que
estén diseñadas para filtrar los materiales microscópicos.
GUARDE ESTE MANUAL PARA REFERENCIA FUTURA
Garantía de dos años del ReadyEdger™de American Gardene
r
Si durante el uso normal residencial este ReadyEdger™ no funciona
debido a un defecto de materiales o de manufactura dentro de dos años
de la fecha de compra, American Gardener, a su discreción única,
reparará o remplazará la unidad sin cargo alguno.
Para servicio de garantía o hacer preguntas llame al (800) 637-2867.
Esta garantía solo aplica mientras este ReadyEdger™ se use dentro de
los Estados Unidos de Norteamérica.
Esta garantía no cubre componentes sujetos a desgaste normal, tales
como cuchillas o baterías. Tampoco cubre abuso, mal uso, o uso del
producto en un entorno comercial. Las piezas de repuesto están
disponibles del detallista donde usted compró el producto, o llamando al
(800) 637-2867 o visitándonos en la web en www.american-
gardener.com.
Por favor lea y siga cuidadosamente las instrucciones de este producto.
Esta garantía le da a usted derechos legales; además, usted podría tener
otros derechos, los cuales varían de estado a estado.

13
ADVERTENCIA: Cuando use esta herramienta, debe siempre seguir las
precauciones básicas de seguridad para reducir el riesgo de fuego, descarga
eléctrica, o lesión, entre ellas las siguientes:
Para reducir el riesgo de lesionarse:
•Antes de todo uso, asegúrese que todos los usuarios de este producto eléctrico
comprendan todas las instrucciones de seguridad y de funcionamiento en este
manual.
•Guarde estas instrucciones y repáselas con frecuencia antes del uso.
•EVITE LOS ENTORNOS Y EL CLIMA PELIGROSOS cuando use la
herramienta.
•NO USE BAJO LA LLUVIA.
•MANTENGA LEJOS A LOS NIÑOS – Todos los visitantes deben mantenerse a
una distancia segura del área de trabajo.
•GUARDE A CUBIERTO LAS UNIDADES INACTIVAS – Cuando no la use, la
unidad debe guardarse a cubierto en un lugar seco y lejos del alcance de los
niños.
•NO FUERCE LA HERRAMIENTA – Hará el trabajo mejor y con menos riesgo de
lesión al ritmo para el cual fue diseñada.
•USE LA HERRAMIENTA ADECUADA – No use la herramienta para ningún
trabajo que no sea para el cual fue diseñada.
INFORMACIÓN Y ADVERTENCIAS ELÉCTRICAS
•Está herramienta tiene aislamiento doble. Repare o remplace los cables
dañados.
•Ya que esta herramienta tiene aislamiento doble, usted puede usar una
extensión eléctrica de dos polos (una extensión sin polo de tierra). Se
recomienda que use una extensión de tres polos (una extensión con polo de
tierra) con un conector tipo NEMA (paletas paralelas, tierra en U). Use solo
extensiones eléctricas con cubierta redonda aprobadas para uso fuera de la
casa.
•Para reducir el riesgo de descarga eléctrica, esta unidad tiene un polo distinto
(una paleta más ancha que la otra). Esta unidad cabe en un enchufe polarizado
de una sola manera. Si la extensión no cabe completamente en la toma, invierta
el enchufe. Si la extensión todavía no entra, use una extensión que esté
polarizada correctamente. No altere el enchufe o la extensión de ninguna
manera.
•Un rótulo en la unidad indicará el voltaje a usar. Usted necesitará esta
información para determinar el tamaño de los alambres (AWG) en la extensión
que va a usar. Nunca conecte la unidad a un voltaje CA diferente al
especificado.
•PRECAUCIÓN: Para reducir el riesgo de descarga eléctrica, solo use la unidad
con extensiones diseñadas para uso fuera de la casa, tales como cables tipo
SW-A, STW-A, STOW-A, SJW-A, SJOW-A, SJTW-A, o SJTOW-A.
TAMAÑO MÍNIMO DE ALAMBRE EN EXTENSIONES ELÉCTRICAS PARA
APARATOS DE 120 VOLTIOS QUE USEN 0-12 AMPS
Largo del cable (pies) 25 50 100 150
*Tamaño del alambre (AWG) 16 16 16 14
*El tamaño del alambre (AWG) para aparatos de 120 voltios que usen 12-16 amps
es 14 AWG para 25 pies (7,6 m), 12 AWG para 50 pies (15 m), Y NO ES
RECOMENDADO para 100 (30 m) o 150 pies (45 m).
14
•LA PROTECCIÓN DE INTERRUPTOR DE CORTO CIRCUITO (GFCI) deberá
existir en los circuitos o tomas en las cuales se use la podadora de setos. Use
receptáculos con protección GFCI integrada para mayor protección.
•JUEGOS DE CABLES: Asegúrese que el cable en la unidad y la extensión
eléctrica se encuentren en buenas condiciones. La extensión debe resistir la
corriente usada por la unidad. Un cable muy pequeño causará una baja de
voltaje que a su vez hará que la unidad pierda energía y se sobrecaliente. La
tabla arriba muestra el tamaño correcto de la extensión de acuerdo a la longitud
del cable y el rótulo de amperaje. Si usted no está seguro del tamaño del cable,
use el próximo tamaño más grueso. Mientras más pequeño sea el número del
grosor (AWG), más grueso será el cable.
•NO ABUSE DEL CABLE – Nunca transporte la unidad por el cable o la hale
para desconectarla del receptáculo. Mantenga el cable alejado del calor, del
aceite, y de los filos y esquinas.
•INSPECCIONE CABLES CON FRECUENCIA - Inspeccione frecuentemente el
cable de la unidad así como la extensión. Busque cortes, rasguños o rajaduras
en el aislamiento del cable. También inspeccione los conectores para ver si
están doblados o rotos. Repare o remplace los cables si encuentra cualquier
defecto.
SEGURIDAD DURANTE EL FUNCIONAMIENTO
•DESPEJE EL ÁREA DE TRABAJO: El uso de esta bordeadora puede hacer
que desperdicios tales como piedras, polvo, madera o metal salgan disparados a
alta velocidad. Asegúrese que su área de trabajo está despejada de personas y
mascotas antes de usar la bordeadora.
•ALÉJESE DE LA CUCHILLA: Párese siempre a la izquierda de la unidad
cuando la use, para evitar ser golpeado por los desperdicios de la cuchilla.
•BUSQUE CABLES ENTERRADOS ANTES DE USAR: Antes de bordear o
atrincherar con este producto, inspeccione el área buscando cables eléctricos (o
de otro tipo) los cuales se encuentren enterrados.
•EVITE GOLPEAR LOS ÁRBOLES, LAS PAREDES, LAS ROCAS, LA ACERA,
EL BORDILLO, U OTROS OBJETOS SÓLIDOS MIENTRAS USE LA
BORDEADORA.
•PELIGRO: ALEJE LAS MANOS, LOS PIES Y EL CUERPO de la cuchilla.
•PRECAUCIÓN: La cuchilla todavía se mueve después de apagar la unidad.
Desenchufe la unidad y espere que la cuchilla se detenga antes de acercarse a
la cuchilla.
•VISTA APROPIADAMENTE – No use ropa suelta o joyas. Éstas podrían
enredarse en las piezas móviles. Use guantes y calzado pesado cuando trabaje
al aire libre.
•NO SE SOBREEXTIENDA – Manténgase siempre en equilibrio y apoyado. Use
las dos manos para manejar la unidad seguramente.
•USE GAFAS PROTECTORAS – Siempre use protección ocular adecuada, y use
una máscara de polvo.
•DÉ MANTENIMIENTO CUIDADOSO – Mantenga los filos limpios para mejor
rendimiento y para reducir el riesgo de lesiones. Siga las instrucciones de
servicio. Mantenga el mango limpio, seco y libre de aceite y grasa.
•EVITE EL ENCENDIDO ACCIDENTAL – No sostenga el interruptor mientras
transporte la unidad si ésta está enchufada. Podría causar que se encienda
accidentalmente si no se maneja con cuidado. Vea que el interruptor esté
apagado cuando enchufe la unidad.

15
•EXAMINE LAS PIEZAS DAÑADAS – Si la unidad experimenta un impacto
fuerte, verifique que no se dañó ninguna pieza y que la unidad funciona
adecuadamente. Examine si las piezas móviles están desalineadas o dobladas,
si hay piezas rotas, o cualquier otra situación que pueda afectar el
funcionamiento. Una pieza dañada debe ser reparada por un centro de servicio
autorizado.
•MANTÉNGASE ALERTA – Esté pendiente a lo que hace. Use el sentido común.
No maneje la herramienta si está cansado.
•NO AGARRE LA CUCHILLA BORDEADORA EXPUESTA cuando recoja o
sostenga la unidad. No trate de quitar desperdicios o sucio cuando la cuchilla
esté en movimiento. Vele que el interruptor de la unidad esté apagado cuando
limpie el material atascado en la cuchilla.
•USE AMBAS MANOS AL MANEJAR LA UNIDAD. Mantenga una mano en el
gatillo de la caja y la otra en el mango frontal accesorio. NUNCA use el protector
de la unidad como mango.
•DETENGA EL MOTOR CUANDO LA UNIDAD SE ENREDE EN UN OBJETO
EXTRAÑO. Inspeccione la unidad. No maneje si hay piezas dañadas o sueltas.
•DESENCHUFE LA UNIDAD – mientras limpie la cuchilla y durante todo
mantenimiento o reparación.
•GUARDE LAS INSTRUCCIONES Y REPÁSELAS FRECUENTEMENTE. Si
usted le presta esta herramienta a alguien por favor préstele estas instrucciones
también para que sepa cómo manejar la unidad con seguridad.
GUARDE ESTAS INSTRUCCIONES
CÓMO ARMAR
Figura-1
5. Saque la bordeadora y todas sus piezas del embalaje.
NOTE: El mango de la bordeadora DEBERÁ extenderse antes de tratar de
armarlo a la caja del motor. Esto extenderá el exceso de cable dentro del
mango y le permitirá insertar completamente el mango en la caja del motor.
6. Mango de extensión cromado – Hale el mango de menor diámetro para
extender el mango a su mayor longitud. Vea la Figura 1. El cable se
alimentará por el mango menor. Asegure el mango en UNA de TRES
posiciones con un tornillo y una “tuerca de mango”. Vea la Figura 2.
16
Figura-2
7. Conexión del mango a la bordeadora – Inserte el extremo del mango en
el encaje de la caja del motor. Gire el mango hacia delante y hacia atrás
mientras empuja firmemente hasta que el mango se asiente
completamente. Asegúrese que los huecos en la caja del motor estén
alineados con los del mango. Asegure el mango a la caja del motor con
perno y tuerca de retención, usando las herramientas incluidas. Vea la
Figura 3.
Figura-3
8. Armar el mango frontal – Alinee el mango frontal como lo muestra la
Figura 4, luego empuje el mango en el ensamblaje superior para que los
huecos se alineen. Asegure el mango con el tornillo y la tuerca plástica.
Figura-4

17
FUNCIONAMIENTO
CÓMO CONECTAR LA EXTENSIÓN ELÉCTRICA
La unidad tiene un retenedor para la extensión moldeado en la parte posterior de la
caja, el cual le permitirá evitar que la extensión se desenchufe de la unidad
mientras la use. Para utilizar el retenedor del cable, haga un bucle con la
extensión y páselo por la ranura de la caja. Vea la Figura 5. El bucle de la
extensión deberá engancharse en la lengüeta de la caja. Hale la extensión para
que el bucle se cierre alrededor del gancho. Una vez el cable esté aferrado al
mango, enchufe el receptáculo de la extensión a la coleta de la unidad. Si su
extensión es muy gruesa para sujetarla usando el retenedor, usted puede asegurar
el cable atándolo en un nudo con la coleta como lo muestra la Figura 6.
Figura-5
Figura-6
PROFUNDIDAD CUANDO HAGA BORDES
PELIGRO – Nunca trate de ajustar la profundidad mientras esté funcionando.
El ReadyEdger™ puede ser ajustado para bordear a tres profundidades diferentes.
Para ajustar la profundidad del corte, suelte la tuerca al frente y a la izquierda de la
bordeadora y mueva la rueda delantera hacia arriba o hacia abajo hasta ajustar a
la profundidad deseada. (vea el rótulo indicador de profundidad). Entonces vuelva
a apretar la tuerca fuertemente.
GUÍA DE BORDEAR
18
El ReadyEdger™ viene equipado con una guía de bordear fija, para facilitarle
seguir la acerca o el bordillo.
PRECAUCIÓN – Asegúrese que la cuchilla de la bordeadora solo dará contra la
tierra antes de encenderla.
PARA ENCENDER (ON) EL READYEDGER™
Una vez la unidad esté enchufada y usted esté listo para bordear, simplemente use
su pulgar para deslizar hacia delante el interruptor de seguridad mientras aprieta el
gatillo (bajo el mango) con los dedos. Vea la Figura 7. El seguro es solo para
arrancar la máquina y lo puede soltar mientras haga los bordes. Para apagar
la herramienta suelte el gatillo. El seguro se soltará y evitará que el gatillo se active
accidentalmente.
Figura-7
INSTRUCCIONES Y TÉCNICAS DE RECORTE
•Siempre mantenga la extensión alejada del área de recorte. Verifique que la
extensión está detrás de la bordeadora. Si usted corta o daña el cable,
desenchúfelo de inmediato. DESPUÉS que el cable esté desenchufado,
inspeccione el daño y remplace o repare según sea necesario.
•Manténgase siempre en equilibrio. Aleje las manos de las cuchillas. Use
protección ocular mientras use la unidad. Sujete la unidad firmemente con
ambas manos y enciéndala.
•No use la bordeadora en vegetación mojada o bajo la lluvia.

19
PRECAUCIÓN: Si la cuchilla se atranca o se para en una rama, palo u objeto
extraño, suelte el gatillo de inmediato. El no detener la unidad cuando se atranque
podría causar daño excesivo al motor de la unidad.
Para limpiar obstrucciones
Cuando la cuchilla se haya detenido completamente, quite la obstrucción
cuidadosamente
PRECAUCIÓN: Para evitar lesiones, aleje las manos del gatillo cuando limpie las
obstrucciones. Para evitar lesiones, no use el ReadyEdger™con ninguna pieza
dañada. Si continúa teniendo problemas, llame al: 1-800-637-2867
¡RECUERDE QUE LAS CUCHILLAS NO SE DETIENEN DE INMEDIATO!
MANTENIMIENTO
PRECAUCIÓN: Para evitar lesiones, desenchufe la unidad y aleje las manos del
gatillo antes de dar mantenimiento, tal como cambiar o limpiar la cuchilla.
LIMPIEZA DE LA CUCHILLA – Una vez acabe de podar, usted puede hallar que
se ha acumulado sucio y vegetación en las cuchillas. Use un cepillo grueso seco
para sacar los desperdicios de las cuchillas. ADVERTENCIA: Para evitar los
daños, aleje las manos del gatillo cuando cambie la cuchilla o cualquier otra pieza.
CAMBIO DE CUCHILLA/INVERSIÓN – El ReadyEdger™ viene con una
CUCHILLA DE DOS LADOS que se puede invertir para prácticamente doblar la
vida útil de la cuchilla. Para cambiar o invertir la cuchilla, use la llave grande,
incluida, para sostener el retenedor de la cuchilla mientras suelta la tuerca de
retención con la llave más pequeña, incluida, girando contra el reloj. Cambio o
invierta la cuchilla, reponga el retenedor de la cuchilla en el mango y asegúrelo con
la tuerca de retención apretando con el reloj.
LIMPIEZA DE PIEZAS PLÁSTICAS – Use solamente un cepillo seco o un trapo
con agua tibia y jabón liviano para limpiar las piezas plásticas. Muchos limpiadores
caseros contienen sustancias que pueden dañar el plástico. Nunca use gasolina,
aguarrás, disolvente de pinturas o fluidos similares. Nunca lave con agua a presión
o lo sumerja en agua. Agua o líquido dentro de la unidad puede causar daño grave
a la unidad.
DEJAR CAER LA UNIDAD – Si deja caer la unidad, inspecciónela
cuidadosamente buscando daños antes de usarla de nuevo.
CÓMO GUARDAR
EVITE LA CORROSIÓN – Los fertilizantes y otras sustancias químicas de jardín
contienen compuestos que pueden acelerar grandemente la corrosión de los
metales. No guarde el aparato sobre o cerca de los fertilizantes o sustancias
químicas.
Guarde la unidad en un lugar alejado de los niños. Las cuchillas son filosas y
pueden ser peligrosas aún cuando la unidad no esté enchufada.
20
SERVICIO
Garantía de dos años en el ReadyEdger™ de American Gardener
Si durante el uso normal residencial este ReadyEdger™ no funciona debido a un
defecto de materiales o de manufactura dentro de dos años de la fecha de compra,
American Gardener, a su discreción única, reparará o remplazará la unidad sin
cargo alguno.
Para servicio de garantía o hacer preguntas llame al (800) 637-2867.
La garantía solo aplica mientras este ReadyEdger™se use dentro de los Estados
Unidos de Norteamérica.
La garantía no cubre componentes sujetos a desgaste normal, tales como baterías
o la cuchilla de la bordeadora. Tampoco cubre abuso, mal uso, o uso del producto
en un entorno comercial. Las piezas de repuesto están disponibles del detallista
donde usted compró el producto, o llamando al (800) 637-2867 o visitándonos en la
web en www.american-gardener.com.
Por favor lea y siga las instrucciones del producto cuidadosamente.
Esta garantía le da a usted derechos legales específicos; además, usted podría
tener otros derechos, los cuales varían de estado a estado.
DEJAR CAER LA UNIDAD – Si deja caer la unidad, inspecciónela
cuidadosamente buscando daños antes de usarla de nuevo.
Si usted ve alguna condición que pudiera afectar el funcionamiento seguro, llame
al número de servicio al cliente al: 1-800- 637-2867.
EN CASO DE PROBLEMAS
Problema: El seguro de pulgar es difícil de aguantar durante el uso.
Solución: El seguro de pulgar se usa solamente cuando enciende la unidad. No
necesita mantener el interruptor hacia adelante cuando use el producto.
Problema: La unidad no funciona.
Solución: Asegure que todas las conexiones estén bien hechas entre la unidad, la
extensión eléctrica, y la toma de corriente. Si la toma tiene protección de interruptor
de corto circuito (GFCI), asegure que funcione correctamente y que esté
encendida.
Problema: El motor parece correr despacio
Solución: Usted podría necesitar un cable de extensión de mayor grosor (AWG).
Por favor lea en la página 3 de este manual la información acerca del tamaño
apropiado de los alambres de la extensión.
Table of contents
Languages: