American Range MAJESTIC Series User manual

PROFESSIONAL QUALITY COOKING EQUIPMENT
OWNER’S MANUAL FOR
MAJESTIC CONVECTION OVEN
MODEL NUMBERS:
MSD-1, MSD-2, MSDE-1, MSDE-2, M-1, M-2,ME-1, ME-2,
MAE-1, MAE-2, MA-1, MA-2, MASDE-1, MASDE-2
13592 Desmond St., Pacoima, CA 91331 818.897.0808 tel 888.753.9898 toll free www.americanrange.com
DESIGN CLASS FUNCTION

Installation, Operation and
Maintenance Instructions
Majestic
Convection Oven
Owner’s Manual
FOR YOUR SAFETY!
Do not store or use gasoline or
other ammable vapors or liquids
in the vicinity of this or any other appliance.
FOR
YOUR
SAFETY
FOR
YOUR
SAFETY
Instruction to be followed in the event the user smells gas should be posted
in a prominent location. This information should be obtained by
consulting the local gas supplier.
RETAIN THIS MANUAL FOR FUTURE REFERENCE.
WARNING!
Improper installation, adjustment, alteration, service
or maintenance can cause property damage, injury
or death. Read the installation, operating and
maintenance instructions thoroughly before
installing or servicing this equipment.
WARNING
IMPROPER
INSTALLATION
WARNING
IMPROPER
INSTALLATION
13592 Desmond St., Pacoima, CA 91331 818.897.0808 tel 888.753.9898 toll free www.americanrange.com
Model Number: __________________________________________
Serial Number: ___________________________________________
Purchase Date: ___________________________________________
Installed By: _________________________ Install Date:__________
Gas Type: _______________________________________________
Electrical Information: ______________________________________

To Our Most Valued Customer:
Congratulations on your purchase of anAmerican Range product. We hope you will enjoy the
design, manufactured quality, innovative features and cooking performance of this product – it
represents our continuing dedication to satisfying the most demanding needs of customers
like you.
Please read this manual and become familiar with important safety information about how
to install and set-up the unit, basic operating instructions, and how to maintain that just-like-
brand-new appearance and performance - over years of day-to-day and special holiday use.
If you should encounter any sort of problem, turn to the section of the manual entitled,
“Troubleshooting” – for a quick solution or guidance regarding the next step required to get
back to tip-top condition.
Thank you for choosing an American Range product for your home. As you can expect, this
appliance is designed for years of reliable service. If you have any questions or comments,
please contact the dealer from whom you purchased the unit, or contact American Range
Customer Service at www.americanrange.com or 818.897.0808.
PROFESSIONAL QUALITY COOKING EQUIPMENT
13592 Desmond St., Pacoima, CA 91331 818.897.0808 tel 888.753.9898 toll free www.americanrange.com
Sincerely,
President, American Range Corporation
Shane Demirjian

13592 Desmond St., Pacoima, CA 91331 818.897.0808 tel 888.753.9898 toll free www.americanrange.com
Majestic Convection OvenOwner’s Manual
Table of Contents
General Information ......................................................................................................1-2
Important Safety Information....................................................................................... 1
Shipping Damage Claim Procedure..........................................................................1
Installation-Gas Standards and Codes..................................................................... 2
Rating Plate..............................................................................................................................3
Clearances ...............................................................................................................................3
Installation ............................................................................................................................4-8
Single Oven Assembly.......................................................................................................4
Double Oven Assembly...................................................................................................5
Caster Installation................................................................................................................ 5
Leveling......................................................................................................................................5
Air Supply and Ventilation...............................................................................................5
Electrical Connection ........................................................................................................6
Gas Connection ...................................................................................................................6
Manual Shut Off Valve...................................................................................................6-7
Oven with Casters..............................................................................................................7
Manual Control.....................................................................................................................8
Cook & Hold Controls.....................................................................................................9
Checking for Gas Leaks................................................................................................. 10
Lighting Instructions......................................................................................................... 10
To Shut Down Oven...................................................................................................... 10
Cleaning and Preventive Maintenance...........................................................10-11
Operation ............................................................................................................................. 12
Troubleshooting Guide.................................................................................................. 13
Electrical Schematics................................................................................................14-15
Electrical Specications.................................................................................................. 16
ENERGY STAR®Majestic Wiring Diagram....................................................... 16
Exploded View Drawings ......................................................................................17-20

Owner’s Manual Majestic Convection Oven
13592 Desmond St., Pacoima, CA 91331 818.897.0808 tel 888.753.9898 toll free www.americanrange.com
1
•Before beginning, please read all the instructions carefully.
•DO NOT remove permanently afxed labels, warnings, or plates from product. This will void the warranty.
•All local and national codes and ordinances must be observed; installation must conform with local codes.
•The Installer must leave these instructions with the consumer who should retain for local inspector’s use and for future reference.
• Installation and service must be performed by a certied / licensed installer, service agency or gas supplier.
•Please ensure that the product is properly grounded.
Your safety and the safety of others is very important. We have provided many important safety messages in this manual and on your
appliance. Always read and obey all safety messages.
IMPORTANT - PLEASE READ AND FOLLOW!
!
DANGER
!
WARNING
!
This is the SAFETY ALERT SYMBOL.
This symbol alerts you to hazards.
Hazards or unsafe practices which may result in severe
personal injury or death.
Hazards or unsafe practices which may result in severe
personal injury or death.
CAUTION
!Hazards or unsafe practices which may result in
personal injury or property damage.
Shipping Damage Claim Procedure:
The equipment is crafted and inspected carefully by skilled personnel before leaving the factory. The transportation company
assumes full responsibility for the safe delivery upon acceptance of the equipment. If the shipment arrives damaged:
1. Note on the freight bill or express delivery document any visible loss or damage and have the document signed by the
person making the delivery.
2. File claim for damages immediately regardless of the extent of damages.
3. For damage noticed after unpacking (concealed loss or damage), notify the transportation company immediately and
le a “Concealed Damage” claim with them. This should be done within fteen (15) days from the date that
delivery is made to you. Retain the shipping container for inspection.
CALIFORNIA PROPOSITION 65 WARNING
The burning of gas cooking fuel generates some by-products which are on the list of substances known by the State of
California to cause cancer or reproductive harm. California law requires businesses to warn customers of potential exposure
to such substances. To minimize exposure to these substances, always operate this unit according to the Owners Manual,
ensuring you provide proper ventilation when cooking with gas.

Important - The installation of this appliance must conform to local codes or, in the absence of local codes, with the National Fuel
Gas Code ANSI Z223.1 Natural Gas Installation Code, CAN/CGA-B149-1 or the Propane Installation Code, CAN/CGA-B149-2
as applicable, including:
1. The appliance and its individual shut off valve must be disconnected from the gas supply piping system during any
pressure testing of that system at test pressure in excess of 1/2 psi (3.45 kPa).
2. The appliance must be isolated from the gas supply piping system by closing the individual manual shut off
valve during any pressure testing of the gas supply piping system.
The appliance, when installed, must be wired and electrically grounded in accordance with local codes, or in the absence of local
codes, with the National Electric Code, ANSI/NFPA 70, or the Canadian Electrical Code, CSA C22.2 as applicable.
Installation, Operation and Service Personnel - Installation of the equipment should be performed by qualied, certied, licensed
and/or authorized personnel who are experienced in state/local installation codes.
Operation of the equipment should be performed by qualied or authorized personnel who have read and understand this manual
and are familiar with the functions of the equipment.
Service of the equipment should be performed by qualied and licensed service personnel who are knowledgeable with American
Range products.
Installation - Gas Standards and Codes
1. A manual gas shut off valve must be installed in the gas supply (service) line ahead of the appliance and gas pressure regulator
in the gas stream for safety and ease of future maintenance/service.
2. The gas pressure regulator supplied with the appliance must be installed prior to connecting the equipment to the gas supply
line. Failure to install a regulator will void the equipment warranty and result in a potentially hazardous condition.
3. Contact factory for installation, maintenance and repairs,American Range Customer Service at www.americanrange.com
or 818.897.0808.
13592 Desmond St., Pacoima, CA 91331 818.897.0808 tel 888.753.9898 toll free www.americanrange.com
2
Majestic Convection OvenOwner’s Manual
DANGER
!

Majestic Convection OvenOwner’s Manual
Rating Plate - The location of the rating plate is shown in Figure 2. The information on the
rating plate denes the model, serial number, gas type (natural or liquid propane), operating
pressures and burner BTU ratings. Keep this information for future reference. It is essential for
proper identication of the unit when requesting additional information or factory support.
Appliances must be connected only to the
type of gas identied on the rating plate.
WARNING
!
Intertek
3013256
Intertek
SERIAL NO.
MODEL: M-2-GR
GAS TYPE: NAT MAN. PRESS: IN. W.C.
5.0
ELECTRICAL RATING
VOLTS 110PHASE 1AMPS 6.5/3/0 CYCLE 60/50
INPUT-BTU/HOUR/BURNER CLEARANCES
NON-COMB. COMB.
CONV. OVEN 45,000 BACK
SIDES
0”
0”
4”
12”
FOR USE ONLY ON NONCOMBUSTIBLE FLOORS
CURB MOUNT MUST HAVE 2” OVERHANG
INTENDED FOR OTHER THAN HOUSEHOLD USE.
ANSI Z83.11a/CSA 1.8a-2007 Food Service Equipment
Clearances - The appliance must be kept free and clear of all combustible materials.
This unit is designed and certied for the following installation only:
CLEARANCE FROM MINIMUM COMBUSTIBLE AND NON-COMBUSTIBLE CONSTRUCTION
COMBUSTIBLE NON-COMBUSTIBLE
Back 6” 0”
Side 6” 0”
Installation - Electric Utility Connections-Standards and Codes
Qualied installation personnel are individuals, a rm or a company which either in person or through a representative are engaged
in and responsible for the installation of electrical wiring from the electric meter, main control box or service outlet to the electric
appliance.
Qualied installation personnel, licensed and bonded, must be experienced in such work, familiar with all precautions required and
have complied with all requirements of state or local authorities having jurisdiction.
U.S. and Canadian Installations - All ovens, when installed, must be electrically grounded in accordance with local codes, or in the
absence of codes, with the National Electrical Code ANSI/NFPA 70 - Latest Edition and/or Canadian National Electrical Code C22.2
as applicable.
The ventilation of these ovens should be in accordance with local codes. In absence of local codes, refer to the national ventilation
code titled, Standard for the Installation of Equipment for the Removal of Smoke and Grease Laden Vapors from Commercial
Cooking Equipment, NFPA-96-Latest Edition.
The appliance is to be installed with a check valve in accordance with applicable federal, province and local codes.
General Export Installations - Installation must conform to Local and National Standards. Local installation codes and/or
requirements may vary. If you have any questions regarding the proper installation or operation of your American Range
Convection Oven, please contact your local distributor. If you do not have a local distributor, contact American Range
Corporation at 1.888.753.9898 or visit us at www.americanrange.com
13592 Desmond St., Pacoima, CA 91331 818.897.0808 tel 888.753.9898 toll free www.americanrange.com
3
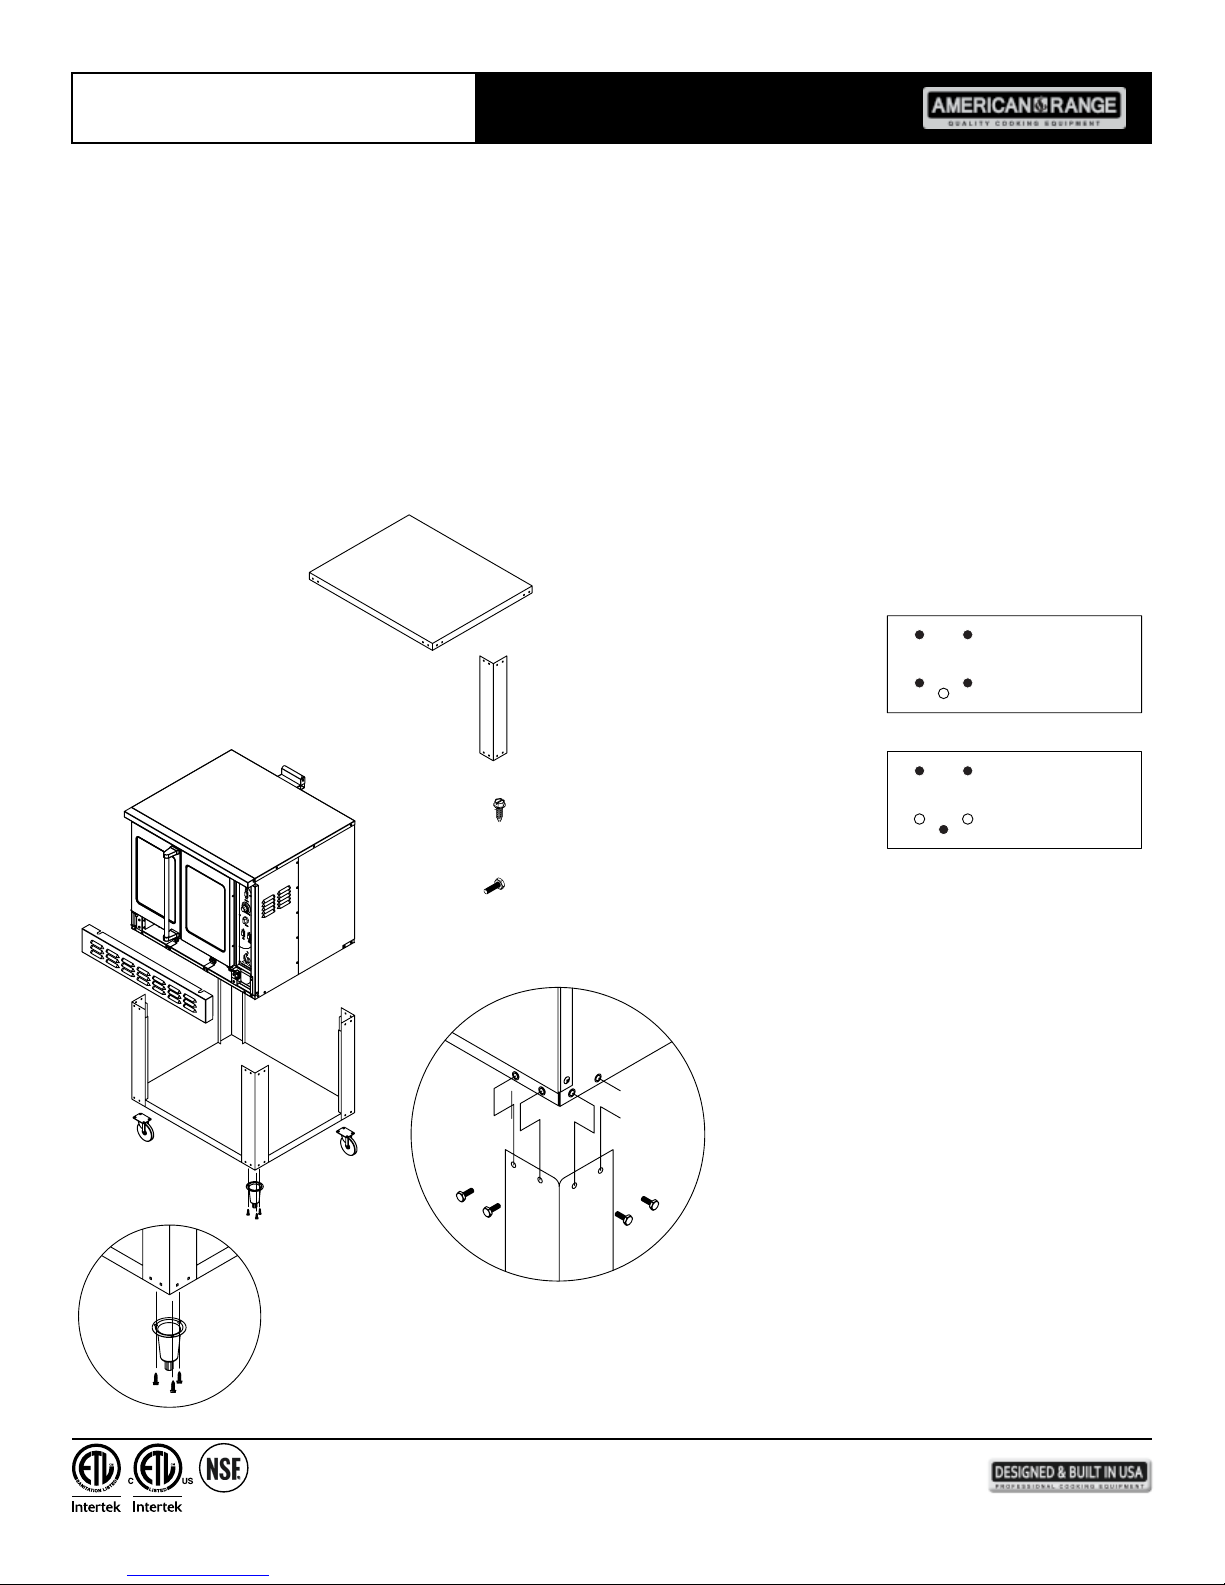
The installation instructions contained here are for the use of qualied
installation and service personnel only. Installation or service by other
than certied / licensed personnel will void the warranty and will result
in damage to the oven and/or injury to the operator.
WARNING
!
Rating Plate

SCREW TOTAL QTY. (16) W/CASTERS
#14 1/4 X 3/4
SCREW TOTAL QTY. (12) W/LEGS
BOLT TOTAL QTY. (32)
#20 1/4 X 3/4
LEG TOTAL QTY. (4)
BOTTOM SHELF QTY. (1)
CASTER
MOUNT HOLE
PATTERN
PATTERN
MOUNT HOLE
LEG
Do Not Mount the oven on a curb base. Use casters. Adequate air space at the bottom and rear of the unit must be provided for
the proper venting of the blower motor.
Assembly - Do not use the door to lift or move the oven! The double ovens are installed on casters shipped with the unit.
The standard assembly parts or casters for the single oven are shipped separately, within the crated unit.
Single Oven - Assemble the leg / stand assembly as follows:
1. Remove the legs from the package.
2. Referring to Figure 1, secure bottom shelf to the legs, using bolts, and nuts provided. Tighten all bolts securely.
3. Place oven on the top of leg / stand assembly. Match holes on the frame with oven bottom base. Fasten with bolts
provided. For the bottom shelf and rack support:
a. Screw the bottom shelf to the legs.
b. Screw the guide support angles to the bottom shelf and top leg frame.
13592 Desmond St., Pacoima, CA 91331 818.897.0808 tel 888.753.9898 toll free www.americanrange.com
4
Majestic Convection OvenOwner’s Manual
Figure 1

Double Oven - Only 6” casters can be used with the double oven.
1. Match holes on the casters with the oven bottom base and assemble with hardware provided.
2. Stack top oven on top of bottom oven.
3. Remove top kick plate by lifting and pulling forward. Then bolt by rear and front joiner brackets as shown in Figure 2.
4. Assemble the ue extension as shown in the same gure.
5. Do not use other manufacturer or aftermarket casters or legs.
Caster Installation - With provided casters, match holes on the caster with holes on the oven bottom base and fasten with the
hardware provided. Locking-type casters must be installed in front of the unit.
Leveling - A carpenter’s spirit level should be placed on the oven’s center baking rack, and the unit leveled both front-to-back and
side-to-side. If the unit is not level, cakes, casseroles and any other liquid or semi-liquid batter will not bake evenly, burner
combustion may become erratic, and the unit will not function properly.
If the oor is relatively smooth and level, the unit may be leveled by turning the “foot” section of the leg, since casters are not
adjustable. Identify the high corner and level the unit - using metal shims if the adjustment amount required exceeds the 1-1/4”
adjustment amount available. Casters must be leveled with shims. A unit will probably not return to the same position after being
moved, so be sure to re-level as necessary.
Air Supply and Ventilation - The area in front of, around and above the appliance must be kept clear to avoid any obstruction of
the ow of combustion and ventilation air. Adequate clearance must also be maintained at all times in front and at the sides of the
appliances for proper operation and servicing. Refer to the chart “Clearance from Minimum Combustible and Non-Combustible
Construction” presented on page 3 of this manual.
Figure 2
13592 Desmond St., Pacoima, CA 91331 818.897.0808 tel 888.753.9898 toll free www.americanrange.com
5
Majestic Convection OvenOwner’s Manual
Majestic
OFF
200500
350
250
300400
450
0
60
LOW
FANLIGHT
OFF
COOK
COOL
OFF
POWER
THERMOSTAT
TIMER
TIMER
THERMOSTAT
POWER
OFF
COOL
COOK
OFF
LIGHTFAN
LOW
60
0
450
400 300
250
350
500 200
OFF
Majestic
MOTOR
JOINER BRACKET
(2 REAR)
LIGHT
FLUE EXTENSION
(2 FRONT, BEHIND
JOINER BRACKET
KICK PLATE)
FRONT VIEW REAR VIEW
FLUE EXTENSION BRACKET
RATING PLATE

Means must be provided for any commercial, heavy-duty cooking appliance to exhaust combustion waste products to the outside
of the building. Usual practice is to place the unit under an exhaust hood. Filters and drip troughs should be part of any industrial
hood. Consult local codes before constructing and installing a hood.
Air movement should be checked during installation. Strong exhaust fans in the hood or in the overall air conditioning system can
produce a slight vacuum in the room and/or cause air drafts – either may interfere with the pilot or main burner performance and
can also be hard to diagnose. If pilot burner or main burner outage problems persist – make up air openings or bafes may have to
be provided in the room.
Electrical Connection - The standard gas operated convection ovens require a 120 VAC, 60 Hz, 15 AMP electrical service for
operation. The supply cord provided on the appliance is equipped with a three-prong (grounding) plug for protection against
electrical shock hazard. The electrical service in the building must be equipped with a properly grounded three-prong receptacle, in
accordance with local codes, or in the absence of local codes, with the National Electrical Code, ANSI/NFPA 70, or in Canada – to
Canadian electrical codes, CSA C22.2. Do not cut or remove the grounding prong from this plug.
For gas red units and any NEC compliant receptacle, properly grounded and with correct
polarity is required.
Electric convection ovens are congured at the factory for operation from 208 VAC, single
phase, or 208 VAC, three-phase electrical service is also an available conguration. Consult
wiring diagram located at the end of this manual and on the back side of the appliance.
Gas Connection - The single deck oven requires one gas connection; the double deck oven requires two gas connections. The gas
inlet line size of this appliance is 3/4” NPT. For proper operation, the gas supply service line must be the same size or greater than
the inlet line size of the appliance.
Manual Shut Off Valve - A gas pressure regulator and a contractor-supplied shut-off valve must be plumbed in the gas service line
ahead of the appliance – in a physical location where it can be reached quickly in the event of an emergency.
13592 Desmond St., Pacoima, CA 91331 818.897.0808 tel 888.753.9898 toll free www.americanrange.com
6
Majestic Convection OvenOwner’s Manual
Electrical Grounding Instructions
The appliance is equipped with a three-prong (grounding) plug for your
protection against electrical shock hazard and should be plugged directly
into a proper grounded three-prong receptacle.
Do not cut or remove the grounding prong from the plug.
WARNING
!
No attempt should be made to operate this appliance during an electrical
service failure. The appliance is not capable of operation without specied gas
and electric requirements.
NOTE
NL NL
GG
GOOD NO GOOD
CAUTION
120 VAC POLARITY SPECS A39074

The gas pressure regulator must be installed in the gas line – failure to install a pressure regulator will void the equipment
warranty. The regulators supplied with convection ovens have 3/4” NPT connections; the regulators adjusted at the factory for
5” W.C (water column) manifold gas pressure (natural gas) or 10” W.C. manifold gas pressure for propane gas operation.
Before connecting the regulator, check the incoming line pressure – as these regulators can only withstand a maximum inlet pressure
of 14” W.C. (1/2 PSI); exceeding this pressure will damage them. Visually double check any installer-supplied intake pipes and/or blow
them out using compressed air to clear any dirt or debris, threading chips, or other foreign matter – before installing a service line.
Those particles will clog gas orices when gas pressure is applied. Compounds used on threaded joints of this appliance piping must
be resistant to the action of NP and LP gas and provide a gas tight seal to prevent leaks. If the gas supply line pressure is greater than
this amount, a step-down regulator will be required. A gas ow direction arrow is cast into the body of the regulator to minimize
installation error – it should point downstream to the appliance. The blue air vent cap on the top of the regulator is part of the
regulator and should not be removed.
Any adjustment to the regulator must be made only by qualied and licensed service personnel with the proper calibrated test
equipment. Gas connections should be performed by a qualied licensed contractor.
Ovens with Casters - In order to be able to service this appliance, it must be installed with the locking front casters supplied,
a exible connector complying with ANSI Z21.69.CGA6.16 and a quick disconnect device complying with ANSI Z21.41CGA 6.9.
Adequate means must be provided to limit the movement of the appliance without depending on the connector and the quick
disconnect device or its associated piping to limit the appliance movement.
All American Range Corporation appliances are adjusted and tested before leaving the factory, effectively matching them to
appropriate atmospheric conditions. We recommend that adjustments and calibrations are performed upon installation to assure
proper operation of the unit and avoid possible problems caused by rough handling or vibration during shipment. This work must be
performed only by qualied service personnel. These adjustments are the responsibility of the customer and/or dealer and are not
covered by warranty.
Check all gas connections for leaks with a soapy water solution before lighting the oven. DO NOT USE AN OPEN FLAME TO
CHECK FOR LEAKS! Putting an open ame beside a new gas connection is extremely dangerous and may result in serious injury
or death.
13592 Desmond St., Pacoima, CA 91331 818.897.0808 tel 888.753.9898 toll free www.americanrange.com
7
Majestic Convection OvenOwner’s Manual
When lighting the gas oven, DO NOT stand with your face close
to the combustion chamber.
CAUTION
!

Majestic Convection OvenOwner’s Manual
13592 Desmond St., Pacoima, CA 91331 818.897.0808 tel 888.753.9898 toll free www.americanrange.com
8
Control Description
1. Oven Indicator Light - This light indicates the heating elements are energized. When
the light goes out, the oven has reached the requested operating temperature.
2. Selector Switch - This switch controls power to the oven. It turns the oven, COOK, OFF
or COOL if the door is open to activate the cooling fan.
3. Thermostat - This allows the operator to set cooking temperatures
from 200ºF to 500ºF.
4. Timer - Turn knob to desired cook time. When cook period ends a buzzer sounds.
5. Light switch - This momentary contact switch is used to control the light.
6. Hi Speed, Lo Speed Convection Fan Switch - Use this switch to set the fan speed for
best cooking results.
Reliable KXT Thermostat Manual Controls

Majestic Convection OvenOwner’s Manual
13592 Desmond St., Pacoima, CA 91331 818.897.0808 tel 888.753.9898 toll free www.americanrange.com
9
Control Description
1. Oven Indicator Light - This light indicates the heating elements are energized. When
the light goes out, the oven has reached the requested operating temperature.
2. Selector Switch - This switch controls power to the oven. It turns the oven, COOK,
OFF or COOL if the door is open to activate the cooling fan.
3. Thermostat - This allows the operator to set cooking temperatures
from 200ºF to 500ºF.
4. Timer - Turn knob to desired cook time.When cook period ends a buzzer sounds.
5. Light switch - This momentary contact switch is used to control the light.
6. Hi Speed, Lo Speed Convection Fan Switch - Use this switch to set the fan speed for
best cooking results.
Cook and Hold Controls
TIMER TEMP.
START CANCEL

Majestic Convection OvenOwner’s Manual
13592 Desmond St., Pacoima, CA 91331 818.897.0808 tel 888.753.9898 toll free www.americanrange.com
10
To Check For Gas Leaks Using a Soapy Water Solution
1. Turn ON the manual gas valve at the inlet side of the gas supply line.
2. Remove the kick plate by lifting and pulling away from the unit.
3. Check for gas leaks at the exible coupling or gas connector tting using a solution of one part soap and three parts water.
4. Sparingly spray or brush the soapy solution at the gas ttings; active bubbling indicates location of gas leak.
5. If a gas leak is detected turn off the manual gas valve at the inlet side of the gas line. Call your certied and licensed service
technician.
Lighting Instructions for Gas Fired Convection Ovens
1. Before attempting to light this appliance, the cover, if so equipped should be open.
2. Turn OFF the manual gas valve located at the outlet side of the gas supply line.
3. Turn the manual gas supply valve to the OFF position.
4. Set the thermostat to the OFF position.
5. Press the power switch to the OFF position.
6. Wait ve minutes.
7. This appliance is equipped with an automatic spark ignition device which automatically lights the pilot burner.
Do not try to light the pilot burner with a match.
8. Turn the manual gas supply valve to the ON position.
9. Press the power switch to the ON “COOK” position.
10. Set the thermostat to the desired temperature. The direct spark ignitor will light the pilot burner and the pilot
burner will light the main burners. If both burners do not light, go back to steps 2 - 9 above and repeat the process. If the
problem persists, call your factory personnel.
11. The cover, if so equipped, should be replaced.
12. If gas odor is detected turn off the gas valve and follow lighting instructions.
To Shut Down the Gas Fired Convection Oven
1. Set the thermostat to the OFF position.
2. Press the power switch to the OFF position.
3. Turn the manual gas supply valve to the OFF position.
Final Preparation - On initial installation, turn the oven thermostat to 250ºF and operate the unit for about one hour, then reset the
thermostat to its maximum and operate the unit for an additional hour. This will drive off any manufacturing oils remaining in the unit.
Let the unit cool and thoroughly clean interior surfaces using hot soapy water.
Maintenance Summary
1. Never attempt to run oven with motor off.
2. Cool down after cooking is nished.
3. Periodically lubricate the pivot pins of the oven door hinge. Use a multi-purpose lubricating oil sparingly.
4. Door chain assembly and door bushing must be inspected periodically and adjusted or replaced to ensure
satisfactory operation of doors.
5. Clean the burner air shutter and burner chamber. Remove any accumulation of debris by hand.
6. Check blower wheel for any accumulation of debris. Remove by hand, do not use any tools.
7. Replace burned out light bulbs.
8. Excessive use will result in excessive wear and tear.

Majestic Convection OvenOwner’s Manual
13592 Desmond St., Pacoima, CA 91331 818.897.0808 tel 888.753.9898 toll free www.americanrange.com
11
Cleaning and Maintenance - Any piece of equipment operates better and lasts longer when properly maintained. Cooking equipment is
no exception. Your American Range convection oven must be kept clean during the working day and thoroughly cleaned at the end of
the day.
To increase the lifetime of the motor, follow these instructions:
a. Do not run an empty oven at higher temperatures for an extended period of time.
b. After you nish cooking place the rocker switch in the COOL position and open the door. Air will be hot,
use care. When the oven temperature is equal to the room temperature, turn the unit OFF.
Daily Cleaning - Convection Ovens
1. Your appliance should be checked for safe and efcient operation at least yearly by a qualied service company.
2. Never spray water at or near equipment at any time as this could damage internal parts of the unit.
3. Stainless Steel Care - All Stainless Steel appliance parts should be wiped regularly with hot soapy water during the day,
and with a liquid cleaner designed for this material at the end of each day as well. DO NOT USE steel wool, abrasive cloths,
cleaners or powders to clean Stainless Steel surfaces! If it is necessary to scrape Stainless Steel to remove encrusted
materials, soak in hot water to loosen the material, then use a wooden or nylon scraper. DO NOT USE a metal knife, spatula,
or any other metal tool to scrape Stainless Steel! Scratches are almost impossible to remove.
4. Remove the baking racks.
5. Be very careful about scratching the porcelain nish on the oven liner panels. Scrape off any food particles with a nylon
griddle scraper.
6. Wash all the above with hot soapy water, then reassemble.
7. Baked-on spills and stubborn stains may be removed with ordinary household ammonia. Scrub with
a nylon pad while oven is at room temperature only.
8. Do not allow any spray-type oven cleaners to come into contact with the temperature probe in the oven.
9. After cleaning the oven, rinse well with a solution of 1/4 cup of vinegar to one quart of clear water to neutralize any
caustic residue remaining from the cleaning agent. Use water sparingly.
Periodic Maintenance
1. Check the ventilation system periodically to see that nothing has fallen down into the exhaust vents.
2. Lubricate the pivot pins of the oven door hinge. Use a multi-purpose lubricating oil sparingly.
Contact the factory, a factory representative or a local service company
to perform maintenance and repairs.
Never use ammonia in an oven that is warmer than room
temperature and always provide direct fresh air ventilation
when cleaning the unit.
CAUTION
!
Disconnect all power sources and lockout to prevent accidental start up
of equipment.
CAUTION
!

TIPS ON USING THE CONVECTION OVEN
General Guidelines
The American Range Convection Oven is a high performance commercial cooking appliance. You may need to adjust cook time and
temperature to achieve best results for your product.
TEMPERATURES and COOK TIMES
Preheating The Oven - Always preheat the oven before baking or roasting. to the desired temperature. When “Oven Indicator Light” is
off the unit is at temperature.
Cook Temperatures - Generally should be 25ºF (10ºC) lower than the deck or range oven recipes. If the edges of the product are done
but the center is raw, or if there is color variation, consider reducing the thermostat setting another 15 - 25ºF (10-15ºC). Continue to
reduce the cook temperature on successive loads until the desired results are achieved.
NOTE: Cooking at excessive temperatures will not reduce the cook time, and more likely, will produce unsatisfactory baking and roasting results.
Cook Time - Check the product in about half the time recommended for deck and range oven recipes. Record cook times and
temperatures that provide the best results for future reference.
NOTE: Cook time will vary with the amount of product loaded, the type of pan and the temperature.
OPERATING TIPS
Pans and Racks - Product or pan height determines how many racks are used. The oven holds up to ten - 18” x 26” (45.7 x 66.0 cm)
pans.
Load the oven from the bottom, centering the pans on the rack. Never place a pan or aluminum foil on the bottom of the oven as this
will obstruct the convection air ow and result in uneven baking and roasting.
Roasting - To reduce shrinkage when roasting, place meat directly on the racks. Place a sheet pan one-half full of water in the bottom
rack position. The water will evaporate, increasing humidity in the oven chamber. The pan catches grease from the meat, making oven
cleaning easier.
Baking - Weigh the product to ensure equal distribution in each pan. Varying amounts of product will cause uneven baking results.
Fan - The fan must be operating for the oven to heat.
Lights - The oven light switch is momentary contact. Press the switch to see what’s cooking – this feature will lengthen the lifetime of
the bulb.
13592 Desmond St., Pacoima, CA 91331 818.897.0808 tel 888.753.9898 toll free www.americanrange.com
12
Majestic Convection OvenOwner’s Manual

TROUBLESHOOTING GUIDE
POSSIBLE CAUSE SUGGESTED ACTION
SYMPTOM: Heating elements do not come on.
Unit is not connected to gas or electrical service Visually check unit is wired to gas or electrical service
Power switch is on Set the power switch to COOK
Thermostat is set to very low temperature Set temperature to desired value
Doors are open Close the door
SYMPTOM: Oven does not reach selected temperature.
May not have been on long enough Unit preheats to 350ºF in about ten minutes
Thermostat may be defective Unit will require service
Too little gas pressure, dirty gas line Call for authorized service
SYMPTOM: Convection fan does not operate.
Unit is not connected to electrical service Visually check unit is wired to electrical service
Power switch is off Set the power switch to COOK
Circuit breaker is tripped Reset the breaker, observe operation
SYMPTOM: General baking problems.
Unit set to “standard” bake temperature Set unit to convection bake temperature
Thermostat out of calibration Unit will require service
13592 Desmond St., Pacoima, CA 91331 818.897.0808 tel 888.753.9898 toll free www.americanrange.com
13
Majestic Convection OvenOwner’s Manual
Always disconnect the electrical power service
before cleaning or servicing the oven.
WARNING
!

13592 Desmond St., Pacoima, CA 91331 818.897.0808 tel 888.753.9898 toll free www.americanrange.com
14
Majestic Convection OvenOwner’s Manual
TOP
TOP
TOP
C
O
O
L
O
N
L
O
H
I
O
F
F
O
N
654321
654321
ENERGY STAR®MAJESTIC & MSD GAS OVEN
MAJESTIC & MSD SERIES PILOT IGNITION

13592 Desmond St., Pacoima, CA 91331 818.897.0808 tel 888.753.9898 toll free www.americanrange.com
15
Majestic Convection OvenOwner’s Manual
TOP
TOP
TOP
C
O
O
L
O
N
L
O
H
I
O
F
F
O
N
65432 1
MA SERIES PILOT IGNITION

13592 Desmond St., Pacoima, CA 91331 818.897.0808 tel 888.753.9898 toll free www.americanrange.com
16
ELECTRICAL SPECIFICATIONS
KW Hz Volts Phase Amps Electrical Connection
(minimum size)
L1 L2 L3
U.S. AND CANADIAN INSTALLATIONS
11 60 208 1 550 -- 50 6 AWG
11 60 208 3 15 15 15 8 AWG
11 60 220 - 240 1 550 -- 50 6 AWG
11 60 220 - 240 3 15 15 15 8 AWG
GENERAL EXPORT INSTALLATIONS
11 50 240 3 19 14 14 Size per local code
11 50 240 1 42 - 42 Size per local code
Majestic Convection OvenOwner’s Manual
C
O
O
L
O
N
L
O
H
I
O
F
F
O
N
HEATING ELEMENTS
CONTACTOR
L3 L2 L1
208V, 3 PH, 30 AMPS
POWER CONNECTION
6
5
4
3
2
1
6
5
4
3
2
1
G
HEATING ELEMENTS
CONTACTOR
L3 L2 L1
208V, 1 PH, 50 AMPS
POWER CONNECTION
ME/MSDE ELECTRIC OVEN
This manual suits for next models
14
Table of contents
Popular Convection Oven manuals by other brands

Whirlpool
Whirlpool MC8990XT Use & care guide

Fisher & Paykel
Fisher & Paykel OB30SD14PLX1 user guide

Wisco Industries
Wisco Industries 721 user manual

Toastmaster
Toastmaster TG50PC Specifications

Jenn-Air
Jenn-Air JDRP536WP-SP installation instructions

Inoxtrend
Inoxtrend GUA-304EB INSTRUCTIONS FOR THE INSTALLATION, USE AND MAINTENANCE

Vulcan-Hart
Vulcan-Hart C4ED Installation and operation manual

Whirlpool
Whirlpool OBI M50 Use & care guide

NuWave
NuWave Pro Plus Manual guide

KitchenAid
KitchenAid KEBN107Y Use and care guide

Diamond
Diamond PLANET 8 Instructions for installation, use and maintenance manual

Casselin
Casselin CFCV3 user manual