Ametek Reichert Tono-Vera Vet User manual

INSTRUCTIONS FOR USE
Tonometer
Tono-Vera™Vet

16308-101 Rev. A • 2
©2020 AMETEK, Inc.
Reichert and Reichert Technologies are registered trademarks of Reichert, Inc.
Tono-Vera, Ocu-Dot, ActiView, and ReichertSync are trademarks of Reichert, Inc.
AMETEK is a registered trademark of AMETEK, Inc.
All other trademarks are properties of their respective owners.
The information contained in this document was accurate at time of publication. Specifications subject to
change without notice. Reichert, Inc. reserves the right to make changes in the product described in this
manual without notice and without incorporating those changes in any products already sold.
ISO 13485 Certified – Reichert products are designed and manufactured under quality processes meeting
ISO 13485 requirements.
No part of this publication may be reproduced, stored in a retrieval system, or transmitted in any form or by any
means, electronic, mechanical, recording, or otherwise, without the prior written permission of Reichert, Inc.
CAUTION: Federal law restricts this device to sale by or on the order of a licensed veterinarian. Rx only.

16308-101 Rev. A • 3
Table of
Contents
Warnings and Cautions������������������������������������������������������������������������������������������������������������������������������������������������������������������������4
Symbol Information �����������������������������������������������������������������������������������������������������������������������������������������������������������������������������5
Introduction�������������������������������������������������������������������������������������������������������������������������������������������������������������������������������������������6
Unpacking Instructions......................................................................................................................................................................................... 7
In the Box�����������������������������������������������������������������������������������������������������������������������������������������������������������������������������������������������8
Tono-Vera™Vet Tonometer Starter Kit - Rechargeable 16309 .................................................................................................................. 8
Tono-Vera Vet Tonometer Starter it - AA Battery 16308............................................................................................................................. 8
Tono-Vera Vet Tonometer Identification ........................................................................................................................................................... 9
Instructions for Use �������������������������������������������������������������������������������������������������������������������������������������������������������������������������� 10
Installing the Batteries........................................................................................................................................................................................10
Rechargeable Battery Model.............................................................................................................................................................................10
AA Battery Model..................................................................................................................................................................................................10
Set Up Base............................................................................................................................................................................................................11
Install Wrist Strap.................................................................................................................................................................................................11
Turning Tono-Vera Vet On and O....................................................................................................................................................................11
Menu.........................................................................................................................................................................................................................12
Ocu-Dot™Probe Installation ..............................................................................................................................................................................13
Measurement Screen..........................................................................................................................................................................................14
Positioning..............................................................................................................................................................................................................15
Device Orientation................................................................................................................................................................................................15
Aligning....................................................................................................................................................................................................................16
Measuring...............................................................................................................................................................................................................17
Understanding Results .......................................................................................................................................................................................18
Data Transfer.........................................................................................................................................................................................................19
Connecting Ton-Vera Vet to the PC ..................................................................................................................................................................19
Transferring Data to the PC...............................................................................................................................................................................19
Tono-Vera Vet Training Aid.................................................................................................................................................................................20
Cleaning & Maintenance ������������������������������������������������������������������������������������������������������������������������������������������������������������������� 21
Probe Chamber .....................................................................................................................................................................................................21
Cleaning Tono-Vera Vet .......................................................................................................................................................................................22
Battery......................................................................................................................................................................................................................22
Storage. ...................................................................................................................................................................................................................22
Disposal...................................................................................................................................................................................................................22
Troubleshooting��������������������������������������������������������������������������������������������������������������������������������������������������������������������������������� 23
Specifications ������������������������������������������������������������������������������������������������������������������������������������������������������������������������������������ 25
Guidance Tables �������������������������������������������������������������������������������������������������������������������������������������������������������������������������������� 27
Warranty��������������������������������������������������������������������������������������������������������������������������������������������������������������������������������������������� 33

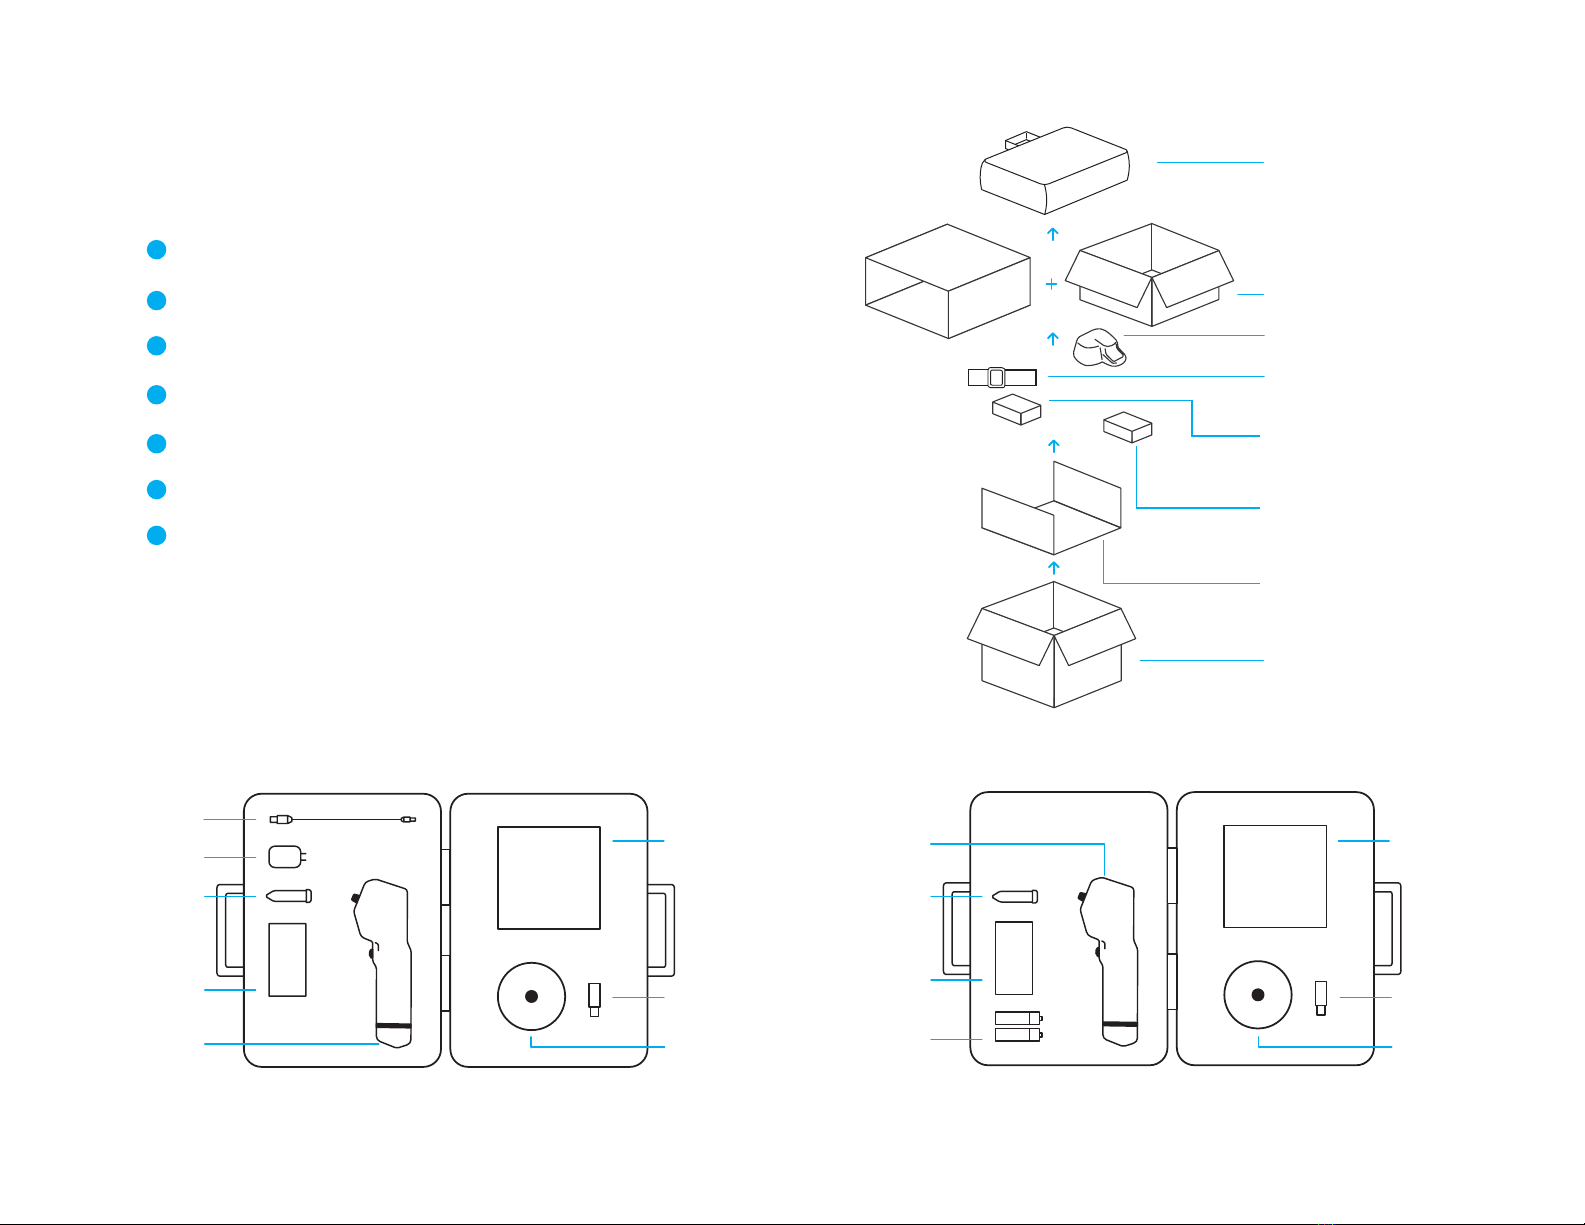
16308-101 Rev. A • 4
Reichert Technologies (Reichert) is not responsible for the safety and reliability of this instrument when
assembly, disassembly, repair or modification is made by unauthorized dealers or persons, or if instrument
is not used in accordance with its Instructions for Use.
Warnings and Cautions
WARNING: An instruction that draws attention to risk of injury or death.
WARNING: United States federal law and European regulations require that this device be purchased
only by a veterinarian or a person acting on behalf of a veterinarian.
WARNING: Do not repair or service this instrument without authorization from the manufacturer.
Any repair or service to this instrument must be performed by experienced personnel or dealers who
are trained by Reichert or serious injury to the operator or patient may occur.
WARNING: This instrument should be used in strict accordance with the instructions outlined in this
Instructions for Use guide. The safety of the operator and the performance of the instrument cannot
be guaranteed if used in a manner not specified by Reichert Technologies.
WARNING: Modifications to this instrument are not allowed. Any modification to this unit must be
authorized by Reichert or serious injury to the operator or patient may occur.
WARNING: Do not use an Ocu-Dot Tonometer Probe on more than one patient to help prevent cross
contamination. Do not clean or disinfect a probe and then use it. Probes are single-use only.
WARNING: To prevent contamination, do not touch the bare Ocu-Dot Tonometer Probe. Do not use
a probe if it touches a non-sanitized surface like a table or a floor. Properly dispose of a touched or
dropped probe (e.g. in a container for disposable needles).
WARNING: Always keep Ocu-Dot Tonometer Probes out of the reach of infants, animals, and young
children. The probes can become a choking hazard.
WARNING: Do not expose the battery to temperatures above 60ºC (140ºF) or disassemble the batteries.
Damage to this unit and/or serious personal injury may result.
WARNING: If an unusual rise in temperature on the handle of the instrument occurs, remove the
battery pack and batteries and contact Reichert Technical Support. Contact information is at the back
of this manual.
WARNING: Do not carry Tono-Vera Vet Li-Ion Rechargeable Battery Pack in a pocket, or close to your
person, as a burn injury may result.
WARNING: The battery should only be replaced with the battery specified in this manual. Use of
another battery may cause fire or an explosion.
WARNING: Do not place a shorting device between the battery terminals, or allow the battery to
become wet. Misuse or improper disposal of this battery may cause it to become very hot, ignite or
explode. Damage to this unit and/or serious personal injury may result.
WARNING: Never allow liquid leaking from the battery to get in your eyes or mouth as this liquid could
cause serious personal injury. If it comes in contact with your eyes or mouth, flush them immediately
with plenty of water and consult a doctor.
WARNING: The use of accessories or cables other than those specified, with the exception of those
sold by the manufacturer as replacement parts for internal components, may result in increased
emissions or decreased immunity of the equipment or system.
WARNING: Use of this equipment adjacent to or stacked with other equipment should be avoided
because it could result in improper operation. If such use is necessary, this equipment and the other
equipment should be observed to verify that they are operating normally.
WARNING: Portable RF communications equipment (including peripherals such as antenna cables
and external antennas) should be used no closer than 30 cm (12 inches) to any part of Tono-Vera Vet,
including cables specified by the manufacturer. Otherwise, degradation of the performance of this
equipment could result.
CAUTION: An instruction that draws attention to the risk of damage to the product.
CAUTION: Do not immerse Tono-Vera Vet Tonometer in fluids or damage to the electronics may occur.
CAUTION: Do not bump, jar, or drop the device because damage to the electronics may occur. If the
device is dropped, carefully inspect the device for damage.
CAUTION: Use of ammonia-based cleaners on the liquid crystal display (LCD) may cause damage to
the display. See maintenance section for detailed cleaning instruction.
CAUTION: Do not attempt to sterilize Tono-Vera Vet Tonometer or damage to the electronics may occur.
CAUTION: Do not use solvents on any part of this instrument as damage to the unit may occur. See
maintenance section for detailed cleaning instructions
CAUTION: Do not autoclave or disinfect using high temperatures exceeding the recommended
temperatures indicated in the specifications section of this manual or damage to the unit may occur.
CAUTION: Do not attempt to modify Tono-Vera Vet Tonometer or Tono-Vera Vet Li-Ion Rechargeable
Battery Pack or damage to the device may occur.
CAUTION: Do not store Tono-Vera Vet Tonometer without the probe cover or debris may enter the unit
and cause malfunctions.
CAUTION: Medical Electrical Equipment needs special precautions regarding EMC and needs to be
installed and put into service according to the EMC information provided in this guide. Portable and
Mobile RF communications equipment can aect Medical Electrical Equipment.
CAUTION: Electromagnetic interference from other devices may aect this instrument.
If interference is present, turn o other electronic devices, or remove them from the immediate area
while operating this instrument.
CAUTION: Portable and mobile RF communications equipment can aect Medical Electrical Equipment.
CAUTION: This instrument is not to be used near high-frequency emitting surgical equipment.
CAUTION: Ocu-Dot Tonometer Probes should be stored between -10°C and 55°C (14°F-131°F).
CAUTION: If liquid is spilled on the device, remove the battery and return Tono-Vera Vet to Reichert for
service. Liquid may damage the electronics.

16308-101 Rev. A • 5
Symbol Information
The following symbols appear on the device.
Caution
REF Catalog Number
SN Serial Number
Date of Manufacture
Manufacturer
Waste of Electrical and Electronic Equipment
Consult Instructions for Use
Fragile Contents in Shipping Container—Handle with Care
Do not get Shipping Container Wet
This Side Up
Type BF Applied Part
Compliance with relevant EU requirements
Refer to Instructions for Use
Authorized Representative in the European Community
Symbols for Ocu-Dot Tonometer Probes only
Do not reuse. Single-Use
Batch Code
Use-by Date
LOT

16308-101 Rev. A • 6
Introduction
Congratulations on your purchase of the Tono-Vera™Vet Tonometer,
a handheld veterinary tonometer.
Tono-Vera Vet Tonometer is a prescription-only device intended for
measuring intraocular pressure (IOP) during routine eye examinations
or when increased IOP is suspected. The device is for use by
properly trained professionals such as veterinarians and veterinary
technicians.
NOTE: Tono-Vera Vet Tonometer is not approved for use on humans.
This Instructions for Use guide is designed as a training and
reference manual for operation, maintenance, and troubleshooting.
We recommend that you read it carefully prior to use and follow the
instructions in the guide to ensure optimum performance of your new
device. If used properly, Tono-Vera Vet Tonometer will provide you with
fast, accurate, and reliable measurements for many years.
Please retain this manual for future reference and to share with
other users. For additional copies of this manual or questions related
to Tono-Vera Vet Tonometer, contact your local authorized Reichert®
distributor or contact Customer Service directly at:
Phone: +1-716-686-4500
Toll Free (US Only): 888-849-8955
Fax: +1-716-686-4555
Email: [email protected]om
Indications for Use
The indications for use include measuring of intraocular pressure of
animal eyes for the purpose of aiding in the diagnosis and monitoring
of glaucoma.
Contra-Indications
None.
Device Description
Tono-Vera Vet Tonometer (hereinafter referred to as Tono-Vera Vet) is
a handheld tonometer which allows IOP to be measured accurately,
rapidly, and without an anesthetic.
Our ActiView™Positioning System (patent pending) guides the
operator to proper alignment on the apex of the cornea with the
Ocu-Dot™Tonometer Probe (hereinafter referred to as Ocu-Dot
Probe). When set to ActiView Auto Measure mode (recommended),
Tono-Vera Vet automatically takes IOP measurements once properly
aligned, providing a high confidence measurement in as few as three
measurements. When set to ActiView Manual Measure mode or
Manual Measure mode, Tono-Vera Vet takes measurements only when
the Manual Measure Button is pressed.
Reichert Tono-Vera Vet incorporates a Bluetooth®module which
provides wireless communication to transfer data to an EMR system.

16308-101 Rev. A • 7
Introduction (continued)
Unpacking Instructions
Retain original packaging to use if future transportation is required.
Open the Outer Shipping Box and remove the Inner Box.
Slide the Sleeve off the Inner Box.
Remove the Carry Case from the Inner Box.
Remove the Accessory Pack beneath the Inner Box.
Verify that all parts and accessories are included.
If anything is missing, contact Reichert at the contact
information located on the last page of this manual.
1
2
3
4
5
6
7
Tono-Vera Vet Tonometer Starter Kit - Rechargeable Tono-Vera Vet Tonometer Starter Kit - AA Battery
USB Cable
*Charging Plug
Spare Probe
Chamber Kit
Spare Probe
Chamber Kit
Quick Start
Guide and
Warranty Card
USB with
Instructions
USB with
Instructions
Training Aid Training Aid
Quick Start
Guide and
Warranty Card
Spot for
Ocu-Dot
Probe Box
Spot for
Ocu-Dot
Probe Box
AA Batteries
Outer Shipping Box
Carry Case
Tono-Vera Vet Base
Ocu-Dot Probes
Accessory Pack
Sleeve and Inner Box
Tono-Vera Case
Shoulder Strap
Universal Charging Plugs
(Part of the Charging Plug*)
Tono-Vera Vet
Tono-Vera Vet

16308-101 Rev. A • 8
Tono-Vera Vet Tonometer Starter Kit - Rechargeable 16309 Tono-Vera Vet Tonometer Starter Kit - AA Battery 16308
Tono-Vera™Vet Tonometer
16308-800
Tono-Vera™Vet Tonometer
16308-800
Tono-Vera™Vet Charging Base
16316
Tono-Vera™Vet Base
16314
Tono-Vera™Vet Li-Ion
Rechargeable Battery Pack
16317
Tono-Vera™Vet AA Battery Pack
16315
Charging Plug
16305-404
USB-C Charging Cable
16305-405
Pack of Four AA Batteries
16305-097
Tono-Vera™ Vet Training Aid
16308-878
Tono-Vera™Spare Probe
Chamber Kit
16305-877
Tono-Vera™Spare Probe
Chamber Kit
16305-877
Tono-Vera™ Vet Quick Start Guide
16308-105
Tono-Vera™ Vet Carry Case
16305-399
Tono-Vera™ Vet Carry Case
16305-399
Tono-Vera™ Vet USB with Instructions
16308-106
Tono-Vera™ Vet USB with Instructions
16308-106
Wrist Strap
13851-096
Wrist Strap
13851-096
Ocu-Dot™ Tonometer
Probes - 100 Count
16307
Warranty Card
16305-111
Warranty Card
16305-111
In the Box
Tono-Vera™ Case
Shoulder Strap
16305-131
Tono-Vera™ Case
Shoulder Strap
16305-131
Tono-Vera™ Vet Training Aid
16308-878
Tono-Vera™ Vet Quick Start Guide
16308-105
Ocu-Dot™ Tonometer
Probes - 100 Count
16307

16308-101 Rev. A • 9
In the Box (continued)
Tono-Vera Vet Tonometer Identification
Tono-Vera Vet
Probe Chamber
Manual
Measure
Button
Display
Menu Button
Canthus
Mark
Battery Pack
Release
USB-C Charging Port
(Rechargeable Model Only)
Battery Pack
Release
Tono-Vera Vet Probe
Chamber Collar
Multifunction
Buttons Canthus
Mark

16308-101 Rev. A • 10
Instructions for Use
Installing the Batteries
CAUTION: Use only the battery type specified in technical specification
section of this manual.
Rechargeable Battery Model
Install the country-specific adaptor to the Charging Plug. Insert one end of
the USB-C Charging Cable into the Charging Plug, and the other end into the
back of the Tono-Vera Vet Charging Base.
Connect the Tono-Vera Vet Charging Base to an AC wall outlet.
Slide the Tono-Vera Vet Li-Ion Rechargeable Battery Pack into Tono-Vera Vet
until the Battery Pack Releases click into place.
Place Tono-Vera Vet into the Tono-Vera Vet Charging Base with the screen
facing the user.
When the device is properly docked, a beep will sound and the battery
charging symbol and percentage charged will briefly appear on the screen.
NOTE: The device may also be charged using the USB-C Charging Cable and
the Charging Plug by inserting one end of the USB-C Charging Cable into the
USB-C Charging Port at the bottom of Tono-Vera Vet.
11
2
2
3
44 5
5
AA Battery Model
Insert the four AA batteries into the Tono-Vera Vet AA Battery Pack.
Be sure to install the batteries so the positive and negative ends
are aligned according to the inscription on the holder.
Slide the Tono-Vera Vet AA Battery Pack into Tono-Vera Vet until the
Battery Pack Releases click into place.
1
2
1 2
3
95%

16308-101 Rev. A • 11
Open the box and fold the flap back along the side.
Insert the Ocu-Dot Probe box with the tray into the back of the Base
with the opening facing forward. The box will stop halfway down. Push
the plastic Ocu-Dot Probe tray all the way forward by inserting your
finger into the circular cutout at the back of the box.
Use the recess carved into the top of the base to hold an Ocu-Dot
Probe Tube.
Insert the loop of the Wrist Strap into the opening at the base
of Tono-Vera Vet.
Pull the other end of the Wrist Strap through the loop until
the Wrist Strap is secured in place.
Install Wrist Strap
It is recommended that you always use the included Wrist Strap when
using Tono-Vera Vet to prevent the device from being dropped.
11
1
1
1
2
2
1
2
2
3
3
Instructions for Use (continued)
Set Up Base
The Tono-Vera Vet Base features a convenient dispenser for the
Ocu-Dot Probes and also includes a recess to hold the empty
Probe Tube while taking a measurement.
Turning Tono-Vera Vet On and O
Press any button to turn Tono-Vera Vet on. The screen will display the
Reichert and Tono-Vera Vet logos. After startup, the load probe notification
will be displayed if a probe is not already loaded. Once a probe is loaded, the
measurement screen will appear.
If the batteries are low, a low battery warning will briefly appear. If the
batteries are depleted, a dead battery warning will appear and the Tono-Vera
Vet will shut off.
To turn off, press and hold the center Multifunction Button for three seconds.
Wrist Strap
Loop
Probe Tube
Holder
Pull Through

16308-101 Rev. A • 12
Brightness
Low, medium, or high screen
brightness settings available.
Bluetooth
On: Device can
connect to a
computer to transfer
measurements to an
EMR system.
Off: Bluetooth off.
System Info
Displays Software Version,
the serial number, and the
device name.
Species
Dog, Cat, Horse, or
Rabbit.
Measure Mode-
ActiView Auto Measure:
Device automatically
takes measurements
when ActiView Positioning
System is properly
aligned to the eye.
Measure Mode-
ActiView Manual
Measure: ActiView
Positioning System is on,
but device will only take
measurements when
blue Manual Measure
Button is pressed.
Measure Mode-
Manual Measure:
ActiView Positioning System
is off. Device will only take
measurements when blue
Manual Measure Button is
pressed.
Volume
Off, low, or high volume
settings available.
Language
English, German,
French, Spanish,
Italian, or
Portuguese.
Exit
Exit the menu.
Measurements
1: (Quick) Provides a reliable IOP
result in one fast measurement.
3+: Takes multiple
measurements (minimum 3 /
maximum of 6) for instances
when a higher-confidence IOP
result is desired.
Sleep
30, 60, or 90 second
sleep timer available.
Instructions for Use (continued)
Menu
Press the Menu Button to access the Menu. Press the left and right
Navigation Buttons to access the different menu screens. Press the
Select Button to change the current setting/selection. The highlighted
option is the active selection.
To exit the Menu, navigate to the Exit screen and press the Select Button,
or press the Manual Measure Button at any time.
+
3
10.210.4
OD
Last
Measurement
OS
Navigation
Buttons
Select
Selected
(White)
Not Selected
(Grayed Out)
Menu
Title
30s
90s
60s
TonoVera-28461
Last Measurement
Displays the
species and results
of the previous
measurement. These
values can be exported
via Bluetooth.
10.210.4
OD
Last
Measurement
OS

16308-101 Rev. A • 13
If Tono-Vera Vet is on, the tonometer will automatically secure the Ocu-Dot
Probe. If it is not, press any button to turn the device on and secure the
Ocu-Dot Probe.
NOTE: The Probe Tube can be used to dispose of the probe, which may be
placed in a sharps container to prevent any injury.
WARNING: To prevent contamination, do not touch the bare Ocu-Dot Probe.
Do not use a probe if it touches a non-sanitized surface like a table or a
floor. Properly dispose of a touched or dropped probe (e.g. in a container
for disposable needles).
WARNING: Do not use an Ocu-Dot Probe on more than one patient to
prevent cross contamination.
WARNING: When Tono-Vera Vet turns off, the probe will be ejected.
Instructions for Use (continued)
Ocu-Dot Probe Installation
Pull off the Tono-Vera Vet Protective Probe Chamber Cover from the
Tono-Vera Vet Probe Chamber. Take a new Ocu-Dot Probe Tube from
the box and remove the cap.
Insert the open end of the Ocu-Dot Probe Tube into the Probe Chamber.
Rotate Tono-Vera Vet up so the Ocu-Dot Probe can slide into the Probe
Chamber.
To remove the Ocu-Dot Probe, press and hold the center Multifunction
Button for three seconds to turn the device off and eject the Ocu-Dot
Probe. It is recommended to eject the used Ocu-Dot Probe directly into
the Probe Tube for disposal.
You may store the empty Ocu-Dot Probe Tube in recess on base.
11
1
1
22
3
4
5
3
5
Store Ocu-Dot Probe
Tube in recess.

16308-101 Rev. A • 14
Instructions for Use (continued)
Measurement Screen
ActiView Positioning System Area: The full-color area on screen where
the eye is aligned to the device.
Battery Indicator: The battery icon indicates the battery level.
Species: The species selected. Options are Dog, Cat, Horse, or Rabbit.
Alignment Target: The alignment area, consisting of a circular center
target and level indicators.
Probe Angle Indicator: Two colored marks (green or yellow) appear on
each side of the Alignment Target, indicating the probe angle of the device.
Number of Measurements: The dots indicate the measurements required
and completed (1 or 3+). An empty white dot indicates a required
measurement. A solid yellow dot indicates an unreliable measurement. A
solid blue dot indicates a completed, reliable measurement.
Measure Mode: If AUTO is illuminated, device will automatically measure
when properly aligned. If AUTO is grayed out (ActiView Manual Measure
or Manual Measure modes), then the Manual Measure Button must be
pressed to take a measurement. Pressing and holding the blue Manual
Measure Button will take continuous measurements.
OD: Right eye. The circle will be blue if selected.
OS: Left eye. The circle will be blue if selected.
Menu: To access the Menu, press the center button beneath the Menu icon.
Refer to the Menu section of this manual for details. If an X icon appears,
measurements have been taken. Press the button beneath the X to clear
out all measurements. If Bluetooth is activated and connected, an export
icon (up arrow) will appear after measurements are taken. Press the
button beneath the arrow to transfer the data to an EMR system.
1
1
2
3
4
5
6
7
8
1
1
2
3
4
5
6
7
8
Battery Indicator
Species
Probe Angle Indicator
OS (Left Eye)
OD (Right Eye)
Select OD/OS
Buttons
Menu
Alignment Target
Number of
Measurements
ActiView Positioning
System Area
Measure Mode
9
10
11
9
10
11 Select OD/OS Buttons: Select OD or OS by pressing the corresponding button.

16308-101 Rev. A • 15
Instructions for Use (continued)
Positioning
To obtain quick, easy, and accurate IOP results,
Tono-Vera Vet features the ActiView Positioning System to guide
users to proper alignment.
The default Measure Mode is ActiView Auto Measure which
enables automatic measurements upon correct alignment.
Canthus marks on the outside of the device also aid with
alignment.
Turn Tono-Vera Vet on by pressing any button.
Install a new Ocu-Dot Probe.
OD (right eye) will automatically be selected, indicated by
a blue circle.
NOTE: To start on the OS (left eye), press the button
beneath the OS area to select the left eye.
Position the device so that the two canthus marks located
at the front of Tono-Vera Vet (one on each side) are
level with the patient’s canthus. Tono-Vera Vet is able to
measure at a probe angle of ±15º, but the Ocu-Dot Probe
must remain perpendicular to the eye.
The correct working distance is 6 mm (±2 mm) from
the eye.
1
1
2
3
4
5
Correct Probe Angle
Incorrect Probe Angle
Device Orientation
Tono-Vera Vet can be rotated a full 360º around the axis of
the Ocu-Dot Probe, as long as the probe is kept parallel to
the ground, within the ±15º probe angle range.
Device Orientation
6 mm (±2mm)
15°
15°

16308-101 Rev. A • 16
Distance & Centration (Approx. 6 mm)
Probe Angle (±15º)
Instructions for Use (continued)
Aligning
Using the ActiView Positioning System, slowly align Tono-Vera Vet so the device
is level with the eye.
NOTE: Tono-Vera Vet is able to measure at a probe angle of ±15º, but the Ocu-
Dot Probe must remain perpendicular to the eye. The Probe Angle Indicators
located on the left and right side of the positioning target will help with the
probe angle. The Probe Angle Indicators will be yellow if the probe angle is too
high or too low, and will be green when the probe is within the correct probe
angle range. The device will not measure if the probe is outside of the ±15º
probe angle range.
Using the ActiView Positioning System, slowly align Tono-Vera Vet so the device
is centered over the pupil and the Ocu-Dot Probe is approximately 6 mm from
the apex of the cornea.
A colored ring will appear when the device detects the eye. The size, color, and
position of the ring indicate alignment and distance.
The goal is to obtain a green ring directly over the central alignment target. This
indicates proper distance and proper alignment.
Yellow Ring
Device is too far away or off-center. Move closer or more centered on the eye.
Green Ring
Proper alignment and distance obtained.
Large Red Ring
Device is getting too close. Move the device further away from the eye.
Large Red Stop Sign
STOP! Device is too close. Move the device further away from the eye.
2
3
1
Yellow Ring:
Too Far and/or O-Center
Yellow Probe Angle Indicators:
Probe Angle Too High
Green Ring:
Proper Distance and Centration
Green Probe Angle Indicators:
Proper Probe Angle Alignment
!
Large Red Ring:
Too Close
Beep Will Sound
Large Red Stop Sign:
Too Close
Beep Will Sound

16308-101 Rev. A • 17
Instructions for Use (continued)
Measuring
If Measure Mode is set to ActiView Auto Measure, measurements will be
taken automatically when Tono-Vera Vet is aligned correctly. If Measure
Mode is set to ActiView Manual Measure or Manual Measure, press the
blue Manual Measure Button to measure upon correct alignment.
NOTE: The blue Manual Measure Button can be pressed at any time if the
operator wishes to override the auto measurement system. However, this
may result in less reliable measurements. Measurements will only be
taken if the device is within the ±15º probe angle range.
The measurement dots indicate the number of and status of
measurements needed to obtain the Final IOP Result.
Each empty white dot indicates a required measurement. A solid blue
dot indicates a successful measurement. A solid yellow dot indicates an
unsuccessful measurement which must be retaken.
When Measurements are set to 1 (Quick), only one meaurement will
be needed to obtain a high-confidence IOP result. When set to 3+,
measurements will be taken until a high-confidence IOP result is obtained,
a minimum of three measurements and a maximum of six. If more than
three measurements are required, an empty gray dot will turn white,
indicating another measurement is required.
NOTE: When measurements are completed, the IOP will be displayed in
a large colored ring on the screen. Refer to the Understanding Results
section of this manual for detailed information.
After measuring the first eye, the device will automatically select the next
eye to measure.
WARNING: If the device takes a measurement while the patient blinks, the
probe could potentially become caught by the patient’s eyelashes. If this occurs,
simply dispose of the probe and begin the examination again with a new probe.
CAUTION: Do not place device on a surface with the Ocu-Dot Probe or
Probe Chamber facing down. This may damage the device and Ocu-Dot
Probe. Place device on its side if the device must be laid down on a surface.
11
2
3
2 3
Manual
Measure
Button
12.514.5
OD IOP
Select and Clear
OD/OS Buttons
Clear
Number of
Measurements

16308-101 Rev. A • 18
Instructions for Use (continued)
Understanding Results
High Confidence Final IOP Result
Once enough measurements are taken for a high confidence Final
IOP Result, the Final IOP Result will be briefly displayed in a large
green ring. After, the measurement screen will reappear and the
corresponding OD or OS circle will have a green ring around it.
Low Confidence Final IOP Result
If the Manual Measure Button was pressed during ActiView Auto
Measure Mode, the Final IOP Result will be briefly displayed in a
yellow ring. After, the measurement screen will reappear and the
corresponding OD or OS circle will have a yellow ring around it.
If the other eye is selected before sufficient measurements
were taken to obtain a High Confidence Final IOP Result, the
corresponding OD or OS circle will appear in yellow.
Retake Measurement
If there is a high variability between measurements (high standard
deviation) the Retake Measurement arrow will appear with a large
orange ring around it. Retake the measurement to obtain a reliable
Final IOP Result.
NOTE: The Retake Measurement arrow will not apear when
Measurement Mode is set to 1 (Quick).
11
2
2
33
14.5
OD
8.7
OD
OD
14.5
8.7

16308-101 Rev. A • 19
Instructions for Use (continued)
Data Transfer
Tono-Vera Vet is capable of transmitting data via Bluetooth® to EMR,
using ReichertSync™Software. To successfully transmit data, Tono-
Vera Vet must be paired with a PC that has ReichertSync installed on
it. To obtain a copy of ReichertSync, contact the Reichert Technical
Support Group at the contact information at the back of this manual.
Install ReichertSync on your PC. Refer to the ReichertSync
Instructions for Use to set up Tono-Vera Vet in ReichertSync.
Navigate to the Bluetooth screen in the Menu.
Follow the directions in ReichertSync to pair Tono-Vera Vet and
the PC. When Bluetooth is enabled, a Bluetooth icon will appear
in the upper right corner beneath the Battery Indicator. This
indicates the status of the Bluetooth connection.
After obtaining Final IOP Results, press the center Multifunction
Button to transfer data to the PC. A countdown may appear
indicating that data is transferring.
Once the data has been transferred, a Bluetooth icon in a green ring
will briefly appear on the screen. The IOP measurements will clear
out and the device will be ready to take a new measurement.
NOTE: If an error occurs, the Bluetooth symbol will appear in an
orange ring. Refer to the Troubleshooting section of this manual.
NOTE: After Tono-Vera Vet is paired to the PC, the Bluetooth
connection will automatically reconnect when the device is powered
up. If Tono-Vera Vet does not automatically reconnect to the PC, refer
to the Troubleshooting section of this manual.
To disable Bluetooth, navigate to the Bluetooth screen in the Menu
and press the Select Button. The large Bluetooth icon will turn gray
and the small Bluetooth icon in the upper right will disappear.
1
1
2
3
4
5
Press the Select Button to enable
Bluetooth. The Bluetooth icon will
turn white when Bluetooth is enabled.
1
2
Connecting Tono-Vera Vet to the PC
Transferring Data to the PC
No Dots:
Not Connected
Green Dots:
Connected and Able to
Transfer Data
TonoVera-28461
14.514.5

16308-101 Rev. A • 20
Instructions for Use (continued)
Tono-Vera Vet Training Aid
The included Training Aid allows users to become familiar with the
operation of Tono-Vera Vet. The Training Aid is designed to simulate
the experience of aligning the device using the ActiView Positioning
System to take measurements.
Turn Tono-Vera Vet on and install a new Ocu-Dot Probe.
Hold the Training Aid in the palm of your hand. Using the on-screen
ActiView Positioning System, slowly align Tono-Vera Vet so the
Ocu-Dot Probe tip is centered over the training eye, and at the correct
distance. The alignment ring and level indicators will turn green when
the device is properly aligned for both distance, centration, and probe
angle. Refer to the Positioning, Aligning, and Measuring sections of this
manual for detailed instructions.
After a successful measurement, the Final IOP Result will read “>99”
and briefly appear in a large orange ring, indicating a successful
Training Aid measurement. After, the orange ring and “>99” will appear
in the selected eye as the Final IOP Result for that eye.
NOTE: The Training Aid eye is a hard material, and the IOP value will
always read as greater than 99. Any IOP measurement over 99
will appear as “>99” and appear in an orange ring.
At any point, measurements can be cleared by pressing Clear (×).
Practice taking IOP measurements with the Training Aid as many
times as desired.
After practice measurements are finished, dispose of the Ocu-Dot
Probe by ejecting it into the Probe Tube. Refer to the Ocu-Dot Probe
Installation section of this manual for more detailed instructions on
disposing the Ocu-Dot Probe.
NOTE: The Training Aid may not work well in very bright environments.
1
1 1
3
2
2
3
4
5
6
>99
Approx. 6 mm
Table of contents