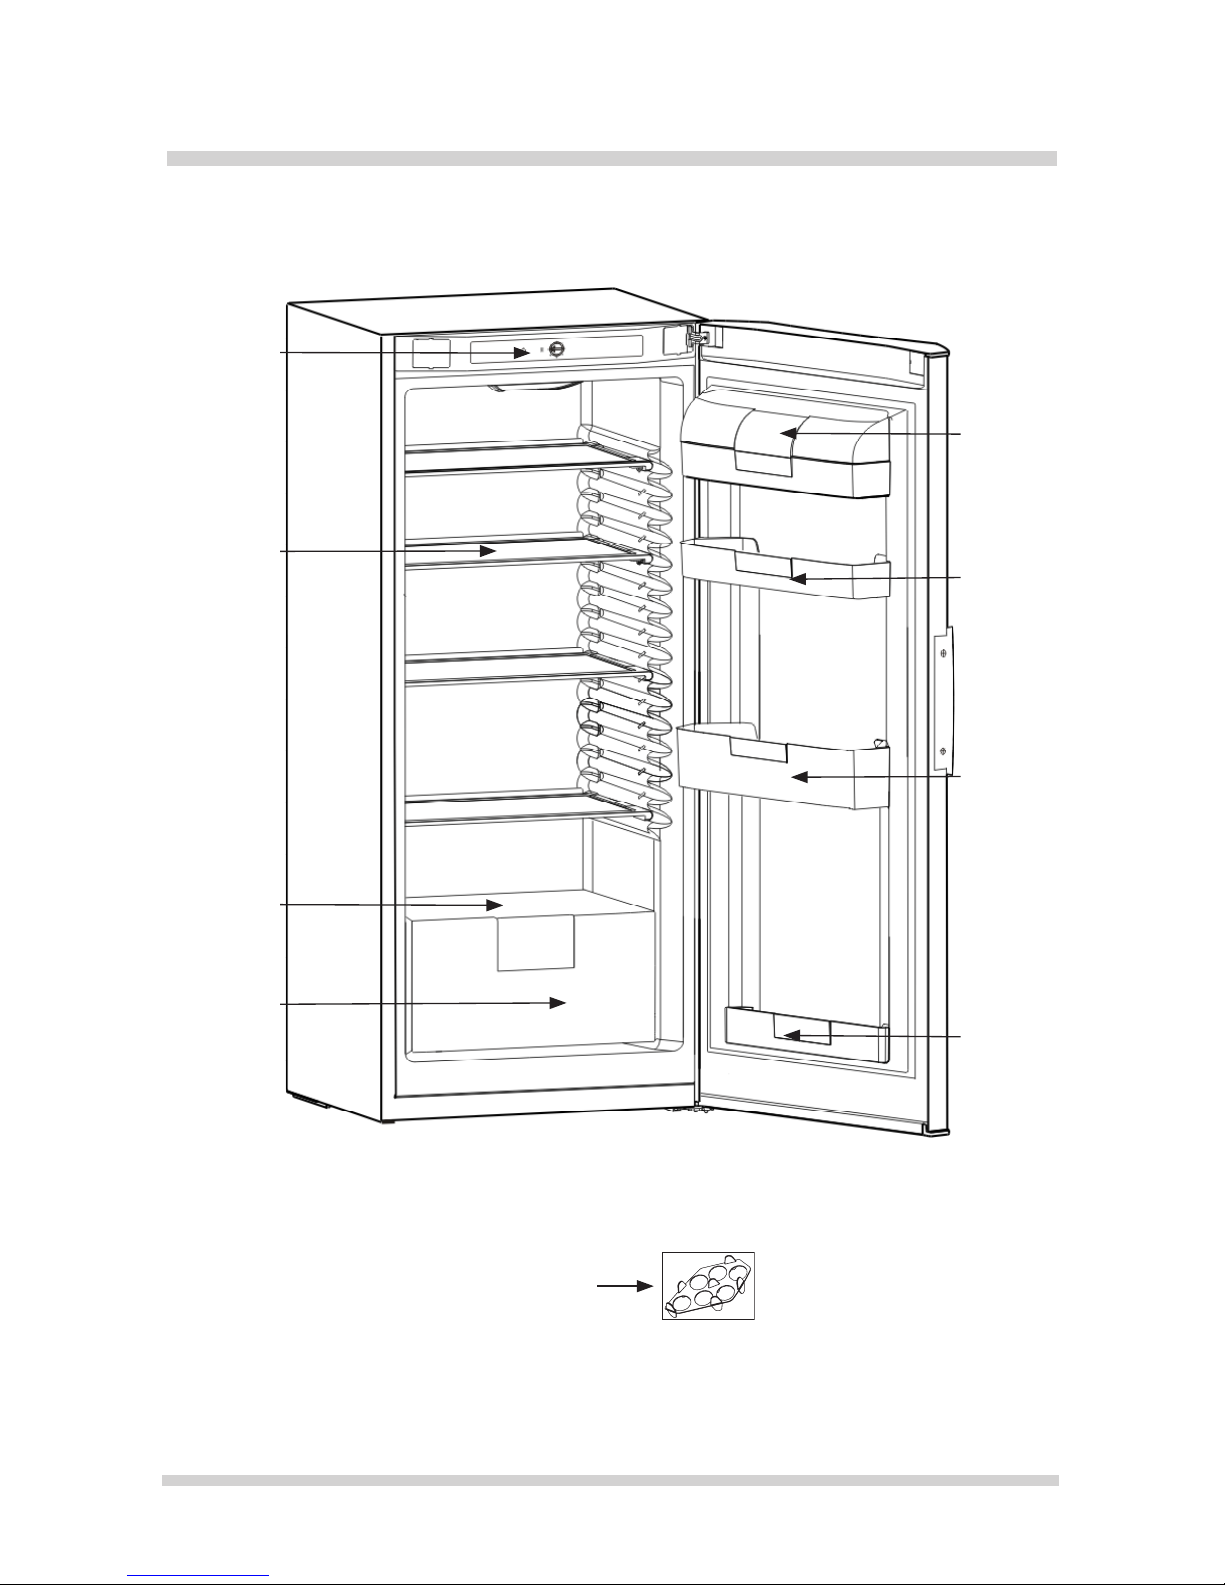
Amica FC202BSW User manual

FC202BSW
OPERATING MANUAL
FRIDGE

2
Note!
This fridge is intended for use at home only.
The manufacturer reserves the right to introduce modications, which do not affect the
operation of the appliance. The changes in the equipment, as well as the inside and
outside decoration, which do not affect its functionality and safety are permissible.
Dear Customer,
The Amica fridge is a combination of exceptional user-friendliness and excellent efciency.
Prior to dispatch, each unit was carefully checked for its safety and operating capabilities.
Before starting the appliance, please read this operating manual carefully.
GENERAL INFORMATION

3
TABLE OF CONTENTS
Introduction
Installation
Operation and
functions
Clearing
Environmental
protection
Specication
Construction and equipment of the appliance.............................................4
Guidelines concerning the safety of use.....................................................7
Installation and operating conditions of the appliance.................................9
Change in the door hinging........................................................................11
Description of the appliance......................................................................13
Storage of products in the fridge...............................................................14
Defrosting, washing and maintenance.......................................................15
Trouble-shooting........................................................................................17
Ozone layer protection...............................................................................19
Packaging..................................................................................................19
Disposal of the equipment.........................................................................19
Specication...............................................................................................20

4
CONSTRUCTION AND EQUIPMENT OF THE APPLIANCE
Example: model FC ...
1
2
3
4
5
6
7
8
9
Additional equipment

5
CONSTRUCTION AND EQUIPMENT OF THE APPLIANCE
The accurate description of the equipment for the model of the fridge purchased by you
may be found in the table on next page.
1 Control panel
2Glass Shelf
3 Glass shelf above the vegetable compart-
ment
4 Vegetable compartment
5 Medium door compartment with a lid
6 Medium door shelf
7 Large door shelf
8 Small door shelf
9 Egg tray

6
Items of equipment FC202BSW
Equipment of the fridge
Glass shelf 4
Glass shelf above the
vegetable compartment
1
Vegetable compartment 1
Large door shelf 1
Small door shelf 1
Medium door shelf 2
Egg tray 2
Lighting type incandescent
bulb
EQUIPMENT

7
GUIDELINES CONCERNING THE SAFETY OF USE
lThe Manufacturer shall not be held
liable for the damage arising from
the failure to observe the principles
contained in this manual.
lKeep this manual for future re-
ference, or to pass it over to the
possible next user.
lThis appliance is not intended for use
by persons (including children) with
limited physical, sensual or psychical
capabilities and persons who lack
experience or familiarity with the ap-
pliance, unless attended or in accor-
dance with the operating manual for
the appliance delivered by persons
responsible for their safety.
lDo not allow the unattended
children to use the appliance. Do
not allow them to play with the
appliance. They must climb insi-
de the drawers and swing on the
doors.
lThe fridge operates properly at the
SN-T ambient temperature (see
page 21). Do not use it in the cellar,
unheated summer cottage during
autumn and winter.
lWhen placing, moving, lifting the
appliance, do not hold the door han-
dles, pull the condenser at the rear
part of the refrigerator and touch the
compressor unit.
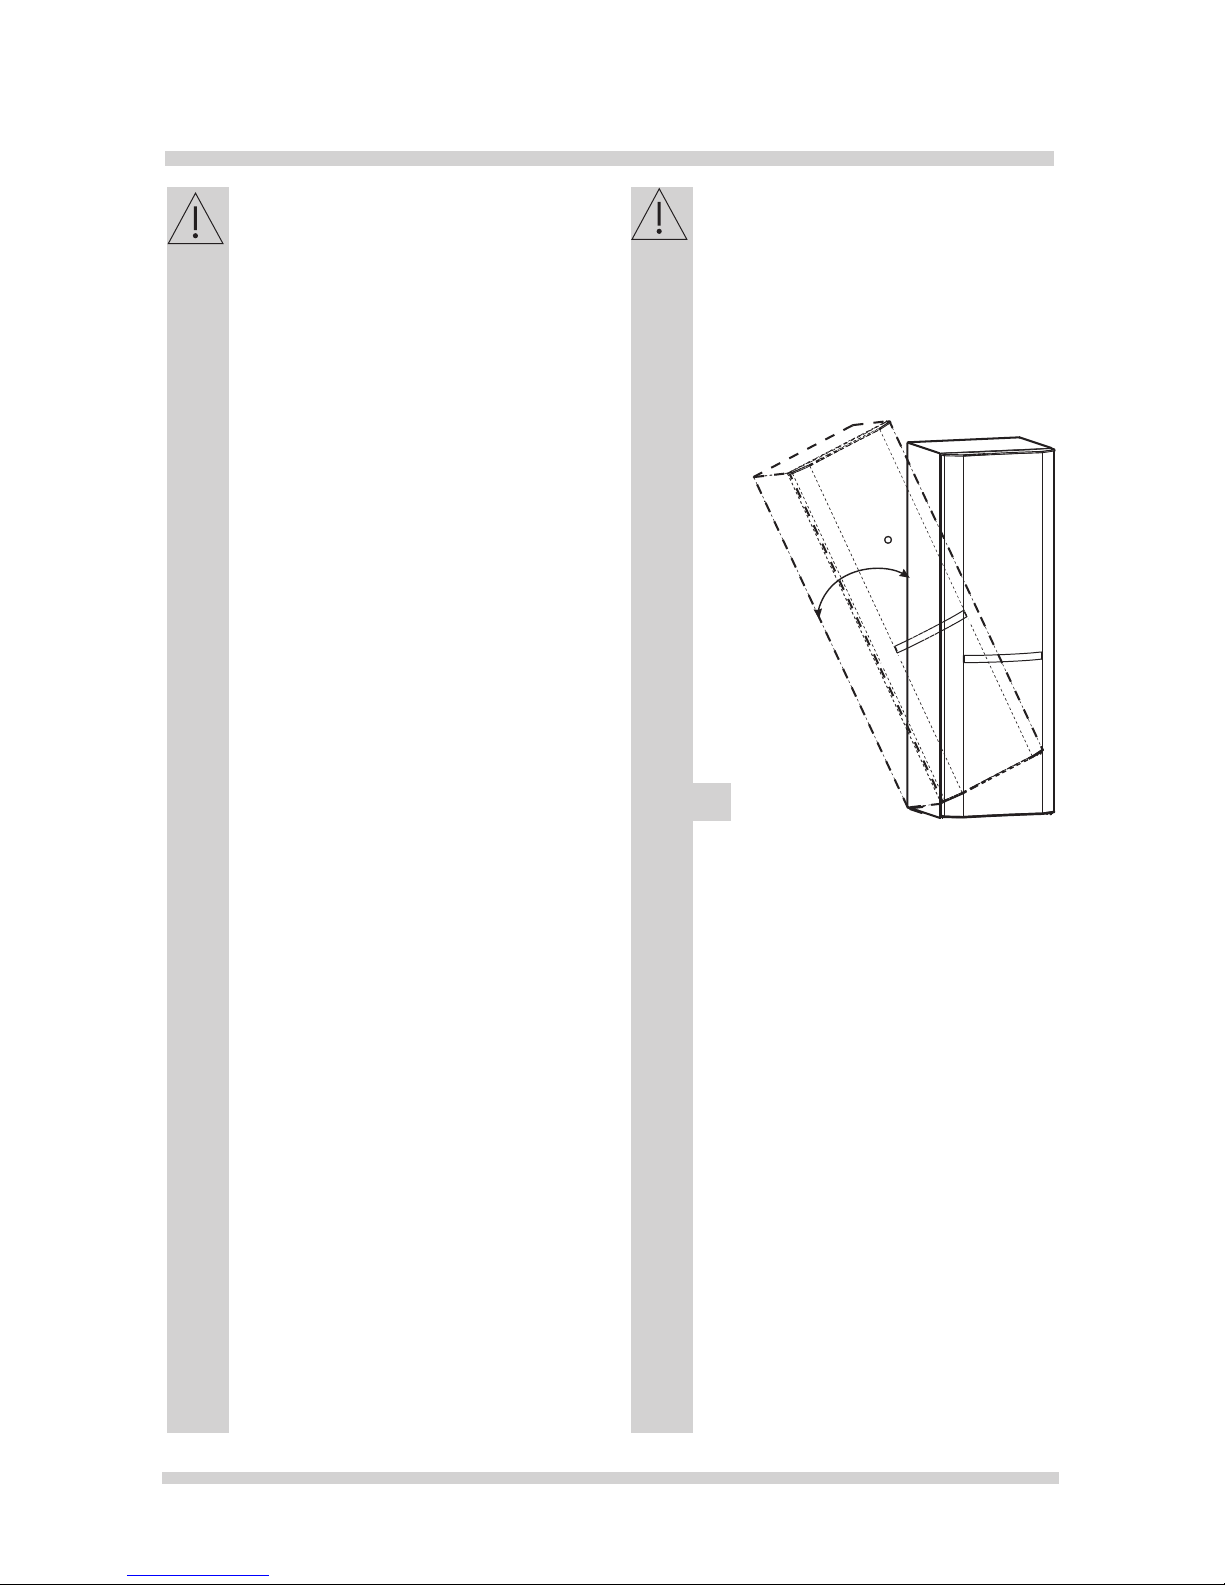
lWhen transporting, moving or
placing the fridge do not tilt it by
more than 40° from the vertical
position. Should such a situation
occur, the appliance may be swit-
ched on after minimum 2 hours
from its placement in the right
position (g.1).
1
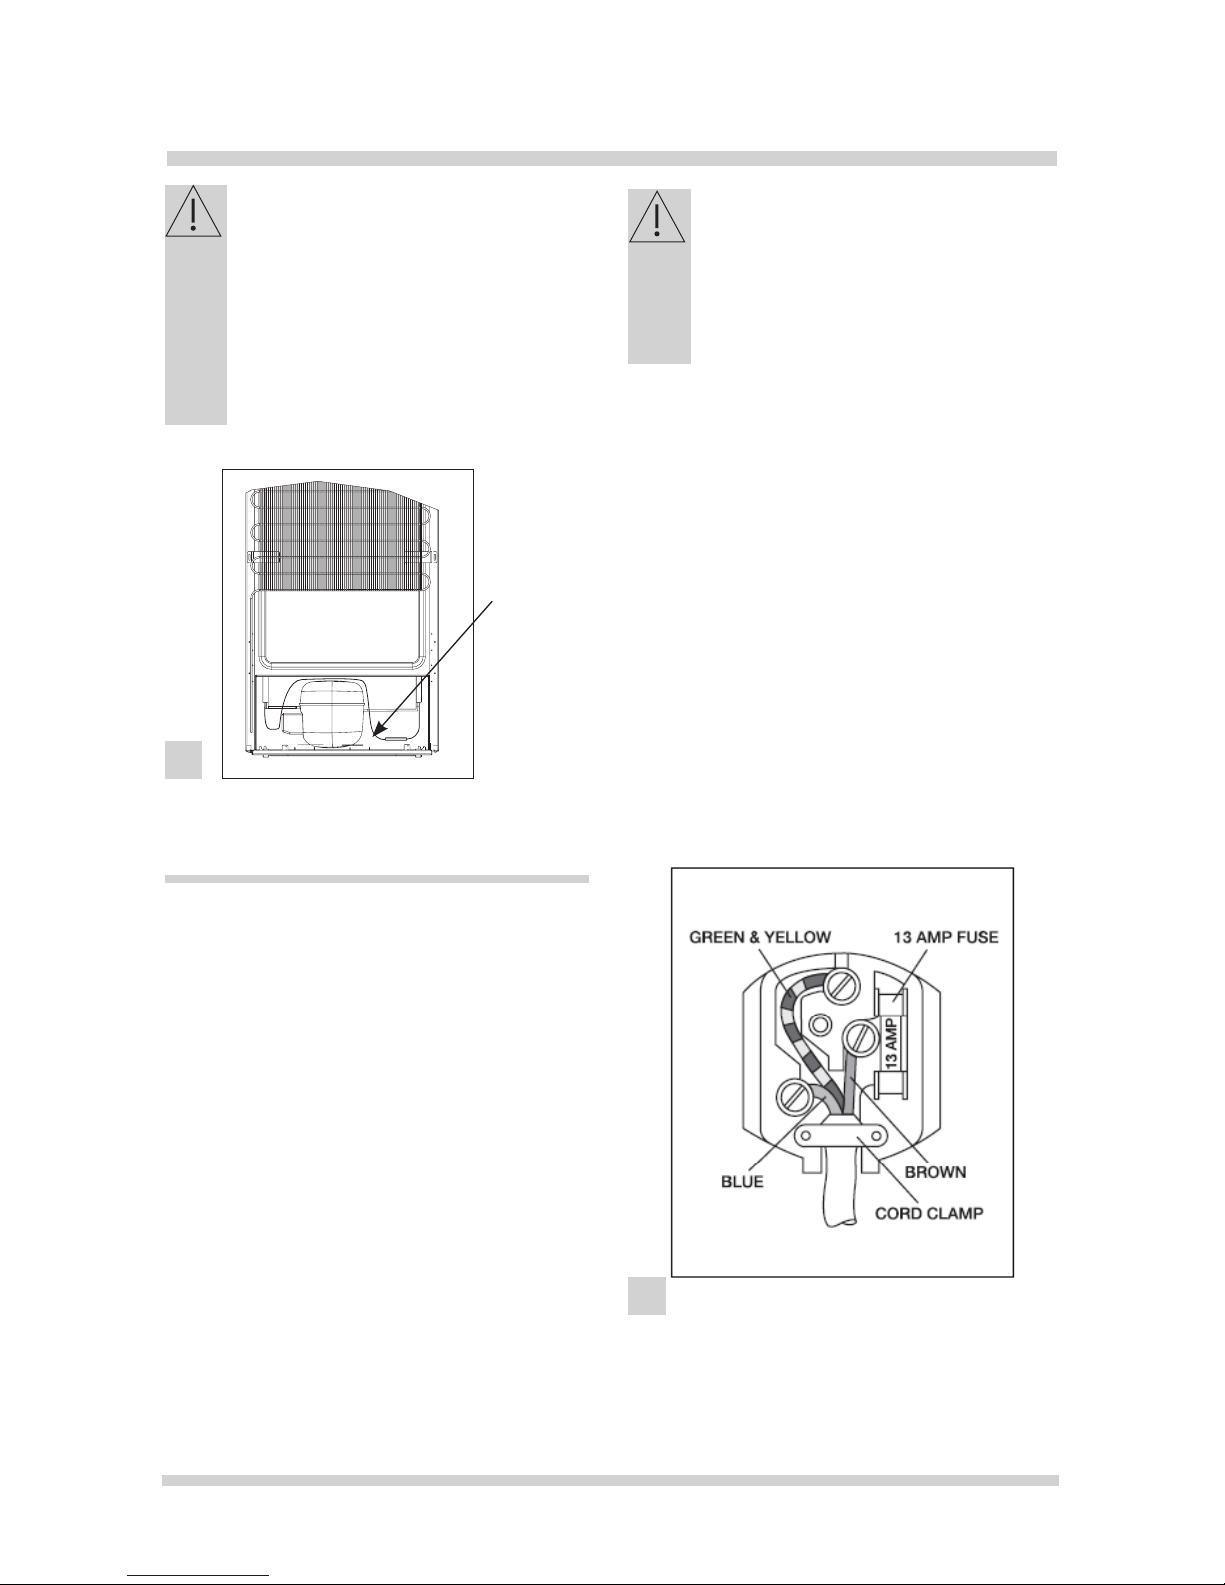
lPull the plug out from the mains
socket before each maintenance
activity. Do not pull the cord, but hold
the body of the plug instead.
lThe cracking-like sound, which the
appliance may emit is caused by
expansion and shrinking of parts as
a result of temperature variations.
lFor safety reasons do not repair the
appliance on your own. Repairs car-
ried out by persons who do not have
required qualications may constitute
a serious hazard for the user of the
appliance.
max40

8
GUIDELINES CONCERNING THE SAFETY OF USE
lMake sure you do not damage the
cooling system, by punching the
refrigerant pipes in the evaporator or
breaking the pipes. The refrigerant
splashes are ammable. Rinse the
eyes with clean water and call for
medical assistance immediately in
case of their contact with the refri-
gerant.
lAir the room in which the applian-
ce is placed for a few minutes (the
size of the room for a product conta-
ining isobuthane/R600a must be at
least 4m3) in case of the damage of
the cooling system.

9
1.Take the product out of the package, re-
move the scotch tapes protecting the door
and the equipment. The possibly remaining
adhesive stains may be removed with a mild
washing agent.
2.Do not throw away the polystyrene ele-
ments of the packaging. In the case of the
necessity to transport the fridge, pack it in
the polystyrene elements and lm, as well
as protect it with a scotch tape.
3.Clean the interior surface of the fridge and
the elements of the equipment with a wa-
shing agent dissolved in lukewarm water,
then wipe it dry.
4.Place the fridge on an even, at and stable
surface, in dry, aired and shadowy room,
far from the heat sources such as an oven,
cooktop, central heating radiator, central
heating pipe, hot water installation, etc.
Minimal distances from the heat
sources:
- from the electric gas and other
ovens - 30 mm,
- from oil or coal red ovens - 300
mm,
- from in-built ovens - 50 mm,
If there is no possibility to ensure the above-
mentioned distances, provide an appropriate
insulation board.
INSTALLATION AND OPERATING CONDITIONS OF THE APPLIANCE
2
3
5. Make sure the appliance is placed in the
horizontal position by screwing in 2 adju-
stable front legs (g. 2)
Installation before using the
appliance for the rst time
6. In order to ensure easy opening of the
door, the distance between the side
wall of the appliance (from the side of
the door hinges), and the wall should
amount to: 90 mm.
7. Ensure adequate ventilation of the room
and free air circulation from all sides of
the appliance (g. 3).
The rear wall of the refrigerator, in
particular, the condenser and other
elements of the cooling system may
not contact other elements, which
may damage them, (e.g. central
heating pipe and the water supply
pipe).
condensator
1220 mm

10
INSTALLATION AND OPERATING CONDITIONS OF THE APPLIANCE
It is prohibited to readjust or modify
any parts of the unit. It is crucial not
to damage the capillary tube visible
in the compressor recess. The tube
may not be bent, straightened and
wound.
If the capillary tube is damaged by
the user the guarantee will be void
(g. 4).
lThe data is provided on the rated plate
located at the bottom of the wall inside the
chamber.
Mains connection
lBefore the appliance is connected to the
mains, set the adjustment knob to the
“0” position.
lThe appliance is intended for connection to
alternating current. The connection values
for voltage (V) and frequency (Hz) are given
on the nameplate in the cabinet.Power must
be connected via a wall socket with switch.
The wall socket should be easily accessible.
All earthing requirements stipulated by the
local electricity authority must be observed.
The cabinet plug and wall socket should
then give correct earthing. If in doubt,
contact your local supplier or an authorised
electrician.
4
5
capillary
tube
This appliance must be earthed
The flexible cord (mains lead)
tted to this appliance has three
cores for use with a 3-pin 13-amp
plug. If a BS 1363 (13-amp) fused
plug is used, it should be tted
with a 13-amp fuse.
Important
The cores in this mains lead are coloured
in accordance with the following code:
GREEN-AND-YELLOW: EARTH
BLUE: NEUTRAL
BROWN: LIVE
These colours might not correspond with
the colour markings identifying the termi-
nals in your plug.

11
S
0
1. Adjust the knob of the temperature regu-
lator to the ”0” position, pull out the plug from
the supply socket.
2. Empty the appliance from the foodstuff.
3. Take out the 2 plugs of the fridge upper
blind (g. 6).
CHANGE OF THE DOOR HINGING
6
7
4. Take out the 2 plugs of the control panel
(g. 7).
6. Unscrew the upper hinge bolts, holding the
door of the fridge (g. 8).
8
7. Remove the fridge door including the
bottom hinge lock.
8. Loosen the two screws of the top hinge,
rotate the hinge pins in the opposite direction
and tighten the screws. (g. 9).
9
9. Transfer the bottom sleeve with door inter-
lock to the other side.
10. Tilt the fridge backwards at an angle of
40°, to enable the access to the bottom hin-
ge.
11. Unscrew both adjusting legs.
12. Unscrew 2 bottom hinge tting bolts
using the cross screwdriver (g. 10).
10
5. Disassemble the left handle.
electronic
control
A
+

12
0
14
12
13
CHANGE OF THE DOOR HINGING
13. Unscrew the bottom hinge pin and ret it
to the other side (g.11).
14. Screw the bottom hinge in on the opposi-
te side of the refrigerator (g.12).
15. Screw both adjusting legs in.
16. Ret the fridge door including the upper
hinge lock, screw the upper hinge in.
17. Fit in the fridge door upper blind plugs
(g. 13). Extra blank cap can be found in a
plastic bag containing the documents.
18. Fit in the control panel upper blind plugs
(g. 14).
21. Switch the fridge on in accordance with
the relevant items of the manual.
11
19. Once the door is attached, please make
sure it is correctly aligned with the appliance
body. Door edge should be parallel to the
edge of the appliance body.
20. Attach the handle on the other side.

13
Control panel
Temperature adjustment
OPERATION AND FUNCTIONS
lighting switch thermostat knob
Change in the knob adjustment causes temperature change in the fridge.
Possible knob adjustment:
lthe appliance is off – 0 position;
lintermediate temperatures range between and 0 position;
The highest temperature in the fridge (the warmest)
Suggested temperature in the fridge
The lowest temperature in the fridge (the coldest)
Do not put food into the fridge before it has reached its operating temperature,
which takes minimum 4 hours.
Temperature inside the fridge
Do not change the temperature settings due to the change in the season of the year. The am-
bient temperature increase will be detected by the sensor and the compressor will be switched
on automatically for a longer period of time in order to maintain the temperature set inside the
chambers.
Minor changes in temperature
The slight changes in temperature are perfectly normal and may occur, for instance during the
storage of great quantities of fresh products in the fridge, or when the door is open for a longer
period of time. This will not affect the condition of the stored foodstuff, and the temperature will
quickly return to its set value.
0
0

14
OPERATION AND FUNCTIONS
Storage of food in the fridge
Observe the following recommen-
dations to ensure the food remains
fresh.
lThe products should be placed on plates
in containers or packed in food wrap.
Distribute them evenly all over the she-
lves.
lPay attention whether the food contacts
the rear wall, if so, it may cause frosting or
wetting of the products.
lDo not put dishes with hot content into
the fridge.
l Products which take over foreign avours
easily such as butter, milk, white cheese and
products with intense avour, such as sh,
smoked meat, hard cheese must be placed
on shelves, packed in food wrap or in tightly
sealed containers.
l Storage of vegetables containing signi-
cant quantity of water will cause the de-
position of water steam on the vegetable
containers, it does not impact the proper
functioning of the fridge.
lBefore putting the vegetables into the frid-
ge, dry them well.
lExcessive moisture shortens the shelf life
of vegetables, especially the leafed vege-
tables.
lDo not wash the vegetables before storing
in the refrigerator. Washing removes the
natural protection, therefore it is better to
wash the vegetables directly before con-
sumption.
lBear in mind that the temperature in
the fridge is affected by several factors,
including the ambient temperature and
the quantities of food products in the
chamber, frequency of opening the door,
amount of frost and the thermostat set-
ting.
lIf you cannot open the fridge door imme-
diately after closing it, allow 1-2 minutes
for negative pressure to compensate,
and retry opening the door.

15
lThe appliance operates in cycles: it refri-
gerates (then the frost settles on the rear
wall), and defrosts (water ows down the
rear wall).
Disconnect the appliance from
the mains before cleaning by re-
moving the plug from the mains
socket or switching off the fuse.
Prevent water from penetrating
the control panel or the light.
Defrosting the fridge
Frost settles on the rear wall of the fridge
chamber. It is removed automatically. During
the defrosting, the condensate, which contains
contaminants may clog the opening in the
through. Should it occur, carefully unclog the
opening with the cleaning plug (g. 15).
DEFROSTING, WASHING AND MAINTENANCE
15
lDo not use defrosting aerosols. They may
cause the formation of explosive mixture,
or contain slovents which may damage the
plastic components of the appliance and
even be harmful to health.
lMake sure the water used for cleaning
does not ow into the evaporation container
through the discharge opening.
lThe whole appliance, except for the door
gasket must be cleaned with a mild cleaning
detergent. The door gasket should be cle-
aned with water and wiped dry.
lWash all the accessories (vegetable conta-
iners, door shelves, glass shelves, etc.).

16
DEFROSTING, WASHING AND MAINTENANCE
Bulb replacement
1. Set the knob to ”0” position and unplug the
appliance from the mains socket.
2. Unscrew the bolt fastening the bulb cover
with a cross screwdriver and take the
cover off.
3. Replace the bulb with a new one observing
the following paramters: 220-240 V, max. 15
W, E14 thread, maximum bulb dimensions:
diameter – 26 mm, length – 55 mm.
4. Put the caver back and t it in (g. 17).
Taking out and putting in the door shelf
Lift the door shelf, remove it and put it back
from the top into its required position (g.18).
16
18
17
Do not use bulbs of greater or
smaller power, apply only the
bulbs of parameters given abo-
ve.
Taking out and putting in the shelves
Slide the shelf out, then slide it in as much as
possible so that its clamp could t the guide
groove (g. 16).

17
TROUBLE-SHOOTING
Problems Possible causes Remedies
The appliance does
not work
Electric circuit rupture - check whether the plug is properly inserted
into the socket
- check whether the power cable of the
appliance is not damaged
- check whether there is voltage in the
socket, by plugging another appliance, e.g.
a night lamp
- check whether the appliance is switched
on by setting the thermostat to a position
above 0
The lighting inside
the chamber does
not work
The bulb is loose or
fused
- see the point above “The appliance does
not work" – t the bulb correctly or replace
it
Temperature inside
the appliance is not
low enough
Incorrect setting of the
adjustment knob
- reset the knob to a higher position
The ambient tempera-
ture is higher or lower
than the SN-T climate
range
- the appliance is adapted to operation in the
SN-T climate range (see page 41)
The appliance is located
at the sunlit place or
near the heat sources
- move the appliance to another place.
Observe the guidelines contained in the
manual
Too much warm food
loaded at a time
- wait 72 hours until the food becomes cool
(freezes) and the required temperature is
reached inside the chamber
Internal air circulation
hindered
- place the food and containers in such a
way that they do not touch the rear wall of
the fridge
The air circulation at the
back of the appliance is
hindered
- move the appliance min. 30 mm away
from the wall
The door of the frid-
ge/freezer are opened
too often and/or remain
open for too long
- reduce the frequency of opening the door
and/or shorten the time when door remains
open
The door does not close
completely
- place the food and containers so that they
would not interfere with door closed

18
TROUBLE-SHOOTING
Problems Possible causes Remedies
The compressor is switched
on too rarely
- check whether the ambient
temperature is not lower
than 10°C
Door gasket inserted
incorrectly
- press the gasket in
The appliance works
continuously
Incorrect setting of the adju-
stment knob
- reset the knob to a lower
position
See. ”Temperature inside the
appliance is not low enough
for description of other possi-
ble causes
- See. ”Temperature inside
the appliance is not low eno-
ugh for description of other
possible remedies
Water collects in the lower
part of the appliance
The water discharge opening
is clogged
- clean the discharge
opening (see the operating
manual – chapter entitled
”Defrosting the fridge”)
Internal air circulation
hindered
- place the food and conta-
iners in such a way as that
they do not touch the rear
wall of the fridge
Dźwięki nie po cho dzą ce od
normalnej pra cy urzą dze nia
Incorrect levelling of the
appliance
- level the appliance properly
The appliance touches furni-
ture and/or other objects
- place the appliance at a
location that ensures proper
clearances around it
Certain sounds can be heard during normal use of the refrigerator, which do not affect its
correct operation.
Sounds, which can be easily prevented:
lnoise caused by the appliance which is not level - adjust the position with the adjustable tur-
n-in front feet. Alternatively, place pads made of soft material under the rear rollers, especially
when the appliance is placed on tiles.
ltouching the adjacent piece of furniture - move the refrigerator away.
lcreaking of the drawers or shelves - take out and put back the drawer or shelf.
lsounds of clinking bottles - move bottles apart.
Sounds heard during normal use are mainly due to operation of the thermostat, compressor
(switching on) and cooling system (thermal expansion and contraction of the radiator caused
by ow of the cooling agent).

19
Environmental protection
Ozone layer protection
The refrigerants and fo-
aming agents, which are
100% free of FCKW and
FKW have been used for
manufacturing our pro-
duct. Therefore we help
protecting the ozone layer
and prevent the greenho-
use effect increase. On the other hand, the
innovative technology and environmentally
friendly insulation help in reducing energy
consumption.
Recycling of the packaging
Our packaging are made
of environmentally friendly
materials, which can be
reused:
lThe external packaging is made of card-
board/foil
lThe FCKW free shape of foamed poly-
styrene (PS)
lPolyethylene (PE) foils and bags
Elimination / disposal of the equip-
ment
If the appliance is no longer in use, cut the
connecting conduit off the used equipment
before its scrapping.
This appliance is marked with
a symbol of the crossed out
waste container in conform-
ance with the European Direc-
tive 2002/96/EC. Such mark-
ing informs that the equipment
may not be kept together with
other waste coming from the
household after the period of
its use. The user is obliged to dispose of the
appliance at the waste collection point. The
local waste collection points, shops and com-
munal units form an appropriate system ena-
bling the disposal of the equipment.
Handling the used electrical and electronic
equipment properly contributes to the avoid-
ance of consequences harmful to the human
health and natural environment, resulting
from the presence of hazardous substances
and improper storage and processing of such
equipment.

20
SPECIFICATION
1) A++/A+ (=low consumption) to G (=high
consumption).
2) The energy consumption refers to the year-
ly consumption in kWh, indicated accor-
ding to DIN EN 153. Deviations may occur
in the practical operation of the appliance,
depending on the use and place of its lo-
cation.
3) Climate range means that your set tempe-
rature is maintained at ”normal” ambient
temperature. Should the room temperture
drop signicantly below the dened scope,
the appliance does not work so often and
the undesirable temperature increase may
occure.
TYPE FC202BSW
Manufacturer Amica
Type of the appliance fridge
Energy class1A++
Annual power consumption
kWh/year2
88
Net usable volume (l)
Fridge 174
Climate range3SN-T
Noise level [dB(A) re1pW] 37 dB (A)
Supply voltage V/Hz 230V; 50 Hz
H x W x D 122 x 55,8 x 62
Appliance weight (kg) 39
Table of contents
Other Amica Refrigerator manuals

Amica
Amica KGCN388196FR User manual

Amica
Amica FM130.3 User manual

Amica
Amica FK2515.4UTAA User manual

Amica
Amica FK328.3F User manual

Amica
Amica UKS16106 Quick start guide

Amica
Amica AR8242C User manual

Amica
Amica KGCN 389 100 Series User manual

Amica
Amica KS 361110-1E User manual

Amica
Amica BC203.3AA User manual

Amica
Amica UM100.3 User manual

Amica
Amica VKS 351 140 W User manual

Amica
Amica BK316.3AA User manual

Amica
Amica EKSS 361 200 User manual

Amica
Amica VC 1752 Series User manual

Amica
Amica GS 15424 W User manual

Amica
Amica VKS15620R User manual

Amica
Amica EKGC 16169 User manual

Amica
Amica FY508.3DFCXAA User manual

Amica
Amica VKS 351 116 W User manual

Amica
Amica GS15496W User manual