Ampete 8FX User manual

Owner's Manual 8FX
Ampete
8FX
Owner's Manual
Ampete Engineering GbR
Krefelder Str. 40
506 0 Cologne
Germany
fon +49 (0) 221 56 09 11
mail [email protected]
web www.ampete-engineering.com
1

Owner's Manual 8FX
__________________________
Ampete Engineering GbR, 2021
Ampete is a registered trademark
copyright 2014, all rights reserved
2

Owner's Manual 8FX
We all
... produce electronic waste! It's just a question of time!
We ere at Ampete Engineering are not only consumers, like you yourselves, but also engineers of electronic
products t at we want to place into a modern world. Here it looks at first glance t at everyt ing as been
invented already. But demands are getting more refined and specific by t e day and as in t e economics,
t e sports- or even spiritual world, performance, utility and consistency depend on small c anges and
nuances in improvements. In ot er words we are supposed to get better every day. T is is not a one way
street, it's a uge responsibility in t e ot er ands!
For us it means more t an wanting a slice of t e pie. It means to review every single product we design for
its added values, to anticipate t e circumstance you put it into in order to ‚simply' be able to maintain it
everyw ere it as been sold to.
Today our w ole life is determined by electronics, at ome, on t e road, at work or vacation, in
supermarkets, concert arenas or even in natural resorts.
Today in general electronics aren't built any longer to last! T ey're c eap.
For people from t e 70ies like us it is a turning point. We grew up in a world w ere an electronic device is
not ing s ort of a masterpiece. Today 90% of electronic applications are manufactured by using robots or
exploitation in countries w ere 'global players' celebrate t e abolition of workers protection and minimum
salaries. But it doesn't end t ere.
After an expected life cycle, more or less s ort, t e c eap electronic waste is gonna be ‚disposed‘ of. Dispose
mig t suggest t at components like ousing, metal and synt etics will be recycled to find t eir way back
into a product. But of course often t is is not ow it is done!
If you ever eard of 'toxic city' (and I don't mean t e fantastic album of a great band) you probably know
w at we are speaking of.
It mig t surprise you to read t is in a manual for an electronic device.
We want to make sure you understand t at by purc asing an Ampete Engineering Product you will get a
device in w ic we put all our passion, belief and knowledge and t at you get a product in t e tradition of
many great people before us, for w om electronics were and still are wonderful masterpieces.
But you also purc ased a little piece of responsibility. Maintain your Ampete Engineering Product – we will
be ere to support you, we built t is to survive… possibly even us.
In case you s ould be faced wit any issue on any day at any place somew ere in t e world, we are ere as
you would expect us to be.
T is is not a promise, it is our view of life.
T anks for letting us be a part in enabling your musical world.
Yours sincerely,
Ampete
3

Owner's Manual 8FX
Table of Contents
Foreword............................................................................... 3
Introduction........................................................................... 5
Features................................................................................ 5
T eory Of Operation............................................................... 5
Front panel............................................................................ 6
Rear panel............................................................................. 6
Hook up................................................................................. 7
888 Setup Diagram........................................................... 7
Daisy-C ain Setup Diagram..................................................8
Quick Start C eck List............................................................. 9
Setup..................................................................................... 9
Setting T e Unit ID................................................................. 9
Controlling t e 8FX via MIDI.................................................... 10
MIDI Control C ange messages table...................................... 11
Troubles ooting..................................................................... 11
Specifications......................................................................... 12
4

Owner's Manual 8FX
Introduction
If you got to t is point you will probably already know t at t e 8FX is designed to add FX loops switc ing
functionality to t e 88S AMPLIFIER & CABINET SWITCHING SYSTEM.
If not, it's as simple as it sounds. If your setup includes more t an four amps, you will rat er c oose an
88S(-STUDIO) over a 444 - but w at about your effects rig, you mig t t ink?
Well, t e 8FX is t e solution!
It turns your 88S-STUDIO into a 444 for 8 amplifiers and 8 cabinets, an 888 if you like.
Features
–8 switc able FX loops en ance an existing 88S or 88S-STUDIO system
–double RJ45 connector to easily integrate into an 88S or 88S-STUDIO system
–true bypass relay based switc ing t roug t e complete signal c ain
–midi program c ange or control c ange to switc your entire 88S / 88S-STUDIO system
–99 midi pc presets
–ground lift switc
–no switc ing noises
–no switc ing latency
–expandable to easily grow toget er wit your 88S / 88S-STUDIO system
Theory of operation
T e initial idea of t e 8FX goes back to t e Ampete 444, w ic was t e first of its kind to not only switc
tube amplifiers and speaker cabinets but also include amp’s effect loops into an entire switc ing process.
Hereby t e FX loops of t e 8FX allow to assign an effect device (no matter if a pedal, a rack or even a
complex effect rig) to any of t e effect loops of t e connected amplifiers. T at way you can utilize THE
SAME effect device(s) for eac amplifier connected to t e System.
Connect your effects or separate looper unit to t e FX IN / FX OUT of t e 8FX.
By pressing t e FX LOOP ON/OFF button, t e FX IN / FX OUT are automatically assigned to t e amplifier‘s
effect loop t at is currently selected in your 88S system. W en engaged, t e first dot of t e display will lig t
up to s ow its active status. Be aware t at t ere is no actual switc ing appening unless you ave selected
a cabinet and an amplifier on t e 88S-STUDIO or 88R before.
W en switc ing between amplifiers, t e 8FX assigns t e FX IN / FX OUT to t e selected amp's FX loop at
t e same time.
5

Owner's Manual 8FX
Front Panel
1. FX LOOP ON/OFF: assigns t e FX loop of t e currently selected amp to t e 8FX’s master loop (FX
IN & OUT)
2. SETUP: press once to access t e setup menu (see page 10)
3. SAVE: press to save a Midi PC preset (see page 11)
4. DISPLAY: T e double 7-segment display s ows t e unit number, setup menu states, or midi pc
numbers
Rear Panel
1. AC JACK: T e 8FX can be supplied wit voltages from 85VAC to 265VAC
2. PREVIOUS SWITCHER: Connect an 88S, 88S-STUDIO, or anot er 8FX via a standard Cat5e cable
3. FOLLOWING SWITCHER: Connect an 88S, 88S-STUDIO, or anot er 8FX via a standard Cat5e
cable
4. MIDI OUT/THRU: If you ave several MIDI devices in your setup, connect t e MIDI Out/T ru wit
t e MIDI In of t e following device (Currently only Midi T ru functionality).
5. MIDI IN: Connect a MIDI pedal, or any ot er MIDI device, to control t e 8FX via Program C ange
or Control C ange messages.
6. GROUND LIFT: Controls w et er t e 8FX audio ground is connected to t e eart conductor or not.
T e circuit is grounded w en t e switc is in t e 'Out' position. If you experience um noise using
effects, switc ing t e ground lift to t e 'In' position will solve t e issue in almost any case.
7. SEND 1: Connects t e FX loop send/preamp out/line out of amplifier 1 to t e SEND 1 jack of t e
8FX. Please be aware t at t is is not an independent loop, but t e corresponding FX loop of t e
amplifier you drive wit t e AMP INPUT 1 and AMP OUTPUT 1 jacks of t e 88S or 88S-STUDIO!
8. RETURN 1: Connect t e FX loop return/power amp in/line in of amplifier 1 to t e RETURN 1 of t e
8FX. Like mentioned before, t is is not an independent loop, but t e corresponding FX loop of t e
amplifier you drive wit t e AMP INPUT 1 and AMP OUTPUT 1 jacks of t e 88S or 88S-STUDIO!
Just like t e described procedure of connecting SEND 1 / RETURN 1 to AMP1s effect loop all ot er
SEND and RETURN jacks (2 – 8) ave to be connected to t eir respective amplifiers effect loops.
9. BUS OUT SEND: To daisy-c ain several 8FX, connect t e BUS OUT SEND to t e following 8FX BUS
IN SEND jack (11)
10.BUS OUT RETURN: To daisy-c ain several 8FX, connect t e BUS OUT RETURN to t e following
8FX BUS IN RETURN jack (12)
11.FX IN: Connect t is jack (in case of multiple 8FX in t e system t e first 8FX in t e c ain) to t e
effect device (pedal, rack or entire rig) input.
In a setup wit more t an one 8FX connect t is jack to t e previous 8FX BUS OUT SEND (9)
12.FX OUT: Connect t is jack (in t e case of multiple 8FX in t e system t e first 8FX in t e c ain) to
t e effect device (pedal, rack or entire rig) output.
In a setup wit more t an one 8FX connect t is jack to t e previous 8FX BUS OUT RETURN (10)
6
1 2 3 4
REMOTE OR
PREV. SWITCHER
FOLLOWING
SWITCHER
MIDI OUT/THRU MIDI IN
GND LIFT
RETURN
SEND
FX OUT
FX IN
1 2 3 4 5 6 8 BUS
OUT BUS
IN
110 - 240VAC
FUSE 0.25A
1 2 3 45 6 8 9 10 11 12

Owner's Manual 8FX
888 Setup Diagram
7
PREV. SWITCHER
FOLLOWING
SWITCHER
MIDI OUT/THRU MIDI IN
GND LIFT
RETURN
SEND
FX OUT
FX IN
1 2 3 45 6 8 BUS
OUT BUS
IN
FX PEDAL
OUTPUT
INPUT
AMPS INSTRUMENT INPUT
1 2 3 4
AMPS SPEAKER OUTPUT
1 2 3 4 IN
LINE BUS
1 2 3 4
SPEAKER CABINETS
1 2 3 4IN
SPK BUS
REMOTE OR
PREV. SWITCHER
FOLLOWING
SWITCHER
5 6 85 6 8 OUT5 6 85 6 8OUT
88S or 88S-STUDIO ID 1
8FX ID 1
AMP1/CABINET1
CABINETS
IMPEDANCE
4 8 16
FX LOOP
SEND RETURNLEVEL
-10dBV
+4dBu
AMP2/CABINET2
CABINETS
IMPEDANCE
4 8 16
FX LOOP
SEND RETURNLEVEL
-10dBV
+4dBu
88R (optional)
7 8 9
ALL OFF 0A/B
4 5 6
123
ENTER ENTER ENTER
AMP CAB1 CAB2
FOOTSWITCHMIDI IN MIDI OUT/THRU TO 1s SWITCHER
NOTE: If 88R is used set 8FX to Mode 1

Owner's Manual 8FX
Daisy-chain Setup Diagram
Note t at t e order of connecting t e 88S / 88S-STUDIO / 8FX units to t e control bus (Cat5e cable) is not
necessarily to be like s own, as long as t e 88S / 88S-STUDIO wit ID 1 is t e first in t e c ain.
8
AMPS INSTRUMENT INPUT
1 2 3 4
AMPS SPEAKER OUTPUT
1 2 3 4 IN
LINE BUS
1 2 3 4
SPEAKER CABINETS
1 2 3 4IN
SPK BUS
REMOTE OR
PREV. SWITCHER
FOLLOWING
SWITCHER
5 6 85 6 8 OUT5 6 85 6 8OUT
88S or 88S-STUDIO ID 1
PREV. SWITCHER
FOLLOWING
SWITCHER
MIDI OUT/THRU MIDI IN
GND LIFT
RETURN
SEND
FX OUT
FX IN
1 2 3 4 5 6 8 BUS
OUT BUS
IN
8FX ID 2
CABINETS 9-16 AMP 9-16 SPEAKER
OUTPUTS
AMP 9-16 INPUTS
FX UNIT
OUTPUT
FX UNIT
INPUT
PREV. SWITCHER
FOLLOWING
SWITCHER
MIDI OUT/THRU MIDI IN
GND LIFT
RETURN
SEND
FX OUT
FX IN
1 2 3 4 5 6 8 BUS
OUT BUS
IN
AMPS INSTRUMENT INPUT
1 2 3 4
AMPS SPEAKER OUTPUT
1 2 3 4 IN
LINE BUS
1 2 3 4
SPEAKER CABINETS
1 2 3 4IN
SPK BUS
REMOTE OR
PREV. SWITCHER
FOLLOWING
SWITCHER
5 6 85 6 8 OUT5 6 85 6 8OUT
88S or 88S-STUDIO ID 2
8FX ID 1
CABINETS 1-8 AMP 1-8 SPEAKER
OUTPUTS
AMP 1-8 INPUTS
AMP 1-8 FX LOOP SEND / RETURN
AMP 9-16 FX LOOP SEND / RETURN

Owner's Manual 8FX
Quick Start Check List
Once wired up t ere is a minimum amount of setup to do - if any
–Unit ID: If you ave several 8FX in your system set t e unit IDs correspondingly. ID 1 will switc
t e FX loops of amplifiers 1 to 8, ID 2 will switc t e FX loops of amplifiers 9 - 16, ID 3 to 17 - 24
etc.
See page 10 on ow to c ange t e unit ID.
If you only ave a single 8FX in your system, leave factory default at ID 1.
–Mode: Set t e 8FX to Mode 1 if you are using a remote 88R in your system. If not leave t e factory
default at Mode 0
–CC Mode: if you are using Midi control c ange messages see page 11 to set t e correct CC Mode
–activate the FX Loop: t e 8FX starts up in t e default state „FX Loop Off“. Hit FX LOOP ON/OFF to
activate it
Setup Menu
To enter t e setup menu press SETUP (2). T e display will s ow „S.u.“ for Setup. Press a button 1, 2 or 3 to
select t e submenu (Note: You want to make your c oice before t e 8FX will automatically exit t e setup
after 2 seconds). Press one more time to see t e current setting, and press repeatedly to set t e desired
value.
–Button 1, MIDI CH.: Press to set t e c annel w ere t e 8FX receives Midi program c ange or control
c ange messages. Note t at 0 stands for „Omni“ (all c annels)
–Button 2, CC MODE: Press to set t e Midi CC Mode (see C apter Controlling t e 8FX via Midi on
page 10).
–Button 3, MODE: Press to set t e 8FX operating mode. Set to „1“ if an 88R is present in t e system.
Else leave at „0“
Setting the Unit ID
T is following paragrap is ONLY applicable in a system wit MORE THAN ONE 88S (-STUDIO).
Just like wit t e 88S or 88S-STUDIO t e ID of eac 8FX as to be determined in order to assign eac 8FX
loops tot e corresponding amplifier. To do t is, set t e unit ID to „1“ for amplifier 1-8, „2“ for amplifier 9-
16, and so on.
Press and old „SETUP“ until t e display s ows „I.d“. Before t e 8FX automatically leaves t e setup page
after 2 seconds, press SETUP again to see t e current ID setting, and press repeatedly to set t e unit ID.
Note that if the 8FX is set to an ID other than „1“ the front button controls as well as the Midi
Input has no functionality
9
1 2 3 4

Owner's Manual 8FX
Controlling the 8FX via MIDI
MIDI Program Change
T e 8FX offers t e possibility to save up to 99 presets of different amplifier / cabinets / FX loop On-Off
combinations.
You can switc between presets by sending MIDI Program C ange messages from your MIDI foot controller,
or any ot er MIDI device connected to t e 8FX's „MIDI IN“ connector.
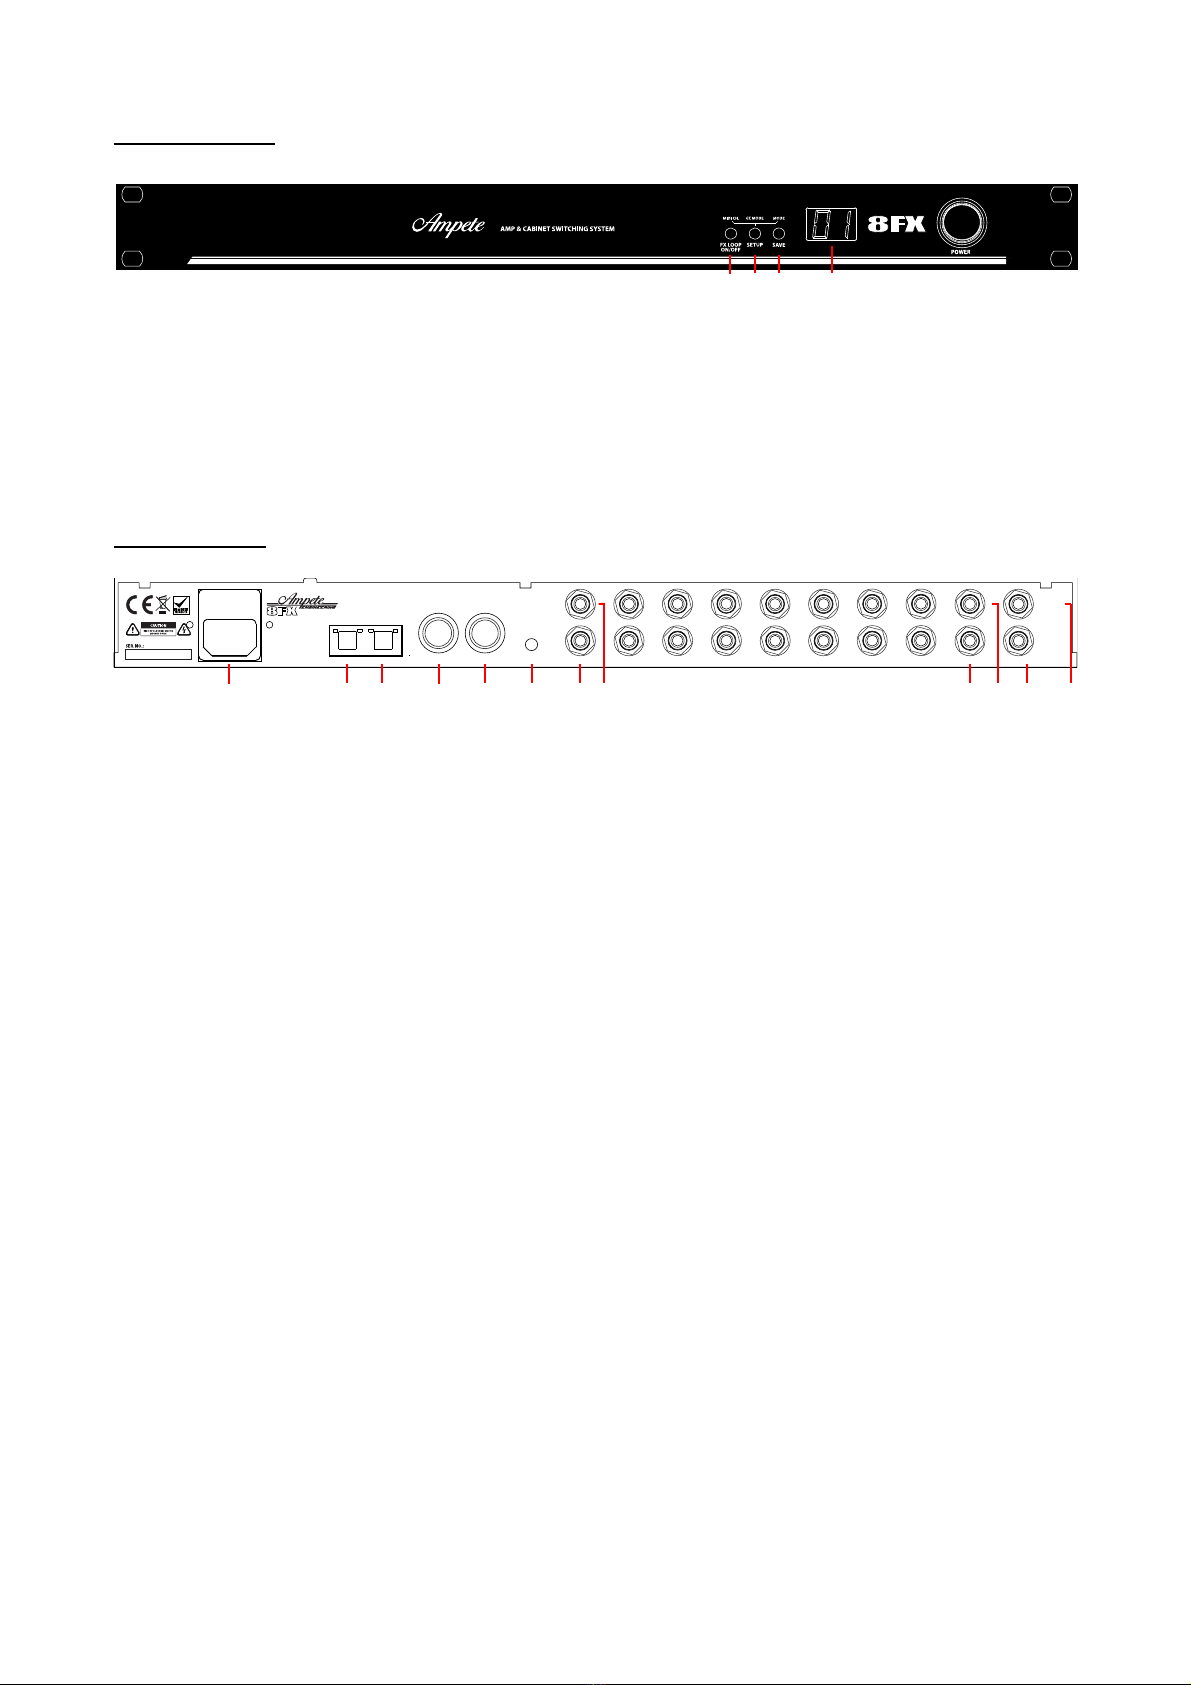
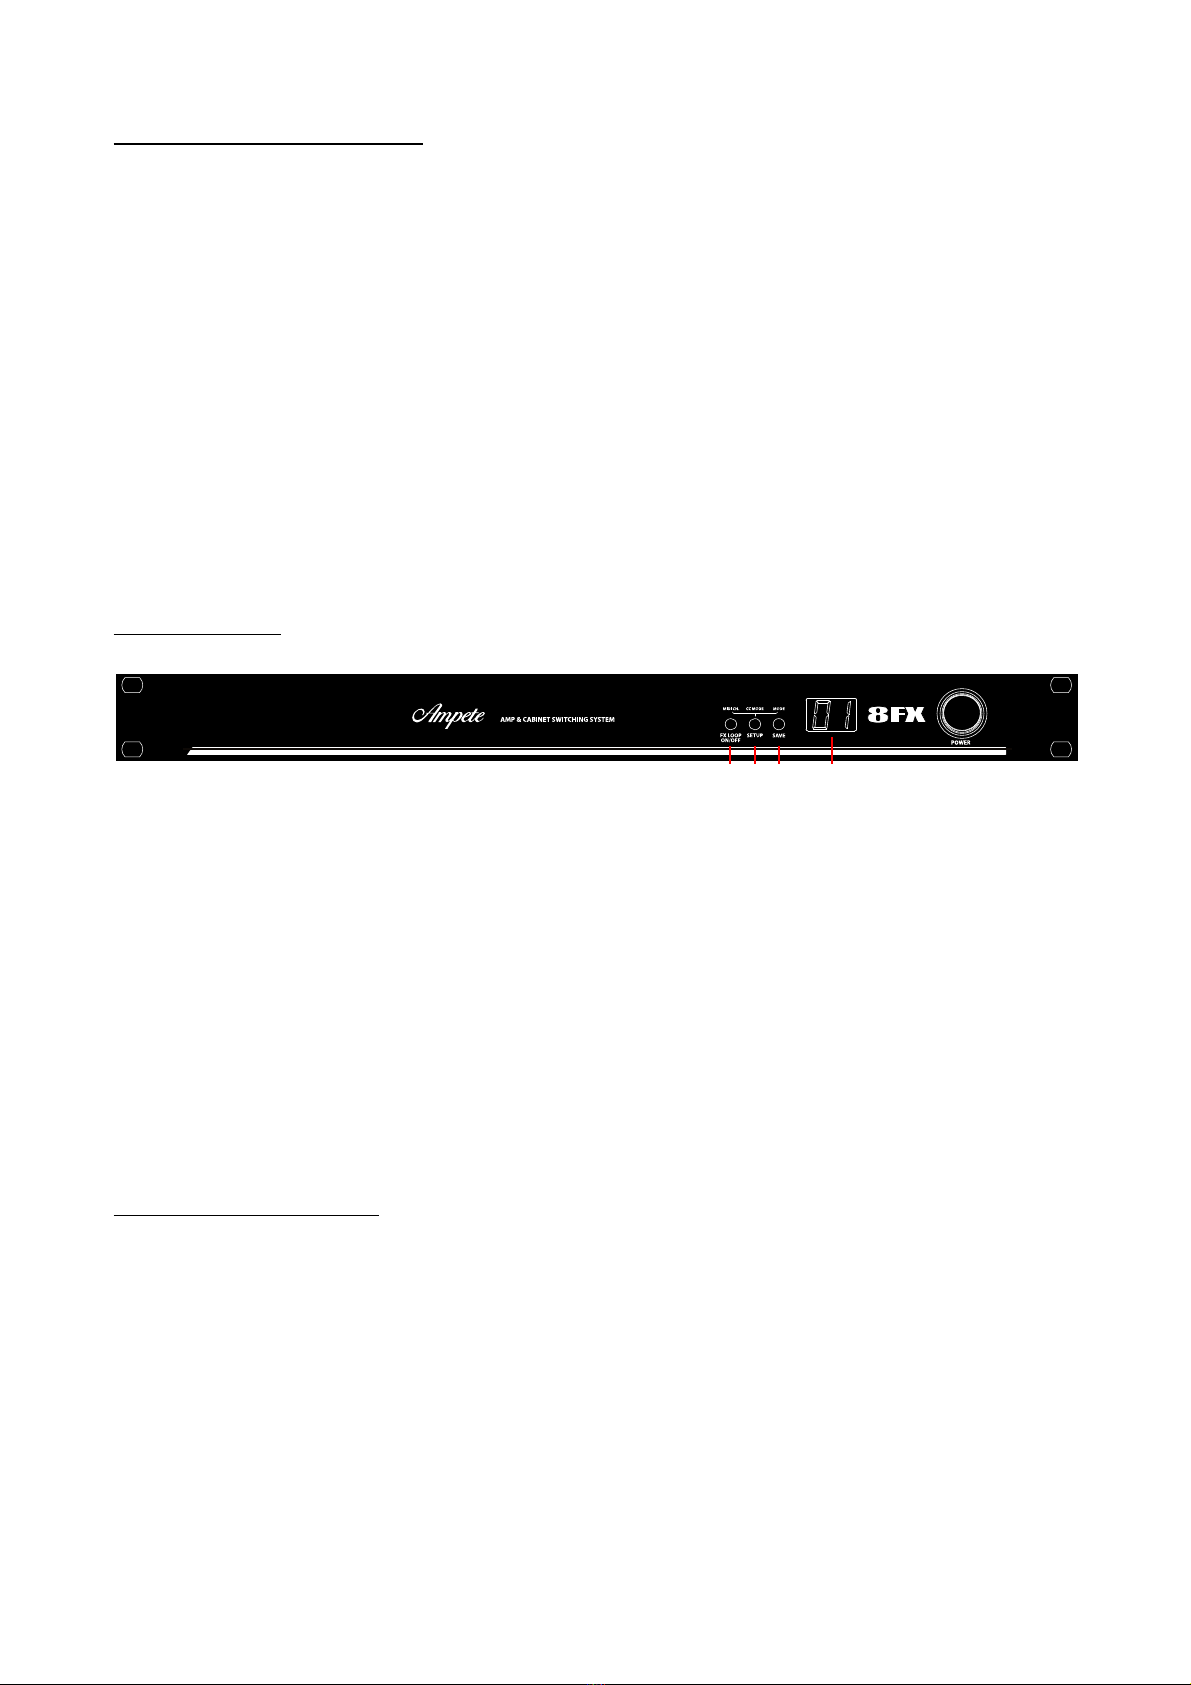
To save a preset, send a MIDI Program C ange message wit t e desired preset number. T e preset
number is s own in t e front panel display toget er wit a dot in t e lower rig t corner to distinguis it from
displaying t e unit ID.
Note t at t e 8FX starts counting t e presets at „1“, even t oug t e MIDI standard internally starts at „0“.
T is is due tot e fact t at most MIDI devices sending MIDI preset c anges start counting at „1“ as well.
If now t e preset is c anged on t e 88S-STUDIO or 88R, t e dot in t e display starts flas ing. Press SAVE to
save t e current status to t e preset.
To protect your amps, a preset can not be activated if t e cabinets saved wit t e preset are not connected
to t e system. In t at case t e display states t e message (n.c.)!
MIDI Control Change
Additionally all switc ing commands can be remote controlled by MIDI Control C ange (CC) messages.
In contrast to recalling presets via MIDI Program C anges, every Control C ange message switc es only one
function at a time. T at's w y it is also called „Direct Access“. For a more detailed description please refer to
t e section „Control C ange messages table“.
MIDI Control Change modes
Even t oug Control C ange messages only access one function at a time, some people prefer programing
presets of several Control C ange messages on t eir MIDI controller, instead of sending Program C ange
messages to access a preset stored in t e 8FX.
Some MIDI controller suc as t e RJM Mastermind GT offer t e possibility to send Control C ange presets in
an „intelligent“ way. T at means CC messages are sent to switc t e currently selected amp or cabinet off
before switc ing anot er one „on“. T is is important due to t e 88S system's rules and orders for t e
switc ing process to protect your amps from damage (see „switc ing rules & protection in t e 88S system
manual).
C oose t e 8FXs Control C ange mode '0' for operating wit suc midi controller pedals.
If you are using a MIDI controller pedal wit a let's say more simple software structure – meaning t e
controller pedal does not „know“ w ic amp or cabinet is currently in use - or if t e number of CC messages
in a preset is limited, t e 8FX’s Control C ange mode '1' mig t work better for you. Wit t at mode t e 8FX
will process Control C ange messages wit value 127 („switc on“) only after switc ing „off“ t e previously
selected amp or cabinet.
If you are unsure about w ic CC Mode works best for you, start wit Mode '0'. It is also t e 8FXs factory
default and covers almost any case, especially if you are sending single CC messages, and not presets of
several CC messages.
W en programing presets of CC messages on your MIDI controller, always keep in mind t at t e 88S system
operates according to certain rules for t e switc ing process mentioned before. I.e. if you program a preset
t at sends commands to switc on two amps at a time, t e 8FX will give out an error status (Er) in t e
display.
10

Owner's Manual 8FX
MIDI Control Change messages table
CC Controller Number Function Value
0 ... 39 AMP 1 ... 40 0=off, 127=on
40 ... 79 CAB1 1 ... 40 0=off, 127=on
80 ... 119 CAB2 1 ... 40 0=off, 127=on
126 FX LOOP 0=off, 127=on
127 SAVE 127=save
Troubleshooting
Problem: No effect signal when switching FX loop
Make sure t e FX loop of t e c osen amplifier is connected correctly to t e 8FXs
matc ing FX loop. For example, if AMP1 is c osen, t e SEND 1 and RETURN 1 on unit
ID 1 ave to be connected to t e same amplifier w ic is connected to AMP1 INPUT
and AMP1 OUTPUT of t e 88S / 88S-STUDIO!
Problem: drastic volume increase or decrease in reverb or delay spillovers when
switching between amplifiers with FX loop option
T e send and return levels of t e connected amplifiers ave to be set equally. Most
often t e send level is controlled by t e c annel volumes, sometimes a separate send
level is present.
Problem: Cracking noise when switching FX on and off
No proper grounding at t e FX loop circuit. Pus ing t e GND LIFT switc will
solve t e issue in almost any case.
Problem: erratic behaviour when switching via MIDI Control Changes
C eck if t e correct CC Mode is set (see page 10)
Problem: No function when switching via MIDI
C eck if t e correct MIDI c annel as been set (see page 9)
11

Owner's Manual 8FX
_______________________________________________________________
Dimensions Front Panel: widt 438mm, eig t 44mm, dept 143mm)
Front Panel: widt 482mm (19“)
Weig t 2,3kg (5 lbs)
Power consumption 3W max.
_______________________________________________________________
Ampete Engineering reserves t e rig t to c ange specifications, wet er it's tec nical, dimensional or in t e owner's manual.
__________________________
Ampete Engineering GbR, 2021
Ampete is a registered trademark
copyright 2014, all rights reserved
12
Table of contents
Other Ampete Switch manuals