manuals.online logo
Brands
  1. Home
  2. •
  3. Brands
  4. •
  5. Amulet Hotkey
  6. •
  7. Desktop
  8. •
  9. Amulet Hotkey DXH4 User manual

Amulet Hotkey DXH4 User manual

solutions you can bank on
AMULET
HOTKEY
®
®
DXH4 and DXH4-M PCoIP Hosts
Quick Start Guide
www.amulethotkey.com DXH4 Quick Start Guide 1.0 November 2016
QS-DXH4-0001
The DXH4 is a quad video head PCoIP® host card that installs into a PCIe slot on a
computer and connects to a remote Amulet Hotkey zero client over an IP network.
A single DXH4 card can support four 1920 x 1200 displays or two high resolution
2560 x 1600 displays. Bridging cables take digital video output from the computer
graphics card(s) to four Mini DisplayPorts on the DXH4.
Two versions of the card are available. The standard DXH4 has an RJ45 network
port. The DXH4-M has a network port designed to accept an SFP module; you can
install a copper or fibre module (available separately).
Note:
This guide uses ‘
DXH4
’ as a generic term when referring to both the
standard
DXH4
product and the
DXH4
-M product.
DXH4 Kit (KT-DXH4-0001): Includes these parts:
■DXH4 PCoIP Host card (CA-DXH4-0001)
■I/O bracket, standard profile, fitted (MW-DXH4-0003)
■I/O bracket, low profile (MW-DXH4-0001)
■4 x 400mm video cables, DisplayPort to MiniDP (CL-MDDP-0003)
■Remote Power Control cable assembly (CL-DXHK-RP01)
DXH4-M Kit (KT-DXH4-M001): As the DXH4 kit except for:
■DXH4-M PCoIP Host card (CA-DXH4-M001)
■I/O bracket, standard profile, fitted (MW-DXH4-0005)
■I/O bracket, low profile (MW-DXH4-0004)
Requirements
■Graphics cards in the host computer must have digital video output.
The DXH4 and DXH4-M can only accept video from a digital source.
■The firmware revision on the PCoIP host card must match that of the zero
client. Use the Administrative Web Interface (AWI) to update firmware on
the host card or zero client if needed. To access the AWI, browse to the IP
address of the DXH4 or zero client.
Caution
■The DXH4 is intended for installation and operation only within an enclosed
environment such as inside a computer case.
■The DXH4 is not designed for hot plugging - before installing or removing a
DXH4 from the PCIe slot, disconnect all power from the host computer for at
least 60 seconds. This allows internal power rails to fully discharge.
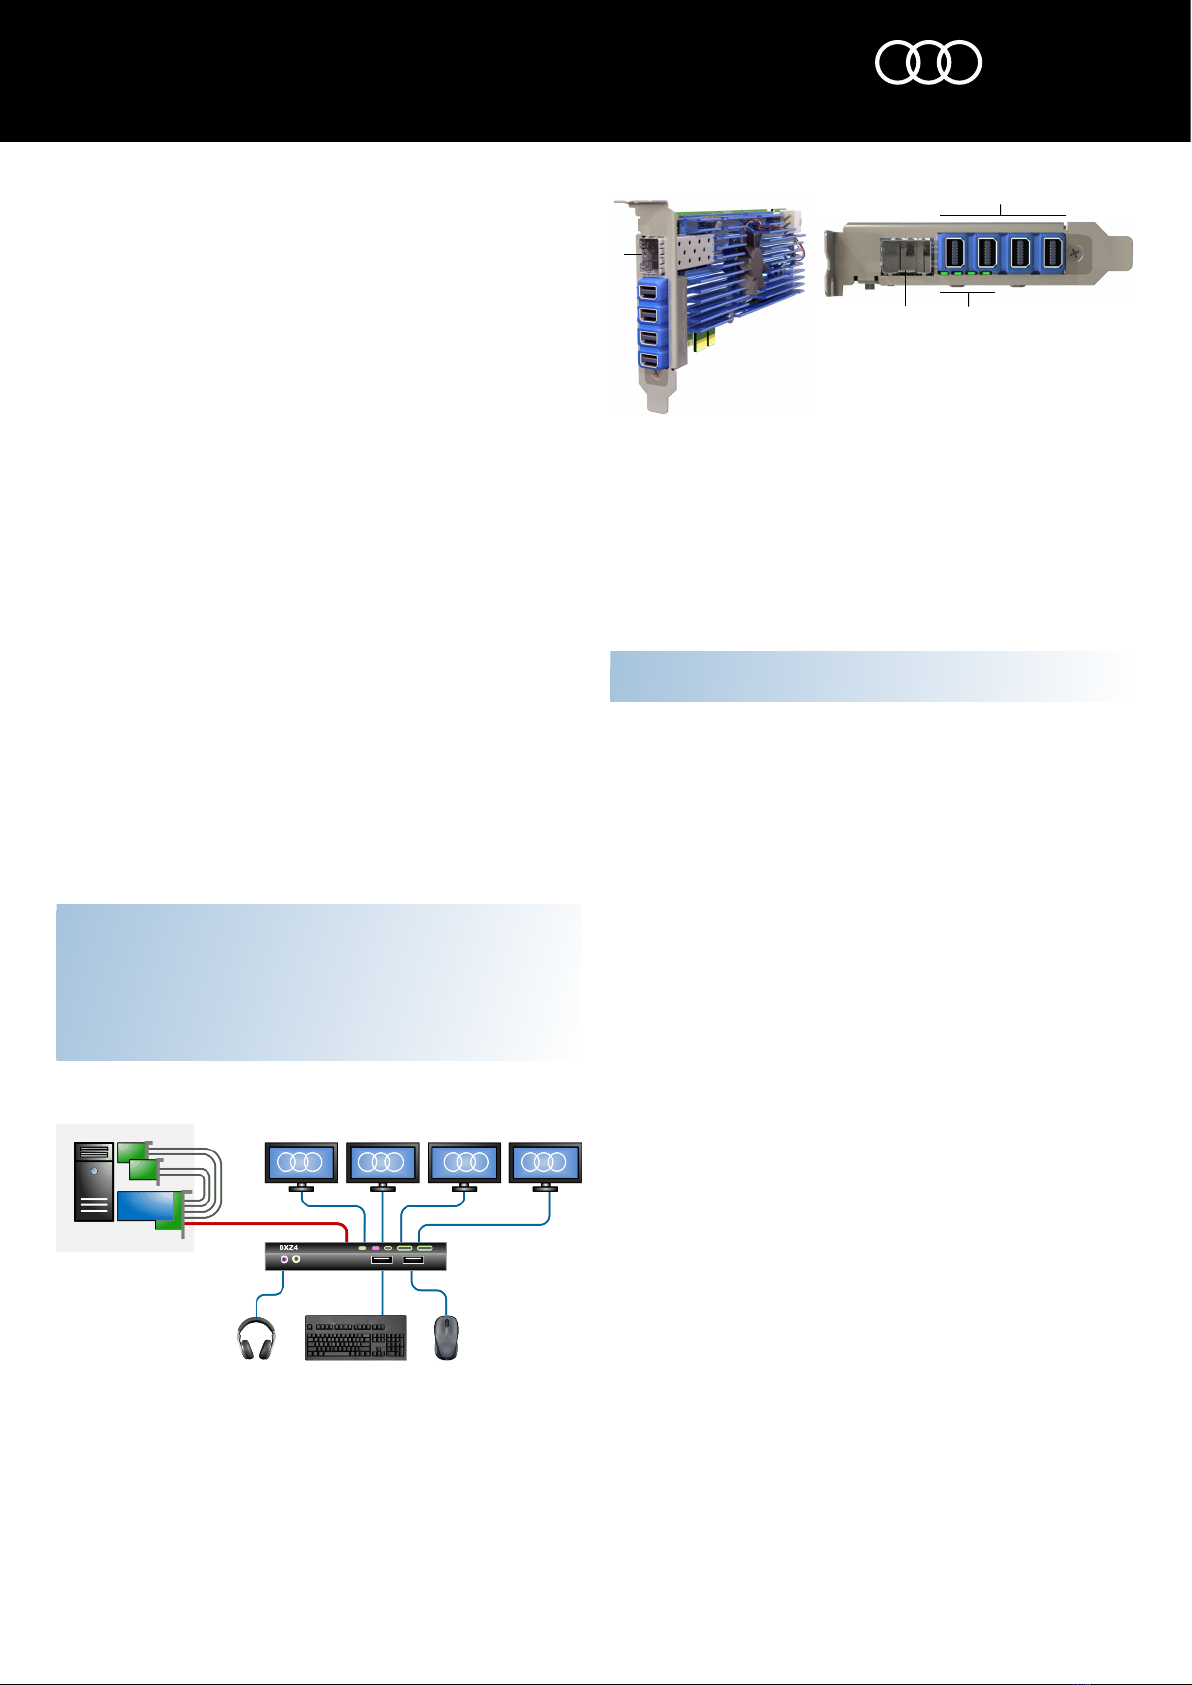
Example deployment in a PCoIP system
1Host computer. 2 Dual graphics cards, connected directly to a DXH4.
3DXH4 connects to remote zero client over LAN or WAN. 4DXZ4 zero client with
four video heads.
Before you start
1. Make a note of the MAC address assigned to the DXH4. Find this address on
the configuration record/serial number label. You may need the MAC address
when pairing the DXH4 to a zero client.
If your network uses DHCP, the DXH4 obtains its IP address from the DHCP
server. If no DHCP server is available, the DXH4 times out after three minutes
and adopts the default IP address 192.168.1.100.
Install the DXH4 or DXH4-M
Always use appropriate anti-static handling procedures when handling the PCoIP
host card or an opened computer.
1. Confirm that the correct I/O bracket is fitted to the DXH4 card. Standard profile
and low profile brackets are both supplied with the DXH4.
2. Ensure that the host computer is turned off. Unplug the power cable.
3. Remove the chassis cover and locate an available PCIe slot.
4. Insert the DXH4 host card into the PCIe slot. Secure the card using an
appropriate I/O bracket.
5. (DXH4-M only) Fit an SFP module into the DXH4-M network socket.
6. Connect the DXH4 to your network.
7. Connect the video outputs on the host computer graphics card(s) to the Mini
DisplayPort video inputs on the DXH4.
8. Replace the chassis cover and reconnect the power cable.
9. Restart the host computer.
Connect a zero client to the DXH4
Several connection methods are supported. The default method is Auto Detect,
but there are other methods such as SLP Discovery or Direct to Host.
You can also use a connection broker. See the DXH4 user manual for more details.
To connect a zero client:
1. Make sure the remote Amulet Hotkey zero client is powered on.
2. Start a PCoIP session to connect the zero client to the DXH4. If you want to use
the default connection method, click Connect. If not, do the steps in Change
the connection method.
Change the connection method
If you need to change the default connection method, do the following steps:
1. Select Options→ Configuration from the Menu Bar.
2. Click Unlock and enter the default password ahkdante.
3. Select the Session tab and select the connection type required from the drop-
down window.
4. Click on OK.
Note: If you want to change the default password, see the DXH4 user manual for
more information.
1
DXH4
4
2
3
2
2
1
3
DXH4-M. 1 Four MiniDP sockets. 2Network
socket. Accepts SFP module. 3 LED indicators.
solutions you can bank on
AMULET
HOTKEY
®
®
DXH4 and DXH4-M PCoIP Hosts
Quick Start Guide
www.amulethotkey.com DXH4 Quick Start Guide 1.0 November 2016
QS-DXH4-0001
© 2016 Amulet Hotkey Ltd. All rights reserved.
Information in this document is subject to change. No part of this document may be reproduced through any means including (but not limited to) electronic or
mechanical, without express written permission from Amulet Hotkey Ltd. Amulet Hotkey Ltd may have patents, patent applications, trademarks or copyrights or other
intellectual property rights covering subject matter in this document. PC-over-IP, PCoIP and the PCoIP logo are registered trademarks of Teradici Corp. Amulet Hotkey
and ‘solutions you can bank on’ are registered trademarks of Amulet Hotkey Ltd. Other product names and company names listed within this document may be
trademarks of their respective owners. Amulet Hotkey products are designed and built in the UK.
Change the default IP address
Change the default IP address as soon as possible to avoid possible address
conflicts, as all new DXH4 cards will revert to this address.
You will need the default password ahkdante.
1. Use the Administrative Web Interface (AWI) to assign a static IP address. To
access the AWI, browse to the IP address of the DXH4.
LED indicators
1. Speed LED: Indicates the network connection speed. Green, 1 Gbit/s
connection. Amber, 100 Mbit/s.
2. A LED: Indicates network activity. Green, full duplex connection, no activity.
Green flash, network activity detected. Red flash, half duplex connection.
Also shows firmware update progress; see the DXH4 Manual.
3. Status LED: Indicates the PCoIP link status. Blue, PCoIP session over fibre link.
Green, PCoIP session over copper link. LED flashes if PCoIP link exists but not in
session. Red flash, card error.
4. L LED: Indicates the connection speed to an internally linked DXH4 card.
Colours are same as for the Speed LED.
WARNING
To reduce the risk of fire or electric shock:
-do not disassemble the unit
-make sure the unit is powered off before you remove
or install components
-do not expose this appliance to rain and moisture.
-do not expose the appliance to dripping or splashing.
-do not place objects filled with liquids on or near the
appliance.
CAUTION
-Apart from those mentioned in this guide, there are no
user serviceable parts inside.
-Install in accordance with these instructions.
-Do not install near significant sources of heat.
-Ensure the product is properly earthed.
-Only use attachments and accessories approved by
Amulet Hotkey.
-Clean the product only with a dry cloth.
Technical Support
Europe: [email protected]
N America: [email protected]
S America: [email protected]
Asia Pacific: [email protected]
More DXH4 Product documentation and downloads available here
http://resources.amulethotkey.com/resources
Refer all servicing to qualified personnel.
For further information on this product, for other contact details, or for
details of our other products, see our website www.amulethotkey.com.
FCC compliance statement
This device complies with part 15 of the FCC Rules. Operation is subject to the
following conditions: (1) this device may cause harmful interference and (2) this
device must accept any interference received, including interference that cause
undesired operation.
1
3
4
2
LED indicators: 1 Speed LED. 2A LED. 3Status LED. 4L LED.
DXH4 user manual
The DXH4 user manual and other product documentation are available on the
Amulet Hotkey website. See the DXH4 user manual for more details about:
■Internal card connections. The DXH4 card has several internal sockets and
jumpers, including an RPC socket, an inter-card connection, and a
supplemental power socket.
■Remote power cycling. The DXH4 supports Wake-on-LAN and Remote
Power Cycling (RPC), allowing users to wake up from standby or power down
the host computer from a remote zero client.
Because of SFP module power requirements, the DXH4-M does not support
Wake-on-LAN on some PCs.
■Troubleshooting. Refer to the manual if you have any display or connection
issues, or contact Amulet Hotkey Technical Support.
■Technical specifications. Full details of the product specifications.

Other manuals for DXH4

3

This manual suits for next models

1

Other Amulet Hotkey Desktop manuals

Amulet Hotkey CoreStation WR3930 User manual

Amulet Hotkey

Amulet Hotkey CoreStation WR3930 User manual

Popular Desktop manuals by other brands

Tripp Lite WWSS2DWSTAA owner's manual

Tripp Lite

Tripp Lite WWSS2DWSTAA owner's manual

Jason.L Litewall 2 Person Run Workstation Assembly instructions

Jason.L

Jason.L Litewall 2 Person Run Workstation Assembly instructions

Compaq Presario 5000US specification

Compaq

Compaq Presario 5000US specification

Epson ActionPC 5500 user guide

Epson

Epson ActionPC 5500 user guide

HP e3000 Command reference

HP

HP e3000 Command reference

Kontron MOPSlcdLX user guide

Kontron

Kontron MOPSlcdLX user guide

Sony VPCL21M1E/B user guide

Sony

Sony VPCL21M1E/B user guide

Asus S501ME user guide

Asus

Asus S501ME user guide

Sony SVL241 L Series quick start guide

Sony

Sony SVL241 L Series quick start guide

Kontron KBox F-210 Series user guide

Kontron

Kontron KBox F-210 Series user guide

Zotac ZBOX NANO user manual

Zotac

Zotac ZBOX NANO user manual

Shuttle XC60J quick guide

Shuttle

Shuttle XC60J quick guide

Asus G15CX user guide

Asus

Asus G15CX user guide

Lenovo ThinkCentre M81 Brugervejledning

Lenovo

Lenovo ThinkCentre M81 Brugervejledning

HP Vectra VE5 3 Technical reference manual

HP

HP Vectra VE5 3 Technical reference manual

Lenovo ThinkCentre M70e user guide

Lenovo

Lenovo ThinkCentre M70e user guide

DigiPos Retail Blade Millennium Technical manual

DigiPos

DigiPos Retail Blade Millennium Technical manual

Lenovo ThinkCentre A52 Brze upute

Lenovo

Lenovo ThinkCentre A52 Brze upute

manuals.online logo
manuals.online logoBrands
  • About & Mission
  • Contact us
  • Privacy Policy
  • Terms and Conditions

Copyright 2025 Manuals.Online. All Rights Reserved.