manuals.online logo
Brands
  1. Home
  2. •
  3. Brands
  4. •
  5. AMX
  6. •
  7. Recording Equipment
  8. •
  9. AMX AXB-TPI/3 User manual

AMX AXB-TPI/3 User manual

Quick Start Guide
AXB-TPI/3 Touch Panel Interface 3
ATTENTION: READ THIS FIRST!
For more detailed installation, configuration, programming, and operating instructions,
refer to the AXB-TPI/3 Touch Panel Interface Instruction Manual available on-line at
www.amx.com.
Overview
The AXB-TPI/3 is a touch panel interface capable of using multiple (RGB and
consumer-type) inputs and of displaying its graphical user interface (GUI) output on
practically any type of monitor. The AXB-TPI/3 has three slots on the rear panel that
can contain any combination of three types of input modules:
•TP3-VID (composite video/S-video)
•TP3-RGB (RGB)
•TP3-VGA (VGA)
Installing the Input Modules (TP3-VID/RGB/VGA)
1. Discharge the static electricity from your body by touching a grounded metal
object and disconnect all connectors from the AXB-TPI/3.
2. Carefully unscrew (counter-clockwise) the two screws located at the rear of the
unit to remove each cover.
3. Gently insert the module into the brackets inside the card slot and slide the input
module into the enclosure until you feel it contact the slot connector.
4. Screw in (clockwise) the two thumbscrews to secure each module.
5. Repeat steps 2 and 3 to insert other input modules, if necessary.
6. When you are done installing the input modules, reconnect all connectors, and
apply power.
Preparing Captive Wires
You will need a wire stripper and flat-blade screwdriver to prepare and connect the
captive wires.
1. Strip 0.25 inch (6.35 mm) of insulation off all wires.
2. Insert each wire into the appropriate opening on the connector.
3. Tighten the screws to secure the wire in the connector. Do not tighten the
screws excessively; doing so may strip the threads and damage the connector.
Using External Power
To use the AXlink 2-pin connector for power transfer from the PSN6.5 power supply,
the incoming PWR and GND cable from the PSN6.5 must be connected to the
corresponding location on the green 2-pin rear panel connector (FIG. 2).
Using the Program and Mouse Ports (DB-9 RS-232 Connectors) for
Control and Communication.
The TPI has two DB-9 RS-232 connectors to support most standard serial touch
devices (serial mouse or touch panel) and RS-232 communication protocols (for PC
data transmission). There is a DB-9 connector on the front panel ( labeled PROGRAM
PORT) for communication with a PC, and one on the rear panel (labeled MOUSE
PORT) for connection to a touch device. The following table lists the (DB-9) RS-232
connector pinouts:
AXB-TPI/3 Specifications
Dimensions (HWD) • 3.47" x 13.75" x 8.38" (8.81 cm x 34.93 cm x 21.29 cm)
• With brackets installed for rack-mounting: 3.47" x 19.00" x 8.38"
(8.81 cm x 48.26 cm x 21.29 cm)
• With brackets rotated 45° for under/over/vertical surface
mounting: 3.85" x 19.00" x 8.38"
(9.78 cm x 48.2 cm x 21.29 cm)
Input Voltage 12 VDC
Current Consumption
(each input module requires
500 mA)
• 0 input module installed - 630 mA
• 1 input module installed - 1.13 A
• 2 input modules installed - 1.63 A
• 3 input modules installed - 2.13 A
Memory • Standard 9 MB (8 MB Flash)
Input/Output Resolution • 640x 480 @60 Hz to 1024 x 768 @ 60 Hz
Input and Output Refresh
Rates (per resolution)
Note: Input resolutions apply to RGB and VGA only
• 640 x 480 (VGA): 60 Hz, 72 Hz, 75 Hz, 85 Hz
• 800 x 600 (SVGA): 56 Hz, 60 Hz, 72 Hz, 75 Hz
• 1024 x 768 (XGA): 60 Hz
Front Components and
Connectors
• PROGRAM port (DB-9)
• LED Indicators - VGA (640x480 resolution), SVGA (800x600),
and XGA (1024 x768)
• AXlink LED - Green LED indicates AXlink communication
activity, power, and data status.
Rear Connectors • Mouse Port - RS-232 (DB-9) 9-pin serial port. The 9-pin serial
port is used to connect a pointer device, such as a serial mouse
or touch-screen overlay.
• VGA Monitor Out - HD-15 15-pin connector for VGA monitor
output.
• RGB Monitor Out - 5 BNC output connectors (from left to right)
red (R), green (G), blue (B), horizontal sync (H), and vertical
sync (V) for RGB monitor output.
• AXlink connector - 4-pin AXlink data/power bus (captive-wire)
connector
• PWR connector - 2-pin 12 VDC power supply (captive-wire)
connector
Input Module Slots/Outputs • Three slots on rear panel can be equipped with any combination
of input modules (S-Video/Composite, VGA, and RGB). The
TPI/3 handles multiple input resolutions and refresh rates.
Input Modules • TP3-VID - Use the TP3-VID input module in any input slot to
connect video sources, such as VCRs and DVDs. The TP3-VID
module has one composite video connector and one S-video
input connector.
•TP3-RGB - Use the TP3-RGB input module in any input slot to
connect RGB-type sources. The TP3-RGB module uses 5 BNC
connectors for R, G, B, H and V.
•TP3-VGA - Use the TP3-VGA input module to connect VGA-
type sources (common for PCs). The TP3-VGA module uses a
HD-15 connector.
Included Accessories • Two rack-mount ears and a package of rack screws
• One 4-pin AXlink connector
• One 2-pin PWR connector
Optional Accessories • PSN6.5 power supply (12 VDC)
• Input module (TP3-VID, TP3-RGB, and TP3-VGA)
FIG. 1 Inserting an input module (TP3-VID, TP3-RGB or TP3-VGA)
FIG. 2 12 VDC Power Connector
(DB-9) RS-232 Connector Pinouts
Pin Signal Function
1N/ANotused
2 RXD Receive data
3 TXD Transmit data
4N/ANotused
5 GND Signal ground
6N/ANotused
7N/ANotused
8N/ANotused
9N/ANotused
Thumbscrews
rear panel
PSN6.5
+ (PWR)
- (GND)
2-pin captive-wire
power connector
+12 VDC power supply
9
8
7
6
5
4
3
2
1
9
8
7
6
Female Male
(Mouse or PC) (TPI)
AMX Corporation reserves the right to alter specifications without notice at any time.
For full warranty information, refer to the AMX Instruction Manual(s) associated with your Product(s).
041-004-2648 10/02 ©2002
AMX Corporation. All rights reserved. The AMX logo is a trademark of AMX Corporation. AMX reserves the right to alter specifications without notice at any time.
3000 RESEARCHDRIVE,RICHARDSON,TX75082•800.222.0193• 469.624.7153 •fax 469.624.7153 •technical support800.932.6993• www.amx.com
93-5975 REV: A
Using the MONITOR OUT HD-15 Connector
Connect the VGA display equipment’s HD-15 (male) connector to the MONITOR
OUT HD-15 (female) high-density connector on the rear panel of the panel. The
following table lists the MONITOR OUT connector pinouts.
WARNING! Do not connect the wire from the PWR terminal on the Central
Controller to the PWR terminal on the TPI/3 AXlink connector, since the
TPI/3 uses an external power supply.
Make sure to connect only the AXM, AXP, and GND wires on the TPI/3’s
AXlink connector when using the PSN6.5 power supply.
Configuration
To configure the touch panel, follow these sections in sequence. Use the NetLinx
Studio program to select a COM port and set its parameters, and use the NetLinx
Studio Terminal Emulator to enter the Send Commands described in the following
sections. Alternatively, you can use AXCESS/X or any other terminal program to
communicate with the TPI. Verify that your PC is connected to the PROGRAM port
on the front panel of the TPI.
1. Setting up Communication
1. In NetLinx Studio, select Tools > Master Comm Settings to open the Commu-
nication Settings dialog, where you can select an available COM port.
2. Click the Configure button to set the communication parameters for the
selected COM port.
The default settings for the TPI are: 38,400, 8-bits, No parity, Stop Bits = 1,
and Flow Control = None.
3. In NetLinx Studio, select Tools > Terminal to launch the Terminal Emulator
window.
4. Type HELLO (you will not see the characters) and press Enter. When a valid
connection exists, the device responds with HOW ARE YOU DOING.
5. Type ECHO ON and press Enter (now the characters should be displayed on the
screen).
2. Setting the Output Resolution
The output resolution for the monitor must be configured and then calibrated. Refer
to the specifications table for available output resolutions and refresh rates.
1. Verify the connection of the output display monitor to the MONITOR OUT port
on the rear panel of the TPI.
2. Use the following command in Terminal Emulator mode:
Resolution <hor>x<vert>:<refresh>
example:
Resolution 1024x768:60
Sets the TPI/3 to send a video signal at 1024 x 768 with a refresh rate of 60 Hz.
Note: If the video is blurry, try a different refresh rate and/or resolution. Check the
output device to verify you are using refresh rates and resolution settings are
compatible with the device.
3. Assigning the Touch Drivers
Use the following command and device IDs to set the mouse driver:
Mouse<# for touch driver>
This command allows you to see the characters on the display as you type them. The
following table lists the supported touch devices and their associated ID’s.
example:
Mouse 12
The example sets the touch device to the VTM-D15/A MultiMedia Touch Panel
or ELO IntelliTouch®panel.
• If the assigned ELO driver does not allow calibration of the monitor, try the alter-
nate ELO touch driver and repeat step 2.
•Do not calibrate the TPI/3 if you are using a Microsoft®compatible mouse or a
mobile mouse.
• Do not enter the <> characters when entering the values or commands, they
are included in the syntax example to visually indicate a field.
4. Calibrating the Monitor
Once the monitor is resized, calibrate it to use the touch drivers. In terminal emulator
mode, there are 4 commands used for calibration:
•Calibrate sets the monitor to begin the calibration test mode.
•Get Cal displays the current calibration values.
•Check Cal allows you to manually check the calibration on the monitor by
using your touch on the panel to display an on-screen cross-hair.
•Set Cal allows you to manually configure the calibration values for the monitor
if you know the correct calibration values (ex: cloning the TPI). This command
is only supported through a serial connection.
1. Calibrate the TPI by entering:
calibrate
2. Press the on-panel cross-hairs as they appear. After the last cross-hair has
been depressed and the coordinates points have been set, a dialog displays
the panel coordinate values.
3. Press the screen to exit from the calibration session and return to the panel
display.
4. To verify these values, check the calibration of the TPI by entering:
check cal
5. Touch the panel at any location and a cross-hair should appear directly below
the touch point.
5. Verifying Your Settings
1. Ty p e ?PAR into the Terminal software to verify the driver. The touch name
should correspond to the desired driver. The return from the TPI/3 includes
these characteristics:
2. In NetLinx Studio, exit the Terminal Emulator (or exit the AxcessX, HyperTermi-
nal or other telnet program).
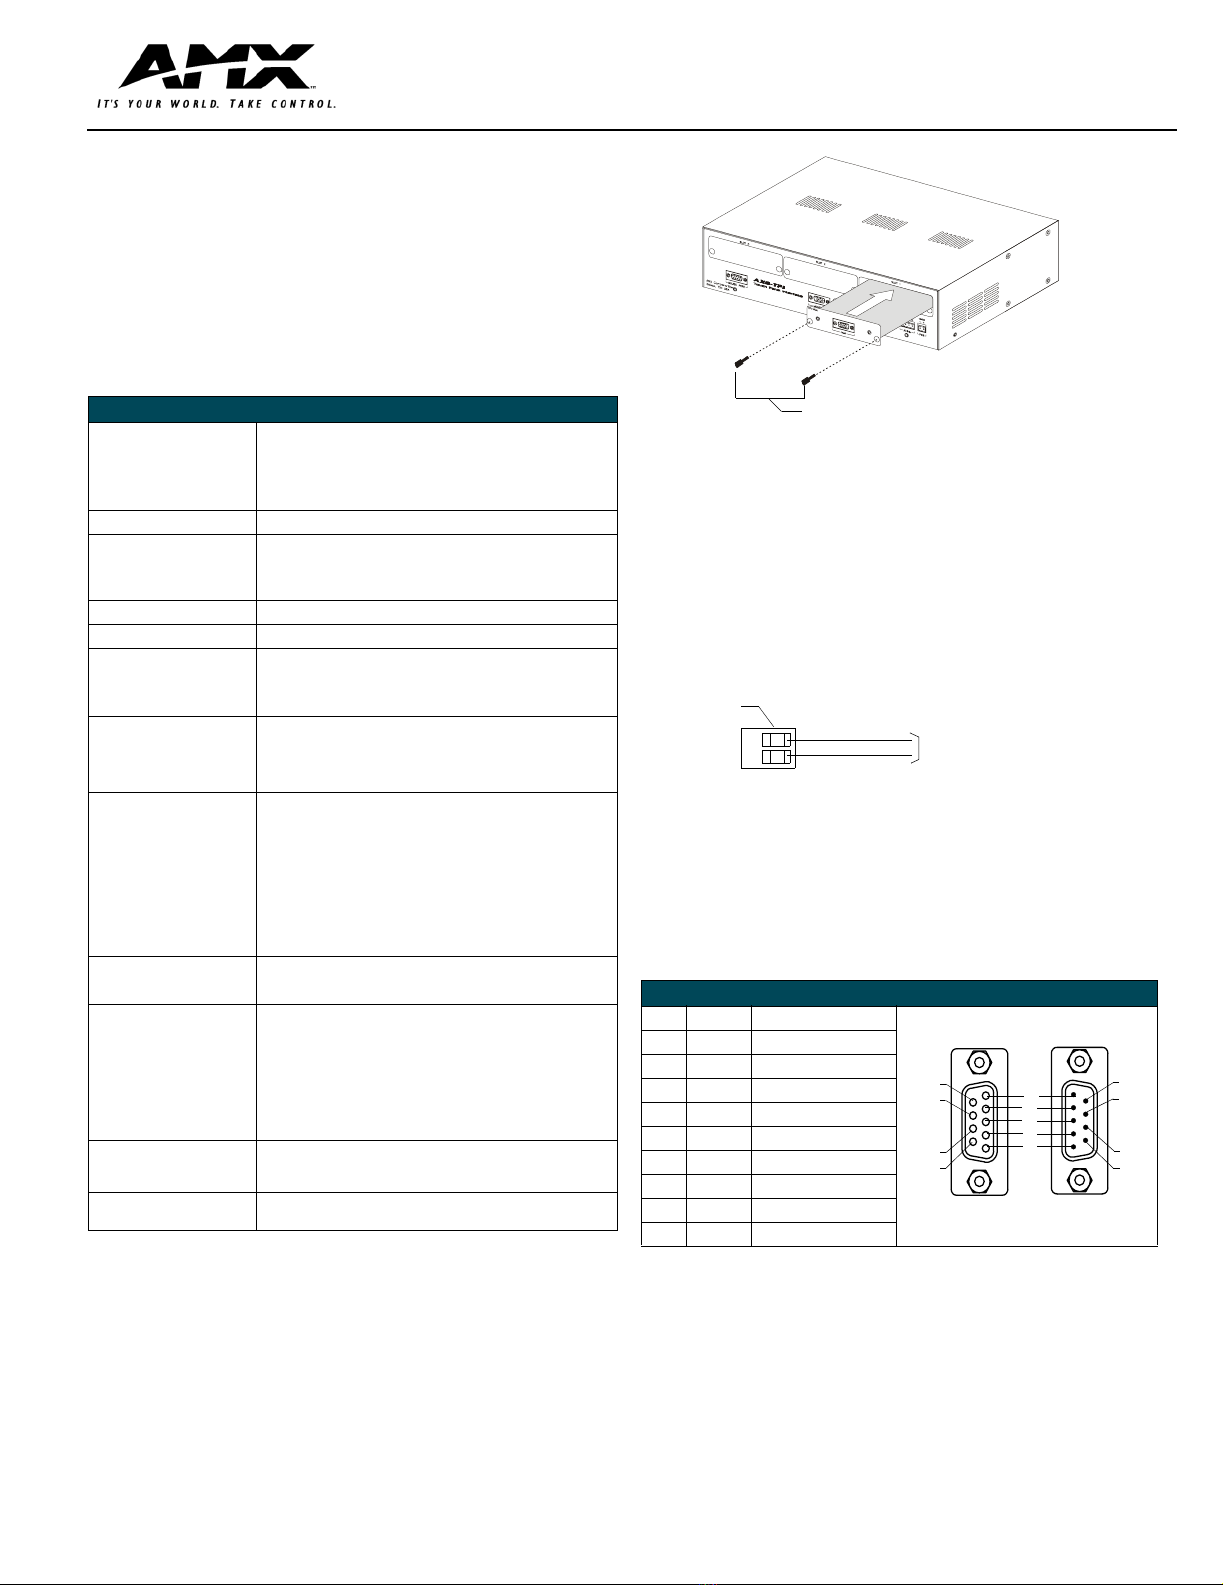
VGA IN HD-15 Connector Pinouts
Pin Signal Function
1 Red Red signals
2 Green Green signals
3 Blue Blue signals
4 N/A Not used
5 GND Signal Ground
6 RAGND Red analog ground
7 GAGND Green analog ground
8 BAGND Blue analog ground
9 N/A Not used
10 SAGND Synchronization analog ground
11 N/A Not used
12 N/A Not used
13 HSYNC Horizontal synchronization signal
14 VSYNC Vertical synchronization signal
15 N/A Not used
VGA HD-15 (male)
10
6
5
1
15
11
Supported Touch Devices / ID’s
Touch Device ID
No touch device 00
Microsoft®serial mouse (default)01
2nd Microsoft Serial Mouse (MX-MM Mobile Mouse®)02
Dynapro®touch monitor 10
MicroTouch®touch monitor 11
Elo IntelliTouch®and VTM-D15/A touch monitors 12
Elo AccuTouch®touch monitor 13
EZ Screen®touch monitor 15
External touch driver FF
•Version indicates the TPI firmware
version on the TPI.
•Mouse Type displays the mouse driver
assigned for use through the TPI.
•Device # identifies the beginning device
address for the attached touch device.
•Cursor enabled displays whether the
cursor is enabled/disabled.
•# Devices identifies the number of
devices that are assigned for use
through the touch panel firmware.
•Brightness displays the brightness value
associated with the monitor. The ability
to adjust the brightness value is not
available.
•Output Resolution displays the
horizontal, vertical, and refresh rate for
the monitor connected to the TPI.
•Contrast displays the contrast value
associated with the monitor. The ability
to adjust the contrast value is not
available.

Other manuals for AXB-TPI/3

3

Other AMX Recording Equipment manuals

AMX Tango DAS-T0804-SIG Parts list manual

AMX

AMX Tango DAS-T0804-SIG Parts list manual

AMX Vision 2 MPEG User manual

AMX

AMX Vision 2 MPEG User manual

AMX NXB-KNX User manual

AMX

AMX NXB-KNX User manual

AMX AXB-SLD Guide

AMX

AMX AXB-SLD Guide

AMX AXP-CPI User manual

AMX

AMX AXP-CPI User manual

AMX AXB-TPI/3 User manual

AMX

AMX AXB-TPI/3 User manual

AMX AXB-DMX512 DMX512 INTERFACE User manual

AMX

AMX AXB-DMX512 DMX512 INTERFACE User manual

AMX AXB-DMX512 DMX512 INTERFACE Parts list manual

AMX

AMX AXB-DMX512 DMX512 INTERFACE Parts list manual

AMX AXC-ADI Guide

AMX

AMX AXC-ADI Guide

AMX AXC-SMP Guide

AMX

AMX AXC-SMP Guide

AMX IP Link Interface RMS User manual

AMX

AMX IP Link Interface RMS User manual

AMX AXC-232 Plus plus Guide

AMX

AMX AXC-232 Plus plus Guide

AMX 16-Channel Custom Panel Interface AXP-CPI16 Parts list manual

AMX

AMX 16-Channel Custom Panel Interface AXP-CPI16 Parts list manual

AMX TPI-PRO-2 User manual

AMX

AMX TPI-PRO-2 User manual

AMX AXB-IRS4 User manual

AMX

AMX AXB-IRS4 User manual

AMX IRIS Parts list manual

AMX

AMX IRIS Parts list manual

AMX AXC-MSE Guide

AMX

AMX AXC-MSE Guide

AMX TPI-PRO-DVI-2 User manual

AMX

AMX TPI-PRO-DVI-2 User manual

AMX AXC-DTMF Plus Guide

AMX

AMX AXC-DTMF Plus Guide

AMX TPI-PRO-2 Parts list manual

AMX

AMX TPI-PRO-2 Parts list manual

AMX AXC-PTI Guide

AMX

AMX AXC-PTI Guide

AMX AXB-DMX512 DMX512 INTERFACE User manual

AMX

AMX AXB-DMX512 DMX512 INTERFACE User manual

AMX TPI-PRO-2 User manual

AMX

AMX TPI-PRO-2 User manual

AMX Tango DAS-T0804-SIG User manual

AMX

AMX Tango DAS-T0804-SIG User manual

Popular Recording Equipment manuals by other brands

Art Xdirect Specifications

Art

Art Xdirect Specifications

Zoom V6 quick guide

Zoom

Zoom V6 quick guide

Befaco HEX MIX VCA user manual

Befaco

Befaco HEX MIX VCA user manual

BHI NEDSP900 manual

BHI

BHI NEDSP900 manual

Phonak MED-EL RONDO Fittings guide

Phonak

Phonak MED-EL RONDO Fittings guide

Pioneer PDR-509 Service schematics

Pioneer

Pioneer PDR-509 Service schematics

Arturia EQ SITRAL-295 user manual

Arturia

Arturia EQ SITRAL-295 user manual

Kongsberg K-Sync Product description

Kongsberg

Kongsberg K-Sync Product description

TK Audio Transceiver 2 manual

TK Audio

TK Audio Transceiver 2 manual

Yamaha CDR-HD1000 owner's manual

Yamaha

Yamaha CDR-HD1000 owner's manual

Roland Cakewalk UA-25 EX owner's manual

Roland

Roland Cakewalk UA-25 EX owner's manual

Tascam Portastudio 2488 quick start guide

Tascam

Tascam Portastudio 2488 quick start guide

juicedLink Little DARling System user manual

juicedLink

juicedLink Little DARling System user manual

RELACART WAM-400 Installation and operation

RELACART

RELACART WAM-400 Installation and operation

Besantek BST-CT101 instruction manual

Besantek

Besantek BST-CT101 instruction manual

Dresser Masoneilan SVI II AP quick start guide

Dresser

Dresser Masoneilan SVI II AP quick start guide

Yamaha E1010 operating manual

Yamaha

Yamaha E1010 operating manual

Peak PLIN-USB user manual

Peak

Peak PLIN-USB user manual

manuals.online logo
manuals.online logoBrands
  • About & Mission
  • Contact us
  • Privacy Policy
  • Terms and Conditions

Copyright 2025 Manuals.Online. All Rights Reserved.