AN SON 7100 series User manual

ANSON

ANSON
2
PREFACE
Thank you for choosing our product, for a better understanding of
the product, we recommend you read this user manual before first
use.
◆Notice to users
This user manual is an operation guide only. Please check our
company website for the latest version or any updates which may
be available. Changes may be made without any notice. This
manual has no implied or stated warrantees, or guartantees of the
product described herein.
◆Product Operating Environment.
This product works with Windows XP/WIN7/VISTA. For best
viewing, resolution should be 1024×768,DirectX should be at least
ver. 8.1 or newer.

ANSON
3
Contents
1 USER LOGIN......................................................................................................................................4
1.1 SYSTEM STARTUP....................................................................................................................4
2 SETUP WIZARD.................................................................................................................................4
2.1 WIZARD INTERFACE................................................................................................................ 4
2.2 ADMINISTRATOR LOGIN INTERFACE.................................................................................. 4
2.3 BASIC SETUP............................................................................................................................. 5
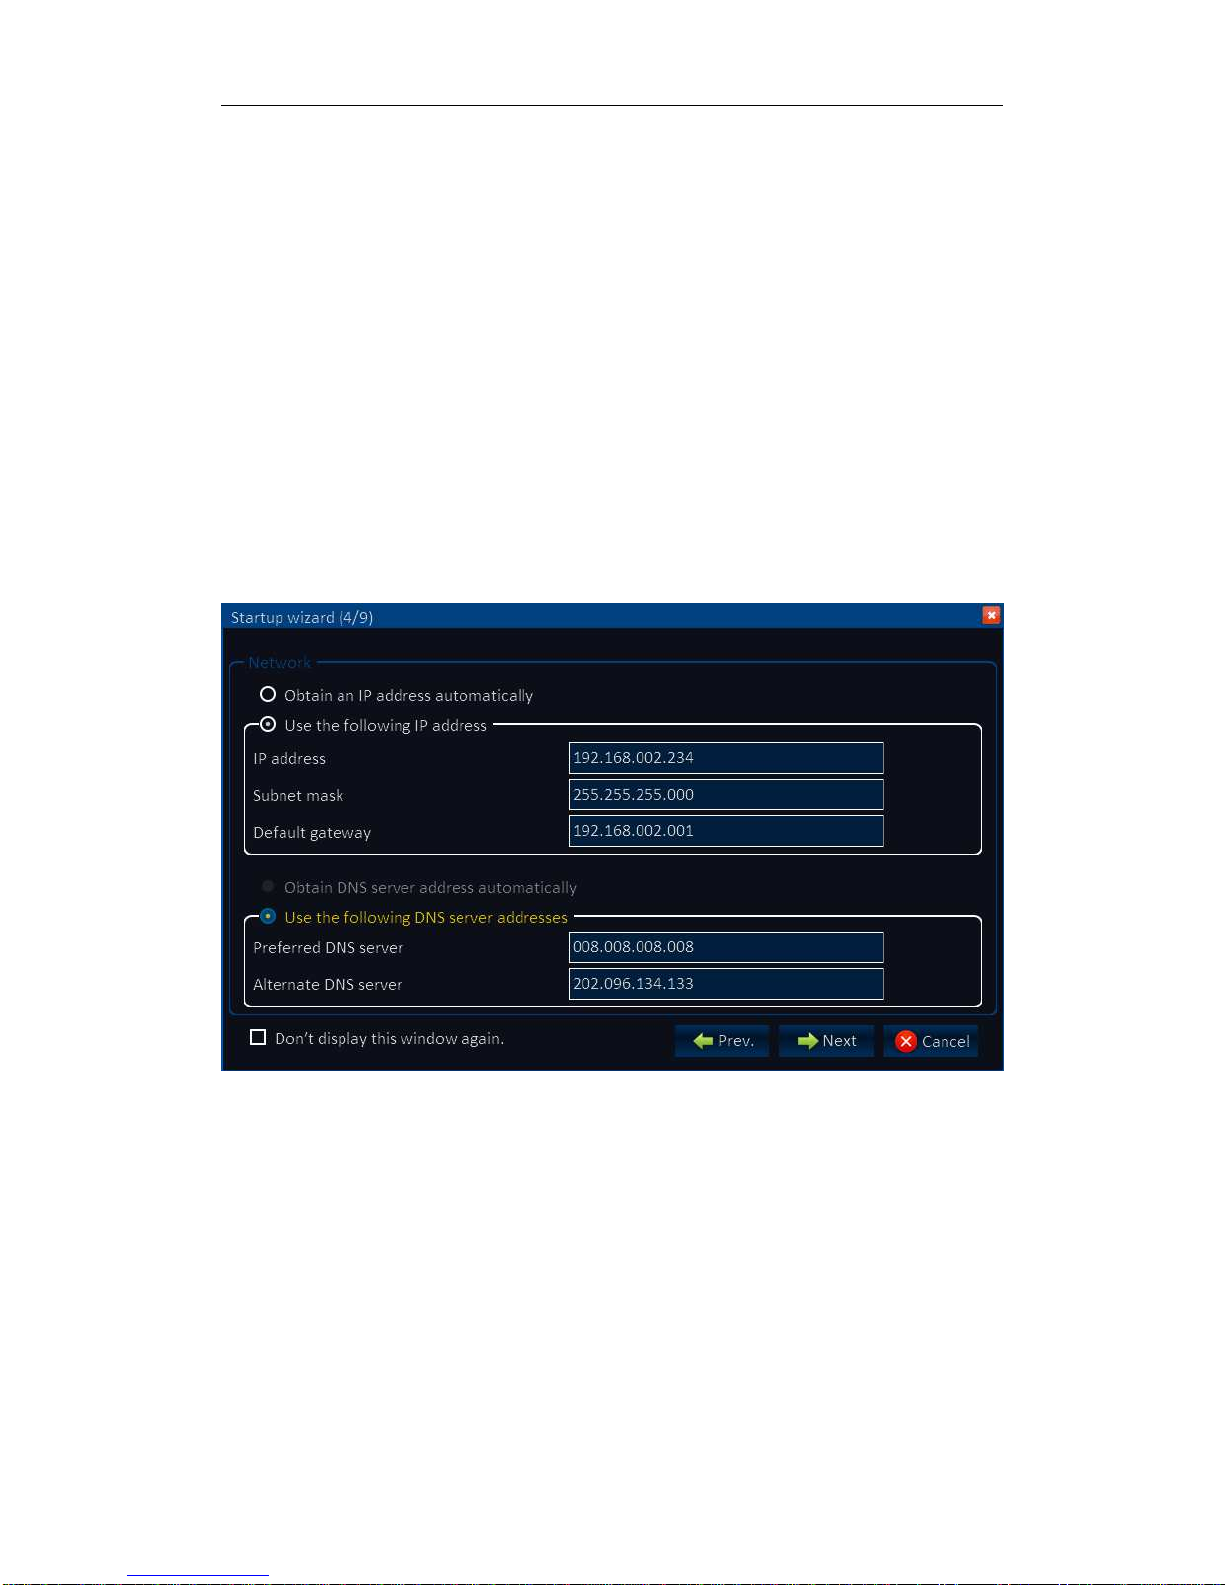
2.4 NETWORK SETUP.....................................................................................................................6
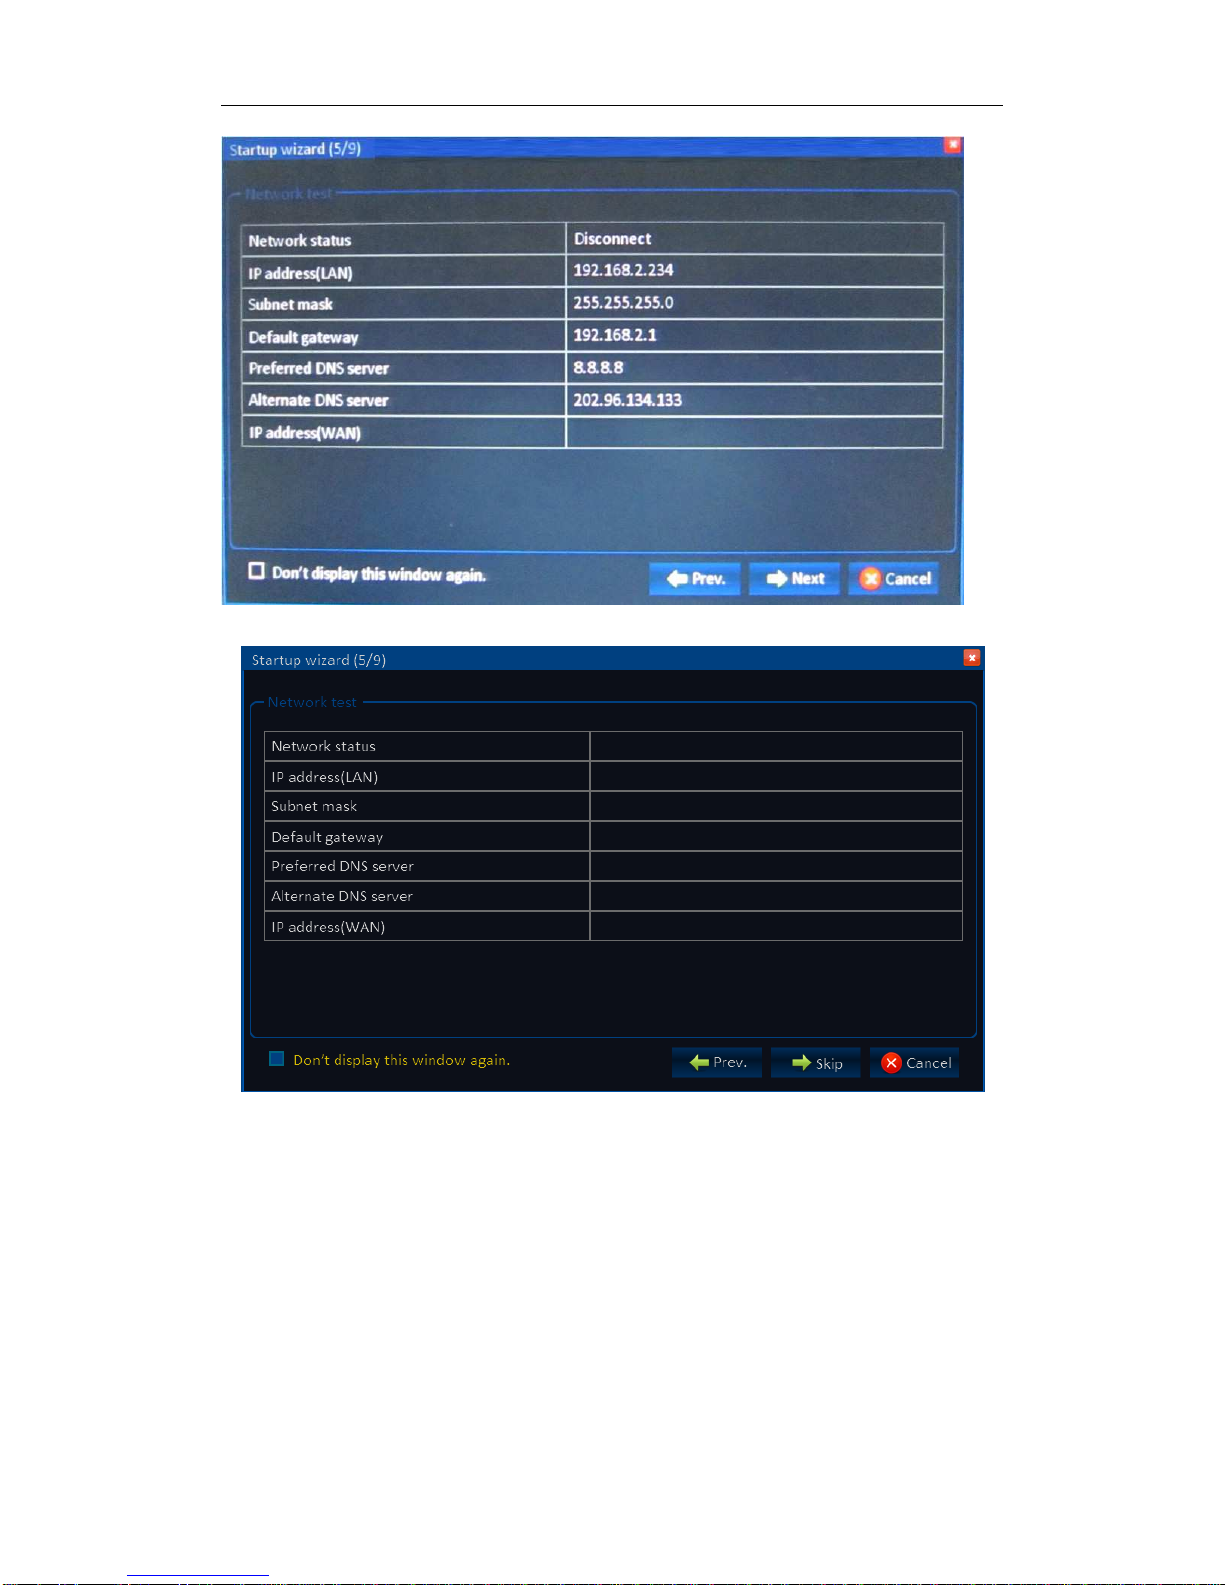
2.5 NETWORK TESTING.................................................................................................................6
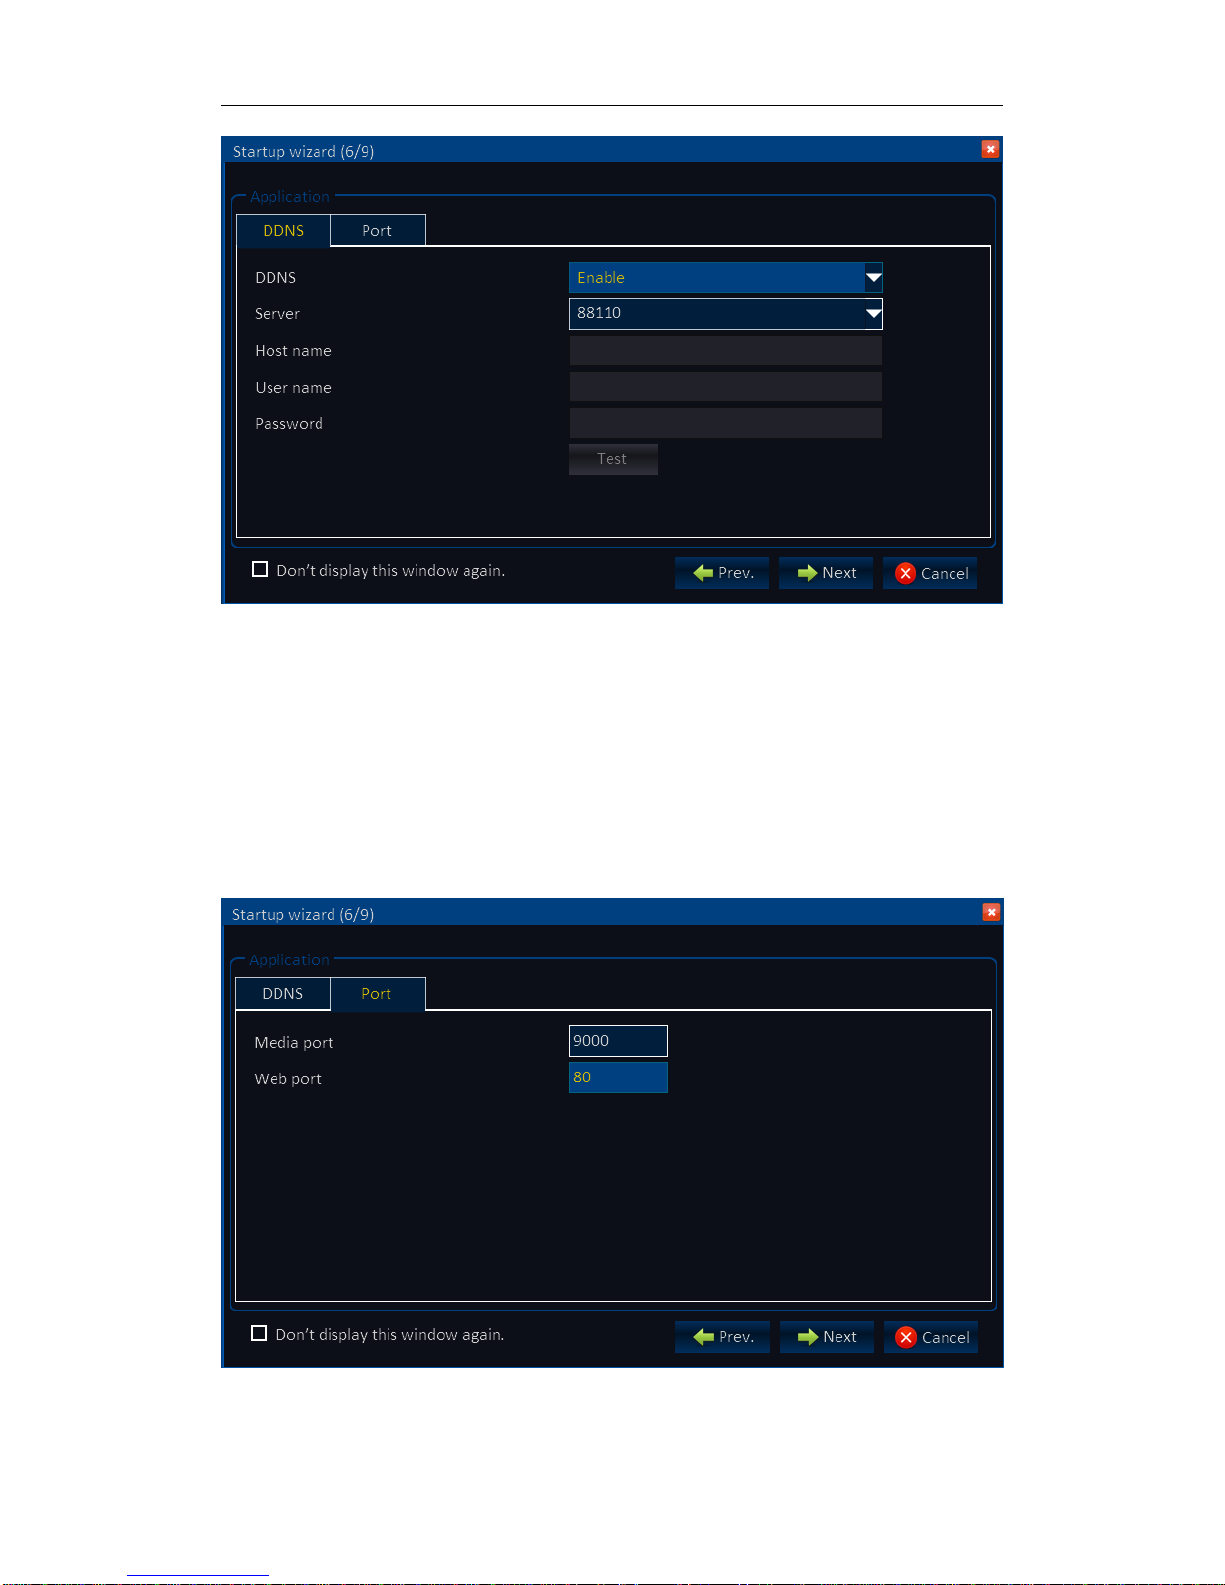
2.6 DDNS & PORT SETUP..............................................................................................................7
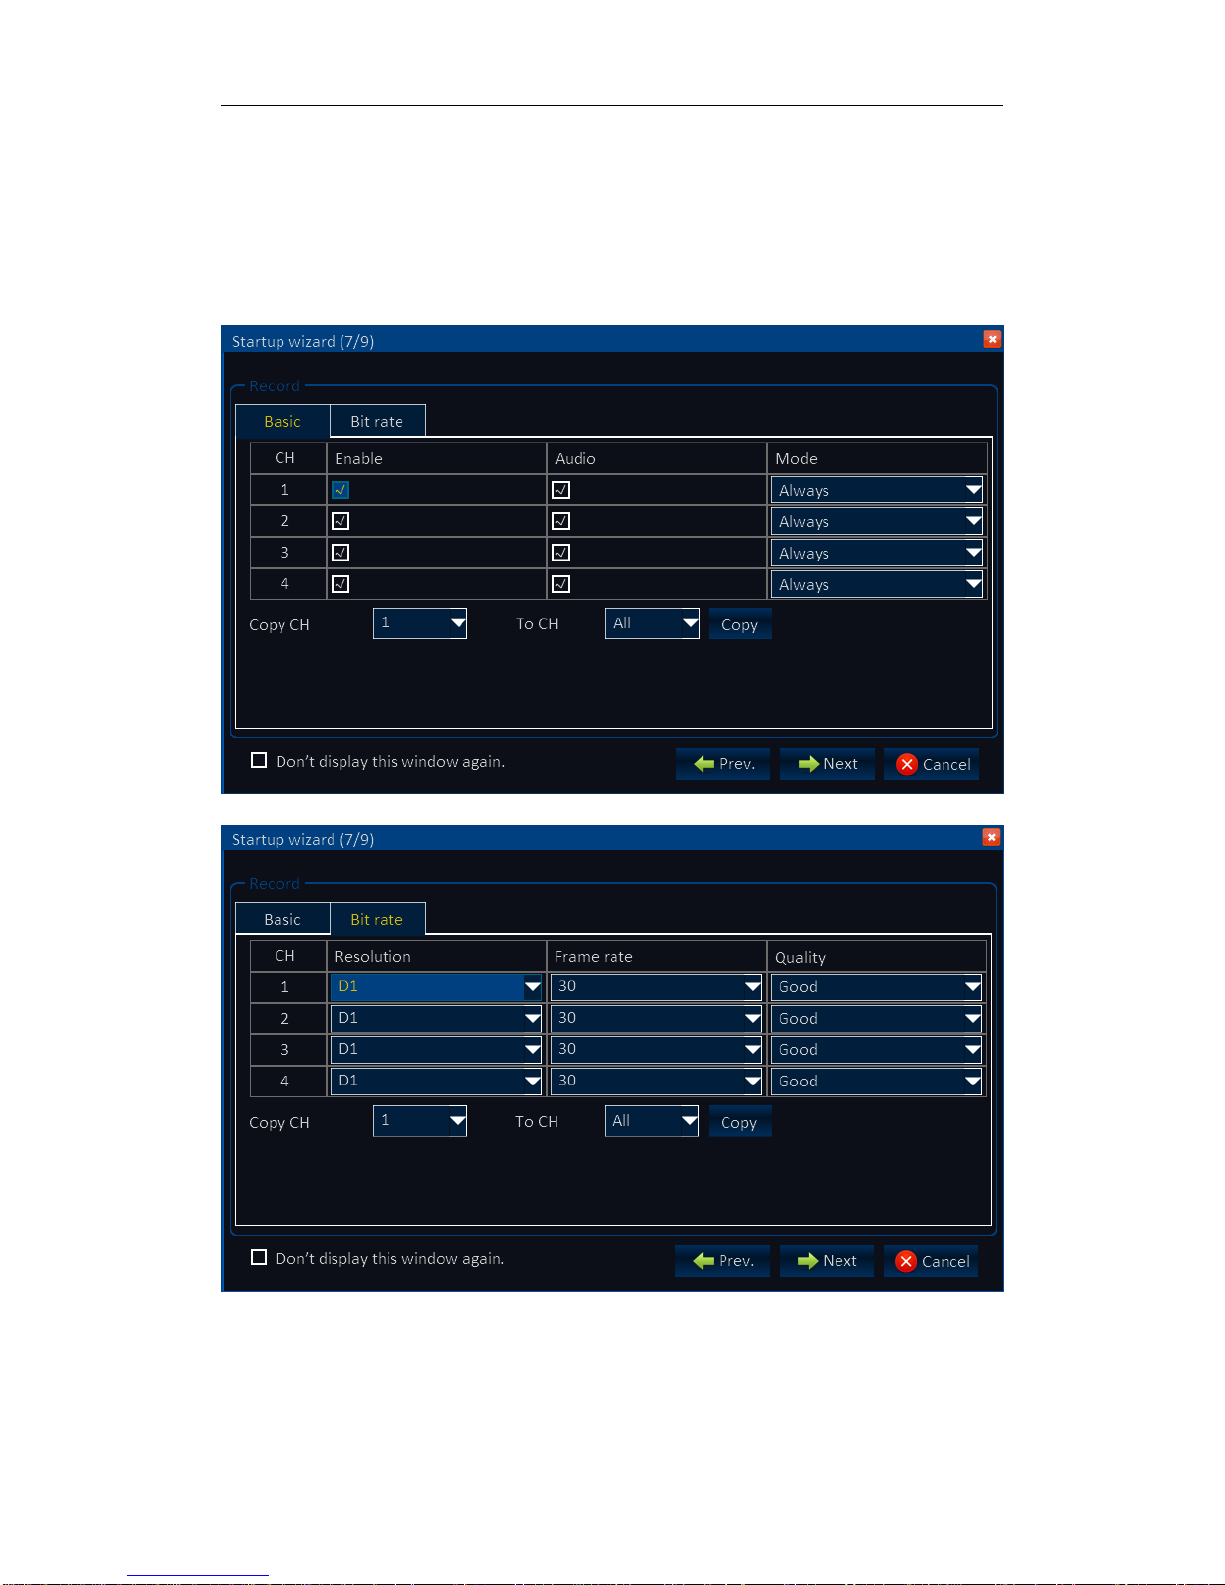
2.7 RECORD MODE & RECORD SETUP.....................................................................................8
2.8 HDD SETUP.................................................................................................................................9
3 SYSTEM LOGIN...............................................................................................................................11
4 INTERFACE INTRODUCTION....................................................................................................... 11
5 BASIC RECORD SETUP................................................................................................................ 11
6 RECORD RESOLUTION SETUP.................................................................................................. 12
7 SCHEDULE.......................................................................................................................................13
8 PLAYBACK.......................................................................................................................................14
9 NETWORK SETUP..........................................................................................................................15
10 DDNS SETUP.................................................................................................................................17
11 PTZ SETUP..................................................................................................................................... 18

ANSON
4
1 System Startup
1.1 System Startup
Power ON/OFF:
Connect the power plug to the power port on the back of the DVR.The system
will automatically run a status check, and will start after few seconds.
2 Setup Wizard
This setup wizard contains all the basic settings, like time setup, network setup,
HDD format reminder, etc. The DVR will achieve basic functions after the setup
wizard has finished. If personalized settings are desired, please login to the
main menu and setup to complete this function.
2.1 Wizard Interface
Wizard interface is shown below. We recommend the initial user place a check
mark '√' in the box in the lower left corner and then click 'Next' to perform the
basic settings.
2.2 Administrator Login Interface
Here we recommend you setup a password for administrator and then click

ANSON
5
"Next" for more settings; if you click "Cancel”, you will enter directly into the
"Main Menu"; if you click "Prev.", the system goes to the previous page.
Note: By default, the administrator user name is: admin. There is no password,
but for better security, we strongly recommend that you setup a password
here.
2.3 Basic Setup
Date/Time, date format, time format, time zone, camera system, language,
should be setup according to the users needs, as below:
Date/Time Setup: Click calendar and choose the date; Click time, a digital

ANSON
6
keyboard will appear, and then set to local time.
Date Format: Three format types: MM/DD/YYYY, DD/MM/YYYY, and
YYYY/MM/DD.
Time Format: 24-hour/ 12-hour.
Time Zone: Click the down arrow, time zone options will be displayed, please
select your time zone.
Note: Once the DVR connects with the internet, it will automatically adjust the
time to the time zone you have chosen. Please make sure the time zone you
chosen is the desired local time zone.
Camera System: PAL/NTSC.
Language: Choose your local language or the language you want.
2.4 Network Setup
There are 2 kinds of network setup: obtain an IP automatically or static IP,
select the type according to your network requirements, as displayed below:
2.5 Network Testing
The system will automatically test your network setup. If a network connection
could not be established, please return to the previous page to correct the
settings and then click “Next”. If no testing is required, just click “Skip” to go to
the next page, as displayed below:

ANSON
7
2.6 DDNS & Port Setup
DDNS: Enable/Disable, please enable the DDNS to use a domain name
server.
Server: Choose your domain name server: 3322, dyndns, no-ip, changeip or
dnsexit.
Host Name: Enter the host name you registered on the domain name server.
User Name: Enter the user name you registered on the domain name server.
Password: Enter the password you registered on the domain name server.
As displayed below:

ANSON
8
Port Setup
Media Port: one private communication port that between DVR and PC,
default: 9000. If this port was occupied by other server port, please change to
an idle port.
Web Port: Http port, default: 80, if change the web port, like to: 8088, when
need to access through browser, need to add the web port after the IP
address.
E.g.: http://ip address:8088
Note: port range: 1-65535, some local ISP’s may block port “80”. We
recommend to change to something such as eg. 8080 See display below:

ANSON
9
2.7 Record Mode & Record Setup
Setup recording and audio for each channel, place check mark '√' to enable
recording and audio.
There are two record modes: Always/Schedule.
For ease, setup one channel and then copy to the others, as shown below:
2.8 HDD Setup
HDD Information: The HDD capacity and HDD quantity is displayed.
HDD Format: Place a check mark '√' under format, and then click “Format”.

ANSON
10
Note: The newly installed HDD must be formatted through our DVR before
usage.
Overwrite: There are three options to choose from; “by days”, “by capacity”
and “never” .Please select desired method.
After HDD setup is completed, the setup wizard finished, you will see the
interface as displayed below, and then click “Close”.

ANSON
11
3 System Login
Open the main menu:
Click “START” in the task bar, by default the taskbar is at the bottom of the
screen, click and hold the taskbar, you can then drag it to any position, if the
taskbar is not displayed, right click the mouse button:
Click “START” to enter the login interface, insert the Device ID, the default
Device ID is “0”. The initial user name is: admin with no password, but if you
setup a password during the setup wizard, you now need to input your
password here.
4 Interface Introduction
In live view, “ ”means normal recording, “ ” means alarm recording, “ ”
means not recording.
5 Basic Record Setup
Login to the Main Menu, click “Basic”, and then click “RECORD”, as displayed
below:

ANSON
12
Enable: place a check mark '√' to enable recording, if unchecked '√' this means
it is not recording.
Audio: place a check mark '√' means audio recording is enabled, if unchecked
'√' audio is not recording.
Record mode: Always/Schedule.
Copy: setup 1 CH and copy settings to any additional channel or all channels.
6 Record Resolution Setup
Resolution: D1, HD1 and CIF
Quality: Best---highest video bit rate, Better---higher video bit rate, Good---high
video bit rate, Normal---medium video bit rate.

ANSON
13
7 Schedule
CH: Select the channel you want to setup
Schedule: From Monday to Sunday, 0:00 to 24:00, setup record mode for time
periods (time period cannot cross a day), double click on the time to enter
the time period setup.
No record—blue color, Normal record---green color, Alarm record---red
color.

ANSON
14
8 Playback
Click “SEARCH” to go to playback interface:
After entering playback interface, DVR will automatically search current day’s
(today) recording files and show in the right window. If there is no recording,
the right window would be empty.
1) Calendar: green & red date background means there is recording that
day, gray background means there is no recording that day, blue back ground
shows the date you have selected.
Note: When you open the playback interface, the calendar displays the
current month, and the blue background date is the current date (today).
2) Record Type: All/Alarm/Normal
3) CH: Choose the channel you want to playback.
4) Search: click “SEARCH”, and the right window will display the
recording files.
5) Backup: check '√'the recording files that you want to backup on the
right window, and then click backup. If the files capacity you select is larger
than your USB capacity, the system will prompt you to change to a bigger
capacity USB or reduce the quantity of selected recording files.
6) Playback: click “PLAYBACK” to enter into playback interface (as below
picture).
The left side shows the calendar, the right side displays the playback time
zone. Green color means normal recording, red color means alarm recording,
and black color (back ground color) means no recording. On the timeline, there
is a time bar that you can drag to any time you want to playback.

ANSON
15
Control button:
1) Click “PLAY/STOP”, “STEP”, “FAST FORWARD”, “FAST BACKWARD” and
“SLOW” to do corresponding operation.
2) Drag the slider to adjust volume, if you don’t need audio, click the speaker
to mute.
3) Click “X” to exit playback interface.
9 Network Setup
Click “ADVANCE” in main menu, and then click “NETWORK”.
1) Lan Setup: Click “Lan” on the “NETWORK” interface.
IP address: Fill in the IP address according to your network settings.
Subnet mask: Fill in the subnet mask according to your network settings.
Default gateway: Fill in the default gateway according to your network
settings. If there is no router in your network, fill in the IP you get from your
Internet Service Provider (ISP). If there is a router in your network, make sure
you have set the subnet mask correctly.
2) ADSL: Left mouse click the “ADSL” button and you will see the menu
displayed below.

ANSON
16
ADSL: Enable the ADSL
Fill the user name and password of your PPPOE which is provided by your
Internet Service Provider (ISP). The system will restart after clicking OK. If the
user name and password are correct, the system will connect to the network
via the PPPOE. And the IP address will be filled automatically.
3) Port Setup: Click “Port”.
Media Port: one private communication port that is between the DVR and PC,
the default is Port: 9000. If this port is occupied by another server port, please
change to an idle port.
Web Port: Http port, default is Port: 80, if a change of the web port is required,
like to example Port:8088, the user will need to add the new port after the IP

ANSON
17
address when accessing the DVR via the web.
E.g.: http://192.168.x.x:8088
Note: Port Range: 1-65535, some ISP’s may block port “80”, so we
recommend to change to another, example Port:8086.
4) Sub Stream: Setup the stream and video quality for the network transfer.
10 DDNS Setup
Click “ADVANCE” in the main menu, and then click “APP”.
DDNS: Enable/Disable, please enable the DDNS when you use domain name

ANSON
18
server.
Server: Choose your domain name server: 3322, dyndns, no-ip, changip or
dnsexit.
Host name: The host name you registered on the domain name server.
User name: The user name you registered on the domain name server.
Password: The password you registered on the domain name server.
11 P.T.Z Setup
Click “ADVANCE” in the main menu, and then click “P.T.Z”, as displayed
below:
Supporting PTZ protocol: Pelco-D/Pelco-P/ Pansonic/Sony/Samsung/
Philips…etc.
Note: Please check the setup information in your PTZ setup manual, including:
Protocol, Baud rate and Address, as displayed below.
This manual suits for next models
1
Table of contents
Popular DVR manuals by other brands

JVC
JVC SR-MV30 instructions

Mitsubishi Electric
Mitsubishi Electric DX-TL4516E series Specifications

Milestone
Milestone Husky X2 Hardware and service guide

Unisight
Unisight M4Core D-Seres manual

Digimerge
Digimerge DH100 Series instruction manual

Sony
Sony SVR-3000 - Digital Network Recorder quick start guide