Ancheer MAGNETIC BIKE User manual

Installation Video
https://youtu.be/gNXEiI0vYHw
MAGNETIC BIKE USER’S MANUAL
CAUTION
Read all precautions
and instructions in this
manual before using
this equipment.
Keep this manual for
future reference.

2
CONTENTS
Safety Precautions ………………………………………………………………………………………...3
Exploded View ………………………………………………………………………………………….......4
Part List ........................................................................................................................................5
Assembly Instructions ………………........................................................................................6
Computer Operation Instructions …………………………………………………………………10
Maintenance …………………………………………………............................................................11
Exercise Instructions ………………………………………………………………………………….....12
Troubleshooting ……………………………………………………………………..…………………….13
Warranty ………..……………………………………………………………………..………………………14

3
Safety Precautions – Please Read the Instruction before Using!
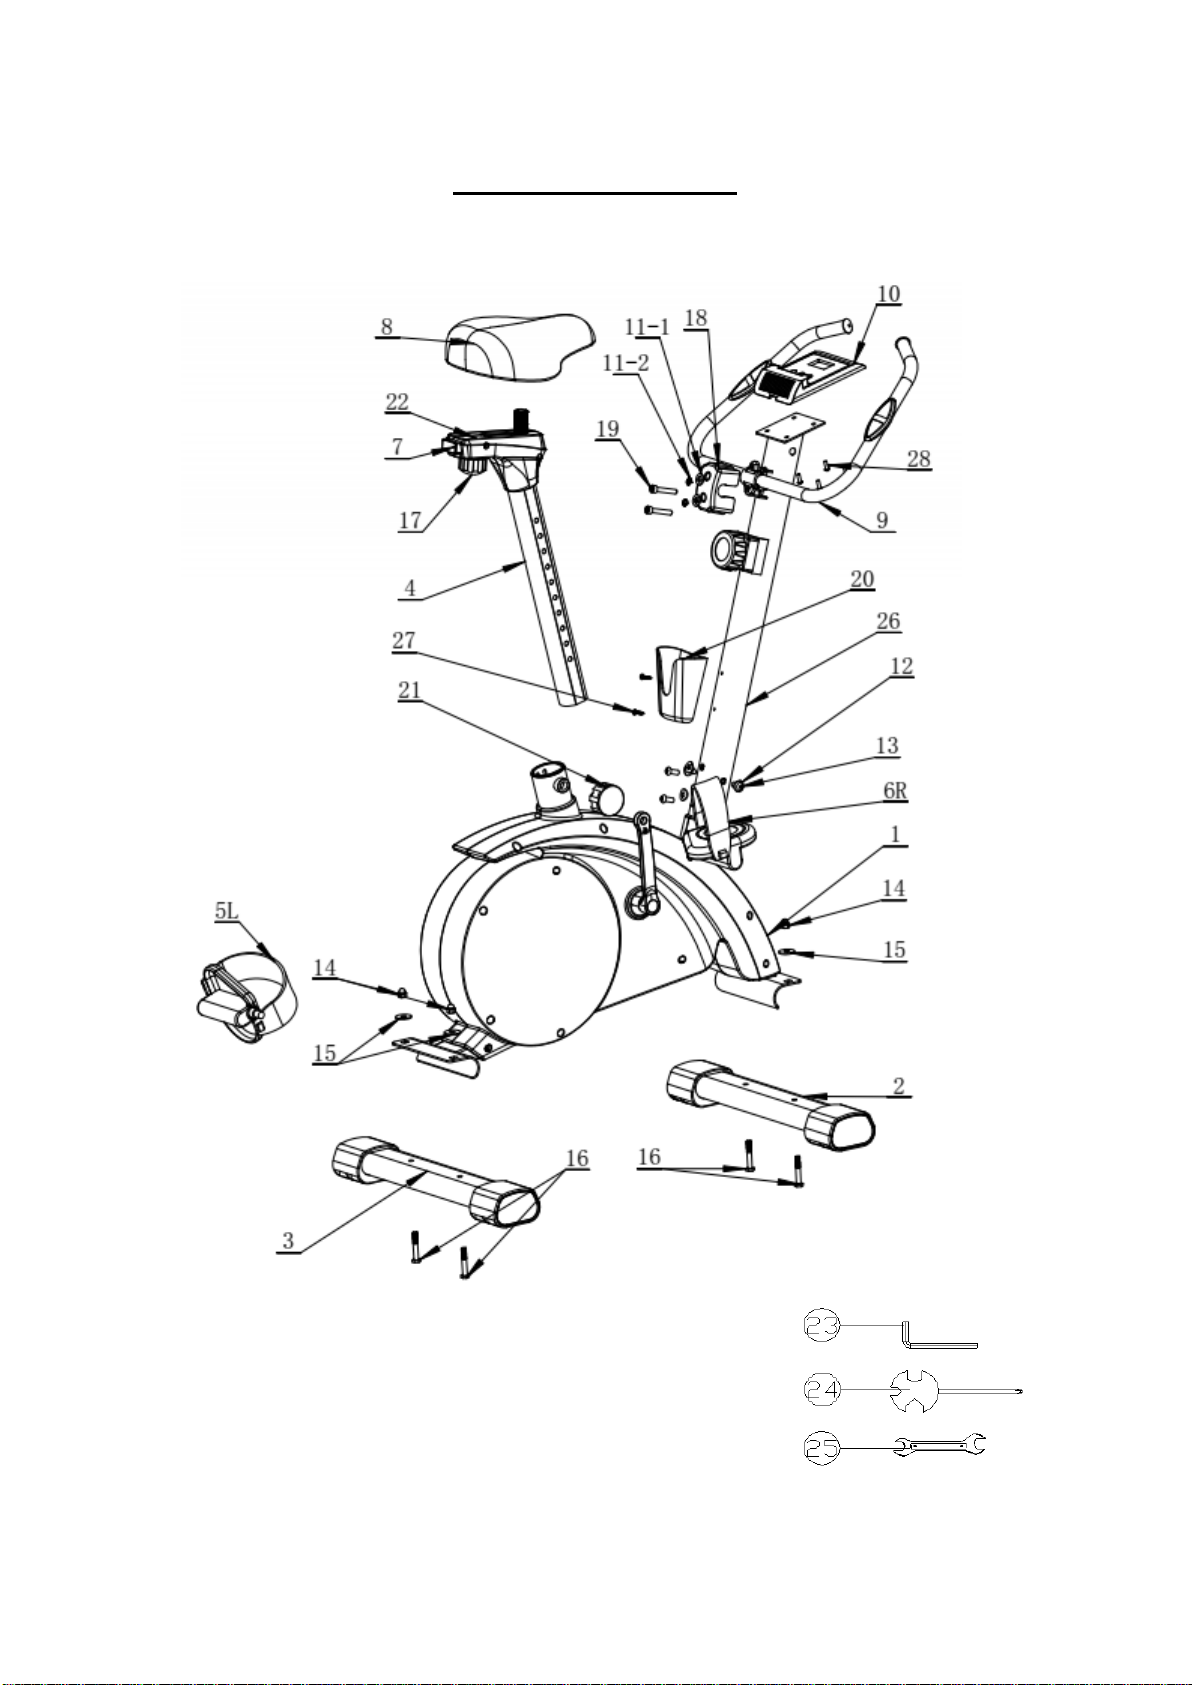
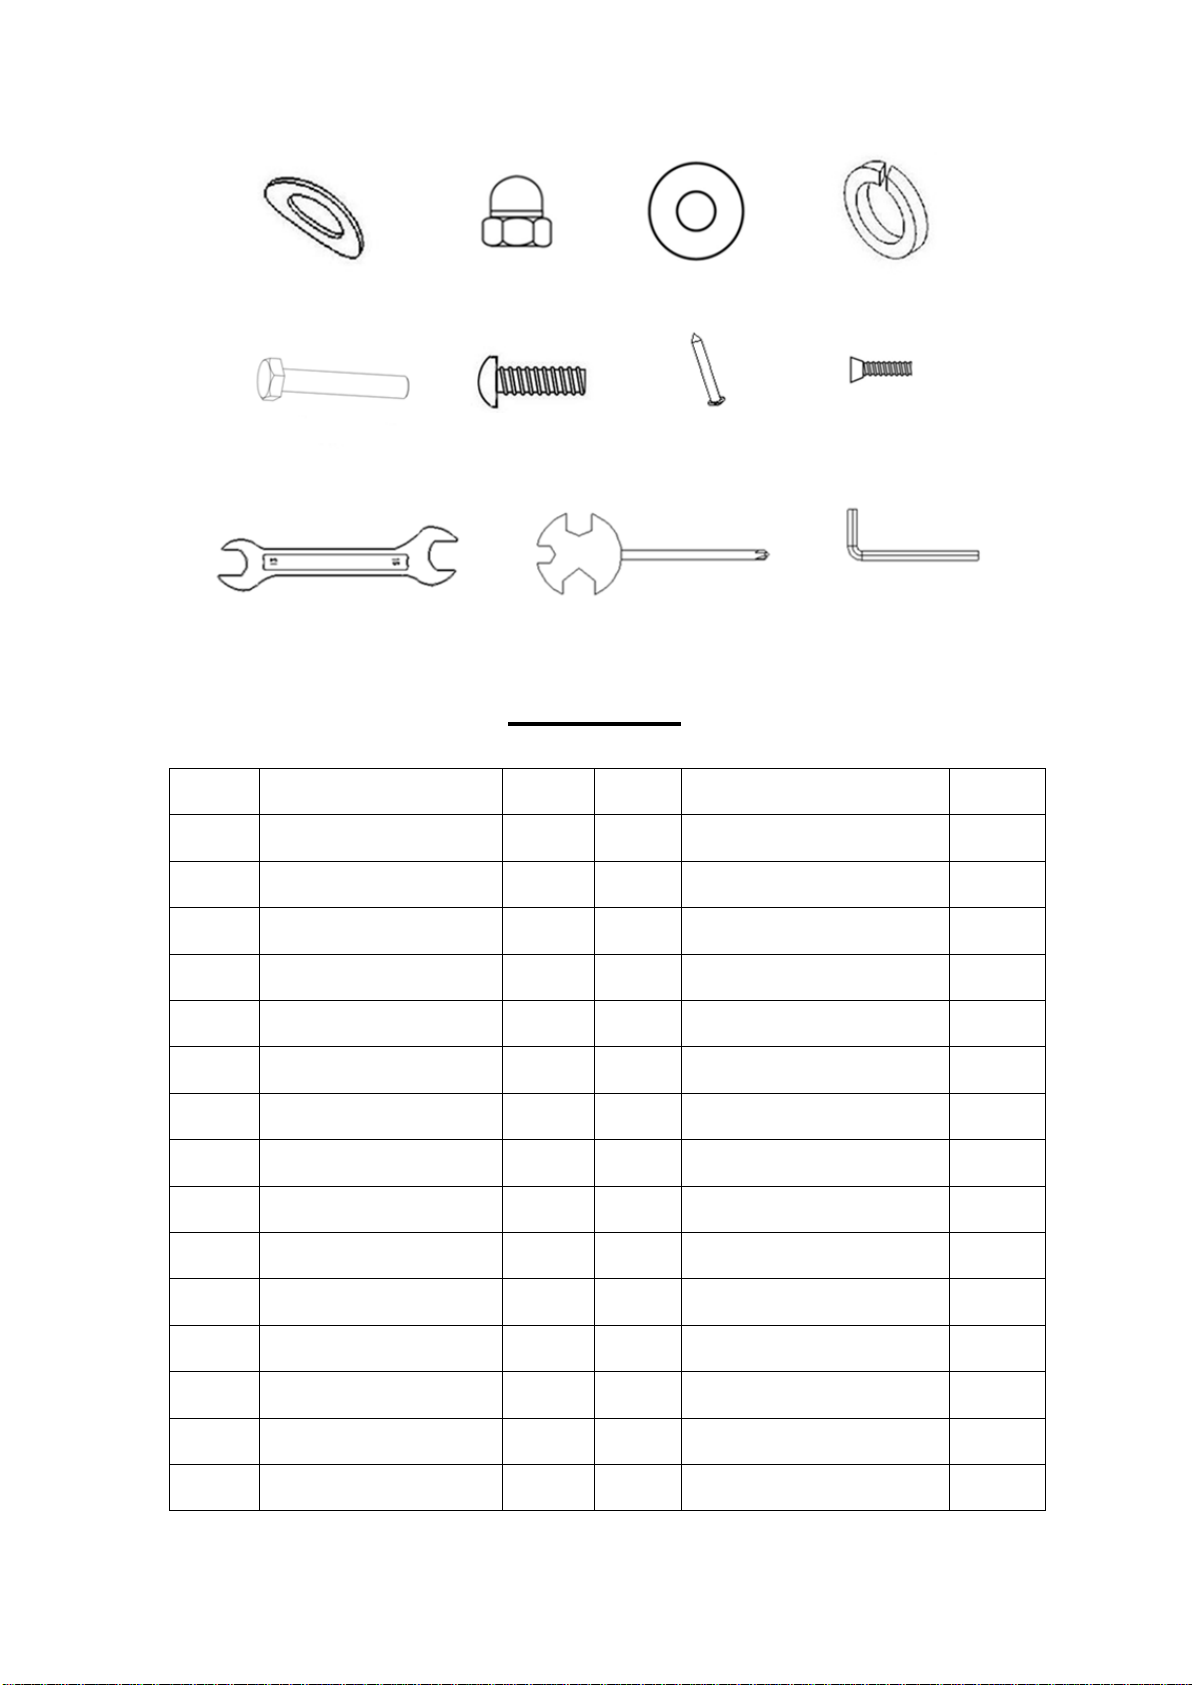
1. According to the installation instruction, use original parts to assemble this product properly. Before
assembly, inspect whether packages are in good condition and whether spare parts are complete in
accordance with transport precautions and the list of spare parts.
2. Prior to exercise, make sure equipment fasteners are in locking state.
3. Please place the exercise bike on a dry and flat ground.
4. To prevent the bottom of the equipment from damage such as abrasion and stain, put an object
such as a rubber cushion or a thin wood plate under the bottom..
5. Before starting the exercise, make sure that there is no object near the exercise bike in 0.5m.
6. Please use the attached or other appropriate tools to assemble or repair the exercise bike. After
exercise, please wipe sweat off it.
7. Improper use and excessive exercise endanger your health. Please carry out your exercise plan under
the direction of a doctor. He can provide you with excellent suggestions on your exercise gestures,
exercise goals and your food. Never make exercise after a meal. This exercise bike is not for the
medical purpose.
8. Please use the exercise bike when the equipment is in good operation. Make necessary maintenance
using original spare parts.
9. When regulating the equipment, note to observe the best position and largest adjustable position to
ensure the adjusted position is safe.
10. Unless otherwise specified in the instruction, this exercise bike is only for use by one person at one
time.
11. During exercise, please wear sports cloths and shoes. The clothes shall not be too long and too wide
so as to prevent them from being hooked or hung during exercise. The shoes must be suited for the
feet and the soles shall be anti-slip.
12. When feeling uncomfortable during the process, please stop exercise immediately, and when
necessary, consult a doctor.
13. The sports equipment is not the toy to play with, and thus, it shall be used by those people for
exercise purpose.
14. Children and disabled persons shall use the equipment in the presence of adults or healthy people.
Appropriate measures shall be taken to ensure a child is unable to use the equipment without the
supervision of an adult.
15. Make sure any part of another person will not be accessible to the equipment during the exercise.
16. To protect the environment, never discard packages or batteries, and please put them into a
designated dustbin or other waste collection point.
17. The exercise bike has a maximum load of 120KG.

4
EXPLODED VIEW

5
PART LIST
NO. DESCRIPTION QTY NO. DESCRIPTION QTY
1 Main Frame 1 15 Ø8 Flat Washer 4
2 Front Stabilizer 1 16 M8*50 Bolt 4
3 Rear Stabilizer 1 17 M10 Lock Knob 1
4 Seat Support Tube 1 18 Cover for Handle 1
5 Crank L 1 19 M7*1.0 Screw 2
6 Crank R 1 20 Water Bottle 1
7 Horizontal Sliding Bar 1 21 M16 Lock Knob 1
8 Saddle 1 22 Cover for Seat 1
9 Handlebar 1 23 L shape Wrench 2
10 Computer 1 24 Multi-function Screwdriver 1
11-1 Ø8 Flat Washer 2 25 13-15 Wrench 2
11-2 Spring Washer 2 26 Handlebar Support Tube 1
12 Ø8 Curved Washer 4 27 Self-tapping Screw 2
13 M8*16 Hexagon Screw 4 28 Screw 2
14 M8 Cap Nut 4
Ø8 Flat Washer
M8 Cap Nut
Ø8 Curved Washer
M8*16 Hexagon Screw
M7*1.0 Screw
13-15 Wrench
Multi-function Wrench (Screwdriver)
L shape Wrench
M8*50 Bolt
Spring Washer
Self-tapping Screw

6
ASSEMBLY INSTRUCTIONS
7 easy steps to assemble then you’re ready to workout – it takes approx 30 mins to assemble.
STEP 1
a. Fix the Front Stabilizer (2) to Main frame (1) using 2 X M8*50 Bolts (16), 2 X Ø8 Flat Washers (15) and
2 X M8 Cap Nuts (14) provided by 13-15 Wrench (25).
b. Repeat Step a. to install Rear Stabilizer (3) to Main Frame (1).
STEP 2
a. Insert the Seat Support Tube (4) to the rear opening tube of the Main Frame (1).
b. Adjust the Seat Support Tube (4) to your desired height, then refit and tighten the M16 Lock Knob
(21).
c. Select your desired forward or backward position, then tighten the M10 Lock Knob (17).
Note
: The Horizontal Sliding Bar (7) and the Cover for Seat (22) are pre-fitted onto the Seat Support
Tube (4). `

7
STEP 3
Fix the Saddle (8) to the Horizontal Sliding Bar (7) with the provided 13-15 Wrench (25) until tight.
STEP 4
a. Before fixing the Handlebar Support Tube (26), please connect the tension and sensor cables as
shown in the following illustrations:
(1) Adjust the tension control to 8 levels, making sure the supper tension cable (A) to bet the longest.
(2) Insert the upper tension cable (A) to the hole (C) in the middle of the lower tension hook (B). Then
pull the upper tension cable (A) till the metal head (D) drop into the hole to lock in.
(3) Connect upper sensor cable (E) to lower sensor cable (F).

8
b. After finish connecting all cables, insert the Handlebar Support Tube (26) to the front opening tube
of the Main Frame (1), to tighten it with 4 X Ø8 Curved Washers (12) and 4 X M8*16 Hexagon Screws
(13) by L shape wrench (23).
STEP 5
a. Fix Handlebar (9) on the Handlebar Support Tube (26) and tighten with 2 X M7*1.0 Screws (19), 2 X
Spring Washers (11-2) and 2 X Ø8 Flat Washers (11-1) by L shape Wrench (23).
b. Then button the Cover for Handle (18) on the Handlebar (9).

9
STEP 6
a. Unscrew the two Screws (28) pre-fitted on the Computer (10).
b. Fix the Computer (10) on the bracket with 2 x Screws (28) by the provided Multi-function Screwdriver
(24).
c. Unscrew the two Self-tapping Screws (27) pre-fitted on the handlebar support tube, then fix the
Water Bottle (20) on it with the two Self-tapping Screws (27) by the provided Screwdriver (24).
STEP 7
a. Firmly fix the left pedal (5L) to the crank arm marked (L) in a anti-clockwise direction by 13-15
Wrench (25) until tight.
b. Now firmly fix the right pedal (6R) to the crank arm marked (R) in a clockwise direction.
Failure to follow the above instructions could result in damage to the cranks and pedals.
Most Important
After all above 7 steps finished, the most important thing is to make sure all the bolts and parts
are securely fixed before you are riding on the bike.

10
COMPUTER OPERATION INSTRUCTIONS
SCAN Scans all functions – TIME, SPEED, DISTANCE, TOTAL DIST, CALORIES
TIME Displays work out time lapse while exercising
SPEED Displays the current speed
DISTANCE Displays the distance while exercising
TOTAL DIST Displays the total distance at the end of your workout
CALORIES Displays the calories you have burned
PULSE Displays the heart rate
1. You will need 2AA batteries (provided) to operate the Computer.
2. To select the function you want, press the MODE button and then select the function of choice from
the table above.
3. To reset the Computer, hold down the MODE button for 5 seconds.
4. The Computer will automatically turn off after 4 minutes when the bike is not in use. Press any key to
restart.
5. To adjust the resistance, turn the tension control to the right (harder), or to the left (easier) .
6. If there is an improper display on the Computer, please replace both batteries with new ones at the
same time.
7. To move the bike, hold onto the saddle support pole, lift and push forward.

11
MAINTENANCE
Regular maintenance will prolong the life of your spin bike and prevent injury. We strongly recommend
that you do the following on a regular basis:
1. Clean the bike after use with a soft cloth – ensure it is dry. Note, a build up of moisture over time will
cause corrosion.
2. Clean the Computer display with a soft cloth and anti-static computer spray to remove dust or finger
prints. Note, harsh chemicals will destroy the protective coating on the Computer and cause a static
build up inside the Computer that could damage the components.
3. Check the front and back stabilizers each time you use the bike to ensure the bike is stable and level
with the floor.
4. Check and tighten loose nuts/buts, the saddle adjustment locks, pedals, and handlebars to ensure
they are secure each time you use the bike to avoid injury.
5. A spent battery is hazardous waste, please dispose of it correctly, and do not throw it in the trash.
6. For replacement parts, contact the distributor.

12
EXERCISE INSTRUCTIONS
Using your EXERCISE CYCLE will provide you several benefits, it will improve your physical fitness, tone
your muscle, and in conjunction with calorie controlled diet, it will help you lose weight.
1. The Warm Up Phase
This stage helps the blood flow around the body and the muscles work properly. It will also reduce the
risk of cramp and muscle injury. It is advisable to do a few stretching exercises as shown below. Each
stretch should be held for approximately 30 seconds, do not force or jerk your muscles into a stretch - if it
hurts, STOP.
2. The Exercise Phase
This is the stage where you put the effort in. After regular use, the muscles in your legs will become more
flexible. Work to your own pace but it is very important to maintain a steady tempo throughout. The rate
of work should be sufficient to raise your heart beat into the target zone shown on the graph below.
SIDE BENDS
FORWARD
BENDS
OUTER THIGH
INNER THIGH
CALF/ ACHILLES
HEART RATE
TARGET ZONE
MAXIMU
COOL DOWN
AGE

13
TROUBLESHOOTING
REF PROBLEM SOLUTION
1
THE PEDALS ARE SPINNING
OUT OF CONTROL
1
. ADD MORE RESISTANCE BY TURNING THE TENSION CONTROL TO THE
RIGHT.
2. START PEDALLING SLOWLY.
3. KEEP TURNING THE TENSION CONTROL TO THE
RIGHT UNTIL YOU
CAN FEEL RESISTANCE WHEN YOU PEDAL.
2 THE BIKE IS UNSTABLE 1. ADJUST THE FRONT AND BACK STABILIZERS UNTIL THEY ARE FLAT ON
THE SURFACE.
2. SHAKE THE BIKE TO ENSURE IT’S STABLE.
3 THE HANDLEBARS
ARE WOBBLY
TURN THE HANDLEBAR SAFETY LOCK U
NTIL TIGHT (DO THIS WHILE
STANDING).
4 MY FEET BARELY TOUCH
THE PEDALS
1. ADJUST THE HEIGHT OF THE SADDLE BY PULLING OUT THE HEIGHT
ADJUSTMENT LOCK.
2. ADJUST THE HEIGHT OF THE BIKE UNTIL THE SADDLE IS HIP HEIGHT.
3. REPEAT STEP 1 AND STEP 2 UNTIL YOUR FEET COMFORTABLY SIT
INSIDE THE FOOTSTRAPS WITH YOUR LEGS SLIGHTLY BENT.
5 THE COMPUTER DOESN’T
RESPOND
1. REMOVE THE COMPUTER FROM THE COMPUTER BRACKET.
2. CHECK THE BATTERY IS LOADED CORRECTLY.
3. CHECK THE COMPUTER IS RESPONDING.
4. IF NOT, REMOVE THE COMPUTER WIRE AND RE-I NSE RT IT.
5. CHECK THE CONSOLE IS RESPONDING.
6. IF NOT, TRY REPLACING THE BATTERY.
7. OTHERWISE, CALL THE DISTRIBUTOR FOR MORE INFORMATION.

14
WARRANTY
1. We have one year quality warranty to the products. Within the warranty period, we provide the FREE
replacement parts, and provide technical support for life.
2. If caused by incorrect assembly, incorrect use or change of parts failures, our company takes no
responsibility.
3. The exercise bike is only for home use, if the problems occurred by commercial use, our company
takes no responsibility.
4. After-sales service isn’t restricted by time and our after-sales service staff would solve your problems
immediately after receiving telephone and hearing feedback idea of users.
5. MOST IMPORTANT THING, you should show our products series no. and relative pictures or
information before getting the warranty if any problem occurred.
Table of contents
Other Ancheer Exercise Bike manuals
Popular Exercise Bike manuals by other brands

Sunny Health & Fitness
Sunny Health & Fitness SF-B122049 user manual

Tempo Fitness
Tempo Fitness TP-U1050 user manual

Johnson
Johnson JPC-5000 Generator Series Assembly and owner's manual

FitNord
FitNord CYCLO 200R owner's manual

BH FITNESS
BH FITNESS G2336i Instructions for assembly and use

CAPITAL SPORTS
CAPITAL SPORTS Spinnado X 13 manual