manuals.online logo
Brands
  1. Home
  2. •
  3. Brands
  4. •
  5. Andrew LeBlanc
  6. •
  7. Indoor Furnishing
  8. •
  9. Andrew LeBlanc Zero Gravity Chairs User manual

Andrew LeBlanc Zero Gravity Chairs User manual

USE AND CARE MANUAL
Andrew LeBlanc Company
Zero Gravity Chairs
Andrew LeBlanc Factory Georgetown, Massachusetts
Dear Customer
You have purchased a piece of fine American made furniture.
Your Andrew LeBlanc chair was manufactured in Georgetown, Massachusetts by craftsman
committed to making the very best zero gravity recliner possible.
Your chair materials are all premium grade, heavy gauge steel, premium urethane or visco-elastic
foam foundation and top grade leather or fabric.
Chairs used properly will give many years of healthy, comfortable reclining pleasure.
We are proud of our chairs and pleased that we can share them with you.
Andrew LeBlanc
Andrew'LeBlanc
Company
Georgetown,'MA
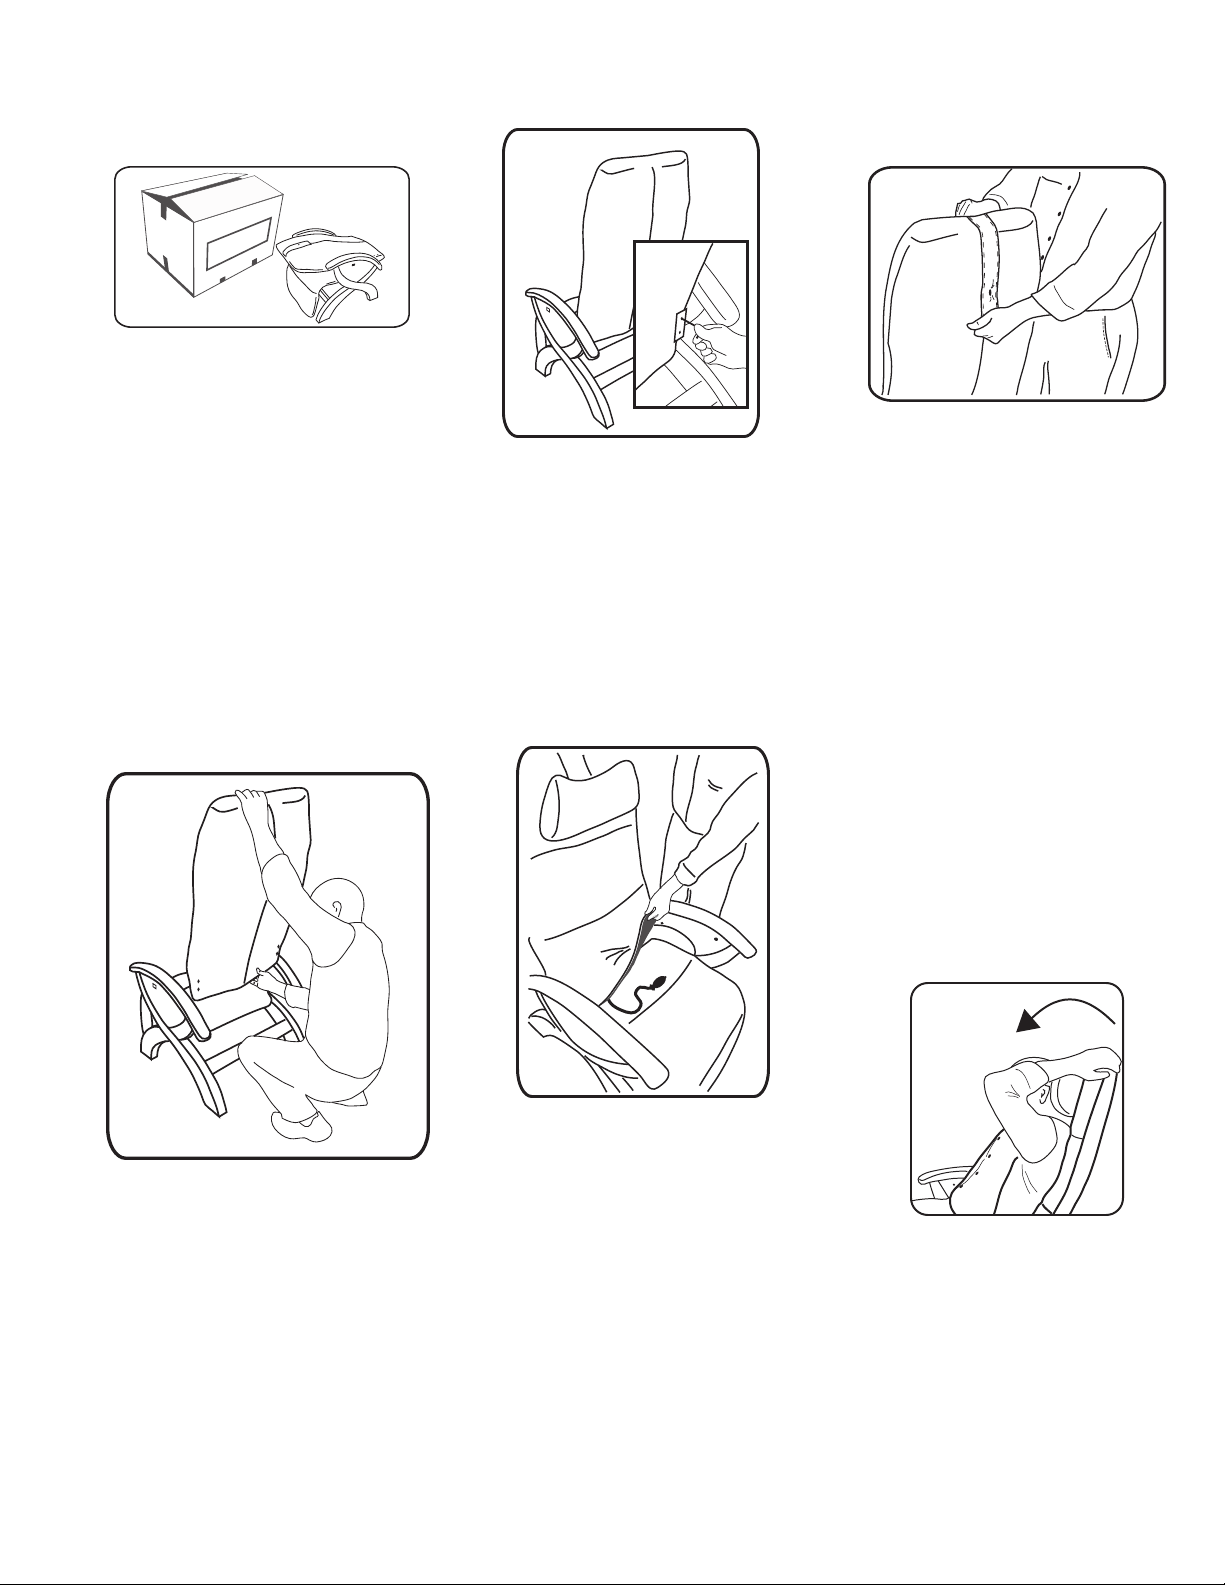
Please be careful opening the
box. Do not use a box cutter. A
deep cut could penetrate the
inner box liner and damage your
chair. Open the box and remove
protective cardboard insert.
Remove backrest then lift the
protective cardboard insert to
one side. With two people, one
on each side carefully lift and
remove the base chair assembly
from the box.
Remove plastic bags covering the
base and backrest.
Four ¾” flat head screws and an
Allen wrench are packaged in a
small plastic bag and secured with
an elastic to one of the lower
backrest mounting plates.
The backrest is installed by standing
behind the chair base and firmly
sliding the backrest assembly down
into the left and right mounting
brackets that are at the back of the
seat cushion.
INSTALLING THE
LUMBAR SUPPORT
Open the lumbar support pocket at
the base of the backrest. Insert the
lumbar air bladder into the pocket
with the inflation tube on the right
side (sitting in the chair). You can
position the lumbar air bladder left,
right, up and down to satisfy your
personal requirements. Once the air
bladder is positioned tuck the
lumbar pocket flap in between the
seat cushion and backrest. To
increase support, pump the bulb, to
decrease support depress the button
on the side of the inflation bulb and
gently push against the air bladder.
UNPACKING YOUR CHAIR THE CERVICAL PILLOW
The cervical pillow is positioned
with a blind zipper on the back of
the chair. Adjust the pillow to the
top of the backrest before sitting.
Once you are comfortably seated
pull the cervical pillow down to a
position that gently supports your
neck and upper spine.
Your cervical pillow has maximum
dacron cushioning when it leaves
the factory. If you find the pillow is
too full easily adjust it by undoing
the zipper on the back of the
headrest, lift the zipper cloth baffle
panel and remove dacron until the
pillow is at the desired fullness.
Put the cloth baffle panel back and
zip closed.
ARTICULATING HEADREST
The headrest is positioned with a
friction hinge that allows it to tilt
forward 15 degrees.
To adjust the headrest angle, sit in
the chair, raise your arms over your
head, reach back and grab the top of
the backrest, hold the upper backrest
in position, with your shoulders pull
the top of the headrest forward.
To return push back.
BACKREST INSTALLATION
Line the holes in the backrest with
the holes in the brackets and install
the flathead screws with the Allen
wrench. When installing the screws
be careful that they are properly
aligned with the nuts in the
backrest frame.
The recline and return motion of
a motorized chair is controlled
with a two position switch
mounted on the left side panel
(sitting in the chair) 2” below the
armrest. Push the back of the
switch button and the chair will
recline. Push the front of the
switch and the chair will return
to the upright position.
MOTORIZED RECLINE
MANUAL RECLINE
The manual recline chair is
controlled with a friction brake. The
release lever is mounted on the right
side (sitting in the chair), just under
the armrest.
To recline: while sitting with your
arms on the armrest, with the finger
of your right hand lift the brake lever
while pushing back and down, lean
your upper body back as the chair
reclines. You can stop at any position
by releasing the brake lever.
To return: Lift the brake lever and
lean slightly forward.
When choosing leather consider that it is a natural material and natures signature
will be incorporated into it. These signatures may be in the form of healed scars,
blemishes or other markings that should be considered natural beauty marks.
Color variations may occur. An armrest may have a slightly different shade than
a cushion because both pieces were cut from a different part of the same hide.
This is not a defect but evidence that it is natural leather.
"For regular care and cleaning, dust periodically with a dry cloth to
remove residual dust and dirt from building up. No harsh cleaners or solvents
should ever be used on the leather, as they could abrade the finish or topcoat off
the article.
"For stubborn stains and spills, a lightly damp cloth with warm water
should be blotted on the stain to lift and remove it. If this does not work, a mild
soap and water solution should be mixed and then blotted to release the stain
and then blot again with dry cloth. This should never be done heavily or in a
scrubbing motion. Some finishes may not be suitable for this method so it should
be spot tested and allowed to dry before overall use.
LEATHER CLEANING AND CARE
NOTES:
About the brake mechanism:
The brake works on a friction principal. A small spring is wrapped around the
brake assembly rod. When the brake is released the spring coil expands and
allows the seat assembly to move forward or backward. During chair position
adjustment a small amount of friction sound is generated. This sound should not
be confused with a malfunction or a brake problem.
Moving your chair:
When moving your chair to a different location make sure to have another person
to help you. DO NOT lift your chair from the armrests. NOVUS PLUS owners:
DO NOT lift your chair from the rear motor cover panel.
CAUTION
Please read all instructions before using this product.
When using an electrical appliance, basic precautions should always be
followed including the following:
• If the supplied cord is damaged, it must be replaced by the manufacturer or its service
agent or a similarly qualified person in order to avoid hazard.
• Never operate this product if it has a damaged cord or plug, if it’s not working properly,
if it has been dropped or damaged, or dropped into water.
• Do not put hands or fingers near the footrest mechanism or on the inside of the chair
while this product is running.
• Use this product only for its intended use as described in this manual.
• Do not operate where aerosol (spray) products are being used or where oxygen is being
administered.
• Close supervision is necessary when this product is used by children or disable persons.
• Keep children away from footrest and other similar parts.
• Weight limit 275 lbs. a small amount of friction sound is generated. This sound should
not be confused with a malfunction or a brake problem.

Popular Indoor Furnishing manuals by other brands

RESTWOOD DOMEK TRANO AP quick start guide

RESTWOOD

RESTWOOD DOMEK TRANO AP quick start guide

JWA CLYDE 68721 Assembly instruction

JWA

JWA CLYDE 68721 Assembly instruction

CONFORAMA CUBIX 214240 Assembling instructions

CONFORAMA

CONFORAMA CUBIX 214240 Assembling instructions

Wallbeds Australia AB1a Assembly instructions

Wallbeds Australia

Wallbeds Australia AB1a Assembly instructions

Nightingale CXO 6200 series User handbook

Nightingale

Nightingale CXO 6200 series User handbook

Kvik OU814 quick start guide

Kvik

Kvik OU814 quick start guide

Home Decorators FRA80866VCWST Use and care guide

Home Decorators

Home Decorators FRA80866VCWST Use and care guide

Burrow PROSPECT 5-DRAWER TALL DRESSER Assembly instructions

Burrow

Burrow PROSPECT 5-DRAWER TALL DRESSER Assembly instructions

Furniture of America CM-BK633TF Assembly instructions

Furniture of America

Furniture of America CM-BK633TF Assembly instructions

HDX 1001663098 Use and care guide

HDX

HDX 1001663098 Use and care guide

ErgoCentric upCentric UPMOD-2L owner's manual

ErgoCentric

ErgoCentric upCentric UPMOD-2L owner's manual

Lightolier Lighting Systems LSC-8 Specification sheet

Lightolier

Lightolier Lighting Systems LSC-8 Specification sheet

Songmics LSD07 manual

Songmics

Songmics LSD07 manual

Leisure made 243968 Assembly instructions

Leisure made

Leisure made 243968 Assembly instructions

ZINUS FPWHRL-12-1 Assembly instruction

ZINUS

ZINUS FPWHRL-12-1 Assembly instruction

Trendteam BLANSHE 2122-862-C9 installation instructions

Trendteam

Trendteam BLANSHE 2122-862-C9 installation instructions

GFW 2659 Assembly instructions

GFW

GFW 2659 Assembly instructions

Furniture of America CM-AC354 Assembly instructions

Furniture of America

Furniture of America CM-AC354 Assembly instructions

manuals.online logo
manuals.online logoBrands
  • About & Mission
  • Contact us
  • Privacy Policy
  • Terms and Conditions

Copyright 2025 Manuals.Online. All Rights Reserved.