Angelbird WINGS PX1 User manual

ANGELBIRD.COM
WINGS
USER MANUAL
WINGS PX1

WINGS
USER MANUAL WINGS PX1
22. Feb. 2016
Page 2
1. INTRODUCTION 3
1.1 Introduction 3
1.2 Package contents 3
2. REQUIREMENTS 4
2.1 SSD Requirements 4
2.2 System Requirements 4
3. SUPPORT 4
4. HANDLING 4
5. INSTALLATION 6
5.1 Installing the M.2 SSD on the Wings PX1 6
5.2 Installing the Wings PX1 into a computer 8
5.2.1 Installion into a Mac Pro 8
5.2.2 Installion into a PC 11
6. TECHNICAL SPECIFICATIONS 13
13
6.2 Features 13
6.3 Warranty 13
7. SSD COMPATIBLITY LIST 14
8. LEGAL INFORMATION 14
8.1 Copyright 14
8.2 Acknowledgments 14
P
X
1

1.1 Introduction
Welcome to the manual for your Wings PX1. The Wings PX1 is M.2 SSD to PCIe
adapter. You can attach a single M.2 AHCI SSD or M.2 NVMe SSD to the adapter
and built it into a PCIe slot of a computer.
NOTE
You can get the up-to-date version of this manual at: www.angelbird.com/downloads
NOTE
You can signup on the Angelbird support portal to receive product updates: www.angelbird.com/psp
1.2 Package contents
The following are included in the Wings PX1 packaging (g. 1).
1. Wings PX1 PCB
2. PCIe bracket (mounted to the PCB)
3. Mounting screws ( )
4. Mounting spacer ( )
5. Heatsink
6. Thermal pad (x2)
7
8. Hex spanner
NOTE
Please keep the packaging. In the unlikely event that you have to return the product for servicing or repair
it must be returned in the original packaging.
WINGS
USER MANUAL WINGS PX1
22. Feb. 2016
Page 3
P
X
1
1. INTRODUCTION
5.
1.
7.
2.
6.
(g. 1)
8.

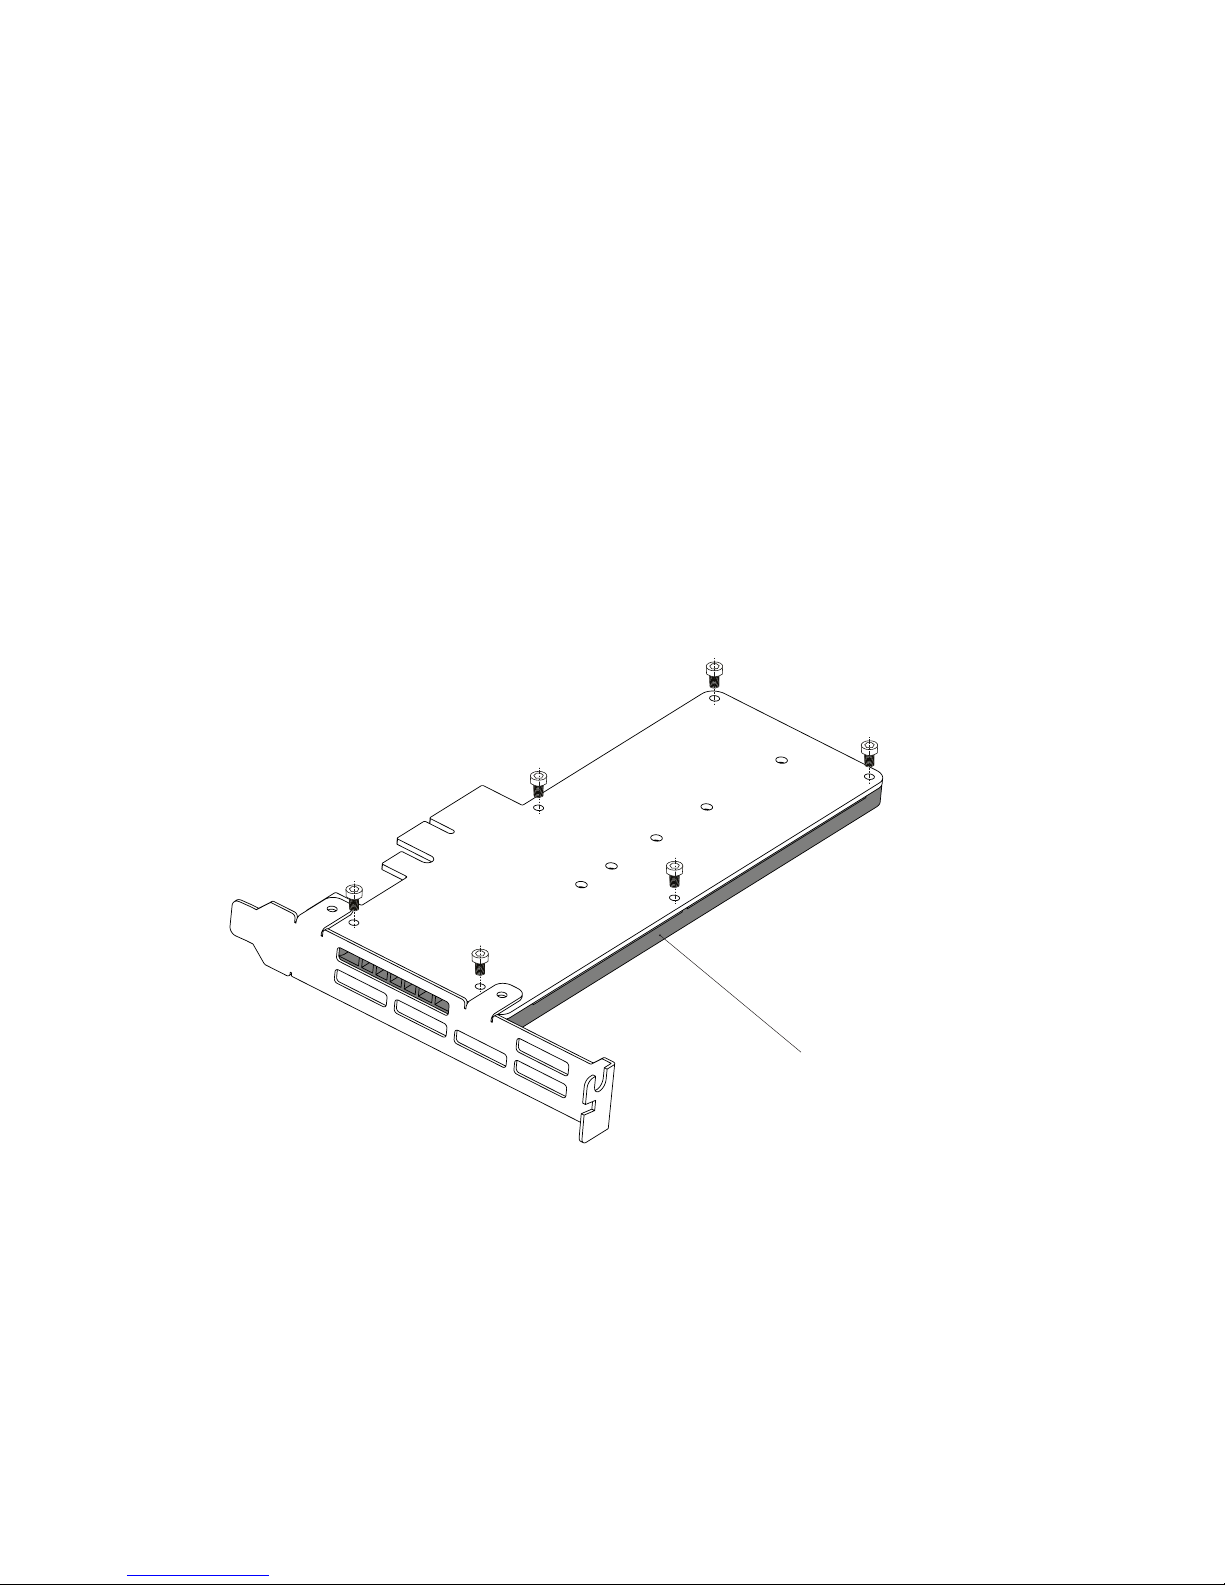
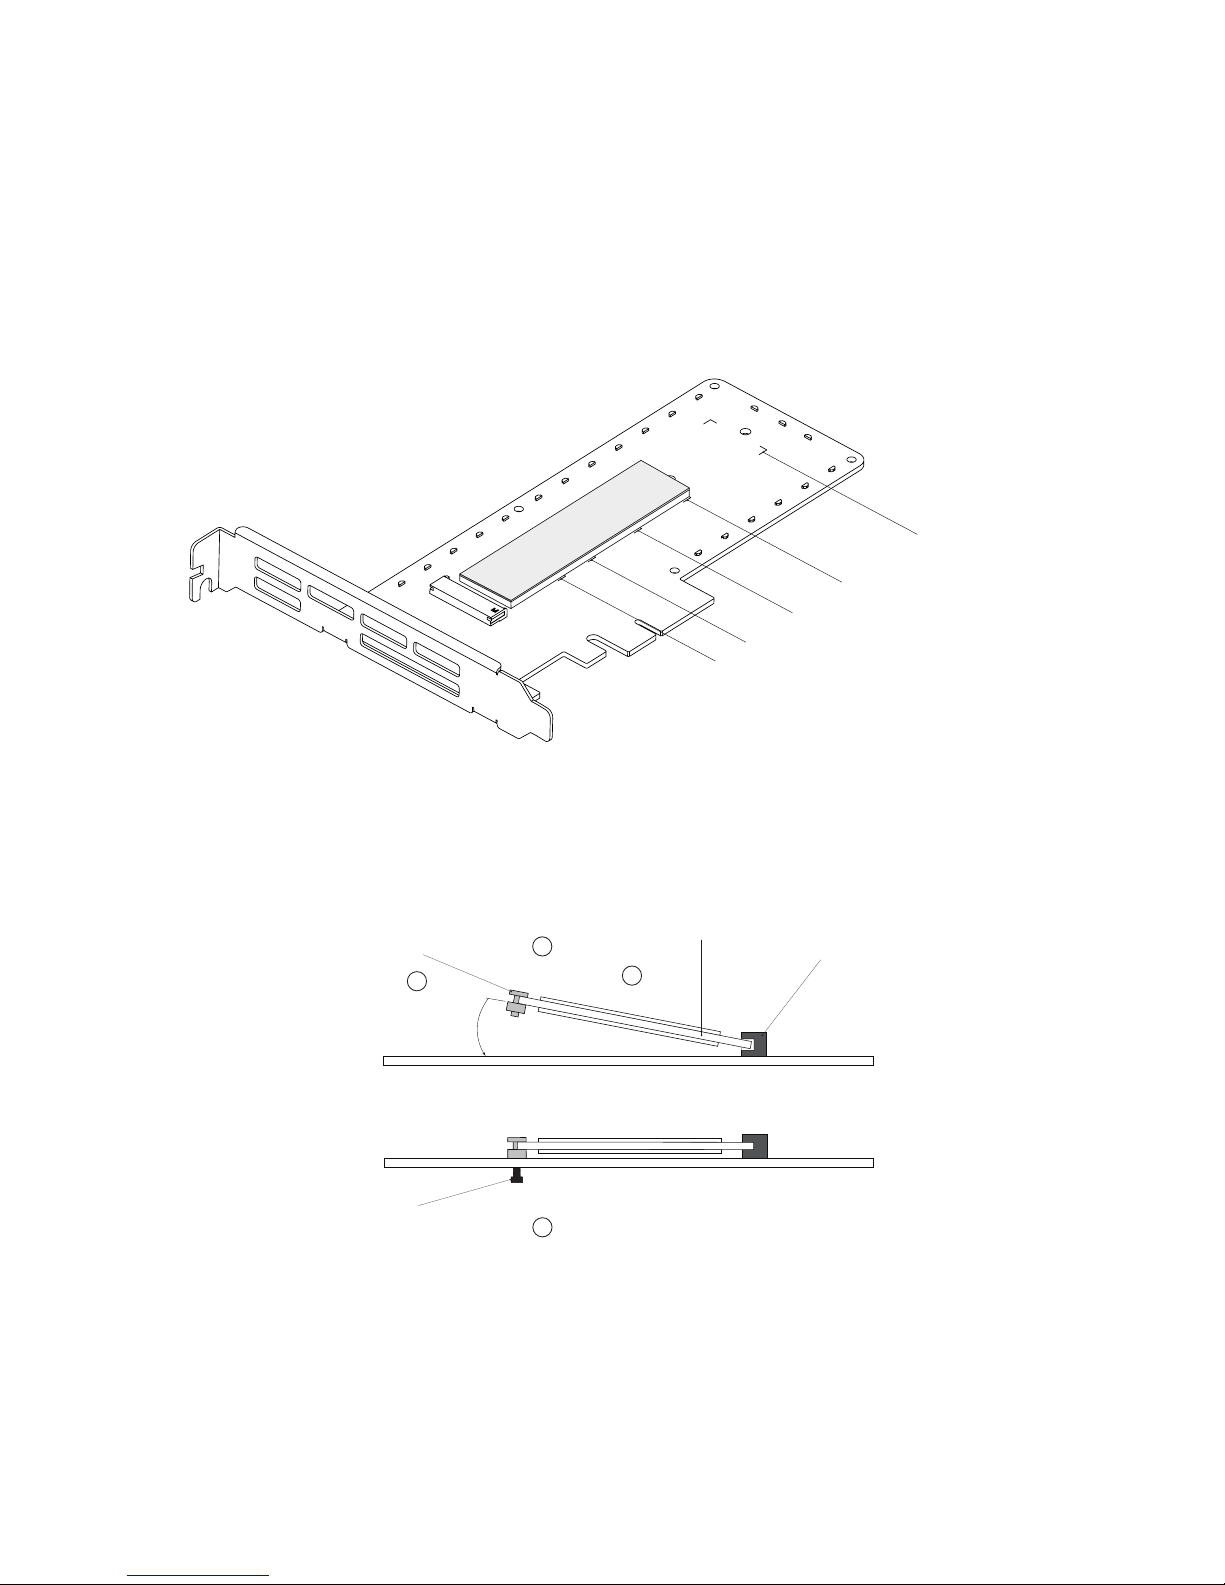
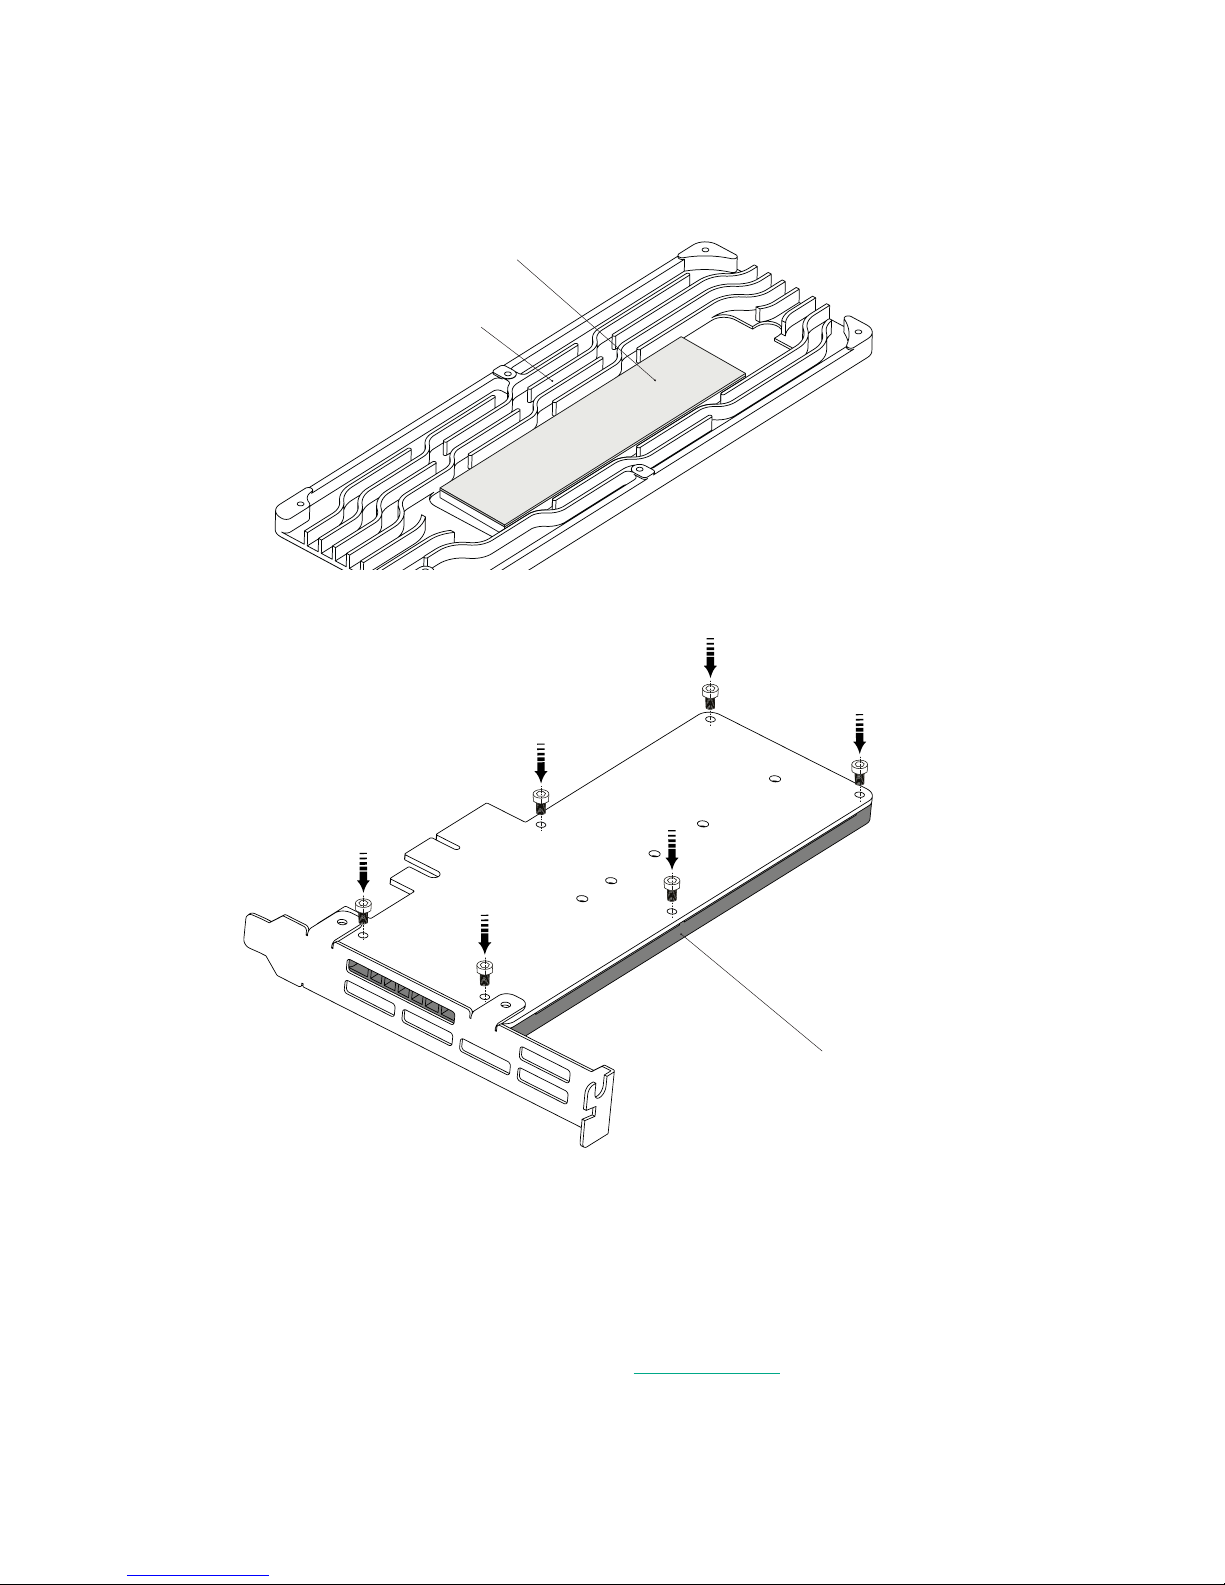
for the Wings PX1 to function correctly.
2.1 SSD Requirements
For a list of tested compatible M.2 SSDs, see the SSD Compatibility list on page 8.
The following two interface types of M.2 SSDs are supported by the Wings PX1.
• M.2 NVMe SSD
• M.2 AHCI SSD
The following M.2 form factors are supported by the Wings PX1.
• 2230
• 2242
• 2260
• 2280
• 22110
2.2 System requirements
Your computer must meet some requirements to be able to use the Wings PX1.
The system requirements depend on the M.2 SSD you mount onto the Wings PX1.
In the text below GenX is the highest PCIe generation supported by the M.2 SSD
you want to use.
I. Hardware requirements
Recommended specications:
Gen3 x16 slot). The optimal PCIe generation depends on the used M.2 SSD.
Minimum specications:
II. Software requirements
Please consult your operating system documentation to determine compatiblity
with your M.2 SSD.
WINGS
USER MANUAL WINGS PX1
22. Feb. 2016
Page 4
P
X
1
2. REQUIREMENTS

3. Support
For support visit the Angelbird Support website at www.angelbird.com/support, or check
the Getting help section.
By signing up for your Personal Support Portal account, you will receive product
updates automatically.
You can download an up-to-date version of this manual at www.angelbird.com/downloads
4. Handling
Before removing the Wings PX1 from its packaging, please be conscious of static
electricity as it could damage the device. For example, touch a metal object to discharge
your static electricity. Remember to disconnect power and turn off the devices you are
handling.
WARNING
Advanced electronic devices must be handled with care.
NOTE
Before unpacking, discharge your static electricity. For example by directly touching a large metal
object.
Do not expose or store the board under excessive heat, cold or humidity.
Modifying the product or its parts beyond the scope of using the product will void any
warranty.
WINGS
USER MANUAL WINGS PX1
22. Feb. 2016
Page 5
P
X
1
3. SUPPORT
4. HANDLING

Two steps are required to start using the Wings PX1.
5.1 Installation of the M.2 SSD on the card.
5.2 Installing the card into a computer.
The next sections guide you through these steps.
5.1 Installing the M.2 SSD on the Wings PX1
Before you can install your Wings
M.2 SSD on the card. The steps below explain how to do this.
I. Remove all the heatsink mounting screws. This will give access to the M.2
connector (g. 2).
WINGS
USER MANUAL WINGS PX1
22. Feb. 2016
Page 6
P
X
1
5. INSTALLATION
➠
➠
➠
➠
➠
➠
Heatsink
(g. 2)

THERMAL PAD
2230
2240
2260
2280
22110
II. For some SSDs it is possible to use an extra thermal pad for even more heat
dissipation. In case the SSD has no components its bottom side, you can
place the thermal pad within the alignment marks marked with “2280” (g. 3).
Place it sticky side down and dont forget to remove the carrier foil.
III. First insert the SSD at an ~25° angle into the M.2 connector (1).
Then attach the mounting spacer to the SSD. Next, push the SSD down until the
mounting spacer touches the PCB (2
screw (3) (g. 4).
IV. To put the thermal pad on the heatsink in the correct position, take the thermal pad,
and remove it from the carrier foil. Place it on the SSD drive, sticky side up. Now put
(g. 5).
WINGS
USER MANUAL WINGS PX1
22. Feb. 2016
Page 7
P
X
1
5. INSTALLATION
(g. 3)
(g. 4)
➠
➠
➠
➠
4
➠
➠
➠
➠
1
3
~25°
mounting spacer
mounting screw
M.2 connector
SSD
2

V. Re-attach the heatsink to the pcb using all six mounting points
(g. 6).
NOTE
Use all 6 mounting points to mount the heatsink.
This will ensure a good connection between the
heatsink and SSD.
5.2 Installing the Wings PX1 into a computer
5.2.1 Installation into a Mac Pro
Before you begin, shut down your computer and unplug the power cable and any
other cables.
NOTE
For instructions on how to install in a PC, please see the section installation in a PC.
IMPORTANT
Before installing the Wings PX1, please make sure that the computer is turned off and the power plug is
disconnected.
WINGS
USER MANUAL WINGS PX1
22. Feb. 2016
Page 8
P
X
1
5. INSTALLATION
(g. 6)
Heatsink
(g. 5)
IV. thermal pad
heatsink

I. Locate the cover release lever on the back of the case, and pull it. This will
release the cover plate lock (g. 7).
II. Remove the right-hand-side cover plate (g. 8).
III. Remove the PCIe access cover (g. 8).
NOTE
We recommend to keep as much free space around the card as possible.
NOTE
For early 2008 Mac Pros, only use slot 3 or 4. Using other slots will result in reduced performance
IV. Locate a free PCIe x4, x8 or x16 slot.
V. Remove the PCIe acess cover (1) and then the PCIe cover bracket (2) for the
chosen slot (g. 9).
WINGS
USER MANUAL WINGS PX1
22. Feb. 2016
Page 9
P
X
1
5.2.1 Installation into a Mac Pro
(g. 7)(g. 8)
1
2
(g. 9)

VI. Gently insert the Wings PX1 into the selected slot (g. 10).
NOTE
Do not force insertion as it may cause damage to the Wings PX1 and the computer.
VII. Put back the PCIe access cover (g. 11).
VIII. Put back the cover plate (g. 12).
WINGS
USER MANUAL WINGS PX1
22. Feb. 2016
Page 10
P
X
1
5.2.1 Installation into a Mac Pro
(g. 10)
(g. 11)
(g. 12)

IX. Push the cover release lever to lock the cover back in place (g. 13).
Wings PX1.
5.2.1 Installation INTO A PC
Before we begin, shut down your computer, unplug the power cable and any other
cables.
NOTE
For instructions on how to install in a Mac Pro, please see the section installation into a Mac Pro.
NOTE
There are many different types of computers. If you are unsure about any of the steps, consult the
manual of your computer.
IMPORTANT
Before installing the Wings PX1, please make sure that the computer is turned off and the power plug
is disconnected.
I. Remove the access cover so you
can access the PCIe slots (g. 14).
WINGS
USER MANUAL WINGS PX1
22. Feb. 2016
Page 11
P
X
1
5.2.1 Installation into a Mac Pro
5.2.2 Installation into a PC
(g. 14)
(g. 13)

II. Locate a free PCIe x4, x8 or x16 slot.
III. Remove the PCIe cover bracket for the chosen slot (g. 15).
IV. Gently insert the Wings PX1 into the selected slot. (g. 16)
V. Place and fasten a PCIe bracket screw toWings PX1 card
to the chassis (g. 17).
IMPORTANT
Do not force insertion as it may cause damage to the Wings PX1 and the computer.
VI. Replace the cover plate.
WINGS
USER MANUAL WINGS PX1
22. Feb. 2016
Page 12
P
X
1
5.2.2 Installation into a PC
(g. 15)
(g. 16)
(g. 17)

WINGS
USER MANUAL WINGS PX1
22. Feb. 2016
Page 13
P
X
1
6. TECHNICAL SPECIFICATIONS
6.1 General Specications
Type
PCIe x4 adapter for PCIe M.2 SSDs
Connectivity
PCIe Gen3 x4. Backward compatible down to PCIe Gen1 x4.
M.2 NGFF PCIe SSDs up to PCIe Gen3 x4.
M.2 form factors 2230, 2242, 2260, 2280 and 22110.
Dimensions (without bracket)
Weight
6.2 Features
• Thermal Throttling prevention
• Full Signal integration with length and phase-matched data traces
• Ground shielding
• CNC-worked aluminium heatsink
• Maximum CopperTM for optimal thermal dissipation
6.3 Warranty 1
10 Years Limited Warranty
1To receive the full limited manufacturer warranty, it is required to register and activate the product on the
Angelbird Personal Service Portal within thirty (30) days after purchase. The required activation code is provided
in the product packaging. When the product is not registered within this period, the legal guarantee period is in effect.

8. LEGAL INFORMATION
8.1 Copyright
Copyright©Angelbird Technologies GmbH. All rights reserved.
8.2 Acknowlegdements
Windows®is a registered trademark of Microsoft Corporation in the U.S. and other countries.
Apple®, Mac®and OS X®are registered trademarks of Apple Inc. in the U.S. and other countries.
Wings™is a trademark of Angelbird Technologies GmbH.
All other marks are property of their respective owners.
WINGS
P
X
1
7. SSD COMPATIBILITY LIST
8. LEGAL INFORMATION
7. SSD COMPATIBLITY LIST (August 2016)
The following is a list of M.2 SSDs which have been tested to work with the
Wings PX1.
AHCI:
• Plextor M6e 128GB
M6e 256GB
M6e 512GB
• Samsung XP941 128GB
XP941 256GB
XP941 512GB
• Samsung SM951 128GB
SM951 256GB
SM951 512GB
NVME:
• Samsung XP941 128GB
XP941 256GB
XP941 512GB
• Samsung SM950 Pro 256GB
SM950 Pro 512GB
• Samsung SM951 128GB
SM951 256GB
SM951 512GB
• Samsung SM960 Pro 512GB
SM960 Pro 1024GB
SM960 Pro 2048GB
• Samsung
• Samsung SM961 1TB
• Toshiba XG3 Series
USER MANUAL WINGS PX1
22. Feb. 2016
Page 14
Table of contents