Antona ANC-7020 Series User manual

Antona Corporation (818)783-4299 URL:http://www.antona.com
1
Rev. A
ANC - 7020 Series
RS-485/RS-422 Synchronous Clock Display
Antona Corporation, Los Angeles, CAAntona Corporation, Los Angeles, CA

Antona Corporation (818)783-4299 http://www.antona.com
1
Antona Corporation
Copyright
Copyright 2000 Antona Corporation. All rights reserved. No part of this
publication may be reproduced, transmitted, transcribed, stored in a retrieval system, or
translated into any language or computer language, in any form or by any means,
electronic, mechanical, magnetic, optical, chemical, manual or otherwise, except within
the bounds of normal internet activity from the antona.com website, without the prior
written permission of the Antona Corporation of Los Angeles, California.
Warranty
Antona Corporation products are warranted to be free from defects in materials
and workmanship for a period of one (1) year from the date of original shipment to
customer.
This warranty is limited to the replacement or repair of parts not subjected to
misuse, neglect, unauthorized repair, alteration (except card options), accident, or
failure due to the effects of static electricity discharge.
In no event shall Antona Corporation be liable to the purchaser for loss of use,
profit, or consequential damages, or damages of any kind, including, but not limited to,
accidental loss or damage to other equipment, arising out of use of Antona Corporation
equipment, whether or not said equipment was used properly. The designer is
responsible for the determining the suitability and use of the product.
This warranty is in lieu of any other warranty, expressed, implied, or statutory,
including, without limitation, any implied warranty or merchantibility or fitness for a
particular purpose. No amendment of this warranty may be effected except in writing by
an officer of the Antona Corporation.
All repair services shall be performed at the Antona Corporation plant in
Los Angeles, Ca. THE PURCHASER MUST OBTAIN A RETURN
AUTHORIZATION FROM THE ANTONA CORPORATION PRIOR TO
RETURNING ANY PIECE OF EQUIPMENT. Shipment to the Antona
Corporation will be at the expense of the purchaser, return shipment will be at the
expense of the Antona Corporation for all warranty repairs.

Antona Corporation (818)783-4299 http://www.antona.com
2
TABLE OF CONTENTS
FEATURES..........................................................................................................................................................3
OVERVIEW.........................................................................................................................................................3
MECHANICALSPECIFICATIONS................................................................................................................................. 3
ELECTRICALSPECIFICATIONS.................................................................................................................................. 3
INSTALLATION........................................................................................................................................................ 3
SERIAL PORT INTERFACE......................................................................................................................................... 4
CLOCK DISPLAY ANDERROR MESSAGES .................................................................................................................. 4
CLOCK JUMPEROPTIONS......................................................................................................................................... 4
Software Options............................................................................................................................................. 5
CLOCK SERIAL INTERFACE TERMINATION.............................................................................................6
EXTERNAL CONNECTIONS TO ANC-7020...................................................................................................6
RS422/RS485 SIGNALS........................................................................................................................................... 6
POWER SUPPLYCONNECTOR ................................................................................................................................... 7
APPENDIX A - CLOCK PROTOCOL...............................................................................................................8
APPENDIX B -CIRCUIT BOARD SCHEMATIC.............................................................................................9

Antona Corporation (818)783-4299 http://www.antona.com
3
Features
♦
♦
L
La
ar
rg
ge
e
f
fo
or
rm
ma
at
t
b
bl
lu
ue
e
L
LE
ED
D
5
5X
X7
7
m
ma
at
tr
ri
ix
x
d
di
is
sp
pl
la
ay
y
r
re
ea
ad
da
ab
bl
le
e
a
at
t
1
12
20
0
f
fe
ee
et
t
♦
♦
D
Di
im
m/
/b
br
ri
ig
gh
ht
tn
ne
es
ss
s
c
co
on
nt
tr
ro
ol
l
♦
♦
L
Lo
ow
w
p
po
ow
we
er
r
c
co
on
ns
su
um
mp
pt
ti
io
on
n
a
an
nd
d
l
lo
on
ng
g
l
li
if
fe
e
L
LE
ED
D
d
di
is
sp
pl
la
ay
y
♦
♦
S
Sy
yn
nc
ch
hr
ro
on
ni
iz
ze
ed
d
m
mu
ul
lt
ti
ic
cl
lo
oc
ck
k
o
op
pe
er
ra
at
ti
io
on
n
♦
♦
R
RS
S-
-4
42
22
2/
/R
RS
S-
-4
48
85
5
I
In
nt
te
er
rf
fa
ac
ce
e
f
fo
or
r
n
no
oi
is
se
e
i
im
mm
mu
un
ne
e
c
co
om
mm
mu
un
ni
ic
ca
at
ti
io
on
n
♦
♦
L
Le
ea
ad
di
in
ng
g
z
ze
er
ro
o
s
su
up
pp
pr
re
es
ss
si
io
on
n
o
op
pt
ti
io
on
n
♦
♦
S
Se
er
ri
ia
al
l
r
re
ec
ce
ei
iv
ve
e
c
co
ol
lo
on
n
b
bl
li
in
nk
k
o
op
pt
ti
io
on
n
Overview
The ANC-7020 series large format synchronous clock display decodes an
RS485 or RS422 noise immune serial signal to remotely display time-of-day
information.
Mechanical Specifications
Clock case size: 5.0"H X 13.5"W
Clock display size: 4.0”H X 11.5”W
Weight: 2 pounds
Connectors: 6-pin RJ-11 modular phone jack with loop through
2.1mm Barrel connector for +5V DC power to unit (center pos.)
Electrical Specifications
Power requirements= 180 ma for full brightness and all LEDs on
150 ma for display at full brightness and normal time display
30 ma for display at dimmest setting and normal time display
20 ma for display off (0/16 brightness setting)
RS-422/485 input = short proof input, non-terminated operation to 150 feet,
terminated operation to 4,000 feet.
Installation
Turn off the ANC-7030 controller chassis before connecting the clock or external
power is connected to the clock display. Never install or remove the clock display
with the power applied to the controller chassis or any other attached clock or
equipment. This could result in permanent damage to the clock due to static
discharge.
Normally the clock is plugged directly into the serial port RJ-11 converter
adapter which plugs into the male DB-9 jack on the back of the chassis under the
connector labeled "CLOCK. The RJ-11 to male DB-9 converter would be impossible to
plug in to the wrong DB-9 (marquee DB-9 connector is female), but the marquee and
clock connectors are both RJ-11s. The user should screw the 2 mounting screws into
the serial port’s DB-9 hex nuts for permanent installation to assure good long-term
connection

Antona Corporation (818)783-4299 http://www.antona.com
4
Serial Port Interface
The clock contains a double buffered UART (universal asynchronous receiver
transmitter) that will decode a fixed format message at 2400 Baud, 8-data bits, no parity
and 1-stop bit. The physical interface is both RS422 and RS485 compatible providing
differential noise immune operation at up to a 4,000 foot distance. Currently, 8 clock
addresses are supported, but up 32 clocks can be driven with from the ANC-7030. The
current version of software in the ANC-7030 controller sends out dim/brightness data to
clocks 0,1,2 and 3 only to reduce the refresh cycle at each clock to 4-seconds. See
appendix A for the protocol of the serial data.
Clock Display and Error Messages
Most of the time the four LED digits will display time-of-day in 24-hour format. At
midnight, the display rolls over from "23:59" to "00:00". All ANC-7020 clock displays
connected to the ANC-7030 controller will update the time change to the display
simultaneously on the minute.
If there is no clock signal being received, the clock will display "Sync" to indicate that
no-synchronization time signal has been received in 1.1 second. Check that the power
is on at the ANC-7030 clock controller unit, and that the RJ-11 connector cable in the
back of the chassis is plugged into the adapter over the DB-9 labeled "CLOCK". If that
does not solve the problem, check the individual cable runs into and out of each clock.
A display of "3?:??" indicates that time data is being received, the data is just not in
range (over 23:59). This could be caused by a failure on the ANC-7332 clock I/O card
due to a real time clock chip failure or the clock I/O card (ANC-7332). Most likely, the
battery that runs the clock chip in the ANC-7030 chassis when power is off, has been
exhausted, and should be replaced (and the time reset from the front panel).
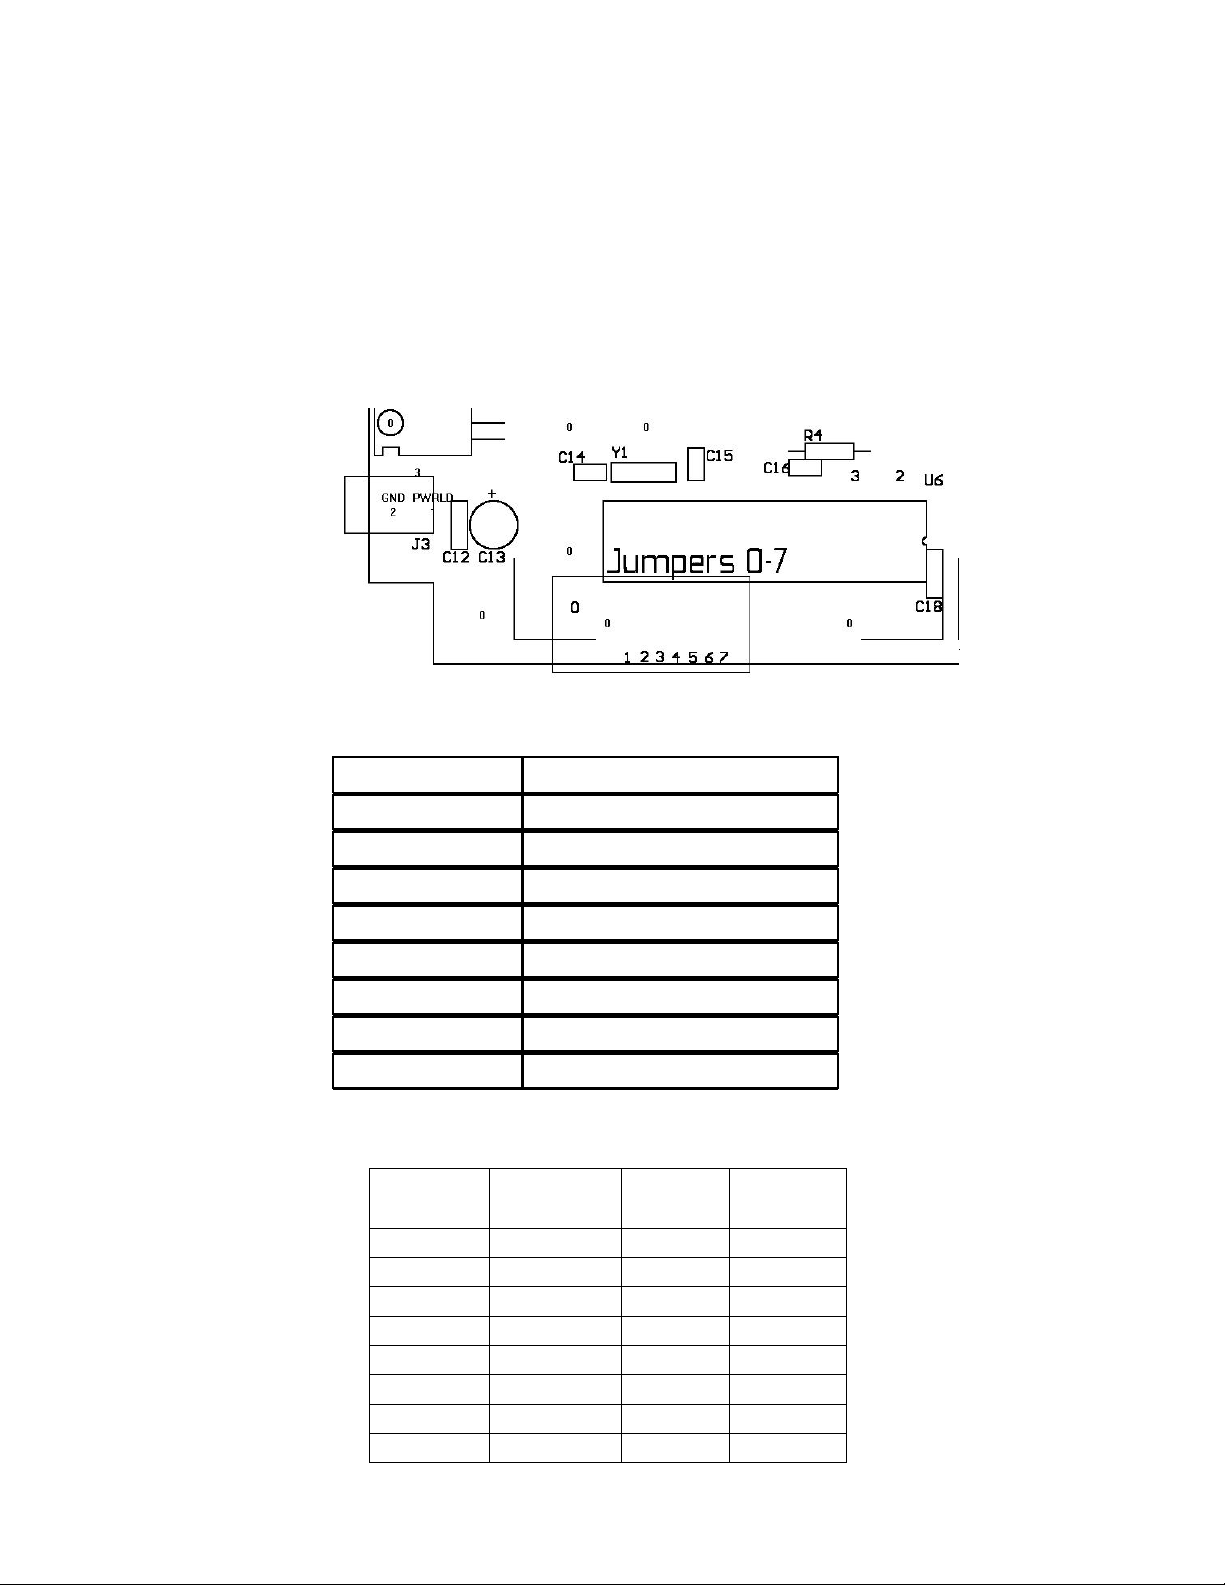
Clock Jumper Options
Before opening the clock case remove power to the enclosure by pulling the left
hand lower side barrel connector from the aluminum case. To open the enclosure to
change jumper options use a small flat blade screwdriver and carefully remove the 4
black nylon screws from the corners of the front blue plastic filter. The plastic filter
will only go on one way so note side and orientation when the filter is removed
for easiest reassembly when finished. To change jumper options near the
microprocessor, remove the 10s of hour digit by carefully pulling up on the digit and
removing it from the aluminum clock case.
Reassemble the enclosure by first reinstalling the 10s of hour digit (if removed) by
lining up the gold pins on the clock motherboard with the mating black receptacle on
the 5X7 LED display along the vertically running 7-pin single inline connector. Once
the vertical connector is seated, press down on the 5X7 matrix along the top of the
display to seat the horizontally running 7-pin connector. Plug power back into the clock
at this point to insure that the 10s digit is operating correctly, and that any jumper
options changed are working. Lastly, use the black nylon screws to replace the front
blue plastic panel. The black nylon screws should easily reassemble if the blue plastic
filter is oriented properly.

Antona Corporation (818)783-4299 http://www.antona.com
5
Software Options
This group of jumpers sets the clock address from 0 to 7 and sets how the time data is
displayed. Jumpers 1,2 and 3 set the clock address as shown in table 2 below. Option
jumper 6 enables a 20 ms wink in the colon to indicate that a correct data block has
been received and processed. When jumper 7 is installed, the 10s of hour digit is
blanked when a time-of-day display is less than "10:00". When enabled, this would
display " 6:00" on the unit instead of "06:00". Jumpers 6 and 7 are not installed when
shipped unless the customer has requested such options.
Figure 1
Jumper pin # Function (shunt on)
0-not used-
1Address bit 0
2Address bit 1
3Address bit 2
4-not used-
5-not used-
6Blink Colon on input
7Leading zero Suppression
Table 1
Clock
Address Jump 1 Jump 2 Jump 3
0 open Open Open
1Shorted Open Open
2Open Shorted Open
3Shorted Shorted Open
4Open Open Shorted
5Shorted Open Shorted
6Open Shorted Shorted
7Shorted Shorted shorted

Antona Corporation (818)783-4299 http://www.antona.com
6
Table 2
Clock Serial Interface Termination
For cable lengths greater than 150 feet, resister termination across the receive
pair end of the cable may be necessary. There are two jumpers within the clock
enclosure to enable a 150-ohm resister across the receiver lines to the differential
interface. These jumpers should be installed onto both pins of the last clock in
the chain. The jumpers are located just below the two 6-pin modular RJ-11
receptacles as shown below:
Jumper Vertically
Figure 2
Install the jumpers vertically across the 4 pins at the "JP1" site to place the 150-ohm
resister in parallel with the receive data lines. Only one clock, the last or only, in the
chain should have this option installed. Without removing the front blue plastic panel,
the user can see if these jumpers have been installed across the two jumper pins.
External connections to ANC-7020
There are three external connectors on the left-hand side panel of the display. Two of
the connectors are 6-pin RJ-11 modular phone type receptacles. All 6 contacts are
connected in parallel on each connector. This means that either receptacle may be
used to input the drive signal and 'loop through' another cable to chain together up to
32 clocks. The current ANC-7030 software version supports 4 clocks with dim/bright
control information being transmitted, but you can add or use the same clock address
to add up to 32 remote reading clocks without additional drive buffering. All clocks set
for a specific address will be set for the same dim/brightness.
RS422/RS485 Signals
Function RJ-11
Pin # Comment Data Direction
Ground 1Signal Ground I/O signal ground
+Tx 2+ transmit data Output from clock
-Rc 3- receive data Input to clock
+Rc 4+ receive data Input to clock
-Tx 5- transmit data Output from clock
Ground 6Signal Ground I/O signal ground

Antona Corporation (818)783-4299 http://www.antona.com
7
Power Supply Connector
The third connector is a 2.1mm barrel type connector to supply the +5V DC required
by the clock. The current requirement is 200 ma and the center conductor of the barrel
connector is plus voltage (+5v). Use the supplied external wall-type DC source to plug
into this connector. For an overall brighter display at all brightness settings, up to a
+9V DC power supply may be used. An internal +5V regulator handles the step down
for the microcontroller and associated circuitry when the applied DC voltage is higher
than +5V.

Antona Corporation (818)783-4299 http://www.antona.com
8
Appendix A - Clock Protocol
The RS422 serial output to the remote mounted clock(s) is fixed at 2400 Baud, 8 data
bits, one stop bit and no parity. Transmission of time-of-day to all clocks is
synchronized at 1-second intervals. Individual brightness settings are transmitted
addressed to each clock 1/2 second after a time-of-day transmission. Data, whether
time or control information is fixed at 6 bytes as follows:
Byte # Description
1Sync Code (CCH)
2Unit Address - 00H to 08H (All=80H)
3Control Code*
4Data byte 1 (hours/brightness)
5Data byte 2 (minutes)
6Checksum - sum of bytes 2-5 modulo 8, 1's
compliment
* - the control codes are as follows:
21H = set clock time of day with bytes 4/5 (packed BCD)
20H = set clock brightness with byte 4 lower nibble (binary)
31H = set clock test LED mode - turns all LEDs on
A typical serial transmission of time data would be as follows:
CCH 80H 21H 12H 34H 0AH
This would display "12:34" on the ANC-7020.

Antona Corporation (818)783-4299 http://www.antona.com
9
Appendix B -Circuit Board Schematic
The following page(s) contain the schematic for the series 7020 time of day clock
display. The schematic and card artwork are copyright protected by Antona
Corporation and are included only to aid the end user to configure the adapter or for
competent technical service personnel to use in maintenance or repair.

Antona Corporation (818)783-4299 http://www.antona.com
10
Table of contents
Popular Clock manuals by other brands

Oregon Scientific
Oregon Scientific RM318PU instruction manual

RGB Technology
RGB Technology ZB series Operation manual

La Crosse Technology
La Crosse Technology Wattz 2.0 Setup guide

TFA
TFA 60.2547 instruction manual

ADE
ADE CK 1704 operating instructions

La Crosse Technology
La Crosse Technology C86286 Faqs