Anyview Pangoo 10 HD User manual

USER GUIDE
10HD
Handheld Video Magnifier
Pangoo 10 HD

12
Content
1. Product description---------------- 2
2. Parts and accessories-------------- 2
3. Structure----------------------------- 3
4. Using Guide-------------------------- 4
5. Troubleshooting--------------------- 12
6. Safety Guide-------------------------- 13
7. Technical Specifications------------ 14
1.Description
Anyview® Pangoo 10 HD handheld video magnifier is of integrated design for
close view and distance view with high resolution. The 10 inch LED HD screen
brings magnificent viewing experience, while HDMI output offer the option
of wider screen vision. The working distance from 3.96cm to 600cm satisfies
the end user’s close view and distance view requirements. The special 2 HD
cameras mean excellent viewing conformity. With excellent functions and
special color technology, this magnifier brings you outstanding vision enjoyment.
2.Parts & Accessories
Parts Name No.
8. Warranty-------------------------------15

34
4. Using Guide
3.Structure
!
4.1 Functions operation
4.1.1 Power On/Off function

56
4.1.4 Auto-focus function
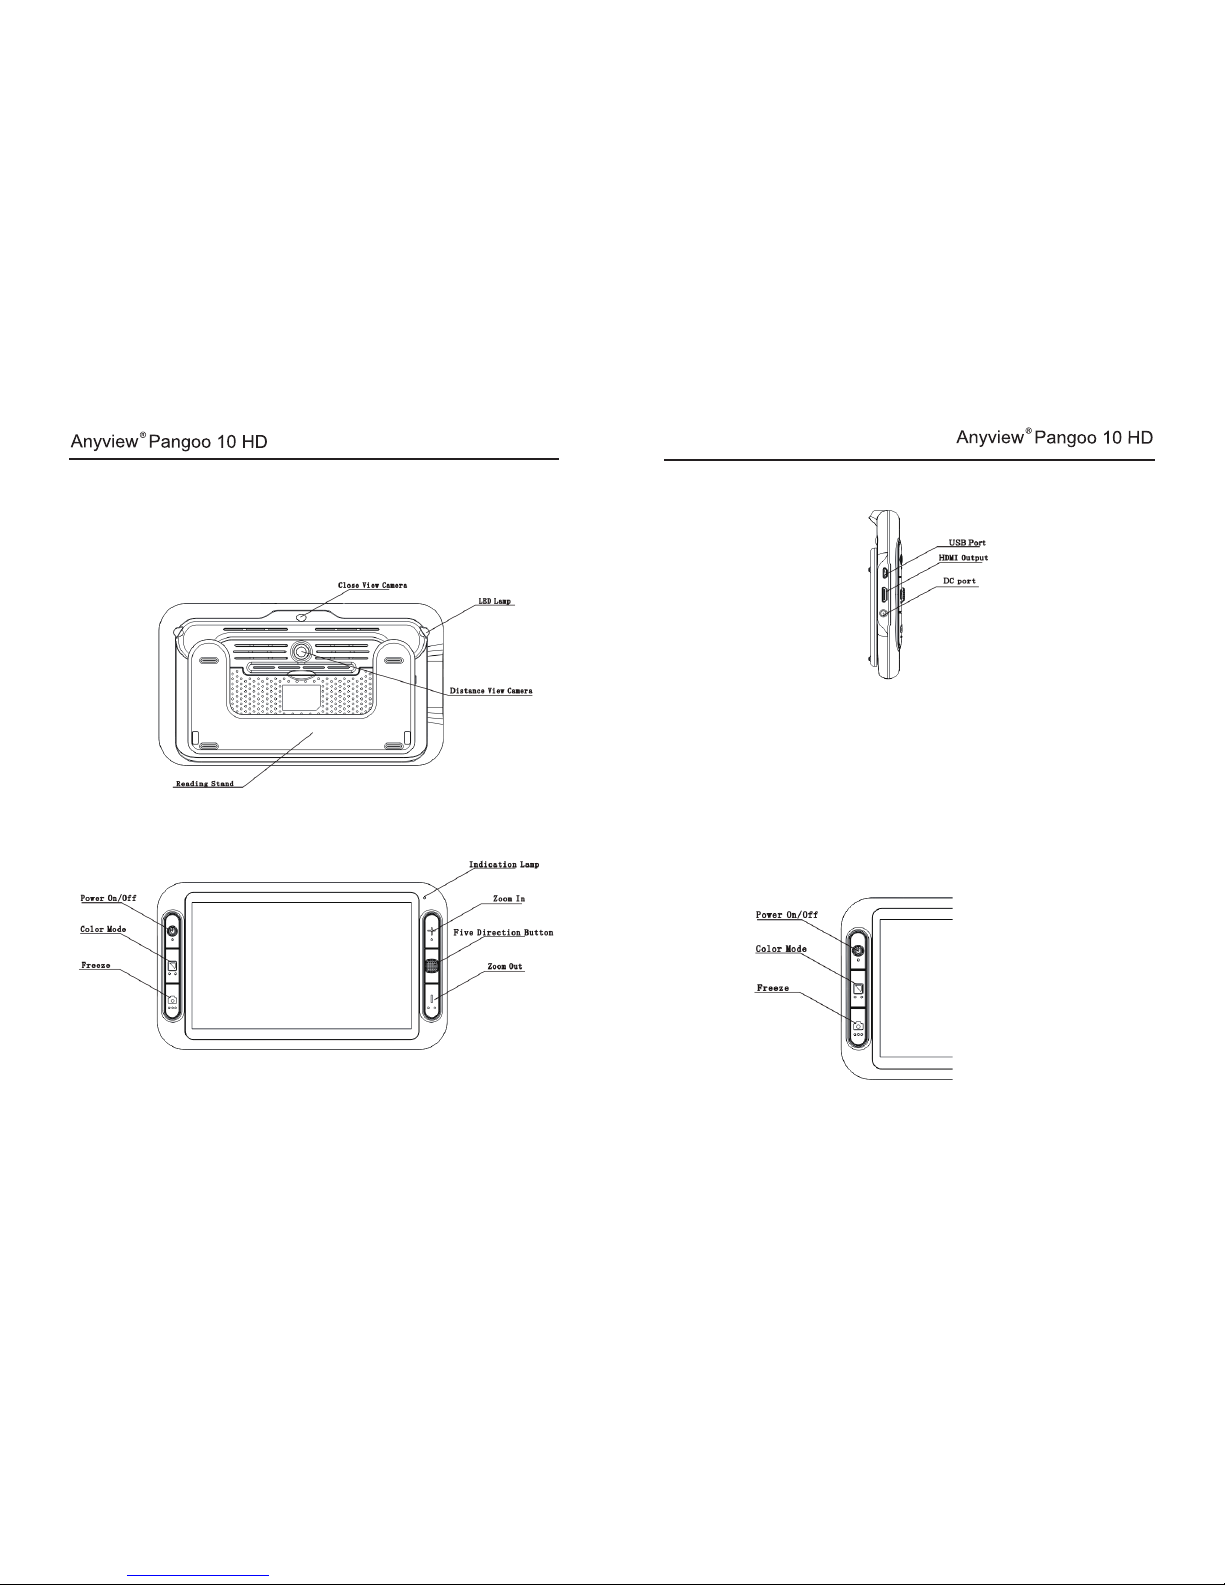
Press and hold the Power Button about 3 seconds until you hear the
BEEP sound. After 2 seconds, the opening image will show and the unit
enters the viewing mode.
Press and hold the Power Button for 3 seconds to turn off.
Notice: the unit automatically turn off in case of power lack.
4.1.2 Two camera switch function
For reading, choose close view mode 。Use Five Direction Button to scroll the image
For far sight, choose distance view mode.Use Five Direction Button to scroll the image
Press the Five Direction Button to switch between close view and distance
view.Under the distance view mode, the unit shows this icon , in case
of close view mode, it shows this icon
4.1.3 Assistive camera lights
Long press the Color Mode Button for 5 seconds until you hear the BEEP
sound,turn on or off the assistive camera lights
In case of close view mode, the unit automatically turn on the lights,
while in distance view mode, the unit measure the distance, turn on or
off the lights according to the lighting conditions.
The auto focus is available for close and distance view mode.
4.1.5 Contrast color mode
Normal mode and favorite mode are available for contrast color mode。
Long press the Color Mode Button for 3 seconds until the Beep sound, it
can switch the favorite color mode and advanced color model.
In favorite mode, press the Color Mode Button to cycle through 3 basic
modes: full color, your favorite contrast color and the reverse color such
as white on blue & blue on white.
In Normal mode, press the Color Mode Button to cycle through the
following 12 color modes:
- Full color mode
- Grey mode
- High contrast white text on black background
- High contrast black text on white background
- High contrast white text on blue background
- High contrast blue text on white background
- High contrast yellow text on black background
- High contrast black text on yellow background
- High contrast blue text on yellow background
- High contrast yellow text on blue background
- High contrast green text on black background
- High contrast black text on green background

7 8
4.1.7 Brightness Adjustment.
(1) Freeze function
Use Freeze button to capture images and letters until Beep sound. Take
the unit closer to have a carefully look at the object, and you can also
magnify or minify images by +/- button and switch contrast modes by
Color Mode Button , and view the images Five Direction Button.
Under the frozen mode, press the Freeze button again, the unit will
indicate to save the picture or not. Turn the five direction button to
right, choose No ( ) back to view mode; Choose( ) to show a
indication( ), save picture. Saving up tto 20 pictures.
4.1.6 Zoom In/Zoom Out
Press the “+” button to zoom in, and press the “-”button to zoom
out,you can choose the right and preferred magnification.
4.1.7 Beep Sound change
Press the Freeze and Zoom In button, to swtich among vibration, Beep
sound and silence in consequence.
4.1.8 Brightness Adjustment.
Hold the “Freeze” button and “Zoom Out” buttons together to enter
into brightness adjustment.
During brightness bar shows, press “Zoom in” to increase brightness
and “Zoom out” to decrease it.

9 10
(2). Album reading function
Long press the Freeze button for 3 seconds, the unit vibrate and enter the
album.
The screen shows direction icons, Left/Right Direction icons means to
switch the pictures, Press the down direction for 3 seconds to delete the
picture, Press the Up Direction means to enter the image viewing.
Click the album picture, zoom in and zoom out functions are available, and
can scroll the picture.
Press the Five Direction Button to come back the album menu.
Long press the freeze button for 3 seconds, the unit vibrate and return
back to view mode.
.
4.1.10 HDMI output
If the unit screen size is not big enough for you, then you can use the HDMI
output function to connect to the TV screen for better magnification
4.1.11. The Hz adjustment
4.1.12 Working time
Under the view mode, long press the zoom in button for 5 seconds until
the unit show icon( ) It can switch between 50hz and 60hz.
Working time is more than 4 hours
Under magnification mode, the unit will turn off automatically if no opera-
tion for over 3 minutes.
4.1.13 Power saving function
4.1.14 Setting memory function
The unit has automatic memory on the most recent settings (e.g. color
mode, magnification size, video output format, button beeps, brightness) so
you will save these settings when you turn on it again.
.
4.1.15. Factory mode setting
Press the button of reset hole behind of magnifier to restore factory setting.
4.1.16 Power charging
Unit on, indicate the power level
Unit off for charging, the red light on, once power full, the red light off.
Unit on for charging, the orange light on, once power full, the orange light
off.
4.1.17 Forced Shutdown
Press the Power button and Freeze button together to shut down the unit
by force.

12
5. Troubleshooting
Troubles Solutions
11
4.1.18 Auxiliary Line Function
Press the Color Mode Button and Five Direction Button together to
enter the positioning auxiliary line function. Continuous pressing is to
circle the modes by horizontal line/double horizontal line/vertical
line/Double vertical line/horizontal Shield/Vertical Shield.
Press the Color Mode Button and Zoom In Button together to switch the
moving objects between screen image and the auxiliary lines. Under the
moving auxiliary lines mode with double horizontal line and double
vertical line, move the five direction button to move the lines and
adjust the distance between the 2 lines. With the horizontal line and
vertical line mode, move the Five Direction Button to move and adjust
the visible area.
4.1.19 Power volume Indication
Press the Color Mode and Zoom Out buttons together to show the
power volume
To check if the battery is in or not and if
the battery has the power or not.
Press the Power button together with
Color Mode Button
or not
To check if the camera lights on or off
or off

13
To keep the video magnifier in good conditions, please read the following
safety guide carefully:
Do not expose Pangoo 10 HD to excessive heat on direct sunlight to
avoid the risk of fire.
Do keep away from the humidity, rain, liquid and chemicals.
Do not use this magnifier near inadequately shielded medical devices.
Do use this magnifier under the temperature between 10°C and 40°C
Do not try to repair the magnifier by yourself or open its shell as it
will void the warranty. Contact your dealer for production service if
that is necessary.
Always unplug the system before cleaning. Use a soft damp cloth to
clean the exterior. Do not use cleaning agents or abrasive materials as
they may cause damage to you unit.
Do use its matched adapter to recharge, otherwise it they may cause
damage to you unit.
6. Safety Guide
14
7. Technical Specifications
10-inch full color LED screen
2x-20x continuous zoom
Continuous magnification: Select the suitable magnification
Camera: 720p HD
Color mode: total 12 color modes
Focus: Auto focus
Working distance: 3.96-600cm
Battery: rechargeable lithium battery 4 hours continuous use
Power saving mode: the unit will turn off automatically after inactivity
for 3 minutes
Fast reading with no blur
Charging time: About 5 hours
Functions: Freeze image, Switch color mode, Zoom in/out
Settings saved after power-off
HDMI output
Battery level indicator:Positive
Power supply: Input:110-240V, Output: 5V, 2.5A
Size: 282x170x27mm
Weight:702g±10g

15
Main unit body one year
Power adapter and accessories one year.
Coming upon the troubles, please contact with after-sale service. If
impossible to solve it by yourself, please read carefully the warranty card,
and post the unit together with the card to us, feedback will immediately
forwarded once the item received.
Warranty
Table of contents
Other Anyview Magnifier manuals
Popular Magnifier manuals by other brands

Eschenbach
Eschenbach Visolux Digital XL FHD operating instructions

Ash Technologies
Ash Technologies Andromeda user manual

Eschenbach
Eschenbach 11744 operating instructions

OttLite
OttLite MG018HFPU-CA quick start guide

Ash Technologies
Ash Technologies Liberty Scholar 2 user manual

HIMS
HIMS GoVision GV100 quick start guide